New restoration project - what have I done!
Discussion


Quick update...
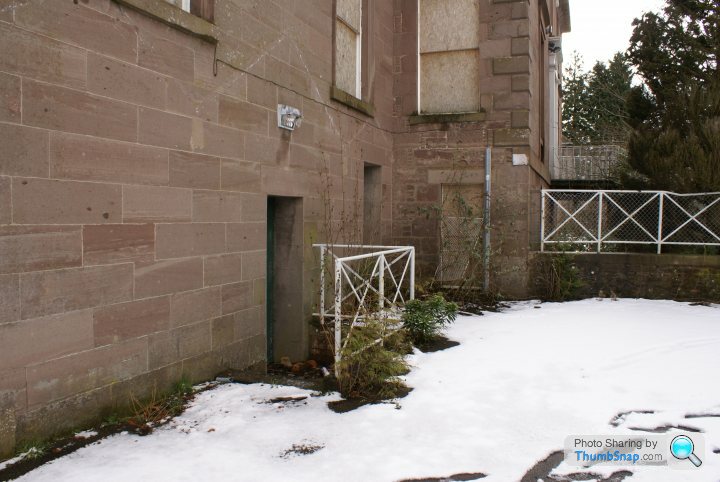
Spect the last two days chisleing away at the remaining brickwork, turned out to be a total nightmare to remove as the first course was laid then the floor screened around it, which meant they refused to yield even to the efforts of Mr Sledgehammer!
Anyway, finally out, and all the rubble cleared out. I'm guessing about 4 tonnes of rubble as it is 3 trailer loads and my trailer take some 1.5tonnes without issue...
Got some pictures of it as it stands just now, just need to clear the other side fully now. Also looking for some advice on what to fill the old channels with, both in floor And wall. Current thinking is a concrete render scratch coat first, then another top coat of render, unless I could do it in one fill? Or is there's another better product to use? Any help would be appreciated
Pics of the room now..


Now this is done, I've started on the clearing of the other side of the workshop, where the built in urinals are.
Here's some before and during pics, sadly there's no After's yet, as it's not finished! I was however, very finished that day! As removing the urinals took about 3 hours to get to where I am now... each one is approx 3" thick ceramic and bedded onto a solid background of mortar approx 2" thick.... so by my man maths I reckon there's another 5-6 hours work left to do to get it all out...


Spect the last two days chisleing away at the remaining brickwork, turned out to be a total nightmare to remove as the first course was laid then the floor screened around it, which meant they refused to yield even to the efforts of Mr Sledgehammer!
Anyway, finally out, and all the rubble cleared out. I'm guessing about 4 tonnes of rubble as it is 3 trailer loads and my trailer take some 1.5tonnes without issue...
Got some pictures of it as it stands just now, just need to clear the other side fully now. Also looking for some advice on what to fill the old channels with, both in floor And wall. Current thinking is a concrete render scratch coat first, then another top coat of render, unless I could do it in one fill? Or is there's another better product to use? Any help would be appreciated
Pics of the room now..
Now this is done, I've started on the clearing of the other side of the workshop, where the built in urinals are.
Here's some before and during pics, sadly there's no After's yet, as it's not finished! I was however, very finished that day! As removing the urinals took about 3 hours to get to where I am now... each one is approx 3" thick ceramic and bedded onto a solid background of mortar approx 2" thick.... so by my man maths I reckon there's another 5-6 hours work left to do to get it all out...
Edited by Griff Boy on Friday 20th January 11:19

HughG said:
A repair concrete would do the job, or knock up an equivalent with sand and 5 or 10mm shingle should be fine as it isn't loaded.
Great, just what I was looking for! Cheers 
The joys of running a b&b.....
We have had some lovely people, some amazing people, and to be fair some rude people stay, and have made some great friends since we opened the B&B, but I never thought we would have to deal with these type of people....
Booked by their employers (who are previous guests and loved the place) up from Luton, been working for the company for 3 weeks, come to Scotland for a job for 1 night and go mad in a local pub getting drunk, then do this at 02:30 yesterday morning.... left my wife absolutely distraught.....and me wanting to give up... not a good day.


It was booked by a company based in Milton Keynes for 2 roofers who sub for the company. Ive since been in contact with the company and emailed them pictures of the damage, and they have confirmed that both now been sacked.
The police are pressing criminal charges for threatening behaviour and criminal damage, but as he's now unemployed it's seeming unlikely that we will get anything back any time soon, especially as he will be required to come to a Scottish court if he pleads not guilty
The employers have stated that they will send me the amount equal to both wages that they were due as of yesterday as contribution to the damage, unfortunately they both get paid on a Friday, and they have only accrued 2 days, so a total of £365. We currently estimate the damage repair cost to be approx £1200 not allowing for loss of revenue due to the room being unuseable until fully repaired and the new bed etc arrives. Unfortunately the employer is currently confirming that they do not feel they are due any more towards the cost as he was subcontracted, and that they think we should pursue him personally.... jolly good....
So far the work now needed is:
New floor (scored heavily in approx 8 places)
New bed
New mattress (I won't detail what was done to this, needless to say it's now in the skip
New bedding (as above)
New glass
Repairs to the wall and redocorate
Sand and repair the door
Complete clean of the room by proffesional cleaners
All in all, pretty crap really. I fully agree with the above poster about not taking it personally, but so far, it's not that easy, and to be honest it's always going to be taken personally.
Thanks to you all for the kind words, having now spent some time cleaning and tidying its becoming obvious that a refit is on the cards, but you know what, I've tackled worse in this house.... biggest negative is that my workshop project will have to take a back seat until this rooms redone...
I'm taking some advice on this situation, as I also feel they have some responsibility on this, whether they are sub contractors or not, they are the ones who booked and paid for the rooms.. some more emails and time required.
In the mean time, as Dory would say... "Just keep swimming"
I'm taking some advice on this situation, as I also feel they have some responsibility on this, whether they are sub contractors or not, they are the ones who booked and paid for the rooms.. some more emails and time required.
In the mean time, as Dory would say... "Just keep swimming"
Bit of an update, It's been too long since my last post, the new business has been getting steadily busier and busier, which has been great. We've one an award from booking.com for customer service scores, been awarded a 4 star rating by Visit Scotland (apparently unheard of to go in at 4 stars at the first go!) and have received some amazing reviews.
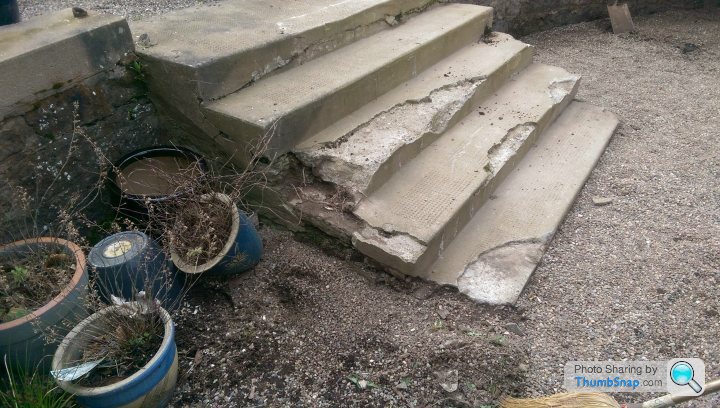
Now the spring is here and the workshop is almost finished it was time to start work in the BBQ area, previously we had only gravelled it to give it a slightly more aesthetically pleasing look, but this was only ever planned to be a temporary solution. It's a small section of the main garden, tucked nicely round from the main house in a lovely sunny spot with great views across the garden and nice and private. It's also set down about 5 foot from the level of the main gardens, which also gives it a nice feel. If you go back to previous posts you'll see I rebuilt the steps a year ago in preparation for doing this area up, but time and money have meant it's been delayed until now, especially as I was told I had to finish the inside of the house first before I could start! Lol
It's a really odd shape, with a curved stone wall on one side, a serious unkept 'hedge' on the other and a new fence at the back...so a nice easy design situation then...not. As a keen bbq fan, I wanted a nice space for both a gas and a charcoal BBQ, and some storage, worktop space, sink area and a bar worktop for mates to sit at when round. Space for a small table And chairs, a large party table and space for a outdoor sofa set with a fire pit, plus as I live in Scotland, a big part of it would need to be under cover as not even rain or hail stones stop play up here!
After some initial surveying of the area I ruled out paving the area, a) due to cost b) due to my back getting progressively more easily to hurt over the last 3 years, c) because the levels over the area I wanted were over 300mm different... and finally d) under the gravel is tarmac, and to lay a paved area properly if have to lift the tarmac and re level the area with compacted hardcore... so a slightly elevated deck area it is then! Lol
Part of me loves decking, i.e. Working with wood :-) , part of me hates it, i.e. Maintenance and slipperyness (is that even a word?) but I've built a number of timber decks before, including a large raised deck at my previous house, and a fair few for friends over the years... biggest change this time would be to oil it rather than stain it. TBH I would have loved a composite decking, but at the scale I wanted it was horrendous in cost and would have meant delaying the work whilst I saved aside some coffers, and then I'd miss the summer!
I'll post some pictures of my design sketches up shortly, and a few befores etc, currently I started the work last Tuesday, so have only managed to get a few days working on it, but it's already starting to take shape. I reckon, including all the raised beds, roof structure and finishing details it's going to be a couple of weeks work in total, but I'll get things up to date first then see how much interest there is in the progress! Lol

dmsims said:
Cheers for that, but already went with this stuff.....http://www.screwfix.com/p/liberon-decking-oil-medi...
dmsims said:
Cheers for that, but already went with this stuff.....http://www.screwfix.com/p/liberon-decking-oil-medi...
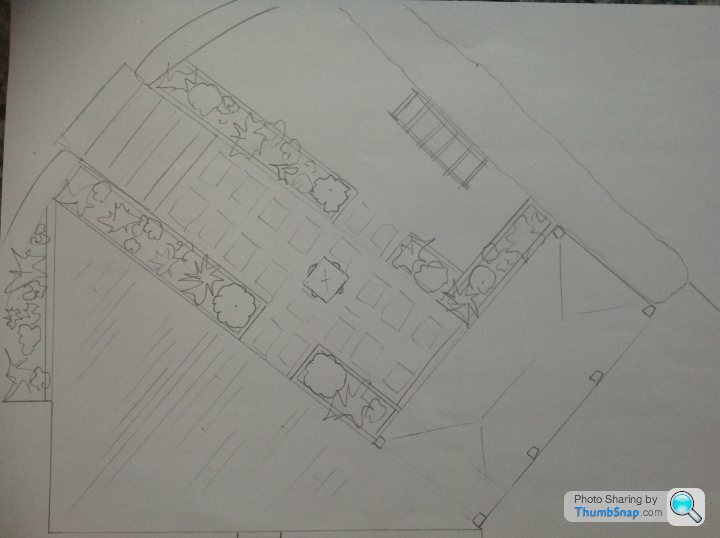
So, this was the rough doodle I did to give us a plan to work to, the idea was to keep an element of a formal garden, bearing in mind the age and style of the house and gardens already it needs to work in style as much as possible, short of building a maze this was the best idea I could come up with!
I'm building a triangular area of decking off the house with the hypotenuse of the triangle to be parallel with the stairs down from the garden, this is the area that gets the most sun, and catches the last rays of the day, so will be putting the sofa, chairs and fire pit here. It'll be approx 8m along the back wall where it meets the house, and approx 6.5m deep, I'm then planning to intersect this at 90deg with the area which will be covered with a clear roof, in a traditional pergola style look and include the BBQ area, bar and small table and chairs. The big table will go on the triangular section if decking. It's all going to be built on one level to avoid steps and make the usable space, well more useable! Lol
I'll then build raised timber planters parallel to the decking on both sides of the path with two areas where you can get onto the decking and looking to put a water fountain of some description in the centre where the paths intersect, This will be stabs framed in gravel. The other area will have a pergola built and probably house a swing seat of some kind.. not fully decided in that yet.
So, quick sketch
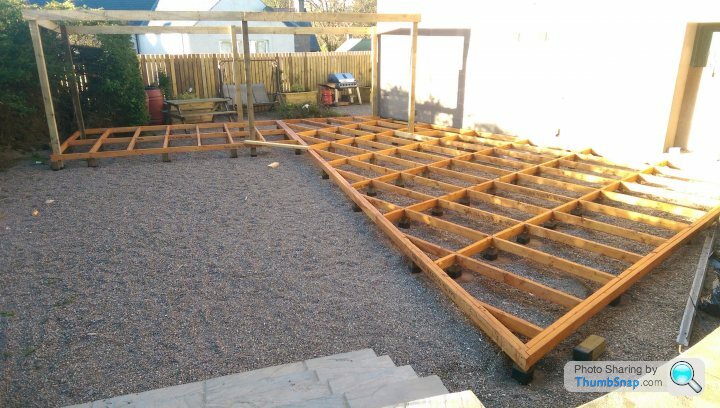
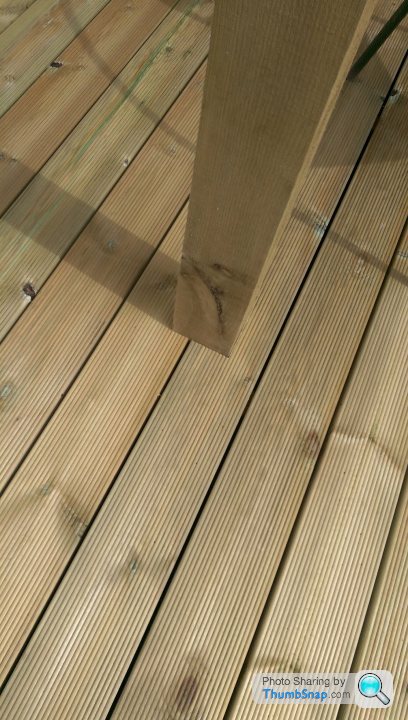
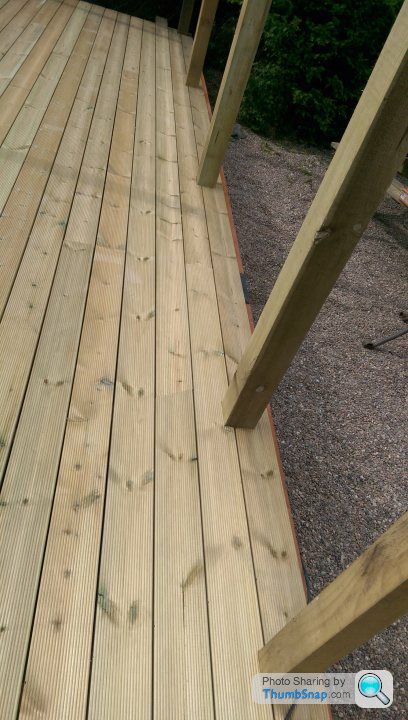
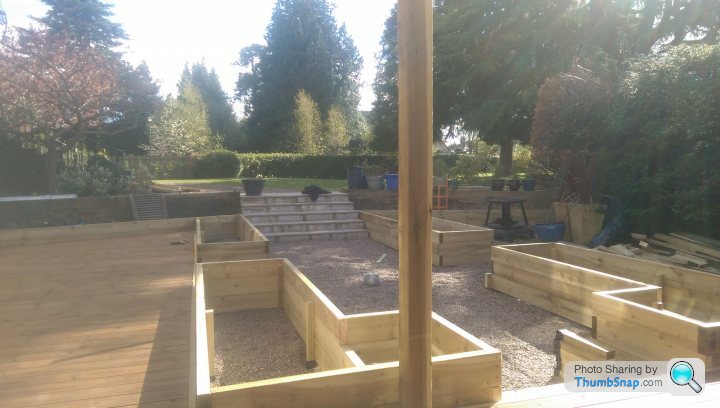
First job was to finish blocking up the old doorway using concrete blocks, scratch coat and apply a colour render, not my strongest skill set I'll be honest, I can build a block wall no problem, and I can plaster well, but never loved rendering... anyway, it's done, so meant I could get on with the deck. First job was to map out the complicated, off angle shape to start with, then start framing it up. It was impractical to try to build the entire frame at 90deg to the deck boards so tried to keep it as simple as possible, bearing in mind the shape! It's all built out of 4x2 C16 treated timber, which I then put a coloured stain protector coat on as well, a) for longevity b) so you would see the frame less through the decking gaps. Plan was to support the frame on 4" square posts set directly onto the tarmac and wrapped in DPC every 1200mm, well within the span capacity of the joists, in fact well over the top... end rails were doubled up for strength and again supported directly on the 4" feet. At last an advantage of having a tarmac into hardcore base down there! The frame for the covered area then went in, bolted to the deck frame, but again right down into the tarmac to transfer the weight away from the deck boards. All the decking was cut around the posts as neatly as I could, and the outer frame fixed on to strengthen the whole frame up until the roof is built and fitted.
Next job was to fit the 5.4m deck boards, 33mm thick with a fine reeded effect finish using a hidden fixing method to avoid screw holes in the top surface, mainly because I hate seeing wobbly lines of screws down a deck, it stops water getting in the boards through the screw holes and also because the decking was not a 90deg to the frame in the triangular section it stopped the screws highlighting the angles.... according to SWMBO it's a bit OCD but made me happier! Then a coat of oil coloured finish to darken the whole thing down, I managed to under order the deck boards by 5 lengths which meant I couldn't quite get it finished yesterday, and the last 10 rows were not fixed down when I took the last pictures, but you get the idea!
Anyway, enough rambling, some pics!
Basic deck frame, sitting, err on the deck...

Dwangs fitted and bearers doubled up, and started to work on levels

Stained, raised, levelled (with a good fall for water!) and the pergola frame in place
Some decking!
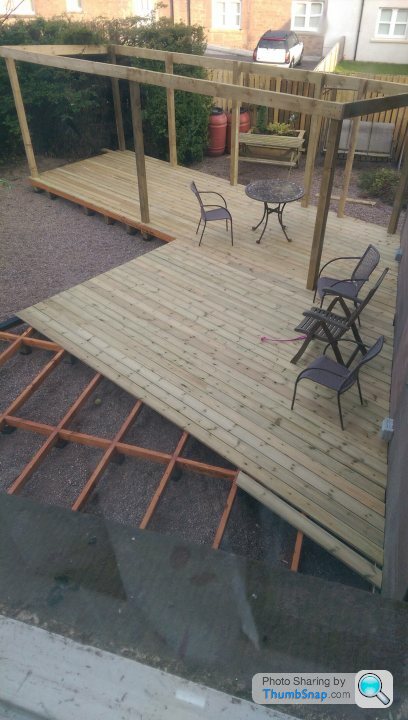
Some PITA scribing...
And how it's sits as of today, with one coat of oil on so far...


Next job was to fit the 5.4m deck boards, 33mm thick with a fine reeded effect finish using a hidden fixing method to avoid screw holes in the top surface, mainly because I hate seeing wobbly lines of screws down a deck, it stops water getting in the boards through the screw holes and also because the decking was not a 90deg to the frame in the triangular section it stopped the screws highlighting the angles.... according to SWMBO it's a bit OCD but made me happier! Then a coat of oil coloured finish to darken the whole thing down, I managed to under order the deck boards by 5 lengths which meant I couldn't quite get it finished yesterday, and the last 10 rows were not fixed down when I took the last pictures, but you get the idea!
Anyway, enough rambling, some pics!
Basic deck frame, sitting, err on the deck...
Dwangs fitted and bearers doubled up, and started to work on levels
Stained, raised, levelled (with a good fall for water!) and the pergola frame in place
Some decking!
Some PITA scribing...
And how it's sits as of today, with one coat of oil on so far...
Dr G said:
Cracking progress; until that 2nd last photo it's difficult to see where the area is and how it will feel but from that it looks like it's going to be a great place to while away summer evenings (or a nice Scottish summer thunderstorm).
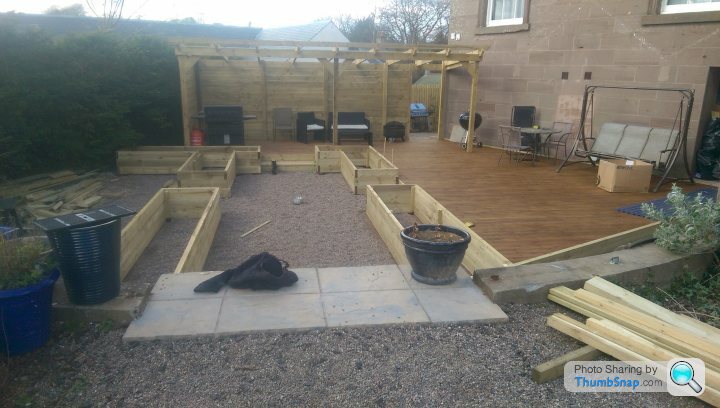
Cheers Doc! Managed to get another day at it today, despite the wind!
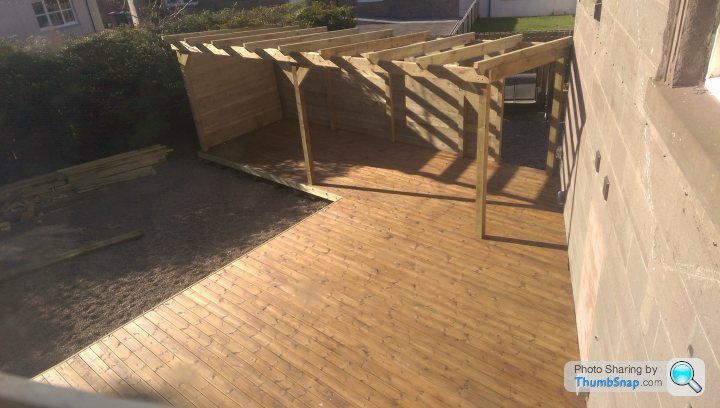
All decking boards now down and fixed, the back and side wall are in and I've cut and fitted all the roof beams, starting to look good now!
View from the BBQ / covered area into the garden

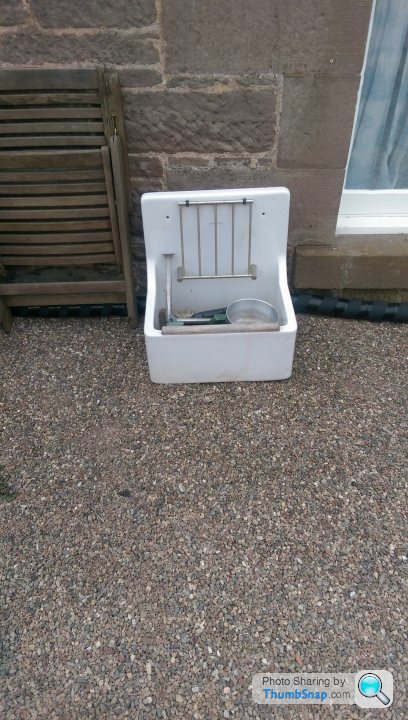
When ripping out the school part of the house I saved a few of these smart little Belfast style sinks, so I'm planning to use it in the BBQ area as a working sink. I'll build a little rustic unit to hold it with some open shelving either side and work space above... definitely come in handy.

Managed a bit more work yesterday, times been tight recently due to work so just an odd day here and there now....
Started on the planters and did some more to the roof ready for the panels to be fitted, annoyingly the panels arrived with 30% of them damaged.....waiting for replacements now.
Having a discussion with my wife about the finish of the planters and covered area. Original plan was to colour oil the decking (only had one coat so far, so will get darker) but leave the planters and cover etc natural, but we are now not sure if it would look better, and blend in more if also stained darker using the same oil? Did a test piece and one coat is fine, and due to the texture of the sawn timber it goes darker than the decking slightly.
So do I
A) leave it all natural except the deck boards (as it stands just now)
B) stain everything the same, darker colour
C) stain the planters but leave the roof and covered area natural
Any opinions?
Got on a bit further yesterday, weathers been against me recently. Had one day with Snow, gales, sun, rain and hail! Gotta love Scotland!
Anyway, where I am just now after moving 13tonnes of soil!

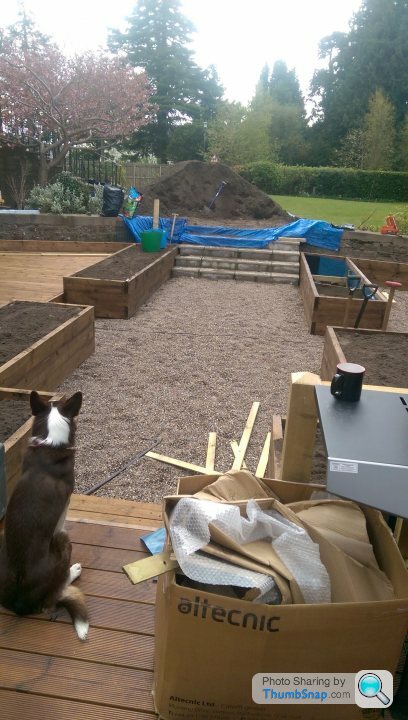

Still got to finish the second coat of decking oil, and fit the roof (when the wind drops a bit!) make a door for the back wall, build the sink unit, build the Weber trolley, make the Worktops, buy a s&£t load of plants! Lol
Anyway, where I am just now after moving 13tonnes of soil!
Still got to finish the second coat of decking oil, and fit the roof (when the wind drops a bit!) make a door for the back wall, build the sink unit, build the Weber trolley, make the Worktops, buy a s&£t load of plants! Lol
Little update....
Bit more progress! The small under cover table and the big table are now finished, just put the last details on them today and all ready to use! Plus gives us a giant party table too, as I made the exactly the same height and width, so can be joined together to seat 10-12 easily! Next job is the kettle workbench...
Planters filled, painted and planted up and starting to look good! Next jobs are to plumb up the sink, and finish the power supply and install the festoon lighting.... and a myriad of smaller jobs too!
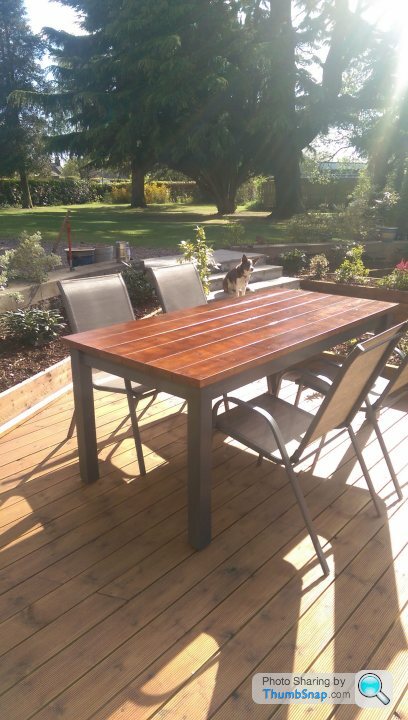
Gassing Station | Homes, Gardens and DIY | Top of Page | What's New | My Stuff