Our Little Durham Restoration Project...
Discussion


A few weeks ago I finished clearing out the garage, every piece of wood that was in the house when we bought it sawn up ready for the fire. I've not seen the inside of this for the best part of 18 months!
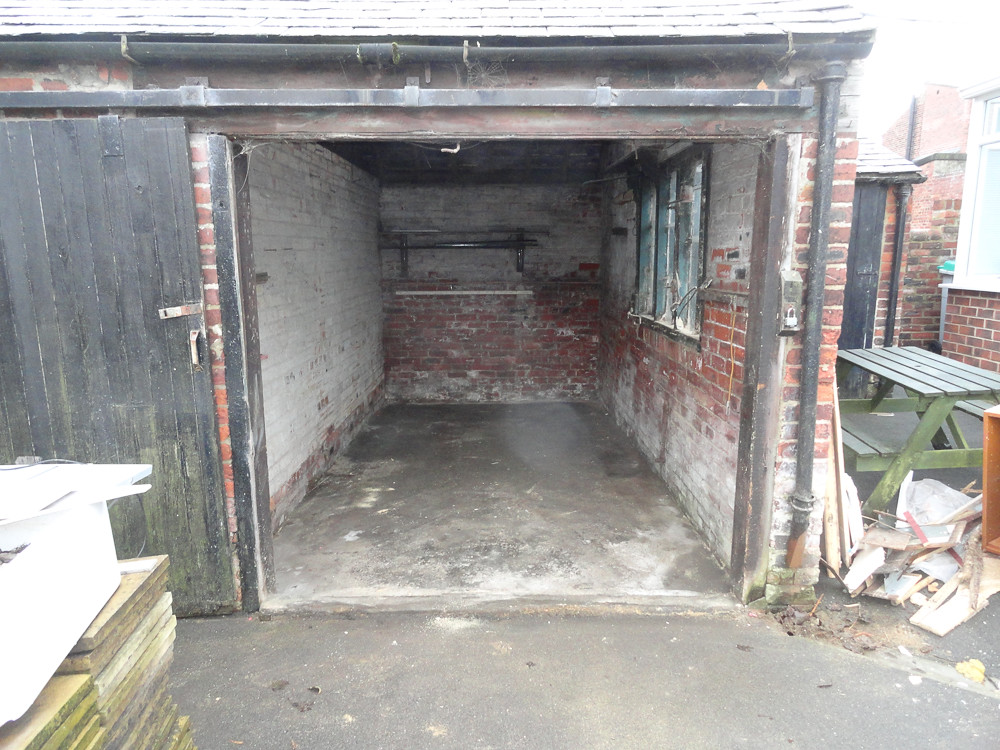 20141119-DSC00858.jpg by paulrockliffe, on Flickr
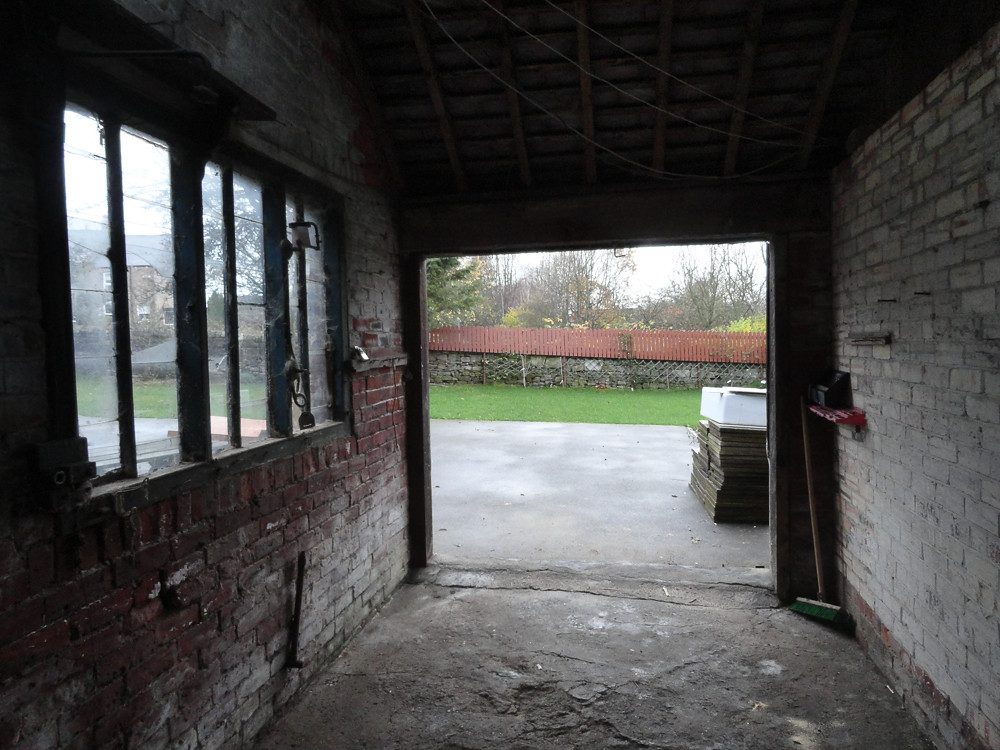 20141119-DSC00860.jpg by paulrockliffe, on Flickr
And, despite my severe doubts, the car fits in!
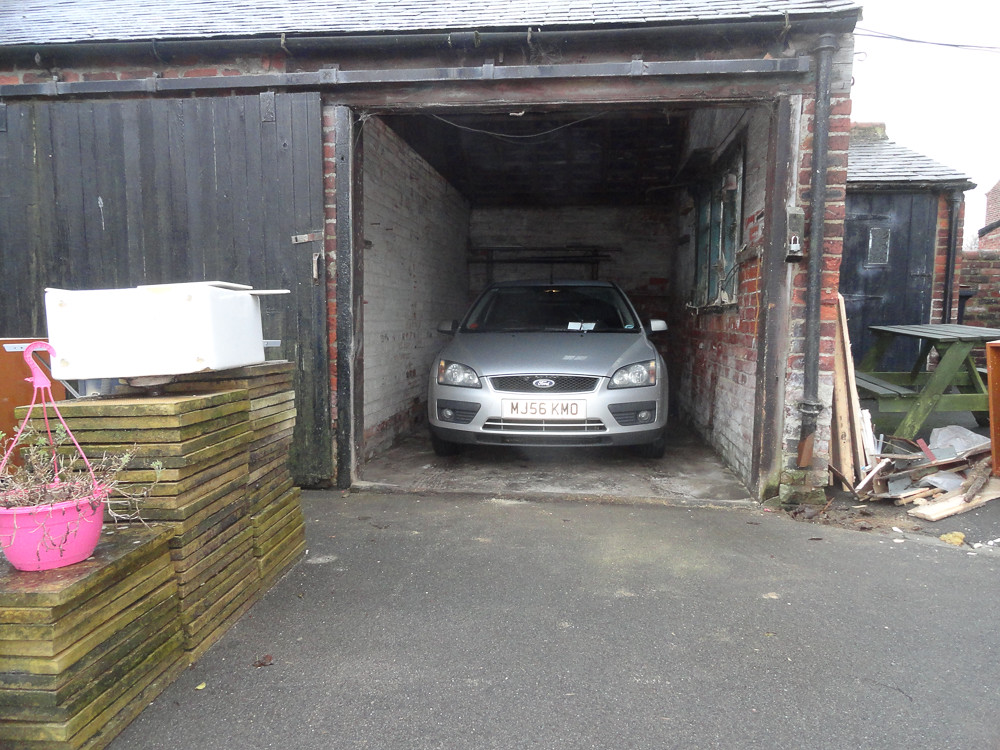 20141119-DSC00861.jpg by paulrockliffe, on Flickr
With loads of room to spare too. It'll never go back in though. I've already cleared a load of stuff out of the workshop into there out of the way. I've made a sheet rack on the left hand wall so all my 8' x 4' sheets are no longer leaned against my bench stopping me doing any work. And I've moved one of my sets of shelves into there to hold all my wood stock. Another set of shelves has gone as part of a de-clutter and the TV is on the wall too.
Next job is to build a mezzanine between two of the roof trusses to get my bikes out of the way, then I'm looking at options for tarting up the whole building and knocking the wall out between the two rooms. More on that later, though it's budget dependent at the moment.
Anyway, I also discovered a second gas (?) pipe coming in!
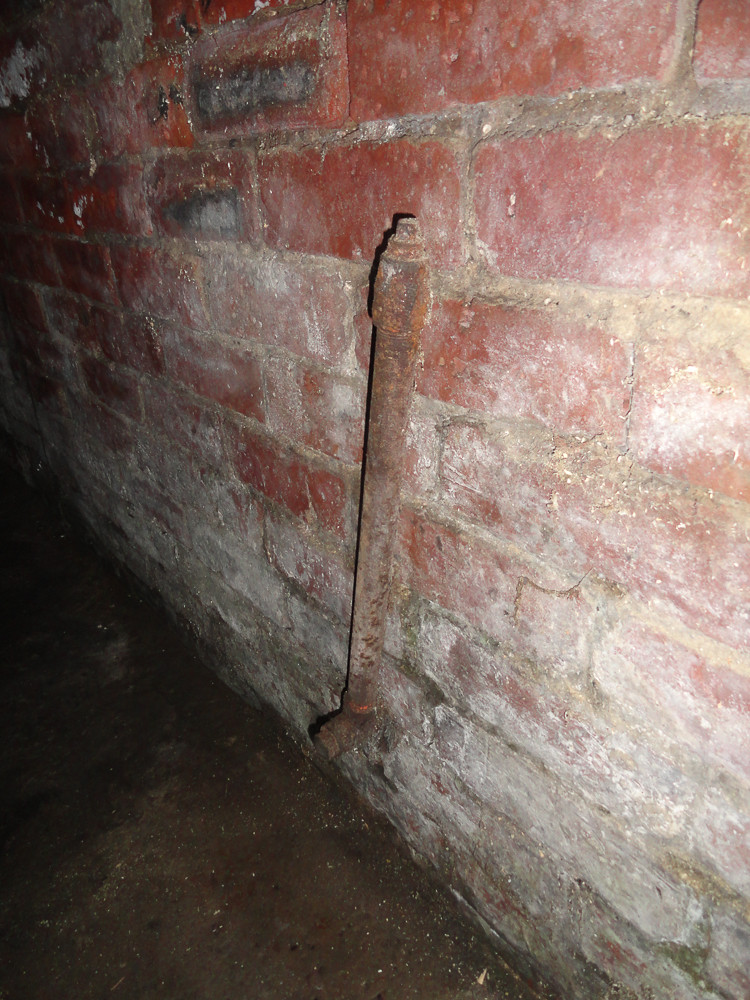 20141119-DSC00863.jpg by paulrockliffe, on Flickr
There's also the remnants of a gas light and the original electrics, which look proper dodgy!
20141119-DSC00858.jpg by paulrockliffe, on Flickr20141119-DSC00860.jpg by paulrockliffe, on FlickrAnd, despite my severe doubts, the car fits in!
20141119-DSC00861.jpg by paulrockliffe, on FlickrWith loads of room to spare too. It'll never go back in though. I've already cleared a load of stuff out of the workshop into there out of the way. I've made a sheet rack on the left hand wall so all my 8' x 4' sheets are no longer leaned against my bench stopping me doing any work. And I've moved one of my sets of shelves into there to hold all my wood stock. Another set of shelves has gone as part of a de-clutter and the TV is on the wall too.
Next job is to build a mezzanine between two of the roof trusses to get my bikes out of the way, then I'm looking at options for tarting up the whole building and knocking the wall out between the two rooms. More on that later, though it's budget dependent at the moment.
Anyway, I also discovered a second gas (?) pipe coming in!
20141119-DSC00863.jpg by paulrockliffe, on FlickrThere's also the remnants of a gas light and the original electrics, which look proper dodgy!
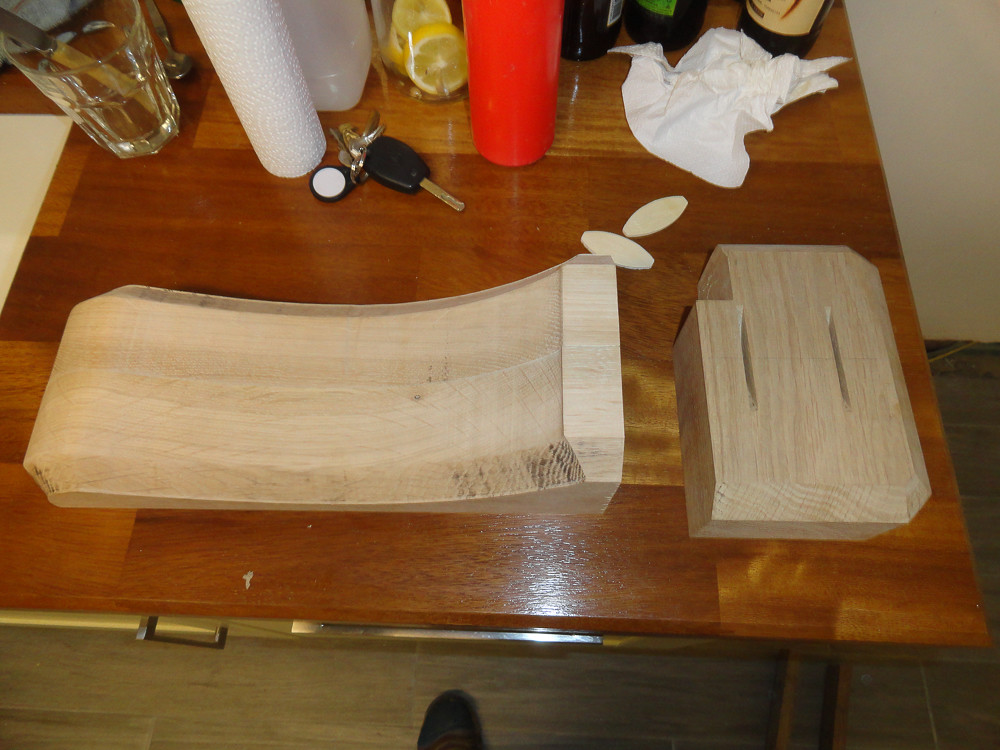
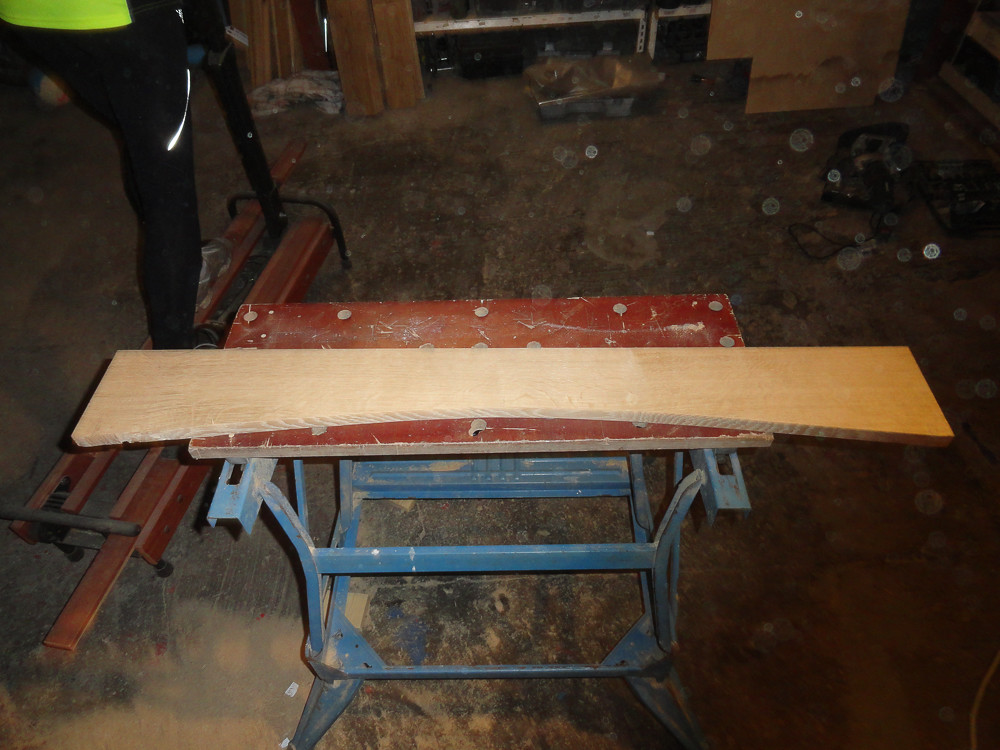
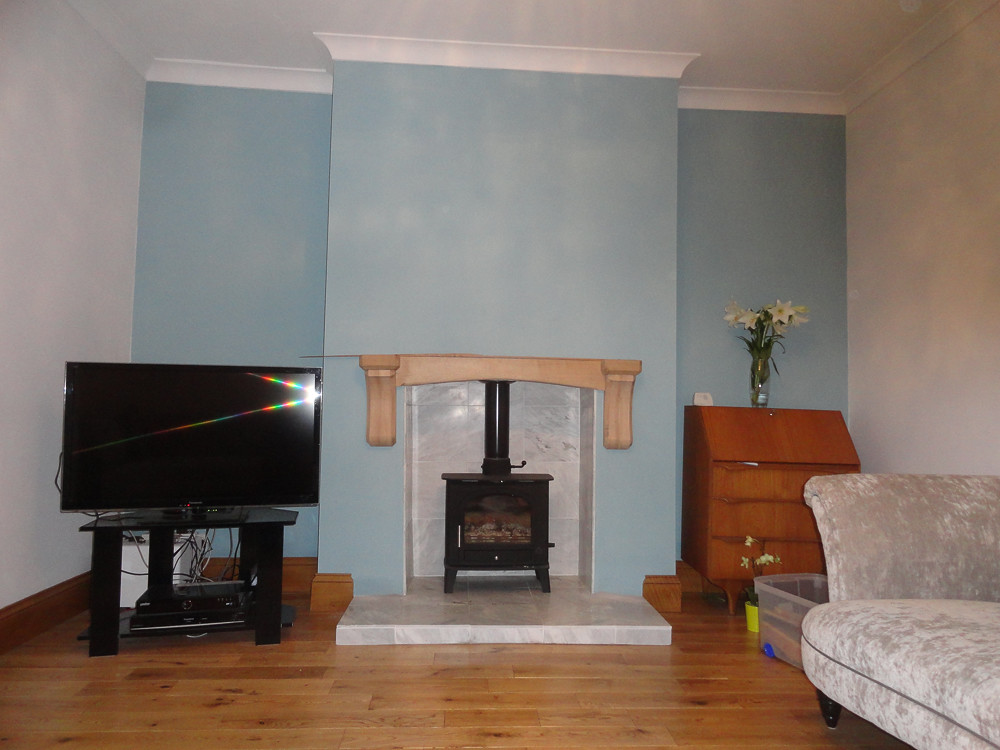
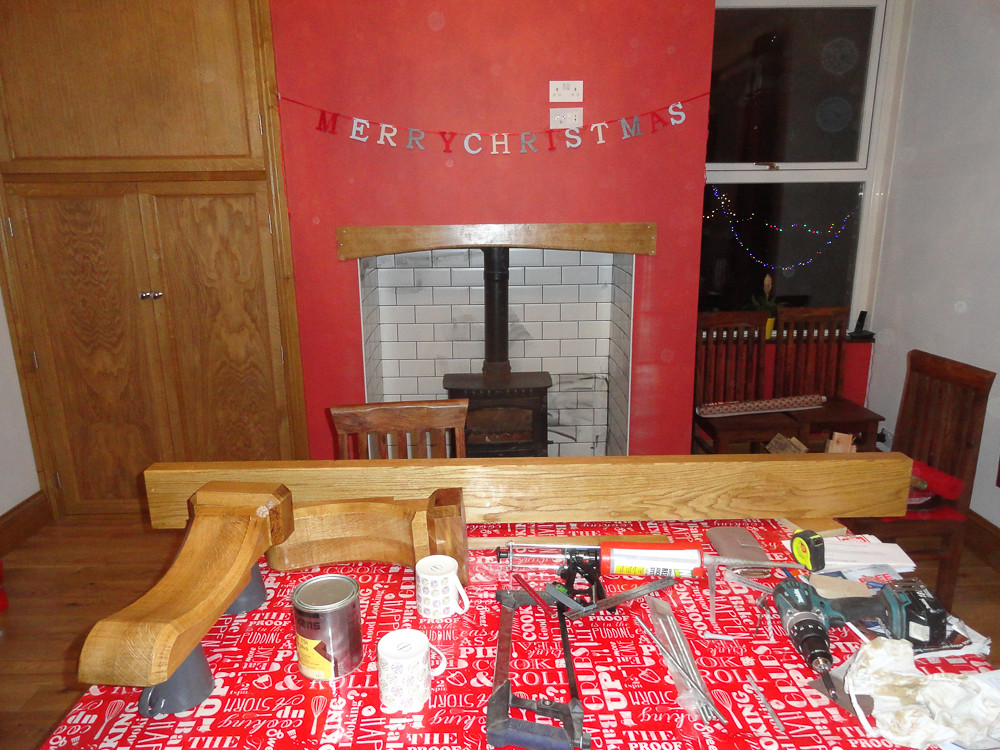
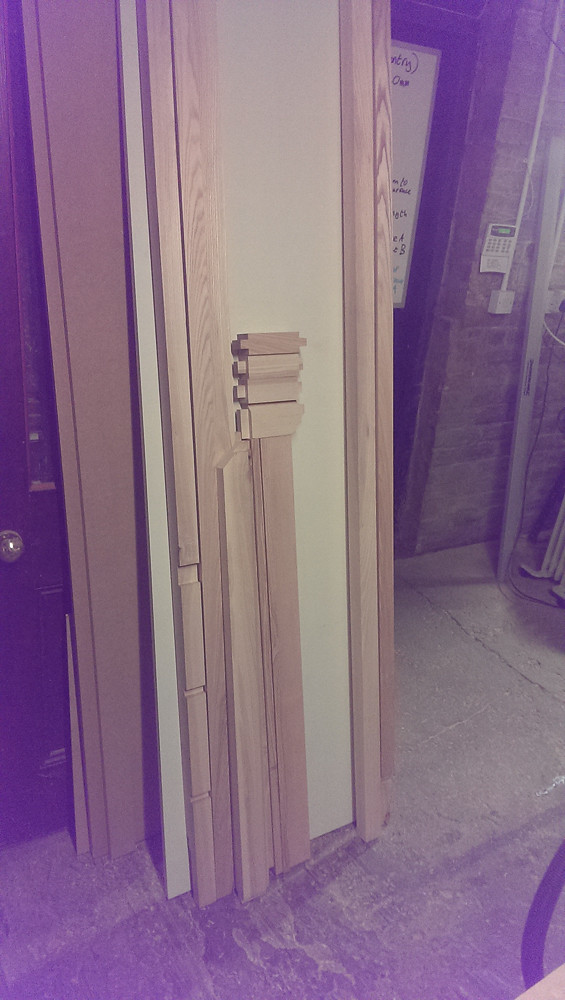
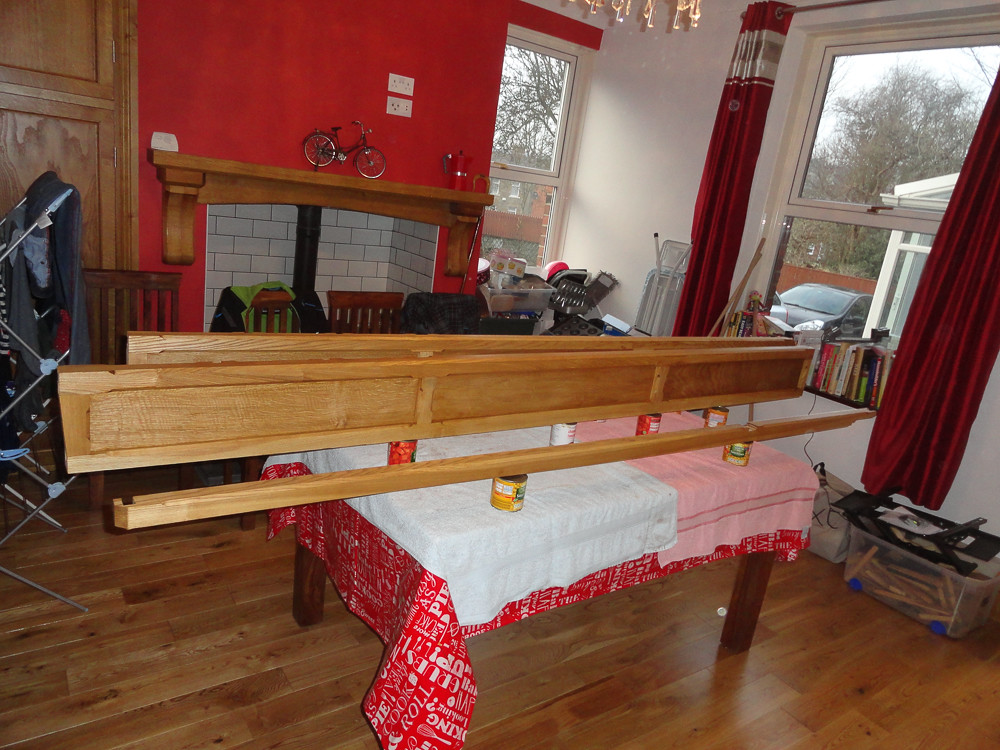
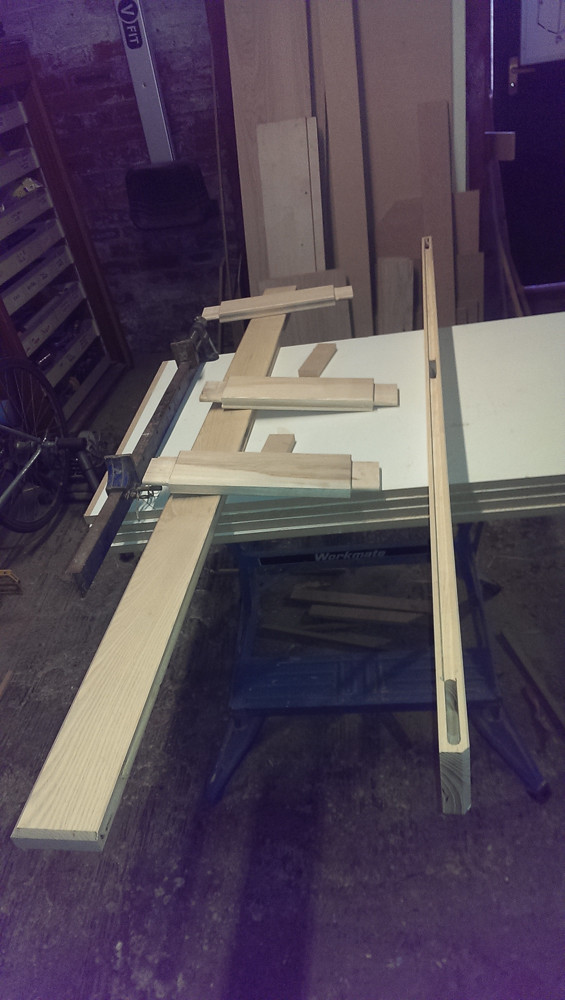
The last few weeks I've also been on a mission to get a couple of mantelpieces done in time for a Christmas party we're hosting this weekend. These things are never straightforward, first step was a drive up Weardale and over Hartside to collect a load of timber, then on to my parent's house to drop some stuff off for my Dad. So first day of my week off and nothing achieved. By the end of the week I was knee-deep in wood shavings, but I had everything cut and ready to finish and fit.
Timber:
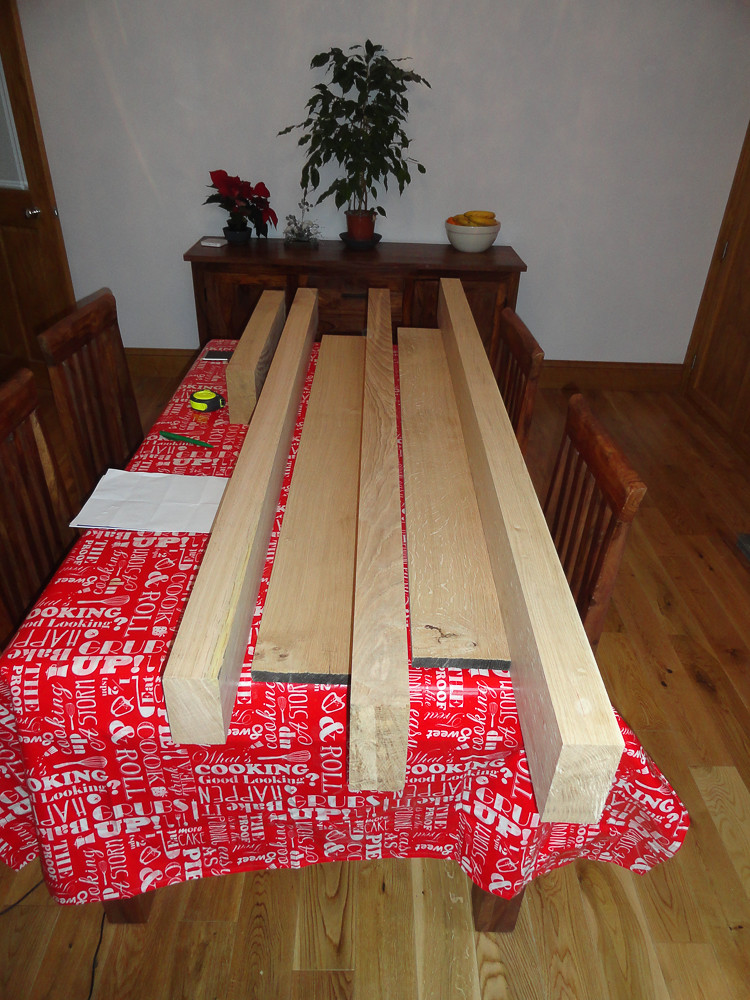 20141125-DSC00864.jpg by paulrockliffe, on Flickr
Every great design starts life as a fully dimensioned CAD plan:
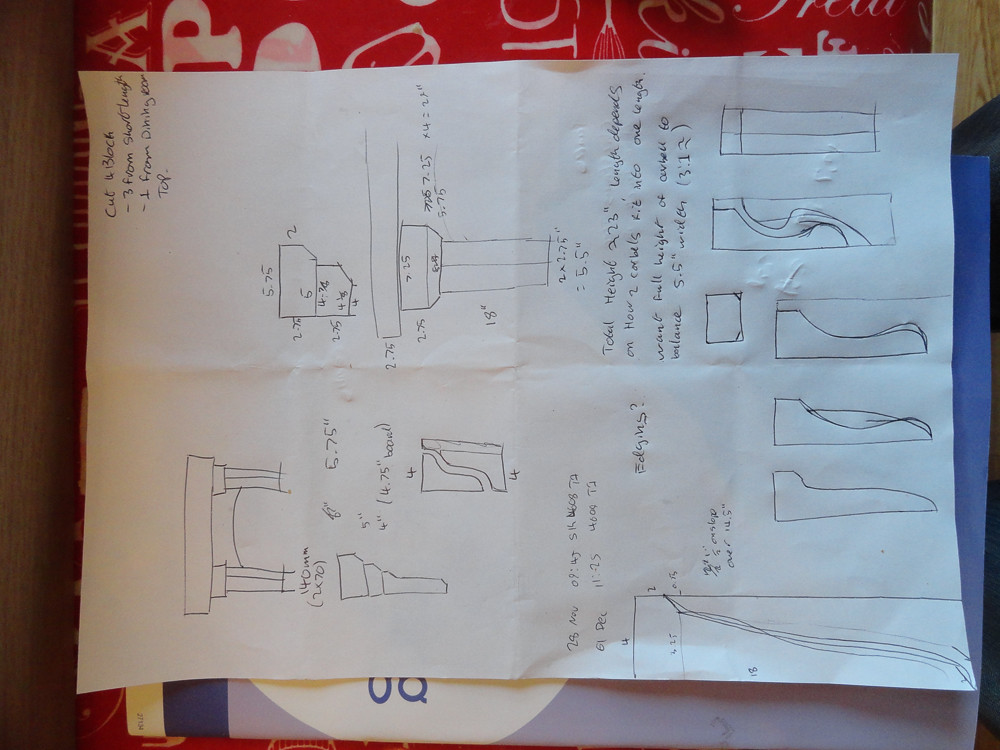 20141125-DSC00865.jpg by paulrockliffe, on Flickr
At this point I discovered that my Dad had authorised the timber to be supplied slightly thicker than requested. I'd specced the timber based on the maximum size I could cut neatly (I don't trust myself with a handsaw yet), but fortunately I'd taken a punt on a Radial Arm Saw the week before and this got me out of jail.
Corbels cut to length:
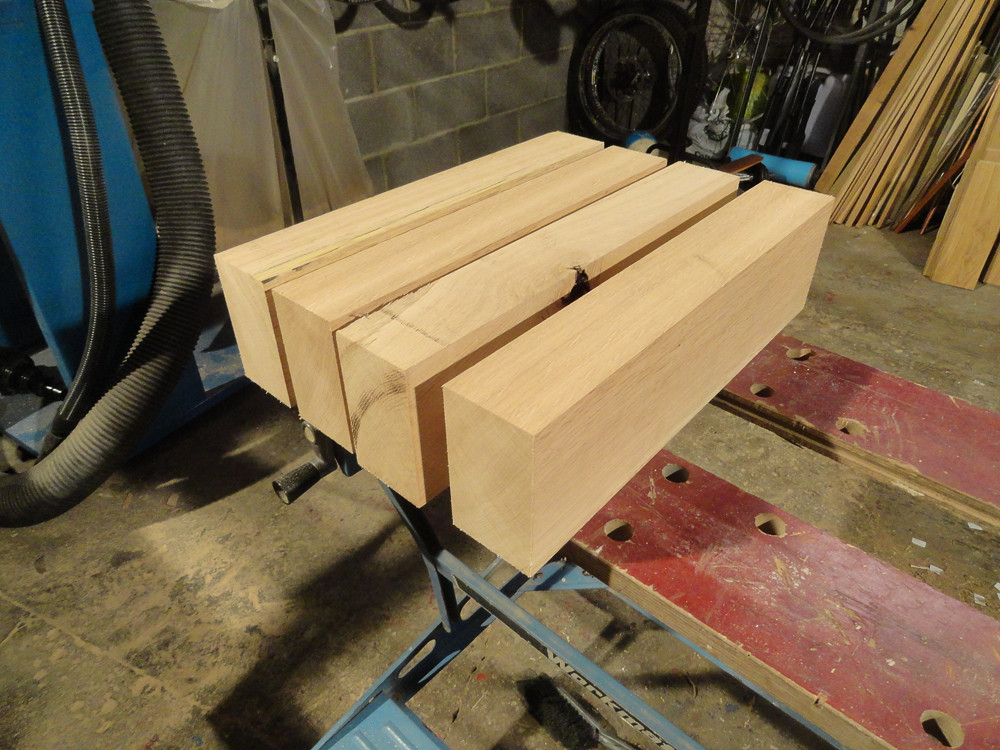 20141125-DSC00866.jpg by paulrockliffe, on Flickr
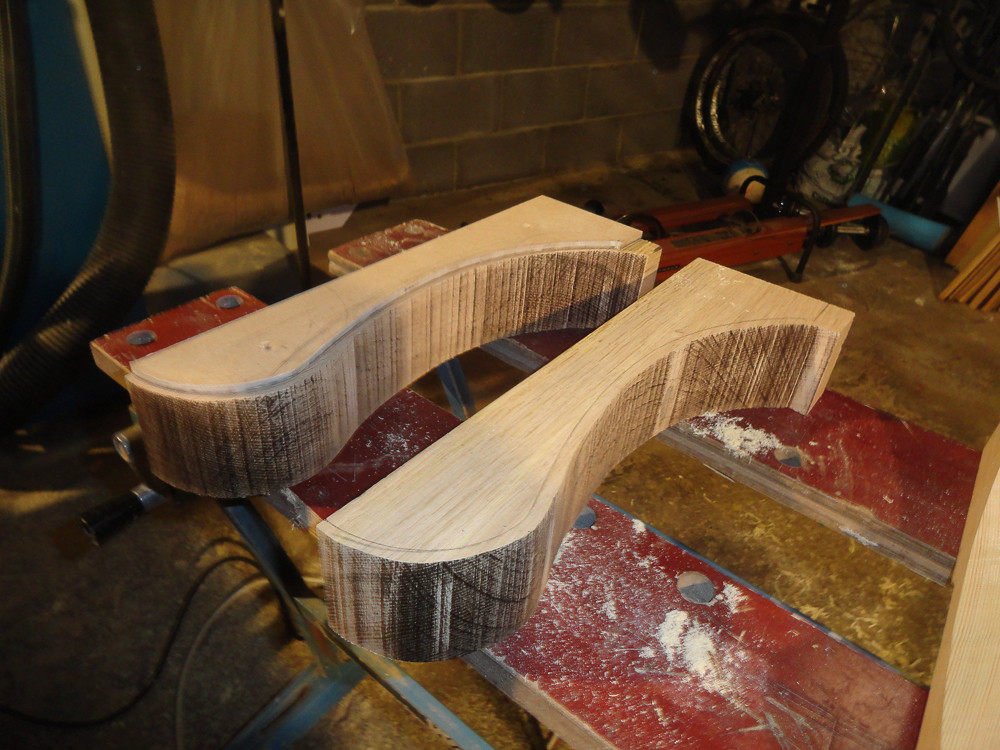
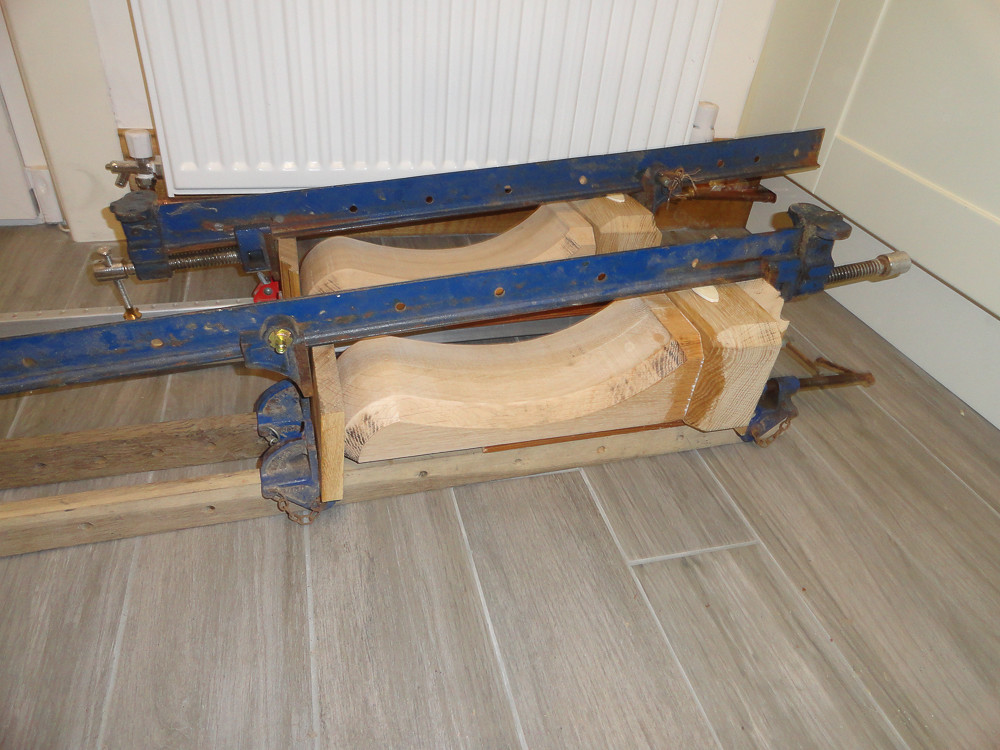
I then spent hours making a template for the profile of the corbels on a piece of MDF. This was transferred to the cut stock and these were then cut out with the bandsaw. I the design is such that two pieces came out of one length, the other two lengths are for the tops of the corbels.
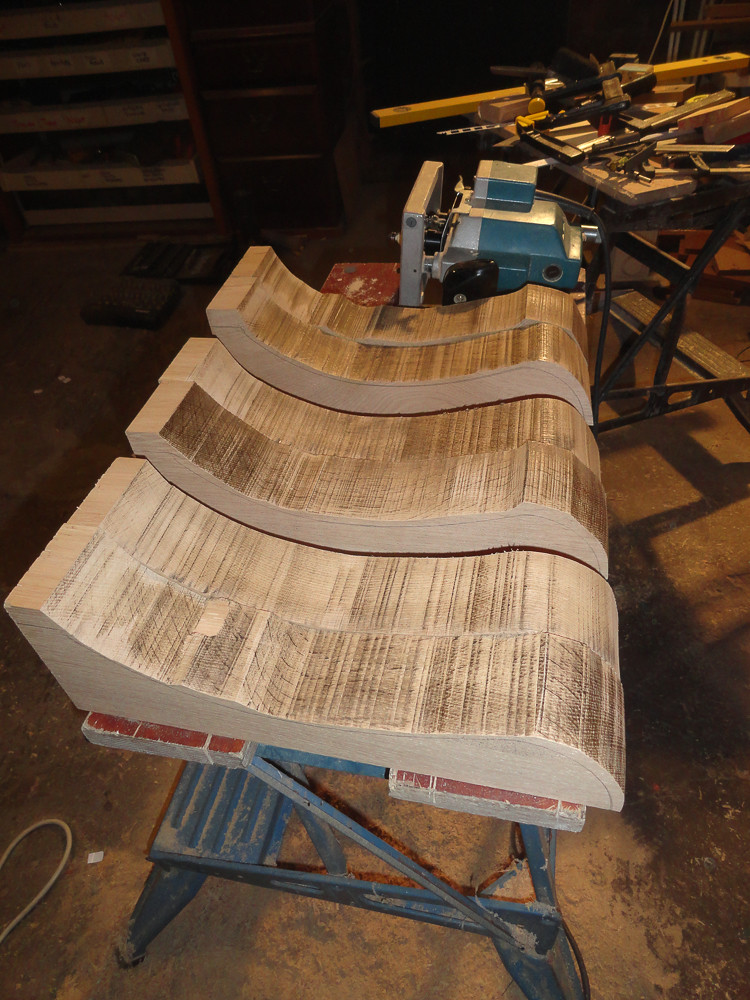 20141125-DSC00871.jpg by paulrockliffe, on Flickr
Believe it or not the wood is 2.75" thick and these were done on a very small bandsaw. Took ages and I honestly didn't think I'd get the last one out of the blade it was so blunt, but somehow it worked.
Template on:
 20141125-DSC00868.jpg by paulrockliffe, on Flickr
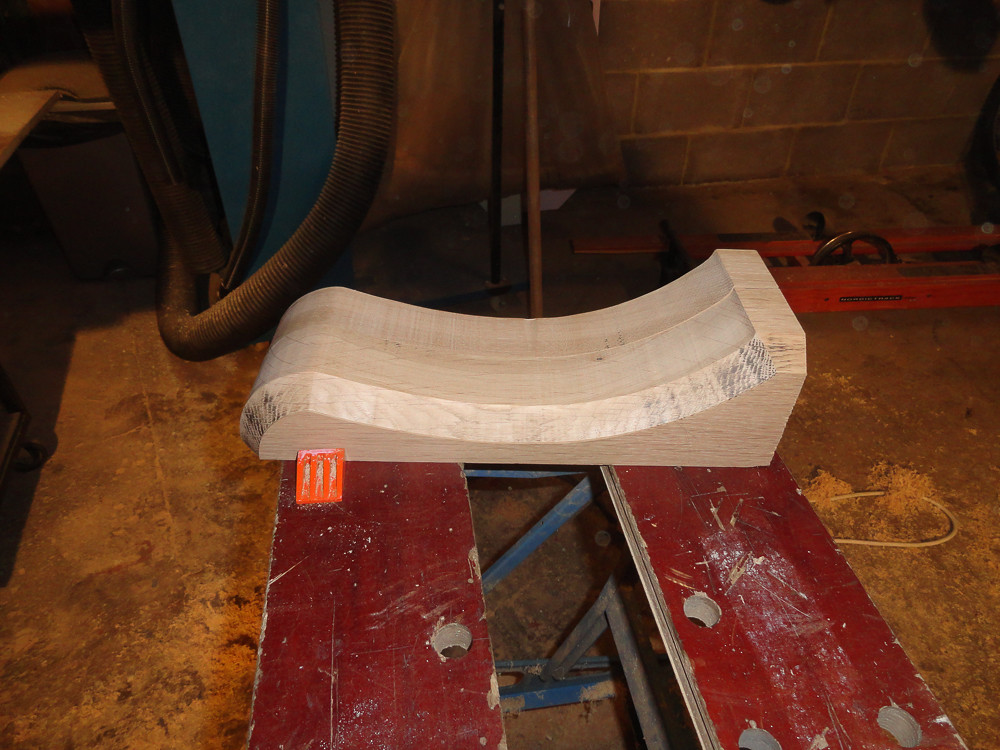
Used the router to trim back to the template and then put a .75" chamfer along the edges. A couple of dwell marks that I'm not overly happy about, though these aren't visible on the finished job. I've got a big new router that's going in a table that will hopefully help with these next time.
 20141125-DSC00869.jpg by paulrockliffe, on Flickr
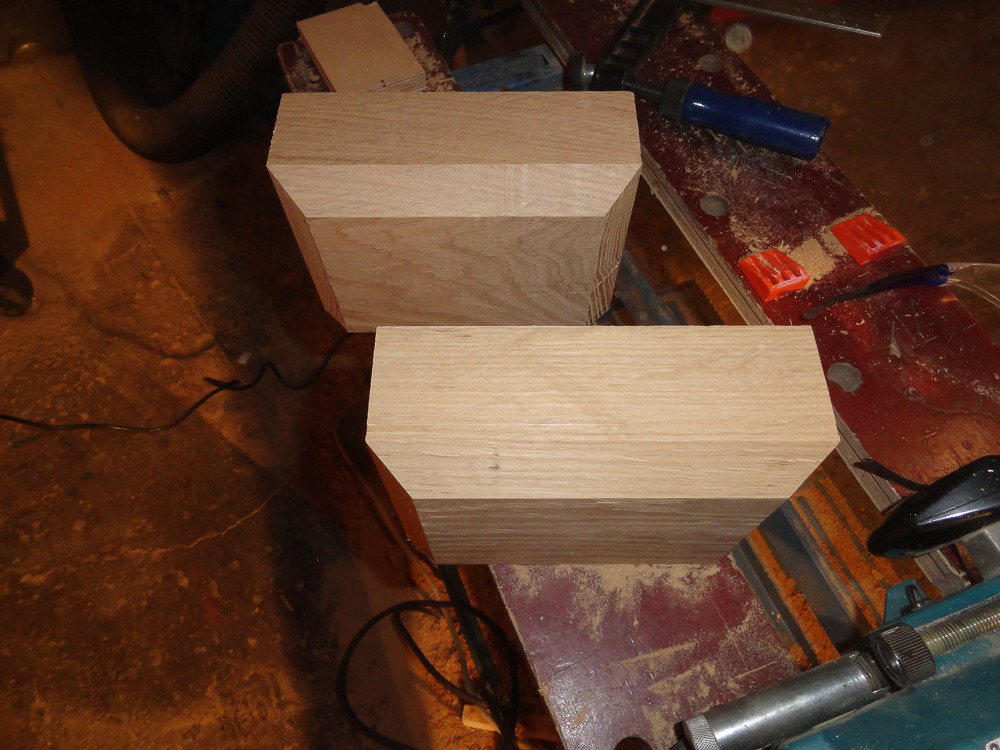
Chamfer on the corbel tops:
 20141125-DSC00872.jpg by paulrockliffe, on Flickr
Finally found a use for the £12 Axminster biscuit jointer I picked up a couple of years ago, as I keep telling the boss, these things always come in handy eventually:
 20141125-DSC00873.jpg by paulrockliffe, on Flickr
More biscuits:
 20141126-DSC00877.jpg by paulrockliffe, on Flickr
And more glue:
 20141126-DSC00878.jpg by paulrockliffe, on Flickr
My bottom board needed a gentle curve on it. The internet suggested some pins and a bit of thin ply:
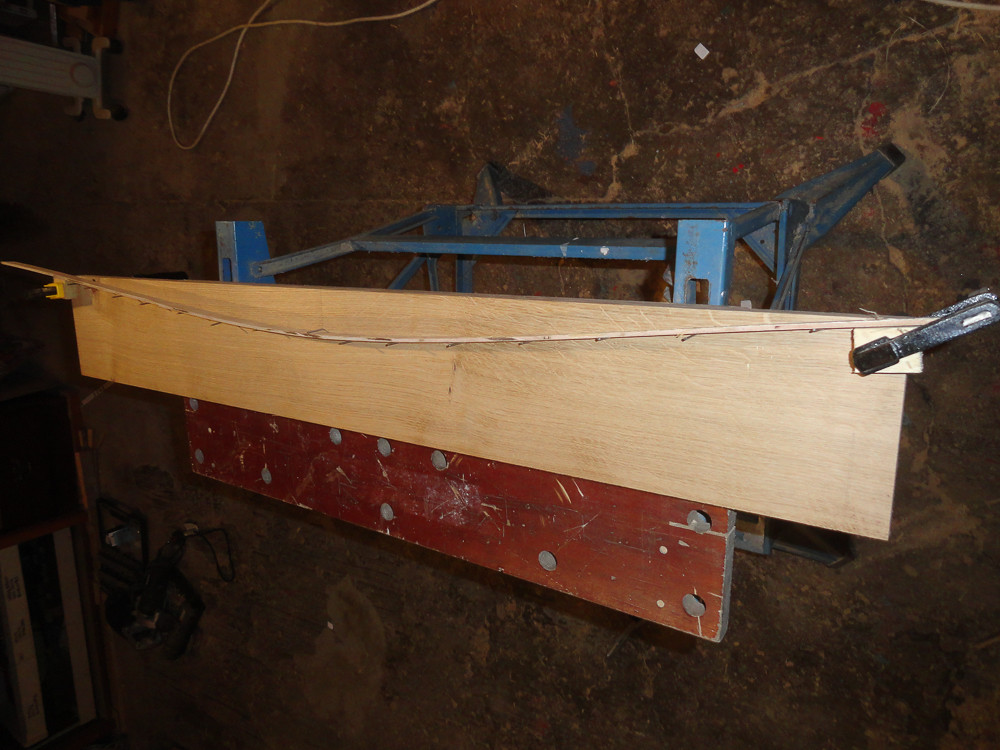 20141126-DSC00879.jpg by paulrockliffe, on Flickr
Marked and rough-cut on the band saw (still with blunt blade):
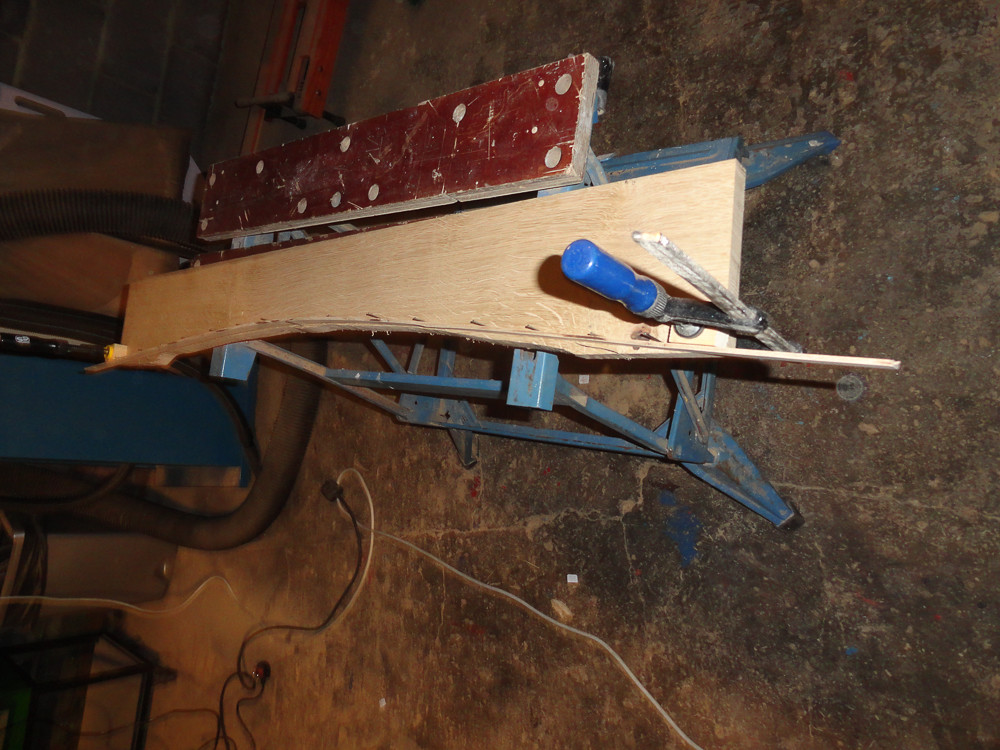 20141126-DSC00880.jpg by paulrockliffe, on Flickr
And finished:
 20141126-DSC00881.jpg by paulrockliffe, on Flickr
I deliberately didn't show you how I trimmed this back with the router because it was straight out of the book of what not to do for workshop safety; router clamped in a workmate and run the pilot bearing against the ply curve former. Be very gentle not to disturb the former. Won't be doing that again, but it worked.
The back board has a round-over routed on then is screwed to the wall in the right place and level:
 20141126-DSC00883.jpg by paulrockliffe, on Flickr
This way I can hang everything off this board and the whole thing goes on a lot easier as the screws will take the weight.
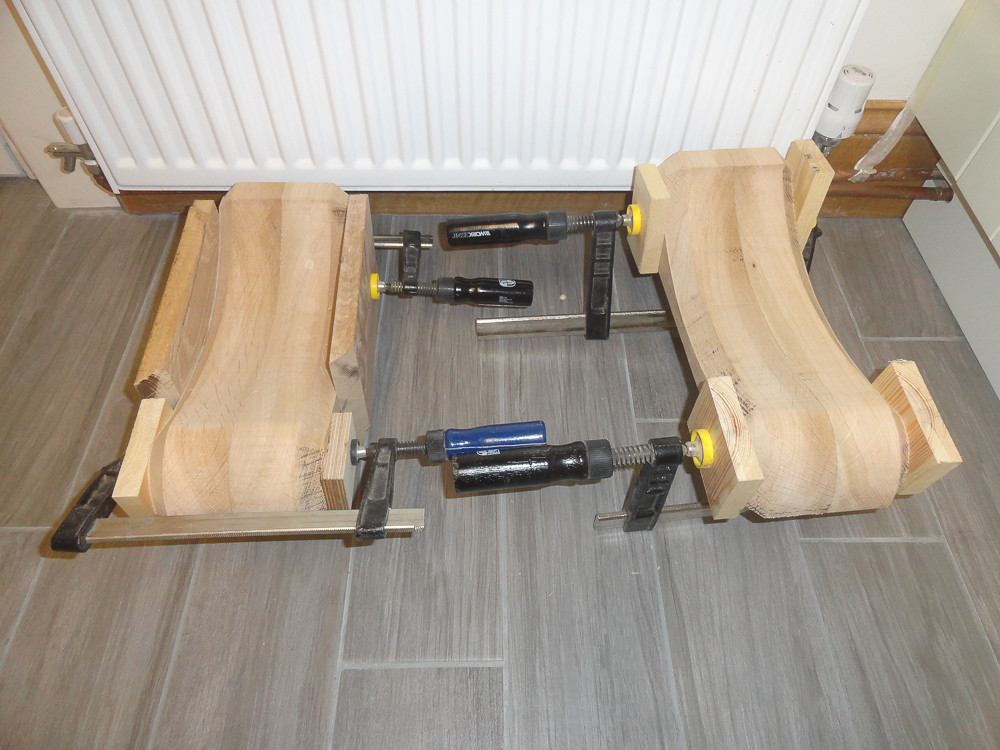
Corbels cantilevered off each other with a strip of ply to check they fit OK with the walls being bent:
 20141127-DSC00885.jpg by paulrockliffe, on Flickr
Then everything off to be finished:
 20141129-DSC00888.jpg by paulrockliffe, on Flickr
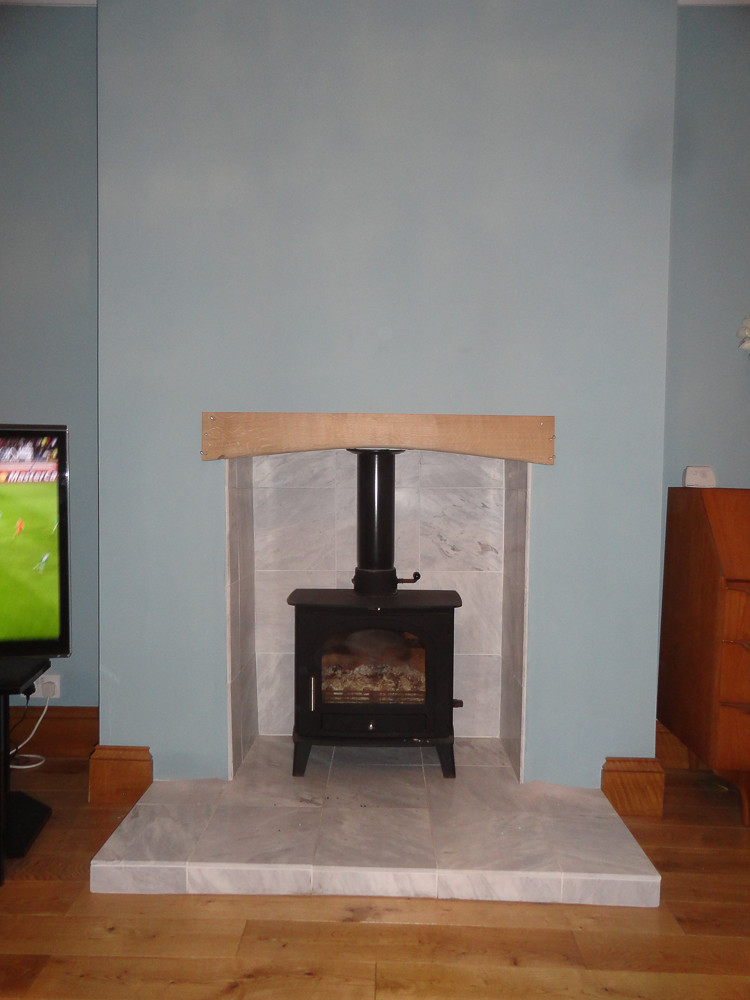
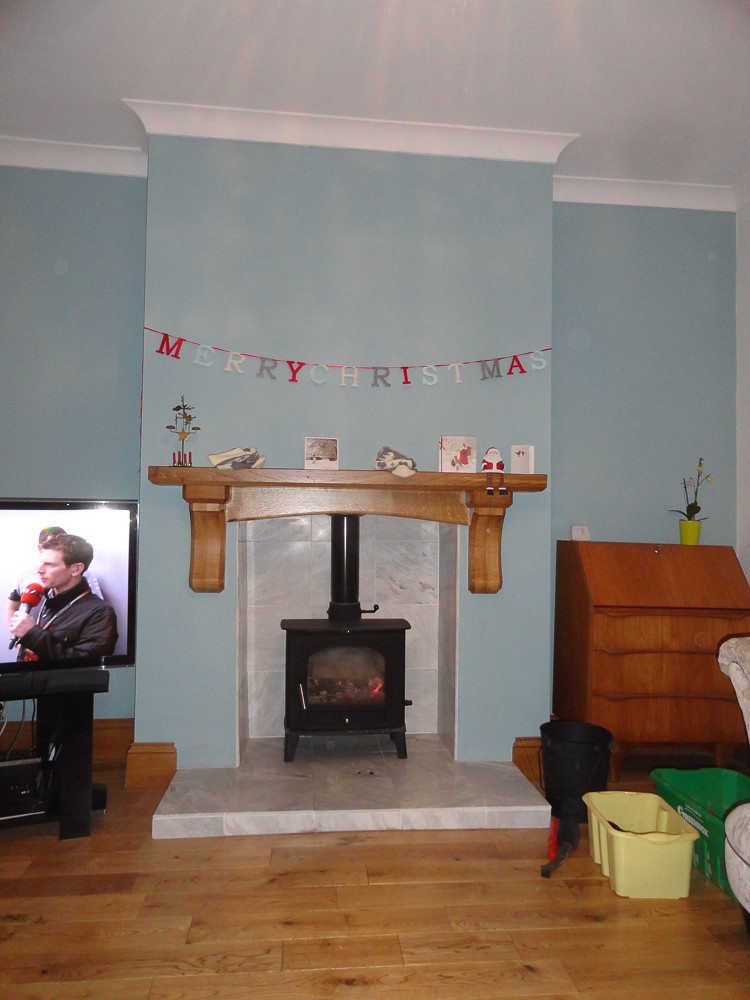
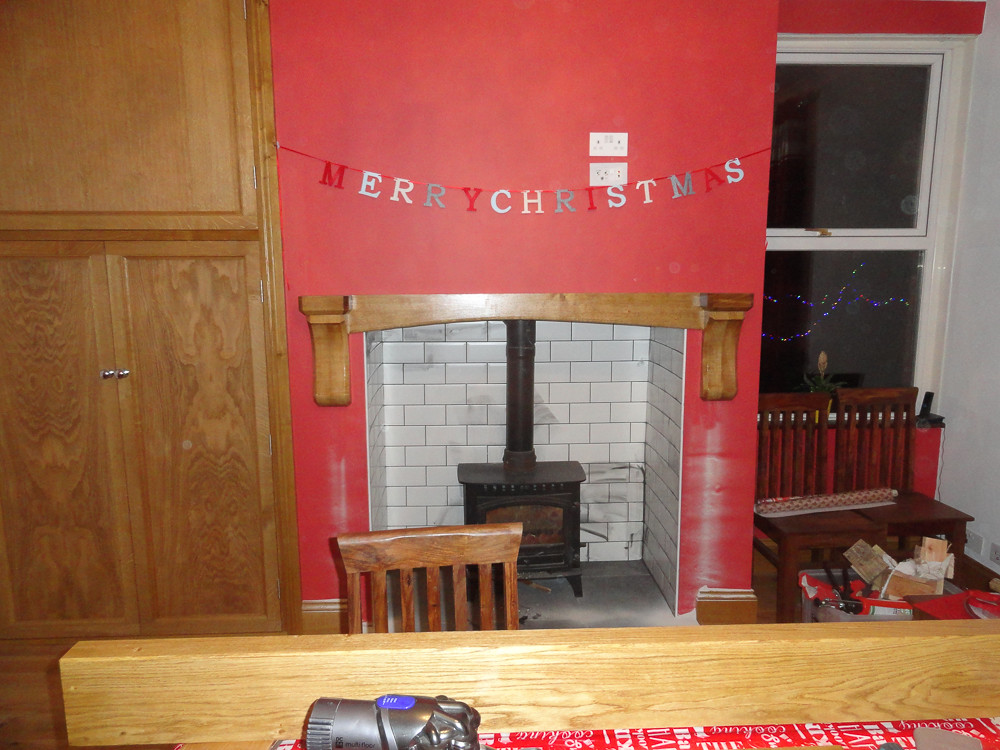
Screw board to wall again. Then I've marked the wall and the back of the corbels and the mantel and drilled some 12mm holes in each, 6mm threaded bar, some of that resin stuff in the holes, hold for a minute and it's all done and rock solid, add Christmas decorations and everyone is happy:
 20141210-DSC00896.jpg by paulrockliffe, on Flickr
Then repeat in the dining room:
 20141210-DSC00898.jpg by paulrockliffe, on Flickr
 20141210-DSC00899.jpg by paulrockliffe, on Flickr
 20141210-DSC00900.jpg by paulrockliffe, on Flickr
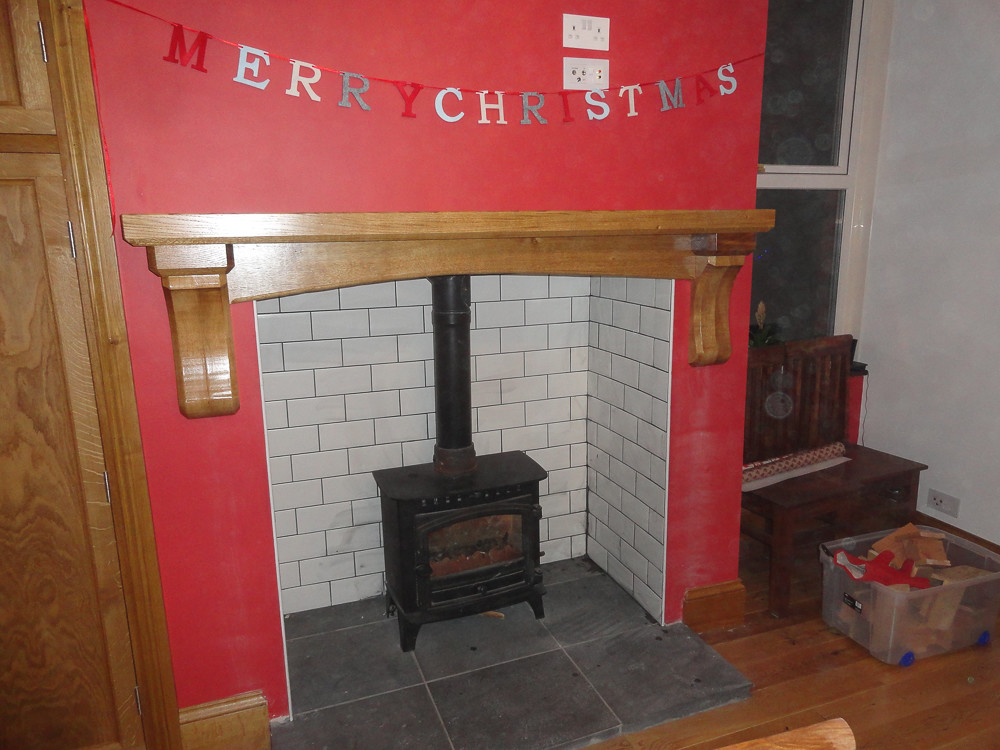 20141210-DSC00901.jpg by paulrockliffe, on Flickr
Timber:
20141125-DSC00864.jpg by paulrockliffe, on FlickrEvery great design starts life as a fully dimensioned CAD plan:
20141125-DSC00865.jpg by paulrockliffe, on FlickrAt this point I discovered that my Dad had authorised the timber to be supplied slightly thicker than requested. I'd specced the timber based on the maximum size I could cut neatly (I don't trust myself with a handsaw yet), but fortunately I'd taken a punt on a Radial Arm Saw the week before and this got me out of jail.
Corbels cut to length:
20141125-DSC00866.jpg by paulrockliffe, on FlickrI then spent hours making a template for the profile of the corbels on a piece of MDF. This was transferred to the cut stock and these were then cut out with the bandsaw. I the design is such that two pieces came out of one length, the other two lengths are for the tops of the corbels.
20141125-DSC00871.jpg by paulrockliffe, on FlickrBelieve it or not the wood is 2.75" thick and these were done on a very small bandsaw. Took ages and I honestly didn't think I'd get the last one out of the blade it was so blunt, but somehow it worked.
Template on:
20141125-DSC00868.jpg by paulrockliffe, on FlickrUsed the router to trim back to the template and then put a .75" chamfer along the edges. A couple of dwell marks that I'm not overly happy about, though these aren't visible on the finished job. I've got a big new router that's going in a table that will hopefully help with these next time.
20141125-DSC00869.jpg by paulrockliffe, on FlickrChamfer on the corbel tops:
20141125-DSC00872.jpg by paulrockliffe, on FlickrFinally found a use for the £12 Axminster biscuit jointer I picked up a couple of years ago, as I keep telling the boss, these things always come in handy eventually:
20141125-DSC00873.jpg by paulrockliffe, on FlickrMore biscuits:
20141126-DSC00877.jpg by paulrockliffe, on FlickrAnd more glue:
20141126-DSC00878.jpg by paulrockliffe, on FlickrMy bottom board needed a gentle curve on it. The internet suggested some pins and a bit of thin ply:
20141126-DSC00879.jpg by paulrockliffe, on FlickrMarked and rough-cut on the band saw (still with blunt blade):
20141126-DSC00880.jpg by paulrockliffe, on FlickrAnd finished:
20141126-DSC00881.jpg by paulrockliffe, on FlickrI deliberately didn't show you how I trimmed this back with the router because it was straight out of the book of what not to do for workshop safety; router clamped in a workmate and run the pilot bearing against the ply curve former. Be very gentle not to disturb the former. Won't be doing that again, but it worked.
The back board has a round-over routed on then is screwed to the wall in the right place and level:
20141126-DSC00883.jpg by paulrockliffe, on FlickrThis way I can hang everything off this board and the whole thing goes on a lot easier as the screws will take the weight.
Corbels cantilevered off each other with a strip of ply to check they fit OK with the walls being bent:
20141127-DSC00885.jpg by paulrockliffe, on FlickrThen everything off to be finished:
20141129-DSC00888.jpg by paulrockliffe, on FlickrScrew board to wall again. Then I've marked the wall and the back of the corbels and the mantel and drilled some 12mm holes in each, 6mm threaded bar, some of that resin stuff in the holes, hold for a minute and it's all done and rock solid, add Christmas decorations and everyone is happy:
20141210-DSC00896.jpg by paulrockliffe, on FlickrThen repeat in the dining room:
20141210-DSC00898.jpg by paulrockliffe, on Flickr20141210-DSC00899.jpg by paulrockliffe, on Flickr20141210-DSC00900.jpg by paulrockliffe, on Flickr20141210-DSC00901.jpg by paulrockliffe, on Flickr
ecotec said:
Firstly, great work the house is looking excellent.
I was interested in your bank of lepai amps and how you are using them to distribute sound - is it just one pi and are you streaming music from the HP server or is it via phone bluetooth?
cheers,
All of those things. Except the HP server as it's lunched itself and I haven't had time to fix it. I've removed the faulty hard-drive but it still isn't working. A job for another day.I was interested in your bank of lepai amps and how you are using them to distribute sound - is it just one pi and are you streaming music from the HP server or is it via phone bluetooth?
cheers,
Anyway. I've got 6 rooms with speakers in, each fired off one of those amplifiers. Each amp is connected to a 4-pole switch.
On one set of poles I have connected inputs from connections in each room and also a bank of inputs that are sat next to the server. That basically gives you local inputs to each room, eg a a TV or stereo in a bedroom coming over the speakers in that room.
On the other set of poles I have a distribution amplifier that takes one input and sends it to 6 outputs. That gives you the sound over all the speakers at once. Obviously you use the switches to control which rooms take the common feed and you can switch amplifiers off too. All the amps are powered by a single transformer, which is on a timer.
On the distribution amplifier there's another 4-pole switch which lets you select between two sets of inputs. I've got a bluetooth box plugged into that at the moment, so you can play from phone or laptop etc. The Raspberry Pi can go on the other input too, but I've been using it to fire some relays as I was messing about with putting the switches onto relays that can be controlled from my phone, but there are unresolved issues with that.
Eventually I'll get around to configuring it all 100%, then there'll be a RPi to cover the bathroom, one to cover the whole house and the bluetooth box. The whole house one will be linked to a touchscreen TV in the Kitchen that will double up as a music centre for the house and a TV for the kitchen.
All the RPis run XBMC (now Kodi), the OpenElec version and are setup with add-ons for a few things as well as connections to the server for music. Without a monitor connected you're normally stuck, but control is via the Yatse remote control on Android. This controller caches your libraries and can work with multiple installations at once. So basically you treat it as a music player on your phone and the RPi/Server does the rest. I believe it lets you bounce sources between devices too, though I've not tested that fully. Only thing complicated about the setup is that you really need to go in your router and give each device a static IP address so they don't get lost.
The system isn't perfect and things like Sonos will give you more flexibility and stuff, but those are mega bucks, like £200 a room just for the amplification. I'm lucky to be a bit tone deaf and use this mostly for listening to radio dramas anyway, so quality isn't a high priority, though I have to say the standard is very very good. Speakers were about £17 a pair, amplifiers were similar. Bluetooth box was £25 and the RPis are about £55. There might be a cheaper option on the RPis if you don't need to stream HD video, but I've not looked in a while.
So today is exactly two years since we bought the house! The 6 month quick project has morphed into a monster and we're still at it! I'll do a proper update in the week to get things properly up to speed, but basically nearly nearly finished. (obviously in 6 months time I'll still be doing finishing off jobs, but they don't count!)
I'm at the point now where the only big things left to do are to dig up the entrance hallway floor and re-do it with a DPC and to finish clearing cavities and get the bricks back in. That requires the use of a boroscope and some custom devices for getting at some stubborn blockages.
Then I have a load of improvement projects, especially outside, but we'll be able to call the house 'finished'.
I've not updated the thread since before Christmas, so quite a few things have been done. I'll get those updated and maybe put together some 'before' and 'after' pics.
smithyithy said:
Slow day today so had a read through the whole thread - what a great transformation, hats off to you!
I'll look forward to the update
Must have been a very slow day! Glad you enjoyed it and thanks!I'll look forward to the update
I've spent all night cutting ply and routing joints for some drawer boxes for the wardrobes, but I'll get some pics, probably on Thursday.........
UPDATE!
Finally got a spare few minutes to get this properly up to date. The last 5 months have been quite hectic, I've got through quite a lot of little jobs and a few big projects. When I look through the pictures I do wonder what I was doing for months of that, but I guess these things always take longer than you think.
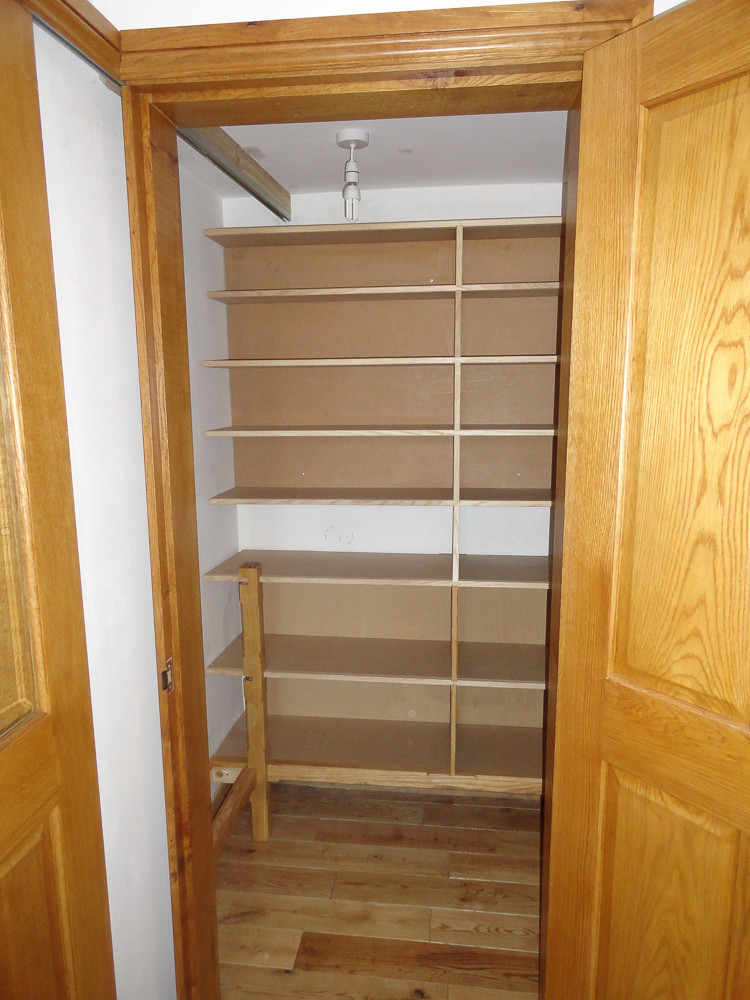
Anyway, first big job after Christmas was the pantry; part of me discouraging the better half from wanting a kitchen extension any time soon is making the kitchen, dining room and under the stairs 'work' as a cooking/dining/storage space. That's why there's a sliding door that's never shut between the two rooms. It's worked quite well and I'm happy that the bigger kitchen will only happen when I'm ready now.
Floor down:
 20150309-DSC00919.jpg by paulrockliffe, on Flickr
Ash frame cut, with supports morticed in:
 20150309-DSC00924.jpg by paulrockliffe, on Flickr
Frame in:
 20150311-DSC00925.jpg by paulrockliffe, on Flickr
Post made:
 20150320-DSC00927.jpg by paulrockliffe, on Flickr
First shelf:
 20150320-DSC00928.jpg by paulrockliffe, on Flickr
More shelves:
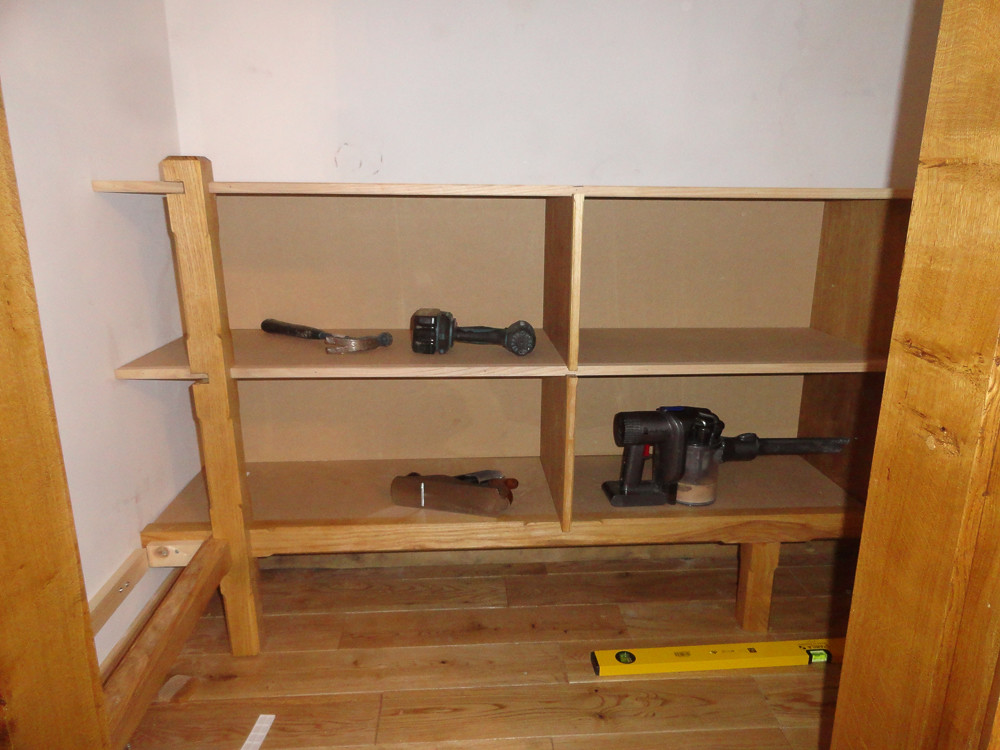 20150401-DSC00932.jpg by paulrockliffe, on Flickr
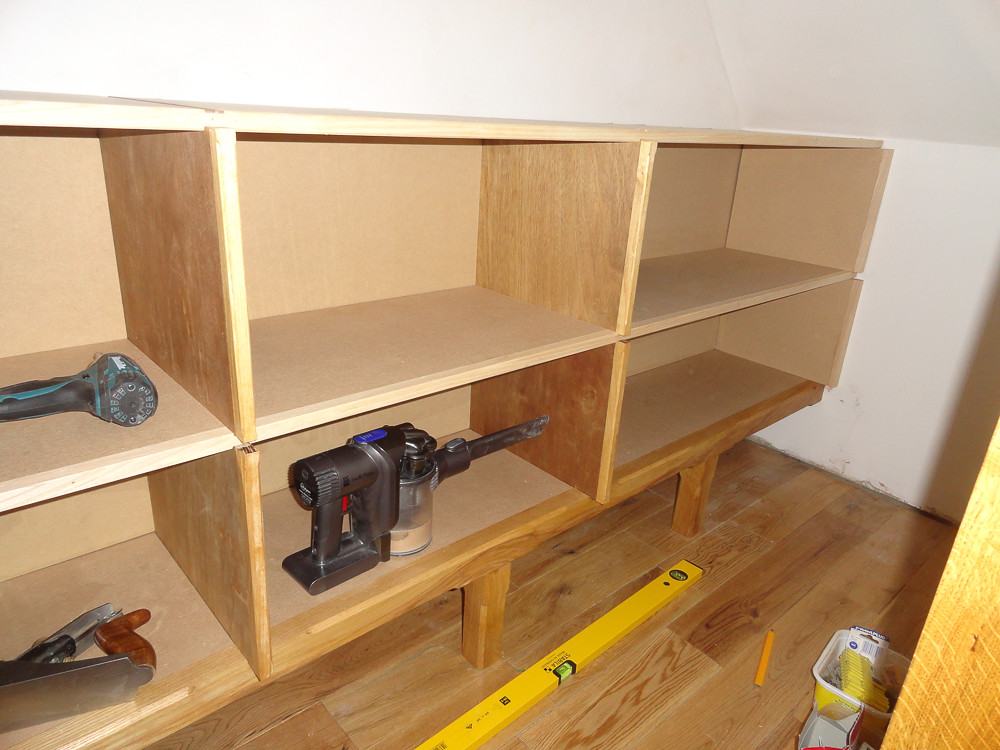
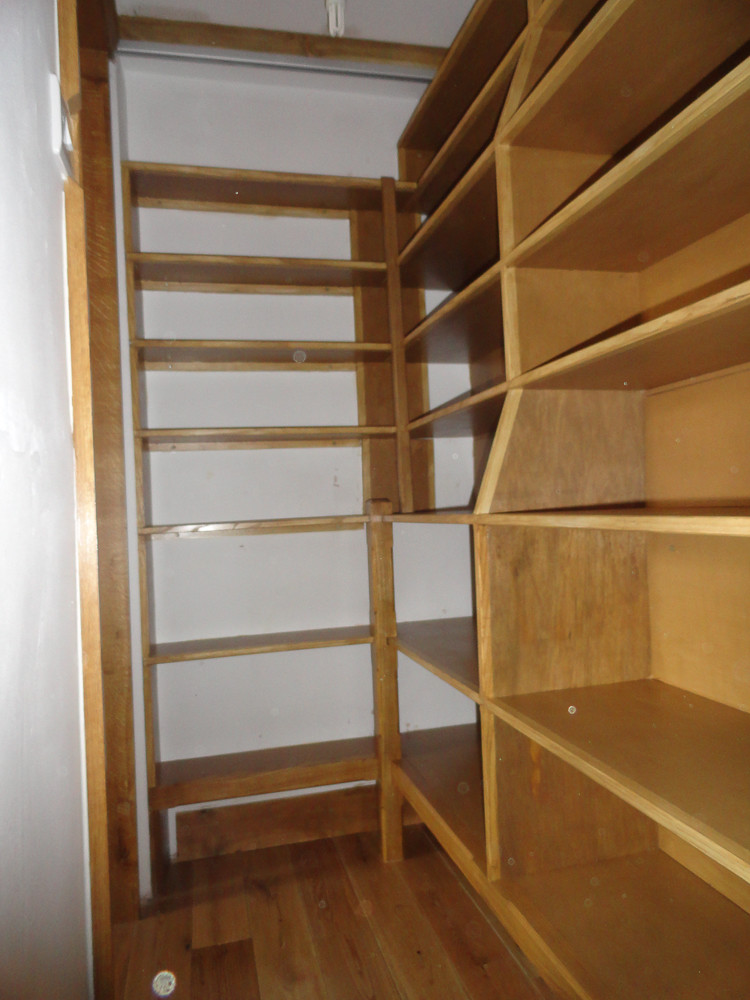
The shelves are all MDF, with an ash facing applied. The construction is basically two separate cabinets, one above each other, with shelves extending behind the sliding door. The compartments are designed to stop the MDF from sagging and transfer the load to the base frame, but they also help to keep everything nicely organised.
 20150401-DSC00933.jpg by paulrockliffe, on Flickr
The top cabinet needed the back routing to accept the shelves and uprights, it was going to take ages, so I made up this jig to get everyting in the right place:
 20150404-DSC00934.jpg by paulrockliffe, on Flickr
 20150404-DSC00935.jpg by paulrockliffe, on Flickr
It's not the best space to get good pictures in, but here's the shelves all in:
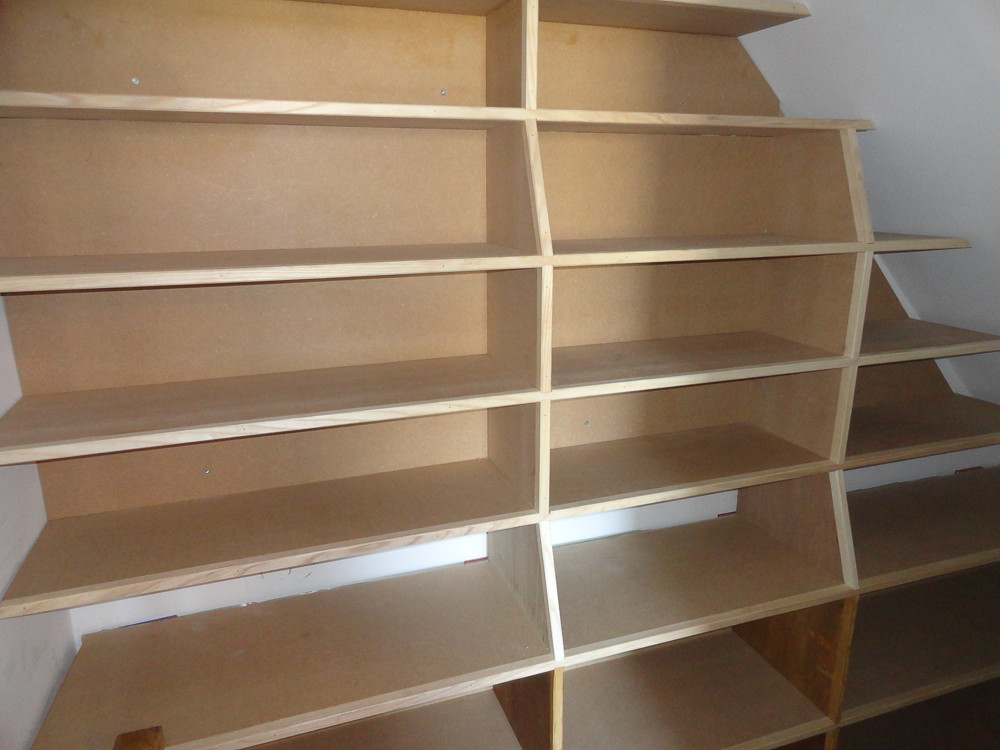 20150406-DSC00937.jpg by paulrockliffe, on Flickr
 20150406-DSC00936.jpg by paulrockliffe, on Flickr
 20150408-DSC00942.jpg by paulrockliffe, on Flickr
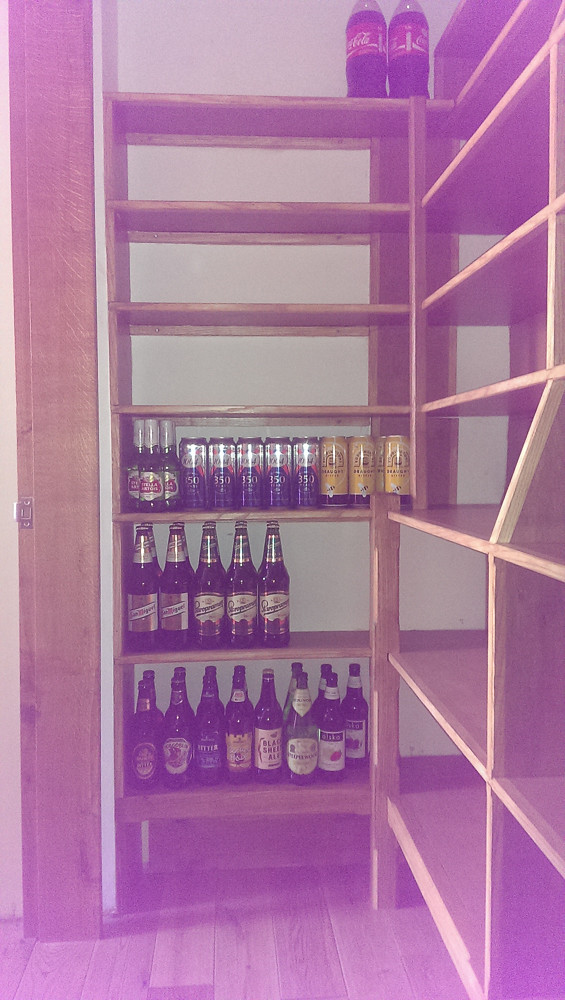
All the shelves are designed to just fit a range of common food product heights, eg cereal boxes, cans of beans etc, so that I could get the maximum number of shelves in the space.
Priorities:
 IMAG0035.jpg by paulrockliffe, on Flickr
really pleased with how this has come out, although the ash was completely unnecessary under the stairs, I think it adds something and helps to bring the three spaces together. It's incredibly practical and has swallowed the contents of the kitchen pretty comfortably!
Finally got a spare few minutes to get this properly up to date. The last 5 months have been quite hectic, I've got through quite a lot of little jobs and a few big projects. When I look through the pictures I do wonder what I was doing for months of that, but I guess these things always take longer than you think.
Anyway, first big job after Christmas was the pantry; part of me discouraging the better half from wanting a kitchen extension any time soon is making the kitchen, dining room and under the stairs 'work' as a cooking/dining/storage space. That's why there's a sliding door that's never shut between the two rooms. It's worked quite well and I'm happy that the bigger kitchen will only happen when I'm ready now.
Floor down:
20150309-DSC00919.jpg by paulrockliffe, on FlickrAsh frame cut, with supports morticed in:
20150309-DSC00924.jpg by paulrockliffe, on FlickrFrame in:
20150311-DSC00925.jpg by paulrockliffe, on FlickrPost made:
20150320-DSC00927.jpg by paulrockliffe, on FlickrFirst shelf:
20150320-DSC00928.jpg by paulrockliffe, on FlickrMore shelves:
20150401-DSC00932.jpg by paulrockliffe, on FlickrThe shelves are all MDF, with an ash facing applied. The construction is basically two separate cabinets, one above each other, with shelves extending behind the sliding door. The compartments are designed to stop the MDF from sagging and transfer the load to the base frame, but they also help to keep everything nicely organised.
20150401-DSC00933.jpg by paulrockliffe, on FlickrThe top cabinet needed the back routing to accept the shelves and uprights, it was going to take ages, so I made up this jig to get everyting in the right place:
20150404-DSC00934.jpg by paulrockliffe, on Flickr20150404-DSC00935.jpg by paulrockliffe, on FlickrIt's not the best space to get good pictures in, but here's the shelves all in:
20150406-DSC00937.jpg by paulrockliffe, on Flickr20150406-DSC00936.jpg by paulrockliffe, on Flickr20150408-DSC00942.jpg by paulrockliffe, on FlickrAll the shelves are designed to just fit a range of common food product heights, eg cereal boxes, cans of beans etc, so that I could get the maximum number of shelves in the space.
Priorities:
IMAG0035.jpg by paulrockliffe, on Flickrreally pleased with how this has come out, although the ash was completely unnecessary under the stairs, I think it adds something and helps to bring the three spaces together. It's incredibly practical and has swallowed the contents of the kitchen pretty comfortably!
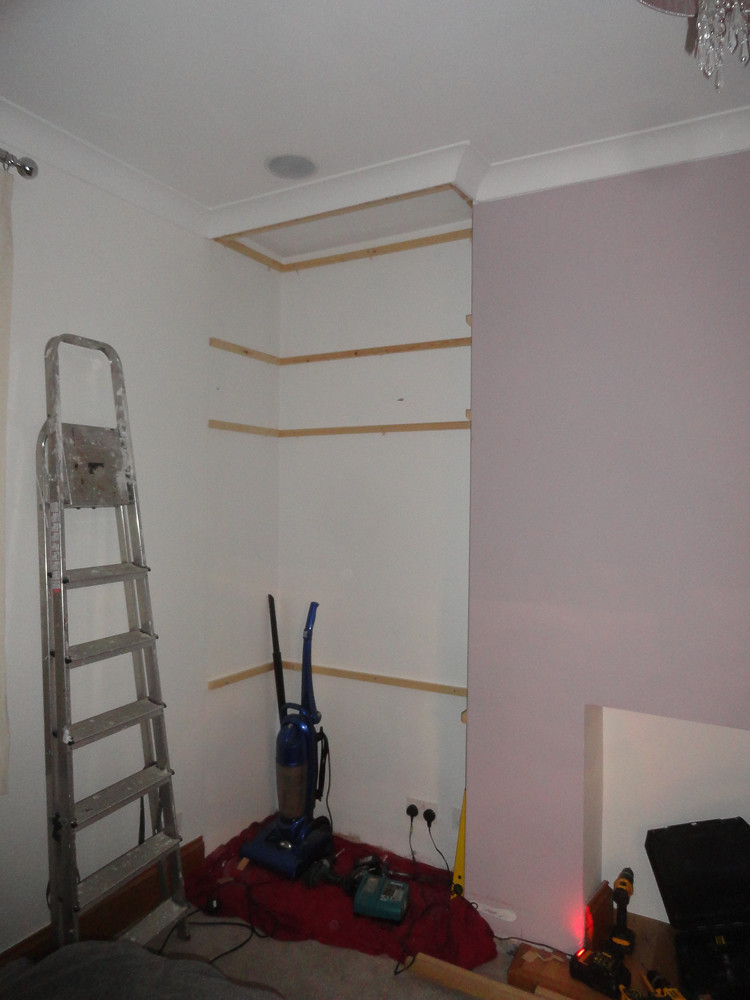
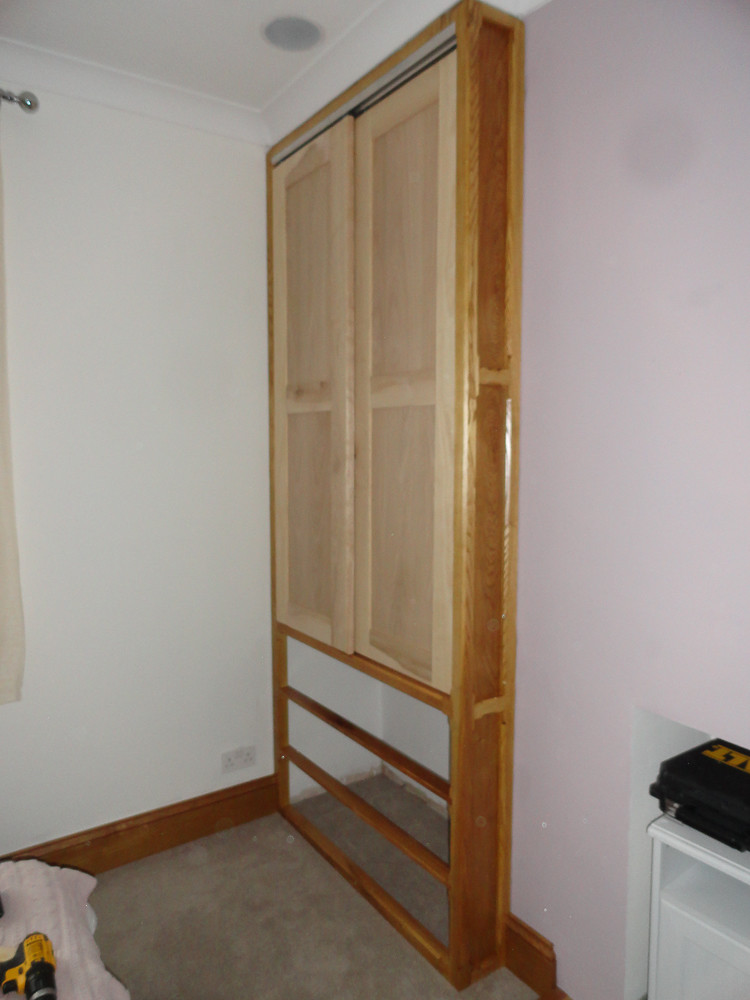
Next up was a couple of wardrobes. I know everything always takes longer than you think, but this job took the piss massively. Me and my Dad spent a three day weekend, then 9 days straight on them, proper man days too. Then I've spent god knows how long fitting drawers to them.
Would be genuinely interested to know what any professionals would charge for similar, I know I'm not particularly quick, but I'd have to be charging thousands for these to make any sense!
We're a bit light on storage space and have too many clothes, so the plan was floor to ceiling in both large bedrooms, with double height rails in our room for maximum hanging space. The lower rails are at head height, with the bottoms filled with drawers.
So a huge pile of ash arrived one Friday evening:
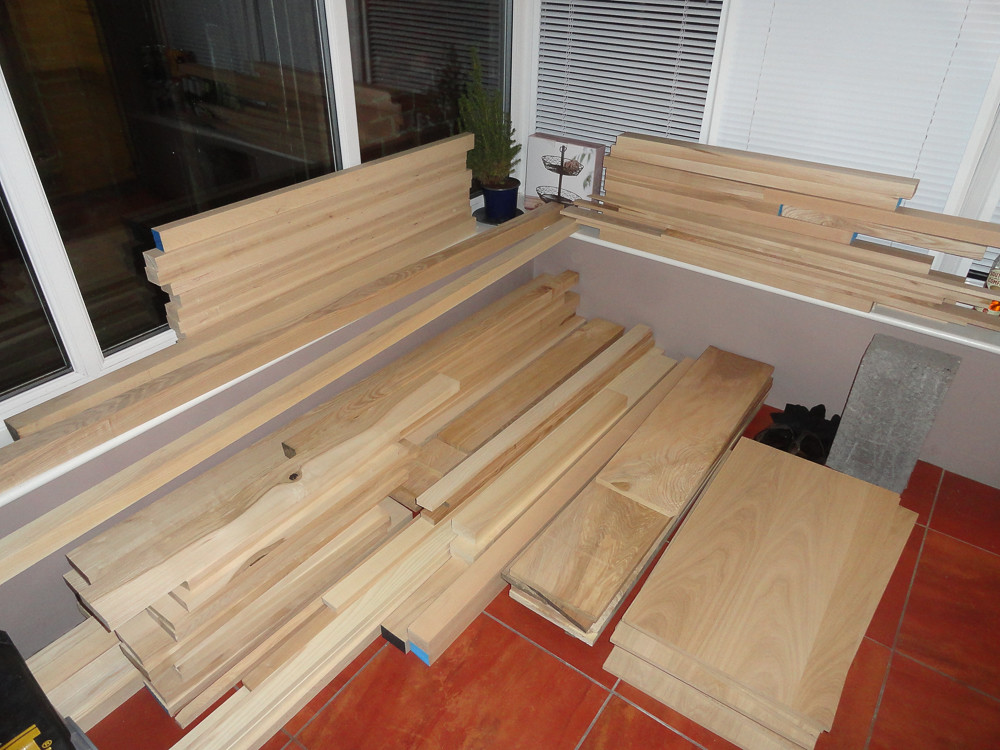 20150320-DSC00929.jpg by paulrockliffe, on Flickr
I knocked up a complicated and detailed design on the back of my workshop door:
 IMAG0015.jpg by paulrockliffe, on Flickr
And off we went!
The router table I built at Christmas came in very handy:
 IMAG0043.jpg by paulrockliffe, on Flickr
And by the end of the weekend we had a load of posts and stuff:
 IMAG0014.jpg by paulrockliffe, on Flickr
The following weekend these slowly transformed from posts to bits, which were then stained and varnished by my Mum. These are the side panels which effectively deepen the alcoves in the rooms to give enough depth for the wardrobe:
 20150408-DSC00947.jpg by paulrockliffe, on Flickr
Battoning in the spare room:
 20150408-DSC00952.jpg by paulrockliffe, on Flickr
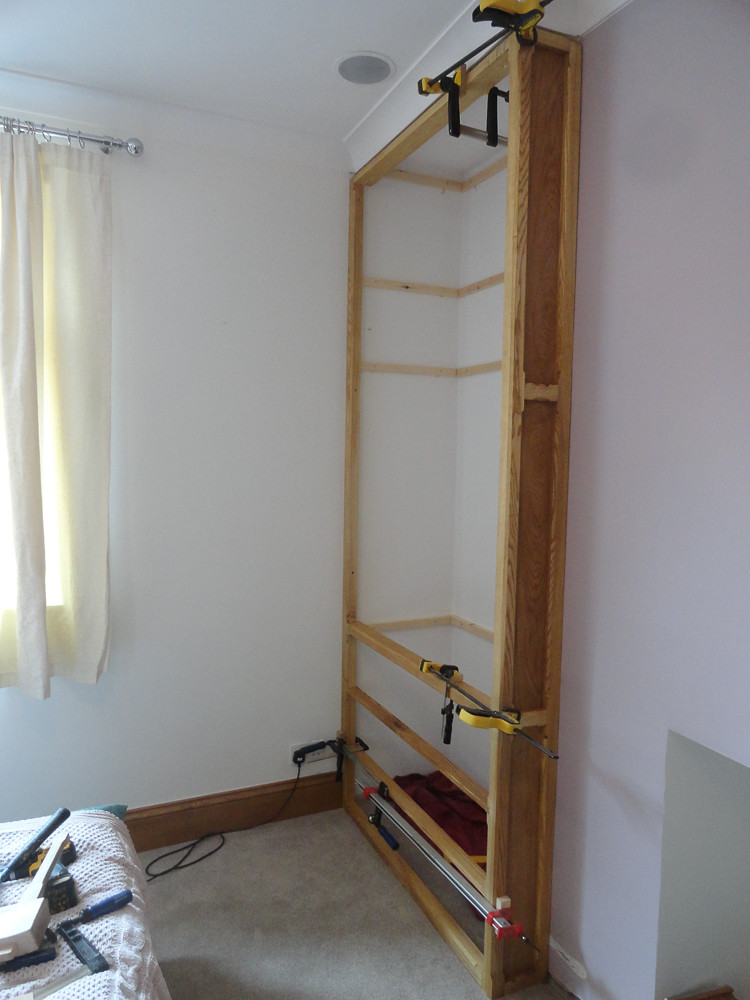
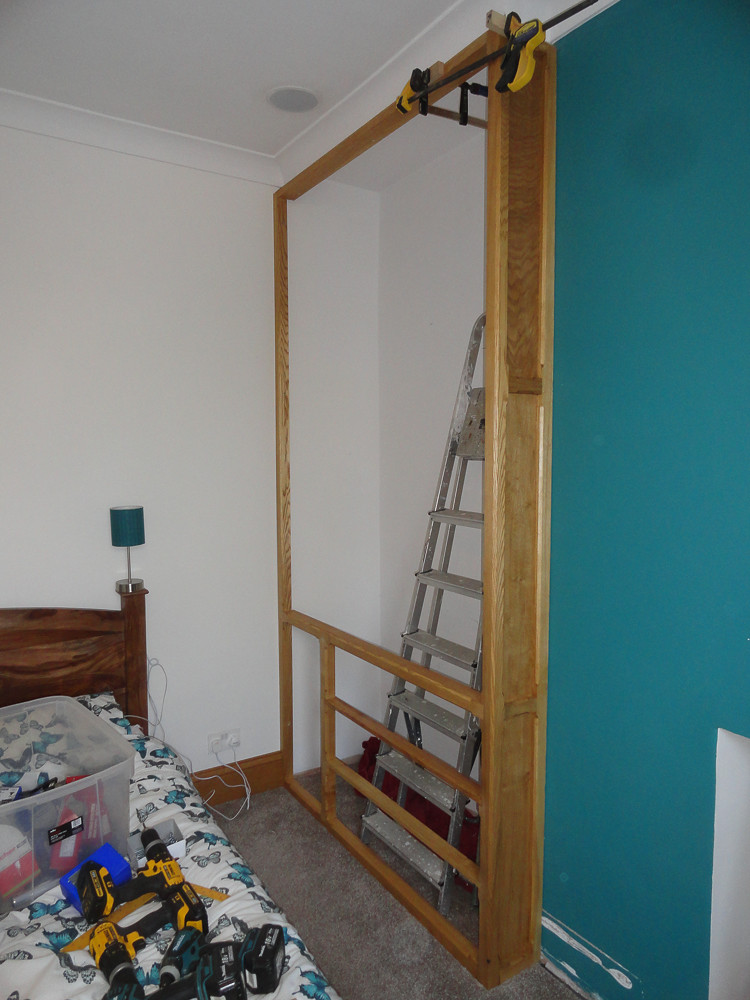
Ash frame in, leveled, straightened and glued:
 20150409-DSC00956.jpg by paulrockliffe, on Flickr
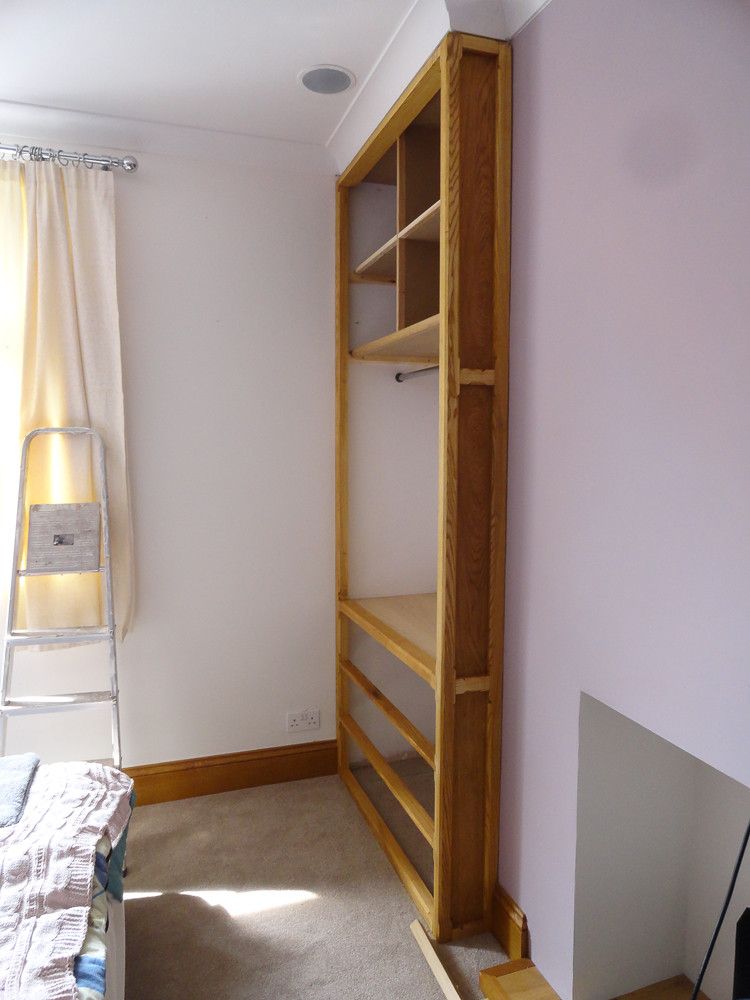
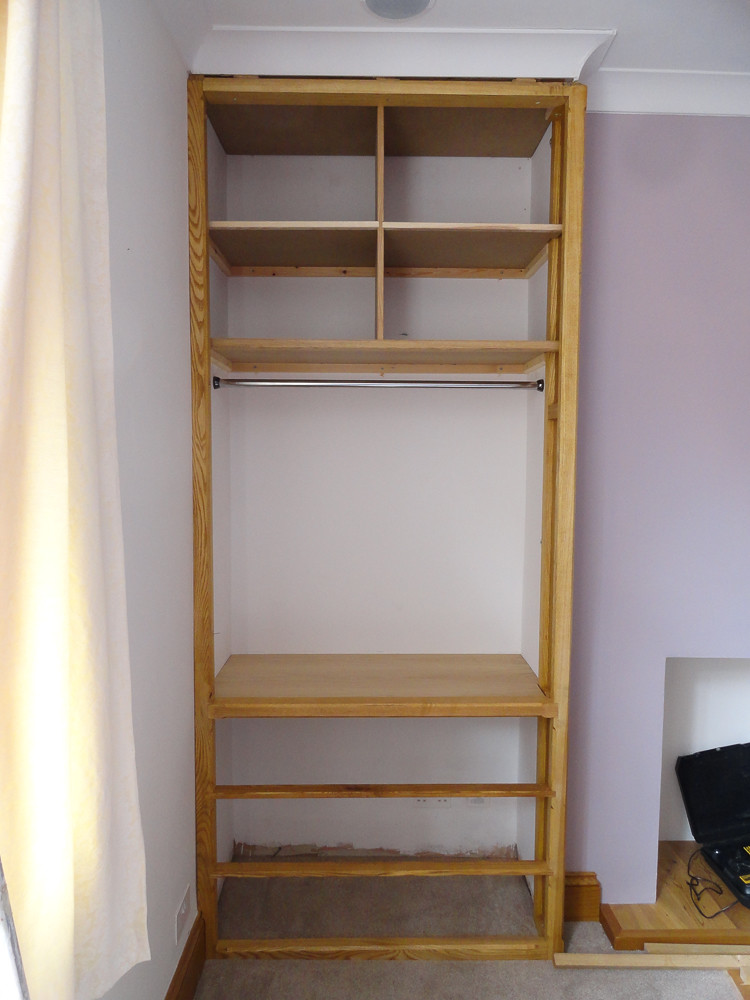
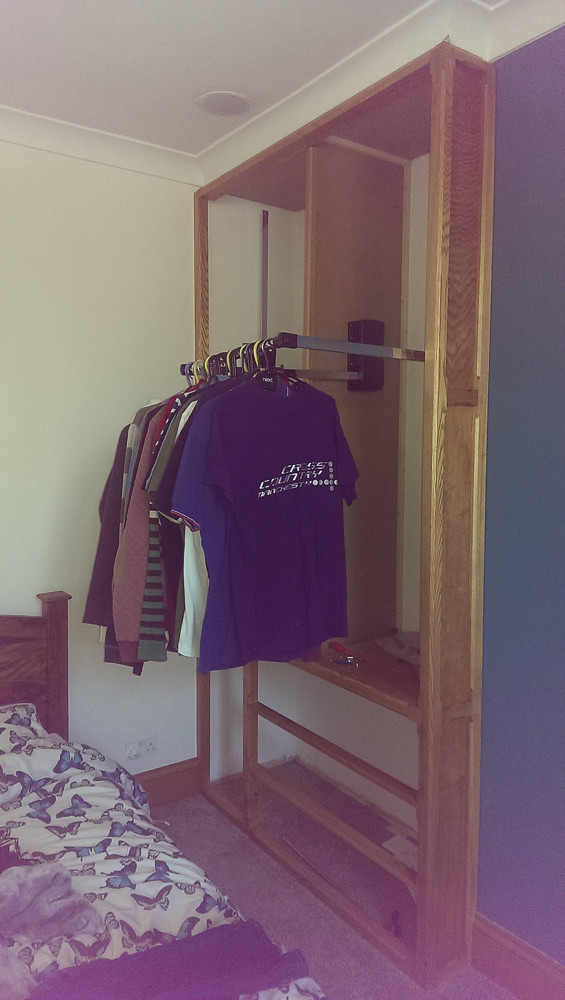
Ash fronted MDF shelving and clothes rail fitted:
 20150410-DSC00959.jpg by paulrockliffe, on Flickr
 20150410-DSC00960.jpg by paulrockliffe, on Flickr
Looks simple in the pictures, but this was days of work getting everything in, mainly because nothing is straight. How I would have loved to have made these free-standing so I could have ignored the bent walls!
Anyway, same again in our room:
 20150409-DSC00958.jpg by paulrockliffe, on Flickr
 20150409-DSC00957.jpg by paulrockliffe, on Flickr
Cantilever rails in, thanks to Mucher for the idea! THink these were sat under my bed for over a year!
 IMAG0053.jpg by paulrockliffe, on Flickr
All the rails in:
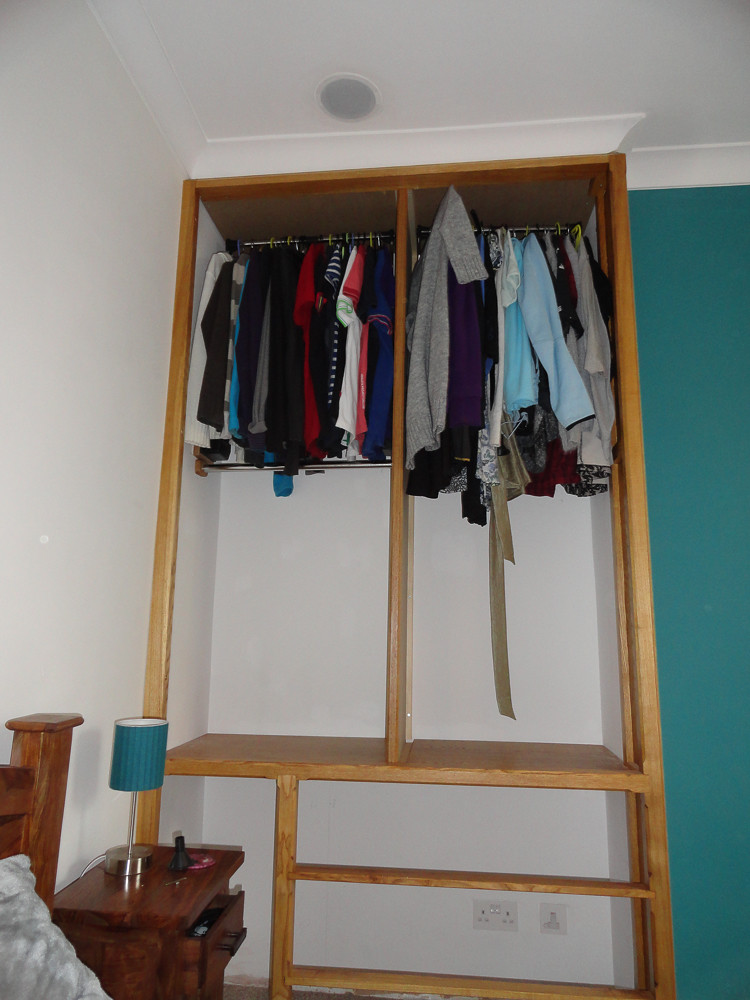 20150425-DSC00969.jpg by paulrockliffe, on Flickr
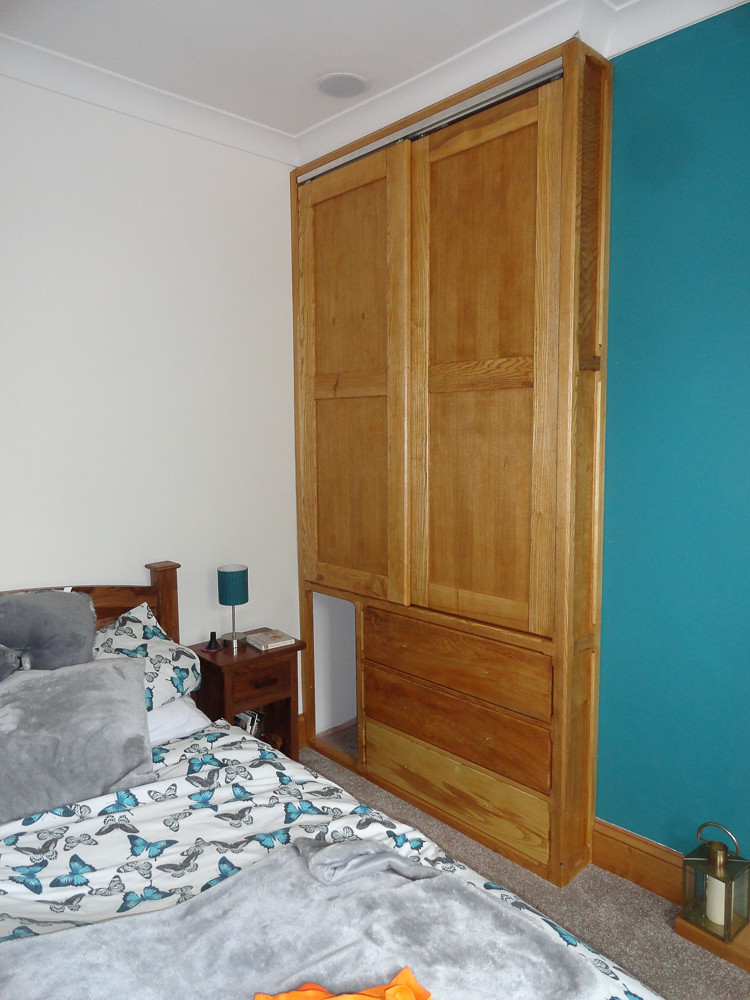
You'll notice the drawers don't run full width in our room, that's because the bed needs to face the window and then the bedside cabinet would interfere with the drawers. So the drawers stop and I have a space to fill. Ideas welcomed, I've still not resolved this. My best idea is to put a sloping floor on the bottom, face the space with a couple of ash boards and cut a hole at the top and a hole at the bottom. Clean socks are posted in at the top and then taken from the bottom hole. Can't get sign-off on this idea, even though it's genius. Might do it anyway, but if you have a better idea, shout up!
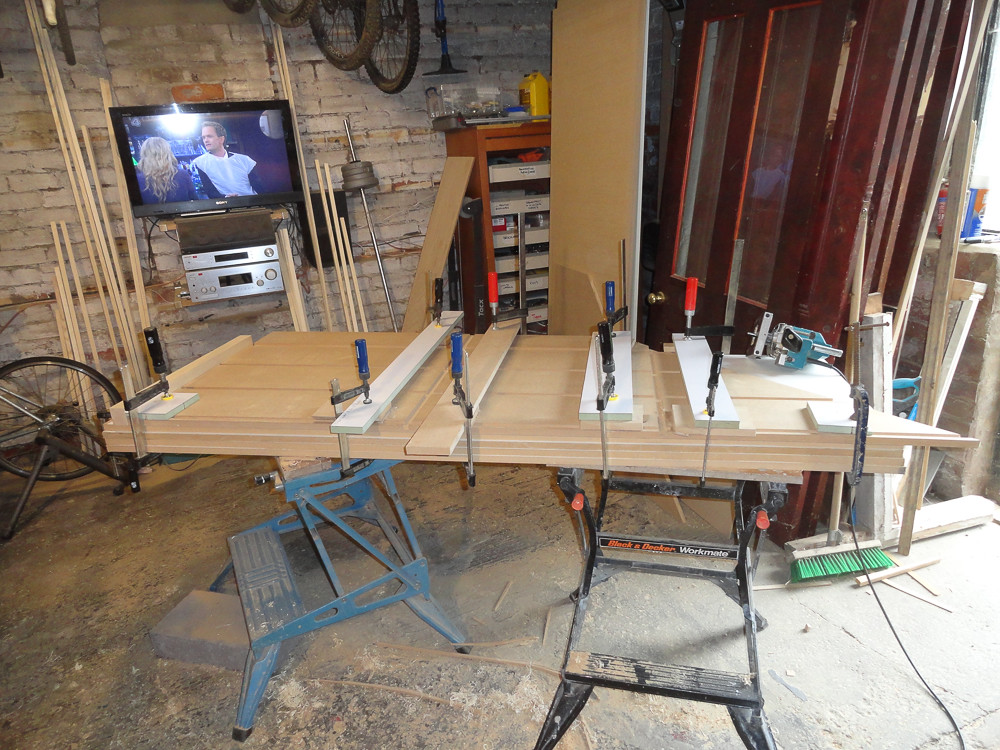
Next up, more hammer for the router table, batch cut a load of tenons:
 IMAG0044.jpg by paulrockliffe, on Flickr
I've never cut proper mortice and tenons before, but it ended up being fairly easy on the table.
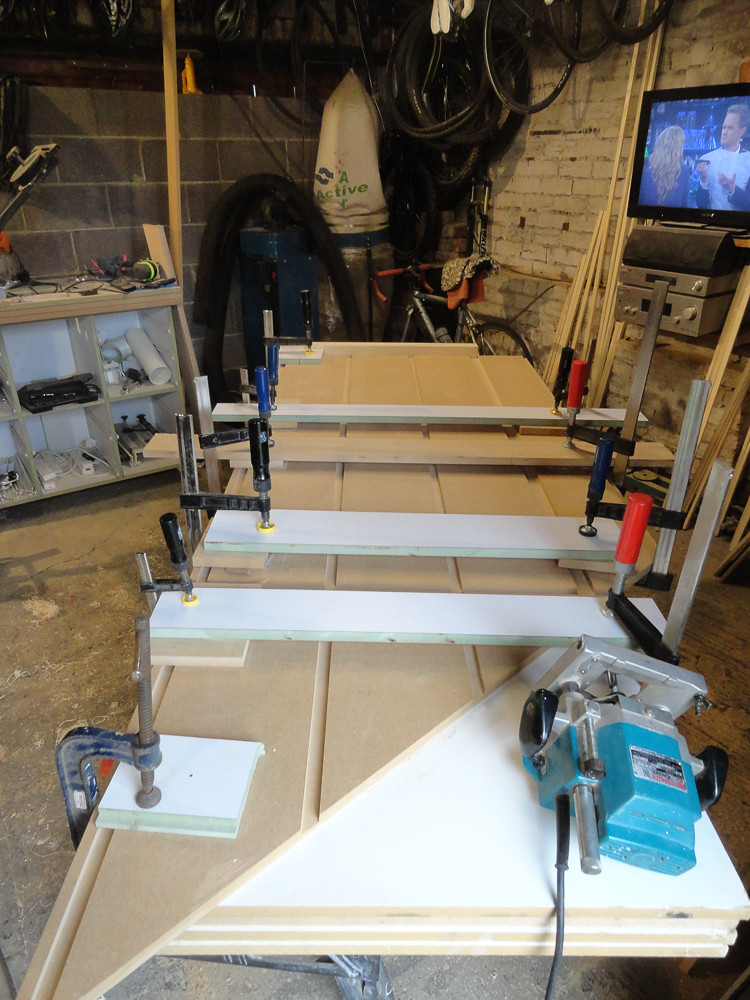
Mortices and grooving for panels done:
 IMAG0047.jpg by paulrockliffe, on Flickr
And four door frames constructed:
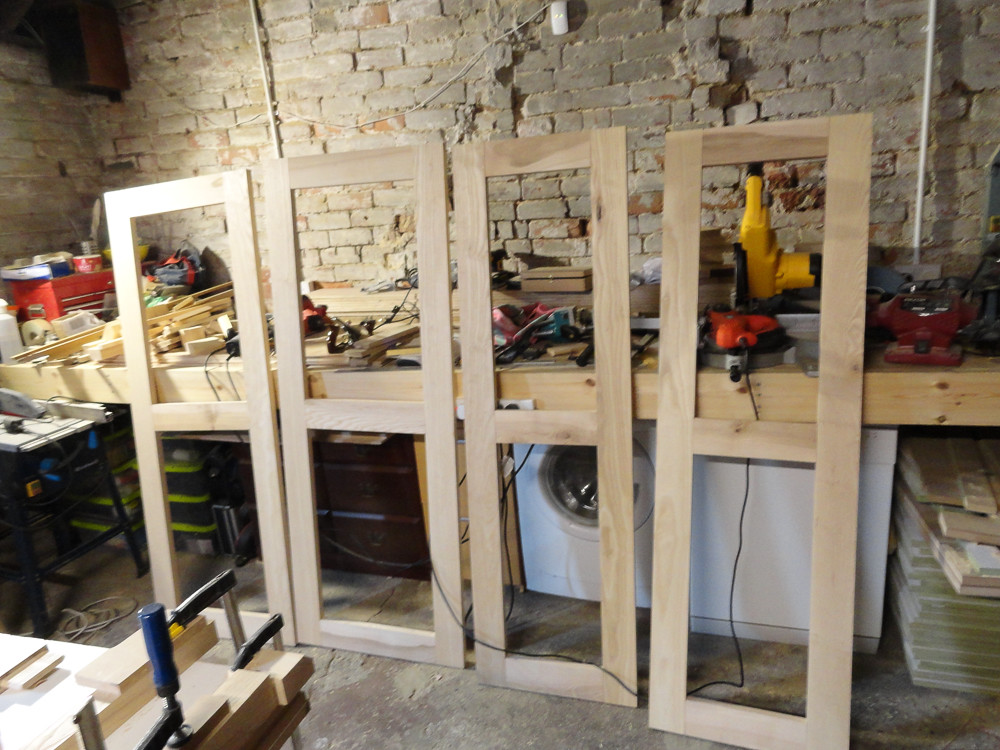 20150411-DSC00962.jpg by paulrockliffe, on Flickr
Panels and glued up:
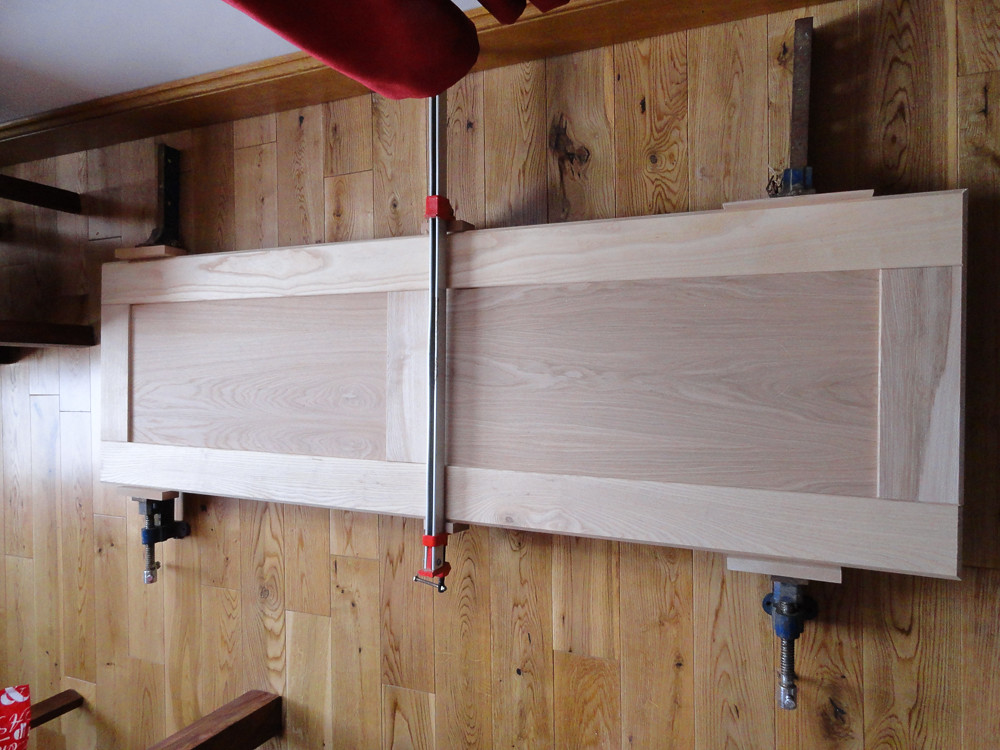 20150411-DSC00963.jpg by paulrockliffe, on Flickr
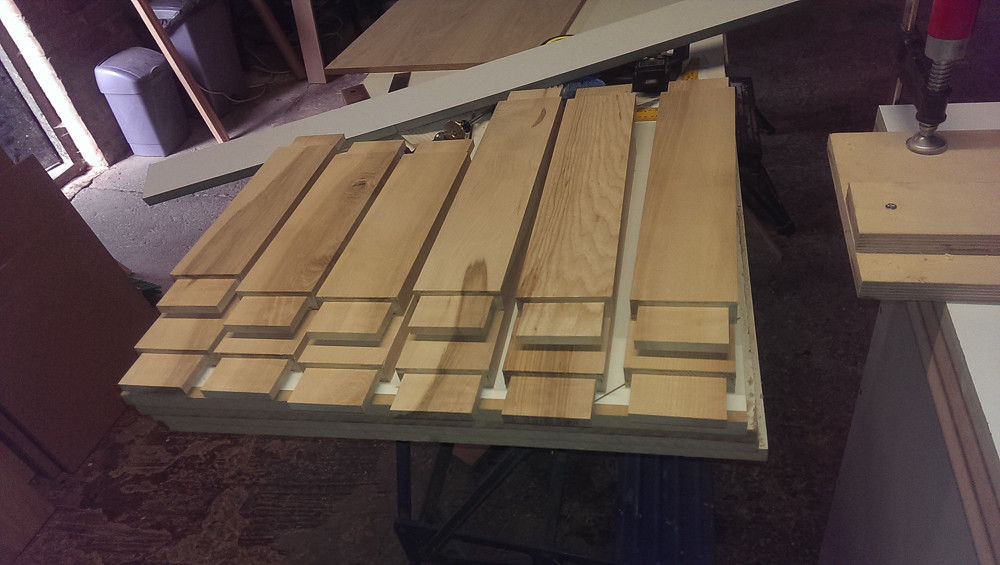
Plywood drawer boxes knocked up:
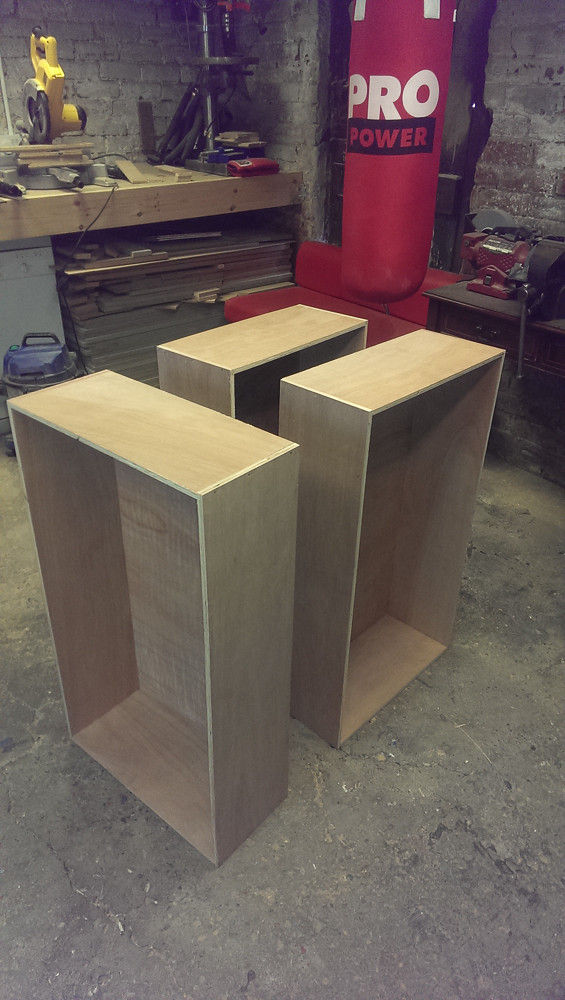 IMAG0086.jpg by paulrockliffe, on Flickr
Doors hung:
 20150412-DSC00967.jpg by paulrockliffe, on Flickr
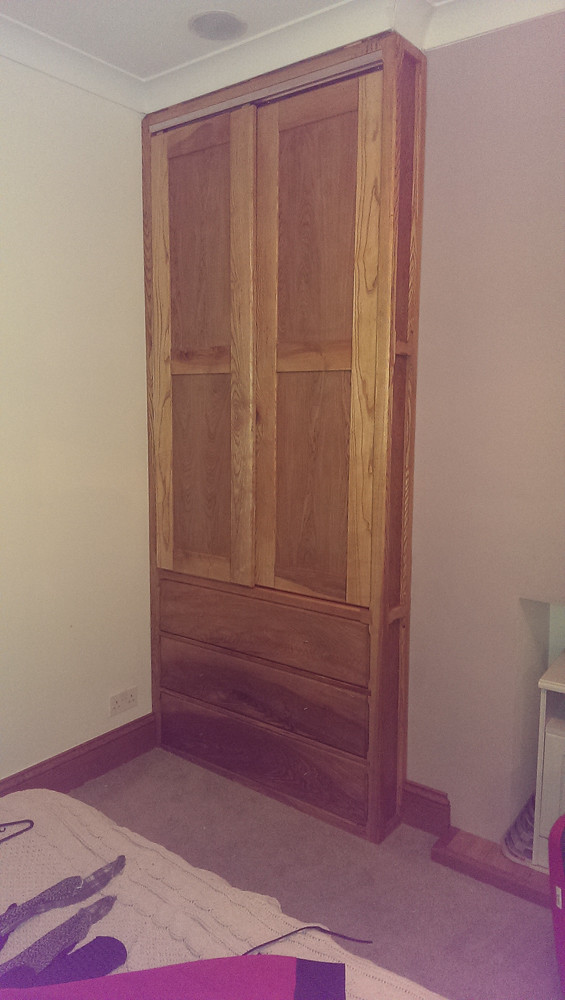
Drawers in, fronts on and vaguely finished:
 IMAG0077.jpg by paulrockliffe, on Flickr
 20150601-DSC00973.jpg by paulrockliffe, on Flickr
 20150601-DSC00974.jpg by paulrockliffe, on Flickr
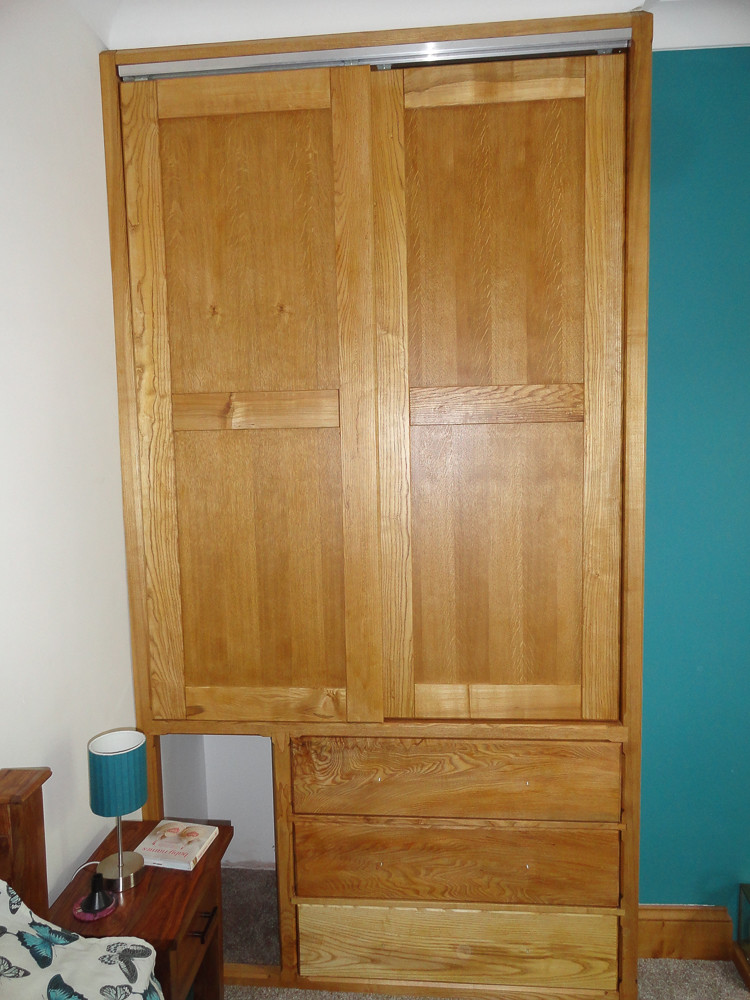
I need to order and fit some drawer knobs, there needs to be a panel fitted to cover the sliding tracks and I need to find a way of restraining the doors at the bottom as the supplied stuff looks awful. And that space is to fill with something.
Other than that, these have turned out really really well, they're the best thing I've done in the house by some way, though I'd hate to have to do them again!
Would be genuinely interested to know what any professionals would charge for similar, I know I'm not particularly quick, but I'd have to be charging thousands for these to make any sense!
We're a bit light on storage space and have too many clothes, so the plan was floor to ceiling in both large bedrooms, with double height rails in our room for maximum hanging space. The lower rails are at head height, with the bottoms filled with drawers.
So a huge pile of ash arrived one Friday evening:
20150320-DSC00929.jpg by paulrockliffe, on FlickrI knocked up a complicated and detailed design on the back of my workshop door:
IMAG0015.jpg by paulrockliffe, on FlickrAnd off we went!
The router table I built at Christmas came in very handy:
IMAG0043.jpg by paulrockliffe, on FlickrAnd by the end of the weekend we had a load of posts and stuff:
IMAG0014.jpg by paulrockliffe, on FlickrThe following weekend these slowly transformed from posts to bits, which were then stained and varnished by my Mum. These are the side panels which effectively deepen the alcoves in the rooms to give enough depth for the wardrobe:
20150408-DSC00947.jpg by paulrockliffe, on FlickrBattoning in the spare room:
20150408-DSC00952.jpg by paulrockliffe, on FlickrAsh frame in, leveled, straightened and glued:
20150409-DSC00956.jpg by paulrockliffe, on FlickrAsh fronted MDF shelving and clothes rail fitted:
20150410-DSC00959.jpg by paulrockliffe, on Flickr20150410-DSC00960.jpg by paulrockliffe, on FlickrLooks simple in the pictures, but this was days of work getting everything in, mainly because nothing is straight. How I would have loved to have made these free-standing so I could have ignored the bent walls!
Anyway, same again in our room:
20150409-DSC00958.jpg by paulrockliffe, on Flickr20150409-DSC00957.jpg by paulrockliffe, on FlickrCantilever rails in, thanks to Mucher for the idea! THink these were sat under my bed for over a year!
IMAG0053.jpg by paulrockliffe, on FlickrAll the rails in:
20150425-DSC00969.jpg by paulrockliffe, on FlickrYou'll notice the drawers don't run full width in our room, that's because the bed needs to face the window and then the bedside cabinet would interfere with the drawers. So the drawers stop and I have a space to fill. Ideas welcomed, I've still not resolved this. My best idea is to put a sloping floor on the bottom, face the space with a couple of ash boards and cut a hole at the top and a hole at the bottom. Clean socks are posted in at the top and then taken from the bottom hole. Can't get sign-off on this idea, even though it's genius. Might do it anyway, but if you have a better idea, shout up!
Next up, more hammer for the router table, batch cut a load of tenons:
IMAG0044.jpg by paulrockliffe, on FlickrI've never cut proper mortice and tenons before, but it ended up being fairly easy on the table.
Mortices and grooving for panels done:
IMAG0047.jpg by paulrockliffe, on FlickrAnd four door frames constructed:
20150411-DSC00962.jpg by paulrockliffe, on FlickrPanels and glued up:
20150411-DSC00963.jpg by paulrockliffe, on FlickrPlywood drawer boxes knocked up:
IMAG0086.jpg by paulrockliffe, on FlickrDoors hung:
20150412-DSC00967.jpg by paulrockliffe, on FlickrDrawers in, fronts on and vaguely finished:
IMAG0077.jpg by paulrockliffe, on Flickr20150601-DSC00973.jpg by paulrockliffe, on Flickr20150601-DSC00974.jpg by paulrockliffe, on FlickrI need to order and fit some drawer knobs, there needs to be a panel fitted to cover the sliding tracks and I need to find a way of restraining the doors at the bottom as the supplied stuff looks awful. And that space is to fill with something.
Other than that, these have turned out really really well, they're the best thing I've done in the house by some way, though I'd hate to have to do them again!
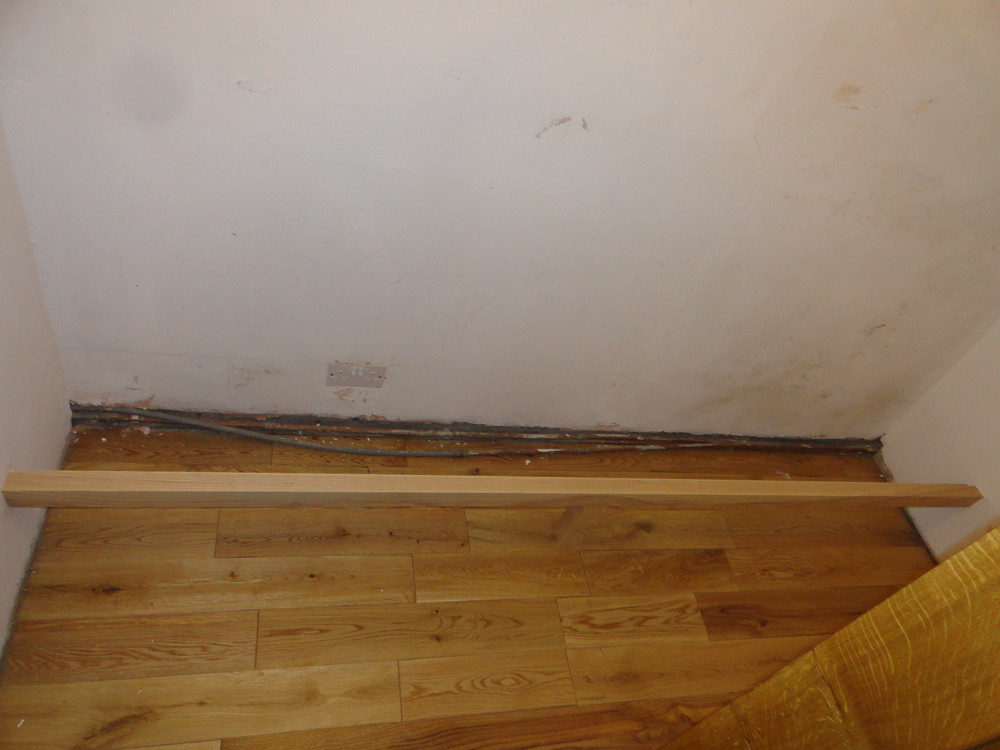
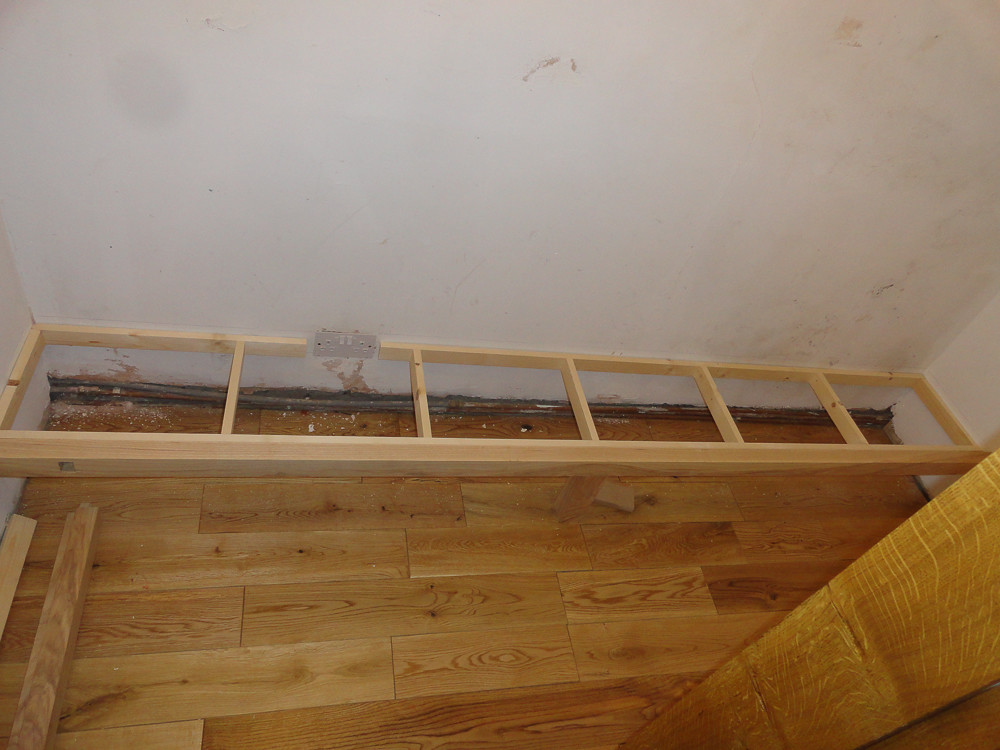
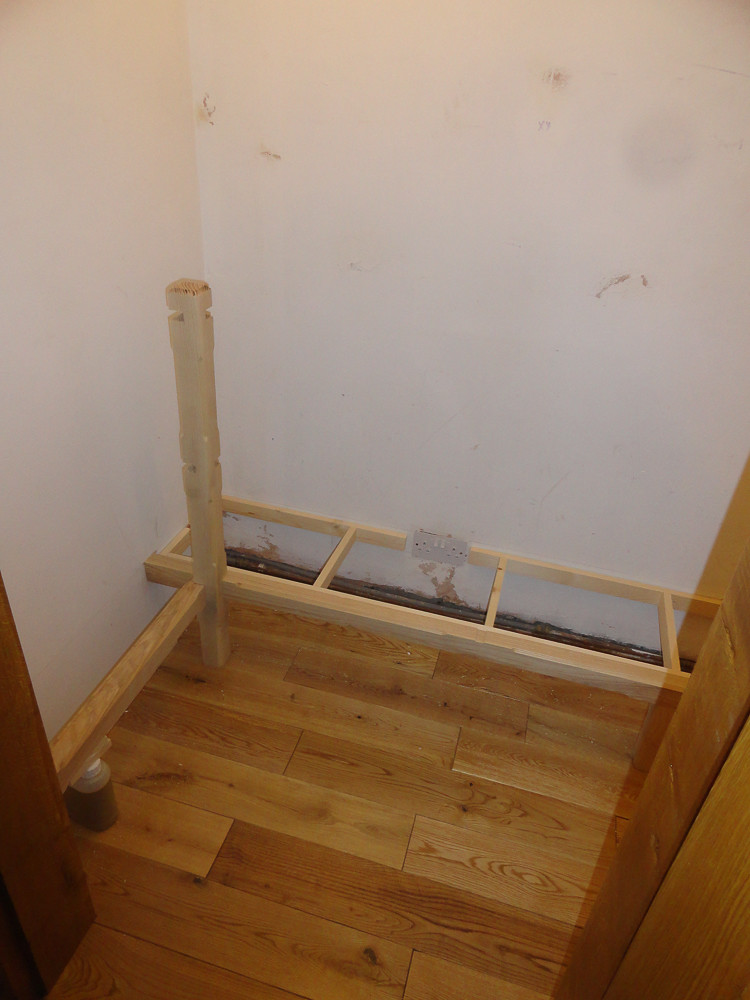
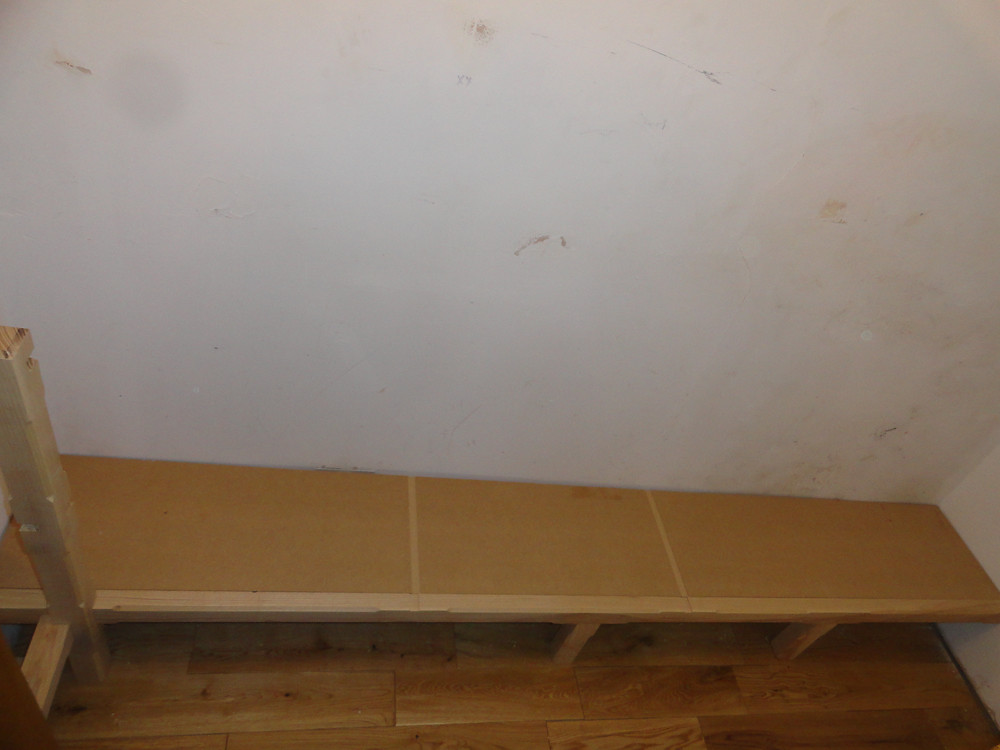
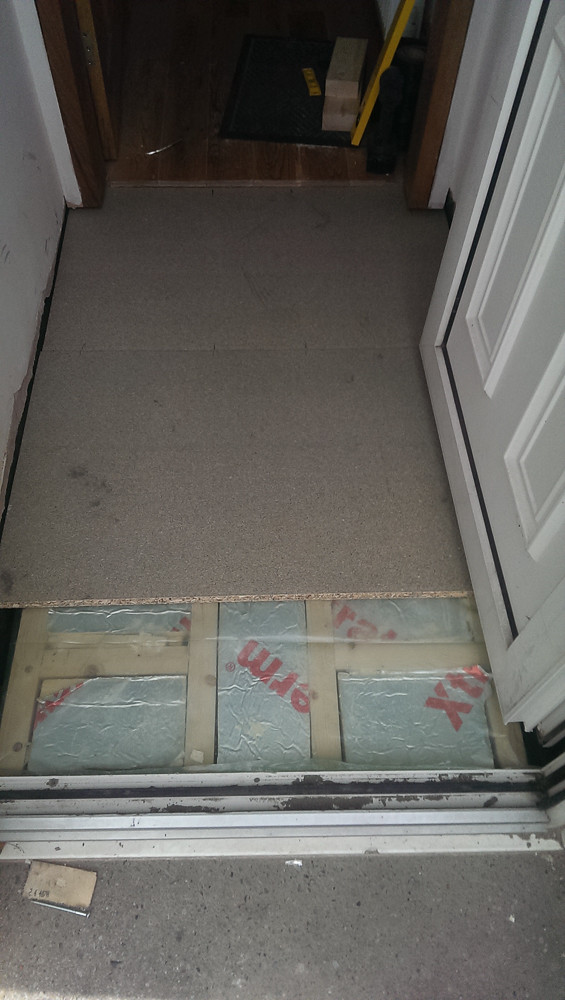
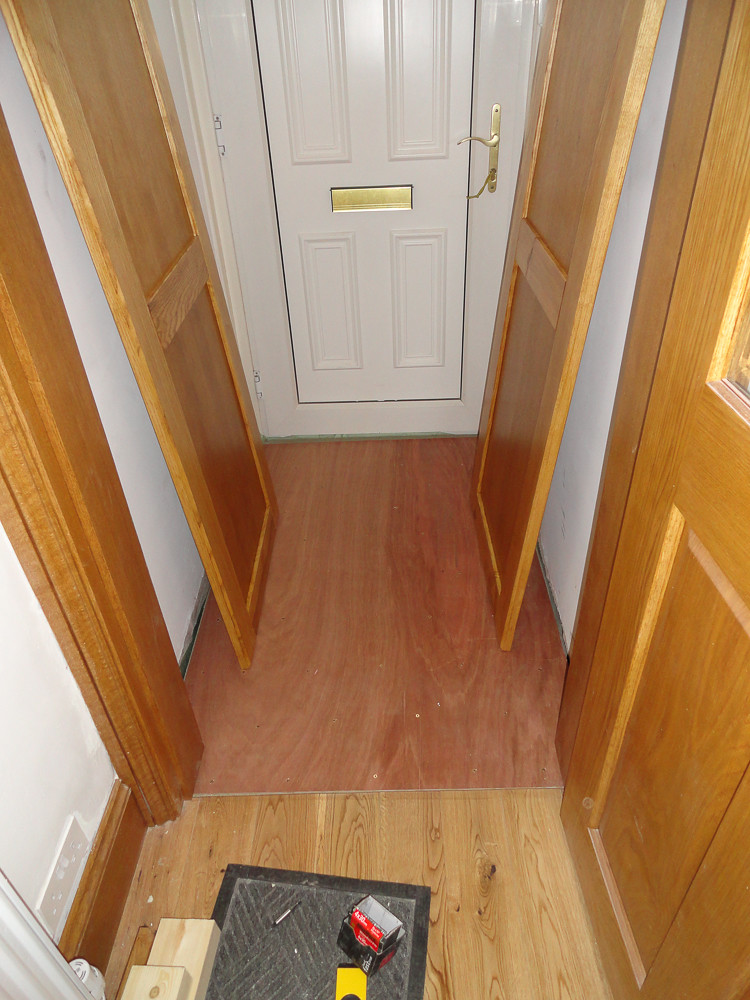
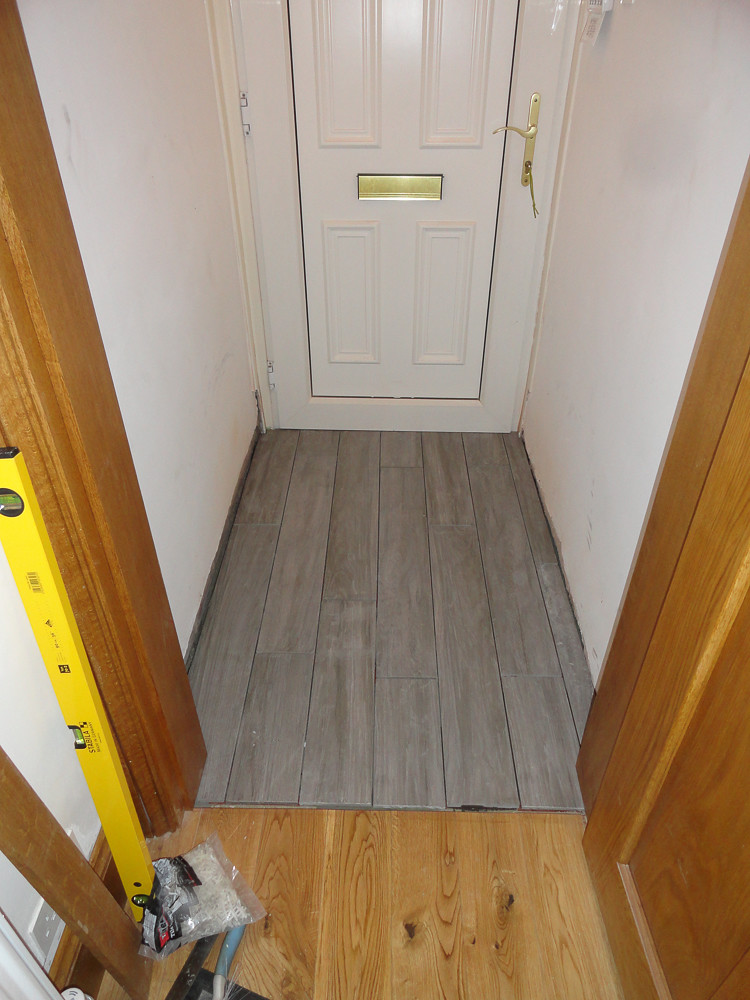
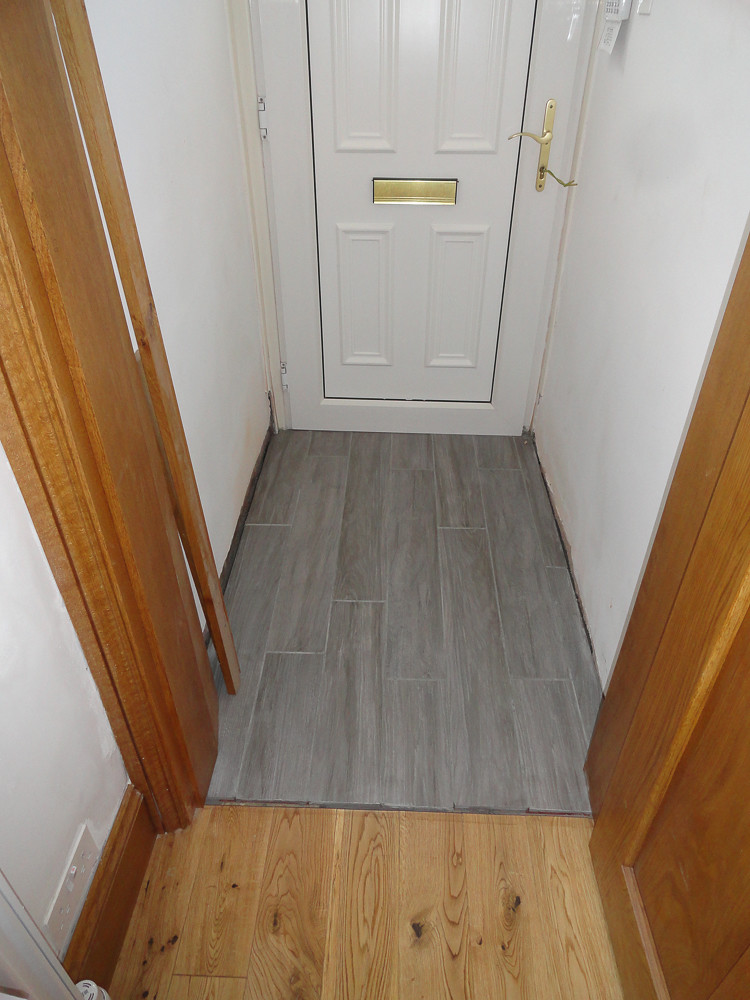
The last 'proper' job in the house was to sort out the front hallway, I've done the floor, but there's still a glass panel, a door knob and some wood work to sort out. The floor was OK, we thought, but then a load of damp came through the floor and I decided to rip it up and start again.
Tiles, concrete, rubbled, several wheel barrow loads and we were down to bear earth. Two strip foundations in and levelled, then suspended floor on top, insulated, 18mm chipboard and 12mm ply over the top. Tiles to match the kitchen, grouted and done:
 IMAG0092.jpg by paulrockliffe, on Flickr
 20150524-DSC00970.jpg by paulrockliffe, on Flickr
 20150525-DSC00971.jpg by paulrockliffe, on Flickr
 20150601-DSC00972.jpg by paulrockliffe, on Flickr
Tiles, concrete, rubbled, several wheel barrow loads and we were down to bear earth. Two strip foundations in and levelled, then suspended floor on top, insulated, 18mm chipboard and 12mm ply over the top. Tiles to match the kitchen, grouted and done:
IMAG0092.jpg by paulrockliffe, on Flickr20150524-DSC00970.jpg by paulrockliffe, on Flickr20150525-DSC00971.jpg by paulrockliffe, on Flickr20150601-DSC00972.jpg by paulrockliffe, on FlickrWhen we re-wired, we had a couple of strip lights put in the workshop. Unfortunately there was a fault with one of the fittings that caused it to melt itself a bit, so I've been running off one light for ages. A while ago I picked up the lights from a barbers shop refit, but hadn't had time to do anything with them. I was relying on one of those cheapo site halogen light things, but that was blowing bulbs every five minutes, so I finally 'invested' some time in my shed.
MDF frames for the reflectors to sit in, with the light units then sat on the frame edge. Suspended from the purlins with some coated steel wire. Wires all run back to a junction box and connected to the wire that did go to the old light fitting:
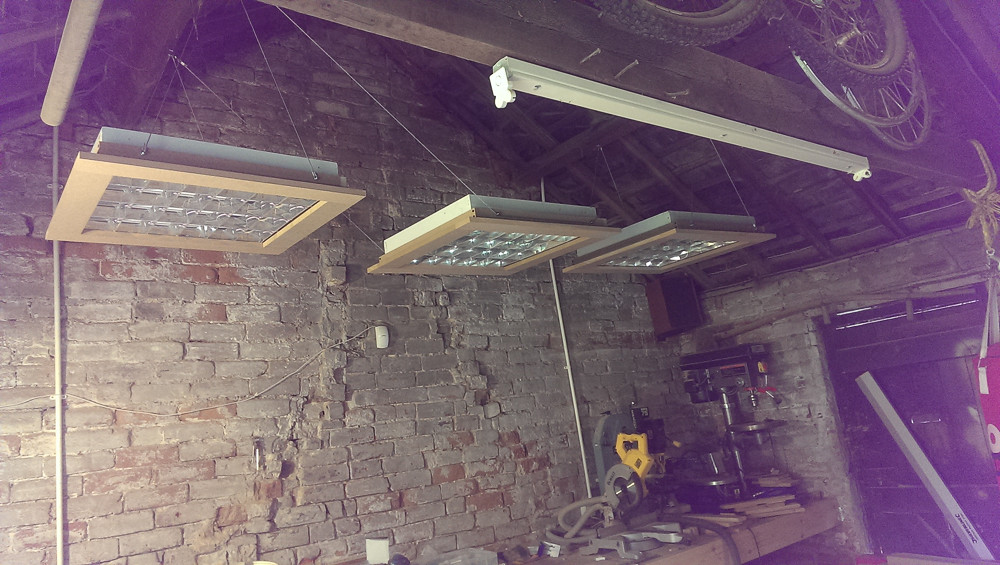 IMAG0082.jpg by paulrockliffe, on Flickr
These are pretty bright:
 IMAG0083.jpg by paulrockliffe, on Flickr
There are supposed to be 6 of these, but I dropped one frame and broke it. not had time to repair. And I've run out of cable to wire it in with. But 5 is adequate for now. Eventually the line of three will be moved to the next bay down and be replaced by a mezzanine floor (storage) with the spotlights from the barbers fitted instead.
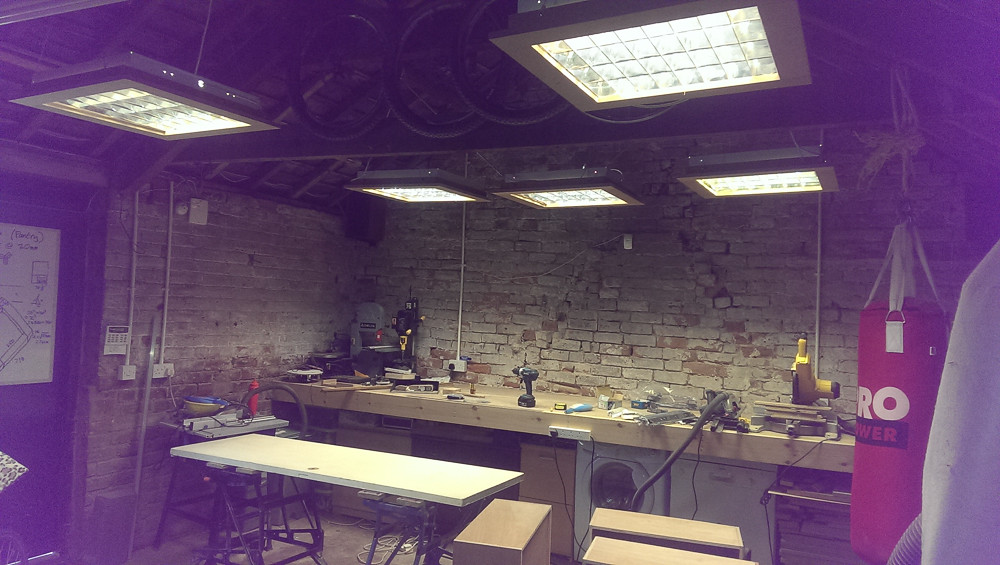 IMAG0085.jpg by paulrockliffe, on Flickr
Has made a huge difference! Only 'issue' with them is that they're all emergency lights, they should be wired with a permanent live as they think the power is off when I turn them off, so the emergency lights fire. No big deal.
MDF frames for the reflectors to sit in, with the light units then sat on the frame edge. Suspended from the purlins with some coated steel wire. Wires all run back to a junction box and connected to the wire that did go to the old light fitting:
IMAG0082.jpg by paulrockliffe, on FlickrThese are pretty bright:
IMAG0083.jpg by paulrockliffe, on FlickrThere are supposed to be 6 of these, but I dropped one frame and broke it. not had time to repair. And I've run out of cable to wire it in with. But 5 is adequate for now. Eventually the line of three will be moved to the next bay down and be replaced by a mezzanine floor (storage) with the spotlights from the barbers fitted instead.
IMAG0085.jpg by paulrockliffe, on FlickrHas made a huge difference! Only 'issue' with them is that they're all emergency lights, they should be wired with a permanent live as they think the power is off when I turn them off, so the emergency lights fire. No big deal.
paulrockliffe said:
Next up was a couple of wardrobes. I know everything always takes longer than you think, but this job took the piss massively. Me and my Dad spent a three day weekend, then 9 days straight on them, proper man days too. Then I've spent god knows how long fitting drawers to them.
Would be genuinely interested to know what any professionals would charge for similar, I know I'm not particularly quick, but I'd have to be charging thousands for these to make any sense!
We're a bit light on storage space and have too many clothes, so the plan was floor to ceiling in both large bedrooms, with double height rails in our room for maximum hanging space. The lower rails are at head height, with the bottoms filled with drawers.
So a huge pile of ash arrived one Friday evening:
20150320-DSC00929.jpg by paulrockliffe, on Flickr
I knocked up a complicated and detailed design on the back of my workshop door:
IMAG0015.jpg by paulrockliffe, on Flickr
And off we went!
The router table I built at Christmas came in very handy:
IMAG0043.jpg by paulrockliffe, on Flickr
And by the end of the weekend we had a load of posts and stuff:
IMAG0014.jpg by paulrockliffe, on Flickr
The following weekend these slowly transformed from posts to bits, which were then stained and varnished by my Mum. These are the side panels which effectively deepen the alcoves in the rooms to give enough depth for the wardrobe:
20150408-DSC00947.jpg by paulrockliffe, on Flickr
Battoning in the spare room:
20150408-DSC00952.jpg by paulrockliffe, on Flickr
Ash frame in, leveled, straightened and glued:
20150409-DSC00956.jpg by paulrockliffe, on Flickr
Ash fronted MDF shelving and clothes rail fitted:
20150410-DSC00959.jpg by paulrockliffe, on Flickr
20150410-DSC00960.jpg by paulrockliffe, on Flickr
Looks simple in the pictures, but this was days of work getting everything in, mainly because nothing is straight. How I would have loved to have made these free-standing so I could have ignored the bent walls!
Anyway, same again in our room:
20150409-DSC00958.jpg by paulrockliffe, on Flickr
20150409-DSC00957.jpg by paulrockliffe, on Flickr
Cantilever rails in, thanks to Mucher for the idea! THink these were sat under my bed for over a year!
IMAG0053.jpg by paulrockliffe, on Flickr
All the rails in:
20150425-DSC00969.jpg by paulrockliffe, on Flickr
You'll notice the drawers don't run full width in our room, that's because the bed needs to face the window and then the bedside cabinet would interfere with the drawers. So the drawers stop and I have a space to fill. Ideas welcomed, I've still not resolved this. My best idea is to put a sloping floor on the bottom, face the space with a couple of ash boards and cut a hole at the top and a hole at the bottom. Clean socks are posted in at the top and then taken from the bottom hole. Can't get sign-off on this idea, even though it's genius. Might do it anyway, but if you have a better idea, shout up!
Next up, more hammer for the router table, batch cut a load of tenons:
IMAG0044.jpg by paulrockliffe, on Flickr
I've never cut proper mortice and tenons before, but it ended up being fairly easy on the table.
Mortices and grooving for panels done:
IMAG0047.jpg by paulrockliffe, on Flickr
And four door frames constructed:
20150411-DSC00962.jpg by paulrockliffe, on Flickr
Panels and glued up:
20150411-DSC00963.jpg by paulrockliffe, on Flickr
Plywood drawer boxes knocked up:
IMAG0086.jpg by paulrockliffe, on Flickr
Doors hung:
20150412-DSC00967.jpg by paulrockliffe, on Flickr
Drawers in, fronts on and vaguely finished:
IMAG0077.jpg by paulrockliffe, on Flickr
20150601-DSC00973.jpg by paulrockliffe, on Flickr
20150601-DSC00974.jpg by paulrockliffe, on Flickr
I need to order and fit some drawer knobs, there needs to be a panel fitted to cover the sliding tracks and I need to find a way of restraining the doors at the bottom as the supplied stuff looks awful. And that space is to fill with something.
Other than that, these have turned out really really well, they're the best thing I've done in the house by some way, though I'd hate to have to do them again!
Good work. We recently removed some similar fitted wardrobes, they took some dismantling. We'll be replacing them with freestanding ones. Would be genuinely interested to know what any professionals would charge for similar, I know I'm not particularly quick, but I'd have to be charging thousands for these to make any sense!
We're a bit light on storage space and have too many clothes, so the plan was floor to ceiling in both large bedrooms, with double height rails in our room for maximum hanging space. The lower rails are at head height, with the bottoms filled with drawers.
So a huge pile of ash arrived one Friday evening:
20150320-DSC00929.jpg by paulrockliffe, on FlickrI knocked up a complicated and detailed design on the back of my workshop door:
IMAG0015.jpg by paulrockliffe, on FlickrAnd off we went!
The router table I built at Christmas came in very handy:
IMAG0043.jpg by paulrockliffe, on FlickrAnd by the end of the weekend we had a load of posts and stuff:
IMAG0014.jpg by paulrockliffe, on FlickrThe following weekend these slowly transformed from posts to bits, which were then stained and varnished by my Mum. These are the side panels which effectively deepen the alcoves in the rooms to give enough depth for the wardrobe:
20150408-DSC00947.jpg by paulrockliffe, on FlickrBattoning in the spare room:
20150408-DSC00952.jpg by paulrockliffe, on FlickrAsh frame in, leveled, straightened and glued:
20150409-DSC00956.jpg by paulrockliffe, on FlickrAsh fronted MDF shelving and clothes rail fitted:
20150410-DSC00959.jpg by paulrockliffe, on Flickr20150410-DSC00960.jpg by paulrockliffe, on FlickrLooks simple in the pictures, but this was days of work getting everything in, mainly because nothing is straight. How I would have loved to have made these free-standing so I could have ignored the bent walls!
Anyway, same again in our room:
20150409-DSC00958.jpg by paulrockliffe, on Flickr20150409-DSC00957.jpg by paulrockliffe, on FlickrCantilever rails in, thanks to Mucher for the idea! THink these were sat under my bed for over a year!
IMAG0053.jpg by paulrockliffe, on FlickrAll the rails in:
20150425-DSC00969.jpg by paulrockliffe, on FlickrYou'll notice the drawers don't run full width in our room, that's because the bed needs to face the window and then the bedside cabinet would interfere with the drawers. So the drawers stop and I have a space to fill. Ideas welcomed, I've still not resolved this. My best idea is to put a sloping floor on the bottom, face the space with a couple of ash boards and cut a hole at the top and a hole at the bottom. Clean socks are posted in at the top and then taken from the bottom hole. Can't get sign-off on this idea, even though it's genius. Might do it anyway, but if you have a better idea, shout up!
Next up, more hammer for the router table, batch cut a load of tenons:
IMAG0044.jpg by paulrockliffe, on FlickrI've never cut proper mortice and tenons before, but it ended up being fairly easy on the table.
Mortices and grooving for panels done:
IMAG0047.jpg by paulrockliffe, on FlickrAnd four door frames constructed:
20150411-DSC00962.jpg by paulrockliffe, on FlickrPanels and glued up:
20150411-DSC00963.jpg by paulrockliffe, on FlickrPlywood drawer boxes knocked up:
IMAG0086.jpg by paulrockliffe, on FlickrDoors hung:
20150412-DSC00967.jpg by paulrockliffe, on FlickrDrawers in, fronts on and vaguely finished:
IMAG0077.jpg by paulrockliffe, on Flickr20150601-DSC00973.jpg by paulrockliffe, on Flickr20150601-DSC00974.jpg by paulrockliffe, on FlickrI need to order and fit some drawer knobs, there needs to be a panel fitted to cover the sliding tracks and I need to find a way of restraining the doors at the bottom as the supplied stuff looks awful. And that space is to fill with something.
Other than that, these have turned out really really well, they're the best thing I've done in the house by some way, though I'd hate to have to do them again!
The rest of the work looks really good too, I'm slightly jealous of your workshop too, must make a lot of these jobs easier.
Craikeybaby said:
Good work. We recently removed some similar fitted wardrobes, they took some dismantling. We'll be replacing them with freestanding ones.
The rest of the work looks really good too, I'm slightly jealous of your workshop too, must make a lot of these jobs easier.
Cheers, having spent months putting those together I can see the appeal with the freestanding ones! The rest of the work looks really good too, I'm slightly jealous of your workshop too, must make a lot of these jobs easier.
Wasn't sure how best to approach these as bespoke is cheaper (these were £400 each roughly), but takes a lot more time. Ready made stuff wouldn't have got as much stuff in as no one does them 2.7m tall.
I could have made bespoke freestanders to fully utilise the space still, would have been much quicker and easier to construct, but the material cost would be much higher, I'd guess getting on to £1k each.
The workshop is awesome, yeah makes things much much easier. There's a bin full of sawdust that would have been spread around the house just doing the wardrobes if I didn't have somewhere proper to work. Mind you it has meant a lot of carrying in and out of the house! The next big job I have lined up is sorting out the workshop; I'm knocking the garage wall out to open up the space, new floor and some work benches to start off with.
Gassing Station | Homes, Gardens and DIY | Top of Page | What's New | My Stuff