Ceiling light wiring help
Discussion


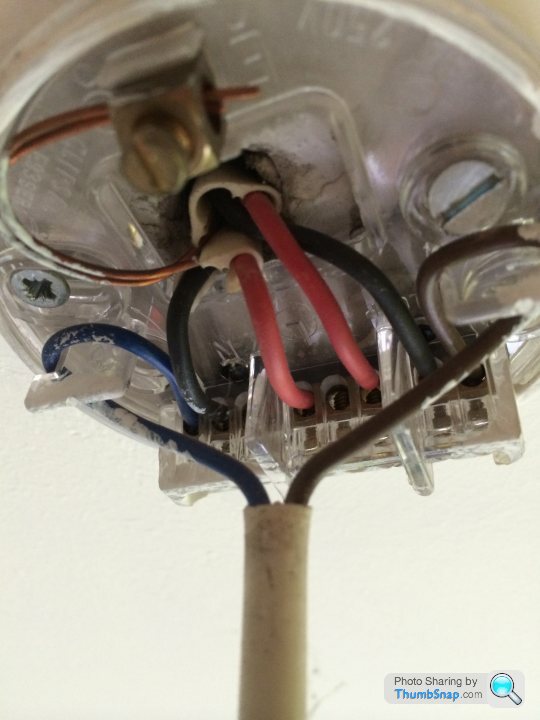
I've just bought a new ceiling light and was hoping it would be a simple installation - disconnect then reconnect the wires, but when I unscrewed the existing pendant cover, I saw this which has confused me - specifically the two red wires:
These are the instructions for connecting the new light, but obviously they assume there are only 3 or 4 wires:

I'm obviously wary of putting more than one wire into a single connector block. Can anyone offer any advice, based on the pictures above?
As you will have realised, electrics is not my DIY strong suit!
Thanks
These are the instructions for connecting the new light, but obviously they assume there are only 3 or 4 wires:
I'm obviously wary of putting more than one wire into a single connector block. Can anyone offer any advice, based on the pictures above?
As you will have realised, electrics is not my DIY strong suit!
Thanks
The row of three connectors are (l to r)
Neutral- permanent live- switched live(should be sleeved red)
Connect your new light to the neutral (blue flex)and switched live(brown flex) terminals.(these flexible cables will be removed with you old fitting)
If your light fitting has an earth connection required terminate into the bare conductor terminal ( should be sleeved green/yellow)
NOTE - unless you turn off the lighting circuit mcb (trip) at your consumer unit the red wires WILL BE LIVE
Turn your lights on, then trip the mcb's in your consumer unit until the light goes off, then check its dead with an electrical tester.
Welcome to a thing called the Ring Main! Most of the wires simply use the connector as a meeting place and go off to do other things. What interests you is the two that connect to the current light (the blue and brown ones hanging down). Those are the two you need. If you're keeping the ceiling fitting it should be an easy swap; use the connectors already there.
I think you might be over thinking this one. 
If you are going to remove/replace the existing ceiling rose base then you're going to need 4 connectors, not the three shown in the instructions pictures, although the table above does mention 'loop' which in this case would be the red wires.
1 for earths
1 for the two reds
1 for black + blue wire from light fitting
1 for black + brown wire from light fitting
Pretty much exactly as it is at the moment.
Simpo Two said:
Welcome to a thing called the Ring Main! Most of the wires simply use the connector as a meeting place and go off to do other things. What interests you is the two that connect to the current light (the blue and brown ones hanging down). Those are the two you need. If you're keeping the ceiling fitting it should be an easy swap; use the connectors already there.
There is no ring main in the ceiling rose the Op has posted.I was just coming here to ask pretty much the same question, I want to take the ceiling rose off and put on a an entirely new fitting, my ceiling rose is the same as the one above, except for the fact that there are 3 red and 3 black wires coming out of the hole in the ceiling, two red were twisted together and two black were twisted together and then the two reds were in one part of the strip, one wire on its own and the same with the two and one black wires.
So my problem is that I am trying to get 3 wires into the new connector block on the light fitting where there is only room for one.
The connector block is attached to the new light fitting with all the light's wire already pre attached.
So, how do I get three into one please?
So my problem is that I am trying to get 3 wires into the new connector block on the light fitting where there is only room for one.
The connector block is attached to the new light fitting with all the light's wire already pre attached.
So, how do I get three into one please?
speedchick said:
I was just coming here to ask pretty much the same question, I want to take the ceiling rose off and put on a an entirely new fitting, my ceiling rose is the same as the one above, except for the fact that there are 3 red and 3 black wires coming out of the hole in the ceiling, two red were twisted together and two black were twisted together and then the two reds were in one part of the strip, one wire on its own and the same with the two and one black wires.
So my problem is that I am trying to get 3 wires into the new connector block on the light fitting where there is only room for one.
The connector block is attached to the new light fitting with all the light's wire already pre attached.
So, how do I get three into one please?
There's an art to getting it all in. Just needs very strong fingers and a bit of practice. If there is really not enough room, so that one wire takes up almost all of the available room then find a local sparks to sort it out. The niceic website will tell you where the nearest one lives.So my problem is that I am trying to get 3 wires into the new connector block on the light fitting where there is only room for one.
The connector block is attached to the new light fitting with all the light's wire already pre attached.
So, how do I get three into one please?
spikeyhead said:
There's an art to getting it all in. Just needs very strong fingers and a bit of practice. If there is really not enough room, so that one wire takes up almost all of the available room then find a local sparks to sort it out. The niceic website will tell you where the nearest one lives.
Thank you, will fit the rose back and ask around a few of the sparks that come into work next week. I don't think I will be able to do it myself as it's a small connector block and pretty thick wires, when it comes to rewiring the rose back, are the two wires that are twisted together really ok like that?Edited by speedchick on Saturday 10th January 13:05

Simpo Two said:
speedchick said:
when it comes to rewiring the rose back, are the two wires that are twisted together really ok like that?
They must be fixed into a connector Shirley?But, there is no way I can get all three wires together in the connector in the new light fitting.

speedchick said:
and then in a connector in the rose
Gotcha - thats ok! Also lol at me for missing the obvious username clue.To the light then (and if you burn your house down / fry your electrics and or self - its not my fault....
The two pairs twisted together will be ring in and ring out both for the lives and neutrals. The (probably red) wire on its own will head down to the switch and the other wire (probably the black one) will be the return up from it.
For the new fitting the two reds should live together but connected in some fashion to the wire going down to the switch. Most normally this is in the set of connectors in a contemporary rose though I have seen this also by using a 20A connector block with the ring in / out in one side and the feed to the switch in the other. I can't comment on how ideal this is - ideally you would use the standard ceiling connector - but I have seen it done.
The light itself would then be wired to the 'switched live' - the return from the switch and another feed from the two neutrals that are left. This should be using the same method as the lives, but again I have seen connector block used for this purpose.
Thats if I understand the situation you describe correctly.
I have just put a new light in my lounge and had a similar problem so used a 20A junction box in the void between the floors and from this ran the lighting cable rather than using the standard connector or trying to use connector blocks. I dont know how 'correct' this is to do - but its elegant, works and provides the opportunity to inspect etc from the room above if be need be. Might work for you...
I've often wondered why modern light fittings aren't made to be straight swaps for the traditional loop-in rose. It wouldn't cost much extra to supply them with 4-way terminal strips.
I also wonder if there is a "correct" way around this problem? I prefer to use a 4-way junction connector screwed to a joist where possible, but I've also seen it done with an extra terminal block inside the fitting for the permanent live loop. Something I saw for the first time very recently was a light switch with the loop terminals built into it. Great for new builds or refurbs.
I also wonder if there is a "correct" way around this problem? I prefer to use a 4-way junction connector screwed to a joist where possible, but I've also seen it done with an extra terminal block inside the fitting for the permanent live loop. Something I saw for the first time very recently was a light switch with the loop terminals built into it. Great for new builds or refurbs.
Gassing Station | Homes, Gardens and DIY | Top of Page | What's New | My Stuff