Horstmann heating timer - how to remove?
Discussion


 Has anyone decorated round their problem Horstmann controller? Need to steam off wallpaper round it as cannot get it off backplate and don't want to break it. Any ideas folks?
Mine was 9 years old. Have a look at my pics over the previous page. You'll see where you need to lever it. Once the 2 screws are removed, it's only held in by the friction of the blade xonnectors
It'll come off. Use a wide bladed implement if you're worried about the plastic integrity.
It'll come off. Use a wide bladed implement if you're worried about the plastic integrity.

OK, here's a 2017 update to add to the advice so far.
I also had a H37XL (installed 5 years ago by builder's sub, hence out of 5-year warranty. The date sticker is on the inside of the timer unit; make a note before you install it) which had started to fail (switch on/off, require daily resets) so I decided to buy a new replacement (£105)........whereupon I quickly ran into exactly the same problem of how to detach the old unit from its backplate 'cos it definitely didn't want to budge!
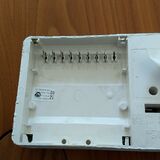
As shown in the photo on the previous page, the clear plastic backplate (to which all the house wiring is connected) has 8 terminal connectors. The white plastic timer has 8 connector 'blades' that slot into the backplate's female connection slots.
When these 8 male & female connections are pushed home, they make a very firm fit between the backplate and the timer.....and it is this tight fit which I and others found so difficult to separate (in order to remove the old/defective timer and slot in the new one).
As previously said, you have to start by turning off the electricity supply and removing 2 small screws on the top of the timer box, whose purpose is to lock the timer to the backplate. The backplate is located directly beneath and between these 2 top screw holes - to the righthand side of the unit as it sits on the wall
The leverage force has to be applied to the LEFT hand top half of the unit (i.e. the opposite to where the backplate is situated) in order to help to loosen/break the connector bond. I only found this out afterwards in speaking to the manufacturer/Horstmann's technical department.
I mistakenly applied leverage to right (on the same side as the backplate, which seemed logical at the time). I needed to resort to a broad and flat-edged lever 'cos my hand/arm efforts were only threatening to rip the whole unit off the wall.
In the end, possibly due to applying leverage to the wrong/righthand top half of the unit, the 8 connectors 'won' the leverage battle (i.e. male did not detach from female) and the whole unit, backplate and all, pulled out of the plasterboard wall - trailing the wiring behind. (The manufacturer also noted that a proper installation should have been to a solid wall or wooden board, rather than the inherent weakness of a plasterboard wall.
A bit of a mess!
Once messily detached from the wall, it was relatively easy to get a screwdriver blade between the old timer unit and the backplate....and to gradually coax the 8 male/female connections apart. THEN I could connect the new timer unit to the old backplate (the wiring for which had thankfully stayed in place).
So I've now solved the timer problem, but now have to find a way to restore the wall and make a firm attachment for the backplate.
Hopefully, my update (+ manufacturer's input) will help others avoid the same problem.
I also had a H37XL (installed 5 years ago by builder's sub, hence out of 5-year warranty. The date sticker is on the inside of the timer unit; make a note before you install it) which had started to fail (switch on/off, require daily resets) so I decided to buy a new replacement (£105)........whereupon I quickly ran into exactly the same problem of how to detach the old unit from its backplate 'cos it definitely didn't want to budge!
As shown in the photo on the previous page, the clear plastic backplate (to which all the house wiring is connected) has 8 terminal connectors. The white plastic timer has 8 connector 'blades' that slot into the backplate's female connection slots.
When these 8 male & female connections are pushed home, they make a very firm fit between the backplate and the timer.....and it is this tight fit which I and others found so difficult to separate (in order to remove the old/defective timer and slot in the new one).
As previously said, you have to start by turning off the electricity supply and removing 2 small screws on the top of the timer box, whose purpose is to lock the timer to the backplate. The backplate is located directly beneath and between these 2 top screw holes - to the righthand side of the unit as it sits on the wall
The leverage force has to be applied to the LEFT hand top half of the unit (i.e. the opposite to where the backplate is situated) in order to help to loosen/break the connector bond. I only found this out afterwards in speaking to the manufacturer/Horstmann's technical department.
I mistakenly applied leverage to right (on the same side as the backplate, which seemed logical at the time). I needed to resort to a broad and flat-edged lever 'cos my hand/arm efforts were only threatening to rip the whole unit off the wall.
In the end, possibly due to applying leverage to the wrong/righthand top half of the unit, the 8 connectors 'won' the leverage battle (i.e. male did not detach from female) and the whole unit, backplate and all, pulled out of the plasterboard wall - trailing the wiring behind. (The manufacturer also noted that a proper installation should have been to a solid wall or wooden board, rather than the inherent weakness of a plasterboard wall.
A bit of a mess!
Once messily detached from the wall, it was relatively easy to get a screwdriver blade between the old timer unit and the backplate....and to gradually coax the 8 male/female connections apart. THEN I could connect the new timer unit to the old backplate (the wiring for which had thankfully stayed in place).
So I've now solved the timer problem, but now have to find a way to restore the wall and make a firm attachment for the backplate.
Hopefully, my update (+ manufacturer's input) will help others avoid the same problem.
Glad you managed to get it off. I'm about to remove mine entirely. I replaced the two zone thermostats with Heatmiser so all I need to do is add another HW Heatmiser and then just bridge all the connections that the timer currently handles.
I have the HW Heatmiser... Just need to get rid of my cold then I'll do it.
I have the HW Heatmiser... Just need to get rid of my cold then I'll do it.
I’ve just noticed that the display on my H37XL has developed a fault and is barely useable, it’s just under two years old in a new build so I’m hoping I’ll have some level of guarantee against it.
The controller itself seems fine as all the heating zones are operating as normal. After reading this thread and various others, would a fix be as simple as acquiring a new control unit and switching it over into the existing wired up back plate?
In terms of programming the unit, is this something that can be done by a plumbing novice? I don’t think our setup is anything out the ordinary, we have two channels assigned to the heating upstairs (radiators, towel rails) and the other channel controls the hot water. Downstairs is underfloor heating so run by a completely different system.
CSLchappie said:
I’ve just noticed that the display on my H37XL has developed a fault and is barely useable, it’s just under two years old in a new build so I’m hoping I’ll have some level of guarantee against it.
The controller itself seems fine as all the heating zones are operating as normal. After reading this thread and various others, would a fix be as simple as acquiring a new control unit and switching it over into the existing wired up back plate?
In terms of programming the unit, is this something that can be done by a plumbing novice? I don’t think our setup is anything out the ordinary, we have two channels assigned to the heating upstairs (radiators, towel rails) and the other channel controls the hot water. Downstairs is underfloor heating so run by a completely different system.
I had to replace my (then 8yo) original because the internal battery had failed. The backplate is exactly the same - very easy replacement once you get over the friction issues described here.The controller itself seems fine as all the heating zones are operating as normal. After reading this thread and various others, would a fix be as simple as acquiring a new control unit and switching it over into the existing wired up back plate?
In terms of programming the unit, is this something that can be done by a plumbing novice? I don’t think our setup is anything out the ordinary, we have two channels assigned to the heating upstairs (radiators, towel rails) and the other channel controls the hot water. Downstairs is underfloor heating so run by a completely different system.
The first replacement came with a faulty LCD panel. As yours is exhibiting similar, I can't help but wonder how crappy these things are.
Anyway, good luck sourcing a warranty replacement. If you find they will not provide you with one FOC, I will be selling mine in a couple of weeks if you're interested. It's only about a year old. And I have the original one I'd throw-in too if you wanted a go at opening up the case to replace the battery.
They are easy-enough to program although they hardly have modern levels of user-friendliness. I must have the manual in the original box I could photograph if you can't find one on-line.
Hi Watchman. Thanks a million for posting this information. Without it - especially the photos -I'd wouldn't have been able to yank my horstman off the wall, which I've just done. And like your own, it was seriously tight.
Seeing the photo you posted, I cut the top right corner off it which allowed me to slip a screwdriver beaten the transparent back plate and the cover plate. Have you sold your old one yet? If not I'd like to buy it as the buttons on mine don't work properly. All the best, and thanks again for the info you posed.
Seeing the photo you posted, I cut the top right corner off it which allowed me to slip a screwdriver beaten the transparent back plate and the cover plate. Have you sold your old one yet? If not I'd like to buy it as the buttons on mine don't work properly. All the best, and thanks again for the info you posed.
I've been away from home this week but I'm due back this evening. I definitely didn't sell the controller already but I can't remember where it is. I'll dig it out and photograph it - see if you're interested in it then. I could throw-in the original one too in case you need any spares.
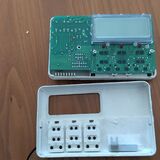
We have had a Horstmann H37 since 2004 and as with everybody else had difficulty getting off the wall but with some perseverance always managed it. However we also fell foul of the battery at the its end off life scenario as well. I decided after 15 years I would replace it. I just thought I would share my investigation into the "non replaceable" battery if you cannot afford the £100 for the new one. If you are a reasonable DIY'er and have a small soldering iron I think it can be done. Removing it from the wall did this time break the clear plastic contact plate but that did not matter as I had a new one which I easily rewired. Splitting the controller apart once off the wall is easy when you know how, you just remove the labels on the back of the controller or just dig a PZ1 screwdriver through them and remove the screws.
This will then give you access to the PCB which is held in place with 2 screws to the back of the unit. Remove these to release the PCB completely and give you access to the battery.

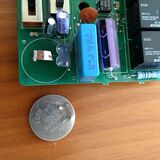
The battery is crimped onto the mounting tags that go into the PCB but these can be gently eased off with a fine blade and a new battery soldered back on. I have also seen on a well known auction site you can buy CR2430 batteries with fitted tags already on them that look very similar but then you would have to de-solder the old one from the PCB and re-solder the new battery in its place.
All depends on your soldering skills. I have to admit I have not replaced the battery as I have fitted the new one but thought some of you may want to have a go?
This will then give you access to the PCB which is held in place with 2 screws to the back of the unit. Remove these to release the PCB completely and give you access to the battery.
The battery is crimped onto the mounting tags that go into the PCB but these can be gently eased off with a fine blade and a new battery soldered back on. I have also seen on a well known auction site you can buy CR2430 batteries with fitted tags already on them that look very similar but then you would have to de-solder the old one from the PCB and re-solder the new battery in its place.
All depends on your soldering skills. I have to admit I have not replaced the battery as I have fitted the new one but thought some of you may want to have a go?
Hi Just to confirm that I have successfully replaced the battery in my clock following the tips from the above post. Very simple to do and the battery was about 3 quid. Clocks working perfect now. I am actually going to replace the battery with a plastic battery holder which will allow an ordinary battery to be inserted without soldering each time it needs replaced. Will post pictures when done. Cheers
Great thread & thanks for your post @165237
Levered my programmer off the wall, this thread gave me the confidence to do so, fitted a long time ago.
Easy to remove the two screws from the rear, cover off and the reason for doing this, clean the contacts on the PCB & push with some tissue & switch cleaner. Now works like new, just a touch needed, days of long press & extra long with a wobble & a wish have gone.
And of course no need for a new programmer - result.
The thing I like about the Hostmann is I can give an hours boost when the heating is in OFF mode,
Many thanks to all contributors. I don't think this information is available anywhere else!
I have one which is now 13 years old, and the buttons are very unreliable [don't do anything for 2 or 3 presses etc] and it resets itself whenever there is a power cut. [fume] Despite the copy function, I find using it is an ergonomic nightmare.
Now, with all your help, I can take it off, replace the battery, and clean up the button contacts. Great!
I go to do so, only to find that the **** #### tiler has not loosened the unit off the wall to put tiles behind, but has tiled all across the top, so I can't reach the screw heads!!
Aaarrrggghhh!
But thanks to you all for all the very useful information.
I see this is a very old thread but hope someone maybe able to help out. I've been supplied one of these but with no backplate. It's with a 2nd hand range cooker. Was going to replace the battery as people have suggested, but after searching the internet cannot find a replacement backplate for it. Has anyone managed to find a replacement for the backplate?
I've contacted Horstmann, now renamed Secure (it's been so long they've changed names) and they don't sell replacements but said they'd let me know if they have a spare.
If they do not, does anyone know if there is a part out there that would do as a replacement? It's just a piece of plastic with a junction box at the end of the day I guess!
Thanks
Hello All, though this thread is quite old, it is still useful to lots of folks, so thank you for posting the previous bits of info and photos, which have helped me to fix the same problem in June 2023 of a Horstmann H37XL controller buttons no longer working reliably and forgetting all settings after power cuts, quite frequent where I live. A new unit is now £135, so the motivation to repair the existing one is ever greater, not to speak of the environmental benefit. I have a few extra tips with photos that I hope will be even more helpful...
As others, I tried to remove the controller from the back-plate to no avail, even with a wrecking bar against the wall on the left hand side and applying a lot of force to the point of things breaking; even a protein energy shake did not help, nor was my heating engineer neighbour able to get it off! I then made a little block of wood and applied the wrecking bar in a different way, such that the force was on the top 2 to 3 mm on the left hand side, when it came off without much force at all (see following photo). So, I conclude that it is the angle of the force that is critical to release the spade connectors from the back-plate. Once off, I took it apart with the 4 screws (2 hidden under the do not remove and identity labels), washed the plastic parts in hot soapy water to remove grime from 2007, cleaned all the contacts on the printed circuit board with very fine wire wool (they were pretty black, but now shiny again). I unsoldered the CR2430 3V lithium battery with the help of a solder sucker and removed it. I hadn't realised it was a CR2430 and thought it must be a ubiquitous CR2032, so had prepped by buying a CR2032 holder with flying leads, so that in future the battery can be easily replaced without dismounting anything (so even my non technically minded other half can do it). The CR2032 is the same 3V, just has less stored power (about 210 mAh instead of 320 mAh), so it won't last 10 years, but as it is easily replaceable now, it doesn't have to.
I actually really like this controller, both for its functionality and ease of use, holiday mode being a good feature too and the build quality is really good as it has cleaned up to be like new even after 15 years: all buttons working easily again and remembering programme after switching off. Just the stupid idea of soldering in a battery and the tight spade connectors let it down. The latter is also now easier, as I sprayed the contacts with WD40 (and wiped away excess) before re-assembling and I can remove it by hand now, as per the drawing in the installation manual.
See photos below and have fun. If you don't have a soldering iron and solder-sucker, you can buy a complete kit on a well known online sales platform for £15, so would still save £120 by this repair. Not bad for an hour's work once you know how!
I will come back in 2 weeks time to post my photos as the system won't let me add photos as I am a new member. The error message says new members cannot post links for 2 weeks, though this was a photo upload, it is done via a link behind the scenes and there doesn't seem to be an exception in the software for photos...
Gassing Station | Homes, Gardens and DIY | Top of Page | What's New | My Stuff