Building some fancy lit shelving
Discussion


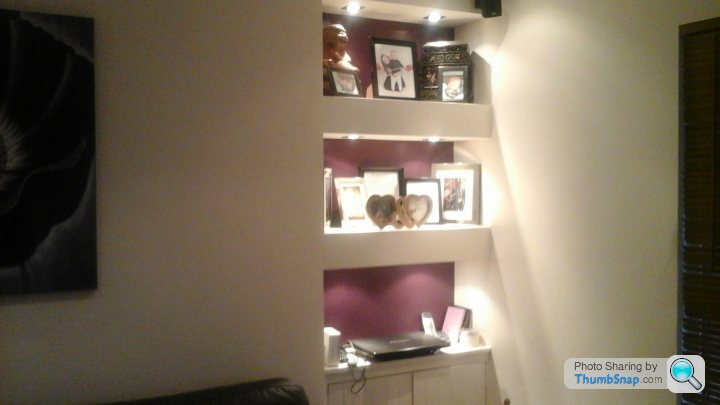
Looking to build something like this into an alcove and wondering what the best way of going about it is.
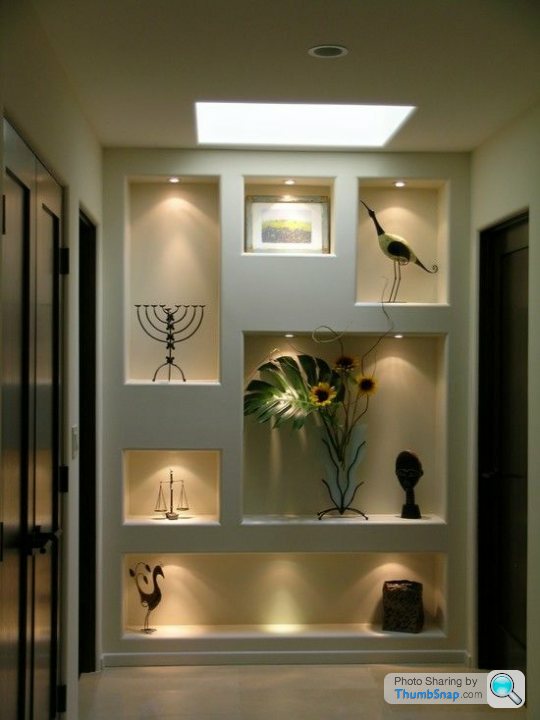
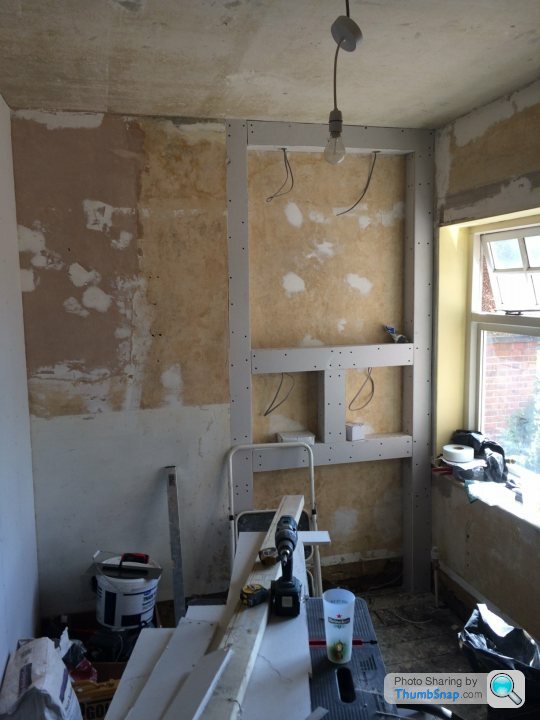
It's only a shallow alcove (approximately 130mm deep) so my original plan was just to build a 4x2 frame, attach plasterboard then skim over to take me flush with the chimney breast:
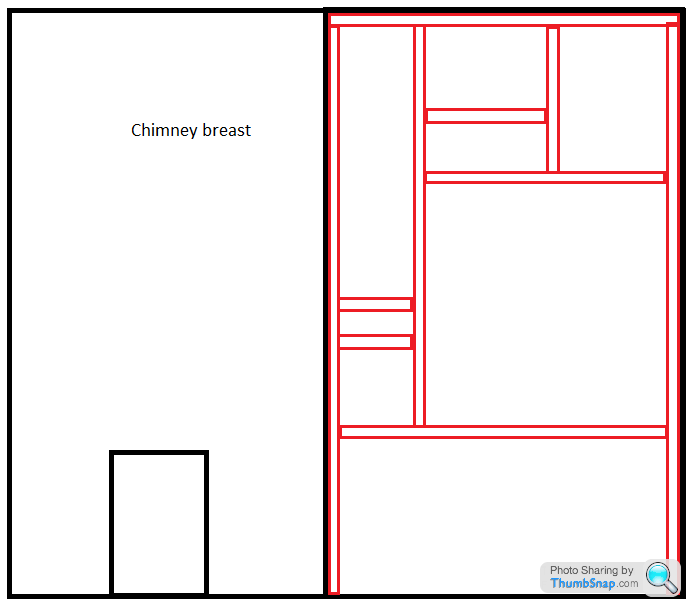
Is this the way this would usually be constructed? The main question is how one goes about recessing the LED downlights - can they be sunk into the 4x2 timber or do they need something thinner like ply?
It's only a shallow alcove (approximately 130mm deep) so my original plan was just to build a 4x2 frame, attach plasterboard then skim over to take me flush with the chimney breast:
Is this the way this would usually be constructed? The main question is how one goes about recessing the LED downlights - can they be sunk into the 4x2 timber or do they need something thinner like ply?
I'd suggest you work out the lighting first, then work "backwards" from there.
A slimline aluminium profile in which the LED strip could sit is certainly possible, and a 4x2 could certainly be rebated/routered, but maybe 4x2 is too thick to start with?
If the shelves were made of, say, 2 x 20mm ply, you could create the LED recess by having 1 (the lower) of the ply layers cut shorter in the recess from the top layer.
Someone did something similar in their build thread on here.... somewhere oop north. If I could remember, I'd link to it....
ETA: IT MIGHT BE in here... : http://www.pistonheads.com/gassing/topic.asp?h=0&a...
A slimline aluminium profile in which the LED strip could sit is certainly possible, and a 4x2 could certainly be rebated/routered, but maybe 4x2 is too thick to start with?
If the shelves were made of, say, 2 x 20mm ply, you could create the LED recess by having 1 (the lower) of the ply layers cut shorter in the recess from the top layer.
Someone did something similar in their build thread on here.... somewhere oop north.
If I could remember, I'd link to it....ETA: IT MIGHT BE in here... : http://www.pistonheads.com/gassing/topic.asp?h=0&a...
Edited by RC1807 on Wednesday 10th August 14:10
You could cut/router the front panel out of one piece of MDF to include the size and shape holes you want, then make an MDF box to go behind each opening. If the front piece holes are a mm undersize, then when the boxes are attached, use a follower trimmer bit in the router to on the front to flush it all off.
Once its sanded and painted it will look like the surrounding walls.
This will also give you voids above each hole to put the lighting.
Once its sanded and painted it will look like the surrounding walls.
This will also give you voids above each hole to put the lighting.
RC1807 said:
I'd suggest you work out the lighting first, then work "backwards" from there.
A slimline aluminium profile in which the LED strip could sit is certainly possible, and a 4x2 could certainly be rebated/routered, but maybe 4x2 is too thick to start with?
If the shelves were made of, say, 2 x 20mm ply, you could create the LED recess by having 1 (the lower) of the ply layers cut shorter in the recess from the top layer.
Someone did something similar in their build thread on here.... somewhere oop north. If I could remember, I'd link to it....
ETA: IT MIGHT BE in here... : http://www.pistonheads.com/gassing/topic.asp?h=0&a...
A slimline aluminium profile in which the LED strip could sit is certainly possible, and a 4x2 could certainly be rebated/routered, but maybe 4x2 is too thick to start with?
If the shelves were made of, say, 2 x 20mm ply, you could create the LED recess by having 1 (the lower) of the ply layers cut shorter in the recess from the top layer.
Someone did something similar in their build thread on here.... somewhere oop north.
If I could remember, I'd link to it....ETA: IT MIGHT BE in here... : http://www.pistonheads.com/gassing/topic.asp?h=0&a...
mgtony said:
You could cut/router the front panel out of one piece of MDF to include the size and shape holes you want, then make an MDF box to go behind each opening. If the front piece holes are a mm undersize, then when the boxes are attached, use a follower trimmer bit in the router to on the front to flush it all off.
Once its sanded and painted it will look like the surrounding walls.
This will also give you voids above each hole to put the lighting.
Thanks for the replies - I've found the alcove shelving bit in that thread but doesn't seem to incorporate the lighting. Do you think that if I were to use MDF/Ply then when painted it would match the emulsion on the walls? This was my main reason for plastering it - to give the seamless/flush look with the chimney breast next to it. Definitely keen to use downlighters as in the picture rather than a strip but cant find out whether or not it's possible to sink these into a block of wood?Once its sanded and painted it will look like the surrounding walls.
This will also give you voids above each hole to put the lighting.
Ah, sorry, gotcha now...
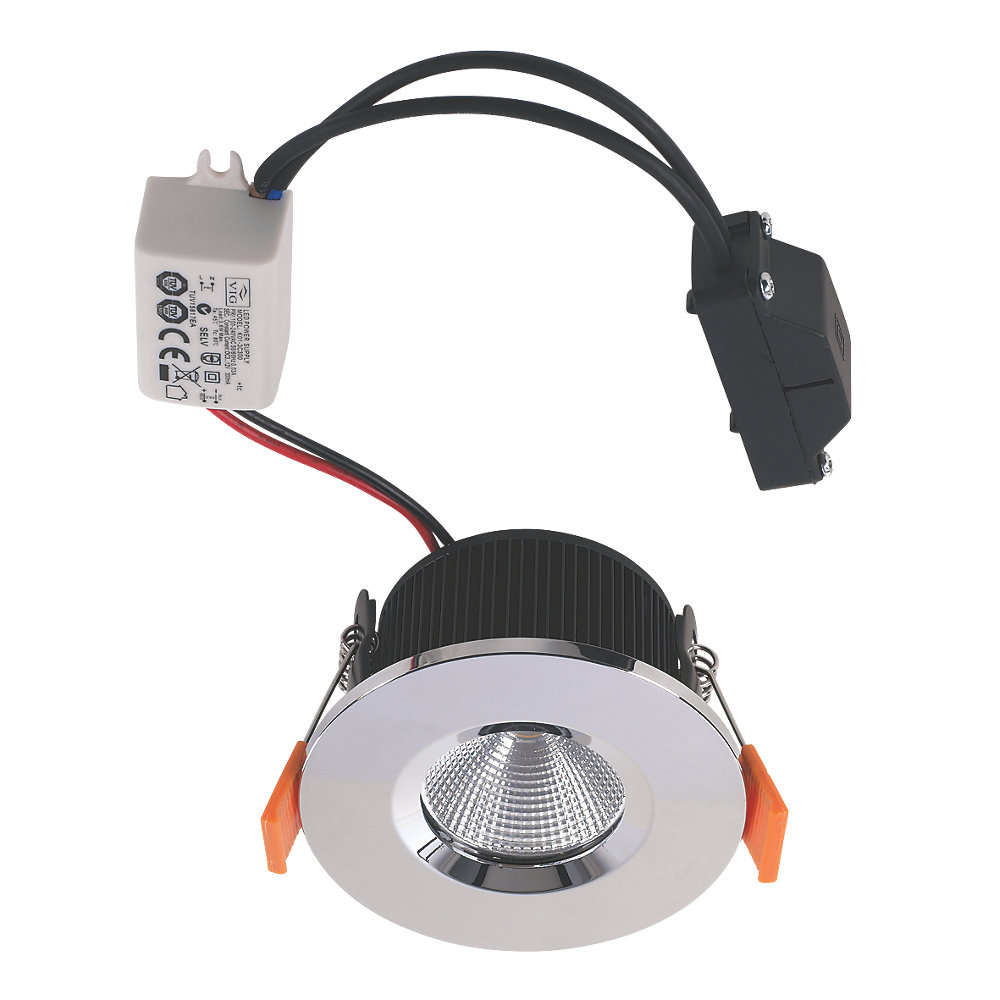
Rather tricky to recess downlights into a block of wood. They need some space around them.
Many are held in place by spring clips.
e.g., from Screwfix website:
As to whether the front surface could be flight like the fireplace if the unit's in MDF: yes. Filling and sanding required, certainly.
Rather tricky to recess downlights into a block of wood. They need some space around them.
Many are held in place by spring clips.
e.g., from Screwfix website:
As to whether the front surface could be flight like the fireplace if the unit's in MDF: yes. Filling and sanding required, certainly.
If I stuck with using 4x2 (have loads of offcuts!) if I were to work on each plastered face size being 6 inches I could then leave the equivalent of a stud as a gap everywhere for the cables to run, and plasterboard the lot - for example like this (orange is a piece of 4x2 and the underside of 'shelf' with 2 inch void above for cable, then another 4x2 above it)
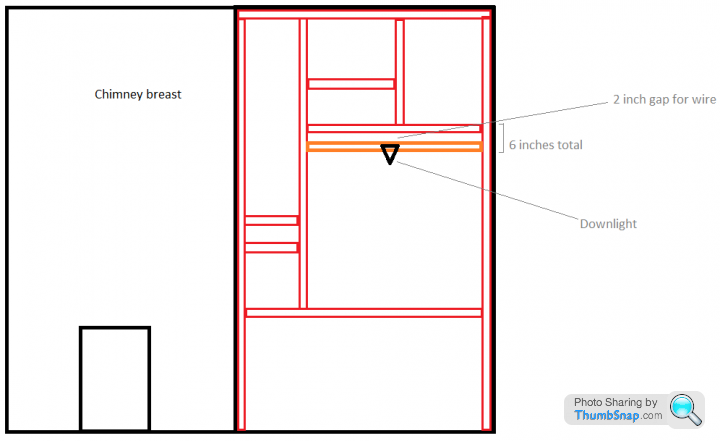
Does that make sense?
Does that make sense?
RC1807 said:
Ah, sorry, gotcha now...
Rather tricky to recess downlights into a block of wood. They need some space around them.
Many are held in place by spring clips.
e.g., from Screwfix website:
As to whether the front surface could be flight like the fireplace if the unit's in MDF: yes. Filling and sanding required, certainly.
This is what I thought too but then wondered about those decking LEDs? Or something like this? http://www.screwfix.com/p/lap-recessed-led-kit-whi...Rather tricky to recess downlights into a block of wood. They need some space around them.
Many are held in place by spring clips.
e.g., from Screwfix website:
As to whether the front surface could be flight like the fireplace if the unit's in MDF: yes. Filling and sanding required, certainly.

If you can get clever and plan the lighting element in advance which presumably you can, my advice would be to edge light the box units from the front - ideally mounted in the sides top to bottom. This way, the light is pretty much hidden from view but because it's lighting from the front inwards, whatever you put on the shelves - be that ornaments or books, will be lit.
In this installation we have used 45 degree profile with 120 LED per metre strip
You can see other examples of the same effect in joinery on this project

In this installation we have used 45 degree profile with 120 LED per metre strip
You can see other examples of the same effect in joinery on this project
E36GUY said:
If you can get clever and plan the lighting element in advance which presumably you can, my advice would be to edge light the box units from the front - ideally mounted in the sides top to bottom. This way, the light is pretty much hidden from view but because it's lighting from the front inwards, whatever you put on the shelves - be that ornaments or books, will be lit.
In this installation we have used 45 degree profile with 120 LED per metre strip
You can see other examples of the same effect in joinery on this project
They look lovely - in that photo are they just lit from the sides or is there a strip along the top too?In this installation we have used 45 degree profile with 120 LED per metre strip
You can see other examples of the same effect in joinery on this project
That's actually a part of our demonstration zone at the office so I have three different methods of lighting those but yes, they are lit across the top front as well given the width. The project link I put up are only lit from the sides.
Point is, whatever you put on the shelves will be lit. If you look at the image in your initial post, down the bottom is a large plant that is obscuring the light making it useless. Lighting from the front resolves that. Using the 45 degree profile ensures the central direction of the light strips is in towards the centre.
Hope that helps.
olimain said:
Looking to build something like this into an alcove and wondering what the best way of going about it is.
It's only a shallow alcove (approximately 130mm deep) so my original plan was just to build a 4x2 frame, attach plasterboard then skim over to take me flush with the chimney breast:
Is this the way this would usually be constructed? The main question is how one goes about recessing the LED downlights - can they be sunk into the 4x2 timber or do they need something thinner like ply?
Make all the shelves in box section and in MDF. Make the shelves, sides etc in 15 or 18MM, the facier (to cover the front faces) in 6MM MDF and sand flush.It's only a shallow alcove (approximately 130mm deep) so my original plan was just to build a 4x2 frame, attach plasterboard then skim over to take me flush with the chimney breast:
Is this the way this would usually be constructed? The main question is how one goes about recessing the LED downlights - can they be sunk into the 4x2 timber or do they need something thinner like ply?
Making them in box section means there is plenty of room for the lighting if you go for recessed spots etc, you then install a battern (the width and height of the internal of the shelf) on the wall, and the slide the shelf over it to secure.
Obviously the top, the btm and the sides need not be boxes, just finish flush with the facier, leaving gaps to the wall, ceiling etc.
If your using LED strips then a 11MM wide x 5MMM routered groove usually works a treat.
Edited by Wozy68 on Thursday 11th August 08:56
E36GUY said:
If you can get clever and plan the lighting element in advance which presumably you can, my advice would be to edge light the box units from the front - ideally mounted in the sides top to bottom. This way, the light is pretty much hidden from view but because it's lighting from the front inwards, whatever you put on the shelves - be that ornaments or books, will be lit.
In this installation we have used 45 degree profile with 120 LED per metre strip
You can see other examples of the same effect in joinery on this project
That looks great, do you guys do joinery too?In this installation we have used 45 degree profile with 120 LED per metre strip
You can see other examples of the same effect in joinery on this project
HotJambalaya said:
That looks great, do you guys do joinery too?
I'm afraid not. The wall itself is a simple batten and plasterboard/skim/paint with the rectangular cut outs which was knocked up in about a day by our office fitters - Abstract Office Interiors. The 'shelf' sections are actually marine-ply boxes that just slot into place.
olimain said:
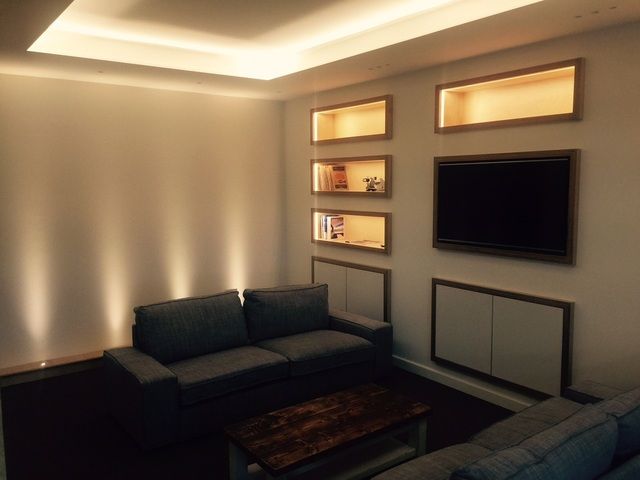
After a busy couple of days I'm nearly there now. In the end went for the plaster finish as had timber/plasterboard/plaster to use up!
Just the electrics to complete now:
Move radiator, skim and paint:

Very nice work.Just the electrics to complete now:
Move radiator, skim and paint:
As you've gone for down lighters - given their proximity to the wall you need to find something that is 10-15 degrees beam angle. Anything wider won't look right as the light will be very intense on the wall just beneath the fittings.
Gassing Station | Homes, Gardens and DIY | Top of Page | What's New | My Stuff