Epoxy garage floor prep can I have a bit of help please?
Discussion


Evening chaps.
Well we battled hard but I think my mistake is terminal.
We hired a floor sander and sanded all day at it today. Emma and Andy both gave me 100% and the three of us have scraped and sanded our hearts out.
We got an amazing finish on the section fore and aft of the bad bit but the problem is that although we are back to the concrete on the high spots on the bit that hasn’t gone off the low spots are like chewing gum. I tried a wire brush on a drill but that doesn’t work either.
Final thoughts as I closed the door for the evening are:
1) go ahead and paint the new coat. It will be sticking to the high spots and hovering over the depressions filled with chewing gum as a substrate.
2) accept that it’s not possible to now use epoxy on this floor and consider other alternatives designed for bad sub floors - I suppose options are the rubber tiles, some form of industrial “amtico” or “karndean” or whatever.
3) hit the floor with heavy duty floor screed at about 3mm thick all the way over and THEN paint it.
What do we think?
I’m so upset but to see my Mrs and my mate helping me so much without me asking is lovely. Big thanks to both of them I really appreciate all your support
Appreciate the help - I had a look at some options this morning for solvents and came up with acetone as a possible.
A quick test with nail varnish remover - yep - it works. So I purchased 5 litres of the stuff from the local drysalter/drugstore this morning and hit it with a hand wire brush, doing one square foot at a time. Thankfully the weather was good so the doors were open so it didn’t gas us!
After about four hours and 2.5 litres of acetone we are sorted. Every bit of the soft stuff is gone and we now have a bare floor again with patches of good first coat (second coat was the bad one).

Got to say it does feel good to have solved the problem. Options now:
1) return half the paint. Screed the floor so it’s perfectly flat and go for mirror finish.
2) use one can of paint on the bare bit we had to scrape, quick de nib with the floor sander and then use the remaining 19 cans of paint mixed with some metal flake - it will then we shiny but the flake will take your eye off any scratches that happen and imperfections in the concrete.
3) screed it and use all 20 cans for a super heavy duty coating.
What do we think?
A quick test with nail varnish remover - yep - it works. So I purchased 5 litres of the stuff from the local drysalter/drugstore this morning and hit it with a hand wire brush, doing one square foot at a time. Thankfully the weather was good so the doors were open so it didn’t gas us!
After about four hours and 2.5 litres of acetone we are sorted. Every bit of the soft stuff is gone and we now have a bare floor again with patches of good first coat (second coat was the bad one).
Got to say it does feel good to have solved the problem. Options now:
1) return half the paint. Screed the floor so it’s perfectly flat and go for mirror finish.
2) use one can of paint on the bare bit we had to scrape, quick de nib with the floor sander and then use the remaining 19 cans of paint mixed with some metal flake - it will then we shiny but the flake will take your eye off any scratches that happen and imperfections in the concrete.
3) screed it and use all 20 cans for a super heavy duty coating.
What do we think?
turbospud said:
i know it wont help but even at this stage id still ceramic tile it.
I did that in my last garage and I did find the tiles cracked easily. When I’m not messing up epoxy mixing I do some fairly heavy duty stuff (I’m actually restoring an old car which is why I’ve built this garage because I ran out of room in the last one!) so the ceramics aren’t really an option for me based on previous performance.Having got to where we are I can tell you with certainty that a thickly applied epoxy floor is seriously durable - even hitting the cured stuff with a coarse belt on the industrial sander does little more than de-nib unless you make an effort to hold it in one place. I’ve also noticed that (and this is obviously my opinion only) the best result with the epoxy is where it is properly thick. I have a feeling they suggest rolling it on thin to keep the coverage sensible and the cost down but, again, based on attacking this one the thicker areas are far more resistant to sanding, scraping and even impact where I have had a test chisel at it.
Based on this I am erring towards the re prime and metal flake option.
I’d like to thank everyone who has helped me so far - tonight I’m really happy because although it’s not finished the problem is solved properly rather than a cross your fingers style solution.
Morning!
Machine came from Brandon Hire - I think most of the hire places do them.
I’ve looked at this more - now I get it.
Put “epoxy floor laying” into you tube and you’ll see that the accepted professional way to do it is to POUR the epoxy directly onto the surface exactly as I was thinking. You then use a notched squeegee to move the liquid around the floor and achieve even coverage. You wear spiked shoes so you can stand in the coating and then as you clear an area your helper cross rolls the finish to make sure it’s smooth.
You do not, as I was told by resin coat, use a paint tray and a roller. That method might well allow you to paint a floor with the measerly amount of paint that I bought in the first place (which keeps it looking super competitive compared to others in this crazy world where it’s all about price and a race to the bottom) but you’re not going to get the concrete smoothed off with a rolled coat fed off a roller tray.
Using the pour it on method you can see from the videos (and my own experience confirms this when I poured on that can with extra hardener) that once you have a proper coating the epoxy has enough surface tension to self level even when it fills depressions.
So I’m now going to acquire some spiked shoes, a squeegee and I’m going to re- prime the bit we had to take back to concrete.... stay tuned hahah.
Andehh said:
Was it a specialist concrete sander you hired?
Will be interested to hear your verdict on the spiked hoes & serrated rubber spreaders (like the below?)
http://adbrufdirect.co.uk/resin-paving/resin-bonde...
Those look great thanks - will see about them.Will be interested to hear your verdict on the spiked hoes & serrated rubber spreaders (like the below?)
http://adbrufdirect.co.uk/resin-paving/resin-bonde...
The sander was just a big belt sander - not a specialist concrete thing. But now for sure with the comments about thickness - I’m not sure where the fact lies. I was convinced based on what I’ve seen that thicker is better but maybe you’re better off using something to hone the floor and then use a super thin coat of resin.
Having said that, the five mil of residue in the bottom of the tin is so hard that you can whack it with a hammer and chisel and pretty much nothing happens. I just can’t for the life of me see how that can be beat?
Flibble said:
A quick look at specs of a decent epoxy gives 55 N/mm2 compressive strength (higher than the concrete it's on) and high impact resistance (you can basically drop any tool you like on it and it won't break). They can be a bit prone to scratches, but if you're worried a polyurethane top coat will give higher scuff resistance. Also if the floor is properly prepped the epoxy bond to the concrete should be stronger than the concrete itself.
The tech specs tend to say thicker for better durability. Up to around 4-5 mm max (really you should be using fillers above 1-2 mm).
Note that a lot of "epoxy" on garage floors is actually just a solvent based paint with a bit of epoxy in it, those last like paints, i.e. not well.
This seems to bear out my messing around attacking various bits of it - at 4/5mm thick it’s serious stuff.The tech specs tend to say thicker for better durability. Up to around 4-5 mm max (really you should be using fillers above 1-2 mm).
Note that a lot of "epoxy" on garage floors is actually just a solvent based paint with a bit of epoxy in it, those last like paints, i.e. not well.
Edited by Flibble on Monday 26th March 16:14
That’s helped me feel that I’m on the right track, thanks.
—
Those blue tiles look extremely smart - would have been a whole heap easier! Hell, I could have the damned car restored by now! Well not quite but you know what I mean! Nice car, by the way!
Understood and I remember wondering at the time if the builder had used lots of adhesive on my tiled floor in the last garage because they cracked for fun. I’m guessing the answer is a resounding no!
I’ll go ahead and try this and see what happens. Feel like we are too far in to reverse direction!
I’ll go ahead and try this and see what happens. Feel like we are too far in to reverse direction!
Haha - the £40 a meter thing is still hugely overpriced. Obviously I made a cock up but if I was doing it again now I know what I’m about there is no way I’d be messing with half tins so I’d never end up with wrongly mixed stuff.
Last night, late, I went in there and conducted the dropped tools test, given that I’m repainting anyway. I have the following conclusion to offer.
1) on the thin sections where we have applied with primer then two rolled coats dropped tools such as spanners from waist height make no mark. Dropping the point end (corner) of a heavy adjustable spanner from waist height chips the paint off.
2) on the thick (poured) sections the same test was repeated and from waist height there is no witness mark on the floor with the heavy spanner. From head height there is a very tiny mark in the surface.
In conclusion I feel like the earlier poster suggesting that there is confusion between epoxy fortified paints and proper epoxy paints and I would add that there is additional confusion created because painting it on and flooding the area create vastly different results. It’s not helped by manufacturers such as Resincoat putting people on the phone who obviously haven’t actually ever done a resin floor.
But yes, my very unscientific tests point me towards thinking that a thick coat of epoxy is about the most durable thing I’ve seen and that it’s vastly superior to a thin coat.
The Moose said:
I read that again this morning and thought it sounded s tty. Sorry about that - wasn't intended in that way
Haha not at all - it was funny and quite apt!tty. Sorry about that - wasn't intended in that way I was in the US once in a Harley Davidson workshop with a pal. There was a plaque on the wall:
LABOR RATE - $30/h
IF YOU WATCH - $40/h
IF YOU HELP - $50/h
IF YOU HAVE ALREADY HAD A GO - $60/h
So funny!
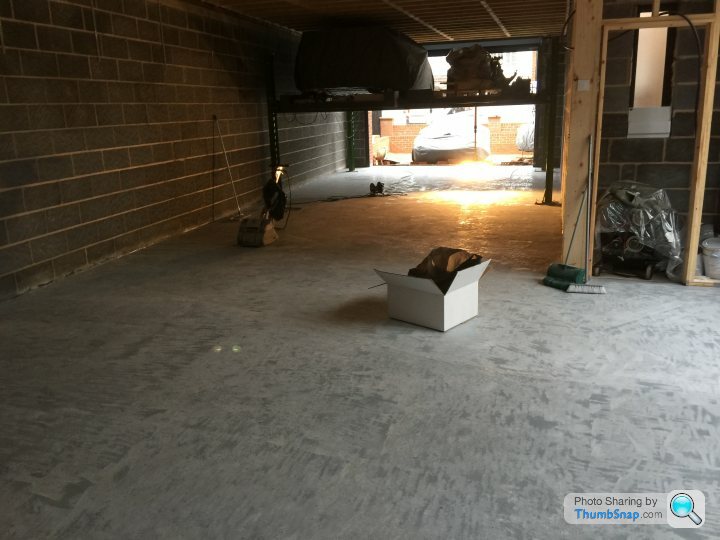
Anyway - tonight we hoovered again and then are in the process of hand sanding the whole floor to make sure there are no bits of residue from either the acetone or the belt sanding - some of the debris from the belt gets kind of “wiped” back on to the surface and at high temperatures caused by the friction it won’t hoover off.
Tomorrow the plan is to finish the sanding, hoover again and re- prime the offending area as well as use some filler I have obtained from Resincoat to deal with the larger imperfections.
I think we are.
This week we spent some time filling in some of the depressions in the surface with the “fine surface filler” supplied to me by resin coat.
We then used the industrial sander (which was on a week’s hire so is due back tomorrow am) to flat that back. We did find that not even the industrial sander leaves as smooth a finish as a very light hand sanding so we invested a couple more hours into that.
Finally I hosed the whole thing off today - that was helpful because as well as clearing the dust it also gave me an insight into where the lower spots of the floor are and so where I might expect to see the resin sit a little thicker. Now I’ve seen how much dust comes off that way I’d add a hose down to the list of prerequisites for this job.
Over the weekend the floor should dry out and then I can have a quick inspect of where we are at.
I obtained rubber squeegees and spiked shoes from a firm called “vi” distribution in sandbach, Cheshire. Very helpful company and reasonably priced. I also got a 25 litre mixing bucket so we can mix two or three tins of the paint at one go and pour from the new bucket.
I’m hoping we can do the final pour on Monday. I’m a bit nervous. Quite a lot of effort has gone into this now!
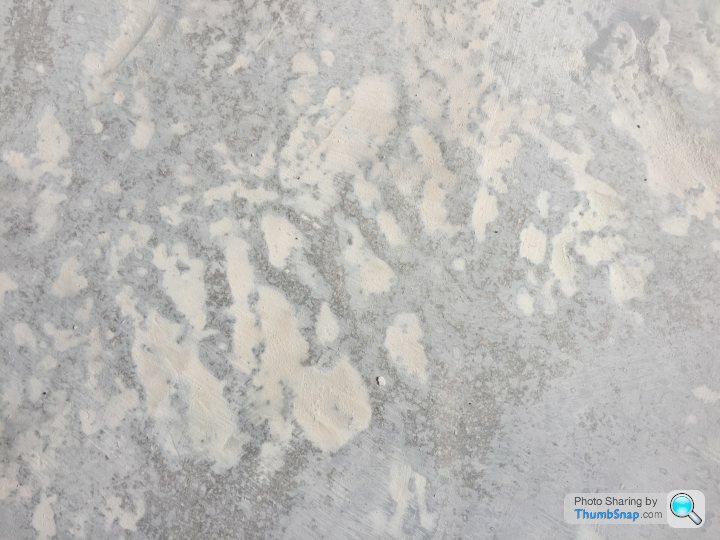
This is a detail shot of how the filler has smoothed the surface out:
This week we spent some time filling in some of the depressions in the surface with the “fine surface filler” supplied to me by resin coat.
We then used the industrial sander (which was on a week’s hire so is due back tomorrow am) to flat that back. We did find that not even the industrial sander leaves as smooth a finish as a very light hand sanding so we invested a couple more hours into that.
Finally I hosed the whole thing off today - that was helpful because as well as clearing the dust it also gave me an insight into where the lower spots of the floor are and so where I might expect to see the resin sit a little thicker. Now I’ve seen how much dust comes off that way I’d add a hose down to the list of prerequisites for this job.
Over the weekend the floor should dry out and then I can have a quick inspect of where we are at.
I obtained rubber squeegees and spiked shoes from a firm called “vi” distribution in sandbach, Cheshire. Very helpful company and reasonably priced. I also got a 25 litre mixing bucket so we can mix two or three tins of the paint at one go and pour from the new bucket.
I’m hoping we can do the final pour on Monday. I’m a bit nervous. Quite a lot of effort has gone into this now!
This is a detail shot of how the filler has smoothed the surface out:

It’s really hard to see on these photos but in words I’d write - the finish is now largely smooth. It feels smooth to run your hand over. There are still some imperfections but as far as we can see none are deep. We have sanded out the concrete fingers where the floor had dried high. The floor is not perfectly flat from corner to corner but where there are changes in level they are gradual, minor and smooth transitionally. There is no build up of filler - it has been used to fill holes only and thus I feel that the floor will still be incredibly strong.
On that basis it will be very interesting to see how the paint goes down...
Still got to decide if we are going for one mahoosive coat or one thick and one final finish thin one - that’s also a possibility. I have been warned by resin coat that if I apply it too thick it might bubble.... tres interesting...

The multiple thin coat thing is potentially a mistake. From what I can see of the previous coats (thin and thick “poured” coats by rollering a thin coat you don’t take advantage of the tremendous self levelling ability of the product. You have to apply the epoxy at a decent thickness for it to be able to smooth across depressions properly.
So today I’m going to apply a last coat of primer over the bits of bare concrete that have been exposed by the heavy sanding.
Monday it’s thick coat time and then probably Tuesday it will finally be done!
So today I’m going to apply a last coat of primer over the bits of bare concrete that have been exposed by the heavy sanding.
Monday it’s thick coat time and then probably Tuesday it will finally be done!
Hi Daniel yes that’s what’s I mean.
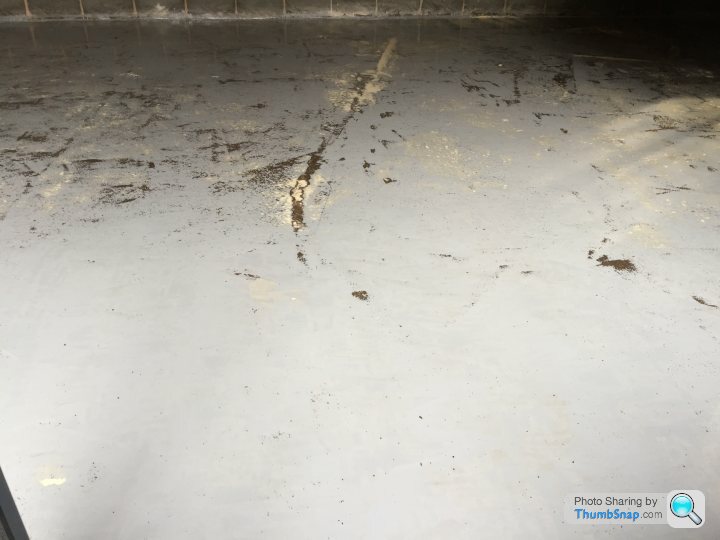
Today we did the final primer coat. Picture doesn’t do it justice its created a nice floor.
Interestingly we poured 5 litres of primer in two lines up the garage direct from the tin and we’re able to cover the whole floor with it now that there are only a few imperfections and now the floor is largely sealed.
Seems really good now. Bit nervous about tomorrow but hopefully ok...
PS spiked shoes worked well but tip - check the spikes are tight in your brand new shoes. As we walked about ours fell to bits leaving an Easter egg hunt of spikes and nuts all over the floor! For the main coat I’ll definitley be getting a spanner to them!!
Ok so we went ahead and painted it today.
Few further tips as I remember them in no particular order:
1) spiked shoes do have a tendency to create more “bits” in the finish as they slightly imprint the floor and sometimes scratch it causing debris. Pick a spot and stay there, moving your body and arms as much as possible before repositioning.
2) pour the paint at the back of the expected coverage area and “push” the material forwards with your squeegee. Work the area as flat as poss and then your helper cross rolls it with the roller.
3) use decorators tack rags to fully clean the edges of the room - that’s where the nasties lie and you want to be able to squeegee right along the edge without dust.
4) have more paint than you project to need, on sale or return, and keep your consistency as the job dictates rather than how much paint you have.
5) do use surface filler to take out the ridges and big holes after you seal the floor. You’ll be amazed at how much better and easier it makes the finish.
6) have spare rollers and squeegees in case one breaks or you hit some dust you didn’t expect.
Today we did the thick coat, so we aimed for the 105 square meters with 14 cans of paint. We actually used 15 cans to get the paint to a lovely gloss. We have 5 cans left if we need to do a thin finish coat which I’ll know tomorrow once it’s possible to access the building. It’s raining right now so I can’t swing the door open to see as it will drip on to the wet epoxy.
When we left the room the finish looked pretty much mirror smooth with the thick coat. I did notice a few bubbles as people had suggested might be the case but through the window it appears as though the self levelling effect is impacting that. So it really will be suck it and see. Will post some pics tomorrow but the job is a whole new level of quality compared to last attempt.
Gassing Station | Homes, Gardens and DIY | Top of Page | What's New | My Stuff