Epoxy garage floor prep can I have a bit of help please?
Discussion


Morning!
Ok so the answer to the trowel is - I’m not sure. I spoke to a guy at Resincoat who sounded like he had actually had experience of putting them down. He advised me against a notched trowel because you he said you want a smooth surface with the squeegee as much as poss then smooth with the roller.
In practice that seems to have worked out exactly as he said - remember you’re pouring your resin on in lines to the correct area so you’re effectively controlling the coverage with that.
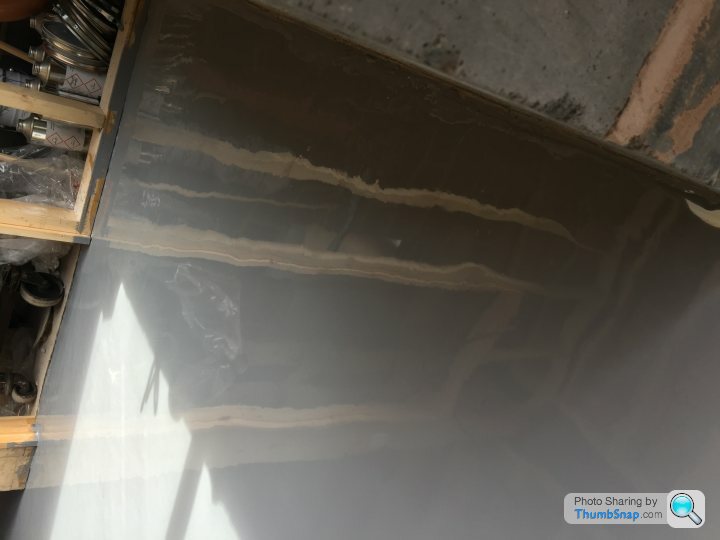
Anyway - there is amazing and very annoying news all at the same time.
Here is the finish - it’s like glass:
Ok so the answer to the trowel is - I’m not sure. I spoke to a guy at Resincoat who sounded like he had actually had experience of putting them down. He advised me against a notched trowel because you he said you want a smooth surface with the squeegee as much as poss then smooth with the roller.
In practice that seems to have worked out exactly as he said - remember you’re pouring your resin on in lines to the correct area so you’re effectively controlling the coverage with that.
Anyway - there is amazing and very annoying news all at the same time.
Here is the finish - it’s like glass:

That’s one thick coat at 1.4 meters square per litre coverage. It’s absolutely phenomenal. (But reserving final judgement until I can walk on it and check the rest of it - with my luck at the moment one of the extension leads will have fallen off the ramp and glued itself to the floor lol)
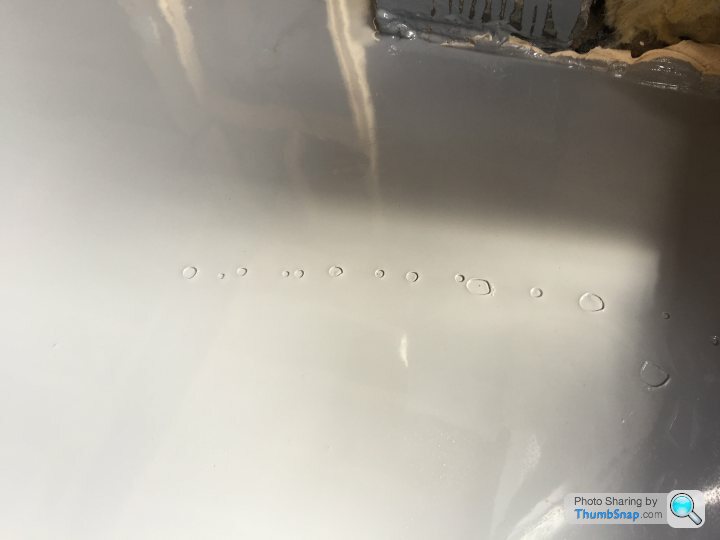
Given that the patio enters the garage at the back of the house I think a custom floor mat will be very cool under the bi fold doors so I’m not tooooo worried about those imperfections.
If the rest of the floor is perfect that’s it, job done, otherwise I’ll apply the last 5 cans as a thin roller coat...
Andeh it will depend on how good your surface is. I’d say you should do your best with the base surface, one coat of primer and then fill the bad bits. Another coat of primer. Then top coat. You can do it with that much paint but maybe not with a foam squeegee thick coat - you’d most likely find it hard to spread it about. We used 75 litres for 105 square meters to achieve that finish, onto a reasonably well filled and primed surface
Haha well you live and learn by these things don’t you!
So the fine surface filler I ordered that they sent was actually a upol product that, reading the tin, is actually nothing more than car filler! The interesting thing is that if you read up the posts above someone else who observed the pros do a floor said that the filler they used smelt like car body filler...
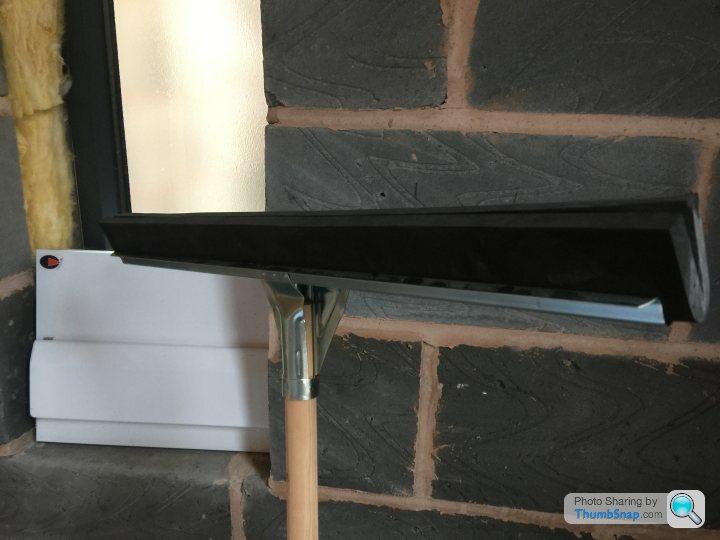
I will get the pic of the rubber squeegee and the details of the upol stuff when I can dare walk on the floor which, 24 hours in, is still slightly soft. I reckon you could gently walk now but I’m not chancing it!
So the fine surface filler I ordered that they sent was actually a upol product that, reading the tin, is actually nothing more than car filler! The interesting thing is that if you read up the posts above someone else who observed the pros do a floor said that the filler they used smelt like car body filler...
I will get the pic of the rubber squeegee and the details of the upol stuff when I can dare walk on the floor which, 24 hours in, is still slightly soft. I reckon you could gently walk now but I’m not chancing it!
Forgot to say - I’m a non expert on this but I saw a video where a guy handled a thin crack in a slab and that’s a different ball game to the body filler stuff.
He actually chiselled out a much bigger crack so that there was surface area and then used some *special stuff* (more research required) to fill the resultant chasm!
The surface filler is just for aesthetic.
He actually chiselled out a much bigger crack so that there was surface area and then used some *special stuff* (more research required) to fill the resultant chasm!
The surface filler is just for aesthetic.
anonymous said:
[redacted]
Yes - I think that sounds right now you mention it. The guy on the video seemed very knowledgeable and it was definitely a two part mix with some kind of cement and special hardener. I’ve watched so many videos on all this now that I’d never find it otherwise I would post the link. The repair to the crack looked highly convincing when it was finished.

KAgantua said:
can you put this on floor tiles?
I think the answer is - it depends on the floor under the tiles. If you have a tiled floor that’s rock solid then i think it’ll work. The epoxy goes off rock hard and it sticks to anything just unbelievably well. You’d want to prime it and then apply either filler or a coat thick enough to get rid of the grout lines, though. Still a big job and it might be just as easy to yank the tiles and start again?If your floor moves - at all - then my advice is null and void and I have no idea since I don’t know if the epoxy is flexible or how it would react in that situation. I suspect *not well*
You’re right about that I think yes. We worked out that for 1mm thickness we would have used 20 cans. Worries about bubbles etc meant that we went for 15 cans so we will be under a mm. It’s wierd because it “feels” much thicker than that, both when you’re laying it and when you’re looking at the finished product.
About the cost - I think the reason that they want so much commercially is the sheer number of visits that are needed because of the drying time and then the fact that you really need two guys. Compound this with my thinking that there are not that many “local” experts thus meaning that there is lots of travelling and it’s easier to see how the costs rack up.
About the cost - I think the reason that they want so much commercially is the sheer number of visits that are needed because of the drying time and then the fact that you really need two guys. Compound this with my thinking that there are not that many “local” experts thus meaning that there is lots of travelling and it’s easier to see how the costs rack up.
Andehh said:
That finish is incredible! Very very impressive.
Julian - is the below the sort of machine you used to remove the failed first attempt?
http://www.brandontoolhire.co.uk/en/surface-prepar...
Hi Andehh - no - that’s the grinder machine I SHOULD have hired prior to the sander I did hire!!! Hahaha.Julian - is the below the sort of machine you used to remove the failed first attempt?
http://www.brandontoolhire.co.uk/en/surface-prepar...
We had to use a bloody hand wire brush to shift that lot - the machine we got from Brandon was just a sander.
So my new best procedure based on everything would be:
1) use a spade to bash off the really bad snot
2) grind with that or similar as mentioned above by the other chap to remove the really bad stuff.
3) sand with the sander I got from Brandon to smooth the remaining bad bits.
4) brush up
5) hoover up, using a compressor to clean the hoover every time it fails!
6) prime with epoxy primer
7) fill the depressions with filler and knock off any bits in the filler with a scraper on a stick
8) use the hose to wash the room out, allow to dry. Note that this is because of you hose it before you prime it the drying time is ages and ages. (But if you have a greasy floor or old floor then I guess you should also be pressure washing and degreasing as step 1a!)
9) hoover
10) re prime, denib again and any final filler for any remaining bits
11) final run over the whole floor with a piece of sandpaper on your knees to make sure all is well close up
12) final hoover
13) pour new floor @ around 1mm thick. Try my best to do it without spiked shoes. Squeegee and cross roller.
You could add a final thin coat... heheh... andy will kill me if I say that 😬😬😬😬
TimCrighton said:
I understand the costing from them in some ways, but when we had costs to 'polish' the concrete floor, a 3000 grit finish with a laser level (so I could use it as a flat patch for the race cars) it was similar to the professionally installed epoxy and wouldn't have had the same wear concerns so it felt like the professional epoxy guys were doing themselves out of work. Yes, I know the polished finish would have need sealing but this could then have been a DIY job. Difficult call.
Costs for DIY on ours seem to look like:
Duramat - c.£600 + Floor sealer if desired to stop dusting (which we would do so another £200-300)
Porcelain Tiles - c. £1,000
Epoxy - c.£800
So all fairly close, just trying to decide on the best and most appropriate finish - looking at your photos is great inspiration!
Interesting about the laser concrete Tim - that sounds phenomenal. Imagine that with one thin rolled coat of epoxy! Awesome.Costs for DIY on ours seem to look like:
Duramat - c.£600 + Floor sealer if desired to stop dusting (which we would do so another £200-300)
Porcelain Tiles - c. £1,000
Epoxy - c.£800
So all fairly close, just trying to decide on the best and most appropriate finish - looking at your photos is great inspiration!
I think it depends on the look you want really. Reading above where someone describes how the porcelain tiles should be buttered makes total sense now as to why my previous garage was so rubbish. That one was ceramic and the guy who did it just did the normal way of doing lines of adhesive. Hence they sounded a bit hollow and broke for fun. But now I’ve read that it’s all making sense - just like there is epoxy jobs and there are epoxy jobs there are tiles and tiles! And very different.
It will be interesting to see how mine stacks up to use. Still got lots to do like board and plaster the walls and ceiling, wiring etc so it will be a while before I’ll be able to show how it looks but I think good so far.
Flibble said:
Is it worth priming before filling? I'd have thought you'd be better off just skimming over with filler / screed and getting that nice and level then going for a single coat of primer on top.
Not sure - I was worried that the filler wouldn't stick so well to bare concrete. It sticks incredibly well to the primed surface. I do think that its good to get the concrete sealed as soon as you possibly can because I suspect that the amount of dust that you'd get trying to flat back filler against an unprimed concrete surface would be a total pain.But, direct to concrete would work for certain as long as you had certainty of adhesion concrete>filler. If you used screed then a million percent yes. My pal Andy does that for a living and he said we would have been better screeding the whole floor from the word go. He does concede that a full screed layer would probably be less durable than concrete>resin, however, under maximum impact conditions. (But I hasten to add that neither of us know that - guess only.)
In respect of the grip levels on the floor - it's early days but I've had a little walk about in my wet trainers and it seems good. It makes a squeaking sound as you move around and seems to be good. I don't think it would be the last word in grip I'd say no worse than nice tiles from what I can see right now.
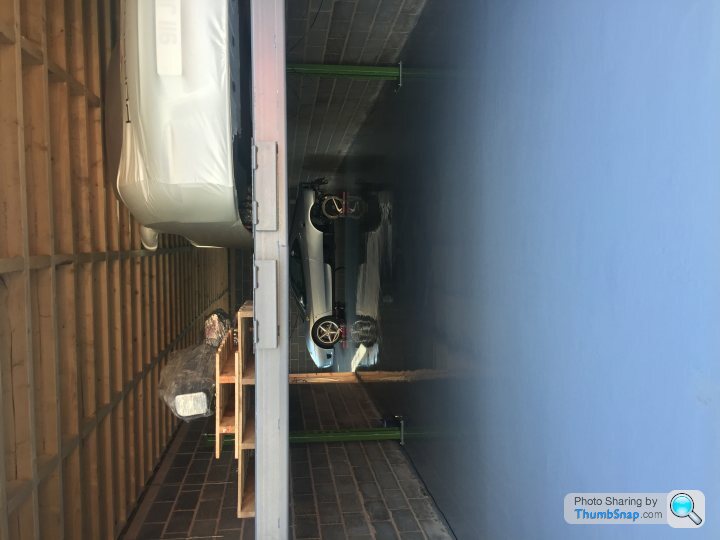
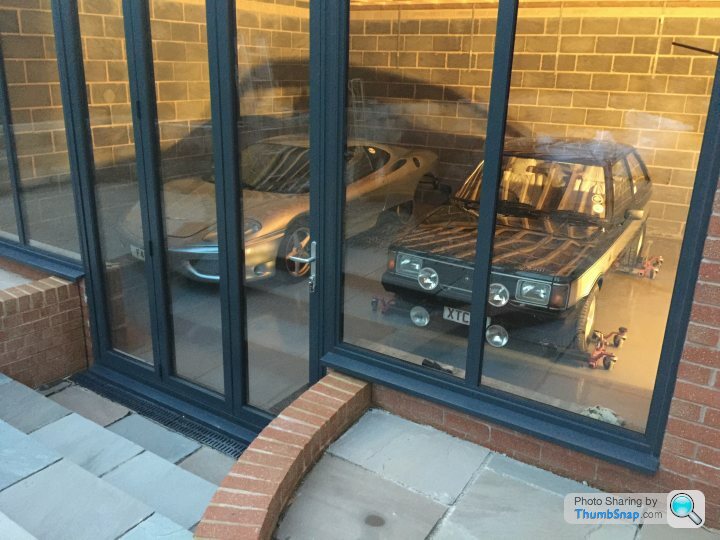
The floor is now ready to use - so that’s five days for it to fully cure - ambient is between 5 and 10 degrees in there over the night and day cycle, for reference.
Tomorrow I’m going to fetch my cars and put them in there - quite excited. Might post back a quick pic of how it looks then it will be lights out on this thread it guess!
Tomorrow I’m going to fetch my cars and put them in there - quite excited. Might post back a quick pic of how it looks then it will be lights out on this thread it guess!
Gassing Station | Homes, Gardens and DIY | Top of Page | What's New | My Stuff