Epoxy garage floor prep can I have a bit of help please?
Discussion


I think we are.
This week we spent some time filling in some of the depressions in the surface with the “fine surface filler” supplied to me by resin coat.
We then used the industrial sander (which was on a week’s hire so is due back tomorrow am) to flat that back. We did find that not even the industrial sander leaves as smooth a finish as a very light hand sanding so we invested a couple more hours into that.
Finally I hosed the whole thing off today - that was helpful because as well as clearing the dust it also gave me an insight into where the lower spots of the floor are and so where I might expect to see the resin sit a little thicker. Now I’ve seen how much dust comes off that way I’d add a hose down to the list of prerequisites for this job.
Over the weekend the floor should dry out and then I can have a quick inspect of where we are at.
I obtained rubber squeegees and spiked shoes from a firm called “vi” distribution in sandbach, Cheshire. Very helpful company and reasonably priced. I also got a 25 litre mixing bucket so we can mix two or three tins of the paint at one go and pour from the new bucket.
I’m hoping we can do the final pour on Monday. I’m a bit nervous. Quite a lot of effort has gone into this now!
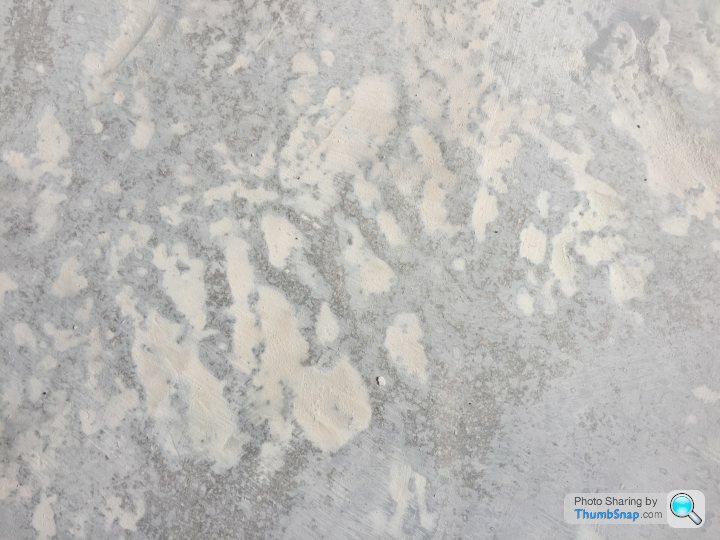
This is a detail shot of how the filler has smoothed the surface out:
This week we spent some time filling in some of the depressions in the surface with the “fine surface filler” supplied to me by resin coat.
We then used the industrial sander (which was on a week’s hire so is due back tomorrow am) to flat that back. We did find that not even the industrial sander leaves as smooth a finish as a very light hand sanding so we invested a couple more hours into that.
Finally I hosed the whole thing off today - that was helpful because as well as clearing the dust it also gave me an insight into where the lower spots of the floor are and so where I might expect to see the resin sit a little thicker. Now I’ve seen how much dust comes off that way I’d add a hose down to the list of prerequisites for this job.
Over the weekend the floor should dry out and then I can have a quick inspect of where we are at.
I obtained rubber squeegees and spiked shoes from a firm called “vi” distribution in sandbach, Cheshire. Very helpful company and reasonably priced. I also got a 25 litre mixing bucket so we can mix two or three tins of the paint at one go and pour from the new bucket.
I’m hoping we can do the final pour on Monday. I’m a bit nervous. Quite a lot of effort has gone into this now!
This is a detail shot of how the filler has smoothed the surface out:


It’s really hard to see on these photos but in words I’d write - the finish is now largely smooth. It feels smooth to run your hand over. There are still some imperfections but as far as we can see none are deep. We have sanded out the concrete fingers where the floor had dried high. The floor is not perfectly flat from corner to corner but where there are changes in level they are gradual, minor and smooth transitionally. There is no build up of filler - it has been used to fill holes only and thus I feel that the floor will still be incredibly strong.
On that basis it will be very interesting to see how the paint goes down...
Still got to decide if we are going for one mahoosive coat or one thick and one final finish thin one - that’s also a possibility. I have been warned by resin coat that if I apply it too thick it might bubble.... tres interesting...
Been reading thought this with interest. I actually watched them do the floor in works warehouse extension 18months ago.
Big machine to take then top off the floor, extraction, no mess. Then a 9" angle grinder with some wheel for doing the same round the edge, extraction but some mess.
Then sweep the lot, and a clear epoxy sealer, as you say, pour it on and spread wearing spiked shoes. Tea break, then second coat a similar colour to the finished shade.
Second day, scraper to take off the high spots where it had bubbled out of the concrete, and filler (looked and smelt just like car body filler) followed by the topcoat. Minimum 48h before forklift traffic.
I do also known someone who was epoxy sheathing a boat and forgot to add the hardner. Same story, all had to be scrapped off again!
Daniel
The multiple thin coat thing is potentially a mistake. From what I can see of the previous coats (thin and thick “poured” coats by rollering a thin coat you don’t take advantage of the tremendous self levelling ability of the product. You have to apply the epoxy at a decent thickness for it to be able to smooth across depressions properly.
So today I’m going to apply a last coat of primer over the bits of bare concrete that have been exposed by the heavy sanding.
Monday it’s thick coat time and then probably Tuesday it will finally be done!
So today I’m going to apply a last coat of primer over the bits of bare concrete that have been exposed by the heavy sanding.
Monday it’s thick coat time and then probably Tuesday it will finally be done!
Julian Thompson said:
The multiple thin coat thing is potentially a mistake. From what I can see of the previous coats (thin and thick “poured” coats by rollering a thin coat you don’t take advantage of the tremendous self levelling ability of the product. You have to apply the epoxy at a decent thickness for it to be able to smooth across depressions properly.
I mean it depends what you mean by thin and thick I guess, if by think you just mean poured and spread rather than rollered then fair play. Daniel
Hi Daniel yes that’s what’s I mean.
Today we did the final primer coat. Picture doesn’t do it justice its created a nice floor.
Interestingly we poured 5 litres of primer in two lines up the garage direct from the tin and we’re able to cover the whole floor with it now that there are only a few imperfections and now the floor is largely sealed.
Seems really good now. Bit nervous about tomorrow but hopefully ok...
PS spiked shoes worked well but tip - check the spikes are tight in your brand new shoes. As we walked about ours fell to bits leaving an Easter egg hunt of spikes and nuts all over the floor! For the main coat I’ll definitley be getting a spanner to them!!
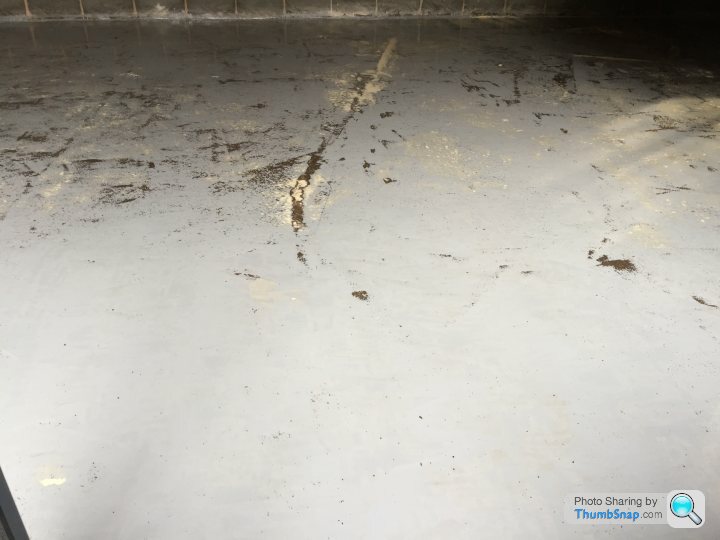
Ok so we went ahead and painted it today.
Few further tips as I remember them in no particular order:
1) spiked shoes do have a tendency to create more “bits” in the finish as they slightly imprint the floor and sometimes scratch it causing debris. Pick a spot and stay there, moving your body and arms as much as possible before repositioning.
2) pour the paint at the back of the expected coverage area and “push” the material forwards with your squeegee. Work the area as flat as poss and then your helper cross rolls it with the roller.
3) use decorators tack rags to fully clean the edges of the room - that’s where the nasties lie and you want to be able to squeegee right along the edge without dust.
4) have more paint than you project to need, on sale or return, and keep your consistency as the job dictates rather than how much paint you have.
5) do use surface filler to take out the ridges and big holes after you seal the floor. You’ll be amazed at how much better and easier it makes the finish.
6) have spare rollers and squeegees in case one breaks or you hit some dust you didn’t expect.
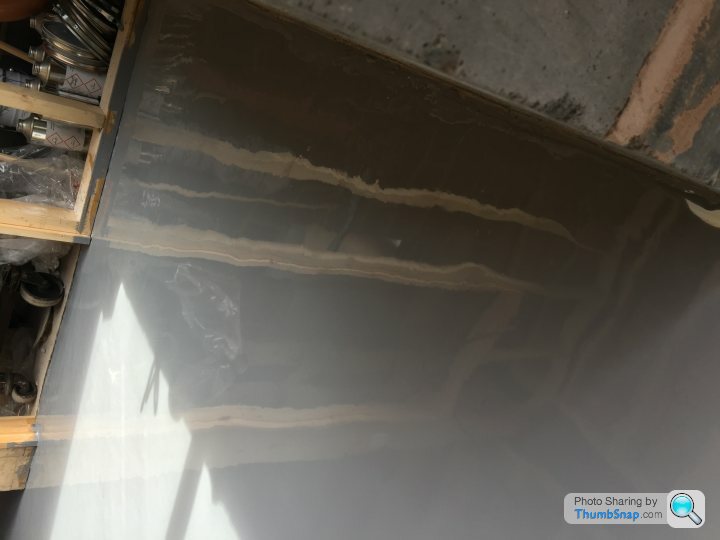
Today we did the thick coat, so we aimed for the 105 square meters with 14 cans of paint. We actually used 15 cans to get the paint to a lovely gloss. We have 5 cans left if we need to do a thin finish coat which I’ll know tomorrow once it’s possible to access the building. It’s raining right now so I can’t swing the door open to see as it will drip on to the wet epoxy.
When we left the room the finish looked pretty much mirror smooth with the thick coat. I did notice a few bubbles as people had suggested might be the case but through the window it appears as though the self levelling effect is impacting that. So it really will be suck it and see. Will post some pics tomorrow but the job is a whole new level of quality compared to last attempt.
Few further tips as I remember them in no particular order:
1) spiked shoes do have a tendency to create more “bits” in the finish as they slightly imprint the floor and sometimes scratch it causing debris. Pick a spot and stay there, moving your body and arms as much as possible before repositioning.
2) pour the paint at the back of the expected coverage area and “push” the material forwards with your squeegee. Work the area as flat as poss and then your helper cross rolls it with the roller.
3) use decorators tack rags to fully clean the edges of the room - that’s where the nasties lie and you want to be able to squeegee right along the edge without dust.
4) have more paint than you project to need, on sale or return, and keep your consistency as the job dictates rather than how much paint you have.
5) do use surface filler to take out the ridges and big holes after you seal the floor. You’ll be amazed at how much better and easier it makes the finish.
6) have spare rollers and squeegees in case one breaks or you hit some dust you didn’t expect.
Today we did the thick coat, so we aimed for the 105 square meters with 14 cans of paint. We actually used 15 cans to get the paint to a lovely gloss. We have 5 cans left if we need to do a thin finish coat which I’ll know tomorrow once it’s possible to access the building. It’s raining right now so I can’t swing the door open to see as it will drip on to the wet epoxy.
When we left the room the finish looked pretty much mirror smooth with the thick coat. I did notice a few bubbles as people had suggested might be the case but through the window it appears as though the self levelling effect is impacting that. So it really will be suck it and see. Will post some pics tomorrow but the job is a whole new level of quality compared to last attempt.
Morning!
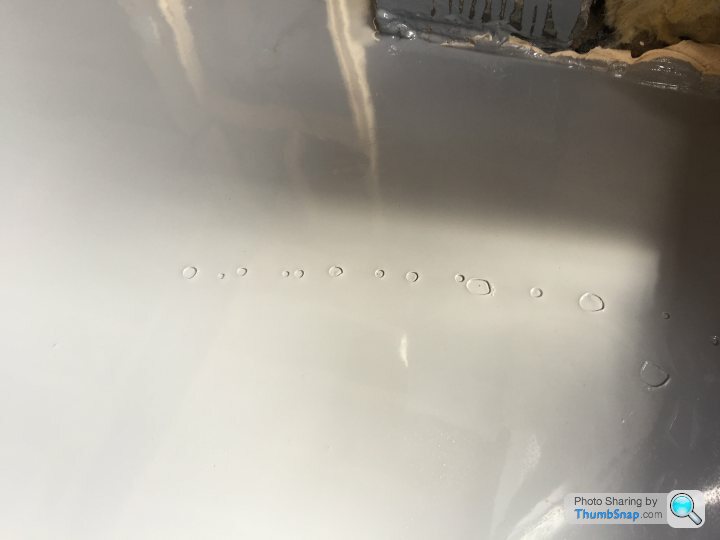
Ok so the answer to the trowel is - I’m not sure. I spoke to a guy at Resincoat who sounded like he had actually had experience of putting them down. He advised me against a notched trowel because you he said you want a smooth surface with the squeegee as much as poss then smooth with the roller.
In practice that seems to have worked out exactly as he said - remember you’re pouring your resin on in lines to the correct area so you’re effectively controlling the coverage with that.
Anyway - there is amazing and very annoying news all at the same time.
Here is the finish - it’s like glass:
Gassing Station | Homes, Gardens and DIY | Top of Page | What's New | My Stuff