Gap between coving and tiles
Discussion


Redoing bathroom and due to height of bath, squareness of walls and the law of sod with my tile sizes, there is a gap between tiles and coving that's too small to fill with bits of tile.
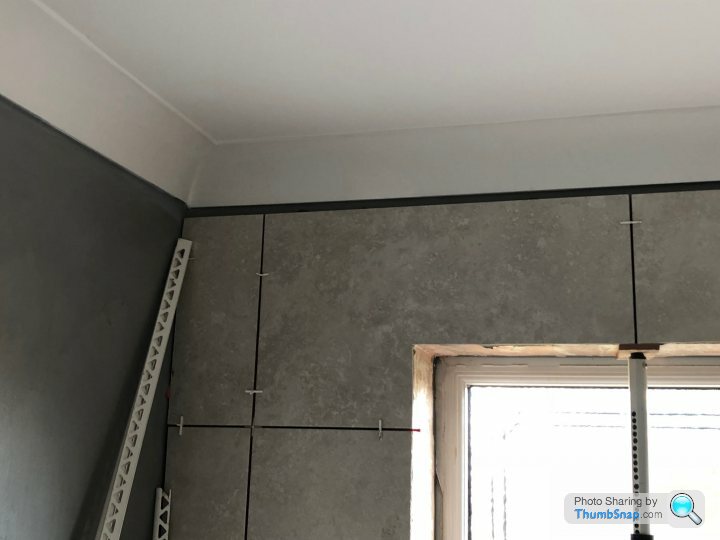
We discussed ripping out coving and reskimming ceiling, tiler is concerned that could damage plasterboard walls and thus tiling/tiles already laid. Pipes for shower also kink into coving to avoid ceiling joist (though that's not a massive issue).
Tiler suggested he could use those plastic corner trim pieces on top but I expect that will look s te.
te.
I could possibly fill the gap and paint white so it just extends coving? I think this might be best option, but with gap not being even all the way along could look a bit awkward.
Any other options?
We discussed ripping out coving and reskimming ceiling, tiler is concerned that could damage plasterboard walls and thus tiling/tiles already laid. Pipes for shower also kink into coving to avoid ceiling joist (though that's not a massive issue).
Tiler suggested he could use those plastic corner trim pieces on top but I expect that will look s
te.I could possibly fill the gap and paint white so it just extends coving? I think this might be best option, but with gap not being even all the way along could look a bit awkward.
Any other options?
Most tillers I have known, measure precisely to avoid things like this from happening. even if it means a half tile top and bottom.
Personally, I would rip out the coving.
Alternatively, rip off the top 2-3 layers of tiles and put in a thin 50mm feature tile all the way around. Then put the tile back on top.
I would normally agree, but he considered the half tile option and with the feature tile being ridged it wouldn't have given the clean lines around the bath when cut. If the adjacent wall didn't run out of square the 1/2 cm gap all around at the top would have been easily filled/painted.
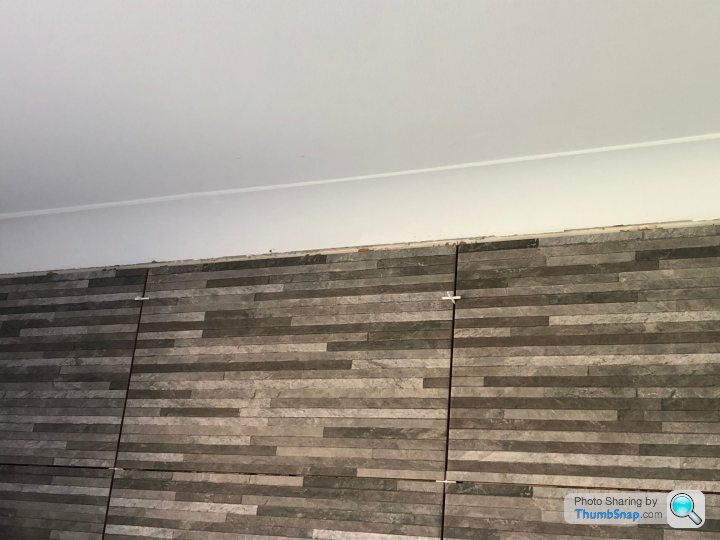
I think we'll bite the bullet and get rid of the coving, which should end up looking better anyway.
I think we'll bite the bullet and get rid of the coving, which should end up looking better anyway.
I could understand if you attempted it yourself but as it sounds like you have paid a tiler I would be asking for him to start again 90% of a good tiling job is planning to avoid this. And where its unadvoidable he should be able to come up with a solution it is his trade after all.
You will notice what ever bodge you do for the rest of you time in that room and that would drive me nuts!
The problem is that if the gap is not the same all the way round easiest solution would be fill / chaulk ectend coving down but this will be a pain to do well.
I would like suggested take a few rows down and stick a feature row in or ask the tiler to re do it cutting the tiles to fit.
Hol said:
Most tillers I have known, measure precisely to avoid things like this from happening. even if it means a half tile top and bottom.
Personally, I would rip out the coving.
Alternatively, rip off the top 2-3 layers of tiles and put in a thin 50mm feature tile all the way around. Then put the tile back on top.
Personally, I would rip out the coving.
Alternatively, rip off the top 2-3 layers of tiles and put in a thin 50mm feature tile all the way around. Then put the tile back on top.

I go one step further, I mark out the wall before I start so I can visualise every cut before I start.
Isn’t the depth of the tile greater than the depth of the lip of the coving? So it was never going to look right whether the tile met perfectly or not?
Presumably you must’ve had the discussion at some point with the tiler about whether to keep the coving or whether to accept the slightly odd tile/coving join?
Personally I’d do as mentioned above and buy a larger sized coving that can accommodate the existing behind it. Just lay it over the top; done properly it should look good and not like a bodge.
I made this mistake with one on my first bathrooms - I measured to the ceiling but it was out by 1"
I used a white plastic quadrant to fill it and it looked ok
I can't imagine a fully tiled wall looking ok with coving so I'd remove it regardless.
It's entirely possible to fill the ceiling if there's an issue although if a plasterer is available it'll be quicker - just check how he's bonding it, hot humid areas and PVA don't mix
OP This happened to me too.
To say I wasn't pleased would be an understatement.
The coving you have looks exactly like mine, its probably made of of polystyrene foam material. It comes off very easily and doesn't blister the plasterboard or anything. It will tear the paint off the ceiling but that's an easy repair for any decorator or yourself.
My tiler recommended me some of the suggestions others have posted here but do you really want to go to the effort of spending thousands on a bathroom and then having a 10 quid quadrant on the top. Just get it done right whatever it needs and take the tile to the top.
Regarding the shower pipes into the coving, if you don't/can't move/bend those pipes then maybe find a different coving at half the drop? Maybe get the new contemporary style coving that uplights LEDs?
Edited by Chamon_Lee on Tuesday 31st July 18:21
Chamon_Lee said:
The coving you have looks exactly like mine, its probably made of of polystyrene foam material. It comes off very easily and doesn't blister the plasterboard or anything. It will tear the paint off the ceiling but that's an easy repair for any decorator or yourself.
More likely to be Gyproc. If so it won't come down without a fight. A multi-tool is the cleanest way to remove it.Coving is down, pipes weren't an issue. Because ceiling had been reskimmed over artex about a year ago, up to the coving, it's going to need a reskim anyway. Will look much better than with coving, so all's well that ends well.
Tiling is very good I think other than that, so back to happy.
Tiling is very good I think other than that, so back to happy.
rsbmw said:
Coving is down, pipes weren't an issue. Because ceiling had been reskimmed over artex about a year ago, up to the coving, it's going to need a reskim anyway. Will look much better than with coving, so all's well that ends well.
Tiling is very good I think other than that, so back to happy.
Who doesn't like a happy ending Tiling is very good I think other than that, so back to happy.
Gassing Station | Homes, Gardens and DIY | Top of Page | What's New | My Stuff