Tools you wish you'd bought sooner...
Discussion


Sway said:
hidetheelephants said:
Sway said:
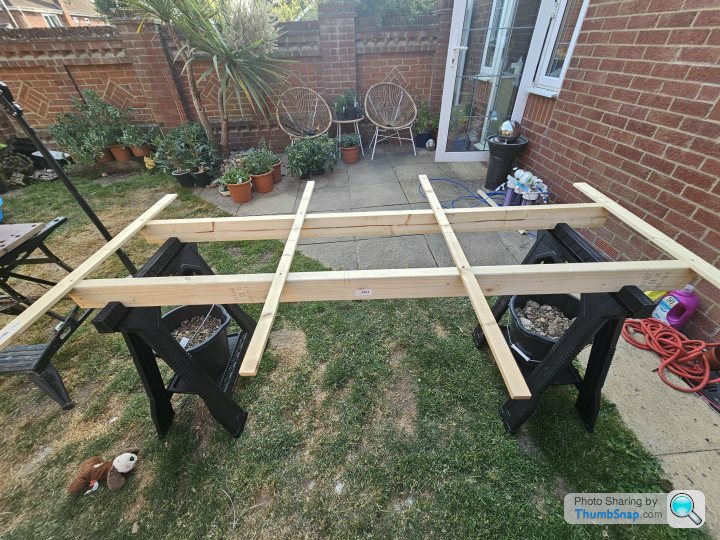
Managed to knock up a decent 'lattice' saw top using cls and some battening using the mitre saw. Sander gave it a quick clean up, and very impressed.
You can't swank into the thread with all that bling and then not show us what you've 'knocked up'.
Especially as it's specifically designed to be sacrificial, and I used odd bits lying around...
I'll post up the wardrobes once they're done though. Just doing the carcasses/plinth for now, as swmbo hasn't decided on the style of doors she wants.
guitarcarfanatic said:
I would always cut MDF so worth working out the angle. Planing tends to deform the edges a little!
If you can stretch to it, I strongly recommend going for MR MDF - it takes paint so well and if you follow Gosforth Handyman or Peter Millards painting MDF tips, you will get a finish almost as good as sprayed.
Unfortunately, I'm not going to be able to cut the angle...If you can stretch to it, I strongly recommend going for MR MDF - it takes paint so well and if you follow Gosforth Handyman or Peter Millards painting MDF tips, you will get a finish almost as good as sprayed.
Worked it out (crappy sketch below!) - and I need a 50 degree cut, the saw only goes to 47...
The 'gap' will be invisible at the back of the fitted wardrobes, so now trying to decide if it's worth cutting the max angle, or just keeping at 90 degrees for simplicity. It's going to need some caulk prior to painting regardless.
uk66fastback said:
That Festool stuff is different league. Our kitchen fitter had all the stuff, similar saw, dust extractor and the cuts were clean as … not cheap though, he said. Looked beautifully made though. Not something me as a DIYer can justify, sadly …
I was very lucky with this one off Facebook marketplace. Really nice guy, but he'd upgraded to the cordless version so sold this for quite a bit cheaper than the 'DIYer alternative' by Makita.Just need someone to do similar and sell off a Domino for peanuts and I'll be very happy!
Sway said:
I was very lucky with this one off Facebook marketplace. Really nice guy, but he'd upgraded to the cordless version so sold this for quite a bit cheaper than the 'DIYer alternative' by Makita.
Just need someone to do similar and sell off a Domino for peanuts and I'll be very happy!
I always keep a lookout for a Domino. It's going to be my first bit of Festool at some point.Just need someone to do similar and sell off a Domino for peanuts and I'll be very happy!
Sway said:
Unfortunately, I'm not going to be able to cut the angle...
Worked it out (crappy sketch below!) - and I need a 50 degree cut, the saw only goes to 47...
The 'gap' will be invisible at the back of the fitted wardrobes, so now trying to decide if it's worth cutting the max angle, or just keeping at 90 degrees for simplicity. It's going to need some caulk prior to painting regardless.
I can’t work out what you’re making but splitting the angle could work? Give you a deeper whatever-it-is on the splay too.Worked it out (crappy sketch below!) - and I need a 50 degree cut, the saw only goes to 47...
The 'gap' will be invisible at the back of the fitted wardrobes, so now trying to decide if it's worth cutting the max angle, or just keeping at 90 degrees for simplicity. It's going to need some caulk prior to painting regardless.

Sebastian Tombs said:
Turn your bit of wood around and do a 40 degree cut the other way. that will give you your 50 degrees.
Don't think that works as the saw only tilts in one direction?Splitting the angle could work, but is a lot more effort figuring out the board lengths!
I think I'll go with the easy 90 degree cuts. The three boards (lower back, upper back and top) won't be attached to each other, only the sides. Some filler in the gap formed, then caulk on the inner edge before painting should be golden.
(I'm making fitted wardrobes for an alcove in our dressing room. It's on the third floor, and the ceiling slopes towards the front of the alcove, so the back needs to be split into two - a vertical lower then an angled upper to follow the shape of the wall).
Doofus said:
Sway said:
hidetheelephants said:
Sway said:
Managed to knock up a decent 'lattice' saw top using cls and some battening using the mitre saw. Sander gave it a quick clean up, and very impressed.
You can't swank into the thread with all that bling and then not show us what you've 'knocked up'.Especially as it's specifically designed to be sacrificial, and I used odd bits lying around...
I'll post up the wardrobes once they're done though. Just doing the carcasses/plinth for now, as swmbo hasn't decided on the style of doors she wants.
This is!
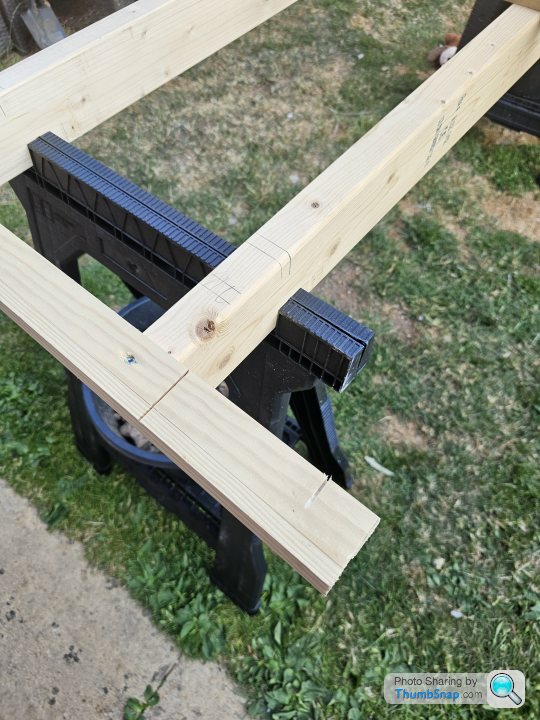
Unlike most (including the pukka shiny ones I really wanted) - cls wedges into the slots on top of the trestles and sticks proud. Thin battens running across (countersunk screws below the depth I'll ever set the blade) gives much more support/width for the sheet. Buckets of gravel for stability.
Battens are sacrificial, don't mind scoring a few mm through them as I'm cutting sheet.
Sway said:
Sebastian Tombs said:
Turn your bit of wood around and do a 40 degree cut the other way. that will give you your 50 degrees.
Don't think that works as the saw only tilts in one direction?Splitting the angle could work, but is a lot more effort figuring out the board lengths!
I think I'll go with the easy 90 degree cuts. The three boards (lower back, upper back and top) won't be attached to each other, only the sides. Some filler in the gap formed, then caulk on the inner edge before painting should be golden.
(I'm making fitted wardrobes for an alcove in our dressing room. It's on the third floor, and the ceiling slopes towards the front of the alcove, so the back needs to be split into two - a vertical lower then an angled upper to follow the shape of the wall).
Jules Sunley said:
Sway said:
Sebastian Tombs said:
Turn your bit of wood around and do a 40 degree cut the other way. that will give you your 50 degrees.
Don't think that works as the saw only tilts in one direction?Splitting the angle could work, but is a lot more effort figuring out the board lengths!
I think I'll go with the easy 90 degree cuts. The three boards (lower back, upper back and top) won't be attached to each other, only the sides. Some filler in the gap formed, then caulk on the inner edge before painting should be golden.
(I'm making fitted wardrobes for an alcove in our dressing room. It's on the third floor, and the ceiling slopes towards the front of the alcove, so the back needs to be split into two - a vertical lower then an angled upper to follow the shape of the wall).
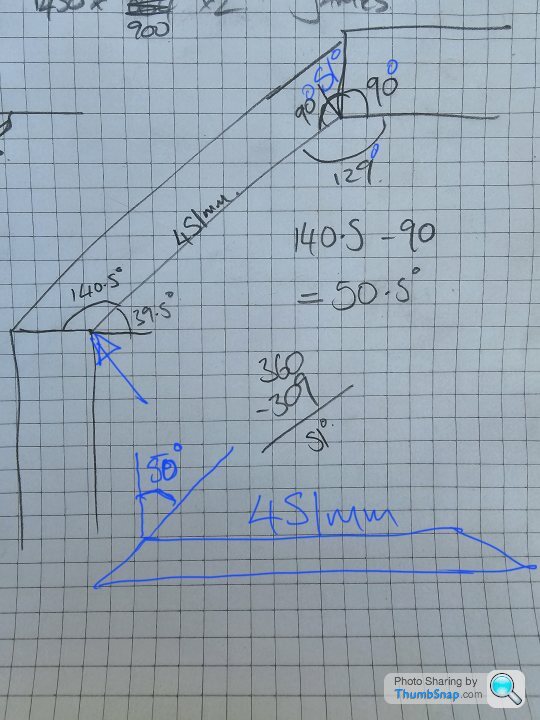
Awful phone sketch incoming...
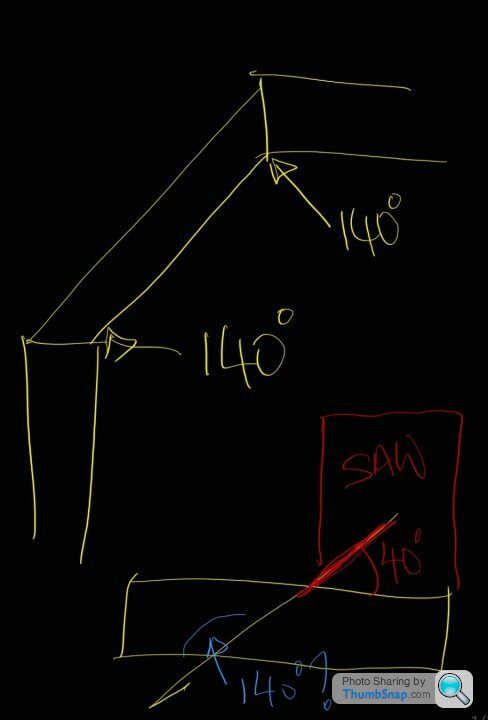
So top left is what I want. Bottom right is I think what you're suggesting - cut at 40 degrees from the 'waste' side, allowing the 1.8mm saw kerf in addition to the desired length?
That'll give me the 140 degree target angle (in blue)?
If so, I'll have to do a bit of trigonometry to figure out the length I'm cutting, as I know the inside length but not currently the outside.
Sway said:
If so, I'll have to do a bit of trigonometry to figure out the length I'm cutting, as I know the inside length but not currently the outside.
The other option if you've got enough length in your board it to cut the angle end first, then cut the 90 at the other end to the correct length afterwards.Probably ends up easier as no dealing with fractions.
pquinn said:
Sway said:
If so, I'll have to do a bit of trigonometry to figure out the length I'm cutting, as I know the inside length but not currently the outside.
The other option if you've got enough length in your board it to cut the angle end first, then cut the 90 at the other end to the correct length afterwards.Probably ends up easier as no dealing with fractions.

Just figured it out, thanks to very rusty trig (and Google!).
I've got a decent amount of board to play with, so I'll play it safe and cut everything else then use the bit left to do my first angled cut before measuring my new distance and cut the other angled cut - hopefully leaving the right distance on the inner face.
It's maths, right?

Gassing Station | Homes, Gardens and DIY | Top of Page | What's New | My Stuff