Discussion


wolfracesonic said:
having all that timber purpose sawn in a timber suitable for outdoors would be very expensive.
True, but set against that if you make it out of treated CLS or other more general outdoor timber it will look terrible when it's finished and get worse quickly over time. Although that wood is treated to last, it's still generally the worst fast-grown s
 te you can buy, so it'll twist, cup, warp and bend. It's not intended to have exposed cut ends, these will deteriorate and let water in even if the wood isn't rotting. When you cut the pieces to length the ends are no longer treated.
Buying timber ready to go, it's still a big job, and firmly in "Do it right or don't bother" territory.
A compromise might be to get a glulam beam supplier to cut a load of shorter beams for you, they might have off-cuts that would work for this. They tend to use slightly better timber, the glulam process stops it wandering all over the place and the pieces would be small enough that you could get them pressure treated once finished. Protect them after pressure treating and you might be onto a winner.
Personally I'd be speaking to a timber frame construction company to see what the decent yards they use are then going to a timber yard to see what they have, western red cedar might be a good option.
The builder who did our house refurb (and my workshop) does a lot of timber frame stuff. I will ask him.
For me this is about the making of it as much as the finished item - from my sums I can buy the timber and fixings for about half the cost of the finished item, and as I plan to enjoy it I don't need to value my time into the factor. Otherwise I'd buy the one I saw...
For me this is about the making of it as much as the finished item - from my sums I can buy the timber and fixings for about half the cost of the finished item, and as I plan to enjoy it I don't need to value my time into the factor. Otherwise I'd buy the one I saw...

Austin_Metro said:
Experienced heads: any advice on marking gauges and marking knives please? 6 quid at tool station or 20+ at the wonderfully dangerous website that is Axminster tools?
Trying to cut more accurate lap joints and the like.
I like the Narex marking knife, it's double bevelled, supposedly for left and right handers but I've found it useful as just a right handed tool.Trying to cut more accurate lap joints and the like.
https://www.workshopheaven.com/narex-marking-knife...
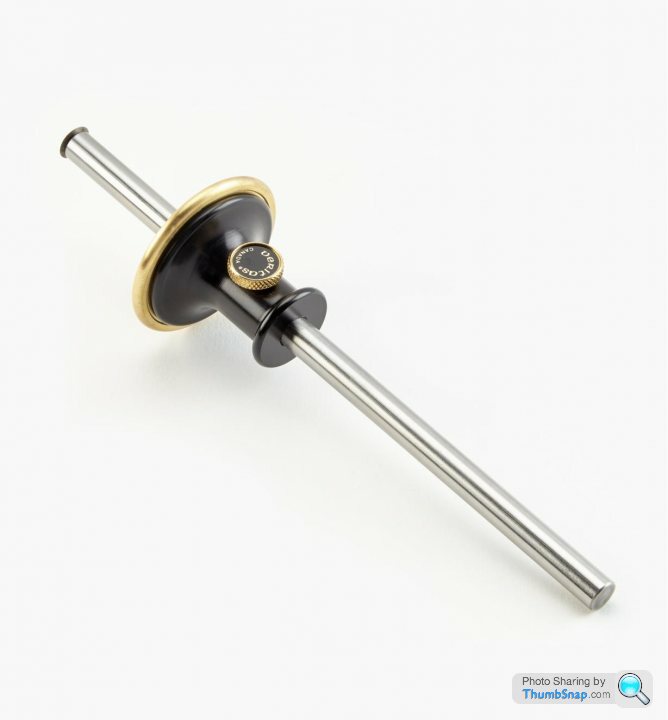
Cheap marking guages aren't sharp, don't stay sharp and usually have a plastic screw which can slip - I use a Marples cutting guage more often than anything else: https://www.workshopheaven.com/marples-rosewood-cu...
If you think Axminster is dangerous, have a look around the Workshop Heaven site I linked to above......
Mark Benson said:
I like the Narex marking knife, it's double bevelled, supposedly for left and right handers but I've found it useful as just a right handed tool.
https://www.workshopheaven.com/narex-marking-knife...
Cheap marking guages aren't sharp, don't stay sharp and usually have a plastic screw which can slip - I use a Marples cutting guage more often than anything else: https://www.workshopheaven.com/marples-rosewood-cu...
If you think Axminster is dangerous, have a look around the Workshop Heaven site I linked to above......
Thanks Mark. That Marples one look great. Will have a look at that site too. https://www.workshopheaven.com/narex-marking-knife...
Cheap marking guages aren't sharp, don't stay sharp and usually have a plastic screw which can slip - I use a Marples cutting guage more often than anything else: https://www.workshopheaven.com/marples-rosewood-cu...
If you think Axminster is dangerous, have a look around the Workshop Heaven site I linked to above......
Mark Benson said:
If you think Axminster is dangerous, have a look around the Workshop Heaven site I linked to above......
Even worse is going on one of Mr Sefton's courses, because then it seems such a shame to leave without entirely filling the car with tools.To clarify, the course I did was excellent, but cost about three times what it said on the website once I'd acquired new shiny things...
I’ve got the Marples marking and mortice gauges, eBay specials but I’ve also purchased a Veritas one, which you can use for either across or with the grain and can also be used as a depth gauge. My only problem with it is that leaves a really fine mark in the timber, great for accuracy, not so much for my eyes! I also prefer the ‘feel’ of the Marples ones.
wolfracesonic said:
I’ve got the Marples marking and mortice gauges, eBay specials but I’ve also purchased a Veritas one, which you can use for either across or with the grain and can also be used as a depth gauge. My only problem with it is that leaves a really fine mark in the timber, great for accuracy, not so much for my eyes! I also prefer the ‘feel’ of the Marples ones.
I usually like Veritas stuff (their inset vice is one of the most useful things I have) but I can't get on with those circular marking gauges at all.As I understand it, marking gauges have a pin and are for scribing a line, parallel to an edge, along the grain.
Cutting gauges, with a blade, are for marking a line, parallel to the end of a board, across the grain. Commonly used for marking the shoulders of a dovetail joint.
Cutting across the grain with a marking gauge only spelches the fibres
Then there's the mortice gauge with two pins, one fixed and one adjustable so two parallel line can be scribed down the grain.
loughran said:
As I understand it, marking gauges have a pin and are for scribing a line, parallel to an edge, along the grain.
Cutting gauges, with a blade, are for marking a line, parallel to the end of a board, across the grain. Commonly used for marking the shoulders of a dovetail joint.
Cutting across the grain with a marking gauge only spelches the fibres
Then there's the mortice gauge with two pins, one fixed and one adjustable so two parallel line can be scribed down the grain.
That’s helpful. Thank you. Cutting gauges, with a blade, are for marking a line, parallel to the end of a board, across the grain. Commonly used for marking the shoulders of a dovetail joint.
Cutting across the grain with a marking gauge only spelches the fibres
Then there's the mortice gauge with two pins, one fixed and one adjustable so two parallel line can be scribed down the grain.
I almost forgot. The mortice cutting gauge has two knives independently adjustable for marking mortices from the end of a board, across the grain.
I don't ever remember having to mark a mortice from the end of a board, but should the opportunity arise I have a very fine mortice cutting gauge in rosewood and brass sitting on a shelf, biding it's time.

I don't ever remember having to mark a mortice from the end of a board, but should the opportunity arise I have a very fine mortice cutting gauge in rosewood and brass sitting on a shelf, biding it's time.
loughran said:
I almost forgot. The mortice cutting gauge has two knives independently adjustable for marking mortices from the end of a board, across the grain.
I don't ever remember having to mark a mortice from the end of a board, but should the opportunity arise I have a very fine mortice cutting gauge in rosewood and brass sitting on a shelf, biding it's time.
^That’s an obscure piece of kit! Maybe useful for a table top where the ends of the legs have tenons on that are visible through the top and you need to cut a mortice to receive them; sell it and you’ll be inundated with work that requires one!I don't ever remember having to mark a mortice from the end of a board, but should the opportunity arise I have a very fine mortice cutting gauge in rosewood and brass sitting on a shelf, biding it's time.
wolfracesonic said:
I’ve got the Marples marking and mortice gauges, eBay specials but I’ve also purchased a Veritas one, which you can use for either across or with the grain and can also be used as a depth gauge. My only problem with it is that leaves a really fine mark in the timber, great for accuracy, not so much for my eyes! I also prefer the ‘feel’ of the Marples ones.
I have this one too, I don't really use it. It's really nice and good value for money, but you really want the double blade one which is far too expensive.I think it's helpful to understand the process of making an accurate joint and how the different designs are intended to be used.
Then buy a Stanley knife and a few packs of blades.
The point behind the two blade/pin mortice gauges is that they reference off your good straight face and you set the pins to the width of the chisel you intend to cut with. That way it's quick to chop the mortice and you're ensuring your parts always meet flush on the visible surface. You use the same setup on your tenon to set it out and so long as you don't screw anything up you'll have a perfect mortice and tenon joint. As a tool it's really about accurate repeatability as much as accuracy.
For a lap joint what matters is being perfectly perpendicular to your reference face and having a sharp finish to the cut surface. You need a good square and a sharp knife, which is where the Stanley comes in - disposable blades.
I do all mine like this:
https://www.youtube.com/watch?v=9iQ1-kuQ1qY
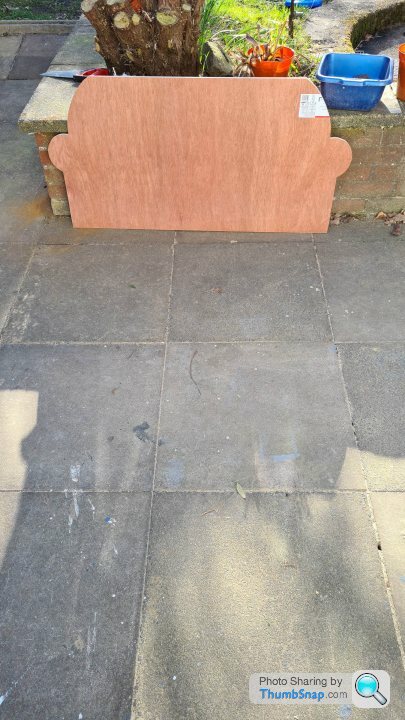
Lad wanted a small sofa for his bedroom. Saw someone build a armchair on YouTube using plywood. So thought I'd give it a go.
Cut a general shape using the 12mm stuff to keep it light. In hindsight too thin for the fixings I had on hand. Would recommend 18mm.
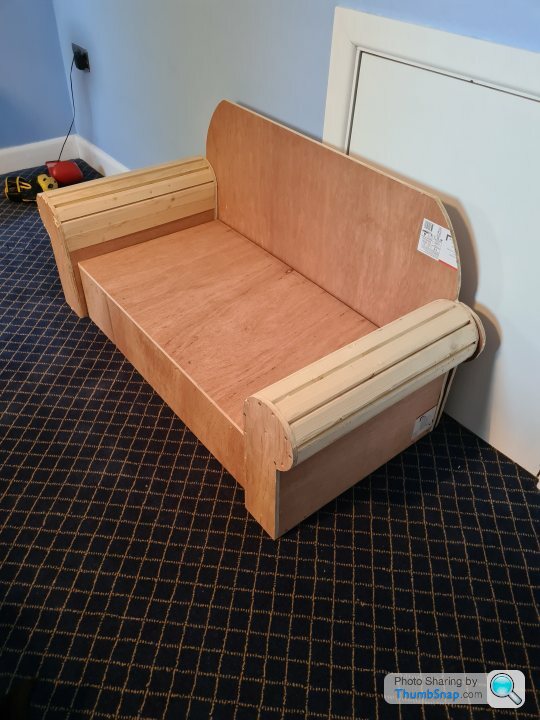
Did the same for arm fronts/backs. Joined together with strips of pine I had lying around. Added the curves using spokeshave and plane.
Got foam from a local foam factory. All offcuts so were cheap.
Easy to cut on table and bandsaw. I discovered after spending ages cutting with scissors and Stanley knives.
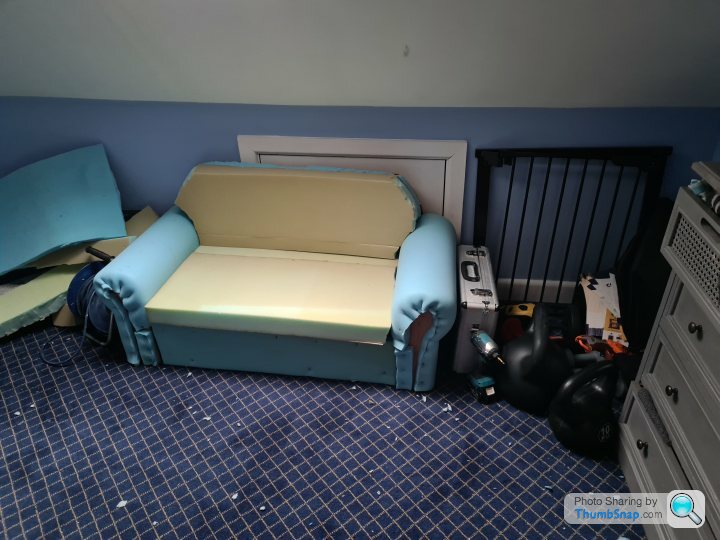
Glued with spray adhesive and tacked with staples.
Kids like all that Marvel stuff so got a reel of comic book fabric. About 6m used in the end I think. Stapled down.

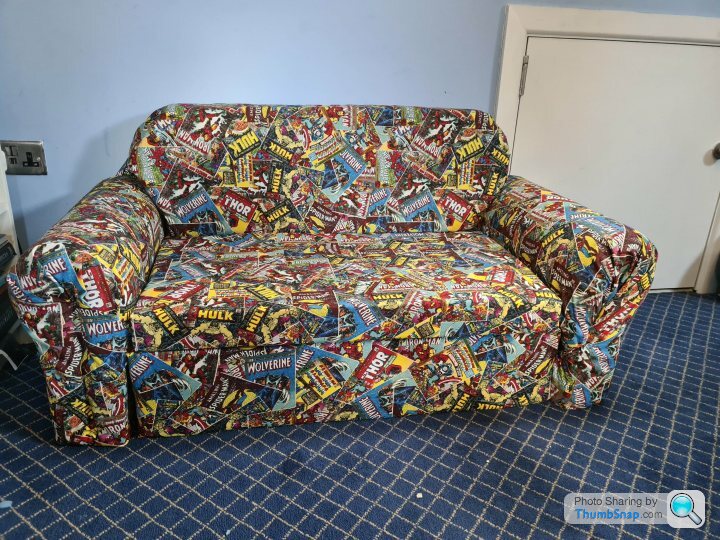
Attached some cheap feet and covered some ply in fabric and foam and screwed onto faces of arms to cover seams.
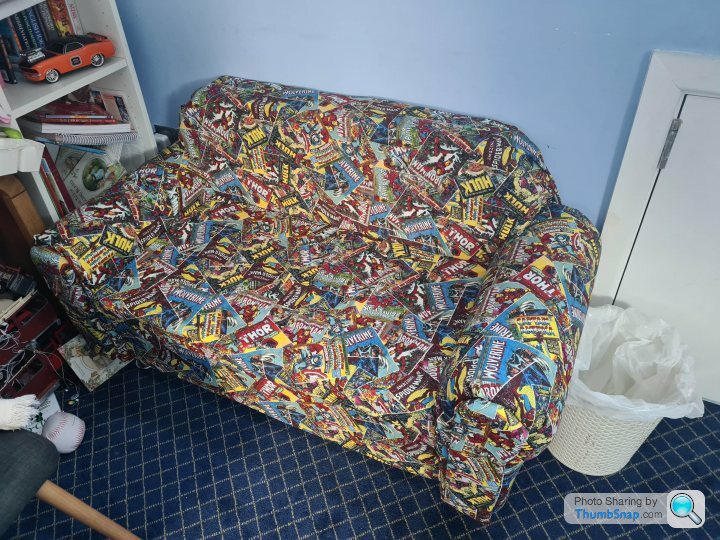
Surprisingly comfy using bits of proper upholstery foam. Although in hindsight should have gone for a lighter shade and less busier fabric.
Cut a general shape using the 12mm stuff to keep it light. In hindsight too thin for the fixings I had on hand. Would recommend 18mm.
Did the same for arm fronts/backs. Joined together with strips of pine I had lying around. Added the curves using spokeshave and plane.
Got foam from a local foam factory. All offcuts so were cheap.
Easy to cut on table and bandsaw. I discovered after spending ages cutting with scissors and Stanley knives.
Glued with spray adhesive and tacked with staples.
Kids like all that Marvel stuff so got a reel of comic book fabric. About 6m used in the end I think. Stapled down.
Attached some cheap feet and covered some ply in fabric and foam and screwed onto faces of arms to cover seams.
Surprisingly comfy using bits of proper upholstery foam. Although in hindsight should have gone for a lighter shade and less busier fabric.
Just finished helping a mate put together a shoe/locker/coat thingy for a friends utility room.
Top section fits 2 Ikea style boxes in each space, small shelves are for shoes, bigger floor level ones are for wellies. There will be coat hooks in the recessed areas.
A lot of cuts on a cheapo track saw (evolution), meaning I'm now looking for quick clamps for the track, as the screw ones got quite tedious
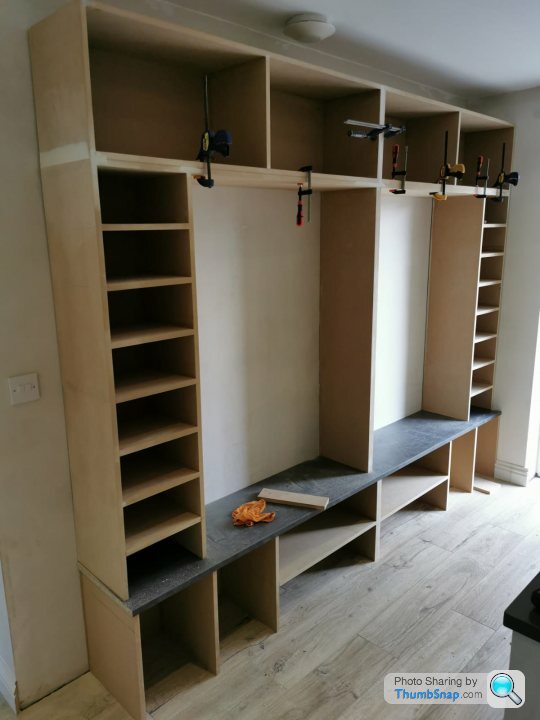
^ Axminster guide rail clamps, these might fit, a bit cheaper than the Festool ones!
Gassing Station | Homes, Gardens and DIY | Top of Page | What's New | My Stuff