Discussion


Over time you will build up a massive stock of timber left over form projects which is great to trial joints and practice with. In the meantime B&Q normally have a waste bin of offcuts that they put outside early morning for people to take bits from or larger pieces inside for sale at 50p or a quid a time. Very useful for small pieces of sheet materials etc.
Schmeeky said:
Cheers for all the replies about useful tools, I've been having a huge amount of fun researching and working out what bits would be most useful - as uncinqsix says I'll be trying to add just what tools I need for each project.
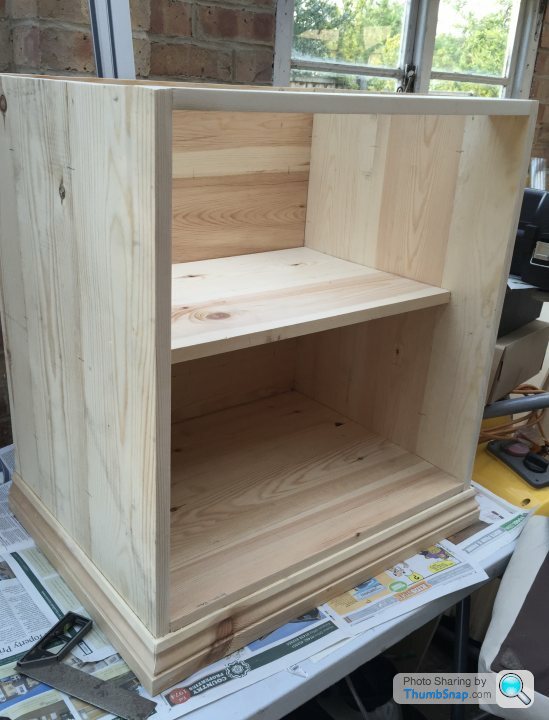
And so, the current project. I've (far too) many books at home, and was using standard sized, cheap-but-decent bookcases from Argos. I decided that a custom built one would fit the available space better, plus have more room on its shelves. It would also be a relatively straighforward project, albeit the largest , by some considerable margin. I wanted it to be a proper job as well, not just bodged together like my step-stool at the start of the thread, so maybe it was time to go shopping for tools..
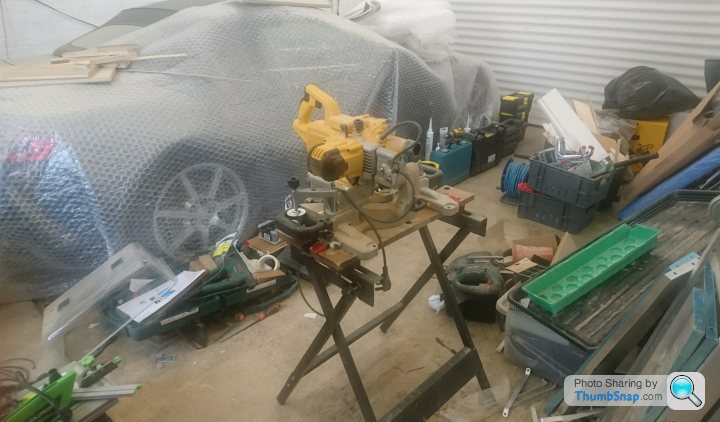
First off, I needed to get smooth and accurate 90^ cuts, so I invested in this Sliding mitre saw, which I see has just increased in price by £20 since I bought mine! I love the thing, it makes quick, accurate and smooth cuts, and is very easy to use. A future project will be to build a stand for it.
In all previous projects I'd just used screwed together butt joints, but here I needed something a tad better, and decided to use what I later discovered were called housing joints. At first I thought I could carve the trenches using the mitre saw, but the depth of cut was pretty uneven. So I started looking at routers. Looking on Amazon they seem to start at £55 or so, for brands that I've never heard of. But then I found this Bosch at a great price! After a little bit of practice I was able to make really nice clean trenches for the shelves to sit in.
Whoever mentioned pocket hole jigs, (which I had to look up as I'd never heard of them) thank you! Brilliant little device, really easy to use, and exactly what I needed for much better looking joints! Kreg Pocket Hole Jig
Other stuff I've been finding useful - clamps! Don't know how I managed before, they make it so much easier!
Anyhows, this is how it is this morning, I just need some ply to form the back and job's a good'un!

Slightly off topic but we have the same bar stools but in a brow y grey colour in our home cinebar And so, the current project. I've (far too) many books at home, and was using standard sized, cheap-but-decent bookcases from Argos. I decided that a custom built one would fit the available space better, plus have more room on its shelves. It would also be a relatively straighforward project, albeit the largest , by some considerable margin. I wanted it to be a proper job as well, not just bodged together like my step-stool at the start of the thread, so maybe it was time to go shopping for tools..
First off, I needed to get smooth and accurate 90^ cuts, so I invested in this Sliding mitre saw, which I see has just increased in price by £20 since I bought mine! I love the thing, it makes quick, accurate and smooth cuts, and is very easy to use. A future project will be to build a stand for it.
In all previous projects I'd just used screwed together butt joints, but here I needed something a tad better, and decided to use what I later discovered were called housing joints. At first I thought I could carve the trenches using the mitre saw, but the depth of cut was pretty uneven. So I started looking at routers. Looking on Amazon they seem to start at £55 or so, for brands that I've never heard of. But then I found this Bosch at a great price! After a little bit of practice I was able to make really nice clean trenches for the shelves to sit in.
Whoever mentioned pocket hole jigs, (which I had to look up as I'd never heard of them) thank you! Brilliant little device, really easy to use, and exactly what I needed for much better looking joints! Kreg Pocket Hole Jig
Other stuff I've been finding useful - clamps! Don't know how I managed before, they make it so much easier!
Anyhows, this is how it is this morning, I just need some ply to form the back and job's a good'un!
Oh, you're in it now 
It's a very slippery slope and before you know it, your entire garage will be full with tools and wood, then you'll have to spend a fortune making bespoke benches/cabinets to organise it the most efficient way because the off the shelf stuff isn't quite what you need!
I would highly recommend getting Google Sketchup. Really useful for making little models and then seeing how they fit in a room. Really good if you move on to bigger stuff like furniture and wardrobes etc. And also for when you start to build the benches for your garage
I don't have a table saw yet, but work mostly with ply, so I get the local timber merchant to cut it. It's incredibly accurate, so I can send them a cut list that I've taken from my sketchup model and it always goes together perfectly. I then have a tracksaw if I need to cut anything myself.
And some sort of power tool dust extractor that hooks up to a sander. You're gunna spend a lot of time sanding, and you don't always notice the dust at first, but it gets everywhere.
Slagathore said:
It's a very slippery slope and before you know it, your entire garage will be full with tools and wood, then you'll have to spend a fortune making bespoke benches/cabinets to organise it the most efficient way because the off the shelf stuff isn't quite what you need!
I would highly recommend getting Google Sketchup.
I don't have a table saw yet, but work mostly with ply, so I get the local timber merchant to cut it. It's incredibly accurate, so I can send them a cut list that I've taken from my sketchup model and it always goes together perfectly. I then have a tracksaw if I need to cut anything myself.
And some sort of power tool dust extractor that hooks up to a sander. You're gunna spend a lot of time sanding, and you don't always notice the dust at first, but it gets everywhere.
Listen to this guy!I would highly recommend getting Google Sketchup.
I don't have a table saw yet, but work mostly with ply, so I get the local timber merchant to cut it. It's incredibly accurate, so I can send them a cut list that I've taken from my sketchup model and it always goes together perfectly. I then have a tracksaw if I need to cut anything myself.
And some sort of power tool dust extractor that hooks up to a sander. You're gunna spend a lot of time sanding, and you don't always notice the dust at first, but it gets everywhere.
I'd tend to listen to other people's recommendations for tools, but at the end of the day you'll have to work it out for yourself as there's really no right answer. I'd get your self on Gumtree and pick up stuff as it comes up and is cheap, then see where you end up. Once you've more experience you'll understand what the tools are really for and whether you need one or whether there's a different way to do the same thing with the stuff you have.
A bandsaw though, you need one of those. So versatile, so useful.
But yeah, design in Sketchup. Get sheet material cut by the supplier. Get a dust extractor, and a decent facemask. Get ear defenders if you go for power tools. First aid kit and fire extinguisher is a good shout too.
Also, if this is a hobby, it's perfectly fine to spend all your time building stuff for your workshop. That's a hobby too! Can't beat a tidy organised shop!
Schmeeky said:
SeeFive, you're not wrong about it being addictive and rewarding! All the time spent in the workshop just feels so 'right'. Pottering away with the tunes going, designing, solving problems, creating. It's just great!
And I've already had my first build request - a friend wants me to make her a coffee table.
You are so lost now. Never see your wife and kids again... And I've already had my first build request - a friend wants me to make her a coffee table.

WRT tunes, cordless headphones make great ear defenders.
On that safety subject, when I got my lathe I bought a full face flip up visor. I much prefer that all the time to protective glasses as you don’t get steamed up from the dust mask so much.
Good advice on extraction above, really reduces the hassle of the entire workshop getting full of fine dust over time. Remember, some hardwoods you may use in future have very small particles that dust extraction miss, and certain woods are really carcinogenic, so have some additional protection for your lungs using quality masks. I lost a woodturning neighbour to that thinking his extraction was the be all and end all, so keep it safe.
Schmeeky said:
Cheers for all the replies about useful tools, I've been having a huge amount of fun researching and working out what bits would be most useful - as uncinqsix says I'll be trying to add just what tools I need for each project.
And so, the current project. I've (far too) many books at home, and was using standard sized, cheap-but-decent bookcases from Argos. I decided that a custom built one would fit the available space better, plus have more room on its shelves. It would also be a relatively straighforward project, albeit the largest , by some considerable margin. I wanted it to be a proper job as well, not just bodged together like my step-stool at the start of the thread, so maybe it was time to go shopping for tools..
First off, I needed to get smooth and accurate 90^ cuts, so I invested in this Sliding mitre saw, which I see has just increased in price by £20 since I bought mine! I love the thing, it makes quick, accurate and smooth cuts, and is very easy to use. A future project will be to build a stand for it.
In all previous projects I'd just used screwed together butt joints, but here I needed something a tad better, and decided to use what I later discovered were called housing joints. At first I thought I could carve the trenches using the mitre saw, but the depth of cut was pretty uneven. So I started looking at routers. Looking on Amazon they seem to start at £55 or so, for brands that I've never heard of. But then I found this Bosch at a great price! After a little bit of practice I was able to make really nice clean trenches for the shelves to sit in.
Whoever mentioned pocket hole jigs, (which I had to look up as I'd never heard of them) thank you! Brilliant little device, really easy to use, and exactly what I needed for much better looking joints! Kreg Pocket Hole Jig
Other stuff I've been finding useful - clamps! Don't know how I managed before, they make it so much easier!
Anyhows, this is how it is this morning, I just need some ply to form the back and job's a good'un!
Nice. Just look at the difference between the two pictures you posted, an enormous design difference. Personally, I would have used M&T for the top rather than the pocket holes. Having said that, it isn’t coming off any time soon And so, the current project. I've (far too) many books at home, and was using standard sized, cheap-but-decent bookcases from Argos. I decided that a custom built one would fit the available space better, plus have more room on its shelves. It would also be a relatively straighforward project, albeit the largest , by some considerable margin. I wanted it to be a proper job as well, not just bodged together like my step-stool at the start of the thread, so maybe it was time to go shopping for tools..
First off, I needed to get smooth and accurate 90^ cuts, so I invested in this Sliding mitre saw, which I see has just increased in price by £20 since I bought mine! I love the thing, it makes quick, accurate and smooth cuts, and is very easy to use. A future project will be to build a stand for it.
In all previous projects I'd just used screwed together butt joints, but here I needed something a tad better, and decided to use what I later discovered were called housing joints. At first I thought I could carve the trenches using the mitre saw, but the depth of cut was pretty uneven. So I started looking at routers. Looking on Amazon they seem to start at £55 or so, for brands that I've never heard of. But then I found this Bosch at a great price! After a little bit of practice I was able to make really nice clean trenches for the shelves to sit in.
Whoever mentioned pocket hole jigs, (which I had to look up as I'd never heard of them) thank you! Brilliant little device, really easy to use, and exactly what I needed for much better looking joints! Kreg Pocket Hole Jig
Other stuff I've been finding useful - clamps! Don't know how I managed before, they make it so much easier!
Anyhows, this is how it is this morning, I just need some ply to form the back and job's a good'un!
Great job. After you have fitted the ply back, you will be out for a small air nailer and compressor combo. One of the benefits of that is a quick trigger pull and brad fired in is less likely to knock your cabinets out of square than multiple blows from a hammer when pinning backs in place. Second benefit is non bruised thumb and index finger
Outbound said:
SeeFive said:
ETA:
Whatever you do, don’t buy the Time Life, Art of Woodworking set of books. You will never escape the damned hobby.
Thanks for that. Picked up the complete set, due to arrive this week along with the Kreg pocket jig Whatever you do, don’t buy the Time Life, Art of Woodworking set of books. You will never escape the damned hobby.

I've been introduced to the pleasures of (very basic) woodworking having just layed engineered oak floor and done the skirting in our lounge. On the upside: by the end of it Id got quite good at scribing. On the downside: I massively underestimated the amount of dust I'd be creating

I now need a low media unit to fill the gap between the chimney breast and the front wall. And of course nothing off the shelf is the right size. And of course I have some new tools. Just wondering if something like this would be a step too far too soon for a complete noob:
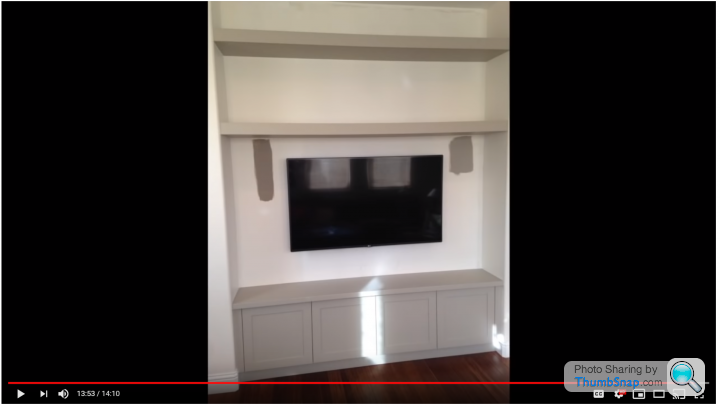
I now need a low media unit to fill the gap between the chimney breast and the front wall. And of course nothing off the shelf is the right size. And of course I have some new tools. Just wondering if something like this would be a step too far too soon for a complete noob:
48k said:
I've been introduced to the pleasures of (very basic) woodworking having just layed engineered oak floor and done the skirting in our lounge. On the upside: by the end of it Id got quite good at scribing. On the downside: I massively underestimated the amount of dust I'd be creating
I now need a low media unit to fill the gap between the chimney breast and the front wall. And of course nothing off the shelf is the right size. And of course I have some new tools. Just wondering if something like this would be a step too far too soon for a complete noob:
I take it you mean the lower unit? Have you ever made a rectangular box? If so, that is all the skills you need.I now need a low media unit to fill the gap between the chimney breast and the front wall. And of course nothing off the shelf is the right size. And of course I have some new tools. Just wondering if something like this would be a step too far too soon for a complete noob:
Finesse will be in design. If you don’t care about joints, then they are largely hidden it that. Bang in a frame and face it to look good as a fitted unit. If you do want to test yourself on the frame, then get a free plan off the web to understand the required joints and adjust it to what you need. It is a great little project to build your skills - especially as you will probably be up against out of square walls.
The construction of rail and stile flat panel doors might mean you buy a few router bits to make them look good when you open them. If you are hiding electronics (Sat /DVD machines etc) with remote controls in there, you may need an open space or glass as the remote signal doesn’t pass through wood.
For the doors...
https://www.axminster.co.uk/accessories/power-tool...
ETA: and how to use them. Note the thicker shaft, make sure you router can handle a collet of that size... or you’ll be buying a new router too. Been there...
https://m.youtube.com/watch?v=oVLYeqWSiqg
Go for it, it will be easier than painstakingly scribing in skirtings (IMO) and a nice piece when finished that you can take pride in.
Edited by SeeFive on Monday 10th June 14:21
48k said:
I now need a low media unit to fill the gap between the chimney breast and the front wall. And of course nothing off the shelf is the right size. And of course I have some new tools. Just wondering if something like this would be a step too far too soon for a complete noob:
You'll want a track saw for that. And get a vacuum that connects to your tools, the type you can plug the tool into and it will start when the tool starts.Sketchup Make is free and if you take the time to learn it you will wonder how you managed without it.
https://help.sketchup.com/en/downloading-older-ver...
Ignore the Sketchup Pro, you don't need that.
More tutorials on YouTube than you can shake two sticks at.
just been trying to find my sketches but no idea where they've gone!! basically I sketched each stage as I went to ensure I'd figured out the right process. I think I've posted the pics before but,
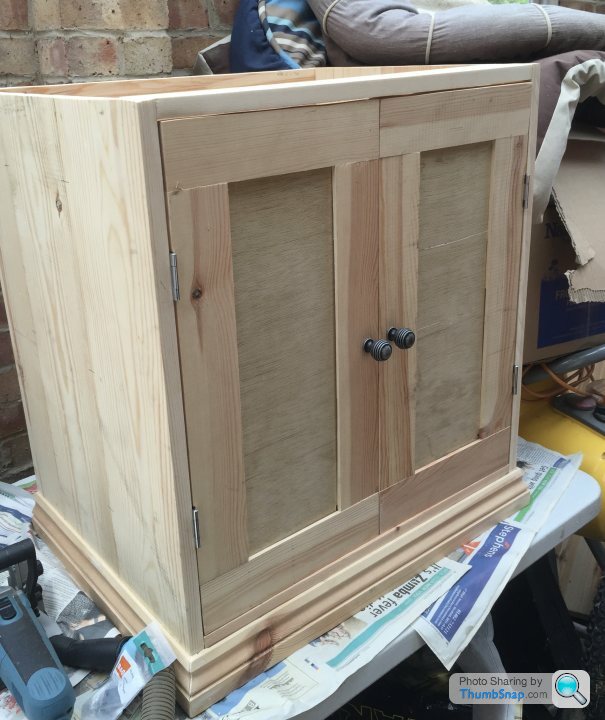
anyway, made up a cabinet base, biscuit jointed and a bit of architrave round the bottom. rather rough and ready
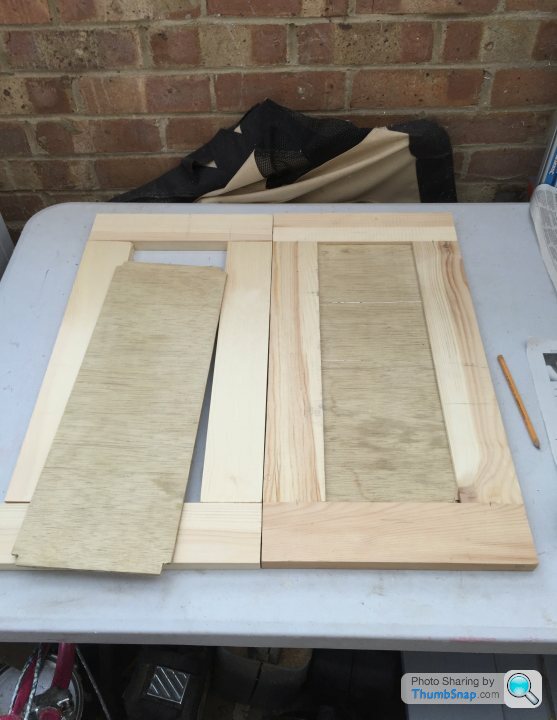
Then figured out how to make some doors for it...
fitted..
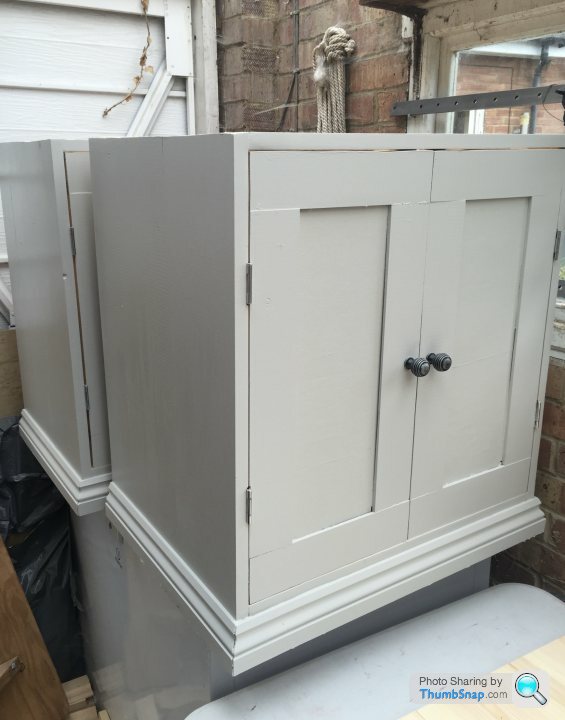
Made another one and painted them...
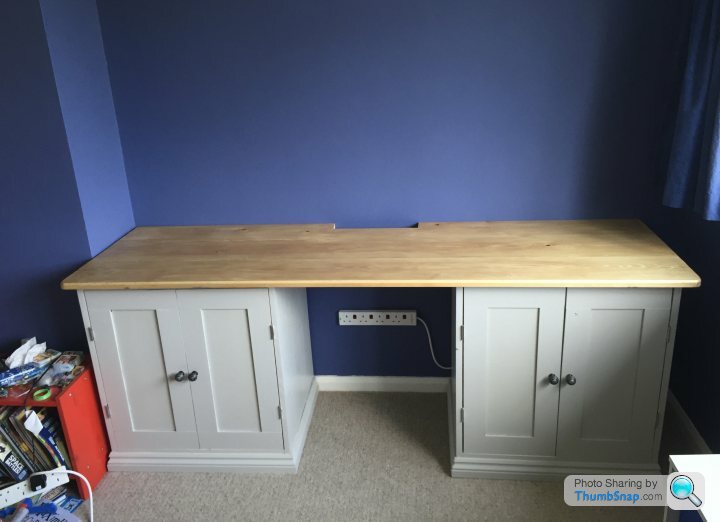
Made a desk top...
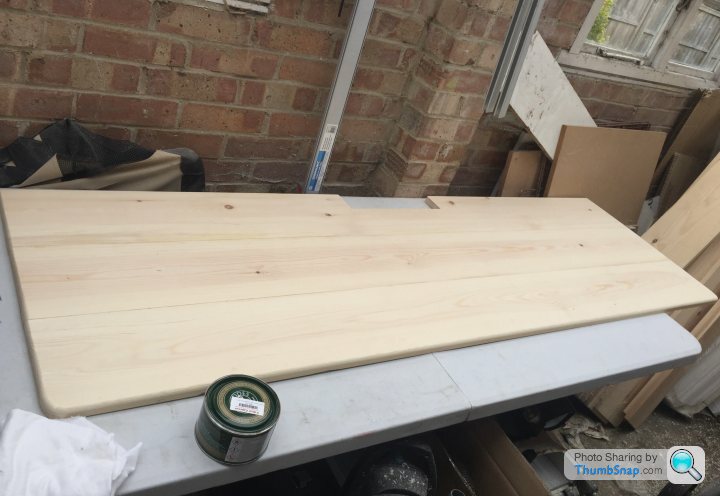
Osmo Polyx is lovely stuff..
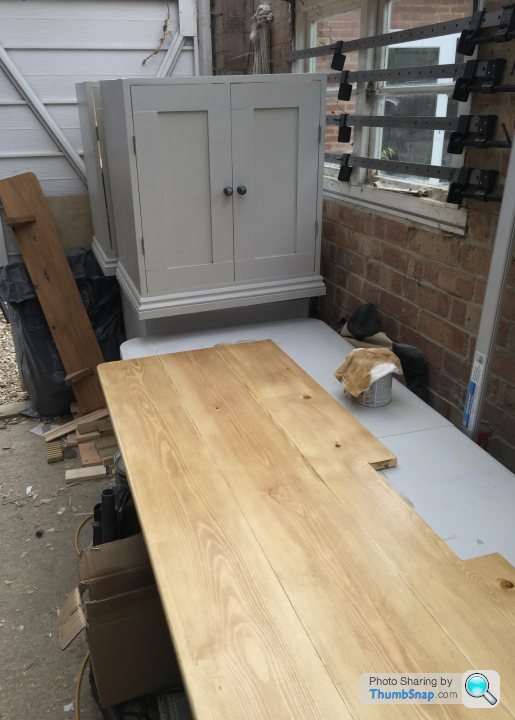
and in place, ready for shelves..
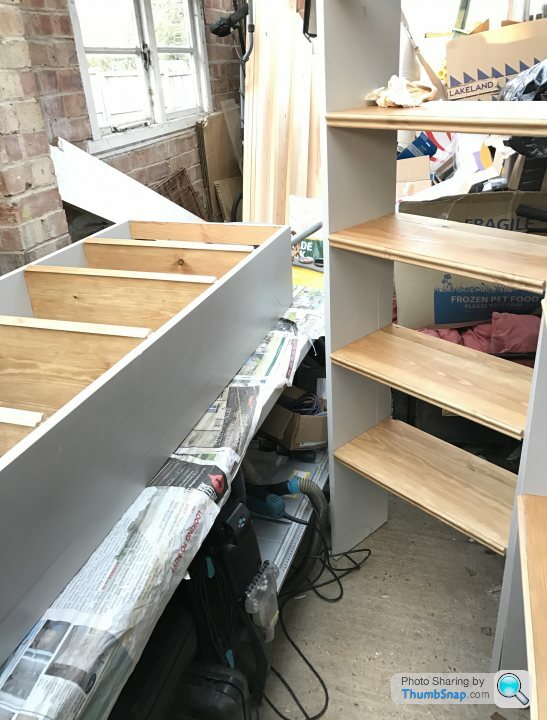
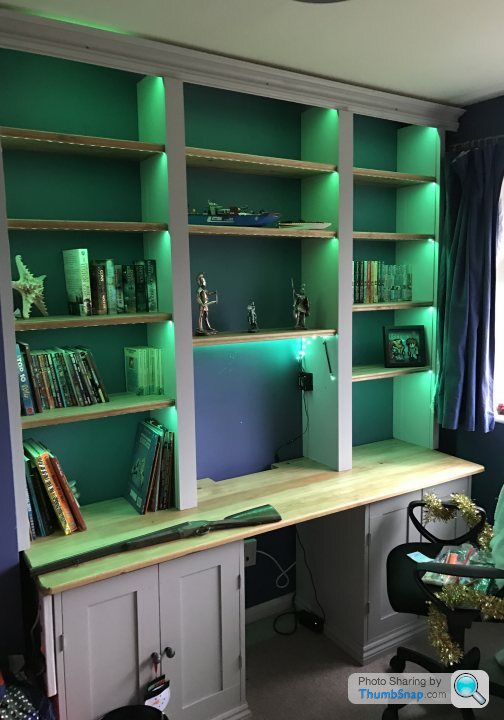
Made up some shelving, I made 3 separate ones for ease of getting up the stairs. Also, I want to put in some lights so this would make it easier..
and fitted..
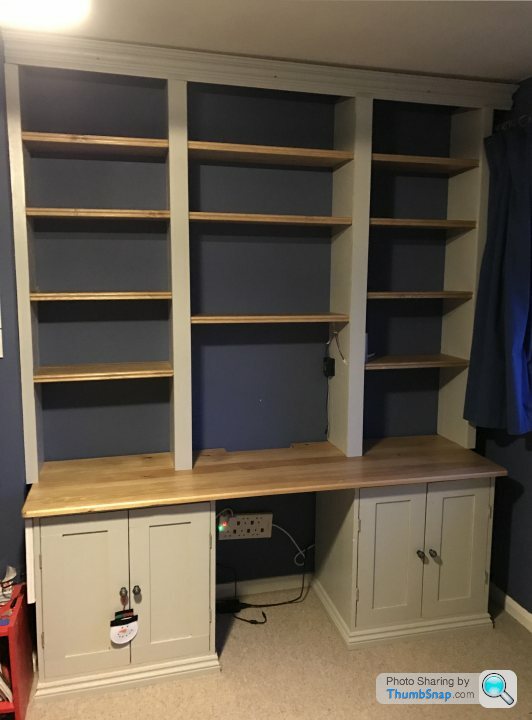
and lights...

anyway, made up a cabinet base, biscuit jointed and a bit of architrave round the bottom. rather rough and ready
Then figured out how to make some doors for it...
fitted..
Made another one and painted them...
Made a desk top...
Osmo Polyx is lovely stuff..
and in place, ready for shelves..
Made up some shelving, I made 3 separate ones for ease of getting up the stairs. Also, I want to put in some lights so this would make it easier..
and fitted..
and lights...
Gassing Station | Homes, Gardens and DIY | Top of Page | What's New | My Stuff