Discussion


wolfracesonic said:
^ Twenty years ago? Should be nice and stable then What will you finish it with, bearing in mind it’s probably going to see some wear and tear?
We have settled on Danish oil, as much as it can take. Then a light sand and re-oiling once a year or whenever it wants it. We agree that stain, varnish or sealant would be near - criminal on a lovely old bit of timber like that. What will you finish it with, bearing in mind it’s probably going to see some wear and tear?I see stuff like Osmo talked about here quite often but I have no experience of it, although I did think about getting all traditional with shellac.
Seeing as the handle took about as long as the blade... Don't feel like I'm cheating posting here!
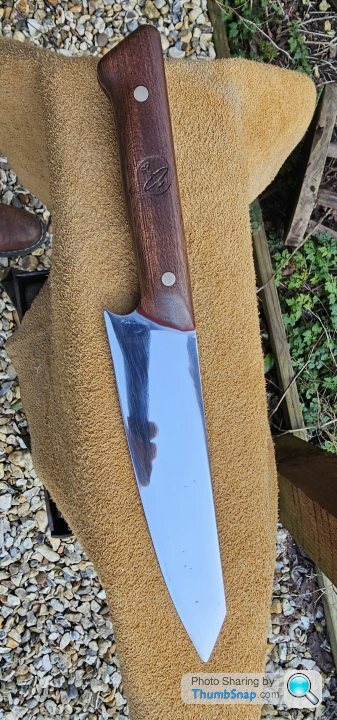
Mahogany scales matched with G10 liners. Hand forged chef's knife, using 80crv2 steel. Bladesmith tutor's forge mark on the scale, a nice spitfire outline.
Unfortunately, there was some movement while epoxying to the steel, so I'm having to do lots of coats of Briwax to help fill in a few gaps - most notably at the front edge of the handle.
Error_404_Username_not_found said:
As always, some lovely stuff here. This is definitely one of my favourite corners of PH. As Loughran said earlier; an oasis of calm. Perhaps it's a natural requirement for hand tool woodworking.
Here's a cutting board for Mrs 404 upcycled from part of a table top from a shop that was being refitted. I'm fairly sure its beech. It was rather stained and well bowed so it took a fair bit of flattening with the trusty #5 plane. It lost slightly over three eighths of an inch in thickness in the process but its still almost three quarters thick.
The Customer is pleased anyway!
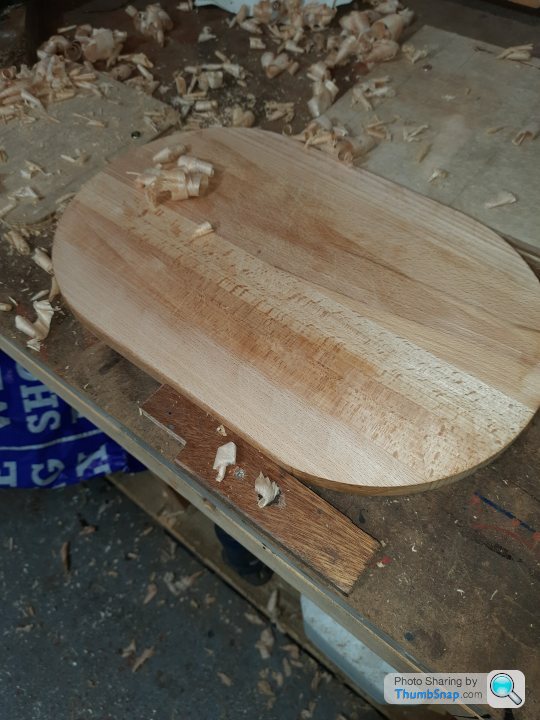
Thats a good shape. If Mrs 404 approves then that is a big win! Here's a cutting board for Mrs 404 upcycled from part of a table top from a shop that was being refitted. I'm fairly sure its beech. It was rather stained and well bowed so it took a fair bit of flattening with the trusty #5 plane. It lost slightly over three eighths of an inch in thickness in the process but its still almost three quarters thick.
The Customer is pleased anyway!
Mrs BS's birthday chopping board is progressing nicely.
This has now been routered and the hole cut out for the handle. Handle cut out was cut using a ripping blade in a jigsaw. Circle created the nearest circular object which in this case was an old 750ml paint tin. Did the job very well.
Recon I have another four coats of oil to do including the other side then its handle and gift wrapping.

Still think is going to be the best board I've made so far (This was always the goal)
Good work there!
Talking of nice and stable, my live edge coffee table is currently in the throws of hand to hand combat with the steel stays I fixed to it. Bookies have probably stopped taking bets.
I've used Osmo on a few things and have always rated it but I recently used some Rubio Monocoat and was very impressed, it may take some persuasion to get me back to Osmo.
https://rubiomonocoat.co.uk/
Austin_Metro said:
Would dowel joints for all have been better? And would this little dowel jig be a good start
https://www.rutlands.com/products/dowel-jig-and-bi...
I like the fact it is easy to see the centre line mark. Anything better for
Yamvisa Dowel Jig Kit 41PCS... https://www.amazon.co.uk/dp/B0C49WDNGJ?ref=ppx_pop...https://www.rutlands.com/products/dowel-jig-and-bi...
I like the fact it is easy to see the centre line mark. Anything better for
I’ve got the generic dowel jig in my shop which works very well, you centre them by placing the protruding lugs either side of the piece you’re drilling, I use this, or dominos with an up cutting bit in a router and a jig I made myself similar to 10 minute workshops jig for joints like you did.
Pocket holes are better suited for cabinets, boxes etc.
Edited by Promised Land on Thursday 29th February 19:17
Austin_Metro said:
I spent a happy Saturday afternoon making airing cupboard shelves. Did it with pocket holes and dowels on the bigger cross pieces. (If using metal screws means this shouldn’t be in woodwork 101 please scroll past…)
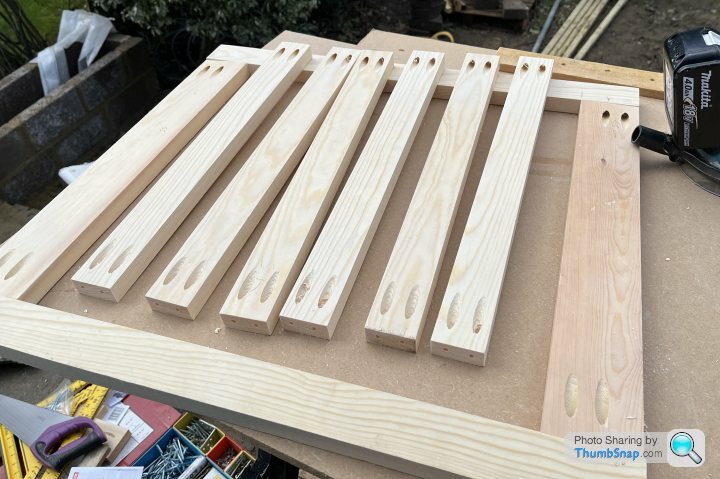
If you don’t zoom in too much it looks ok:
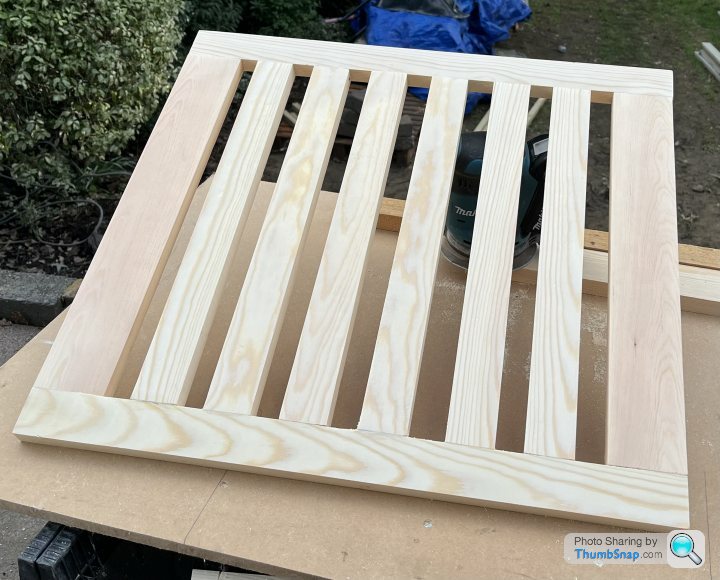
The point of the post though is that although pocket holes were quite fun to do, it was pretty easy to over tighten and knacker the wood.
Would dowel joints for all have been better? And would this little dowel jig be a good start
https://www.rutlands.com/products/dowel-jig-and-bi...
I like the fact it is easy to see the centre line mark. Anything better for beginners?
That does look sharp though. Did you use the recommended screws ? I know Kreg do a panhead/roundhead screw designed specifically for that purpose. I can imagine that a countersunk head would pull itself through the slat.If you don’t zoom in too much it looks ok:
The point of the post though is that although pocket holes were quite fun to do, it was pretty easy to over tighten and knacker the wood.
Would dowel joints for all have been better? And would this little dowel jig be a good start
https://www.rutlands.com/products/dowel-jig-and-bi...
I like the fact it is easy to see the centre line mark. Anything better for beginners?
(disclaimer ! I have never used a pocket hole system, they just sort of passed me by, so I'm no authority .
 )
) Hi Folks
Looking for a bit of advice if anyone has any experience of Douglas Fir. I've been building an extension on our house and have some pretty hefty timber A frames in the roof. 4 inside and 1 outside.
Any recommendations for finishes? I don't want to change the colour much it's more about protecting it. Particularly the external timbers.
Cheers James
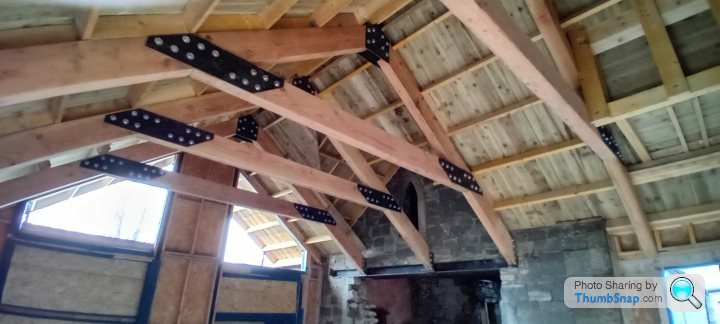
loughran said:
That does look sharp though. Did you use the recommended screws ? I know Kreg do a panhead/roundhead screw designed specifically for that purpose. I can imagine that a countersunk head would pull itself through the slat.
(disclaimer ! I have never used a pocket hole system, they just sort of passed me by, so I'm no authority . )
Thanks! I bought the Trend jig and then their screws from Toolstation. (disclaimer ! I have never used a pocket hole system, they just sort of passed me by, so I'm no authority .
) I found the instructions in the Trend box unhelpful and their video only slightly better. On reflection, I set it to the thickness of the planed timber but given the greater width of the receiving piece, could perhaps have set it to the width of that, which would have led to a shallower angle, which with longer screws would have allowed a stronger joint … and another 15 quid for the longer screws.
I’ve got one more shelf to do, and I was thinking of swapping to dowels. The Rutland dowel jig above appeals but it is for 10mm dowels in 19mm timber. That seems a little out of whack - only 4.5mm cover each side - google sources say one third dowel to 2/3 timber. Anyone got a view on that, please?
Promised Land said:
Yamvisa Dowel Jig Kit 41PCS... https://www.amazon.co.uk/dp/B0C49WDNGJ?ref=ppx_pop...
I’ve got the generic dowel jig in my shop which works very well, you centre them by placing the protruding lugs either side of the piece you’re drilling, I use this, or dominos with an up cutting bit in a router and a jig I made myself similar to 10 minute workshops jig for joints like you did.
Pocket holes are better suited for cabinets, boxes etc.
How easy is that type to line up - so the holes match. I can see how the Rutland works, that one not so much. I’ve got the generic dowel jig in my shop which works very well, you centre them by placing the protruding lugs either side of the piece you’re drilling, I use this, or dominos with an up cutting bit in a router and a jig I made myself similar to 10 minute workshops jig for joints like you did.
Pocket holes are better suited for cabinets, boxes etc.
Edited by Promised Land on Thursday 29th February 19:17
I’m relatively new to woodworking but I’ve done a few jobs around the house - panelling and making some alcove cupboards etc.
Tools acquired so far are an evolution mitre saw and a Mac Allister track saw, dewalt drills.
Next projects are going to be wardrobes and a humidor. Maybe more cupboards etc.
I’m trying to weigh up what should be the next tool purchase that gives the most flexibility…
DeWalt table saw 7485 - seems like if I’m going to spend quite a lot of money then it’s worth getting one of the better ones as it’s important to have a precise one. Maybe buy second hand though? This tool seems like it will be useful for a large number of jobs.
Table router - seems like it will cover more interesting jobs, making my own mouldings and can be used with a jig to make dovetail joints etc for the humidor box. Not sure what I need though - considering a Trend plunge router set into a router table but on a recent YouTube video I saw one of the smaller hand held routers which had been mounted upside down in a home made timber router table - maybe that would provide a beginner with a cheaper option and still some flexibility?
I probably need box but which is the better option to begin with?
Thanks
Totally depends what you use them for
I have a trim router / hand held plunge router / table router! All used for different things arguably I also have a dremel which can be used as a router and a cnc which is similar!
Do you work on wood you can take to the machine (table router) / wood which is bigger and you need to take the tool to the wood / small uses where a hand held router works better… etc size of router determines the diameter of the shaft for the bits - other than that it varies so much that if you are going to do lots of woodwork each will justify a place in the workshop…
And then of course you can get into spindle moulders which are grown up router tables!
Do be careful though table saws and routers are getting into dangerous tools territory - worth learning how to use properly and being aware that a lot of YouTube videos will be American with reduced safety taking place…
A powerful handheld router is a useful piece of kit. I have some Trend T10 and T11 routers, mostly bought secondhand these days on eBay and they're nice machines. Based on the old Elu design they will happily sit upside down in a homemade router table and give years of fun. (although cutters can grow into an expensive habit.)
Thinking about it, the T11 is more suited to being inverted, the cutter height can be adjusted through the base.
If you buy a table saw, please use the riving knife and crown guard ALL THE TIME. Youtube/instagram is awash with videos of folk using table saws with unguarded blades.... and seemingly very few videos of folk searching amongst the shavings for their missing digits. Nobody means to have accident but when things go wrong with woodworking machinery it all happens very quickly.
And ALWAYS wear eye protection please.
You can not blink fast enough.
As for me, a final coat of polish on my staircase. We've got people coming to stay next week so all those jobs that never got finished, got finished this weekend.
It felt quite extravagant making a staircase out of burr oak but I'm pleased I did it, it looks good and there can't be too many like it.


And then to finish things off, the landing light switch need to be surface mounted so a wooden box was required.

Thinking about it, the T11 is more suited to being inverted, the cutter height can be adjusted through the base.
If you buy a table saw, please use the riving knife and crown guard ALL THE TIME. Youtube/instagram is awash with videos of folk using table saws with unguarded blades.... and seemingly very few videos of folk searching amongst the shavings for their missing digits. Nobody means to have accident but when things go wrong with woodworking machinery it all happens very quickly.
And ALWAYS wear eye protection please.
You can not blink fast enough.
As for me, a final coat of polish on my staircase. We've got people coming to stay next week so all those jobs that never got finished, got finished this weekend.
It felt quite extravagant making a staircase out of burr oak but I'm pleased I did it, it looks good and there can't be too many like it.
And then to finish things off, the landing light switch need to be surface mounted so a wooden box was required.
loughran said:
As for me, a final coat of polish on my staircase. We've got people coming to stay next week so all those jobs that never got finished, got finished this weekend.
It felt quite extravagant making a staircase out of burr oak but I'm pleased I did it, it looks good and there can't be too many like it.
I can't be the only one to look at that and wonder how many are going to tumble down it and break their neck?It felt quite extravagant making a staircase out of burr oak but I'm pleased I did it, it looks good and there can't be too many like it.
 Looks lovely besides that.
Those stairs look amazing. As others have said, I'd make people put clean socks on before treading on that!
Finally finished the Chopping board number 17 and number 1 for Mrs B. It got a nod of approval so a win there. Really pleased with how it turned out in the end and only required a little bit of resin here and there to fill the gaps.
Got another three in production and plans for a few more to give out to family members. Getting more and more tempted by a commercial grade Planer Thickenesser. However, I've just read that some of them are well over 100Kg. Not sure how I will get that down to the workshop...
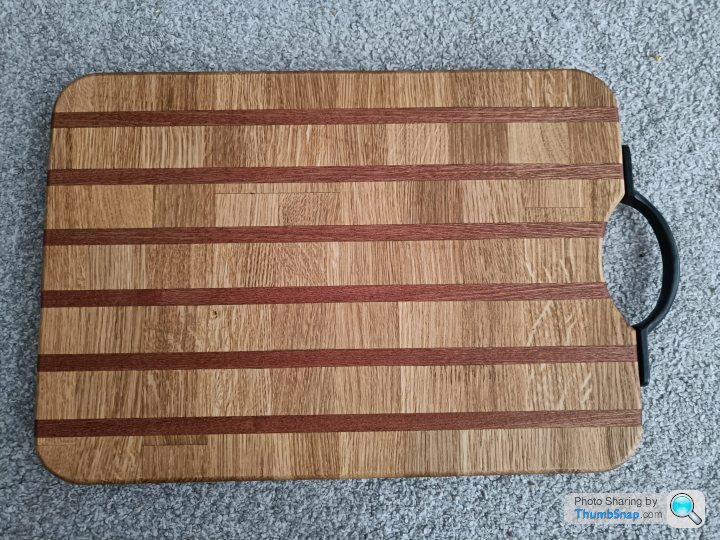
Gassing Station | Homes, Gardens and DIY | Top of Page | What's New | My Stuff