Discussion


Has anybody tackled flooring ? A long time ago I saw some parquet flooring that blew me away and when we needed a bedroom floor I thought I'd give it a go.

The flooring I'd seen was a panel of Parquet de Versailles, the pattern which Louis the 14th laid when he was busy doing doing home improvements at Versailles around 1650ish.
I've done a fair bit of parquet and as a rule you spend a great deal of time on your hands and knees which is a balls ache. The beauty of Parquet de Versailles is it was produced in yard square panels, on a bench, in a workshop, then delivered to site on a horse and cart and banged down.... everywhere.
It must have been the first mass production flooring ever made on such a grand scale and it meant Louis didn't have hundreds of craftsmen cutting millions of bits of wood on their hands and knees on site and holding the marble people up.
All this sounded perfect. Assemble the panels in the shed, sand them, polish them and lay them in an afternoon. Our bedroom is 4m x 4m so 16 panels. Nothing of a job.
I wanted the floor to look old, like it had been fitted a couple of hundred years ago, so I started practicing distressing oak. The colour would be important but also the surface would need to be textured and battered to reflect a couple of centuries of abuse. I needed inspiration and fortunately I needed to be in Paris so I took the opportunity and detoured to Versailles for the day.

Versailles is incredible... the history, the grandeur .... how a small chateaux was transformed into such a grand palace... just breathtaking. I definitely recommend you go before you die. Every floor, everywhere in the Palace of Versailles is covered with parquet de Versailles. 11 square miles of it..... and it was a huge disappointment.

I'd travelled to Versailles to study a 17th century floor but when I got there there was not much to see. Turns out that there are something like one leptillion people a day visit Versailles, stomping around in their hobnailed boots and all the parquet floors are sanded back and varnished to within an inch of their lives and utterly and completely characterless.
After a cup of tea and a baguette I went in search of the genuine article and eventually, behind a door labelled 'Do not enter' I found what I was looking for. Pure, unadulterated three hundred and fifty year oak floor tiles.


Back in the shed I set too and prepared the timber with scrapers, a wire brush, chains and a cudgel covered in nails. For colour I tried traditional mordants, lye, salts of ammonia a well aged piss. Modern day woodstains really are not up to the job, far too fresh looking and vibrant.
In the end I fumed some pieces in ammonia, wiped others in a stinking brew of walnut shells and vinegar with added rusty nails for drama, washed it off with slaked lime water and started all over again. Slowly but surely I beat the living daylights out of that poor oak until it looked like it was pulled from the decks of the Mary Rose.
The thing with ammonia and oak (and mahogany to a lesser extent) is that the ammonia reacts with the tannins in the wood turning it darker and giving an aged appearance. There was a time when cabinet makers hung newly made furniture up in the rafters of stables to bring the timber to life. Similar thing with the walnuts and rusty nail juice, it's all about the tannins.
All this took forever but eventually I laid the 16 panels and our bedroom floor was finished !


And whilst I'm happy with it.... despite the beatings and the abuse and the chemical attacks it still doesn't quite capture that amazing quality of the original. I think I played it too safe.
My wife likes it. and give it a hundred years or so and I think it will be fine.
For me it's the same as it ever was, there's nothing I've done that i can't do better next time so next I started on the spare room, simpler pattern with a herringbone but more wire brush and more cudgel. A few more floors and I'll get the hang of it.

The flooring I'd seen was a panel of Parquet de Versailles, the pattern which Louis the 14th laid when he was busy doing doing home improvements at Versailles around 1650ish.
I've done a fair bit of parquet and as a rule you spend a great deal of time on your hands and knees which is a balls ache. The beauty of Parquet de Versailles is it was produced in yard square panels, on a bench, in a workshop, then delivered to site on a horse and cart and banged down.... everywhere.
It must have been the first mass production flooring ever made on such a grand scale and it meant Louis didn't have hundreds of craftsmen cutting millions of bits of wood on their hands and knees on site and holding the marble people up.
All this sounded perfect. Assemble the panels in the shed, sand them, polish them and lay them in an afternoon. Our bedroom is 4m x 4m so 16 panels. Nothing of a job.
I wanted the floor to look old, like it had been fitted a couple of hundred years ago, so I started practicing distressing oak. The colour would be important but also the surface would need to be textured and battered to reflect a couple of centuries of abuse. I needed inspiration and fortunately I needed to be in Paris so I took the opportunity and detoured to Versailles for the day.
Versailles is incredible... the history, the grandeur .... how a small chateaux was transformed into such a grand palace... just breathtaking. I definitely recommend you go before you die. Every floor, everywhere in the Palace of Versailles is covered with parquet de Versailles. 11 square miles of it..... and it was a huge disappointment.
I'd travelled to Versailles to study a 17th century floor but when I got there there was not much to see. Turns out that there are something like one leptillion people a day visit Versailles, stomping around in their hobnailed boots and all the parquet floors are sanded back and varnished to within an inch of their lives and utterly and completely characterless.
After a cup of tea and a baguette I went in search of the genuine article and eventually, behind a door labelled 'Do not enter' I found what I was looking for. Pure, unadulterated three hundred and fifty year oak floor tiles.
Back in the shed I set too and prepared the timber with scrapers, a wire brush, chains and a cudgel covered in nails. For colour I tried traditional mordants, lye, salts of ammonia a well aged piss. Modern day woodstains really are not up to the job, far too fresh looking and vibrant.
In the end I fumed some pieces in ammonia, wiped others in a stinking brew of walnut shells and vinegar with added rusty nails for drama, washed it off with slaked lime water and started all over again. Slowly but surely I beat the living daylights out of that poor oak until it looked like it was pulled from the decks of the Mary Rose.
The thing with ammonia and oak (and mahogany to a lesser extent) is that the ammonia reacts with the tannins in the wood turning it darker and giving an aged appearance. There was a time when cabinet makers hung newly made furniture up in the rafters of stables to bring the timber to life. Similar thing with the walnuts and rusty nail juice, it's all about the tannins.
All this took forever but eventually I laid the 16 panels and our bedroom floor was finished !
And whilst I'm happy with it.... despite the beatings and the abuse and the chemical attacks it still doesn't quite capture that amazing quality of the original. I think I played it too safe.
My wife likes it.
and give it a hundred years or so and I think it will be fine.For me it's the same as it ever was, there's nothing I've done that i can't do better next time so next I started on the spare room, simpler pattern with a herringbone but more wire brush and more cudgel. A few more floors and I'll get the hang of it.


loughran said:
Has anybody tackled flooring ? A long time ago I saw some parquet flooring that blew me away and when we needed a bedroom floor I thought I'd give it a go.
The flooring I'd seen was a panel of Parquet de Versailles, the pattern which Louis the 14th laid when he was busy doing doing home improvements at Versailles around 1650ish.
I've done a fair bit of parquet and as a rule you spend a great deal of time on your hands and knees which is a balls ache. The beauty of Parquet de Versailles is it was produced in yard square panels, on a bench, in a workshop, then delivered to site on a horse and cart and banged down.... everywhere.
It must have been the first mass production flooring ever made on such a grand scale and it meant Louis didn't have hundreds of craftsmen cutting millions of bits of wood on their hands and knees on site and holding the marble people up.
All this sounded perfect. Assemble the panels in the shed, sand them, polish them and lay them in an afternoon. Our bedroom is 4m x 4m so 16 panels. Nothing of a job.
I wanted the floor to look old, like it had been fitted a couple of hundred years ago, so I started practicing distressing oak. The colour would be important but also the surface would need to be textured and battered to reflect a couple of centuries of abuse. I needed inspiration and fortunately I needed to be in Paris so I took the opportunity and detoured to Versailles for the day.
Versailles is incredible... the history, the grandeur .... how a small chateaux was transformed into such a grand palace... just breathtaking. I definitely recommend you go before you die. Every floor, everywhere in the Palace of Versailles is covered with parquet de Versailles. 11 square miles of it..... and it was a huge disappointment.
I'd travelled to Versailles to study a 17th century floor but when I got there there was not much to see. Turns out that there are something like one leptillion people a day visit Versailles, stomping around in their hobnailed boots and all the parquet floors are sanded back and varnished to within an inch of their lives and utterly and completely characterless.
After a cup of tea and a baguette I went in search of the genuine article and eventually, behind a door labelled 'Do not enter' I found what I was looking for. Pure, unadulterated three hundred and fifty year oak floor tiles.

Back in the shed I set too and prepared the timber with scrapers, a wire brush, chains and a cudgel covered in nails. For colour I tried traditional mordants, lye, salts of ammonia a well aged piss. Modern day woodstains really are not up to the job, far too fresh looking and vibrant.
In the end I fumed some pieces in ammonia, wiped others in a stinking brew of walnut shells and vinegar with added rusty nails for drama, washed it off with slaked lime water and started all over again. Slowly but surely I beat the living daylights out of that poor oak until it looked like it was pulled from the decks of the Mary Rose.
The thing with ammonia and oak (and mahogany to a lesser extent) is that the ammonia reacts with the tannins in the wood turning it darker and giving an aged appearance. There was a time when cabinet makers hung newly made furniture up in the rafters of stables to bring the timber to life. Similar thing with the walnuts and rusty nail juice, it's all about the tannins.
All this took forever but eventually I laid the 16 panels and our bedroom floor was finished !
And whilst I'm happy with it.... despite the beatings and the abuse and the chemical attacks it still doesn't quite capture that amazing quality of the original. I think I played it too safe.
My wife likes it. and give it a hundred years or so and I think it will be fine.
For me it's the same as it ever was, there's nothing I've done that i can't do better next time so next I started on the spare room, simpler pattern with a herringbone but more wire brush and more cudgel. A few more floors and I'll get the hang of it.
Great post!The flooring I'd seen was a panel of Parquet de Versailles, the pattern which Louis the 14th laid when he was busy doing doing home improvements at Versailles around 1650ish.
I've done a fair bit of parquet and as a rule you spend a great deal of time on your hands and knees which is a balls ache. The beauty of Parquet de Versailles is it was produced in yard square panels, on a bench, in a workshop, then delivered to site on a horse and cart and banged down.... everywhere.
It must have been the first mass production flooring ever made on such a grand scale and it meant Louis didn't have hundreds of craftsmen cutting millions of bits of wood on their hands and knees on site and holding the marble people up.
All this sounded perfect. Assemble the panels in the shed, sand them, polish them and lay them in an afternoon. Our bedroom is 4m x 4m so 16 panels. Nothing of a job.
I wanted the floor to look old, like it had been fitted a couple of hundred years ago, so I started practicing distressing oak. The colour would be important but also the surface would need to be textured and battered to reflect a couple of centuries of abuse. I needed inspiration and fortunately I needed to be in Paris so I took the opportunity and detoured to Versailles for the day.
Versailles is incredible... the history, the grandeur .... how a small chateaux was transformed into such a grand palace... just breathtaking. I definitely recommend you go before you die. Every floor, everywhere in the Palace of Versailles is covered with parquet de Versailles. 11 square miles of it..... and it was a huge disappointment.
I'd travelled to Versailles to study a 17th century floor but when I got there there was not much to see. Turns out that there are something like one leptillion people a day visit Versailles, stomping around in their hobnailed boots and all the parquet floors are sanded back and varnished to within an inch of their lives and utterly and completely characterless.
After a cup of tea and a baguette I went in search of the genuine article and eventually, behind a door labelled 'Do not enter' I found what I was looking for. Pure, unadulterated three hundred and fifty year oak floor tiles.
Back in the shed I set too and prepared the timber with scrapers, a wire brush, chains and a cudgel covered in nails. For colour I tried traditional mordants, lye, salts of ammonia a well aged piss. Modern day woodstains really are not up to the job, far too fresh looking and vibrant.
In the end I fumed some pieces in ammonia, wiped others in a stinking brew of walnut shells and vinegar with added rusty nails for drama, washed it off with slaked lime water and started all over again. Slowly but surely I beat the living daylights out of that poor oak until it looked like it was pulled from the decks of the Mary Rose.
The thing with ammonia and oak (and mahogany to a lesser extent) is that the ammonia reacts with the tannins in the wood turning it darker and giving an aged appearance. There was a time when cabinet makers hung newly made furniture up in the rafters of stables to bring the timber to life. Similar thing with the walnuts and rusty nail juice, it's all about the tannins.
All this took forever but eventually I laid the 16 panels and our bedroom floor was finished !
And whilst I'm happy with it.... despite the beatings and the abuse and the chemical attacks it still doesn't quite capture that amazing quality of the original. I think I played it too safe.
My wife likes it.
and give it a hundred years or so and I think it will be fine.For me it's the same as it ever was, there's nothing I've done that i can't do better next time so next I started on the spare room, simpler pattern with a herringbone but more wire brush and more cudgel. A few more floors and I'll get the hang of it.
loughran said:
That looks intriguing, please tell me more.
Thanks!.. 18mm Birchplywood.
I've done a few other projects with friends + students, by using the same technique, 2d profiles Cnc machined first, and then formed with hot-water than assembled with bolts to get double-curved final form.

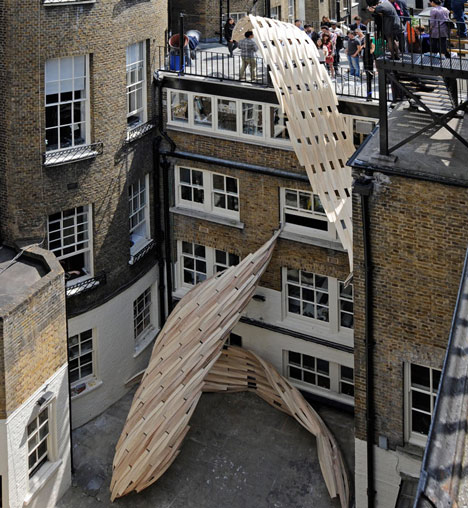
It's amazing, how you can manipulate the wood by using particular geometries + force !
Anyone have a Festool Domino?
I've always wanted one, but never really paid attention to prices as I didn't think I'd bother getting one, but now my time spent making stuff is limited to weekends, the speed and accuracy would be appreciated.
They're doing £100 cashback offer at the moment and I'm wondering if that is the biggest discount you're likely to get? I don't ever really recall seeing them in the tool clearance sales or New Year sales etc and I've never been to any of the trade shows to see if they do any good deals there.
Does't seem to be any any new models coming out or other brand copies coming any time soon, so thinking with £100 off, that'll be the best price for a while yet?
SeeFive said:
geeks said:
To be fair I wasn't very clear with my plan, I am home now so will take some pictures tomorrow and sketch it up, there should still be enough room for a sky box if I do it properly I think.... Not looking to shrink it a great deal but trim the corners off, something like this (shape wise):

Jesus Geeks, I hope this isn’t your first woodwork project. It is a bugger to get right. 
It looks like you want it freestanding? So back to your original picture, the sides are different to the second example above - it looks like someone has already butchered that one and it looks quite horrible at the sides (at least that!, god, those awful mitred hacked off breadboard edges!).
Your unit has flat panel rail and leg side panels which depending on the quality of unit will either be mortise and tenon at the corners of the frame or dowelled. The panel should just float in a groove (no glue) because of designing out a cross grain situation.
When you cut off the back corners, you will shorten that side panel, the rear panel and lose the rear leg in the process. So you need to put the leg back somehow. Personally, like Paul mentioned I would try to disassemble it, but if it is M&T and properly fitted/glued you have one hell of a job to get it apart and will probably (almost certainly) damage the wood. Glue dissolving agents are not going to reach inside the wood where the glue is on the tenon inside the mortise, and a lot depends on what glue they used. I have never tried to do this on anything I cared about, so perhaps someone else can chip in with a solution to that one (awaits heat gun suggestions
)Alternatively, if you can saw accurately, as Paul also mentioned you may be able to cut down the rear joints on each rail, leaving the tenon glued in its hole. If I was doing that, I would leave a hair of waste on the leg and remove it after with a more gentle plane or sander rather than risk the offset saw teeth (or operator error) damaging the leg.
Then you need to re make the mortises top and bottom for the side panel, re make the tenons on the (now) shorter side rails (or use dowels if you can’t M&T), narrow the infill panel and glue it up again square (measure diagonals), remembering not to use any glue on the panel. If it is assembled how I think it should be, you should be able to leave the front joints on the side panel / front legs alone - the infill panel should just slide out when you cut the back leg joints free. Do this for each side, getting them identical and square. Set the existing rear panel aside, keep it but it is probably too short for the next step. Now for the back.... aaaargh.
This is the difficult bit. You have a choice. The hardest but best approach is to make what you have into a 6 legged panelled frame with new wood and some angled M&T or dowel joints depending on how strong you want it. Unless you have a lot of skills and/or a lot of time, don’t do this. I don’t have the skills (or space) to put what you need to do into words, but there are YouTube lessons on angled M&T / dowelling approaches if you want to take a look and frighten yourself.
Easiest is to make the new, narrower rear back panel (the one parallel to the front of the unit) go right to the floor. This will give the rear stability you need in the absence of an extra couple of legs. You are probably going to need some more wood here, or bodge some out of sight legs or something onto the existing shorter rear panel to make it reach right to the floor, but I think they will be weaker and get in the way later - your choice. Make sure that the top sits on this panel (cut it to the right height minus the thickness of the top). I am going to assume that the shelves are loose and the uprights are structural inside the cabinet. If so, fix this rear panel to the uprights (or whatever is structural inside) accurately and squarely.
Then find some method to infill the back angled sides with what you salvage out of the back panel you set aside, or if not possible, use new wood and fix that to both the top and bottom and anything else that remains structural on the inside uprights / shelves. You now need to join this to the legs, and without major wood surgery, this is probably going to be some kind of brackets out of sight at the back or on the internal structure (or both). The good news is nobody is going to see the back, so mechanical fixings will help here in all sorts of places to get strength back, even corner glue blocks / fixing blocks where they can’t be seen under the shelves and onto the panels etc will help.
The reason for this Heath-Robinson approach is to avoid re making the frame with 6 legs, requiring new, matching wood and avoiding the difficult angled M&T / dowel joints you will have now seen created on the YouTube videos. You really need for a 6 legged frame rail / stile assembly. You avoid this by using the floor length rear panel as a substitute for the extra 2 rear legs.
It is going to be really wobbly until you get the top back on and the rear infilled fully and fitted to anything structural which is left. Make sure it is on a very flat, solid surface at all stages of getting it back together, no carpets. The top will need fixing to the back panel and 2 side panels and maybe internal uprights (as I assume the uprights are structural, not the shelves) to add strength. You really need to get this all square or the front door might not close properly. So be really careful when fixing the top back on. I would mark out on the underside of the top exactly where each element lands square and assemble it all upside down to those lines. Set this out and check all round at least twice to get it right before fixing, and keep checking you are on your lines as you go.
Once you have got it all square, fixed solidly and back up the right way, the long rear bottom edge of the new rear panel may cause some instability on an uneven floor or carpet. If this is the case, cut a relief at the bottom (cut a long inch or two chunk out of the bottom) leaving two narrow “legs” touching the floor at the edges. If no instability, don’t bother if you don’t want / need to.
I am sure I have missed loads for brevity (riiiighht) and the inability to have a good look around the unit, but hopefully you get the gist of the approach / design and will work out the rest as you go.
Good luck, but I still say I would be putting that nice unit in a bedroom or on eBay rather than risk destroying it, and then go shopping for another very similar one that fits in the corner of the lounge. The worst possible outcome is it gets screwed up, and you go shopping anyway. Or if as you say you can’t find an exact matching item, get a local cabinetmaker to alter it properly, or even make you a custom matching item at a more scary price than the very nice, perfectly acceptable quality but mass produced CNC high street one you have.
Or leave it sticking out of the corner a bit
ETA: it’s late, I am tired... thinking simpler now... maybe shorten the side panels as above, panel it in all round the back with the existing leftovers as far as possible and get some adjustable feet under the bottom shelf at the very back, avoiding the long back panel completely?
Edited by SeeFive on Thursday 4th July 01:51
Slagathore said:
Anyone have a Festool Domino?
I do. I use it for making frame and panel kitchen doors. But I must confess that for general joining of two pieces of wood I prefer a biscuit joiner except where the extra strength of the domino joint is desirable.If you fancy one and there's a good deal to be had then you may as well get one now and start using it.
Slagathore said:
Anyone have a Festool Domino?
I've always wanted one, but never really paid attention to prices as I didn't think I'd bother getting one, but now my time spent making stuff is limited to weekends, the speed and accuracy would be appreciated.
They're doing £100 cashback offer at the moment and I'm wondering if that is the biggest discount you're likely to get? I don't ever really recall seeing them in the tool clearance sales or New Year sales etc and I've never been to any of the trade shows to see if they do any good deals there.
Does't seem to be any any new models coming out or other brand copies coming any time soon, so thinking with £100 off, that'll be the best price for a while yet?
We have two in the workshop, looks a good offer, we got the second when the first was out of action due to the 5mm tool getting stuck on the thread. We realised how much we relied on it. I've always wanted one, but never really paid attention to prices as I didn't think I'd bother getting one, but now my time spent making stuff is limited to weekends, the speed and accuracy would be appreciated.
They're doing £100 cashback offer at the moment and I'm wondering if that is the biggest discount you're likely to get? I don't ever really recall seeing them in the tool clearance sales or New Year sales etc and I've never been to any of the trade shows to see if they do any good deals there.
Does't seem to be any any new models coming out or other brand copies coming any time soon, so thinking with £100 off, that'll be the best price for a while yet?
Makes a really good strong joint but the accuracy is possibly is biggest plus point.
singlecoil said:
Slagathore said:
Anyone have a Festool Domino?
I do. I use it for making frame and panel kitchen doors. But I must confess that for general joining of two pieces of wood I prefer a biscuit joiner except where the extra strength of the domino joint is desirable.If you fancy one and there's a good deal to be had then you may as well get one now and start using it.

singlecoil said:
I do. I use it for making frame and panel kitchen doors. But I must confess that for general joining of two pieces of wood I prefer a biscuit joiner except where the extra strength of the domino joint is desirable.
If you fancy one and there's a good deal to be had then you may as well get one now and start using it.
Yeah, it seems to be a good all-rounder and favourable over a biscuit joiner as it can do what a biscuit joiner can do but stronger. I think I'll probably go for it. I suspect it's on of the products they never reduce, so this might be as cheap as it gets for a while.If you fancy one and there's a good deal to be had then you may as well get one now and start using it.
RSVR101 said:
We have two in the workshop, looks a good offer, we got the second when the first was out of action due to the 5mm tool getting stuck on the thread. We realised how much we relied on it.
Makes a really good strong joint but the accuracy is possibly is biggest plus point.
Accuracy is definitely a big pull, and the speed. I've used Dowels in the past - perfectly strong enough for what I was making, but whilst everything lined up and the joints were tidy, it took ages drilling the holes and trying to drill in to the end of an 18mm panel is quite fiddly.Makes a really good strong joint but the accuracy is possibly is biggest plus point.
4Q said:
I'd never heard of this until now. Having just googled and watching a YouTube video it seems this mornings PH visit is going to cost me £800

They've been on my radar for ages, I just never really paid particular attention to the prices, so I think with the £100 off offer, it might be the best offer in a while. I'm planning on getting the basic DF500, as I don't think I need the accessories in the bigger sets, then I think it works out cheaper if you buy the 1060 assortment of dominos separately as well.
Trustmeimadoctor said:
triton tdj600?
I did have a look at those a while back but have read quite a lot of bad reviews on them and didn't want to risk it. 4Q said:
I'd never heard of this until now. Having just googled and watching a YouTube video it seems this mornings PH visit is going to cost me £800
If you are thinking of getting one - there’s an offer on eBay at the moment with the voucher code ‘PARTY‘. Gets £100 off. Still gunna try applying for £100 back from festool, but I suspect they’ll tell me to p s off. Saves waiting for the cash back.
 Bought the 1060 domino box as well with the same code and it takes 20% off as well. Just have to do 2 transactions as the domino maxes it out on it’s own.
wolfracesonic said:
Interesting stuff Loughran, I'd like to go to Versailles sometime though I've read Vaux le Vicomte has it beat for style and elegance if not scale. What's your next project for your place, a hall of mirrors?
Thanks. Yes Vaux le Vicomte is the Chateau that was used for filming a lot of the Versailles TV show. I've never been but I hear it makes Versailles look a bit council. Built by Louis' finance minister, they fell out because it was so much better than the King's palace. The minister went to jail and Louis stole his gardener and architect. As for my next project..... fortunately I live in a not very big house and I'm running out of space. I do have a friend with a big house in France and he needed a big dining table and some chairs. I got pretty exited because he planned to have a model railway running up the middle for cruet delivery but we haven't got round to that yet.
These are the legs,

And with the chairs and tops in place.


loughran said:
Thanks. Yes Vaux le Vicomte is the Chateau that was used for filming a lot of the Versailles TV show. I've never been but I hear it makes Versailles look a bit council. Built by Louis' finance minister, they fell out because it was so much better than the King's palace. The minister went to jail and Louis stole his gardener and architect.
As for my next project..... fortunately I live in a not very big house and I'm running out of space. I do have a friend with a big house in France and he needed a big dining table and some chairs. I got pretty exited because he planned to have a model railway running up the middle for cruet delivery but we haven't got round to that yet.
These are the legs,
And with the chairs and tops in place.
That’s absolutely fab. I wish I had customers who would allow me to (pay the price of) take the time to make that. As for my next project..... fortunately I live in a not very big house and I'm running out of space. I do have a friend with a big house in France and he needed a big dining table and some chairs. I got pretty exited because he planned to have a model railway running up the middle for cruet delivery but we haven't got round to that yet.
These are the legs,
And with the chairs and tops in place.
I’m looking on my phone, but those segments of the top are removable and if so what keeps them together when they are together .... if that makes sense
Laminated pieces of (oak?) in a vacuum to make the chair backs?
Edited by Wozy68 on Tuesday 16th July 17:49
Hi, yes, the leaves are bullet dowelled where they join and are pulled tight underneath with brass leaf forks which are traditionally used on multi leaf tables.

Large dining tables were often designed to have leaves that could be added or subtracted depending on how big the party was but with this table I divided the top up into four sections purely because I didn't want to make (or transport) an oak table top over 5 meters long. smile
Yep, the chair backs are laminated in oak. 6 thin pieces glued and vacuum formed over a mdf mould in a Bagpress bag.
When laminating wood it's good practice to have the grain of each ply at 90 degrees to it's neighbour but I wanted these backs to look like solid wood that has been bent so the grain of all the layers runs in the same direction, lengthways. You loose the inherent stability of crossply and some backs come off the mould a little twisted but the good ones stay good for ever.
Once you've got the backs, the rest of the chair is as simple as it gets.
Gassing Station | Homes, Gardens and DIY | Top of Page | What's New | My Stuff