Discussion


Another way would be to simply screw everything together.
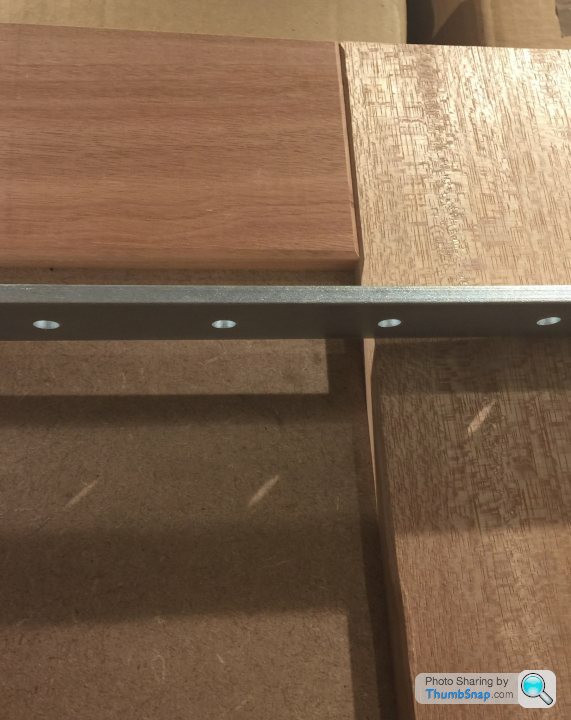
Screw down through the top into the legs and screw through the legs into the cross brace at the back. You will be screwing into endgrain but if you use a substantial screw like a Reisser 5.0 x 60mm and drill a 3mm pilot hole you'll get a good fix.
Counterbore the holes you drill for the screws, glue and screw everything together and then plug the counterbore holes with plugs cut from an offcut.
https://www.google.com/search?q=plug+cutter&cl...
Trim the plugs flush, sand everything down, apply a couple of coats of your preferred finish and if you've cut the plugs from a similar shade of wood you'll hardly notice them. Alternatively cut the plugs from a contrasting timber and impress friends and family with the honest construction detail.
Edited by loughran on Sunday 23 February 09:51
Very good point, tapered plugs are the way to go.
Years ago, I remember the screw and plug joint was regarded with distain where traditionally a mortice and tenon would have been be used. Then in the 70s an American furniture maker called Sam Maloof started screwing stuff together and everybody relaxed a bit.

http://sammaloofwoodworker.com
Years ago, I remember the screw and plug joint was regarded with distain where traditionally a mortice and tenon would have been be used. Then in the 70s an American furniture maker called Sam Maloof started screwing stuff together and everybody relaxed a bit.
http://sammaloofwoodworker.com
Edited by loughran on Sunday 23 February 15:47
Well, I’ve made the router table at last (copying most of the designs you see online) which seems to work quite well, and I’ve made the odd sized door for our bathroom too such that it matches the others we bought. Hardwood round the sides and MDF in the middle. It’s turned out quite well I think, thanks for the tips. Just need to work out how to hang it now!

Thanks, the panel is 18mm MDF so I just cut short strips of 18mm MDF to join the stiles and rails together, and cut a 20mm deep 18mm slot the full length of the stiles and rails. Doing the length of the stiles was a little tricky as the stiles are about three times as long as the router table I made (two passes with a half inch cutter) but managed to get it a tight enough fit that I had to use a mallet to get it assembled. The big clamps were about £8 each from B&Q and really helped. Anyway, ordering the door custom made would have been a few hundred quid so my man maths has fully justified the chop saw and a few other tools I bought before I started. It’s enjoyable anyway.
Anyone built a Dovecote before? I've committed to building one for the MIL for mothers day.
This looks a reasonable guide with some usable dimensions and materials. I'll keep this thread updated.
http://wiki.diyfaq.org.uk/index.php/Dovecot_/_Bird...
This looks a reasonable guide with some usable dimensions and materials. I'll keep this thread updated.
http://wiki.diyfaq.org.uk/index.php/Dovecot_/_Bird...
Have you started it yet? Cutting it a bit fine if not. I’ve not built one before but as it’s for the MIL I’d suggest interior grade 3mm mdf, 25mm panel pins and the most toxic timber preservative you can illegally obtain, or, if she’s a good ‘un, western red cedar, stainless fasteners and an accompanying bunch of flowers

Mr.Grooler said:
Well, I’ve made the router table at last (copying most of the designs you see online) which seems to work quite well, and I’ve made the odd sized door for our bathroom too such that it matches the others we bought. Hardwood round the sides and MDF in the middle. It’s turned out quite well I think, thanks for the tips. Just need to work out how to hang it now!
Your door looks great, you must be really pleased ! When you were planning the joints I didn't realise it was such a big door. Any progress with the hinging/hanging ?It's been wardrobes for me this week with a slide out shoe rack. The faff factor has been high.

After all the planning, I did get a bit worried about whether it would accommodate the customers shoes but anything up to 13" long will fit. When I first met these customers the husband asked if I'd ever seen the film Overboard with Goldie Hawn and could he have a shoe rack like that.  Fortunately they decided against it... that would have been a faff.
https://www.youtube.com/watch?v=Yuk6MZtJhu4
The faff with this rack is the runner it runs on. Nice bit of kit, it cost £450, but mounting and dismounting the heavy rack is fiddly. And yes, mounting the door when you can't get into the cabinet unless the door is open had its moments.
Fortunately they decided against it... that would have been a faff.https://www.youtube.com/watch?v=Yuk6MZtJhu4
The faff with this rack is the runner it runs on. Nice bit of kit, it cost £450, but mounting and dismounting the heavy rack is fiddly. And yes, mounting the door when you can't get into the cabinet unless the door is open had its moments.


Gassing Station | Homes, Gardens and DIY | Top of Page | What's New | My Stuff