Magnets or DIY kitchens?
Discussion


snotrag said:
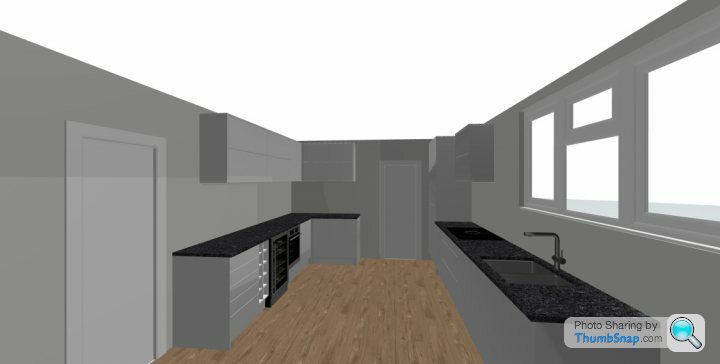
That 3D image (done for someone else) is nothing to do with the kitchen in my photos - dont worry about that!
For colours - we had some samples sent out and then made our final decisions in the showroom.
Honestly, if its at all feasiable book an appointment and have a day out. Its easily access off the A1 (its not Leeds as stated up there though!).
This is how far I have got with my design. It’s meant to be gloss white but in the image it’s very much grey rather than white. Just a bit annoying I can’t get an idea of what it would actually look like in real life. I’ll def be making a trip to the showroom when the time is right though. For colours - we had some samples sent out and then made our final decisions in the showroom.
Honestly, if its at all feasiable book an appointment and have a day out. Its easily access off the A1 (its not Leeds as stated up there though!).
UTH said:
I think this is exactly what I'll be doing......I'm based in Surrey, so it's quite a trek, but from all the stuff I've read on PH is does sound worth it to go with DIY, so a trip to their showroom makes sense
When you're there I assume you can load up your design then talk it through with the staff until it's perfect, then check out colours and samples and so on, and you're basically done, right? I wouldn't feel 100% confident ordering straight off my own design without talking it through with someone first as I'm sure I'll make some basic design errors and end up with things not quite how I'd want it.
Just bear in mind at the moment they've taken their "beta" online planning software offline with a message to say the full version will be released soon, so at the moment you'll need to use a third party online planner that may not have the exact unit configs etc you need. DIY's online planner has been down since at least early August when I first started looking, I'd have thought a lack of planning tool would be a bit of a barrier for some potential customers ordering from an online only store so I'm surprised if it is merely the end of a beta program that the full version wasn't ready to release pretty much straight away.When you're there I assume you can load up your design then talk it through with the staff until it's perfect, then check out colours and samples and so on, and you're basically done, right? I wouldn't feel 100% confident ordering straight off my own design without talking it through with someone first as I'm sure I'll make some basic design errors and end up with things not quite how I'd want it.
LocoBlade said:
Just bear in mind at the moment they've taken their "beta" online planning software offline with a message to say the full version will be released soon, so at the moment you'll need to use a third party online planner that may not have the exact unit configs etc you need. DIY's online planner has been down since at least early August when I first started looking, I'd have thought a lack of planning tool would be a bit of a barrier for some potential customers ordering from an online only store so I'm surprised if it is merely the end of a beta program that the full version wasn't ready to release pretty much straight away.
Are you sure? I've just logged back into my design and I can still change it etc as usual? UTH
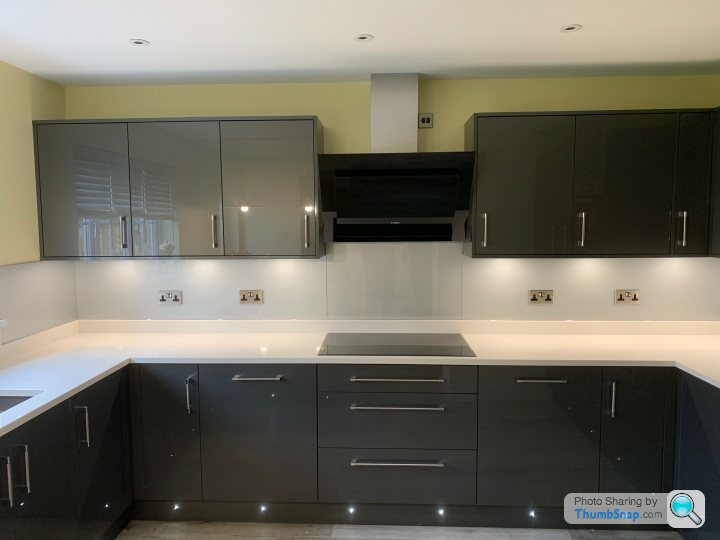
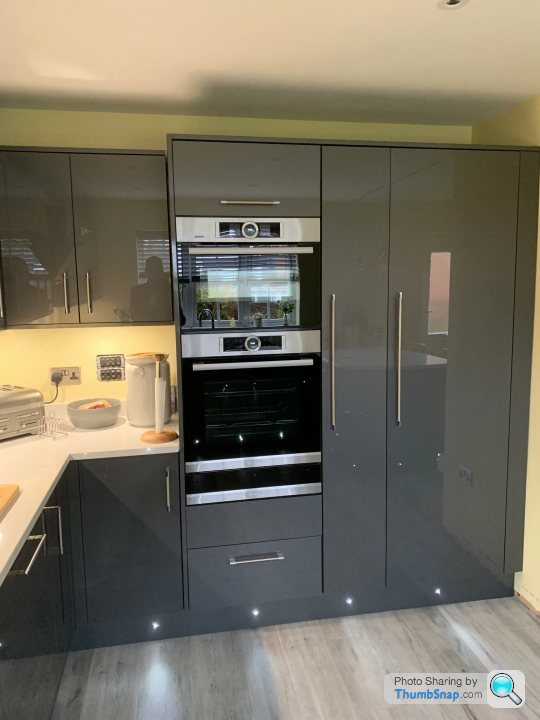
I fitted it myself, the only external assistance was the plastering/termination of old gas, radiator move and worktops, which were sourced/fitted from a local supplier as was the glass splashback.
It took quite a bit of planning and the preparation work including flooring/plumbing/electrics/lighting/room painting took quite a time, but it was only me working on it. Rough timescales, 12 days for that lot, 5 days to fit units (level etc, including all end panels, underpanels, plinth etc) and then probably 5 days doing all final bits.
Carcasses/doors/end panels/etc (DIY Kitchens) 35% - 6K (about a third of total cost!!!)
Quartz Worktop/Glass Splashback 20%
Appliances inc Sink/Tap 25%
Electrics and Lighting 10%
Flooring/Skirting/etc 5%
External Trades - Plasterer/Gas 5%
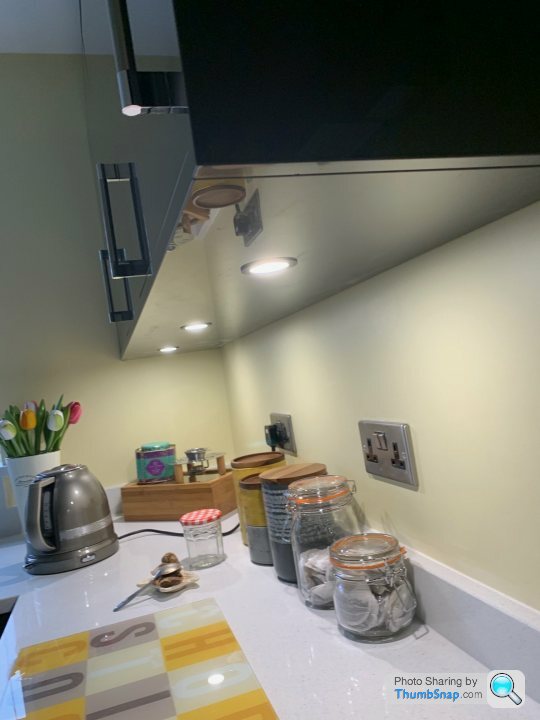
Undercupboard lighting was achieved using an end panel, holes cut for slim LED COB lights, on back of panel channels routed for cables, fitted to underside of cupboards - not great photo
Other view

With Glass Splashback
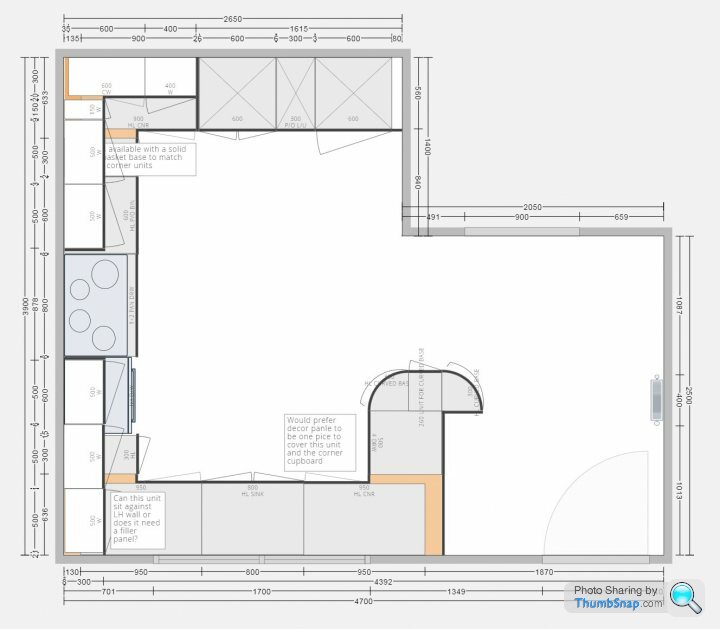
Plan
I fitted it myself, the only external assistance was the plastering/termination of old gas, radiator move and worktops, which were sourced/fitted from a local supplier as was the glass splashback.
It took quite a bit of planning and the preparation work including flooring/plumbing/electrics/lighting/room painting took quite a time, but it was only me working on it. Rough timescales, 12 days for that lot, 5 days to fit units (level etc, including all end panels, underpanels, plinth etc) and then probably 5 days doing all final bits.
Carcasses/doors/end panels/etc (DIY Kitchens) 35% - 6K (about a third of total cost!!!)
Quartz Worktop/Glass Splashback 20%
Appliances inc Sink/Tap 25%
Electrics and Lighting 10%
Flooring/Skirting/etc 5%
External Trades - Plasterer/Gas 5%
Undercupboard lighting was achieved using an end panel, holes cut for slim LED COB lights, on back of panel channels routed for cables, fitted to underside of cupboards - not great photo
Other view
With Glass Splashback
Plan
UTH said:
Great thanks mate, just realised I think you posted this on another kitchen thread (possible mine) and I admired it then too haha.
I wish I was as able as you to fit it all myself, but I fear I'll have to end up paying a fair whack to get someone to fit it.
Its not the kitchen unit fitting that is difficult or takes the time it's everything else!!! And drilling the holes for the handles in the tall units, was definitely a case of measure 10 times drill once!I wish I was as able as you to fit it all myself, but I fear I'll have to end up paying a fair whack to get someone to fit it.
DavidY said:
UTH said:
Great thanks mate, just realised I think you posted this on another kitchen thread (possible mine) and I admired it then too haha.
I wish I was as able as you to fit it all myself, but I fear I'll have to end up paying a fair whack to get someone to fit it.
Its not the kitchen unit fitting that is difficult or takes the time it's everything else!!! And drilling the holes for the handles in the tall units, was definitely a case of measure 10 times drill once!I wish I was as able as you to fit it all myself, but I fear I'll have to end up paying a fair whack to get someone to fit it.
snotrag said:
LocoBlade said:
DIY's online planner has been down since at least early August when I first started looking,.
Working fine here - that screen grab was literally from the next browser window to this one. When I go there I get this, but it would appear if you've already got an account you can continue using it

UTH said:
DavidY said:
UTH said:
Great thanks mate, just realised I think you posted this on another kitchen thread (possible mine) and I admired it then too haha.
I wish I was as able as you to fit it all myself, but I fear I'll have to end up paying a fair whack to get someone to fit it.
Its not the kitchen unit fitting that is difficult or takes the time it's everything else!!! And drilling the holes for the handles in the tall units, was definitely a case of measure 10 times drill once!I wish I was as able as you to fit it all myself, but I fear I'll have to end up paying a fair whack to get someone to fit it.
It took me 4 days to level and fit/secure all the units, including making the filler panels, and end panels where they affected unit positioning, ie end panel between tall and normal units.
DavidY said:
UTH said:
DavidY said:
UTH said:
Great thanks mate, just realised I think you posted this on another kitchen thread (possible mine) and I admired it then too haha.
I wish I was as able as you to fit it all myself, but I fear I'll have to end up paying a fair whack to get someone to fit it.
Its not the kitchen unit fitting that is difficult or takes the time it's everything else!!! And drilling the holes for the handles in the tall units, was definitely a case of measure 10 times drill once!I wish I was as able as you to fit it all myself, but I fear I'll have to end up paying a fair whack to get someone to fit it.
It took me 4 days to level and fit/secure all the units, including making the filler panels, and end panels where they affected unit positioning, ie end panel between tall and normal units.
DavidY said:
Its not the kitchen unit fitting that is difficult or takes the time it's everything else!!! And drilling the holes for the handles in the tall units, was definitely a case of measure 10 times drill once!
I made a jig to do all my handles, well worth the time setting up a couple of scraps with the holes at the right spacing and the right set-back from the edge. LocoBlade said:
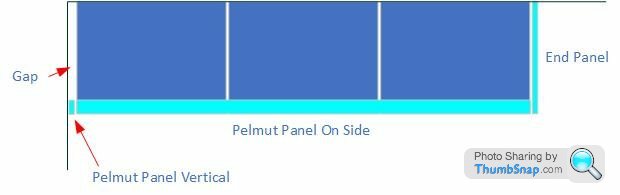
Ooh I like that idea of a back panel creating space for the lighting rather than pelmets
Idea stolen from DIY Kitchens showroom, and then refined!!! (they used surface mount light units - I used recessed COB units)I cut sections out of tall end panels for these, but used other parts of the tall end panel for filler panels elsewhere
paulrockliffe said:
I made a jig to do all my handles, well worth the time setting up a couple of scraps with the holes at the right spacing and the right set-back from the edge.
I had a jig for all 'normal handles' but it wasn't capable of the gap required for the tall fridge and larder unit panels, especially as the larder one was in the middle of the door! The jig was about a £10 from Amazon and well worth it!Tall panels, hole centres 460mm!!!
DavidY said:
LocoBlade said:
Ooh I like that idea of a back panel creating space for the lighting rather than pelmets
Idea stolen from DIY Kitchens showroom, and then refined!!! (they used surface mount light units - I used recessed COB units)I cut sections out of tall end panels for these, but used other parts of the tall end panel for filler panels elsewhere
LocoBlade said:
Did you frame the wall cabinets on all sides with end panels?
No only bottom and side that shows ie next to cooker. The top used an pelmut panel on its side, and on the LHS where the cuboards meet the wall, I needed a similar panel to stop the door binding on the wall, again I used some pelmut on its side (so end showing) - this then allowed the light cables to exit the panel on the end, travel up the wall in the gap behind the pelmut panel and onto the top. Using pelmuts like this saved cost as well!!From Above
Angpozzuto said:
I had the exact same thing with DIY kitchens, I was very impressed with how quickly they dealt with the issues we had
Yes, I've got to say the remedial work has been spot on. It's taking a little while but at no time have I felt the need to convince or justify the requested action. The delays have been down to mistakes rather than any debate. They rightly require photos of the any damage/defects but this really seems just a formality to prevent fraud. I thought they might try and convince me to use the supplied touch-up paint (like I would happily do if we damage anything later on) but they just shipped out replacements.
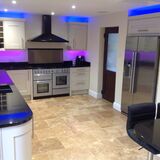
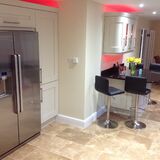
We used DIY Kitchens and we and the kitchen installer were very impressed with the quality of the finish.
We used a local worktop company to supply and fit the granite.
Added some Hue compatible lighting for the kitchen disco effect. The usual Hue scenes have a white light under the cabinet.
Make sure on your planning to understand the pieces that you need. There are lots of guides on the site.
eg The end pieces either side of the cooker, the end pieces on the upper cabinets, how corner units work etc...
We ordered extra blanks of wood to fill in around the fridge and touch up paint for accidents (not needed fortunately)
(the back door is old & brown upc. That will be changed at some stage)
UTH said:
This is how far I have got with my design. It’s meant to be gloss white but in the image it’s very much grey rather than white. Just a bit annoying I can’t get an idea of what it would actually look like in real life. I’ll def be making a trip to the showroom when the time is right though.
They have a visualiser on DIY Kitchens although it’s just a generic kitchen where you can change door colours, flooring, worktop styles.Gassing Station | Homes, Gardens and DIY | Top of Page | What's New | My Stuff