My Garage Build
Discussion


I’m hoping to embark on a similar project myself (assuming we get planning permission) and it would be good to know your thoughts on the company you bought the frame from and if you’d use them again (happy to receive a pm on this).
I’m sure I read that you have a nail gun? If so, make sure you use annular nails of the correct length (63mm is usually sufficient for most batten sizes) and that you stagger the batten joints for each row.
I also noticed that you are installing a secret gutter. Is there a reason you aren’t using dry soakers and then flashing over the top ? You could then go either stepped or straight flash (max of 1.5m length sections with min 100mm overlap).
If you go for the straight option, I’ve found an easy way to get a neat line is to fix a batten onto the wall with a screw at each end and in the middle. Then with a 4” angle grinder you run it along the wall against the batten. This helps keep it straight and if done with the correct sized batten it can also act as a depth gauge. Remove batten once cut.
Good luck it’s looking great.
Edited by W12GT on Friday 12th May 17:08
BigBen said:
Day 4 (bank holiday monday)
Not a huge amount of progress today due to lunch guests. Tasks were:
- Treating the back wall panels with another coat of flameproofing liquid. One panel now done with the target 3 coats, 1 coat to go on the other. Back wall panels can be installed soon.
- Built the final side panel (but not clad)
- Made the temporary platform above the attic trusses safer as I will be working on it a lot
- Devised a jig for fitting the remaining joists on the non hipped part of the roof. Essentially this will allow me to work alone and fit the joists without an assistant. I will take a picture of it tomorrow
- Spotted that my dodgy measuring of the attic trusses yesterday left one of them in the way of some of the joists, no real loss of attic space by removing it so I have. Annoyed at myself for not spotting it yesterday.
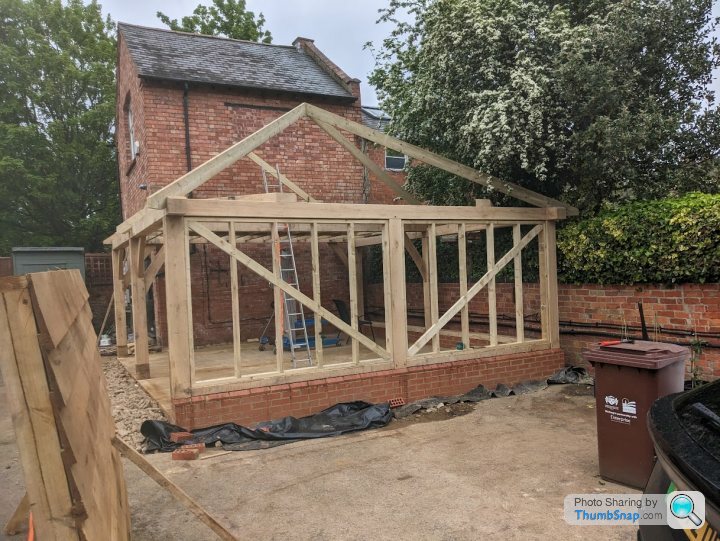
DIfficult to see from the picture but each panel is slightly recessed so the cladding will go between the vertical beams, different to the suggested builds / library photos but think it will look better and shows of the frame. I may ultimately put some kind of draft proofing round the edges but probably won't.
Tomorrow the roof slates, ridge tiles and battens arrive. Hope to at least have all the joists installed by the end, if not the membrane etc
Ben
An observation regarding inserting the panels into the frame; youmay have movement issues where the primary structure (columns) get wet and the framing of the secondary structure (panels) stay dry. This will mean shrinkage at different rates. I’m almost certain that the boarding you use will shrink (albeit marginally lengthways) but enough to leave you with an open gap adjacent to the columns. Also it will be a nuisance to get a tidy edge on any membrane you use and to seal the end grain.Not a huge amount of progress today due to lunch guests. Tasks were:
- Treating the back wall panels with another coat of flameproofing liquid. One panel now done with the target 3 coats, 1 coat to go on the other. Back wall panels can be installed soon.
- Built the final side panel (but not clad)
- Made the temporary platform above the attic trusses safer as I will be working on it a lot
- Devised a jig for fitting the remaining joists on the non hipped part of the roof. Essentially this will allow me to work alone and fit the joists without an assistant. I will take a picture of it tomorrow
- Spotted that my dodgy measuring of the attic trusses yesterday left one of them in the way of some of the joists, no real loss of attic space by removing it so I have. Annoyed at myself for not spotting it yesterday.
DIfficult to see from the picture but each panel is slightly recessed so the cladding will go between the vertical beams, different to the suggested builds / library photos but think it will look better and shows of the frame. I may ultimately put some kind of draft proofing round the edges but probably won't.
Tomorrow the roof slates, ridge tiles and battens arrive. Hope to at least have all the joists installed by the end, if not the membrane etc
Ben
If you have the time and inclination I’d recommend moving the panels flush with the columns and then you will use a vertical batten at the corners to provide clean lines and protect the end grain of the boarding.
W12GT said:
I also noticed that you are installing a secret gutter. Is there a reason you aren’t using dry soakers and then flashing over the top ? You could then go either stepped or straight flash (max of 1.5m length sections with min 100mm overlap).
What I am referring to as a secret gutter is a continuous soakerEdited by W12GT on Friday 12th May 08:24
https://www.drainagesuperstore.co.uk/product/gas1-...
so I think we are talking about the same thing
Good spot on movement of the panels, I can certainly move them around so they are either proud or sub flush so can experiment.
Very happy with the company I bought from, great instructions and always on the end of an email / web chat or whatever when I need to ask questions pre-delivery. Also lots of nice details like including a tub of chemicals to clean the oak once it is assembled and including all the fixings for the joists.
BigBen said:
W12GT said:
I also noticed that you are installing a secret gutter. Is there a reason you aren’t using dry soakers and then flashing over the top ? You could then go either stepped or straight flash (max of 1.5m length sections with min 100mm overlap).
What I am referring to as a secret gutter is a continuous soakerEdited by W12GT on Friday 12th May 08:24
https://www.drainagesuperstore.co.uk/product/gas1-...
so I think we are talking about the same thing
Good spot on movement of the panels, I can certainly move them around so they are either proud or sub flush so can experiment.
Very happy with the company I bought from, great instructions and always on the end of an email / web chat or whatever when I need to ask questions pre-delivery. Also lots of nice details like including a tub of chemicals to clean the oak once it is assembled and including all the fixings for the joists.
Thanks for the feedback on the company, I will be contacting them!
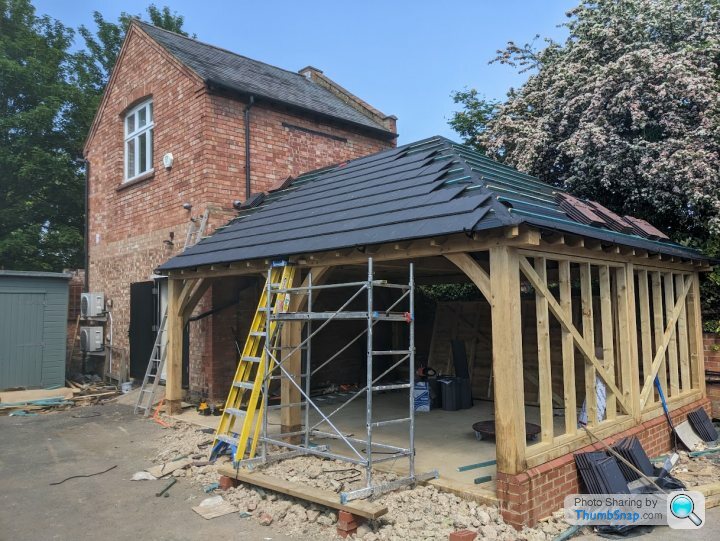
Day 8 started with a trip to the builders merchant then the roofing store to try and buy some pre-cut fillet for under the felt trays. This was mainly a failure. In the end I fabricated some shims and they seem to have done the job.
Next job was to start battening. I was nervious about this as they all need to be parallel. Using a combination of a long spirit level and measuring from the joist ends (difficult because of membrane/ membrane tray) I got the first one about right. It possibly meanders a few cm over its length but suspect that won't be noticable in the finished product, it certainly isn't no the naked eye.
No help today so I have been up and down the ladder more times than I care to think about. I also must have slightly cocked up the maths somewhere and the top two rows of tiles will be about 4cm closer together than the other 9 rows, again won't be noticable and I have repeated this on the other sides so it will all line up in the end. (I suspect it was because I forgot to subtract the width of the batten that I had hooked the tape mesure over)
I was also pleasantly surprised about how secure it felt walking around the roof on the battens, I am a larger gentleman so did have a few concerns

It occured to me that an extra pair of hands would more than half the build time, the number of times having someone on the other end of a timber or a sheet of membrane in the breeze is huge. I am not complaining, if I was that bothered I could have paid for some help, but pointing out to future readers that if you had two or more of you I reckon a 4-5 day build would be possible.
The weekend is interrupted by a trip to Saracens tomorrow for the Rugby premiership semi final which I hope Saints win then a kids football match on Sunday but the family have promised to help inbetween. The back roof is not yet battened and I have not completely figured out how to do it. Simplest is likely to start from the top and work down but that does not feel natural.
Next job was to start battening. I was nervious about this as they all need to be parallel. Using a combination of a long spirit level and measuring from the joist ends (difficult because of membrane/ membrane tray) I got the first one about right. It possibly meanders a few cm over its length but suspect that won't be noticable in the finished product, it certainly isn't no the naked eye.
No help today so I have been up and down the ladder more times than I care to think about. I also must have slightly cocked up the maths somewhere and the top two rows of tiles will be about 4cm closer together than the other 9 rows, again won't be noticable and I have repeated this on the other sides so it will all line up in the end. (I suspect it was because I forgot to subtract the width of the batten that I had hooked the tape mesure over)
I was also pleasantly surprised about how secure it felt walking around the roof on the battens, I am a larger gentleman so did have a few concerns
It occured to me that an extra pair of hands would more than half the build time, the number of times having someone on the other end of a timber or a sheet of membrane in the breeze is huge. I am not complaining, if I was that bothered I could have paid for some help, but pointing out to future readers that if you had two or more of you I reckon a 4-5 day build would be possible.
The weekend is interrupted by a trip to Saracens tomorrow for the Rugby premiership semi final which I hope Saints win then a kids football match on Sunday but the family have promised to help inbetween. The back roof is not yet battened and I have not completely figured out how to do it. Simplest is likely to start from the top and work down but that does not feel natural.
Andy RV said:
Good work, what type of tiles are you using? Your batten spacing appears rather large?
They are quite big clay tiles, called New Cassius. Progress over the weekend was rather slow due to a trip to North London to watch the Saracens beat the Saints and knock us out of the premiership playoffs. On Sunday there was a similarly important kids football match to attend so another day gone.
What I did manage was battening the rear of the roof using a new set of ladder hooks I bought earlier in the week and also distributed the tiles around the roof as best as I could. I extended the hire of the Genie lift so have been using it to do the initial lifting then handballing the (extremely heavy) bundles of 5 tiles around. I had a friend round to help which was incredibly useful. We also moved the rear panels close to their final position which was a vital step because I am back at work this week so really needed to be able to get my car out.

Not entirely sure about the straightness of the battens on the reverse (unseen) side of the roof but it does not vary more than 2 cm across its length so suspect it will be fine and in any case that side will be unseen.
Expect slower progress this week as back to work, although I am keen to at least have a few tiles in place over the next few evenings.
Ben
CharlesdeGaulle said:
BigBen - what's the brick building adjacent? Is that workshop space?
Downstairs is a workshop and upstairs is my office. The footprint is slightly too small for a double garage and it was converted at some cost by the previous owners into an insulated building with air con / heat on both levels.I may one day add an internal door between the two buildings but suspect that will open up a whole new can of building control worms so may not bother.
Aluminati said:
BigBen said:
Next question is how do I attach the triangular cut tiles close to the roof hips? Some kind of special clip or additional battens and some drilled holes?
My lads will either side slice with a grinder or drill a hole (s) depending how the cut falls on the batten.Have not got anything done this week due to being back at work and returning hired equipment etc. Will be back on it at the weekend.
It is amazing how much work interferes with DIY projects. But today I had a clear day so made some decent progress. I was able to start fixing the tiles to the battens. The approach I have taken is avoid the ends where I will have to make cuts. The logic behind this (I am an engineer there is always logic) is I have a cordless angle grinder that is (was) supposed to arrive today which will make the cutting of angles easier.
Started on the front side because I have the platform set up and it is easier to see what is going on. Once the lowest row was in I got into a rhythm and got a lot done in a fairly short time.
The backside of the roof was next, this was a bit slower mainly because of having to work downwards and because for the first time I had to work around the edge soakers. Next challenge is a fair chunk of the tree is going to have to go but need to wait until next door are out or something (it is all stuff on my side that needs to go but it will leave a bit of a hole.) This would have been an advantage of doing the job in winter as the tree looks really nice in blossom at the moment.
Issuettes today have been:
- The suggested 5cm overhang of bottom tiles into the gutter has not been the most accurate measurement I have ever made. The solution will be to move the gutters further out perhaps by fitting a facia board.
- I am not convinced I will have enought tiles. According to the maths I do but according to my eye I don't. Will crack on with the backside tomorrow and see what happens.
- Finally I can't rule out being sun burned but that is a problem for later
Ben
BigBen said:
Next question is how do I attach the triangular cut tiles close to the roof hips? Some kind of special clip or additional battens and some drilled holes?
I think you’ve cut your battens too short - they should meet as they go around the roof. I think you are going to have some issues if you leave them as they are.That said if you don’t want to do the battens then you could use a stiff mortar mix underneath on the corner and pop the nails into that. However, I wouldn’t recommend this way as it causes bridging and any water will get trapped and rot the membrane below.
W12GT said:
BigBen said:
Next question is how do I attach the triangular cut tiles close to the roof hips? Some kind of special clip or additional battens and some drilled holes?
I think you’ve cut your battens too short - they should meet as they go around the roof. I think you are going to have some issues if you leave them as they are.That said if you don’t want to do the battens then you could use a stiff mortar mix underneath on the corner and pop the nails into that. However, I wouldn’t recommend this way as it causes bridging and any water will get trapped and rot the membrane below.
Aluminati said:
W12GT said:
BigBen said:
Next question is how do I attach the triangular cut tiles close to the roof hips? Some kind of special clip or additional battens and some drilled holes?
I think you’ve cut your battens too short - they should meet as they go around the roof. I think you are going to have some issues if you leave them as they are.That said if you don’t want to do the battens then you could use a stiff mortar mix underneath on the corner and pop the nails into that. However, I wouldn’t recommend this way as it causes bridging and any water will get trapped and rot the membrane below.
Gassing Station | Homes, Gardens and DIY | Top of Page | What's New | My Stuff