My Garage Build
Discussion


BigBen said:
The battens come up to the runners that are fitted (were not fitted in the last picture). I understand from the dry hip instructions that the correct way is to batten all the way round then fit the hip runner as spacers but I don't see the difference in terms of what wood is where. Where I am short of wood I have used either hip clips or or put in a bit more battening, will show pictures in the near future
One I have some lads currently doing. You can see the double stacked runner straight off the hip. No wobble trying to seat on angled battens were the pitches meet.
Aluminati said:
One I have some lads currently doing. You can see the double stacked runner straight off the hip. No wobble trying to seat on angled battens were the pitches meet.
That is how mine meets the runner on the hip which seemed a better way to do it than cutting a spacer between each set of battens. It also means the battens sit flush with the roof rather than meeting at a point proud of the hip rafter.Realise I have not updated this for a few weeks, essentially life has got in the way a bit. I thought this weekend would be the same with a family visit. Luckily my Brother in Law was keen to help and we got a decent shift in. Also worth noting he is practically minded like me so was a good assistant.
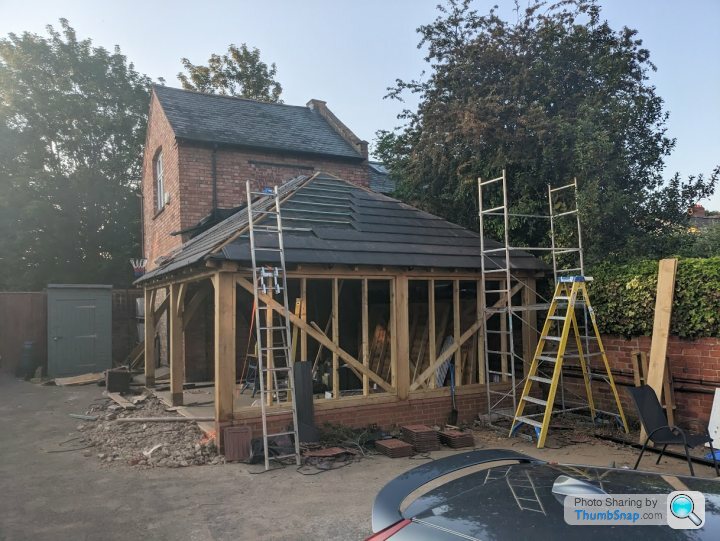
During the week a few neighbours were kind enough to give me a hand lifting tiles onto the roof then on Friday the boy and I set about installing them (we have quite a team going working on one row each, he is getting to be a dab hand.) It was then I spotted that perhaps letting said boy (or possibly my mate from Rugby who the boy swears was responsible) lay out said battons only lightly supervised was perhaps not a wise choice, it was as if he had decided to 'eyeball' one of the rows instead of use spacers which then messed up the top 3 rows.
Anyway a bit of re-battoning later and today we got the back side of the roof done to the hip (but not at the wall end) and the end roof more or less done to the right hand hip runner. Hope to finish the end roof in the evenings this week, although that is a stretch goal as I am a bit bored of cutting tiles! Have become much better at fitting the clips to the corner tiles, almost looks like I know what I am doing in places.
I have not fully thought through how I will install the hip tiles without having to climb over the tiles which I don't fancy but I am sure I will figure it out.
- I know how the tiles are installed, just not how I will get myself into the position to carry out said installation
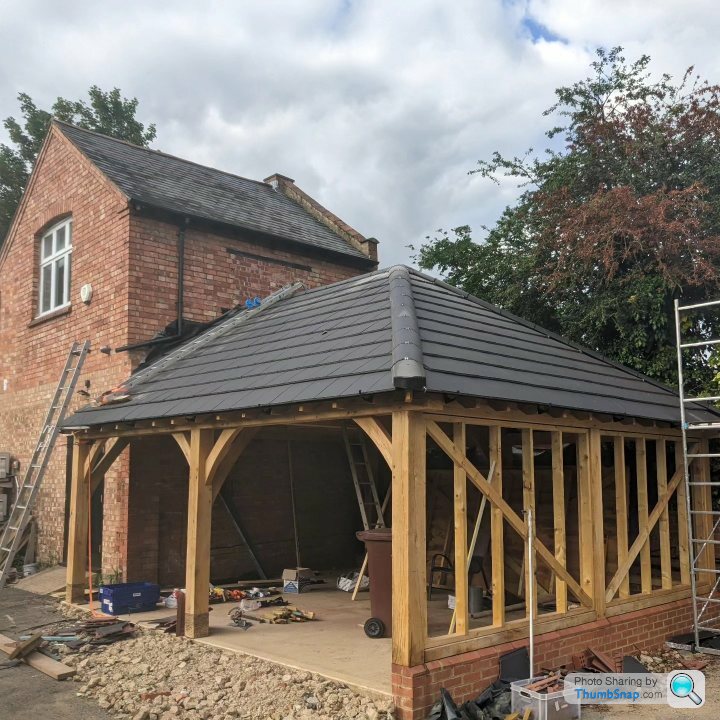
A good day today, got the tiling of the hip end finished and got the batons in place for the dry hip installation. The most exciting thing is this means I don't have to do any more diagonal tile cutting which I have grown to hate. (actually not true there are two more on the top rows of the main roof.
The next job is to wash the roof to get all the dust from the cut tiles off as it will impede the adhesive that the dry hip kit uses. I also mitred the end hip tiles today so they are pretty much ready to go. Might get the washing and maybe one of the hips done tomorrow morning but not sure as I am off to the US with work around lunchtime so don't have much of a work window.
Question for the roofers reading what do I do with the hip / ridge tiles where they meet. I understand the tiles need mitring so they fit together but then what? I see that you can buy hip / ridge junction tiles, are these worthwhile?
Question for any medics reading, what is the recommended treatment for sunburn / heat stroke. Asking for a friend who spent the day on a roof on one of the hottest days of the year......
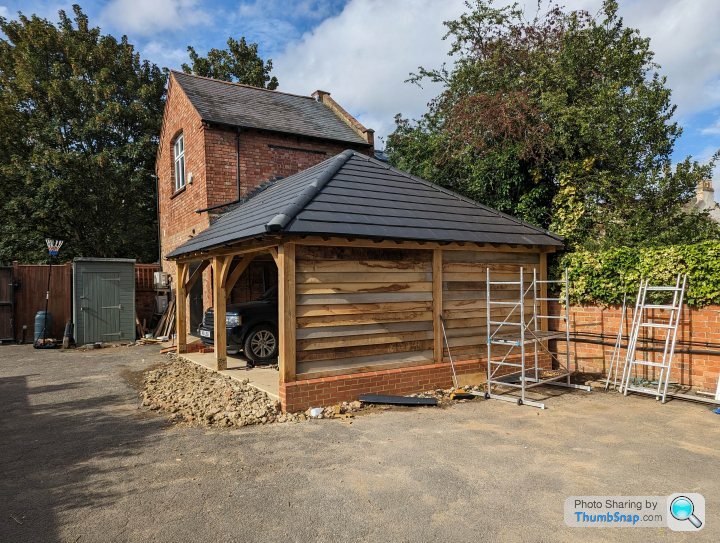
This might look a bit like the other pictures but there in an important difference. The roof is now completely tiled. What you can't see is some of the tiles are slightly different to the rest, I ran out and could only find riven style replacements locally, I fitted them on the side of the roof no one can see so no problem.
Remaining task is to do the flashing where it meets the wall of the outbuilding. I have fabricated a fibreglass section of gutter to join the two sides of the soaker so it is all ready to be covered up.
Then it will be time to finish guttering and wall panes so building control can come and hopefully sign off.
BigBen said:
This might look a bit like the other pictures but there in an important difference. The roof is now completely tiled. What you can't see is some of the tiles are slightly different to the rest, I ran out and could only find riven style replacements locally, I fitted them on the side of the roof no one can see so no problem.
Remaining task is to do the flashing where it meets the wall of the outbuilding. I have fabricated a fibreglass section of gutter to join the two sides of the soaker so it is all ready to be covered up.
Then it will be time to finish guttering and wall panes so building control can come and hopefully sign off.
It looks great, Ben, it must be very satisfying. Have you decided if you will drive cars in or reverse them in? Or does the yard layout allow either?Remaining task is to do the flashing where it meets the wall of the outbuilding. I have fabricated a fibreglass section of gutter to join the two sides of the soaker so it is all ready to be covered up.
Then it will be time to finish guttering and wall panes so building control can come and hopefully sign off.
JeremyH5 said:
It looks great, Ben, it must be very satisfying. Have you decided if you will drive cars in or reverse them in? Or does the yard layout allow either?
Should be able to go in either way, although it will be mainly taken up with my old R107 which has little chance of emerging under its own steam for a while now.

Thought I had better update this as it has been a while. Not really been my fault, mainly the fact it has rained for 40 days and 40 nights.
Work since the last update has been fitting the flashing to the edges and installing all the walls. Flashing has been a learning experience but looks OK. Walls were heavy but not too complicated.
The other important milestone that you may notice is I have a car in the garage. It fits. Probably should have checked that before. Even better room for two cars and will have space to open the doors.
Still to do is some edging on the other side of the roof and building a small section of wall. And flooring the atic space. All small jobs but all take time.
Reflections on the flashing work is I used a lead alternative stuff, should have used lead, would have looked a bit better and in all likelyhood would not be much more difficult. Another thing I know next time.
Any thoughts on how to build some doors?
Ben
McGee_22 said:
Good build thread - how’s it looking now?
A few more details that were missing from the earlier thread.i) I picked up some floorboards from a guy who was refurbishing his house. I used these to floor the attic space. I think I have enough left to do another one so if anyone wants them let me know. I have subsequently used this space to store garden furniture and car body panels.
ii) Last weekend I cleared the space and began painting the floor (it has to be warm ish for the paint to dry so it has taken a while)
You may also notice I have fitted lights to the inside. Not shown are lights on the outside which are on a motion sensor. Also fitted an outdoor WiFi access point so the garden has good WiFi.
The most interesting development is there are still not doors and I have still not decided what to do about this. I quite like it door free and the angles involved mean it does not get wet inside. I suspect I will leave it as is until I get fed up moving tools to and from the adjacent workshop.....
Gassing Station | Homes, Gardens and DIY | Top of Page | What's New | My Stuff