Discussion


T5SOR said:
Thanks for all the great help.
I'm picking up a new Skywatcher Explorer 200P tomorrow.
Are there any accessories I need to consider? A book on what to do and what all the bits are would be useful too
Get the book "Turn left at Orion". I'm actually working my way through it front to back as far as I can at my latitude - it's always best to go out with a plan and it's a great introduction to what's out there.I'm picking up a new Skywatcher Explorer 200P tomorrow.
Are there any accessories I need to consider? A book on what to do and what all the bits are would be useful too
Edited by T5SOR on Sunday 11th April 17:02
T5SOR said:
I have just picked it up and put it together. It’s not brand new, it’s from someone selling used. They only used it a few times.
It’s a Skywatcher Explorer 200P on an EQ5 mount.
Accessories;
2x Barlow Lens 1.25”
Super 10mm
Super 25 Wide Angle Long Eye Relief
Celestron E-lux Eyepiece 1-1/4”
Lunar and Planetary Color Filter 1.25” x4
Hyperion 68 Degree 10mm Eyepiece
Some sort of adapter from maybe 2.5” to 1.25”
£430 for everything.
Need to work out what all these bits are
Nice saving on the newly increased retail price!It’s a Skywatcher Explorer 200P on an EQ5 mount.
Accessories;
2x Barlow Lens 1.25”
Super 10mm
Super 25 Wide Angle Long Eye Relief
Celestron E-lux Eyepiece 1-1/4”
Lunar and Planetary Color Filter 1.25” x4
Hyperion 68 Degree 10mm Eyepiece
Some sort of adapter from maybe 2.5” to 1.25”
£430 for everything.
Need to work out what all these bits are
First up - did it come with the manual? If not, I think this is the relevant one : Telescopes with EQ3-2 & EQ5 Mount
Also checking that the slow motion controls and finder scope are present, and finally the little wheel bolt that screws into the end of the counter-weight bar hasn't gone missing. It's known as the toe-saver, and it stops the counter-weights slipping off - on cold nights it's been known for the contraction of the weight attachments to cause them to slip, and without the toe-saver it could mean you never play Premiership-level football again.
Assuming everything is there, if you have a decent line of sight from your viewing location during the day, it's useful to align the finder scope with the main telescope, ideally with something a mile or so away - tree, church steeple, pylon etc.
In terms of general setting up, do everything that you can do during the day such as a very rough polar alignment, using a compass if necessary, levelling and balancing the mount etc - much easier than doing it all in the dark. Leaving a bin-liner or other cover over the rig as you wait for it to get dark will stop the initial dew-fall from getting everything wet, but inevitably you will get some moisture covering it at some stage - the good news is that Newtonian reflectors are pretty good at resisting dew build-up on the optics. Usually.
If you have a polar scope fitted in the mount, experiment with doing a more precise polar alignment after it gets dark - a useful widget to help this process is a Polar Scope Illuminator, which makes the reticule in the polar scope much easier to see. There are useful polar alignment apps for your phone which will show you where Polaris should appear in the reticule at a given time and location. If you don't have a polar scope, you can at least look up through the hole through the mount to check you can see Polaris. Don't get too hung up on precise polar alignment though - knowing how to do it will make your life easier if you want to get into imaging, but a good polar alignment should mean you only have to adjust the Right Ascension axis to keep targets in view, and not have to fertle with the Declination control too much.
Get a copy of Stellarium if you don't already have one, and I'd suggest enabling the Oculars plugin and entering the details of the scope and your eyepieces - this will give you an idea of a) what targets are likely to be available on any given night and b) the field of view you can expect using your different eyepieces.
Then hopefully have some clear evenings and get out there! If you have a clear view to the West, try and catch the Orion nebula before it disappears - easy to find and you can experiment with the views your different eyepieces give you.
The telescope will almost certainly benefit from collimation, but don't worry about it initially - can suggest some tools to help with it, but to start with take a look at the collimation section in the manual, and try a 'star test' - looking at the shape of the rings made by an out-of-focus star - this will give you an indication of how far out of collimation it is.
FWIW I'm going to dust off my 200P and put that on my main mount for a couple of weeks for some imaging sessions - if we get any decent weather, will share anything I manage to capture.
Have fun!
I got to use it on Sunday and it was very enjoyable. I even managed to get some pics of the moon with my iPhone through the lens.
Unfortunately on Monday I got to know the mount much better, as I had to strip it down to remove the latitude bolt that bent. The bolt then stripped the thread and I have been researching how to avoid this again...... it seems the angle of the tongue is insufficient for our UK latitude and the bolt hits the tongue at an angle that causes stress to it.
Has anyone fitted a mod to the tongue? I see there are some differing approaches. I am thinking of getting one of these made up at work and some bigger bolts;
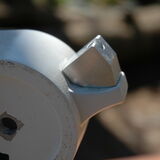
I will need to get the mount head drilled and re-threaded.
Unfortunately on Monday I got to know the mount much better, as I had to strip it down to remove the latitude bolt that bent. The bolt then stripped the thread and I have been researching how to avoid this again...... it seems the angle of the tongue is insufficient for our UK latitude and the bolt hits the tongue at an angle that causes stress to it.
Has anyone fitted a mod to the tongue? I see there are some differing approaches. I am thinking of getting one of these made up at work and some bigger bolts;
I will need to get the mount head drilled and re-threaded.
Gassing Station | Science! | Top of Page | What's New | My Stuff