Redoing wiring harness
Discussion


Hi all,
I’ve decided to embark on figuring out the wiring on my 1976 reliant scimitar, as it was sat for 7 years and I could all sorts of foul things in it when I first got it.
The car is going to be a street/ strip car so bare basics with a few comfets, I’ve just ripped the whole wiring loom out and I’m on the fence whether to make my own loom from scratch with a fuse box and a few breakers, but the actual wires inside the loom look in really good nick, the exposed parts not so much.
Am I better off stripping out the wires that arnt needed and recovering the loom? Or building a new one, and what would be involved for each, obviously stripping the existing is easier so is it worth making a new one?
Thanks in advance
By the time you've got it stripped out, I'd have thought it was worth your time to make a new loom.
At that age I expect you'll find the wiring loom is pretty simple and probably not hard to re-make. Are all the connection housings reusable and can you find the terminals to go with them?
At that age I expect you'll find the wiring loom is pretty simple and probably not hard to re-make. Are all the connection housings reusable and can you find the terminals to go with them?
I would use the old loom. That way you have a wiring diagram with colours. If you don't use the original wires you will either have to buy wires of many colours or have a four colour loom. You have the added hassle of having to have an earth loom as well. Refer to the original wiring diagram and decide which parts you need to retain and strip out the redundant wires. Remake any terminals that look dodgy buy some lucar multi plugs to keep it tidy.I have done a similar job on a rally car this is much the neatest easiest way.
Have fun...
Have fun...
Whatsmyname said:
drcox99 said:
That’s the thing I’m not super knowlageable on how I would even go about making a new loom but I would like the added peace of mind knowing it is all new and having distribution blocks and a fuse panel
Use the existing loom to make a peg board jig. drcox99 said:
That’s what I was hoping to do, what’s the best way of doing that? Just straight up rip the current loom apart?
I've done this a couple of times for engine looms, but not for a whole car. Given the age of the car I'm assuming the wiring is relatively simple so it ought to be relatively easy. I'd do it like this: Label all the connectors that terminate the loom, and label whatever they connect into. Take lots of pictures showing where the loom fits, especially where the loom is physically supported and how it passes pipes and brackets. Physically remove the loom from the car, keeping it intact. Get a board big enough to lay the loom out on without different parts getting in the way of each other. Splay it out so that nothing overlaps and all the runs are straight. Doesn't matter whether the layout has any relation to the geometry when it is installed. Add something to secure the loom so that each junction and each end point is fixed to the board. I like using velcro cable straps for that, but there are plenty of other ways. Draw out the route the loom takes between the mounting points. Trace out for each connector where each wire goes to, and document it, including the wire colours. Order 50% more wire than you think you need in each colour/size from your favorite supplier. Mine is VWP. Buy really good quality terminals, and the right tool to crimp them. Buy a wire labeler. Dymo sell some good ones. Buy lots of heat shrink tubing to connect the wire ends, and plenty of loom tape, and whatever you want to use to protect the loom. I like braided sleeving for this but others use split corrugated tube which is easier to use. Lay each new wire on the board and terminate the ends to match the original. Use lots of cable ties to keep it roughly loomed and 'dry fit' it and test in the vehicle. If it fits and works, take it out and loom it properly before the final fit.
Thanks that’s exactly what I was looking for!
There are little blocks on some of the wires hat I have to assume are relays, I’ll take some pictures this evening.
I’ve seen a lot of the race cars have a board with relays, fuse block and distribution block, how would I go about integrating this new loom into something like that?
There are little blocks on some of the wires hat I have to assume are relays, I’ll take some pictures this evening.
I’ve seen a lot of the race cars have a board with relays, fuse block and distribution block, how would I go about integrating this new loom into something like that?
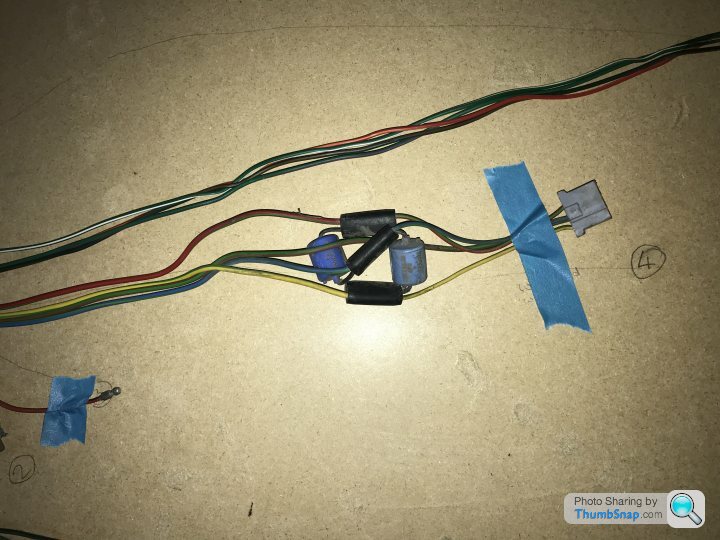
What's the wording on the blue canisters & what does the white multiplug connect to?
I'm inclined to think that it's to do with indicators & someone's fitted LED bulbs so needs resistors in parallel to correct the flash rate but we need to know the above.
I'd suggest labelling the loom connectors so you don't forget what went where.
I'm inclined to think that it's to do with indicators & someone's fitted LED bulbs so needs resistors in parallel to correct the flash rate but we need to know the above.
I'd suggest labelling the loom connectors so you don't forget what went where.
Edited by paintman on Friday 21st September 00:02
drcox99 said:
I couldn’t really read the writing, but that cluster goes to the windscreen wipers as far as I can tell
Should have labelled things when you took them off. If you don't know what went where then you're going to have problems trying to identify previous mods. Might be better going onto a Scimitar dedicated site such as RSSOC & seeing if they can help or at least identify what that connector goes too by the wiring colours. Been a long time since I had mine & IIRC the Autobook manual was the only workshop manual at the time & I can't recall what the wiring diagrams were like.
Posssibly suppressors of some sort to prevent radio interference?
I'd suggest you get a magnifying glass & read what's on them so you might get some better guesses.
Edited by paintman on Friday 21st September 09:08
Gassing Station | Home Mechanics | Top of Page | What's New | My Stuff