Just bought myself a van to convert
Discussion


Very slow, had a bit of a cash flow problem, but selling the motorbike on Saturday so that should free it up. I need to get electrics before insulating/carpeting
The biggest problem i've had is trying to be 4 or 5 steps ahead in the planning, so I know what is going where. The problem is I reckon I'll run into brick walls at points along the build when I realise that something I had planned for, cant be done.
I've cut out cardboard templates for a rough idea of where the seating/bed will go, and what I'll be left with. The challenge comes in working out the best way to make the bed longer and then fitting it all together as I'm planning a U shape now rather than a 6ft long side bed. This should allow me to have a removable unit behind the driver seat as if I use the L Shape idea, then it has to be over the rear arch and it wouldnt support itself on its own having the arch cutout.
Any progress? I'm about to buy lining carpet to put over the NHS quality plastic on the interior roof and sides of my van (already fitted, and with insulation behind it) I'm probably going to get it from megavanmats.com. Has anyone got any experience of them? I'm also looking for information on adhesives to stick to the unknown plastic/PVC as most adhesives are advertised as for use on wood or metal.
Not had any issues when using megavanmats.
As for the adhesive for the carpet liner, Trimfix. http://www.vanguard-conversions.co.uk/product_p/tf...
It is a contact adhesive and will allow you 'unpeel' the carpet if you are not happy and re-apply.
As for the adhesive for the carpet liner, Trimfix. http://www.vanguard-conversions.co.uk/product_p/tf...
It is a contact adhesive and will allow you 'unpeel' the carpet if you are not happy and re-apply.
Making some slow but steady progress. Started on the electrics, bought split charge, 240v hook up, lighting and sockets so on the go with those at the moment. I'm through the bulkhead now with the 240v hook up fixed under the bonnet so its just a case of routing cables and fixing it all under the driver seat.
Should get that done over the next couple of days and then I'll turn to insulating it all. I've bought all of the carpet material from mega van mats, bought 14 cans of adhesive, 10m of smoke for the sides and 3m of silver for the ceiling.
I'm also about to order 9mm one piece floor, just sorting out prices at the moment
The battery charger and RCD are going under the drivers seat, i'm switching spotlights from the side panel next to the sliding door and I'm having a couple of 240v sockets and 12v sockets from the front. I might have a 12v socket in the rear door but other than that, its fairly straightforward
I went for 14 cans as I'm going to use it to do the insulation too!
I went for 14 cans as I'm going to use it to do the insulation too!
Spent all day routing cables and fixing up the RCD & split charge system. Its very much 1 step forward, 2 steps back with this kind of thing. Being my first go at it, I'm routing something, then I think a few steps ahead in the build and its got to come out as it'll be no good where it is.
I've routed spare 240v cable to the back of the van, 12v lighting cable to the tailgate and also some 12v cable to the rear offside.
I'm having the initial couple of sockets under the driver seat in front of the RCD & Battery so i'll start with those and work out in time where the others would be best located. I've got 3 switches to sort out on the passenger seatbelt panel but I need to obtain a 15mm drill bit so that I can get them located.
I'm off now to start on the insulation!
Conscious that I never updated this, so grabbed a few photos together to show how the conversion is going.
It started like this:


Electric wheelchair lift in the rear with 2 seats

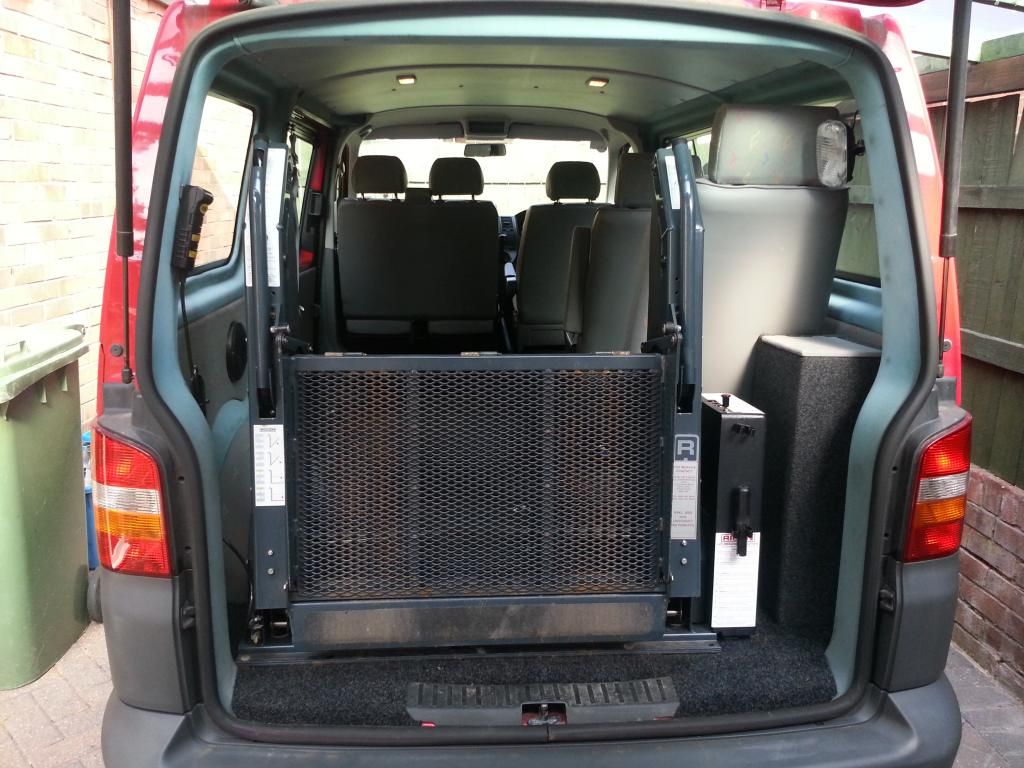

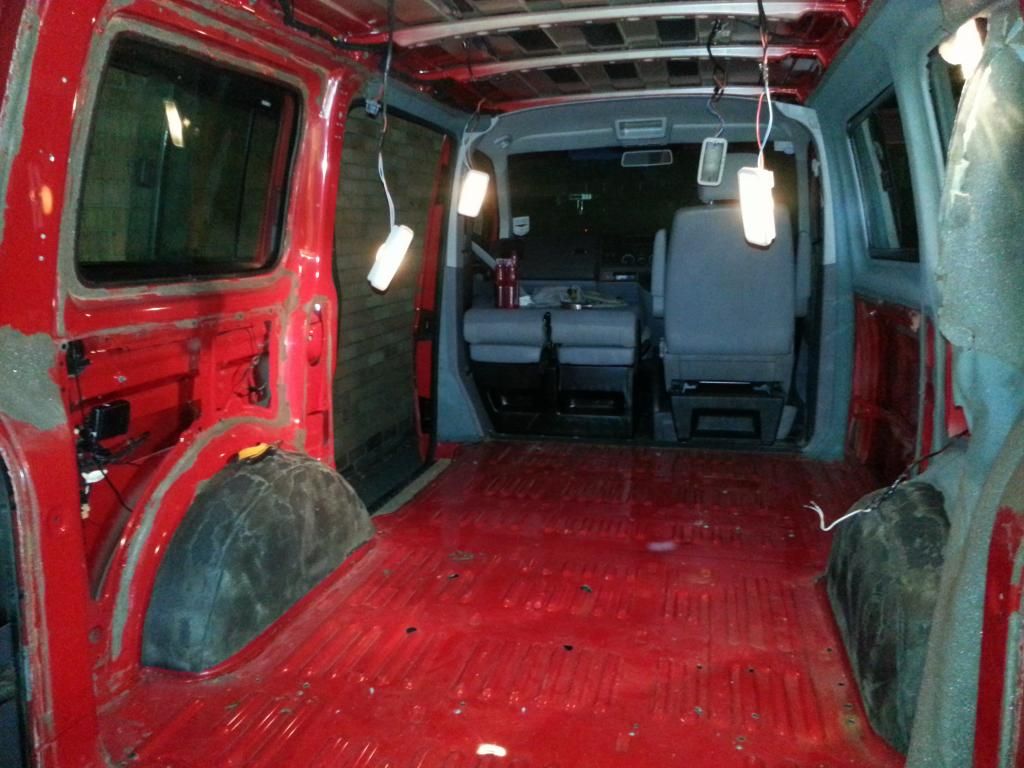
First thing to do was to strip out the rear as far back as I could. It was a professional conversion so naturally, there was going to be a lot of bolts....
Spent days underneath the van, unbolting the seats, and unbolting the wheelchair and seatbelt mounts. Some of the bolts were over the diesel tank, so that had to be dropped, and the plates themselves were under there too. The T5 has pretty much the whole floor under the van covered in plastic, so it was a case of removing those, sliding in and out from under it and having some assistance to help unbolt from both top and bottom.
After many a skinned knuckle and some really filthy work underneath, got it stripped out
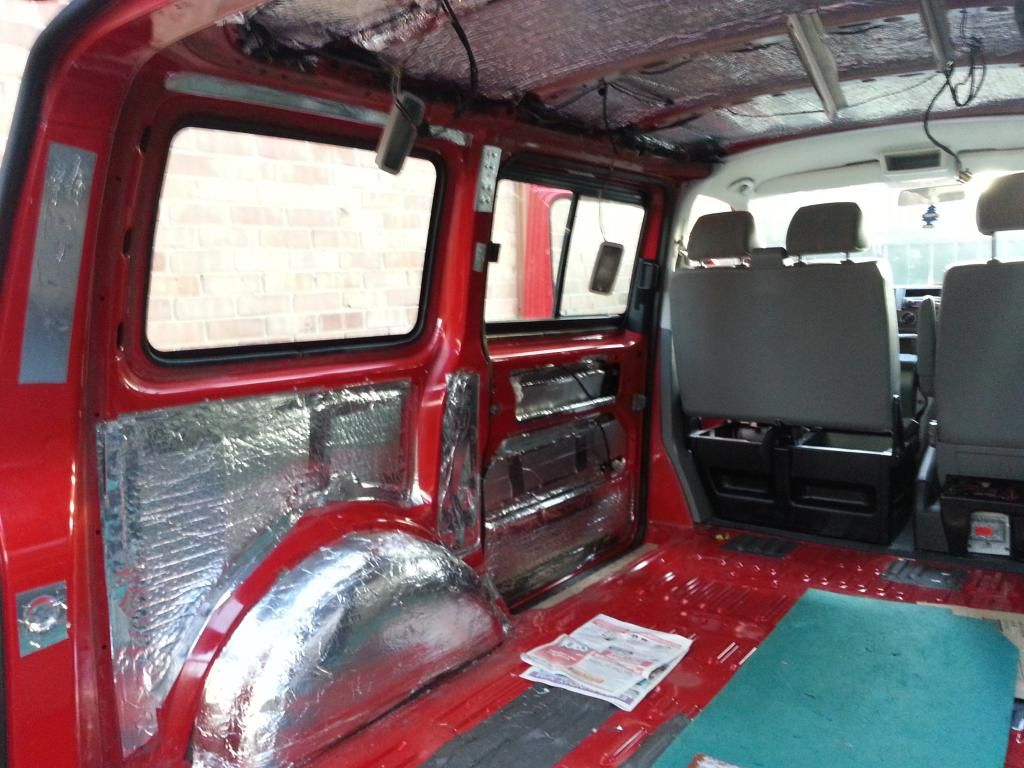
Once all the carpeting and sound proof material was removed (some of the soundproofing was replaced, particularly the stuff over the arches), I then deadened the panels

Whilst I was there, I decided to pull out the front seats too ready to start wiring for the electrics

Started on insulating the panels using some rather expensive (given to me after someone had too much) foil based insulation. This isnt the cheap £15 stuff from B&Q!
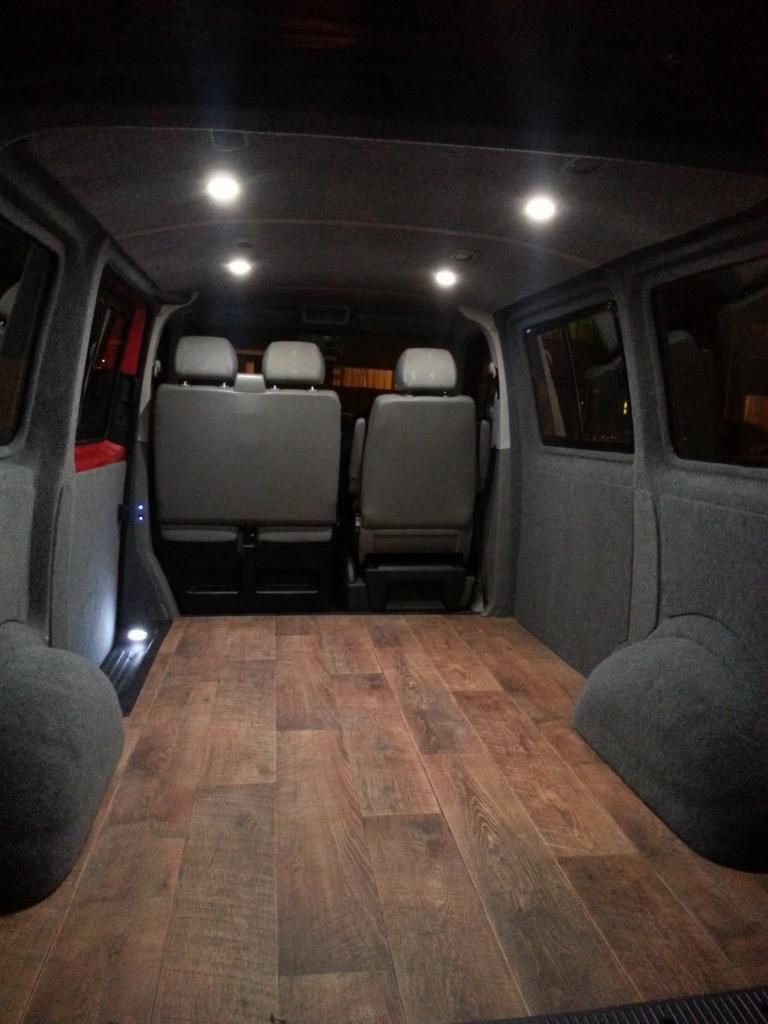
Wired up some ceiling lights and after carpeting the roof panel, pushed it all back into place. The original rocker lights activate when the doors are opened, whilst the spots run from the leisure battery under the seat. They are operated by rocker switches by the sliding door.
It was then time to carpet the side panels. Took my time to do this (about 10 hours in total) to make sure that it was well stuck down and that the stuff got into every contour. The cabling on the side is additional cable wired through the B pillar (not wired into the electrics at this point) so that it can be used if I want to add extra sockets along the right hand side of the van at a later date.

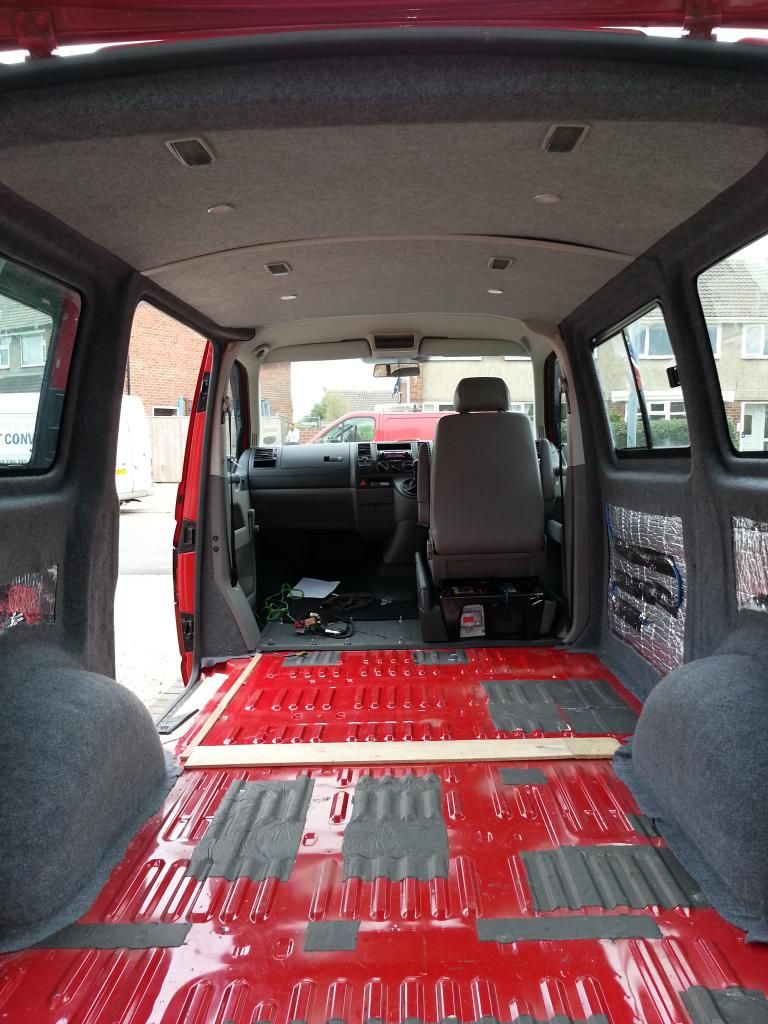
Finished off carpeting the panels, added a 12mm one piece Birch ply floor to the van (ripped the old one out) and then covered it with some hard wearing lino. I'll see how this holds up but at worst if it does tear, I can rip it off the floor and replace with some altro style flooring.
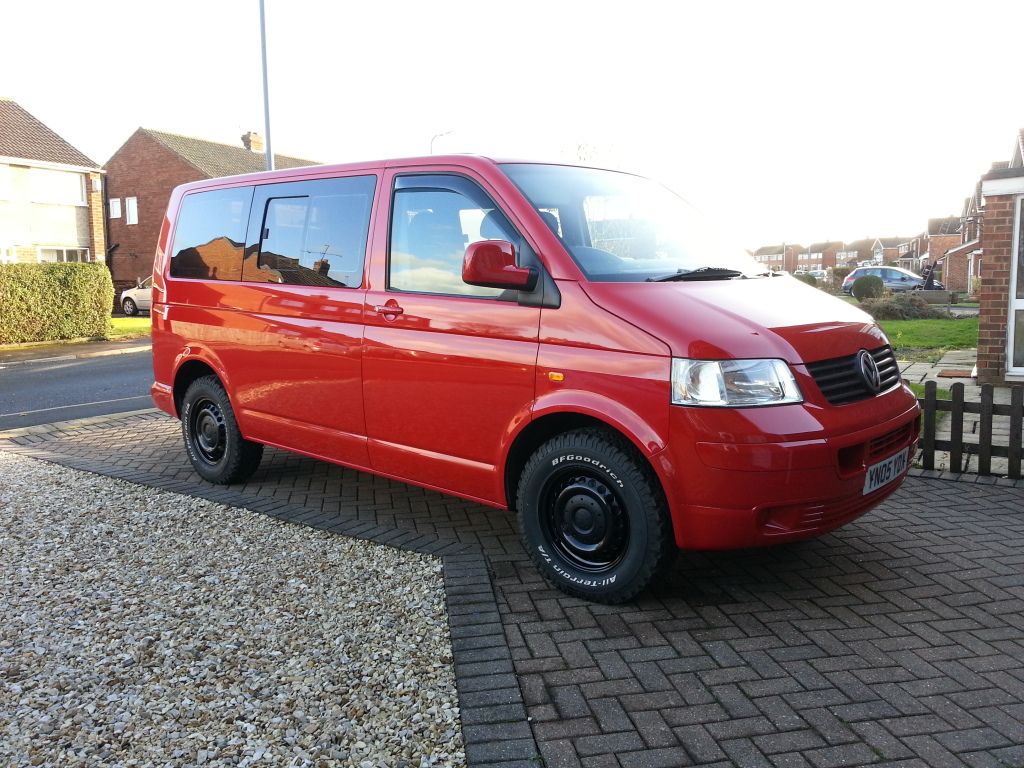
Once that was completed, returned to the bodywork of the van. Took it to a local painters and had all the coding done. I also got a set of powdercoated steels and some BF Goodrich ATs fitted. No chance of getting stuck on sites!
Really pleased with how its turned out so far, the next step is to build units and a bed unit from scratch using Birch ply before taking it to the upholsterers. I'm looking for comfortable but functional, with plenty of storage. I've got a few ideas but will see how things go in the next couple of months.
It started like this:


Electric wheelchair lift in the rear with 2 seats


First thing to do was to strip out the rear as far back as I could. It was a professional conversion so naturally, there was going to be a lot of bolts....
Spent days underneath the van, unbolting the seats, and unbolting the wheelchair and seatbelt mounts. Some of the bolts were over the diesel tank, so that had to be dropped, and the plates themselves were under there too. The T5 has pretty much the whole floor under the van covered in plastic, so it was a case of removing those, sliding in and out from under it and having some assistance to help unbolt from both top and bottom.
After many a skinned knuckle and some really filthy work underneath, got it stripped out

Once all the carpeting and sound proof material was removed (some of the soundproofing was replaced, particularly the stuff over the arches), I then deadened the panels

Whilst I was there, I decided to pull out the front seats too ready to start wiring for the electrics

Started on insulating the panels using some rather expensive (given to me after someone had too much) foil based insulation. This isnt the cheap £15 stuff from B&Q!

Wired up some ceiling lights and after carpeting the roof panel, pushed it all back into place. The original rocker lights activate when the doors are opened, whilst the spots run from the leisure battery under the seat. They are operated by rocker switches by the sliding door.

It was then time to carpet the side panels. Took my time to do this (about 10 hours in total) to make sure that it was well stuck down and that the stuff got into every contour. The cabling on the side is additional cable wired through the B pillar (not wired into the electrics at this point) so that it can be used if I want to add extra sockets along the right hand side of the van at a later date.

Finished off carpeting the panels, added a 12mm one piece Birch ply floor to the van (ripped the old one out) and then covered it with some hard wearing lino. I'll see how this holds up but at worst if it does tear, I can rip it off the floor and replace with some altro style flooring.

Once that was completed, returned to the bodywork of the van. Took it to a local painters and had all the coding done. I also got a set of powdercoated steels and some BF Goodrich ATs fitted. No chance of getting stuck on sites!

Really pleased with how its turned out so far, the next step is to build units and a bed unit from scratch using Birch ply before taking it to the upholsterers. I'm looking for comfortable but functional, with plenty of storage. I've got a few ideas but will see how things go in the next couple of months.
Gassing Station | Tents, Caravans & Motorhomes | Top of Page | What's New | My Stuff