996 C4S Front bumper alignment
Discussion


Starting to pick up a few small jobs and a C4S I bought last week. One of the most obvious is a broken inner front driver side wheel arch liner. Thought this would be a quick replacement. Stupid of me.
This is the bumper as it naturally sits, you can see the bumper sits proud of the arch liner, and it looks like somebody tried to use the liner to pull the bumper in and that's what's caused the damage. At this point the mounting bolts underneath are out. Looking at the other side (no mounting bolts present underneath - doh!) when I undo some of the arch liner bolts everything sits where it was, but the drivers side needs a good push to get it to line up and there's nothing substantial to hold it in place. I don't want to replace the liner and have it break again. As far as I can tell there's room for the bumper to move, it's not resting snug on the inner liner.
Any ideas?
Hi,
I can't see your photo but from experience, the 9X6 generation front bumpers are quite sensitive to all the tabs/clips (etc) being in exactly the right place. If you take a good look underneath you should be able to see what should go where.
In addition, there is much more scope to adjust the 9X6 bumper simply by holding bits in place differently when you tighten up the bolts. The bumper on my old car used to stick out slightly on one corner and it used to really bug me until I realised that I had simply put it on wrongly when cleaning the rads and it could be fixed by undoing, moving, and redoing a single screw.
The 9X7 front bumper mounting is altogether a better design and it seems to be a much more binary "on right" or "On wrong" affair
toastyhamster said:
Starting to pick up a few small jobs and a C4S I bought last week. One of the most obvious is a broken inner front driver side wheel arch liner. Thought this would be a quick replacement. Stupid of me.
This is the bumper as it naturally sits, you can see the bumper sits proud of the arch liner, and it looks like somebody tried to use the liner to pull the bumper in and that's what's caused the damage. At this point the mounting bolts underneath are out. Looking at the other side (no mounting bolts present underneath - doh!) when I undo some of the arch liner bolts everything sits where it was, but the drivers side needs a good push to get it to line up and there's nothing substantial to hold it in place. I don't want to replace the liner and have it break again. As far as I can tell there's room for the bumper to move, it's not resting snug on the inner liner.
Any ideas?
Yep, something’s been fitted incorrectly or one of the brackets that doubles up as the radiator mounting brackets was (or still is) bent.This is the bumper as it naturally sits, you can see the bumper sits proud of the arch liner, and it looks like somebody tried to use the liner to pull the bumper in and that's what's caused the damage. At this point the mounting bolts underneath are out. Looking at the other side (no mounting bolts present underneath - doh!) when I undo some of the arch liner bolts everything sits where it was, but the drivers side needs a good push to get it to line up and there's nothing substantial to hold it in place. I don't want to replace the liner and have it break again. As far as I can tell there's room for the bumper to move, it's not resting snug on the inner liner.
Any ideas?
So it’s basically a question of stripping the arch liner out and seeing why it shifts when you start tightening the fasteners up.
Edited by Slippydiff on Wednesday 4th December 16:19
Slippydiff said:
toastyhamster said:
Starting to pick up a few small jobs and a C4S I bought last week. One of the most obvious is a broken inner front driver side wheel arch liner. Thought this would be a quick replacement. Stupid of me.
This is the bumper as it naturally sits, you can see the bumper sits proud of the arch liner, and it looks like somebody tried to use the liner to pull the bumper in and that's what's caused the damage. At this point the mounting bolts underneath are out. Looking at the other side (no mounting bolts present underneath - doh!) when I undo some of the arch liner bolts everything sits where it was, but the drivers side needs a good push to get it to line up and there's nothing substantial to hold it in place. I don't want to replace the liner and have it break again. As far as I can tell there's room for the bumper to move, it's not resting snug on the inner liner.
Any ideas?
Yep, something’s been fitted incorrectly or one of the brackets that doubles up as the radiator mounting brackets the is or was bent.This is the bumper as it naturally sits, you can see the bumper sits proud of the arch liner, and it looks like somebody tried to use the liner to pull the bumper in and that's what's caused the damage. At this point the mounting bolts underneath are out. Looking at the other side (no mounting bolts present underneath - doh!) when I undo some of the arch liner bolts everything sits where it was, but the drivers side needs a good push to get it to line up and there's nothing substantial to hold it in place. I don't want to replace the liner and have it break again. As far as I can tell there's room for the bumper to move, it's not resting snug on the inner liner.
Any ideas?
So it’s basically a question of stripping the arch liner out and seeing why it shifts when you start tightening the fasteners up.
This was supposed to be the quick job ahead of a rear strip down to evaluate the exhausts and do the engine mounts. Meh!
toastyhamster said:
Slippydiff said:
toastyhamster said:
Starting to pick up a few small jobs and a C4S I bought last week. One of the most obvious is a broken inner front driver side wheel arch liner. Thought this would be a quick replacement. Stupid of me.
This is the bumper as it naturally sits, you can see the bumper sits proud of the arch liner, and it looks like somebody tried to use the liner to pull the bumper in and that's what's caused the damage. At this point the mounting bolts underneath are out. Looking at the other side (no mounting bolts present underneath - doh!) when I undo some of the arch liner bolts everything sits where it was, but the drivers side needs a good push to get it to line up and there's nothing substantial to hold it in place. I don't want to replace the liner and have it break again. As far as I can tell there's room for the bumper to move, it's not resting snug on the inner liner.
Any ideas?
Yep, something’s been fitted incorrectly or one of the brackets that doubles up as the radiator mounting brackets the is or was bent.This is the bumper as it naturally sits, you can see the bumper sits proud of the arch liner, and it looks like somebody tried to use the liner to pull the bumper in and that's what's caused the damage. At this point the mounting bolts underneath are out. Looking at the other side (no mounting bolts present underneath - doh!) when I undo some of the arch liner bolts everything sits where it was, but the drivers side needs a good push to get it to line up and there's nothing substantial to hold it in place. I don't want to replace the liner and have it break again. As far as I can tell there's room for the bumper to move, it's not resting snug on the inner liner.
Any ideas?
So it’s basically a question of stripping the arch liner out and seeing why it shifts when you start tightening the fasteners up.
This was supposed to be the quick job ahead of a rear strip down to evaluate the exhausts and do the engine mounts. Meh!
There's a good chance the radiator brackets have been bent by someone driving the car into a raised kerb when parking the car nose in.
The only way to establish which supporting bracket/s are out of position, is to remove the arch liner, once that's out of the way, it should be clear why the bumper needs pulling and twisting to get it to fit correctly.
FWIW, I spent a whole day getting the bonnet to front bumper shutline even and the N/S of the bumper to fit correctly on my Mk1 996 GT3

Definitely worth it though

So, got the car in the garage, got the heater on for a couple of hours and set to work.
This is supposed to be a double garage!

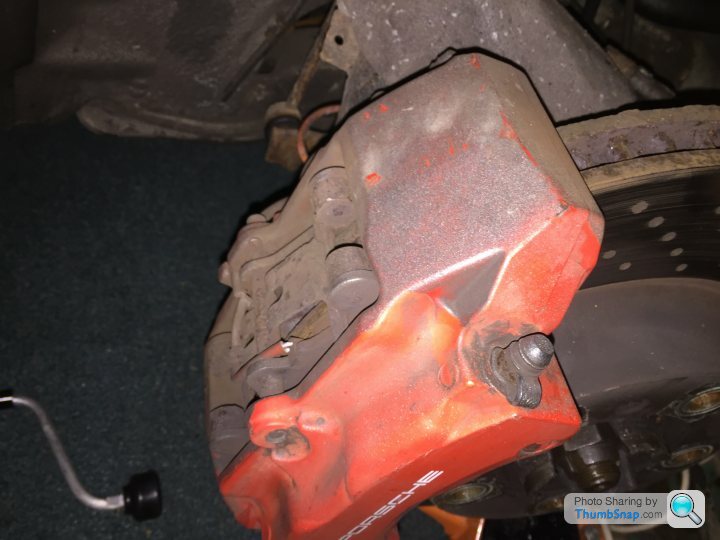
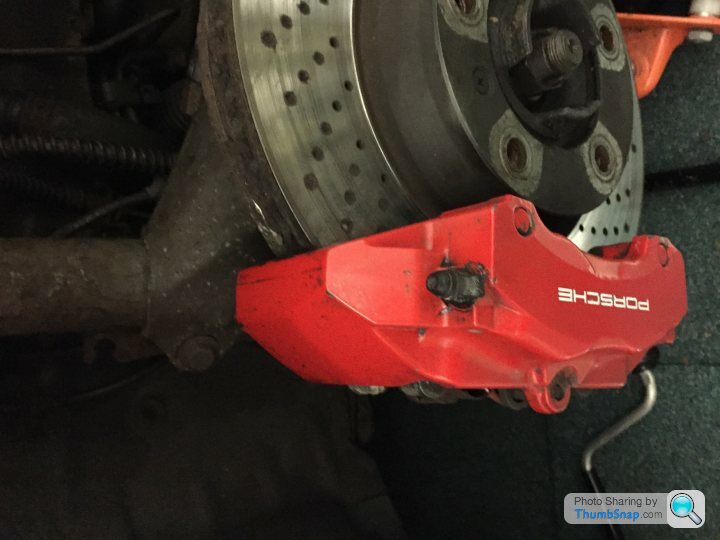
Thanks to the bodger who did the front end paint for the overspray on the calipers, got some cutting compound to get the worst off:
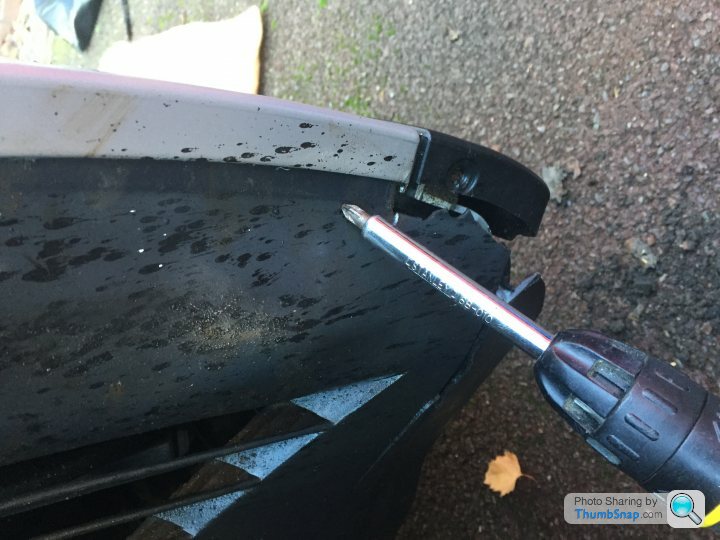
Had to get the angle grinder out to attack three of the inner fasteners which were rusted in:
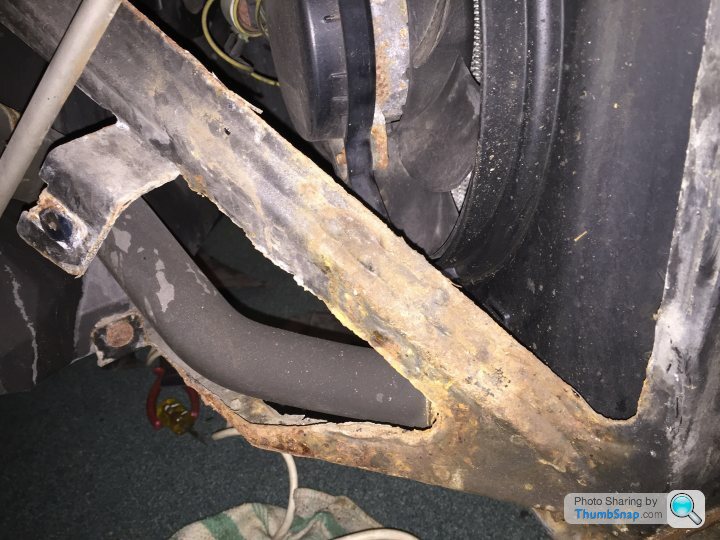
Radiator bracket seems straight or at least nothing obviously bent, as it's just a few mm required I think I'll elongate the hole in the bumper so I can pull it in on this bracket:

Lack of dremel parts to finesse off the rusted fasteners means a break now til tomorrow, plus I need some rust killer and hammerite.
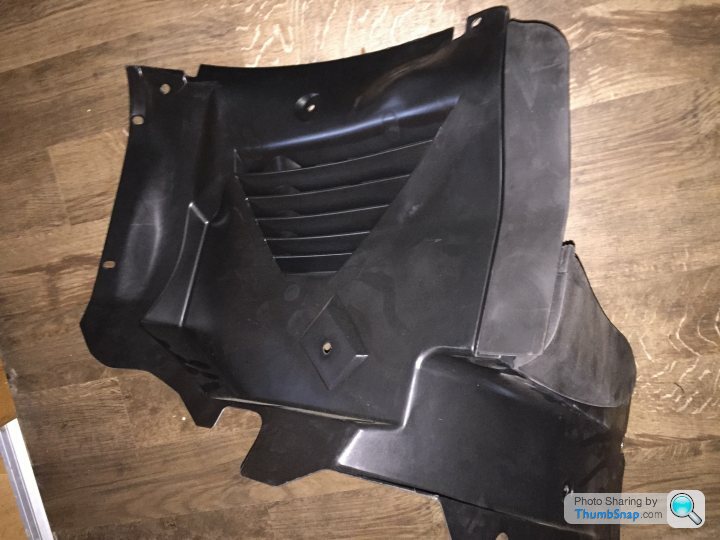
New part ready for fitting, glad I went to the OPC as some of the online prices were miles higher, this whole part was less than the cost of just the front panel online.
This is supposed to be a double garage!
Thanks to the bodger who did the front end paint for the overspray on the calipers, got some cutting compound to get the worst off:
Had to get the angle grinder out to attack three of the inner fasteners which were rusted in:
Radiator bracket seems straight or at least nothing obviously bent, as it's just a few mm required I think I'll elongate the hole in the bumper so I can pull it in on this bracket:
Lack of dremel parts to finesse off the rusted fasteners means a break now til tomorrow, plus I need some rust killer and hammerite.
New part ready for fitting, glad I went to the OPC as some of the online prices were miles higher, this whole part was less than the cost of just the front panel online.
Not sure anybody is reading, but what the hey.
Worst of the overspray off the caliper, any more progress can wait until a warm sunny day.
Waiting for the paint on the rad bracket to dry I used a headlight polish (didn't bother using the wet and dry, just the polish):
Before:
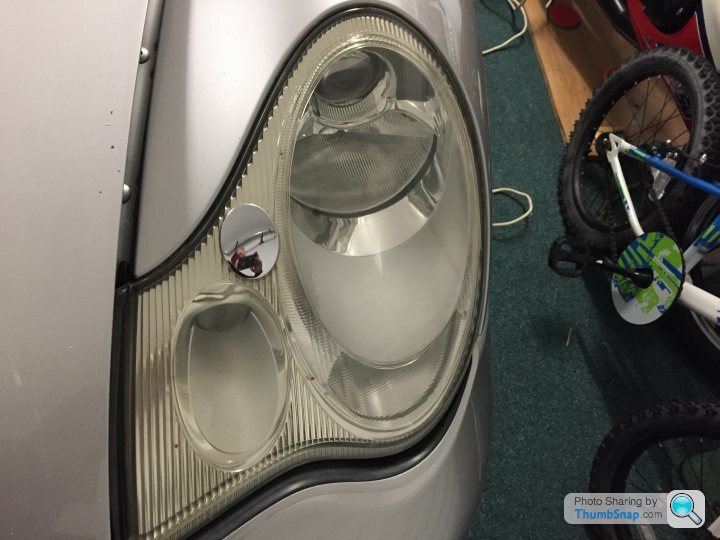
After:

After a ridiculous amount of hassle with seized screws, lining stuff up and knocking over a full tub of copper grease:
Next job engine mounts, but not for a while.
Worst of the overspray off the caliper, any more progress can wait until a warm sunny day.
Waiting for the paint on the rad bracket to dry I used a headlight polish (didn't bother using the wet and dry, just the polish):
Before:
After:
After a ridiculous amount of hassle with seized screws, lining stuff up and knocking over a full tub of copper grease:
Next job engine mounts, but not for a while.
Drop links arriving tomorrow as it looks like it's on the originals and there's a knock over bumps on the drivers side, seems the easiest thing to change first. It's cold and wet, anything else can wait.
Car has now done more miles in the last 3 weeks than it's done in the last two years. #canwetaketheporschedad
Car has now done more miles in the last 3 weeks than it's done in the last two years. #canwetaketheporschedad
Drop links, 30 minutes a side says youtube. Youtube can do one.
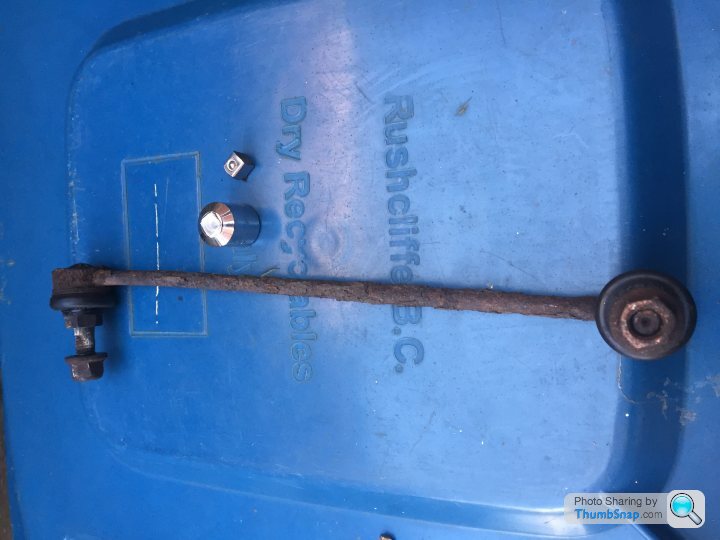
90 minutes to do the drivers side, seized nuts and seized drop link. Gave up on the passenger side when my drive converter sheared. Trip to Halfords this week and try again next weekend. Judging from the lack of play in the removed link I doubt very much it's the cause of the knock but they were only £26 each.
It's put me off doing more suspension work without a ramp.
toastyhamster said:
Drop links, 30 minutes a side says youtube. Youtube can do one.
90 minutes to do the drivers side, seized nuts and seized drop link. Gave up on the passenger side when my drive converter sheared. Trip to Halfords this week and try again next weekend. Judging from the lack of play in the removed link I doubt very much it's the cause of the knock but they were only £26 each.
It's put me off doing more suspension work without a ramp.
This is mainly what stops me doing any work on my own cars, there’s rarely such a thing as a simple job!90 minutes to do the drivers side, seized nuts and seized drop link. Gave up on the passenger side when my drive converter sheared. Trip to Halfords this week and try again next weekend. Judging from the lack of play in the removed link I doubt very much it's the cause of the knock but they were only £26 each.
It's put me off doing more suspension work without a ramp.
Took me longer to replace the fuse box cover on my Clio than it did to change headlamp bulbs on both sides.
toastyhamster said:
Drop links, 30 minutes a side says youtube. Youtube can do one.
90 minutes to do the drivers side, seized nuts and seized drop link. Gave up on the passenger side when my drive converter sheared. Trip to Halfords this week and try again next weekend. Judging from the lack of play in the removed link I doubt very much it's the cause of the knock but they were only £26 each.
It's put me off doing more suspension work without a ramp.
That’s more indicative of poor quality tools than any intrinsic problem with the car ...90 minutes to do the drivers side, seized nuts and seized drop link. Gave up on the passenger side when my drive converter sheared. Trip to Halfords this week and try again next weekend. Judging from the lack of play in the removed link I doubt very much it's the cause of the knock but they were only £26 each.
It's put me off doing more suspension work without a ramp.
If you haven’t already got one, get yourself one of these :
https://www.amazon.co.uk/Makita-GA4034-240-Angle-G...
There’s a world of fun to be had with them, and hours to be saved too (especially when it comes to 996 exhaust removal jobs...)
Don’t forget to buy a decent set of goggles and ear defenders whilst you’re at it.
Slippydiff said:
toastyhamster said:
Drop links, 30 minutes a side says youtube. Youtube can do one.
90 minutes to do the drivers side, seized nuts and seized drop link. Gave up on the passenger side when my drive converter sheared. Trip to Halfords this week and try again next weekend. Judging from the lack of play in the removed link I doubt very much it's the cause of the knock but they were only £26 each.
It's put me off doing more suspension work without a ramp.
That’s more indicative of poor quality tools than any intrinsic problem with the car ...90 minutes to do the drivers side, seized nuts and seized drop link. Gave up on the passenger side when my drive converter sheared. Trip to Halfords this week and try again next weekend. Judging from the lack of play in the removed link I doubt very much it's the cause of the knock but they were only £26 each.
It's put me off doing more suspension work without a ramp.
If you haven’t already got one, get yourself one of these :
https://www.amazon.co.uk/Makita-GA4034-240-Angle-G...
There’s a world of fun to be had with them, and hours to be saved too (especially when it comes to 996 exhaust removal jobs...)
Don’t forget to buy a decent set of goggles and ear defenders whilst you’re at it.
If the car is a keeper the exhaust will be on the list.
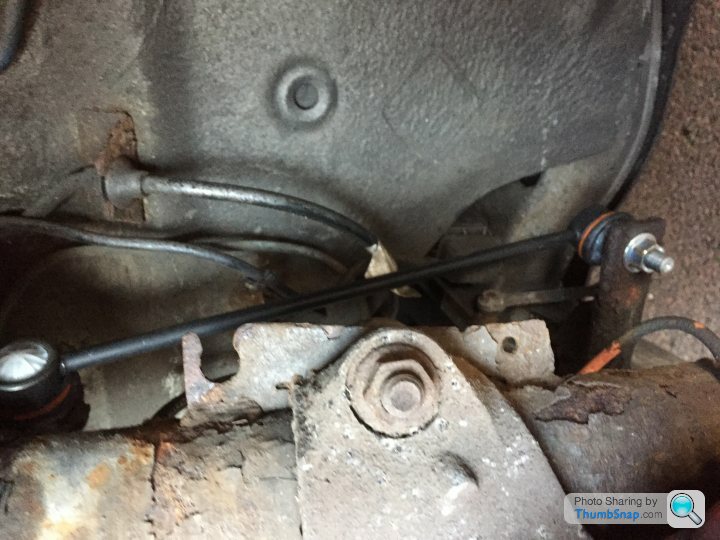
Front drop link no.2 completed today, it looks like the drivers side knock is gone so I decided to pull my finger out and get the other side done as well. Got my lump hammer from my allotment and decided this would be easy after lessons learnt from the first one.
Didn't go to plan. Got the nuts off much easier having done the other side but the top of the link was so seized in even the lump hammer couldn't shift it, it just knocked the bottom spring holder round the shock shaft. After a lot of swearing my slow brain worked out that actually having some load on the spring mount might stop it moving, so I jacked up the car on the suspension and with the full weight of one corner on it the lump hammer finally worked.
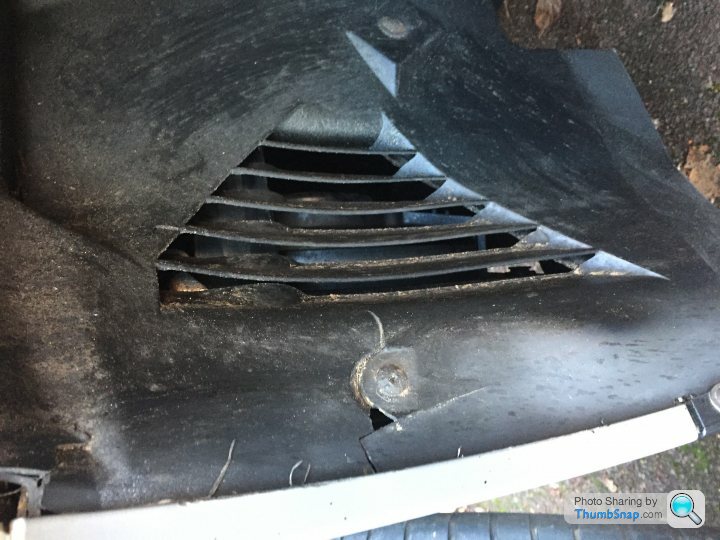
Removed overspray from brake caliper, and also the wheel arch liner. Front liner is damaged but not as bad as the other side, one more job to add to the list.
On the plus side car took me and the kids to their Grandads and my family over a couple of days, around 300 miles all in with no issues.
Didn't go to plan. Got the nuts off much easier having done the other side but the top of the link was so seized in even the lump hammer couldn't shift it, it just knocked the bottom spring holder round the shock shaft. After a lot of swearing my slow brain worked out that actually having some load on the spring mount might stop it moving, so I jacked up the car on the suspension and with the full weight of one corner on it the lump hammer finally worked.
Removed overspray from brake caliper, and also the wheel arch liner. Front liner is damaged but not as bad as the other side, one more job to add to the list.
On the plus side car took me and the kids to their Grandads and my family over a couple of days, around 300 miles all in with no issues.
Since last post had all four wheels refurbed and two front Michelins, other than that it's sat in the garage.
Engine mounts this morning, a lot easier than inner wheel arches or drop links, piece of cake actually. Glad I did them too, passenger side leaking oil quite badly so didn't have long left.
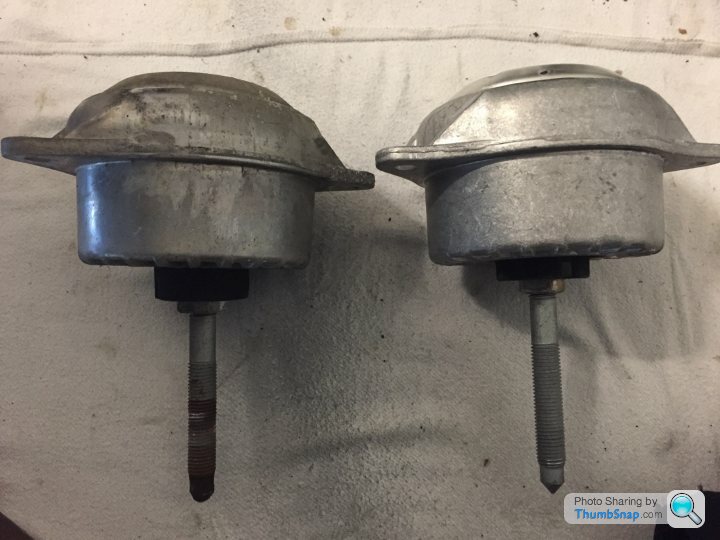

Engine mounts this morning, a lot easier than inner wheel arches or drop links, piece of cake actually. Glad I did them too, passenger side leaking oil quite badly so didn't have long left.
Gassing Station | 911/Carrera GT | Top of Page | What's New | My Stuff