1985 Citroen BX 19GT overhaul
Discussion


Breadvan72 said:
S10GTA said:
driverrob said:
True.
How many cars of that era had an LCD display plus an on-board computer for fuel consumption, average speed etc?
Renault 25...Vauxhall Senator.... I'm stuck nowHow many cars of that era had an LCD display plus an on-board computer for fuel consumption, average speed etc?
Lowtimer said:
Breadvan72 said:
S10GTA said:
driverrob said:
True.
How many cars of that era had an LCD display plus an on-board computer for fuel consumption, average speed etc?
Renault 25...Vauxhall Senator.... I'm stuck nowHow many cars of that era had an LCD display plus an on-board computer for fuel consumption, average speed etc?

So, work is slowly progressing on the BX GT! The original plan was to have it mobile and driving by this time this year. Nope, not gonna happen! Business got very busy, life got in the way - the usual BS. So we still don't have a working GT.
That said, there has been some progress, however slight. It has now moved from the dolly to the 2-post ramp:
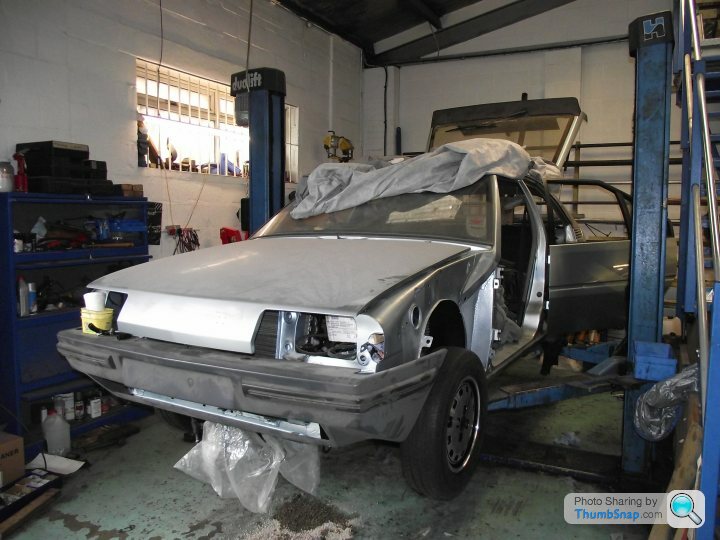
The main reason for this is that I needed the dolly it was sitting on for another TVR job! This way, I am now pressured into making progress with it, as it's holding up a ramp we need for servicing and repairs in the workshop.
First job was to bolt on the remainder of the front suspension, and see if the clutch was working. The old-style BE1 (reverse up next to 1st gear in the gate) uses a cable-operated clutch, but no adjuster on the cable itself. All you get is a pushrod with an adjustable cup the seats it against the release arm. Having fitted a NOS genuine Peugeot clutch, and a NOS Citroen cable, I was expecting a veritable world of clutch pleasure. Instead, what I've got is a click. You push the clutch pedal down, and there is a big click from the release bearing area. Not good. I found it was happening when the pedal is near the end of its travel, and the old clutch had done many, many miles, so the adjuster had been wound out to compensate for the thinning clutch plate. 'Fine', thinks I. I'll just adjust it back down again. I finally get rid of the click, but find the pedal now sitting lower than the brake pedal height. 'Bugger' thinks I. So, I clag on all the suspension, build up the driveshafts, hook it all up and get someone to press what's left of the clutch pedal while I try and rotate a wheel. And I can, easily. Let go of pedal, no dice - wheel stays locked. So the clutch is working, at least. I decide I really need to have it running and see how it behaves before going further with it, so my plans to complete the front end cease and I move to the back end instead.
It's no bad thing, having it on here though. It means access to the back, and the biggest elephant still sitting in the room (rust.....lots of lovely old French rust) is easier to try and tackle.
Those who've been following from the start will remember I found loads of rot hiding for me in the rear chassis legs. I made a start at the time cleaning, plating and sorting the offside, which was the better of the two sides in terms of condition. Looking back, I'm a bit disappointed with how I left it, as I think I could have done a neater job. That said, the offside is now solid, if ugly, and the nearside is totally unsorted, so it's the nearside I'm going to town on.
The main area of concern on any BX these days, is the forward rear subframe mounts. They nestle up behind the back of the inner sill, and pick up the rear chassis legs through a big, thick L-shaped plate, which also lends itself as the rear jacking point. BXs like to rot here! One guy I know has actually had a subframe detach here (there are three other mounts, so it didn't result in a crash. I still think new pants were needed though). The GT is as bad as I've seen in this respect, even though the shell is galvanised.
So the first thing to do is to gain access to the mounts, which are underneath the rear seat bench:

The nearside looked ugly with the flash on:
Looked ALOT worse with the flash off:

From underneath the rot was obvious:
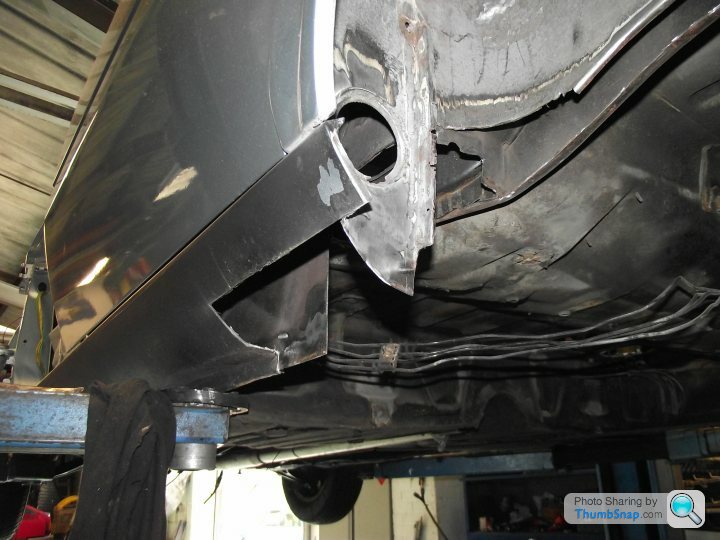
Some of that was already cut out as I planned the previous repair, but the area for the mount was a bigger concern. There was also an MoT-pass patch (on top of another patch) on the outer sill, which I was keen to lose:
So the first thing I did was cut out some metal....

I had a mate stop by, and he advised me I'd got the shape totally wrong!:

But then I showed him what I was up to:

It's a jig for realigning the rear subframe mounting holes. It dawned on me that I was going to hack all this lot out completely, and would have no way of knowing where it was meant to go back. I didn't want to give my Dad back a car that crabbed its way down the road, so made this. Took HOURS! We'll see if it actually works when I go to put the axle back on!
Then it was time to drill out some spot-welds (the ones still actually connected to metal):
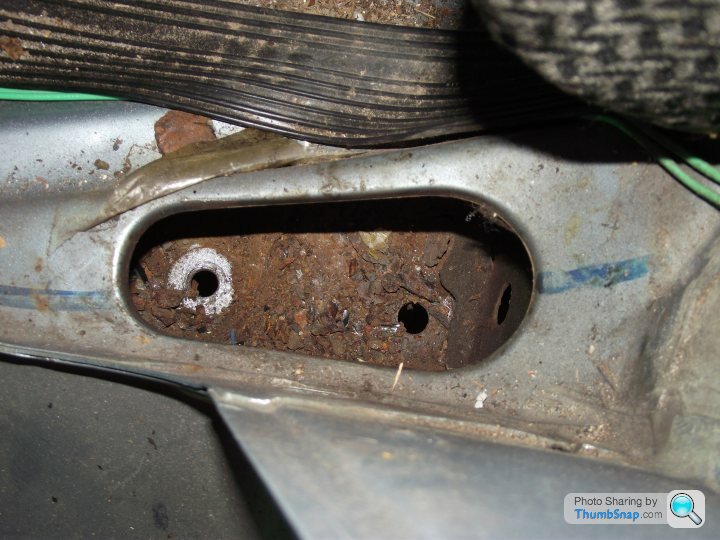
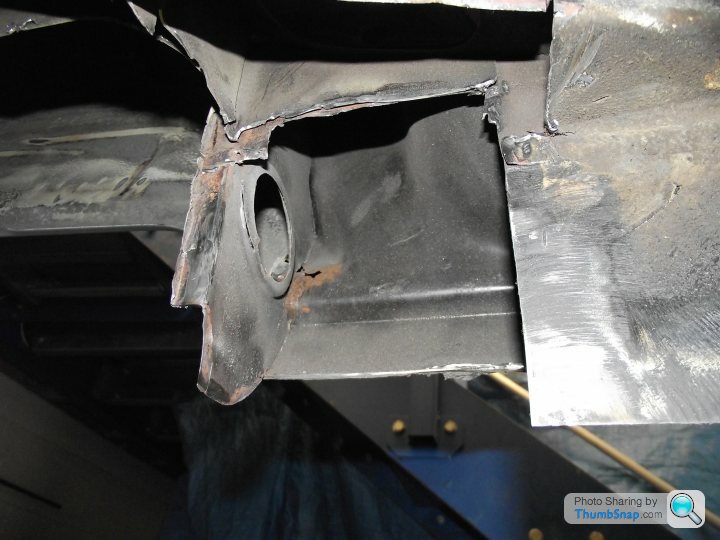
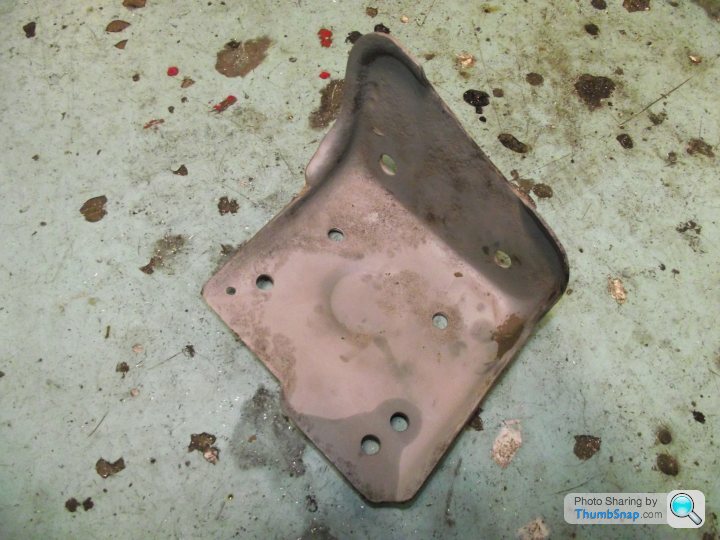
And then remove the mounting plate:

So that wasn't really connected to much, then! And the mad thing is that it would have passed an MoT, as none of that would have been visible.
The plate itself looks bad, but is actually still pretty strong. I managed to buy a new set that a company called Chevronics have had fabricated, but they're not a perfect OE match, and while these look rough, I think they're actually still pretty strong, so will shot blast them later and see how they come out. I can keep the ones I bought for a later job where the mounts are totally shot.
As we can see, now the plate has gone, there isn't much left of the chassis leg at all! The subframe bolts should pass through the plate AND the chassis leg, which has gone!
So I begin removing weight from the BX:
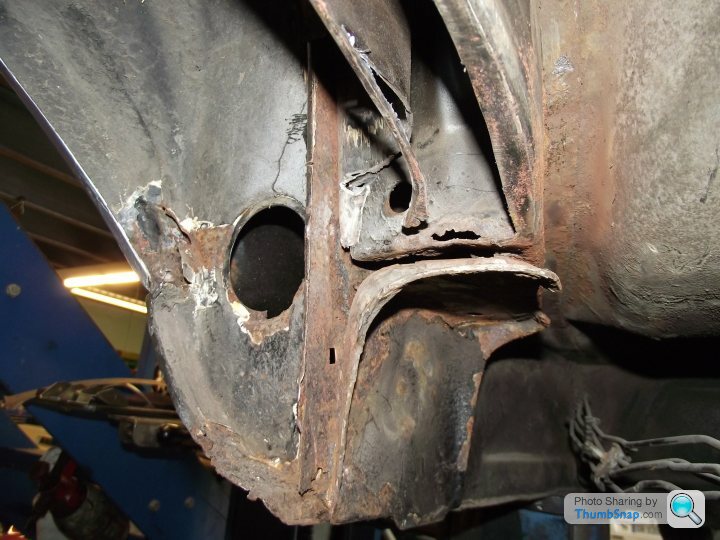
Straight away, another issue:
"Hey Rich, that's a nice grinder you've got there. Be a shame if some rust was.....OUT OF REACH:
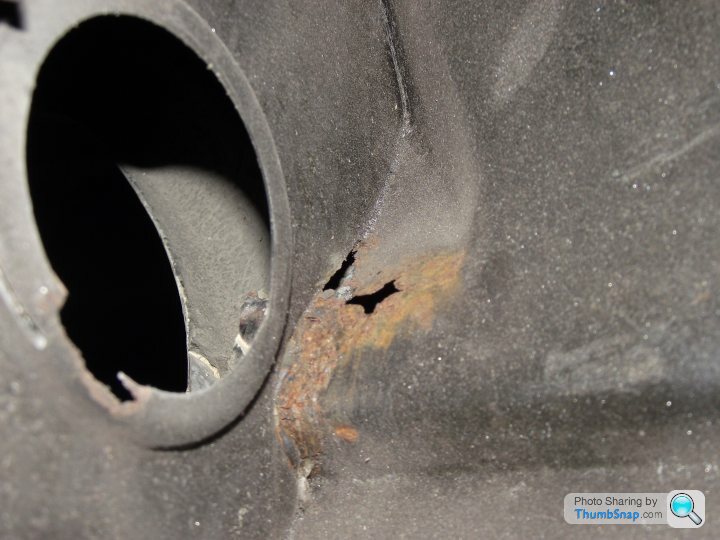
Yup, totally out of reach. To get to that and sort it properly is a 1/4 panel off job. Am I doing that? No. No I am not doing that! So I'll grind out what I can, rust treat, lather in 2k mastic paint and then smother with sealant. it's not structural, it won't be visible, and if I can stop that in its tracks and make sure it never gets worse, I'll be happy. Or, I'll take the 1/4 off again in 10 years! Sometimes, you have to admit defeat, in a manner of speaking.
So, I cheered myself up by chopping out the s tty MoT repair.
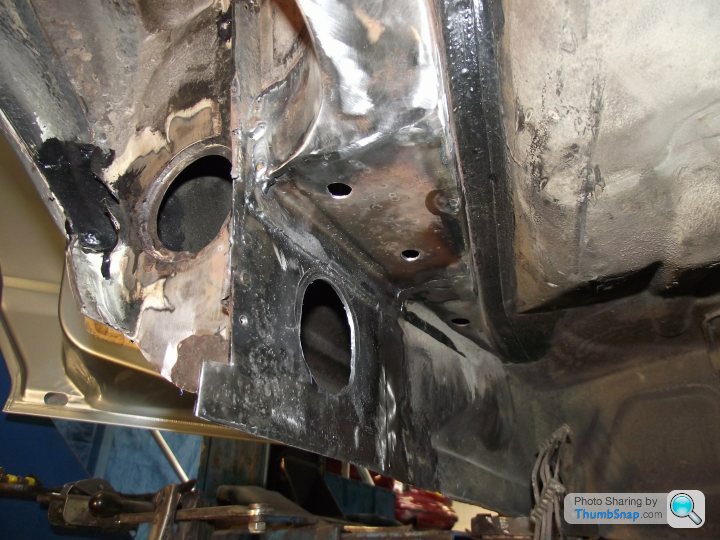
Then I started making new sections and welding them in. Before I made this section, I rust treated and painted all the areas above it (except the ones the welder will get near - the original cavity wax will have to do!) That plate is to replace two overlapping plates, which I don't really need to bother with, so now the whole side section there is 2mm plate steel top the bottom. That's actually heavier duty than what was there before.

The more visually astute of you will have spotted that I didn't measure twice, cut once on that section!
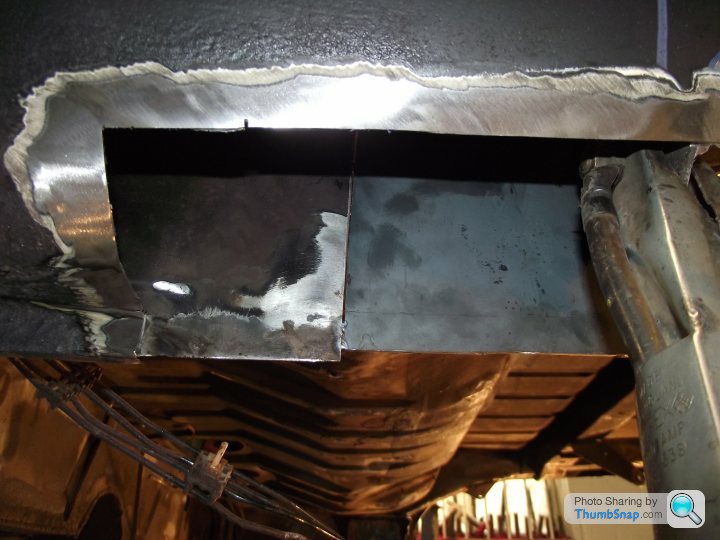
No matter, that's the beauty of welding metal!:
Seaming to improve.....
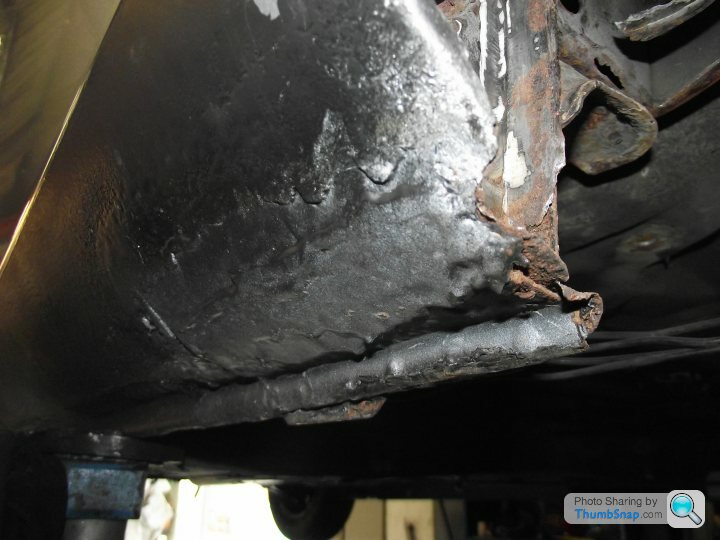
Then I put a base back on the chassis leg:

Next week I'll go back in, finish the remainder of the chassis leg off, clean up and refit the subframe mount and make a new end section for the sill. Then I'll take off all the underseal at the back of the car, treat it all and paint it all. Then I'll make sure the offside is all well and rebuild the back end.
Easy as that......
That said, there has been some progress, however slight. It has now moved from the dolly to the 2-post ramp:
The main reason for this is that I needed the dolly it was sitting on for another TVR job! This way, I am now pressured into making progress with it, as it's holding up a ramp we need for servicing and repairs in the workshop.
First job was to bolt on the remainder of the front suspension, and see if the clutch was working. The old-style BE1 (reverse up next to 1st gear in the gate) uses a cable-operated clutch, but no adjuster on the cable itself. All you get is a pushrod with an adjustable cup the seats it against the release arm. Having fitted a NOS genuine Peugeot clutch, and a NOS Citroen cable, I was expecting a veritable world of clutch pleasure. Instead, what I've got is a click. You push the clutch pedal down, and there is a big click from the release bearing area. Not good. I found it was happening when the pedal is near the end of its travel, and the old clutch had done many, many miles, so the adjuster had been wound out to compensate for the thinning clutch plate. 'Fine', thinks I. I'll just adjust it back down again. I finally get rid of the click, but find the pedal now sitting lower than the brake pedal height. 'Bugger' thinks I. So, I clag on all the suspension, build up the driveshafts, hook it all up and get someone to press what's left of the clutch pedal while I try and rotate a wheel. And I can, easily. Let go of pedal, no dice - wheel stays locked. So the clutch is working, at least. I decide I really need to have it running and see how it behaves before going further with it, so my plans to complete the front end cease and I move to the back end instead.
It's no bad thing, having it on here though. It means access to the back, and the biggest elephant still sitting in the room (rust.....lots of lovely old French rust) is easier to try and tackle.
Those who've been following from the start will remember I found loads of rot hiding for me in the rear chassis legs. I made a start at the time cleaning, plating and sorting the offside, which was the better of the two sides in terms of condition. Looking back, I'm a bit disappointed with how I left it, as I think I could have done a neater job. That said, the offside is now solid, if ugly, and the nearside is totally unsorted, so it's the nearside I'm going to town on.
The main area of concern on any BX these days, is the forward rear subframe mounts. They nestle up behind the back of the inner sill, and pick up the rear chassis legs through a big, thick L-shaped plate, which also lends itself as the rear jacking point. BXs like to rot here! One guy I know has actually had a subframe detach here (there are three other mounts, so it didn't result in a crash. I still think new pants were needed though). The GT is as bad as I've seen in this respect, even though the shell is galvanised.
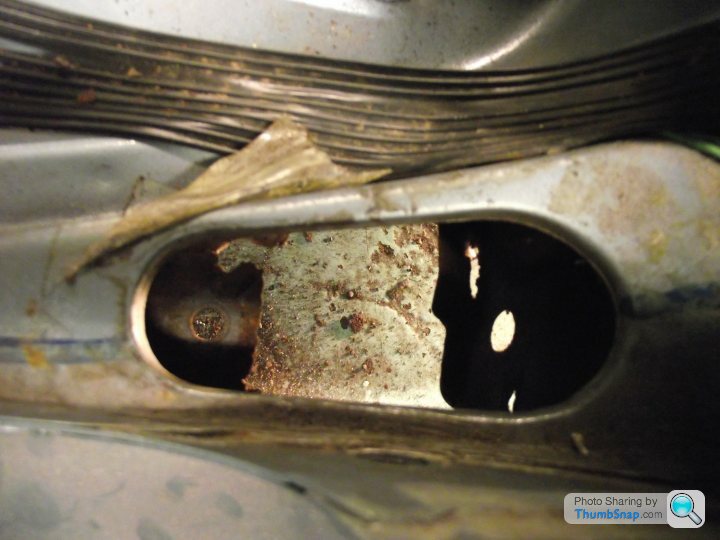
So the first thing to do is to gain access to the mounts, which are underneath the rear seat bench:
The nearside looked ugly with the flash on:
Looked ALOT worse with the flash off:
From underneath the rot was obvious:
Some of that was already cut out as I planned the previous repair, but the area for the mount was a bigger concern. There was also an MoT-pass patch (on top of another patch) on the outer sill, which I was keen to lose:
So the first thing I did was cut out some metal....
I had a mate stop by, and he advised me I'd got the shape totally wrong!:
But then I showed him what I was up to:
It's a jig for realigning the rear subframe mounting holes. It dawned on me that I was going to hack all this lot out completely, and would have no way of knowing where it was meant to go back. I didn't want to give my Dad back a car that crabbed its way down the road, so made this. Took HOURS! We'll see if it actually works when I go to put the axle back on!
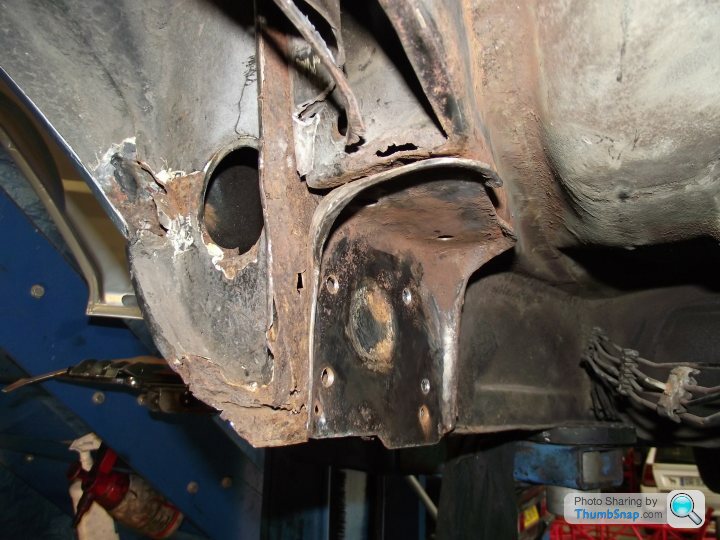
Then it was time to drill out some spot-welds (the ones still actually connected to metal):
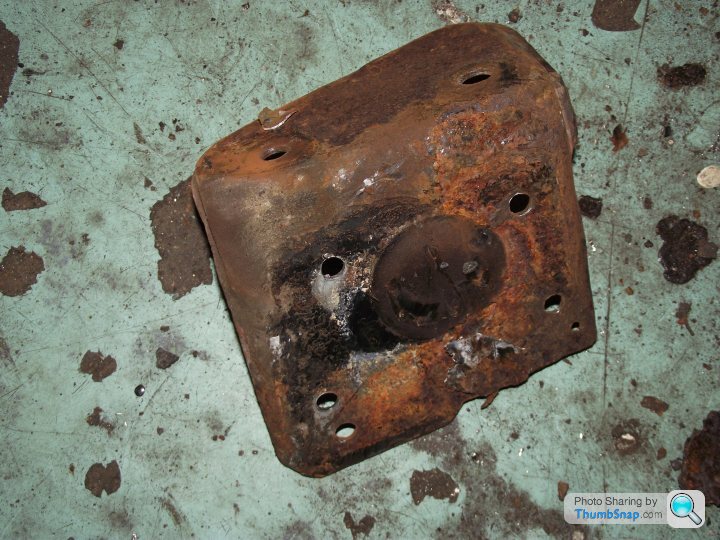
And then remove the mounting plate:
So that wasn't really connected to much, then! And the mad thing is that it would have passed an MoT, as none of that would have been visible.
The plate itself looks bad, but is actually still pretty strong. I managed to buy a new set that a company called Chevronics have had fabricated, but they're not a perfect OE match, and while these look rough, I think they're actually still pretty strong, so will shot blast them later and see how they come out. I can keep the ones I bought for a later job where the mounts are totally shot.
As we can see, now the plate has gone, there isn't much left of the chassis leg at all! The subframe bolts should pass through the plate AND the chassis leg, which has gone!
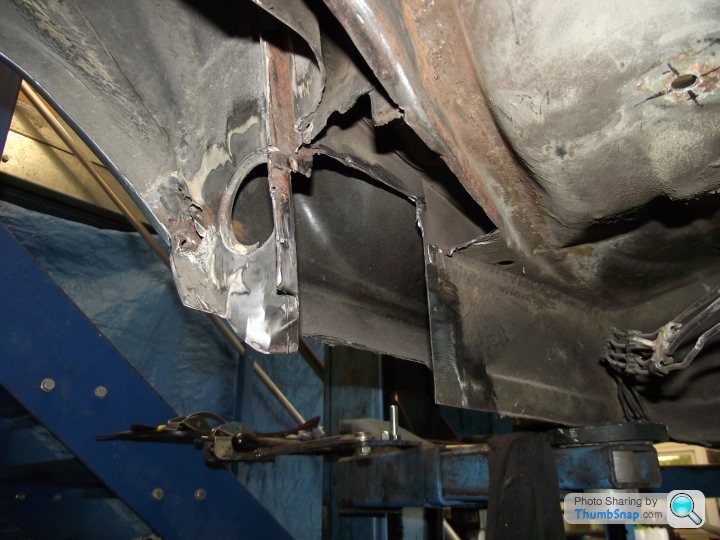
So I begin removing weight from the BX:
Straight away, another issue:
"Hey Rich, that's a nice grinder you've got there. Be a shame if some rust was.....OUT OF REACH:
Yup, totally out of reach. To get to that and sort it properly is a 1/4 panel off job. Am I doing that? No. No I am not doing that! So I'll grind out what I can, rust treat, lather in 2k mastic paint and then smother with sealant. it's not structural, it won't be visible, and if I can stop that in its tracks and make sure it never gets worse, I'll be happy. Or, I'll take the 1/4 off again in 10 years! Sometimes, you have to admit defeat, in a manner of speaking.
So, I cheered myself up by chopping out the s
tty MoT repair.Then I started making new sections and welding them in. Before I made this section, I rust treated and painted all the areas above it (except the ones the welder will get near - the original cavity wax will have to do!) That plate is to replace two overlapping plates, which I don't really need to bother with, so now the whole side section there is 2mm plate steel top the bottom. That's actually heavier duty than what was there before.
The more visually astute of you will have spotted that I didn't measure twice, cut once on that section!
No matter, that's the beauty of welding metal!:
Seaming to improve.....
Then I put a base back on the chassis leg:
Next week I'll go back in, finish the remainder of the chassis leg off, clean up and refit the subframe mount and make a new end section for the sill. Then I'll take off all the underseal at the back of the car, treat it all and paint it all. Then I'll make sure the offside is all well and rebuild the back end.
Easy as that......

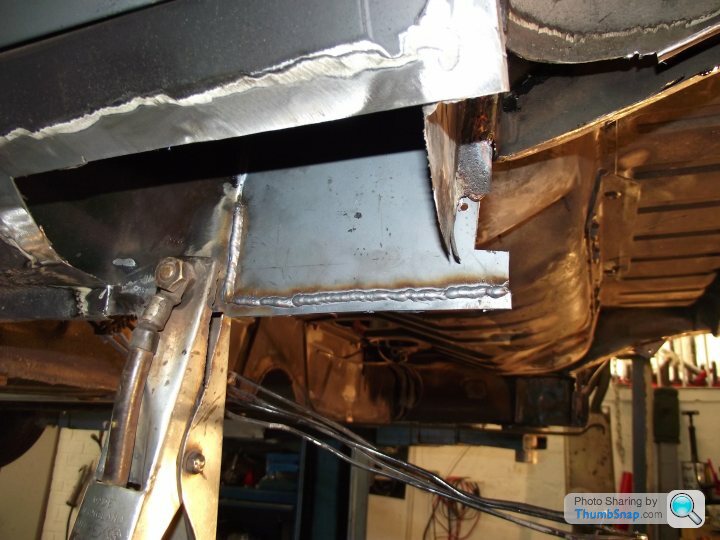
Some more progress on the BX. Picking up from where I left off, I finished rebuilding the NSR chassis leg. Firstly by tacking bits on:

Then stitching everything up:


Then linishing off to try and make it look like it was never done in the first place!:
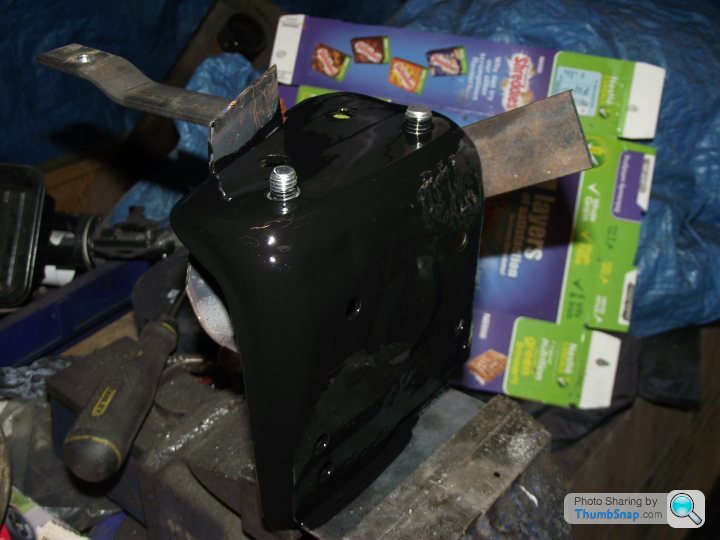
Then I took the subframe mount to the grit blaster to get it ready for fitting:
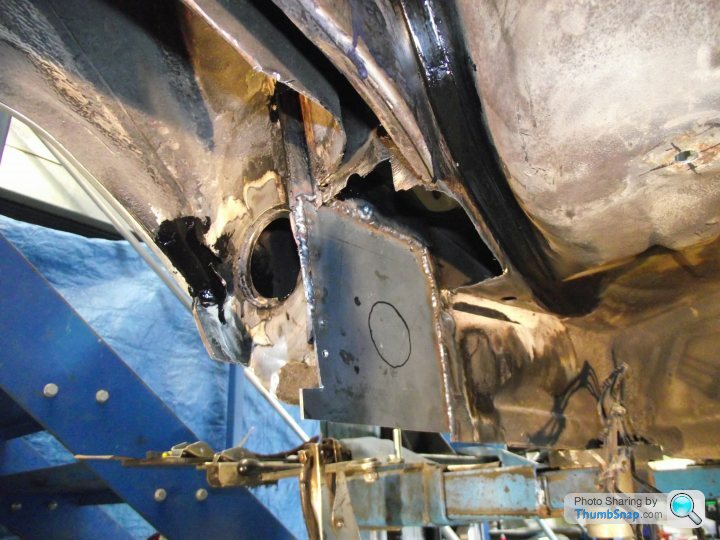
And it was after that, that there were two OH COCK moments. The first came when I realised I had the angle of the chassis leg slightly wrong:

The gap on the left, though not as bad as the shadow makes out, it's supposed to be there. Combination of me cocking up the measurements, and the top of the plate had rusted away a bit, as can be evidenced here:

(The second 'oh cock' moment came when I accidentally slipped with a grinder and took a chunk out of a high-pressure suspension line. A perfectly good, high-pressure suspension line too. Now I've got to make a new pipe front to back, just because of that!)
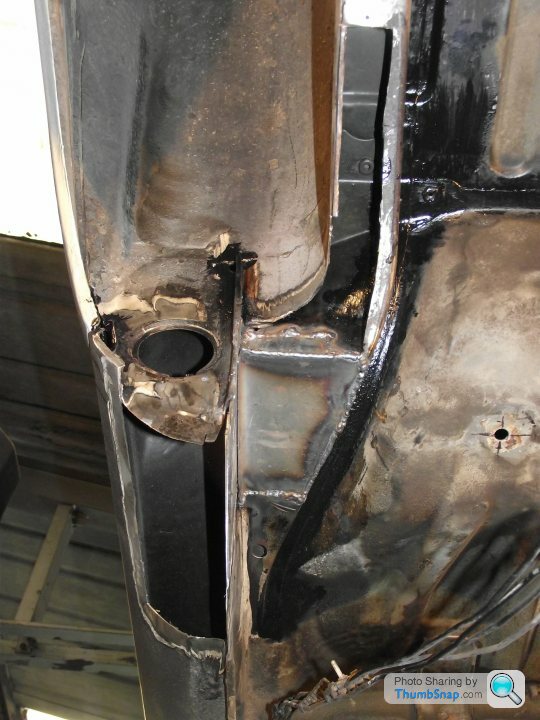
Anyway, I couldn't do much with the chassis leg, so I decided to kill two birds with one stone, and beef up the mounting plate:
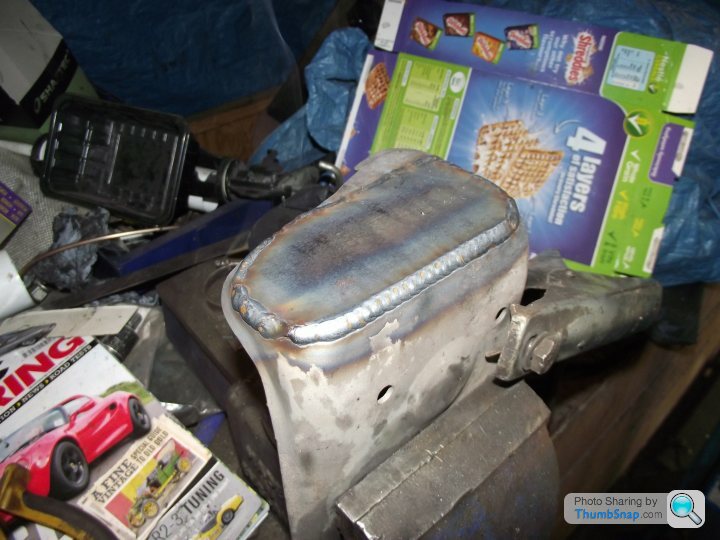
Then I worked at it with a linished and more layers of plate until I got the right profile:
I opened up a locating hole, using the jig I made:
Before painting it, and the back faces of the subframe mount in high-temp POR15 black. Reasoning being that once it's welded on, I can't get to the back of it to paint/seal it again. I went high-temp paint, and just accepted that there will be some bits around the welds that I won't be able to get it. I can't easily dip-galv the shell like Citroen did in 1985!:

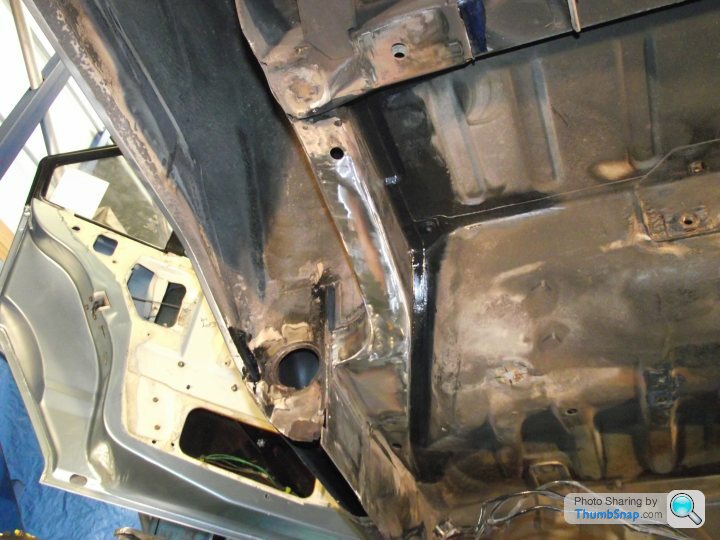
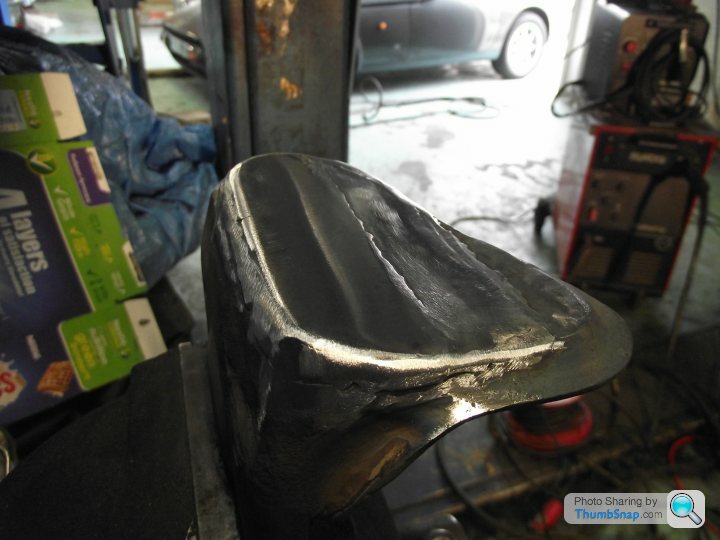
Then I using some massive puddle welds to refit it to the shell:
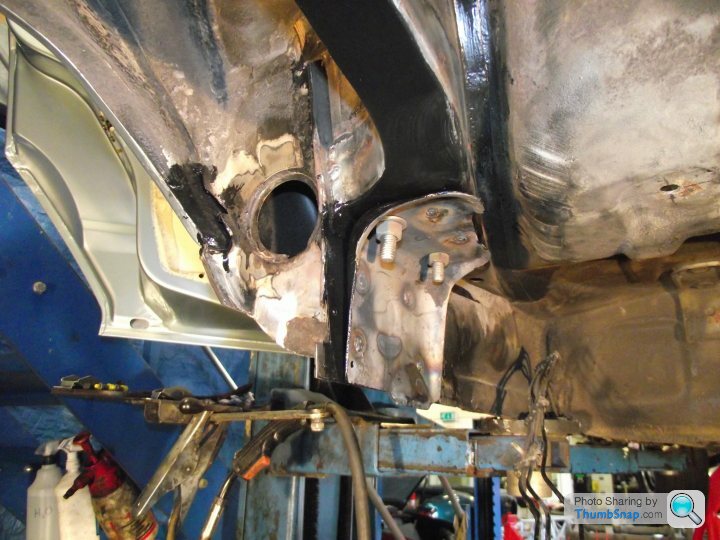
I also doubled the thickness of the jacking point, which in turn seam welded the bottom of that plate to the inner sill (which is now 2mm thick at that rear section - should be stronger than from the factory!
Once all that was taken care of, I moved onto prepping the rest of the wheel arches and floor pan from the rear footwell backwards, for paint. Spent 30mins on it, ended up with a pile 10mm thick on the floor, and more up my nose:
Not looking forward to finishing that!
Then stitching everything up:
Then linishing off to try and make it look like it was never done in the first place!:
Then I took the subframe mount to the grit blaster to get it ready for fitting:
And it was after that, that there were two OH COCK moments. The first came when I realised I had the angle of the chassis leg slightly wrong:
The gap on the left, though not as bad as the shadow makes out, it's supposed to be there. Combination of me cocking up the measurements, and the top of the plate had rusted away a bit, as can be evidenced here:
(The second 'oh cock' moment came when I accidentally slipped with a grinder and took a chunk out of a high-pressure suspension line. A perfectly good, high-pressure suspension line too. Now I've got to make a new pipe front to back, just because of that!)
Anyway, I couldn't do much with the chassis leg, so I decided to kill two birds with one stone, and beef up the mounting plate:
Then I worked at it with a linished and more layers of plate until I got the right profile:
I opened up a locating hole, using the jig I made:
Before painting it, and the back faces of the subframe mount in high-temp POR15 black. Reasoning being that once it's welded on, I can't get to the back of it to paint/seal it again. I went high-temp paint, and just accepted that there will be some bits around the welds that I won't be able to get it. I can't easily dip-galv the shell like Citroen did in 1985!:
Then I using some massive puddle welds to refit it to the shell:
I also doubled the thickness of the jacking point, which in turn seam welded the bottom of that plate to the inner sill (which is now 2mm thick at that rear section - should be stronger than from the factory!
Once all that was taken care of, I moved onto prepping the rest of the wheel arches and floor pan from the rear footwell backwards, for paint. Spent 30mins on it, ended up with a pile 10mm thick on the floor, and more up my nose:
Not looking forward to finishing that!
Well done, great to see a BX being restored. My Dad had a GT, then a GTi and I ran a 16V for 72000 miles, passed it on to my Dad and it reached 168000 before being retired due to MOT failure. It has now been recommissioned 
If I didn't have a Caterham filling my single garage, I would have bought the BX 16V back as it was a brilliant car.
If I didn't have a Caterham filling my single garage, I would have bought the BX 16V back as it was a brilliant car.
downsman said:
Well done, great to see a BX being restored. My Dad had a GT, then a GTi and I ran a 16V for 72000 miles, passed it on to my Dad and it reached 168000 before being retired due to MOT failure. It has now been recommissioned
If I didn't have a Caterham filling my single garage, I would have bought the BX 16V back as it was a brilliant car.
Sounds good, what colour was the 16v? It's a pretty tight owner circle, I probably know the owner!If I didn't have a Caterham filling my single garage, I would have bought the BX 16V back as it was a brilliant car.
Gassing Station | Readers' Cars | Top of Page | What's New | My Stuff