Caterham 7 Superlight No.157
Discussion


Update time! She's actually back on the road now but we'll get to that in due course!
Once the front suspension was done, the next job was to get the engine and box back in. However, first the passenger footwell end plate had to be fitted. Long story short, this was an utter ballache and took forever! Caterham only supply the plate folded on 2 sides so some very careful measuring and bending had to be done first. I took this really slowly and thoroughly but having access to a proper bending at work certainly helped. The plate was then powdercoated and offered up ready for riveting.

Unbeknown to me, I was told that a much easier and better looking job can be done by using skin-pins to hold the plate in place whilst it gets riveted up. So these were obtained from a fellow RAF mate (and sevener) and after the holes were drilled on one side the panel was skin-pinned. Now it was a case of drilling the remaining holes and skin-pinning these. Unfortunately I couldn't drill the holes with the panel in place hence it had to come out 4 times whilst each side was completed and skin-pinned up again


Anyway, once all the pins were in place, they could be removed one-by-one and riveted, leaving the panel nice and straight and not buckled anywhere.


Finally where I'd knocked the panel the chips were touched up with Hammerite to ensure a decent finish. Once this was done, the bell-housing was attached to the gearbox and then the 'box popped back in the car, with the aid of the jack. The bolts underneath the chassis are particularly difficult to access and torque up so this actually took quite some time to achieve!


Next the engine was craned back in to the car (having swapped the sump pan over for the new shiny Dry Sump Pan).


The DS scavenge pump bracket is actually part of one of the engine mounts so this was fitted whilst the engine was still on the crane. As you can see from the images it's a very tight fit to the steering column but we got it in eventually! The only snag then was the steering column touched the bracket when the wheel was turned as for some reason it describes a circle when turned and isn't exactly true...cue much head-scratching and more than a few swear words

Anyway, after a quick cup of tea and some more swearing it was quite a simple fix, it actually only required the steering rack to be turned a few mm round and bolted back in place for all to be well. It is still a tight fit but there's 3-4 mm clearance now which is a relief!
Next I decided to strip the rear suspension as the turn round time for the damper refurb at Bilstein is 2-3 weeks and I wanted that to start so I could have the Dry Sump Kit fitted in the meantime. As you can see from the images, there rear suspension was in a bit of a state. Anyway this was all unbolted and the spring/damper units sent away.


Unfortunately, on the radius arms I just could not get some of the bushes out without damaging them so I bought new ones, but the de-dion A Frame and other bits were stripped, powdercoated and new Powerflex bushes fitted. Once the spring/dampers came back from Bilstein the whole lot was reassembled with new bolts, washers and nuts as well as new anti-roll bar drop-links. At the same time, I Hammerited the rear chassis bars and tidied up the wiring to the rear lights. Here it is finished (please excuse the rusty handbrake cable, that's a job for later on!)


In the meantime, a few quick jobs were done - the front wings were refitted, a new rear number-plate light wired in and new carbon stone guards riveted in place.


I then cracked on with the DS Kit fitting. Due to only having sporadic moments to devote to the car (due to over-running time-wise my wife was less than sympathtic at this point ) I didn't take any pictures but in short, the DS tank plate was fitted along with the DS Tank and braided hoses (which were made bespoke by Think Automotive) and connect to the sump plate and are p-clipped to the chassis. The new SFS silicon coolant hoses were also done at the same time as well as the Gold Scavenge Pump, drive belt and tensioner.


You can also see the mech oil gauge temp sender mounted to the block below, keeping things nice and tidy.


At this point I wired in the oil temperature sender and tidied up with the wiring to the starter and alternator as well as sorted out the loom and the battery connections. At the same time I plumbed in the catch tank vent pipe under the car with p-clips to take any oil fumes away to the back of the car.

The the primaries were re-fitted and torqued up and the exhaust system given a bloody good polish!


So the completed engine bay looks like this:
So there, it is all done after 5 months off the road! I've taken the car out on a quick shakedown and all seems well (including rock solid oil pressure in fast corners ) Just got to wait for the rain to stop to get some decent post winter refresh pictures! In the meantime, here she is all tucked up safe and sound in the garage connected to the new trickle charger.


Once the front suspension was done, the next job was to get the engine and box back in. However, first the passenger footwell end plate had to be fitted. Long story short, this was an utter ballache and took forever! Caterham only supply the plate folded on 2 sides so some very careful measuring and bending had to be done first. I took this really slowly and thoroughly but having access to a proper bending at work certainly helped. The plate was then powdercoated and offered up ready for riveting.
Unbeknown to me, I was told that a much easier and better looking job can be done by using skin-pins to hold the plate in place whilst it gets riveted up. So these were obtained from a fellow RAF mate (and sevener) and after the holes were drilled on one side the panel was skin-pinned. Now it was a case of drilling the remaining holes and skin-pinning these. Unfortunately I couldn't drill the holes with the panel in place hence it had to come out 4 times whilst each side was completed and skin-pinned up again
Anyway, once all the pins were in place, they could be removed one-by-one and riveted, leaving the panel nice and straight and not buckled anywhere.
Finally where I'd knocked the panel the chips were touched up with Hammerite to ensure a decent finish. Once this was done, the bell-housing was attached to the gearbox and then the 'box popped back in the car, with the aid of the jack. The bolts underneath the chassis are particularly difficult to access and torque up so this actually took quite some time to achieve!
Next the engine was craned back in to the car (having swapped the sump pan over for the new shiny Dry Sump Pan).
The DS scavenge pump bracket is actually part of one of the engine mounts so this was fitted whilst the engine was still on the crane. As you can see from the images it's a very tight fit to the steering column but we got it in eventually! The only snag then was the steering column touched the bracket when the wheel was turned as for some reason it describes a circle when turned and isn't exactly true...cue much head-scratching and more than a few swear words
Anyway, after a quick cup of tea and some more swearing it was quite a simple fix, it actually only required the steering rack to be turned a few mm round and bolted back in place for all to be well. It is still a tight fit but there's 3-4 mm clearance now which is a relief!
Next I decided to strip the rear suspension as the turn round time for the damper refurb at Bilstein is 2-3 weeks and I wanted that to start so I could have the Dry Sump Kit fitted in the meantime. As you can see from the images, there rear suspension was in a bit of a state. Anyway this was all unbolted and the spring/damper units sent away.
Unfortunately, on the radius arms I just could not get some of the bushes out without damaging them so I bought new ones, but the de-dion A Frame and other bits were stripped, powdercoated and new Powerflex bushes fitted. Once the spring/dampers came back from Bilstein the whole lot was reassembled with new bolts, washers and nuts as well as new anti-roll bar drop-links. At the same time, I Hammerited the rear chassis bars and tidied up the wiring to the rear lights. Here it is finished (please excuse the rusty handbrake cable, that's a job for later on!)
In the meantime, a few quick jobs were done - the front wings were refitted, a new rear number-plate light wired in and new carbon stone guards riveted in place.
I then cracked on with the DS Kit fitting. Due to only having sporadic moments to devote to the car (due to over-running time-wise my wife was less than sympathtic at this point
) I didn't take any pictures but in short, the DS tank plate was fitted along with the DS Tank and braided hoses (which were made bespoke by Think Automotive) and connect to the sump plate and are p-clipped to the chassis. The new SFS silicon coolant hoses were also done at the same time as well as the Gold Scavenge Pump, drive belt and tensioner.You can also see the mech oil gauge temp sender mounted to the block below, keeping things nice and tidy.
At this point I wired in the oil temperature sender and tidied up with the wiring to the starter and alternator as well as sorted out the loom and the battery connections. At the same time I plumbed in the catch tank vent pipe under the car with p-clips to take any oil fumes away to the back of the car.
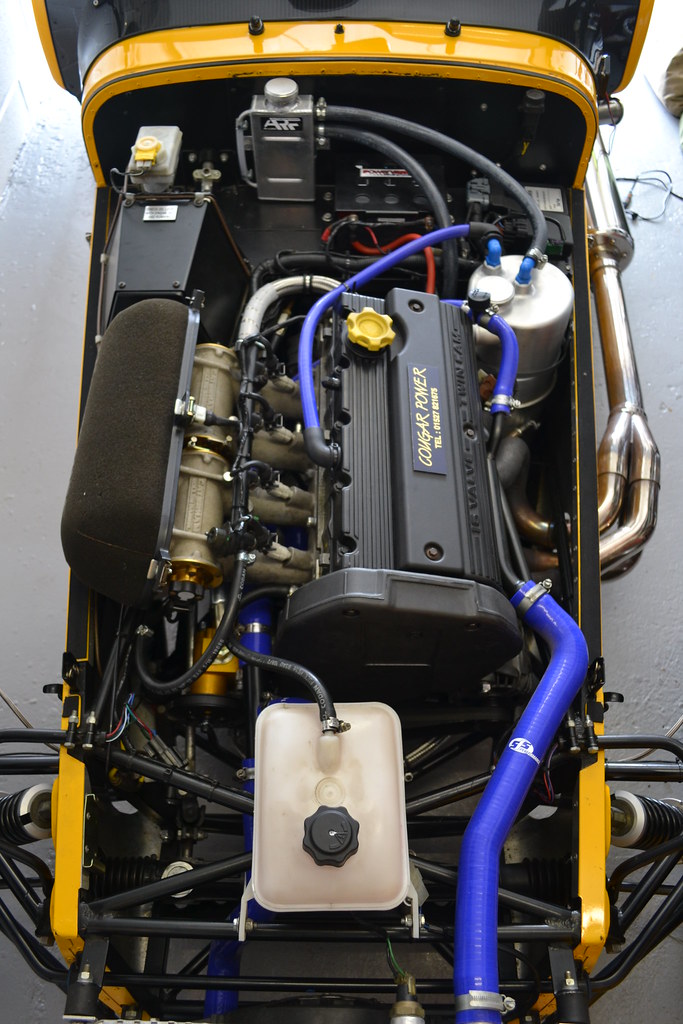
The the primaries were re-fitted and torqued up and the exhaust system given a bloody good polish!
So the completed engine bay looks like this:
So there, it is all done after 5 months off the road! I've taken the car out on a quick shakedown and all seems well (including rock solid oil pressure in fast corners
) Just got to wait for the rain to stop to get some decent post winter refresh pictures! In the meantime, here she is all tucked up safe and sound in the garage connected to the new trickle charger.

Gassing Station | Readers' Cars | Top of Page | What's New | My Stuff