Ferrari F430 Spider
Discussion


Thanks all.
Following on from the inlet duct comparison I noticed that the mesh used on the Mk2 was actually better than the Mk1, which was simply a piece of mesh crudely folded over the entrance aperture.
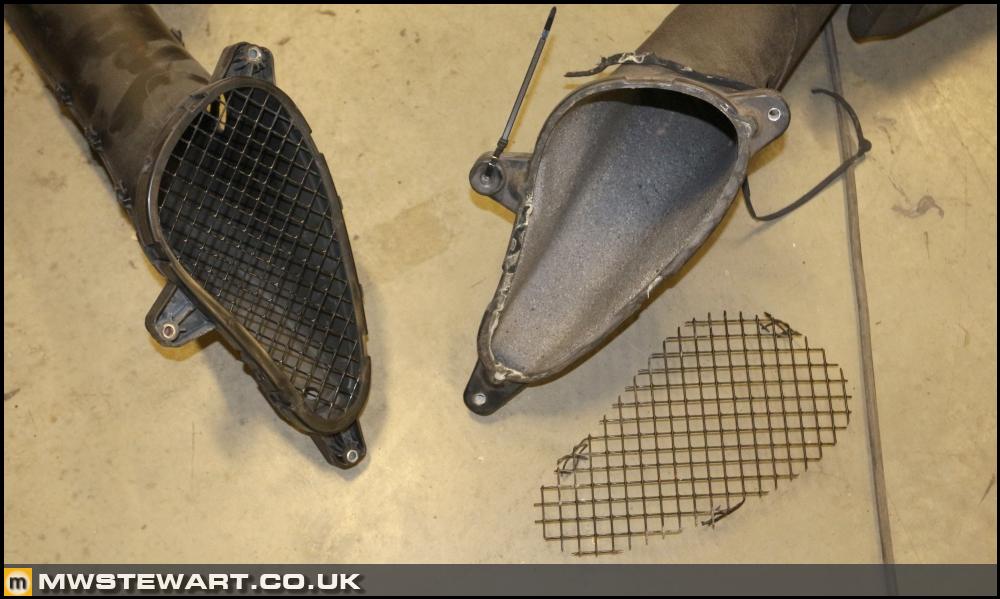
I cut down the end section of my old Mk2 ducts and bonded it on to the Mk1 ducts.
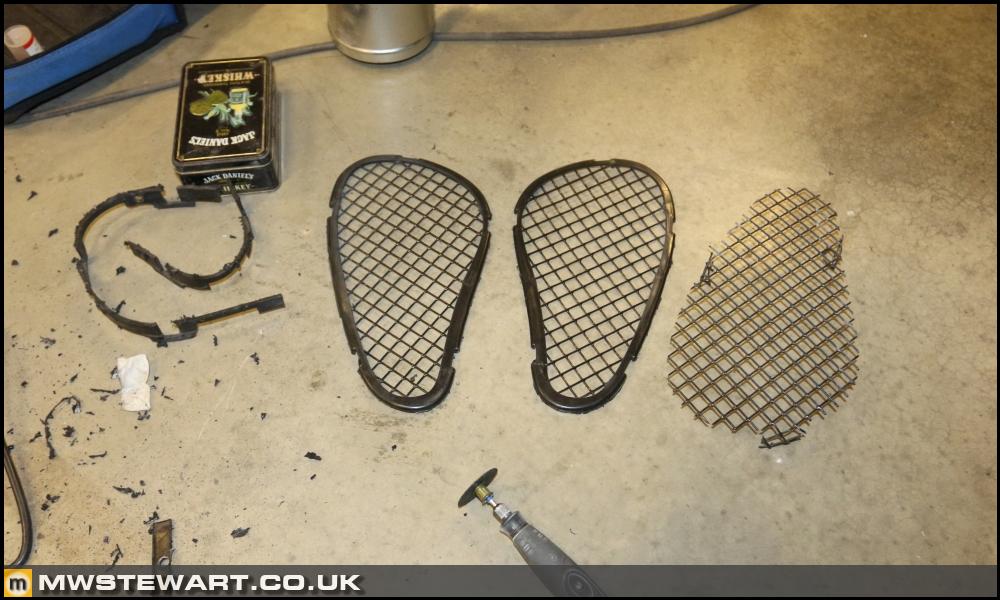
I also sprayed the inside of the Mk1 with satin black.
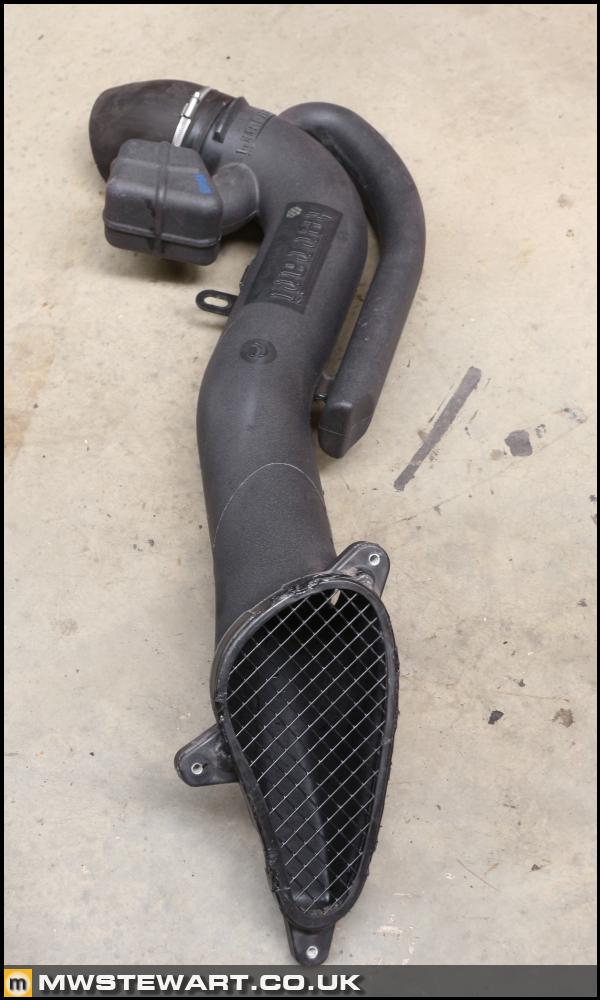
To remove and fit the air ducts I had to remove the left hand side charcoal canister for the evap system, and loosen the fuel filler neck. I had a few issues with yet more of Ferraris cheese fasteners, by that I mean anything that isn't high tensile is made of the most appalling quality metal. I'm spending a bit of time replacing fasteners with either stainless or decent quality BZP.
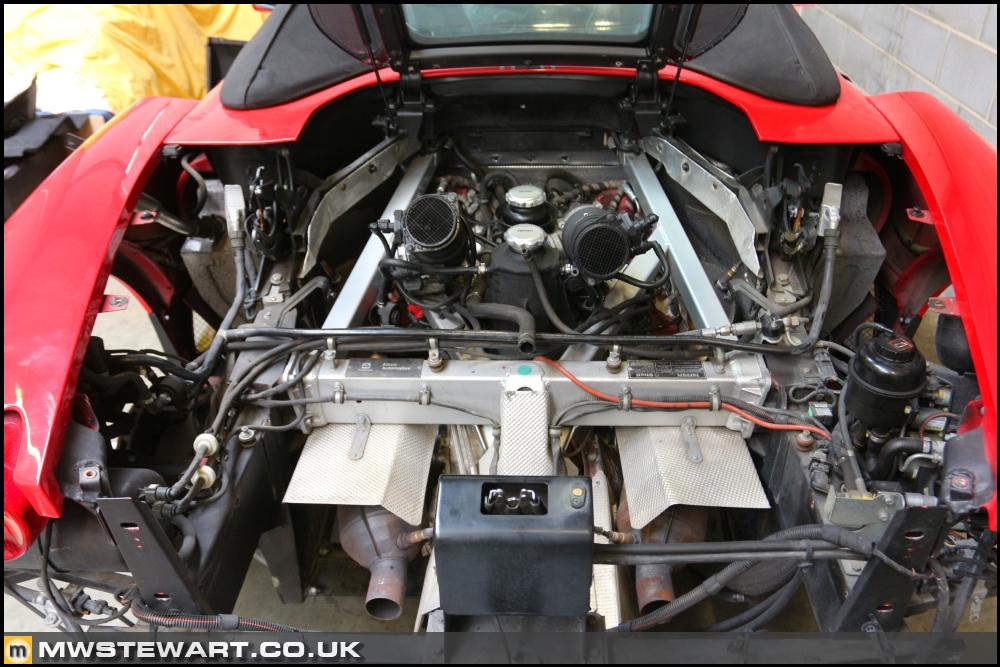
Before refitting the inlet runners I marked and drilled the A frame for M6 Rivnuts to mount the new coil/spark plug water shields. My cam covers are starting to look a bit scabby in places so I'll attend to them at some point.
Yet more evidence that a Ferrari service history is not good for the car.
Following on from the inlet duct comparison I noticed that the mesh used on the Mk2 was actually better than the Mk1, which was simply a piece of mesh crudely folded over the entrance aperture.
I cut down the end section of my old Mk2 ducts and bonded it on to the Mk1 ducts.
I also sprayed the inside of the Mk1 with satin black.
To remove and fit the air ducts I had to remove the left hand side charcoal canister for the evap system, and loosen the fuel filler neck. I had a few issues with yet more of Ferraris cheese fasteners, by that I mean anything that isn't high tensile is made of the most appalling quality metal. I'm spending a bit of time replacing fasteners with either stainless or decent quality BZP.
Before refitting the inlet runners I marked and drilled the A frame for M6 Rivnuts to mount the new coil/spark plug water shields. My cam covers are starting to look a bit scabby in places so I'll attend to them at some point.
Yet more evidence that a Ferrari service history is not good for the car.
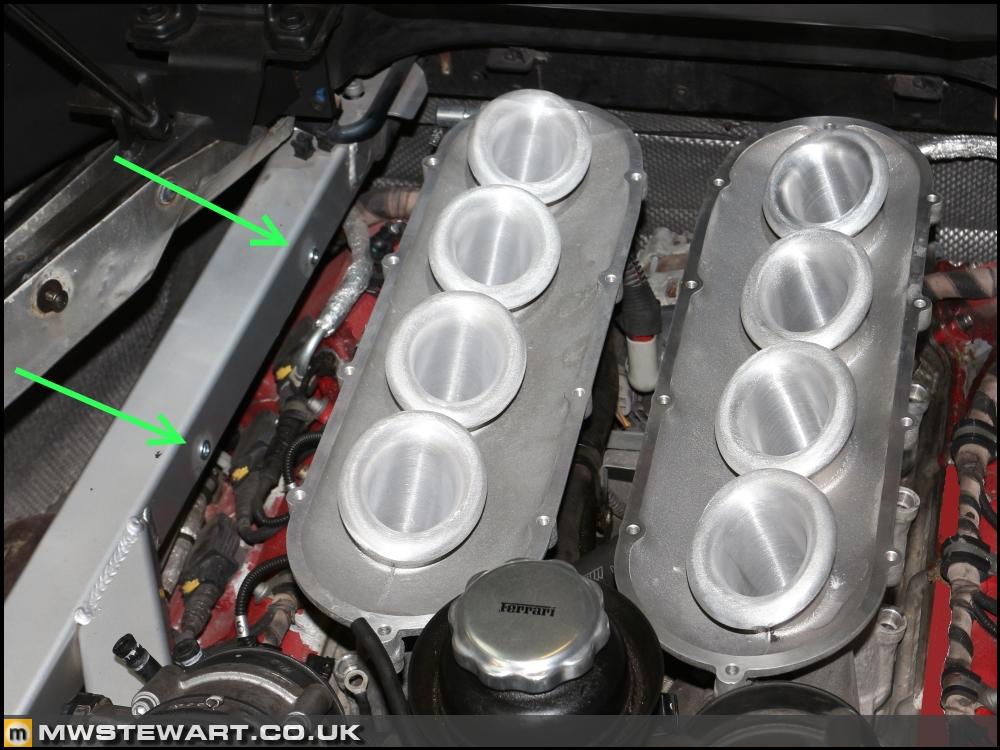
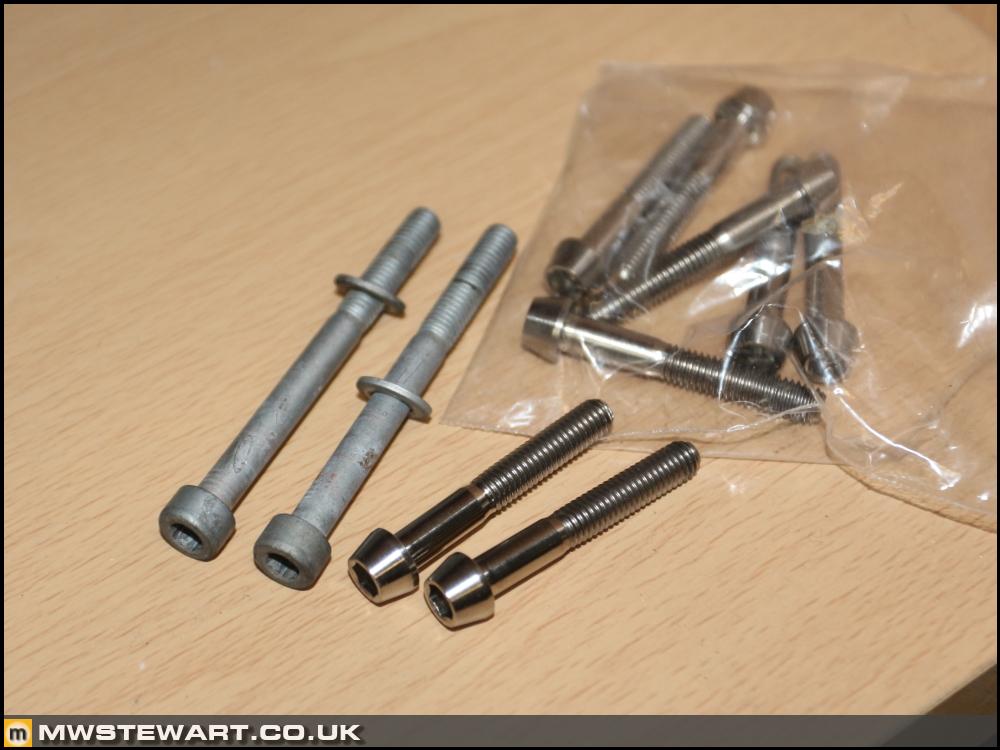
I had noticed that the carbon fibre plenums are always fitted with taper head Allen bolts instead of the regular cap screws used for the alloy plenum. A taper head usually indicates titanium so that's what I've gone for.
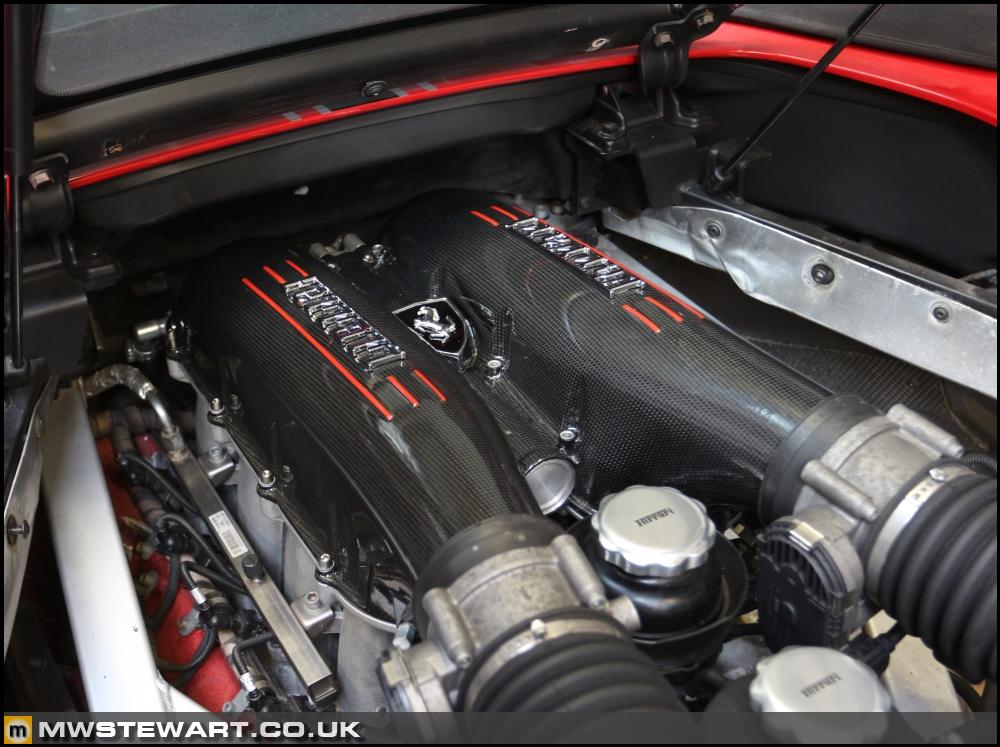
Plenum fitted. It was all plug and play except for the charcoal canister purge line, so I need to order an adapter hose for it.
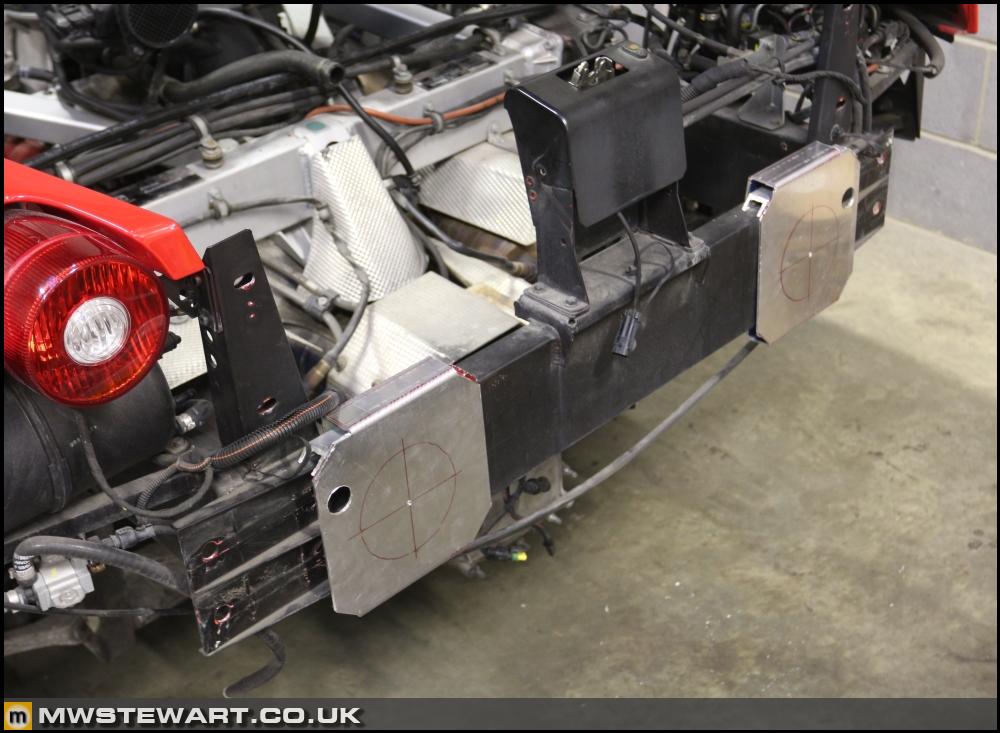
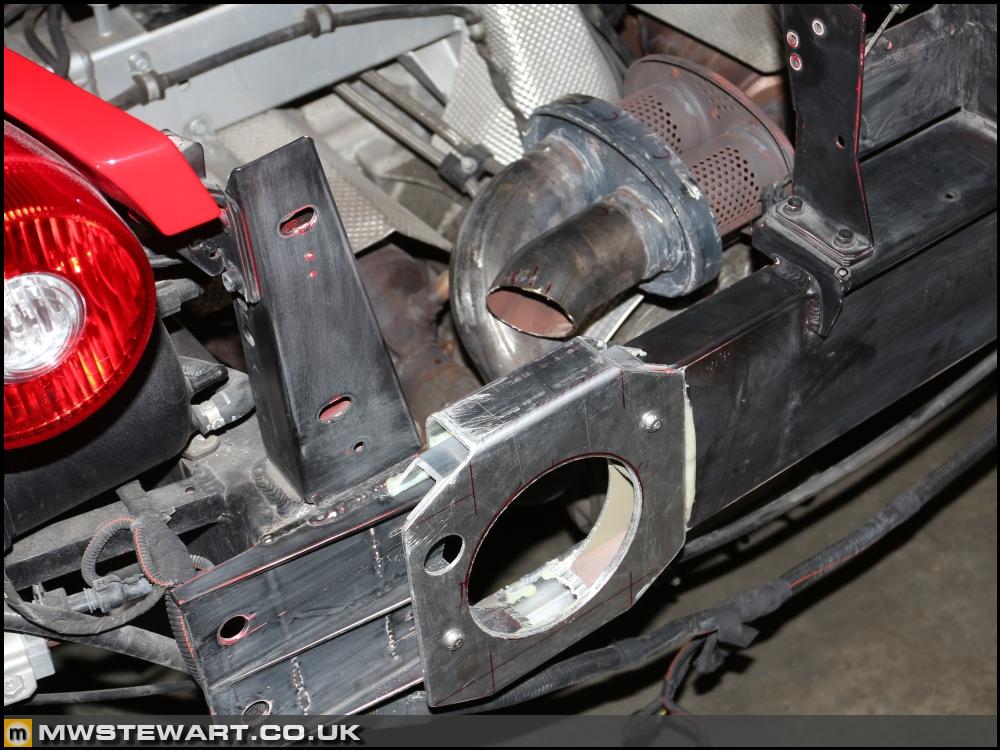
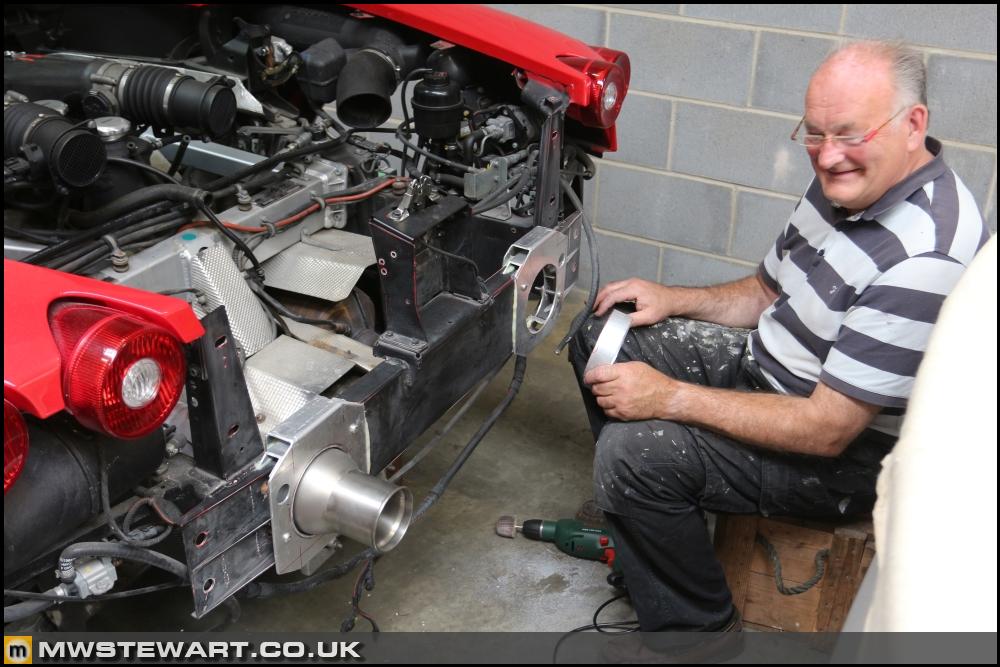
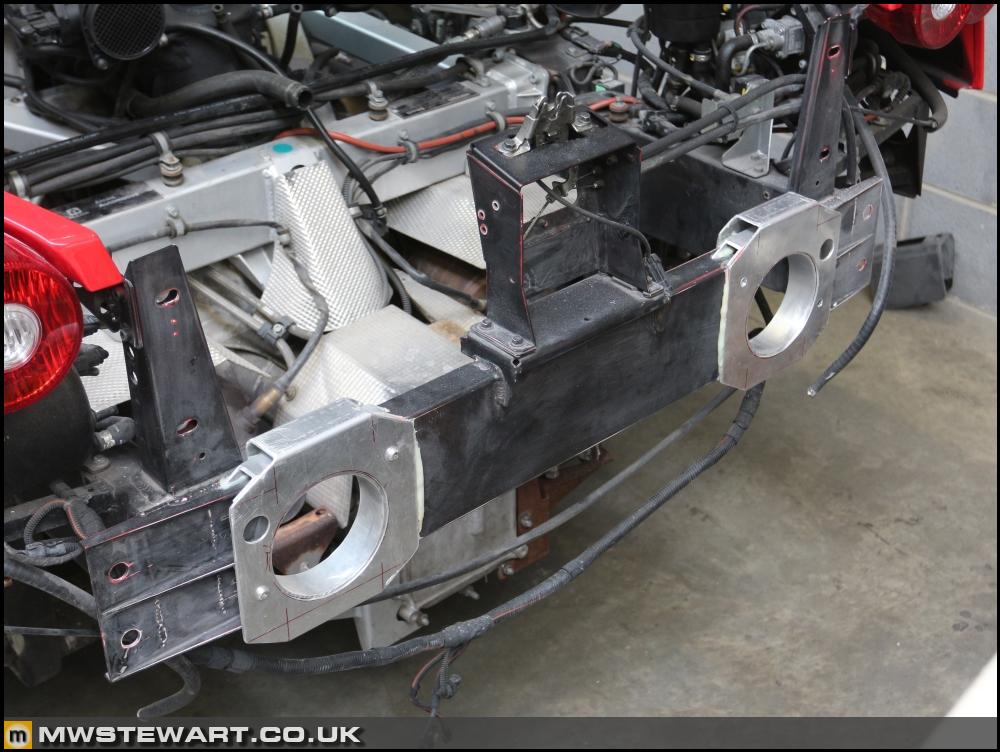
I've made a start fabricating the rear cross member parts. My Dad has been helping me in the workshop.
The new rear bumper was offered to up check our exhaust measurements were spot on. I'm pleased to say they were.
Plenum fitted. It was all plug and play except for the charcoal canister purge line, so I need to order an adapter hose for it.
I've made a start fabricating the rear cross member parts. My Dad has been helping me in the workshop.
The new rear bumper was offered to up check our exhaust measurements were spot on. I'm pleased to say they were.
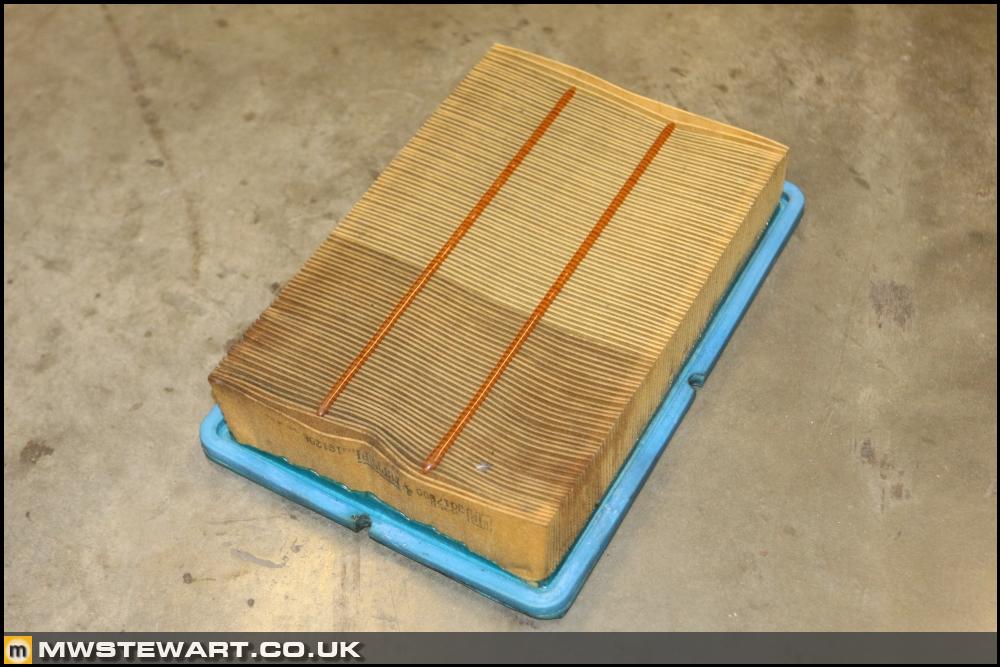
Thanks all. It looks like some oil on the lower section of filter, but what I was really trying to show was that it is filthy - I should have openend it out to make it clearer. The car is serviced annually regardless of mileage and the Ferrari approach is to evaluate the condition of the filter and replace if necessary. That filter must be five years old at least, so that's porbably three opportunities gone by to replace what should have been replaced due to its soiled condition.
Out of interest I will check for a date.
Out of interest I will check for a date.
mwstewart said:
Thanks all. It looks like some oil on the lower section of filter, but what I was really trying to show was that it is filthy - I should have openend it out to make it clearer. The car is serviced annually regardless of mileage and the Ferrari approach is to evaluate the condition of the filter and replace if necessary. That filter must be five years old at least, so that's porbably three opportunities gone by to replace what should have been replaced due to its soiled condition.
Out of interest I will check for a date.
Do you have the previous owner's / owners' invoices? I appreciate you can't share for name & shame reasons but it would be interesting to know if a dealer charged them for new filters, too.Out of interest I will check for a date.
EJH said:
Do you have the previous owner's / owners' invoices? I appreciate you can't share for name & shame reasons but it would be interesting to know if a dealer charged them for new filters, too.
I have all of it but sadly it is nothing unique. It was the same on my last car and echoes the experience of others.Zombie said:
That bracket for the engine lid catch looks like its begging to be remade in CF!
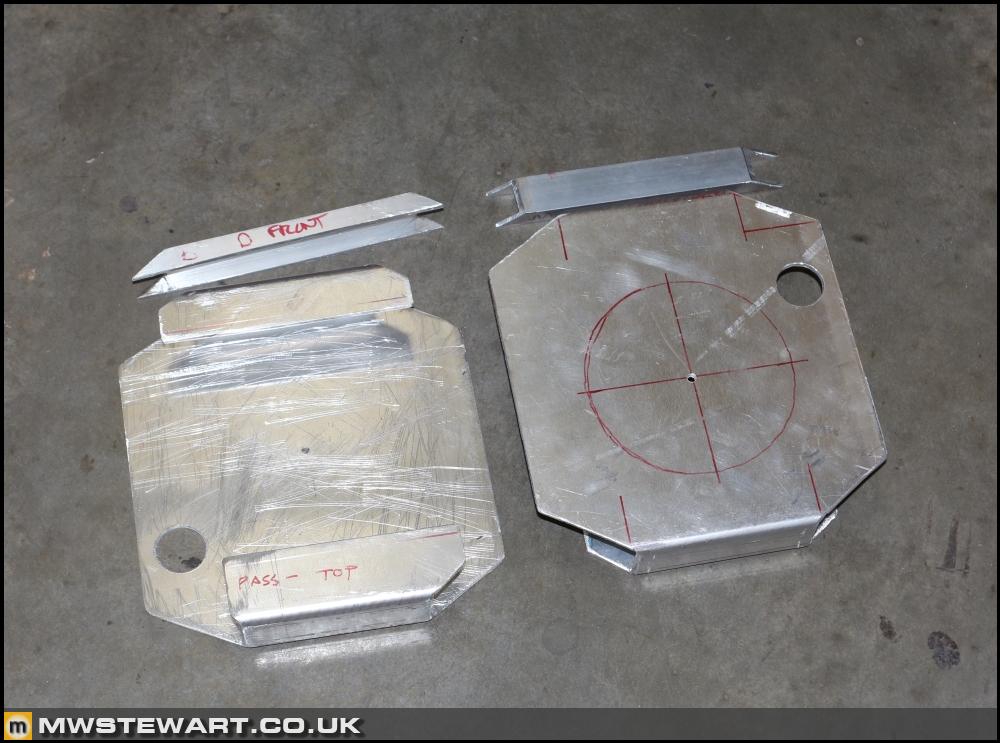
Yeah!The rear cross member outer plates are finished. The scratches on the inside edge are to provide a better key for the adhesive.
Dad masked off the contact patches and sanded back to bare aluminium. He then sanded the rest of the rear area and degreased everything ready for me to repaint in satin black.

Epoxy applied.
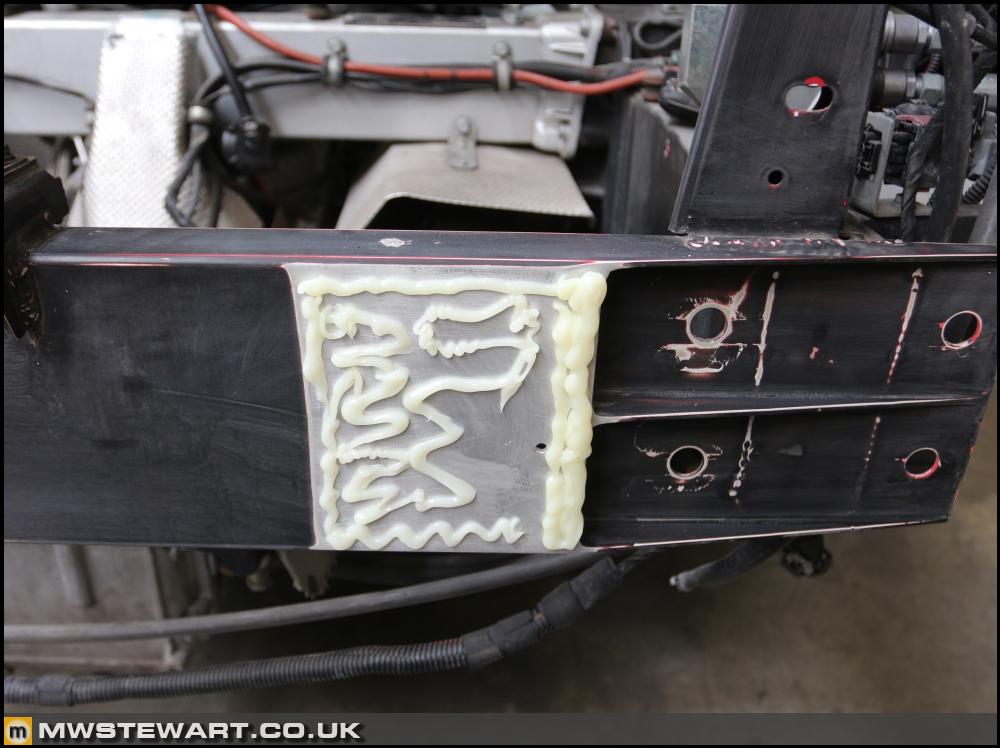
Clamped up. The adhesive set in five minutes. Incredible stuff. We did a hammer and chisel test on two pieces of aluminium stuck with it, and the actual aluminium bent before the adhesive gave way.
Challenge exhaust
Here's the Challenge exhaust as-is before I started to modify it to suit the Scuderia bumper - the Challenge tailpipe spacing is different.
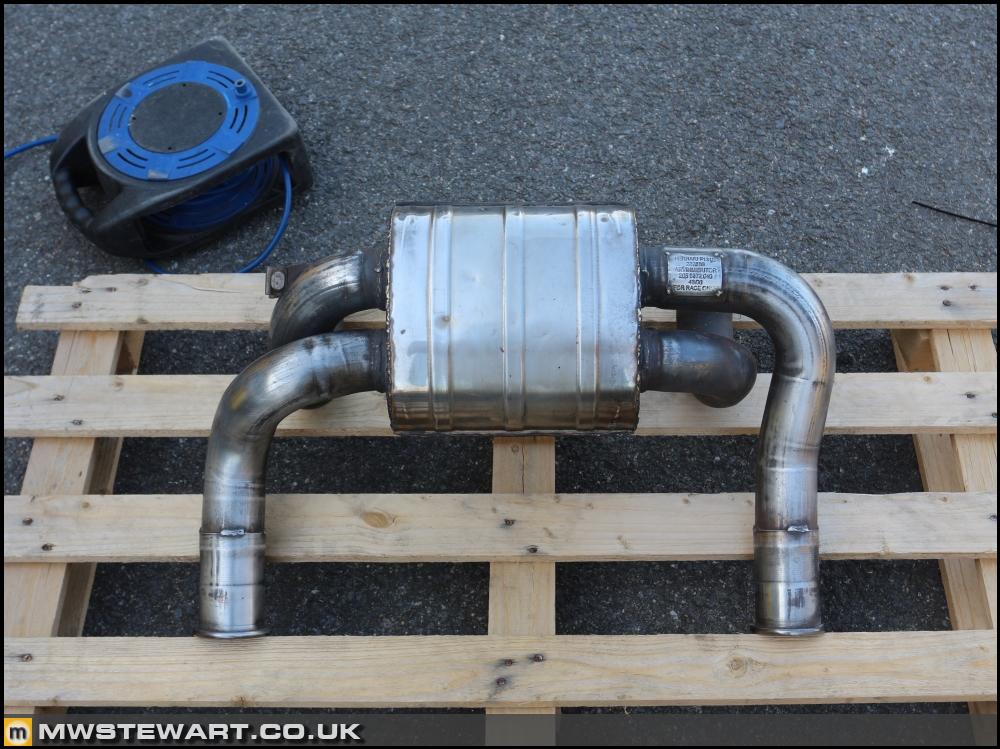
First I cut off the outer cover which is simply a container for a layer of heat management material. The outer cover does not seal any exhaust gasses. I wore a mask when removing the heat barrier as it’s a fibrous material that I can't imagine does any good inside a pair of lungs. I also removed the tailpipe trims because the Challenge type aren't suitable for the Scuderia bumper.
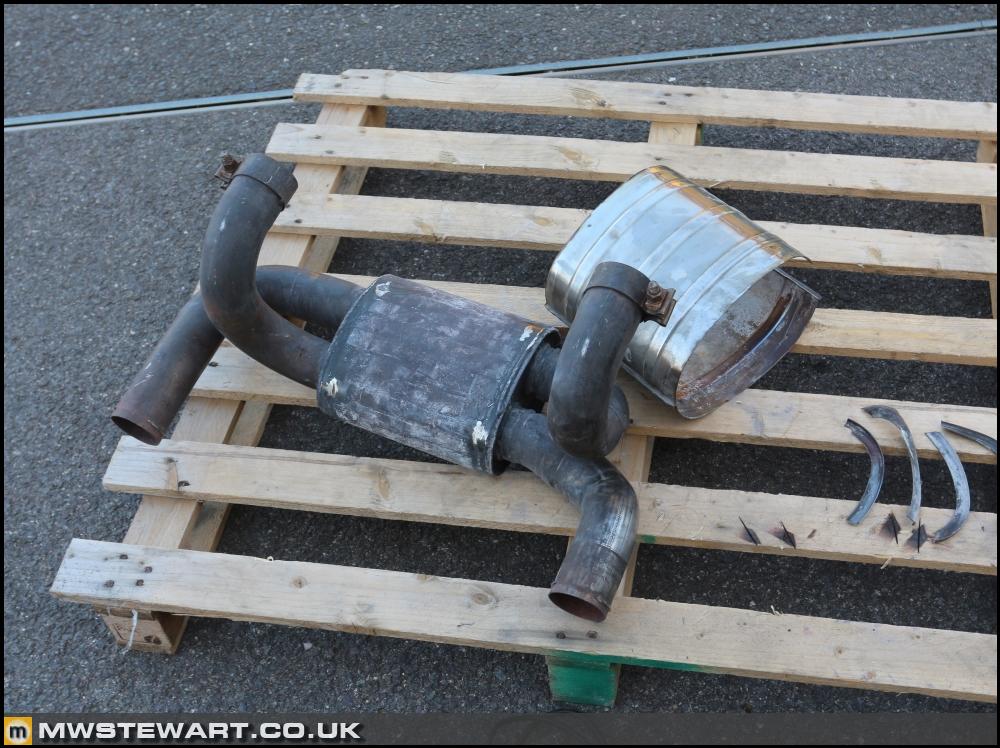
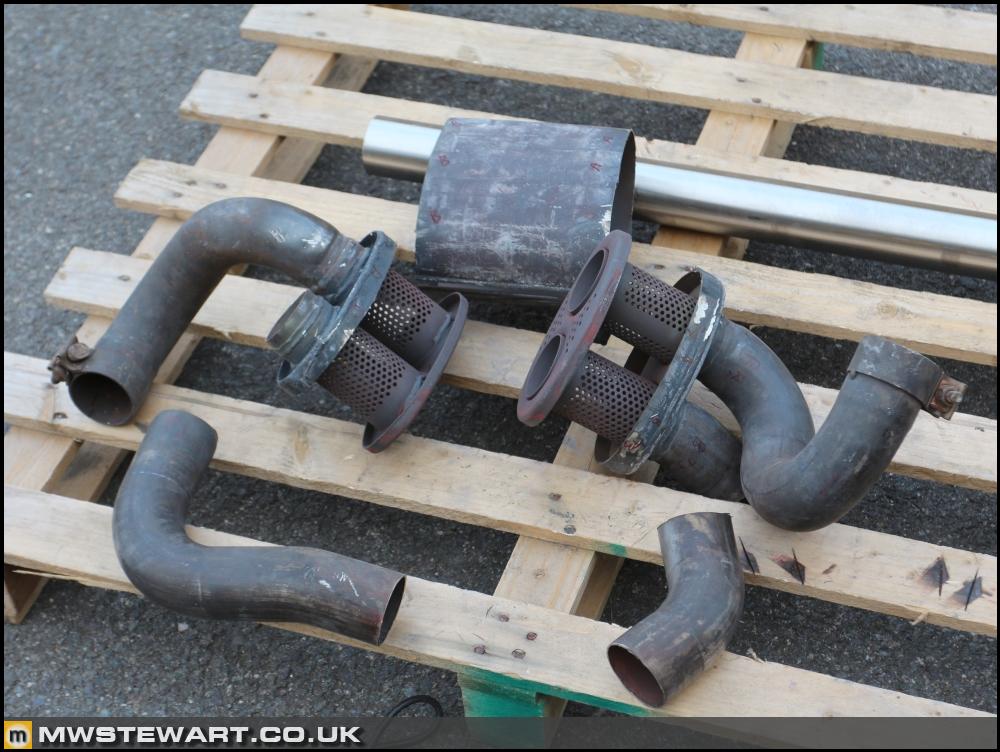
Next I opened the actual silencer itself which comprises three chambers. Originally it was packed with stainless steel wool but that had long since disintegrated and there were only a few strands left! I need to move the tailpipe positions further outboard so I cut off the existing pipes at a point where I can easily weld in some infill section.
I mounted the exhaust in the car to start measuring up for the new tailpipe positions.

I only managed to drill one tailpipe hole in the rear cross member because it claimed by drill. It had served me well for years so I can't complain; I will pick up a new one tomorrow.
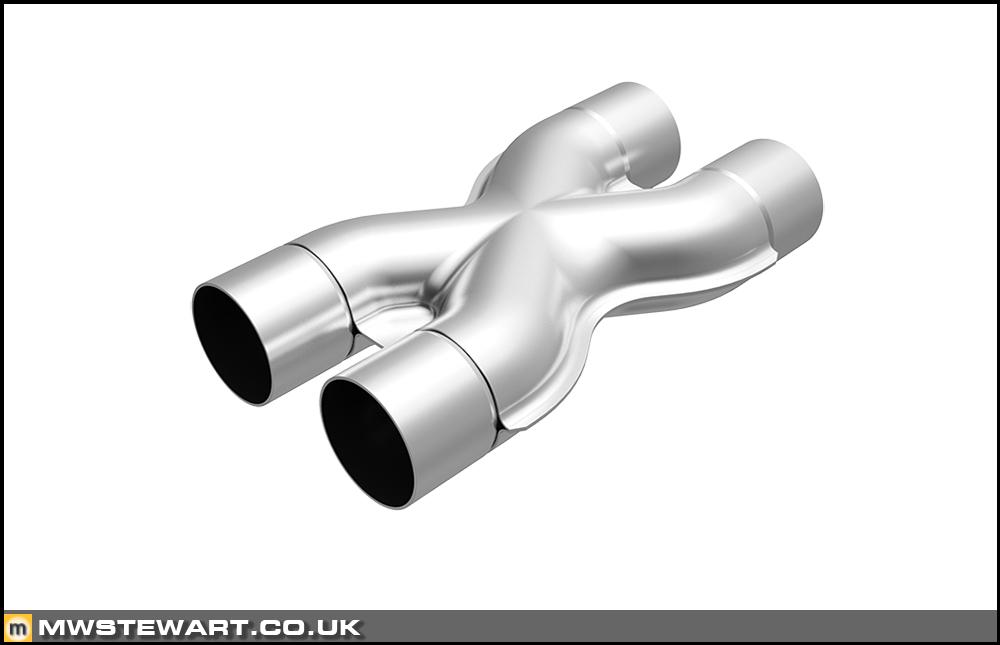
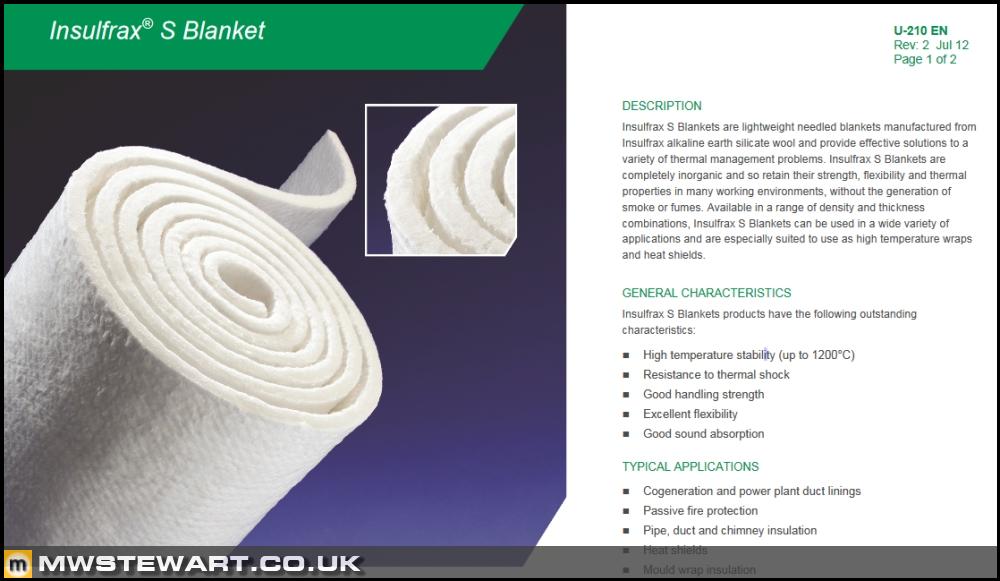
Next steps for the exhaust are to weld in a Magnaflow X-Pipe into the silencer, then drill some holes in it, then repack with Insulfrax S ceramic fibre.
Interior
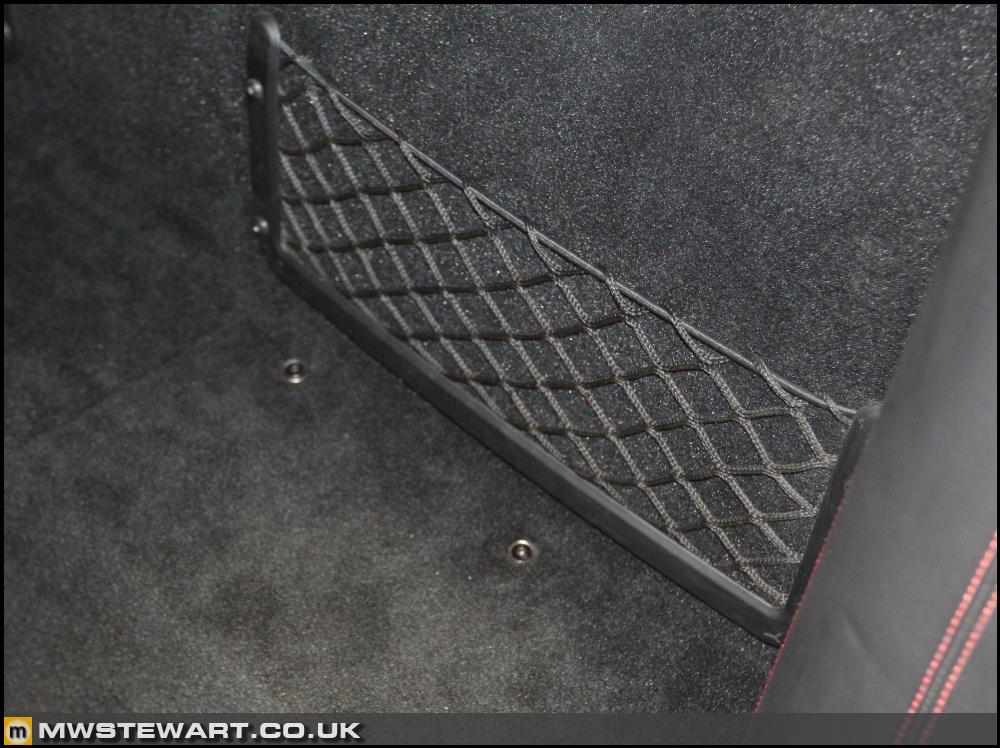
I tided up a couple of bits inside the car. Some of the countersunk washers used on lower trim panels had oxidised in places so I'm renewing all of them.

The map pockets in the rear shelf has been stretched and looked unsightly.
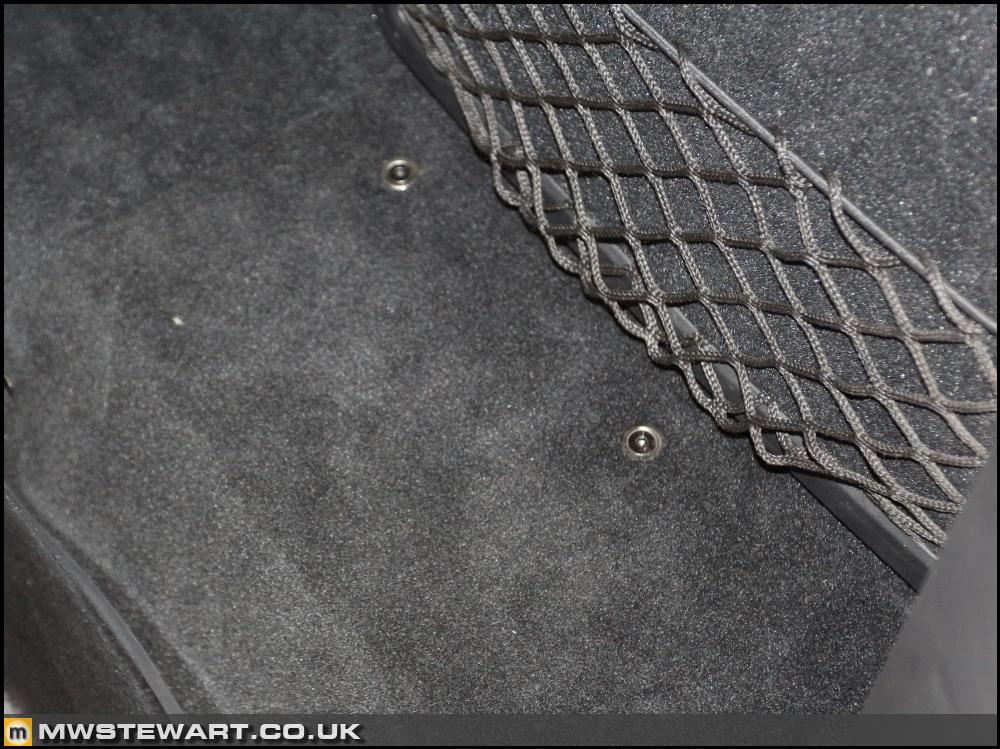
I removed them and took up the slack behind the net fixing points.
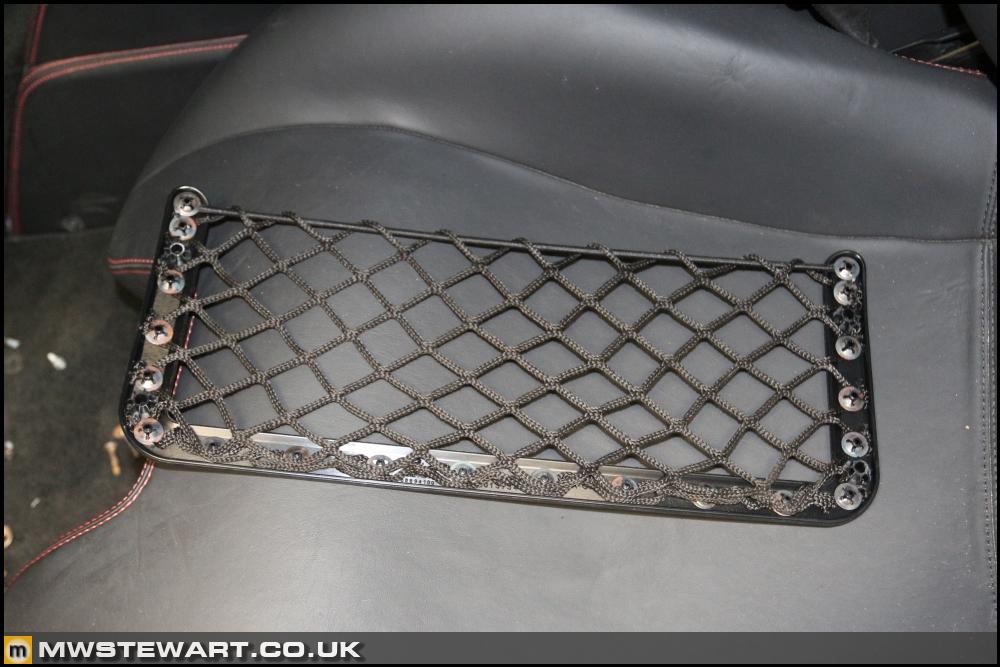
Completed. Much better.
Dad masked off the contact patches and sanded back to bare aluminium. He then sanded the rest of the rear area and degreased everything ready for me to repaint in satin black.
Epoxy applied.
Clamped up. The adhesive set in five minutes. Incredible stuff. We did a hammer and chisel test on two pieces of aluminium stuck with it, and the actual aluminium bent before the adhesive gave way.
Challenge exhaust
Here's the Challenge exhaust as-is before I started to modify it to suit the Scuderia bumper - the Challenge tailpipe spacing is different.
First I cut off the outer cover which is simply a container for a layer of heat management material. The outer cover does not seal any exhaust gasses. I wore a mask when removing the heat barrier as it’s a fibrous material that I can't imagine does any good inside a pair of lungs. I also removed the tailpipe trims because the Challenge type aren't suitable for the Scuderia bumper.
Next I opened the actual silencer itself which comprises three chambers. Originally it was packed with stainless steel wool but that had long since disintegrated and there were only a few strands left! I need to move the tailpipe positions further outboard so I cut off the existing pipes at a point where I can easily weld in some infill section.
I mounted the exhaust in the car to start measuring up for the new tailpipe positions.
I only managed to drill one tailpipe hole in the rear cross member because it claimed by drill. It had served me well for years so I can't complain; I will pick up a new one tomorrow.
Next steps for the exhaust are to weld in a Magnaflow X-Pipe into the silencer, then drill some holes in it, then repack with Insulfrax S ceramic fibre.
Interior
I tided up a couple of bits inside the car. Some of the countersunk washers used on lower trim panels had oxidised in places so I'm renewing all of them.
The map pockets in the rear shelf has been stretched and looked unsightly.
I removed them and took up the slack behind the net fixing points.
Completed. Much better.
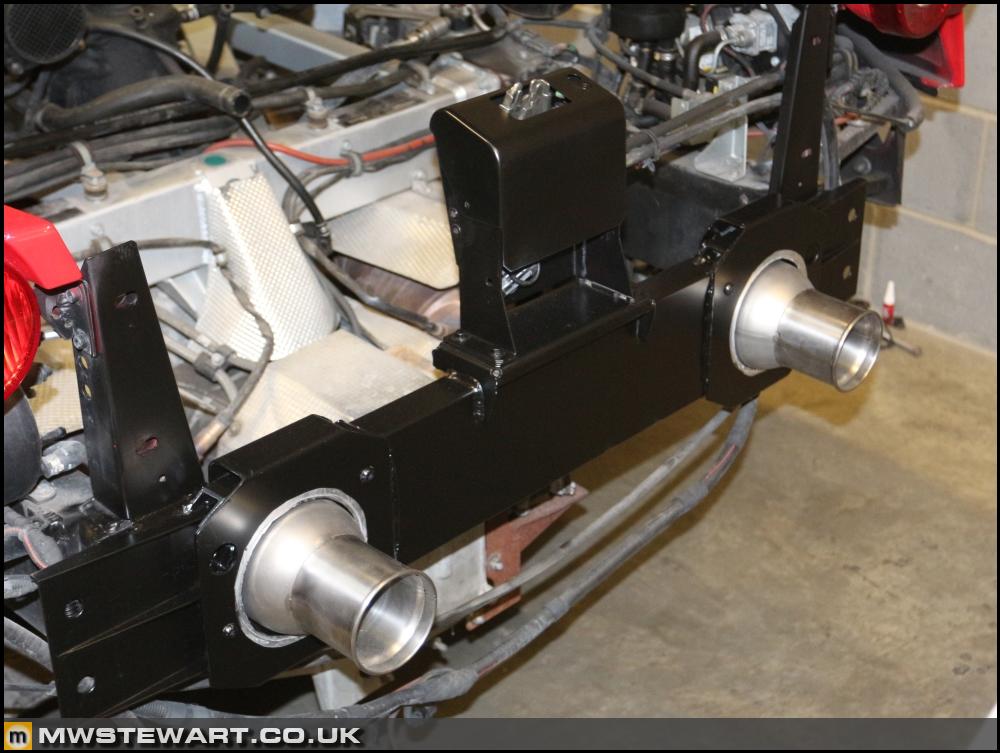
Cross member complete
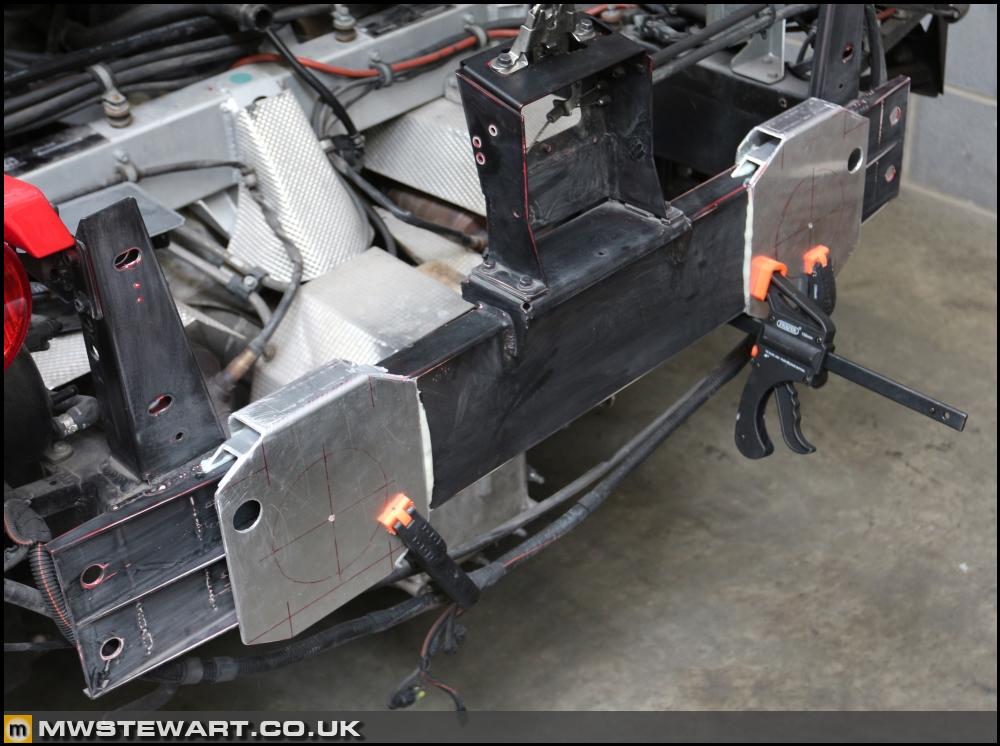
I have reinforced the exhaust trim aperture with 3mm aluminium tube cut to length. I've also added two M8 through-bolts to protect the adhesive from peeling forces.
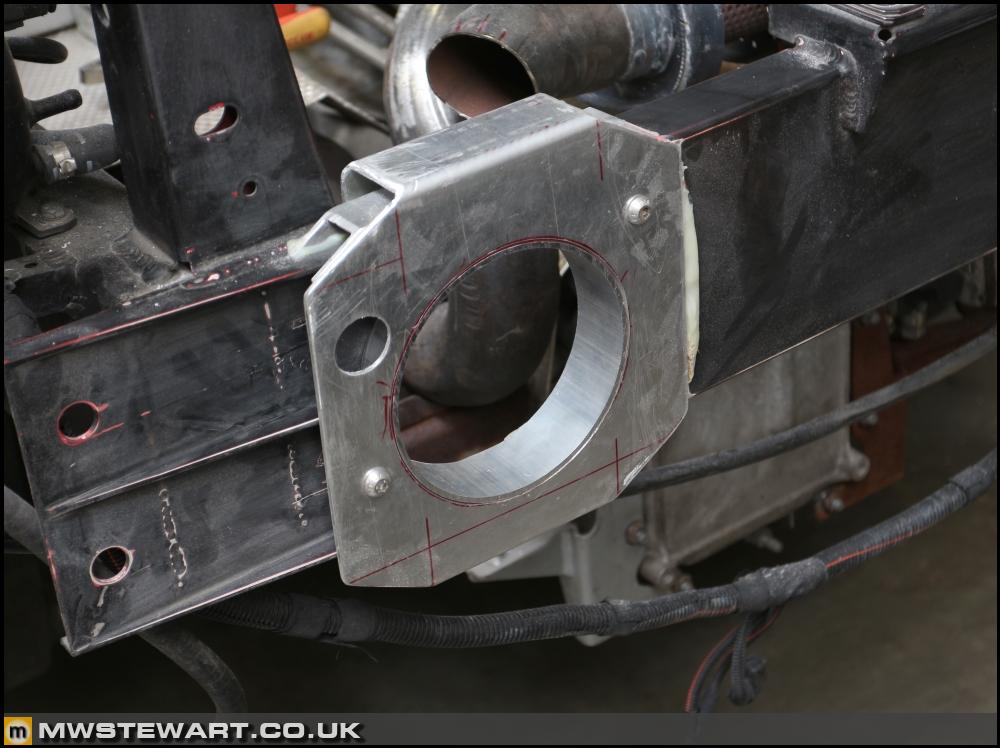
I did one side and Dad did the other. We used a mixture of files and flap discs in the drill to get an interference fit between tube and cross member.
Both sides installed ready for adhesive. I added three M6 rivnuts on each side of the cross member to mount the exhaust tips.
After Dad degreased the rear panel I etch primed any bare metal then sprayed everything in satin black.
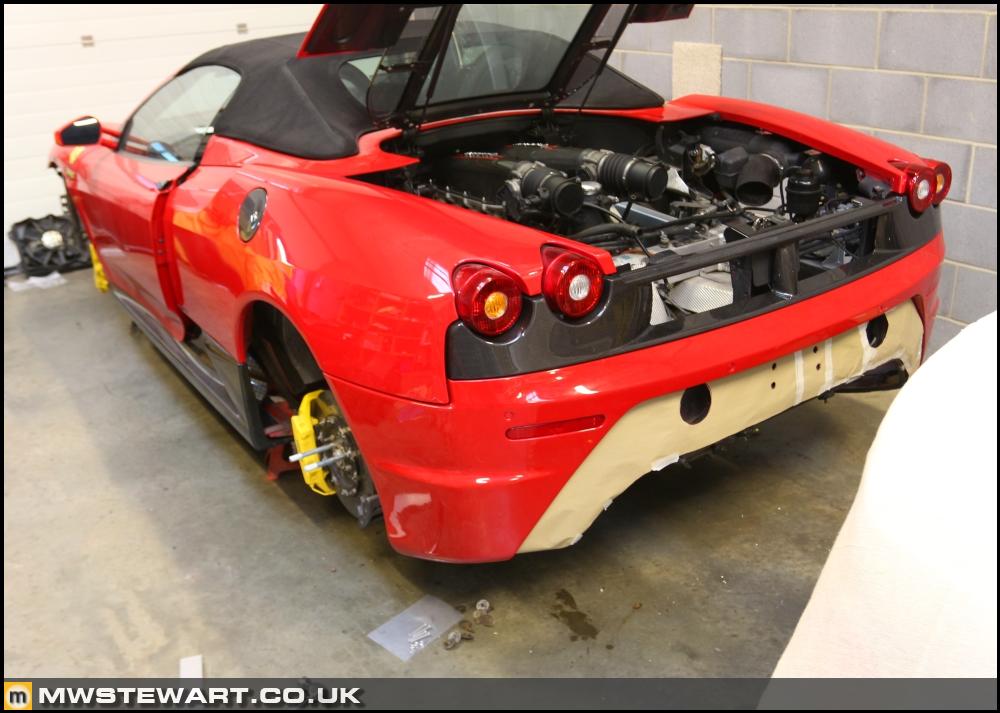
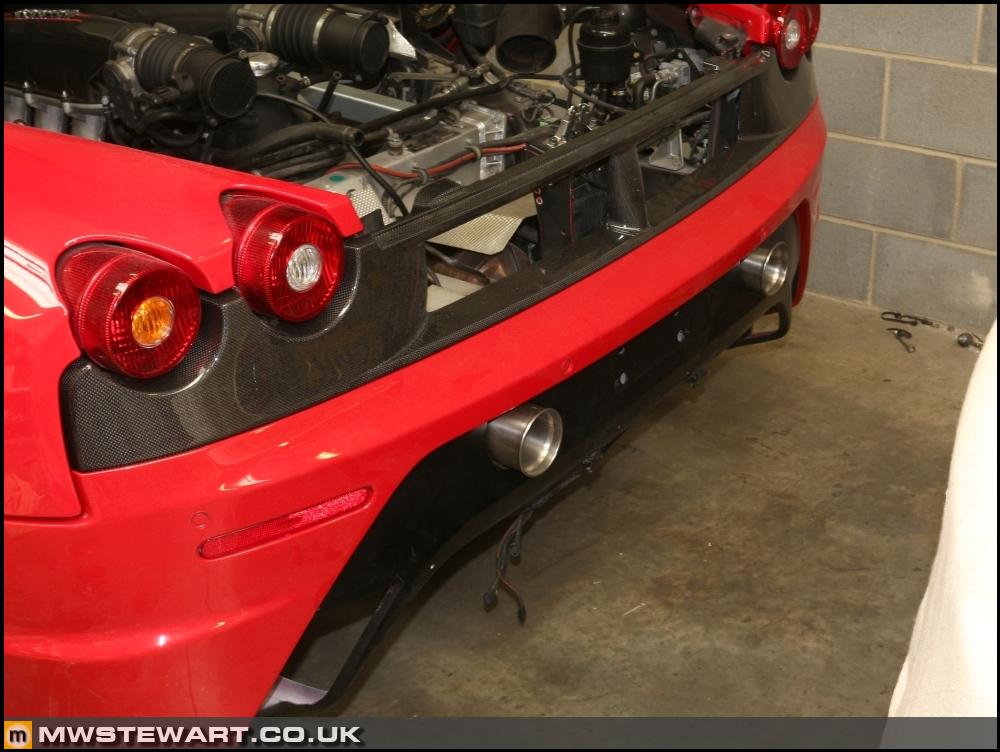
Bumper fitted but not yet adjusted hence some uneven gaps!
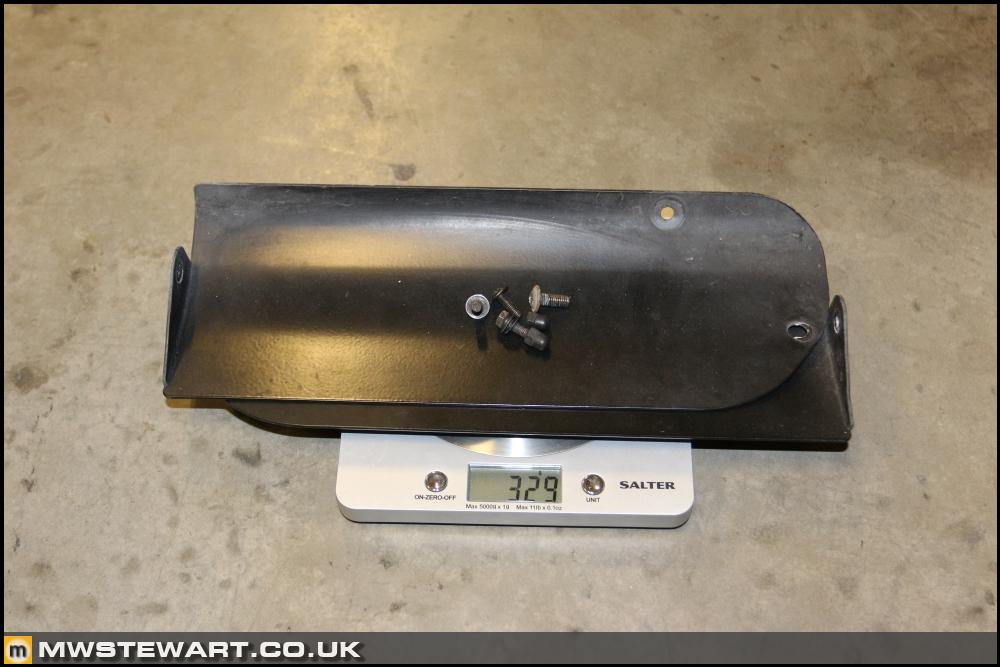
F430's equipped with the carbon upper segment are fitted with a couple of trim pieces behind the mesh, either to prevent the exhaust silencer from being seen outside the car, or to deflect air. The Scuderia does not have these - presumably to aid cooling - so I've removed them.
Exhaust mounting
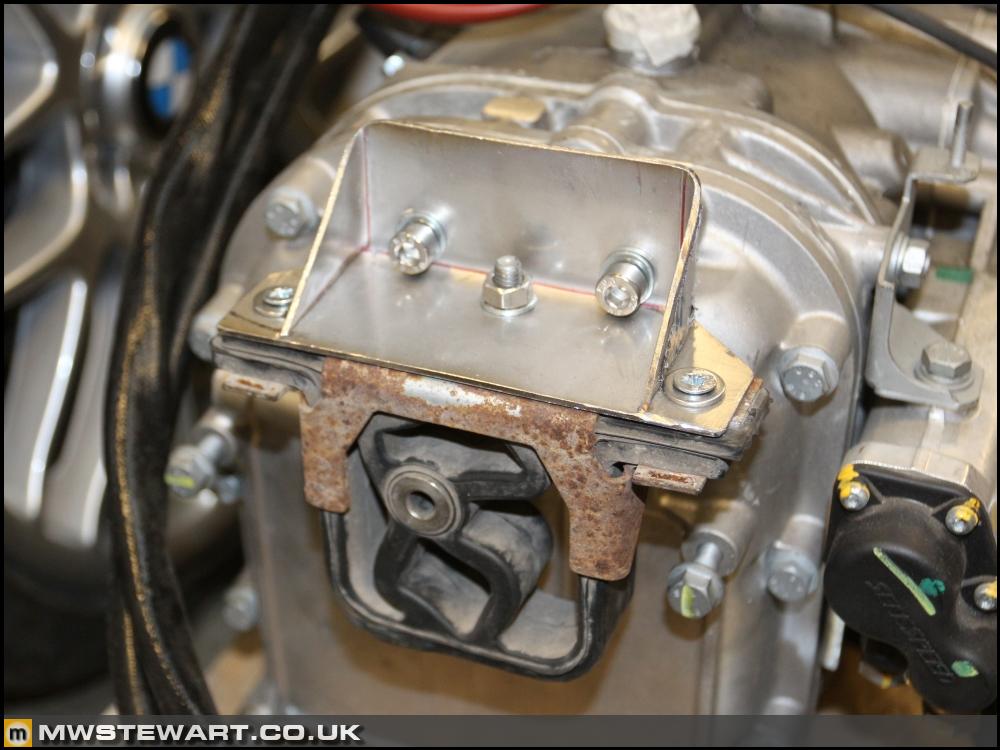
After weighing the Challenge silencer I decided to use a single BMW exhaust mount and after some thinking and offering it up to the car I decided the best place was parallel with the diff casing on the gearbox. I described the design to Dad and he made a template for me.
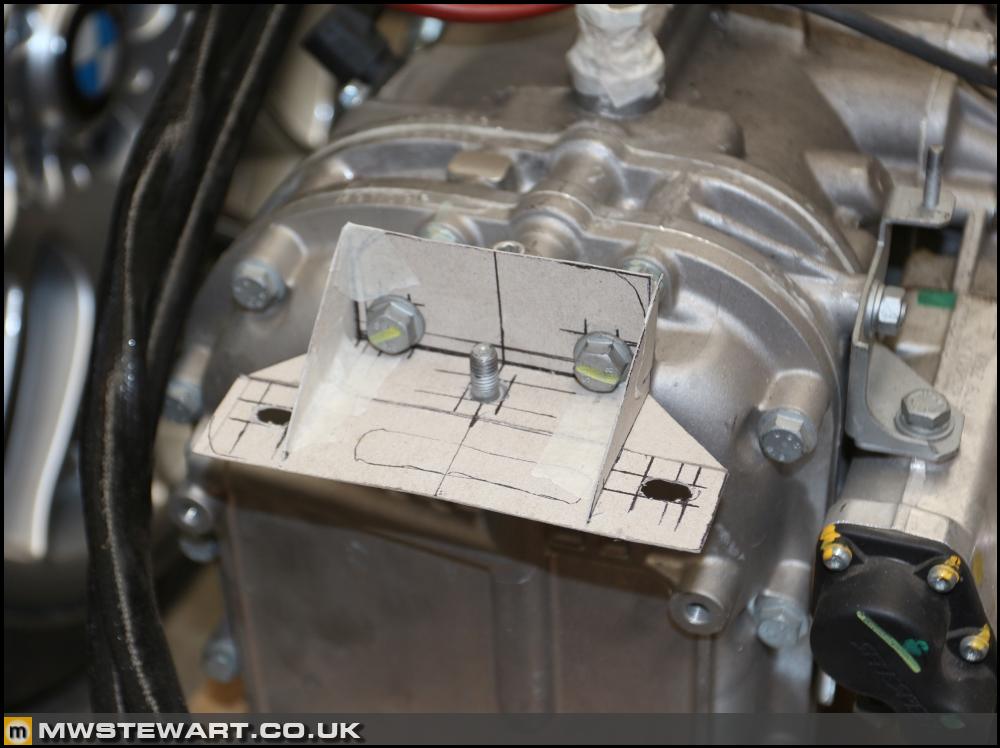
I fabricated the bracket from 2.5mm stainless plate. It didn't need to be any thicker because most of the lower edge is supported by a boss on the gearbox, though I may add another two gussets between the mounting bolts.
Weight saving
It's been a while since I updated the table but things are progressing nicely,.
Sprung weight saved: 43.57 kg
Unsprung weight saved: 23.29 kg
Total weight saved: 68.87 kg
I have reinforced the exhaust trim aperture with 3mm aluminium tube cut to length. I've also added two M8 through-bolts to protect the adhesive from peeling forces.
I did one side and Dad did the other. We used a mixture of files and flap discs in the drill to get an interference fit between tube and cross member.
Both sides installed ready for adhesive. I added three M6 rivnuts on each side of the cross member to mount the exhaust tips.
After Dad degreased the rear panel I etch primed any bare metal then sprayed everything in satin black.
Bumper fitted but not yet adjusted hence some uneven gaps!
F430's equipped with the carbon upper segment are fitted with a couple of trim pieces behind the mesh, either to prevent the exhaust silencer from being seen outside the car, or to deflect air. The Scuderia does not have these - presumably to aid cooling - so I've removed them.
Exhaust mounting
After weighing the Challenge silencer I decided to use a single BMW exhaust mount and after some thinking and offering it up to the car I decided the best place was parallel with the diff casing on the gearbox. I described the design to Dad and he made a template for me.
I fabricated the bracket from 2.5mm stainless plate. It didn't need to be any thicker because most of the lower edge is supported by a boss on the gearbox, though I may add another two gussets between the mounting bolts.
Weight saving
It's been a while since I updated the table but things are progressing nicely,.
| Original F430 Part | Fitted Quantity | Original Part (kg) | Replacement Part (kg) | Sprung Saving (kg) | Unsprung Saving (kg) | Replacement Part |
|---|---|---|---|---|---|---|
| Brake disc, front - iron | 2 | 8.3 | 6.77 | - | 3.06 | CCM - 380mm (alloy bell) |
| Brake disc, rear - iron | 2 | 8.3 | 4.61 | - | 7.38 | CCM (alloy bell) |
| Brake caliper & pads, front - iron | 2 | 4.9 | 5.94 | - | -2.08 | CCM - 380mm |
| Brake caliper & pads, rear - iron | 2 | 4.9 | 4.72 | - | 0.36 | CCM |
| Door handles, exterior | 2 | 0.065 | - | 0.02 | 0.09 | Carbon |
| PAS reservoir cap | 1 | 0 | 0.065 | -0.065 | - | Alloy cover |
| Fuel Flap | 1 | 0.143 | 0.128 | 0.015 | - | Carbon |
| Seats - standard, electric, heated | 2 | 28.2 | 17.9 | 20.6 | - | 16M/Scuderia carbon |
| Strut & spring, front | 2 | 4.74 | 3.8 | - | 1.88 | 16M/Scuderia Mk2 |
| Strut & spring, rear | 2 | 5.37 | 4.59 | - | 1.56 | 16M/Scuderia Mk2 |
| Anti roll bar, front (19mm) | 1 | 3.04 | 2.73 | 0.21 | 0.1 | 16M/Scuderia |
| Side skirts - standard | 2 | 4.62 | 2.9 | 3.44 | - | 16/Scuderia carbon |
| Kick plates - standard | 2 | 0.841 | 0.163 | 1.356 | - | 16M/Scuderia (carbon) |
| Wheels, front - standard | 2 | 12.9 | 10.5 | - | 4.8 | 16M - optional 5 spoke |
| Tyres, 225/35/19 Pirelli P Zero Rosso (new) | 2 | 10.7 | 10.23 | - | 0.94 | 235/35/19 MPSS (new) |
| Wheels, rear - standard | 2 | 13.7 | 12.3 | - | 2.8 | 16M - optional 5 spoke |
| Tyres, 285/35/19 Pirelli P Zero Rosso (new) | 2 | 13.61 | 13.92 | - | -0.62 | 285/35/19 MPSS (new) |
| Wheel bolts - standard | 20 | 0.128 | 0.065 | - | 1.26 | Titanium |
| Engine lid grilles - standard | 2 | 0.677 | 0.219 | 0.916 | - | 16M (mesh) |
| Engine lid grille brackets | 2 | 0.354 | 0.216 | 0.276 | - | Modified to 16M spec |
| Engine lid grille screws - M6x20 | 14 | 0.007 | 0.002 | 0.07 | - | M5x8 |
| 16M badges, side | 2 | 0 | 0.073 | -0.146 | - | - |
| Anti roll bar, rear - 20mm | 1 | 3.008 | 1.839 | 0.858 | 0.311 | 16M specific (22mm hollow) |
| Air inlet ducts/resonators - Mk2 | 2 | 1.131 | 1.225 | -0.188 | - | Mk1 (single piece) |
| Plenum chamber | 1 | 5.063 | 3.19 | 1.873 | - | Challenge/16M/Scuderia (carbon) |
| Plenum chamber bolts | 1 | 0.176 | 0.1 | 0.076 | - | Titanium |
| Cross member exhaust modifications | 1 | 0 | 0.65 | -0.65 | - | Modified to 16M/Scuderia spec |
| Exhaust tailpipes | 2 | 6.5 | 0.343 | 12.314 | - | 16M/Scuderia - optional titanium |
| Bumper, rear - challenge grille, PDC | 1 | 13 | 9 | 4 | - | 16M/Scuderia - PDC added |
| Challenge grille air deflectors | 1 | 0.329 | 0 | 0.329 | - | Not fitted to 16M/Scuderia |
Sprung weight saved: 43.57 kg
Unsprung weight saved: 23.29 kg
Total weight saved: 68.87 kg
Zombie said:
Is there a lightweight Lithium battery you could buy to replace what the presumably standard lead acid battery?
Good to see your Dad's involved - My Father is similarly talented
Love reading updates on this thread.Good to see your Dad's involved - My Father is similarly talented
My Dad, who is a retired mechanical engineer, was never interested when I was changing gearboxes etc. in my Minis.
The company he worked for (Ruston in Lincoln and later Newton-le-Willows) built various sized diesel engines and gas turbines and he said a tiny 998cc A Series petrol held no interest for him.
He only ventured out to check for oil spills on his driveway :-)
If two things summed up your work on these cars, they would be courage, and attention to detail.
There can't be enough hours in the day for you to do the research on each little project plus the actual modifying/work plus real job plus house renos plus relationship. It's unbelievable!
There can't be enough hours in the day for you to do the research on each little project plus the actual modifying/work plus real job plus house renos plus relationship. It's unbelievable!
Gassing Station | Readers' Cars | Top of Page | What's New | My Stuff