Ferrari F430 Spider
Discussion


mwstewart said:
Thanks. SoFast 3 was MY08 which is builds from September 2007 onwards when the factory reopened after the summer break. To be precise it is all cars from assembly number 74557 - see www.mwstewart.co.uk/misc/f430/F430 assembly change.... There were updates to gearbox software available for all years regardless of F1 type but the CFC301 system was more significant.
Good to hear clutch life is good!
Just looked it up from the service history - your right, it has the CFC231 TCU which I guess is before the 301. software revision is EAC63B60.Good to hear clutch life is good!
Is it worth swapping over to the newer TCU? or does it require a wiring harness and additional sensor? I presume the 'auto easy exit' was a software change as my car has that - it always starts in 'auto' but as soon as you use a paddle it drops into manual mode?
paulmnz said:
Just looked it up from the service history - your right, it has the CFC231 TCU which I guess is before the 301. software revision is EAC63B60.
Is it worth swapping over to the newer TCU? or does it require a wiring harness and additional sensor? I presume the 'auto easy exit' was a software change as my car has that - it always starts in 'auto' but as soon as you use a paddle it drops into manual mode?
It's wiring, engine ECUs, and the sensor, so it's quite a bit of work.Is it worth swapping over to the newer TCU? or does it require a wiring harness and additional sensor? I presume the 'auto easy exit' was a software change as my car has that - it always starts in 'auto' but as soon as you use a paddle it drops into manual mode?
I understand the software you have was a decent improvement over the MY06 update.
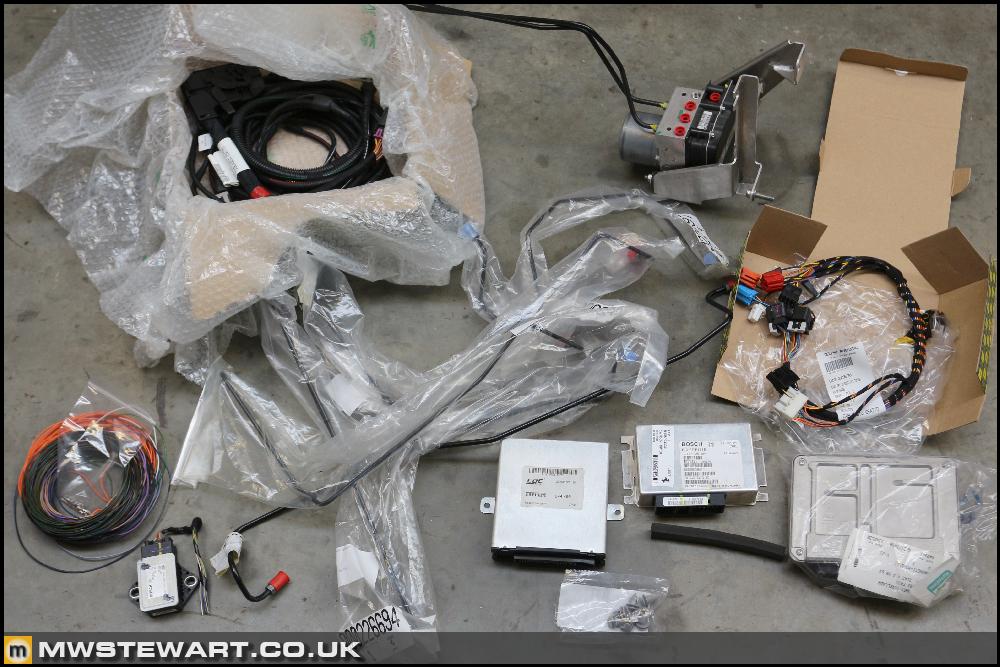
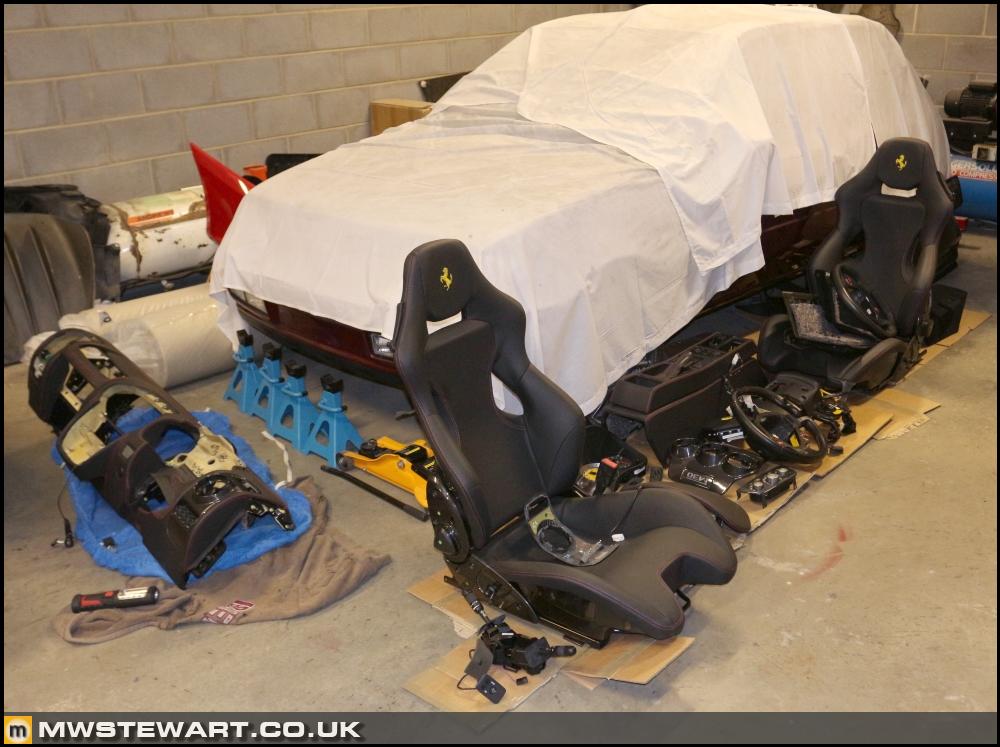
I'm about to start on the electronics. Some more parts have arrived.
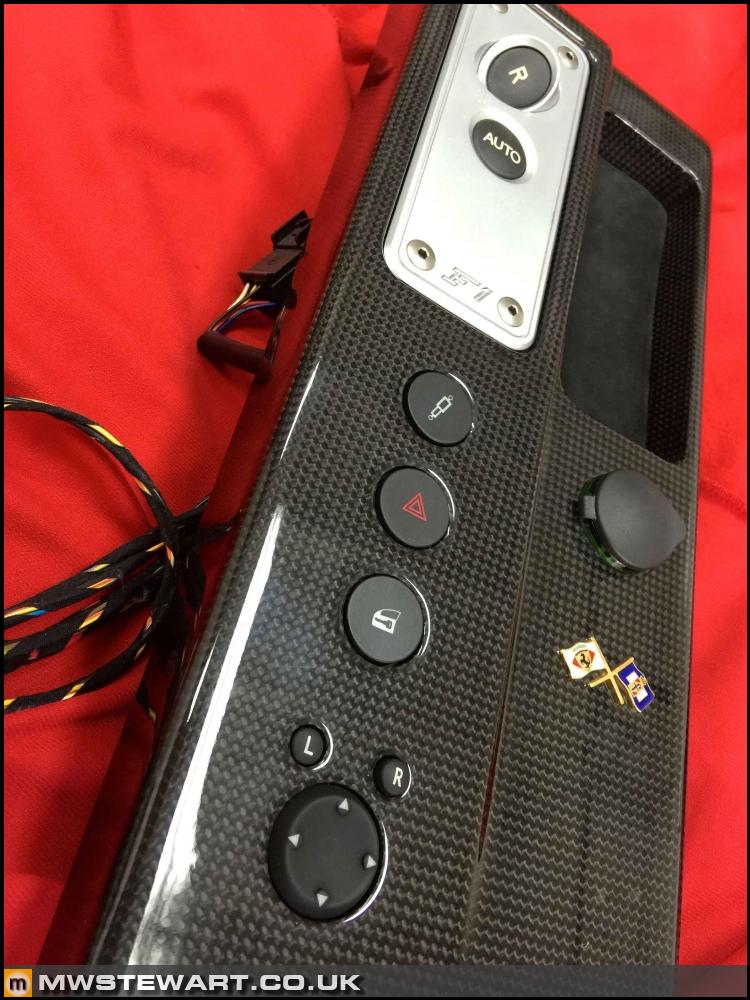
Scuderia centre console - 1200 miles only.
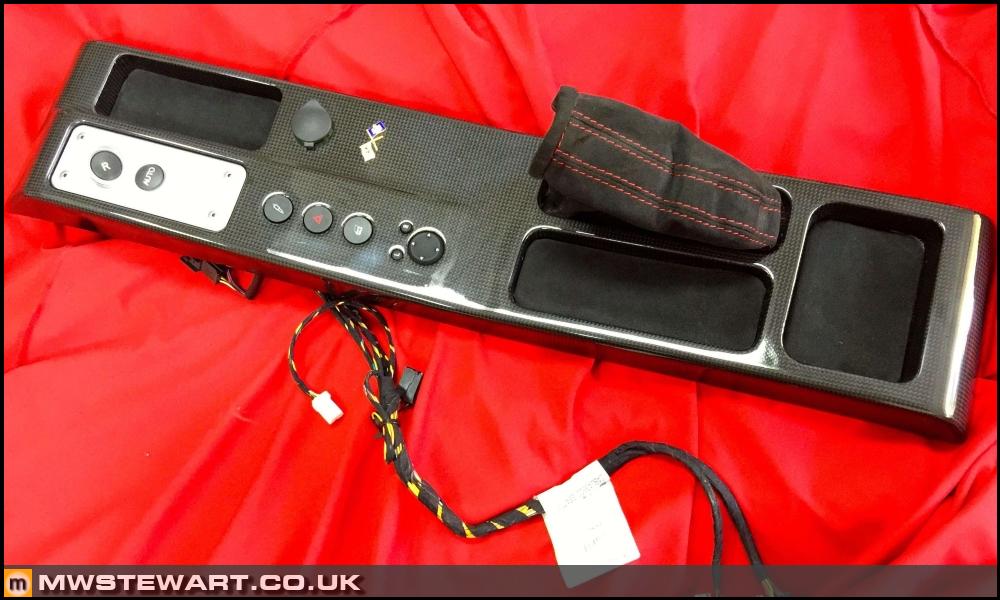
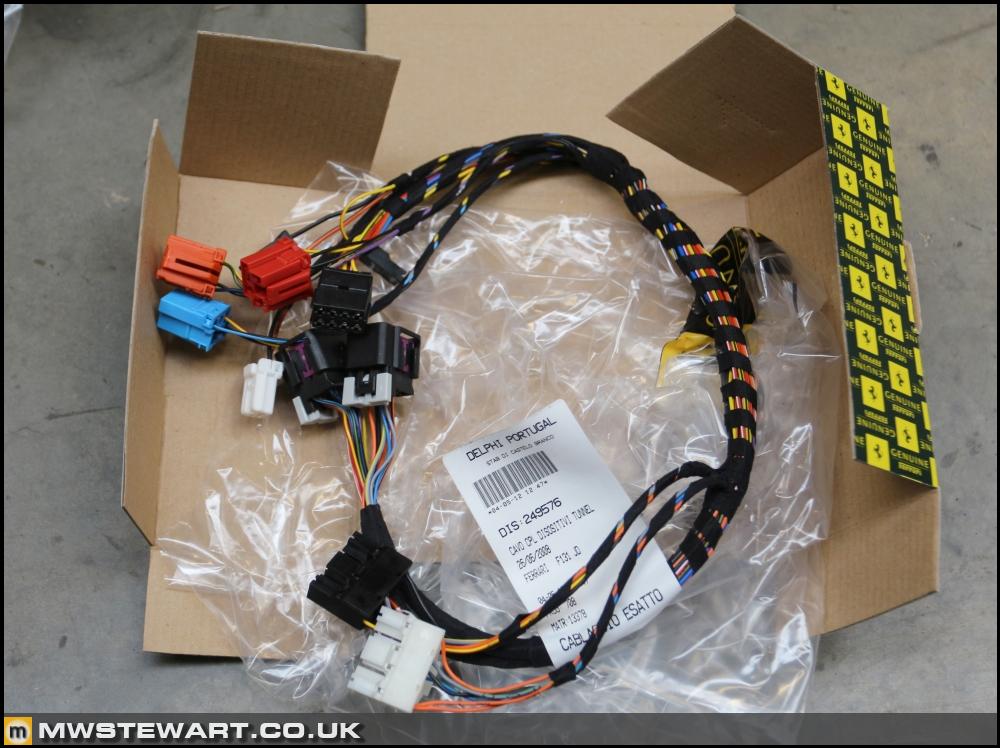
16M centre console loom. This has provision for the 'bumpy road' button and a door locking button, both of which I will have to make provision for in my body loom.
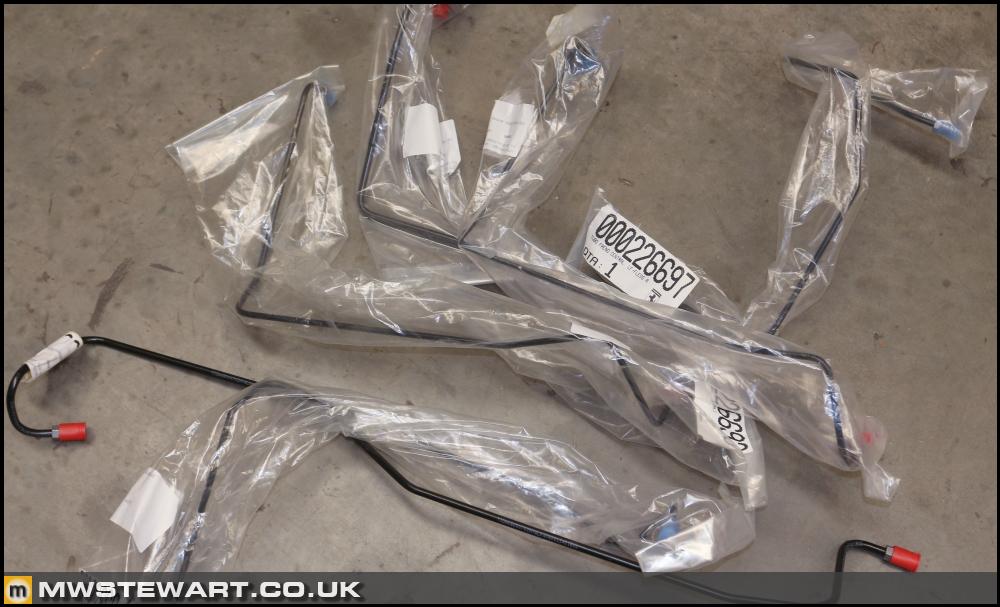
Brake pipes for the Scuderia ABS module. Obviously OEM and they come pre-bent.
I now have all of the electronic parts required to convert to Scuderia spec. I made a start today and will continue tomorrow.
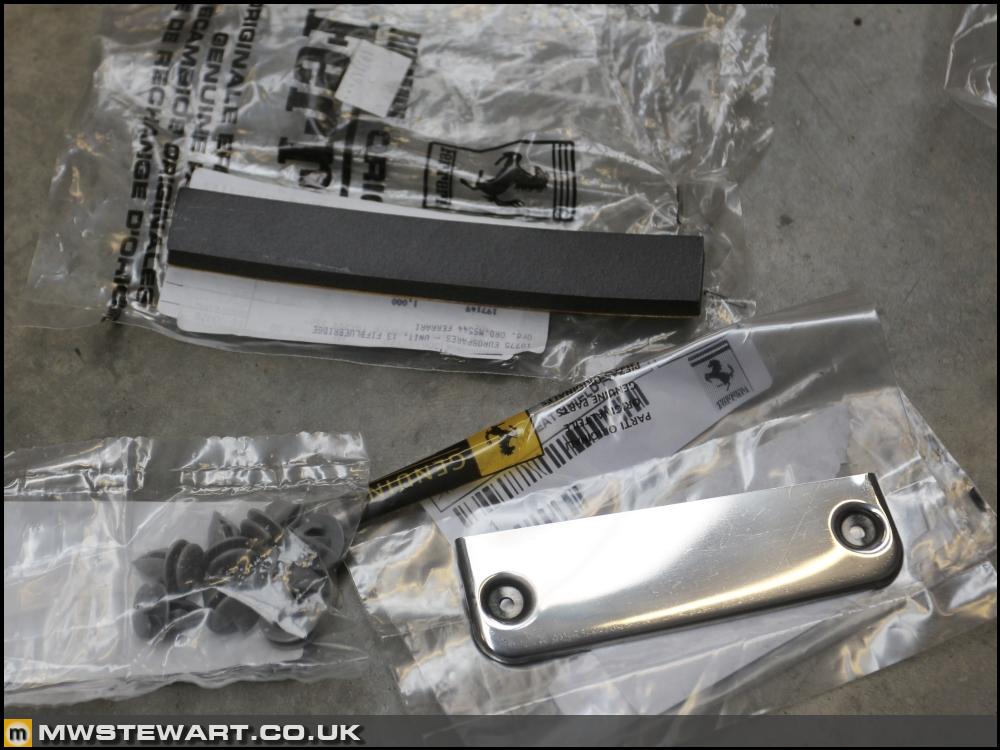
Exhaust heat shield for the rear bumper, which had been on back order for an absolute age. Also some new trim clips to refit interior trim I'll remove to rewire, and correct anti chafe strip for the new ABS module.
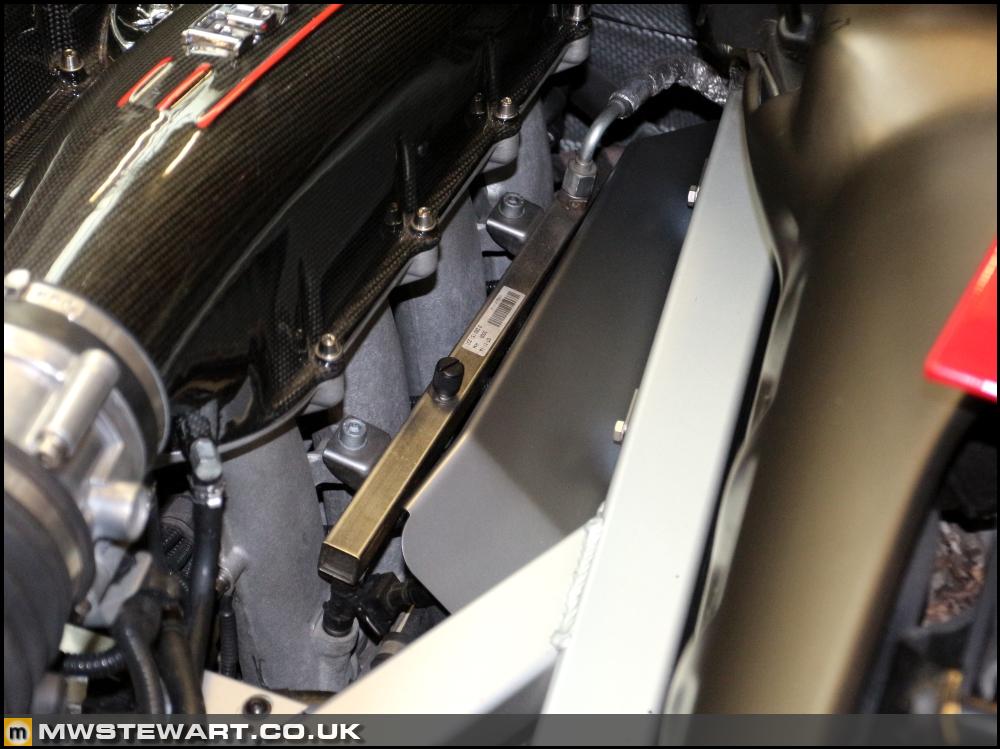
Engine lid trim piece fitted. This is a one off I commissioned - very pleased with it.

RH coil water guard fitted. This was anoher part that was on back order for many weeks.
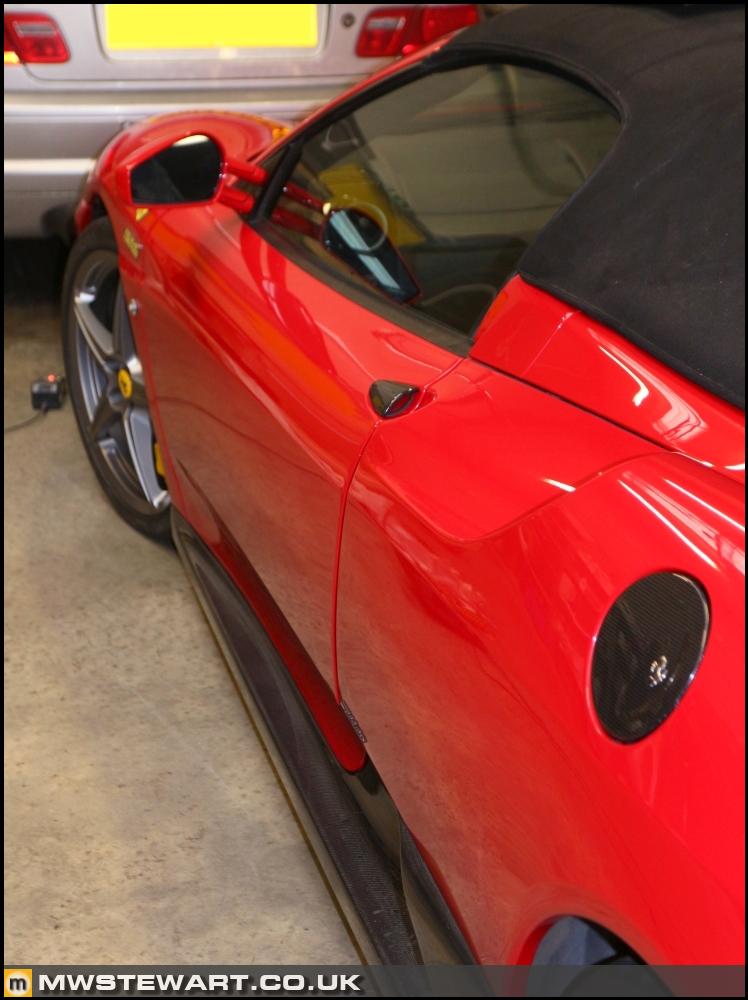
Something off of my snagging list: I didn't have time over summer to correctly align the passenger door after I'd removed the striker. Before:
After:
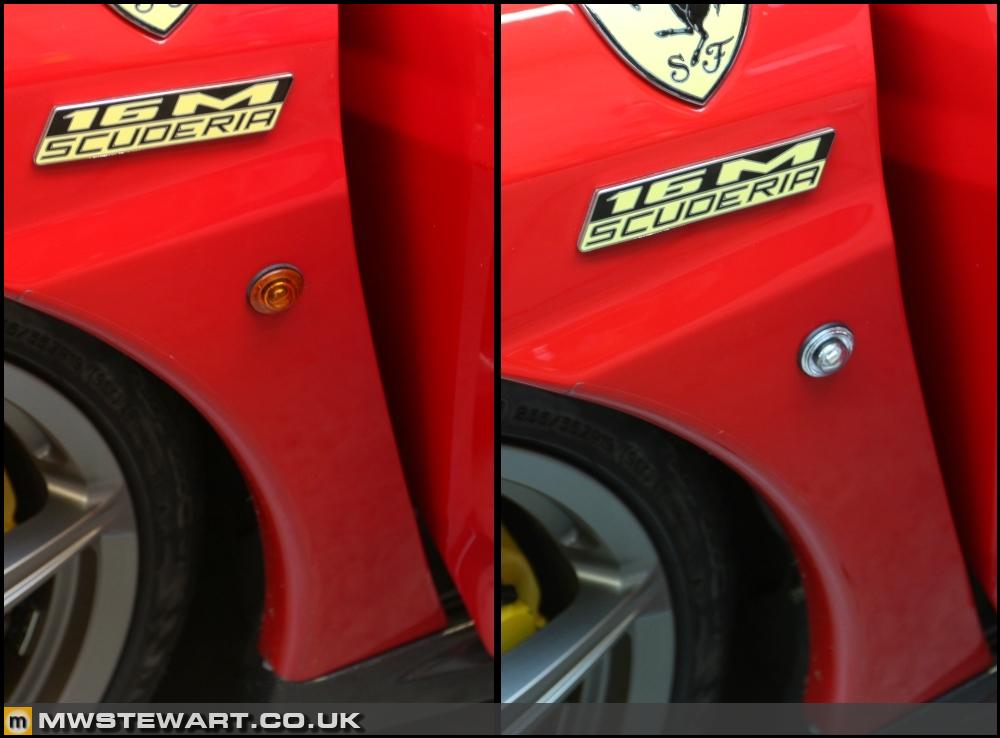
Clear repeaters and LEDs fitted.
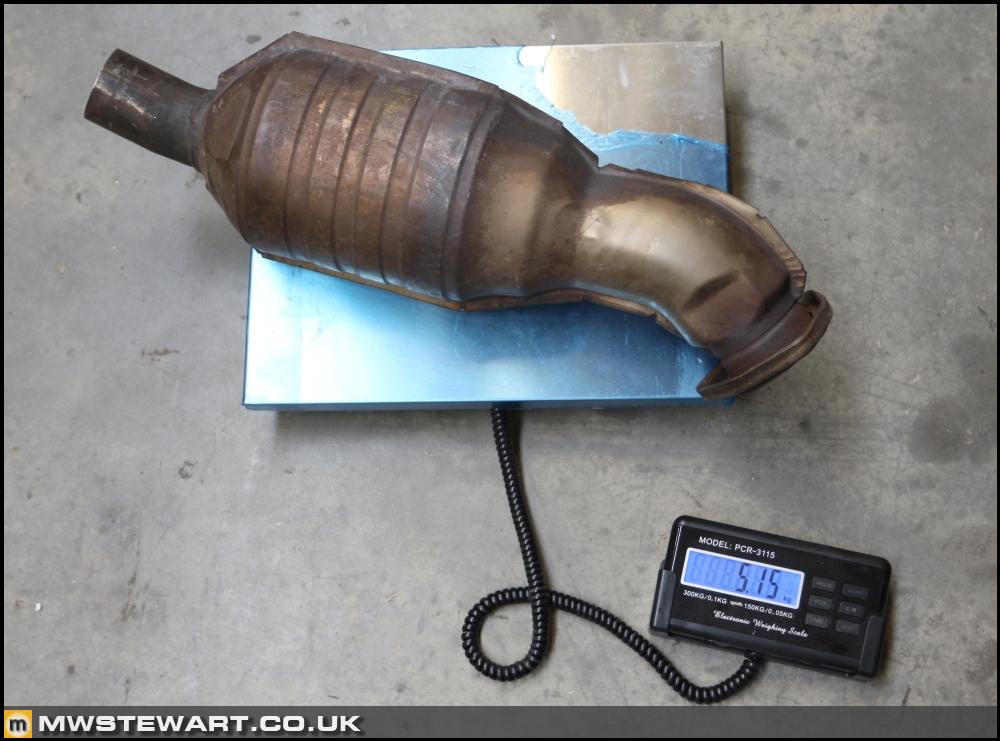
I collected my old exhaust parts this morning from Christian Lewis.
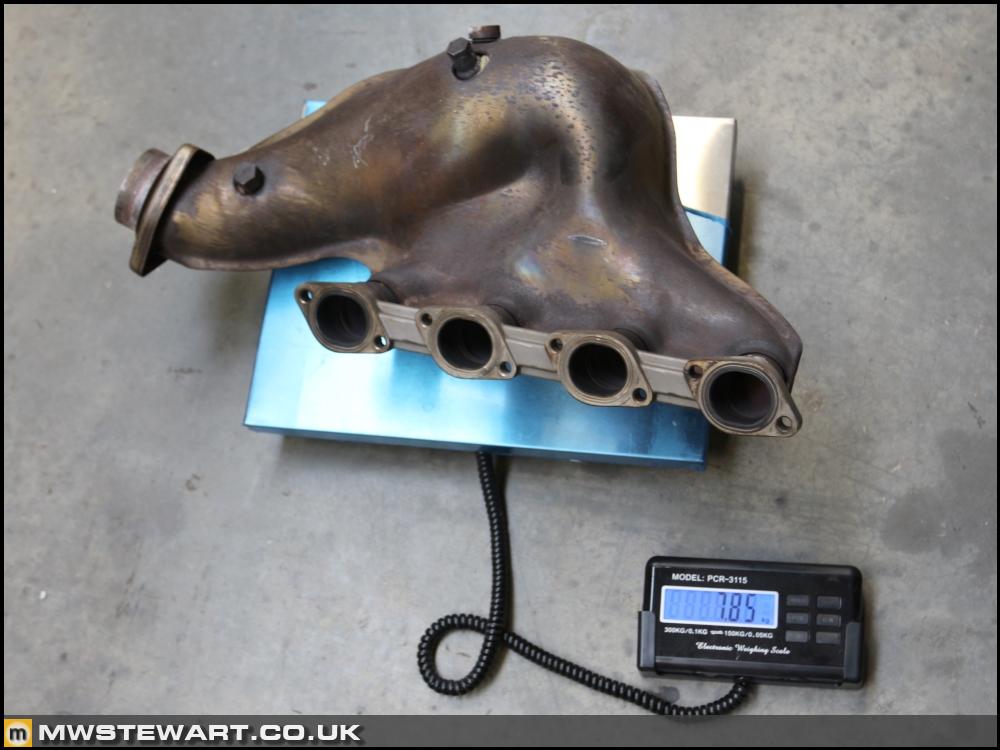
After the heat blankets are factored in there's only 3.6kg saved by the Capristo manifolds and cats.
Weight saving
I've made a change to my brake disc weights after actually weighing them. It turns out that Brembo made the CCM discs lighter year-on-year. I had previously used data for 2006 discs.
Sprung weight saved: 71.49 kg
Unsprung weight saved: 24.97 kg
Total weight saved: 96.46 kg
Scuderia centre console - 1200 miles only.
16M centre console loom. This has provision for the 'bumpy road' button and a door locking button, both of which I will have to make provision for in my body loom.
Brake pipes for the Scuderia ABS module. Obviously OEM and they come pre-bent.
I now have all of the electronic parts required to convert to Scuderia spec. I made a start today and will continue tomorrow.
Exhaust heat shield for the rear bumper, which had been on back order for an absolute age. Also some new trim clips to refit interior trim I'll remove to rewire, and correct anti chafe strip for the new ABS module.
Engine lid trim piece fitted. This is a one off I commissioned - very pleased with it.
RH coil water guard fitted. This was anoher part that was on back order for many weeks.
Something off of my snagging list: I didn't have time over summer to correctly align the passenger door after I'd removed the striker. Before:
After:
Clear repeaters and LEDs fitted.
I collected my old exhaust parts this morning from Christian Lewis.
After the heat blankets are factored in there's only 3.6kg saved by the Capristo manifolds and cats.
Weight saving
I've made a change to my brake disc weights after actually weighing them. It turns out that Brembo made the CCM discs lighter year-on-year. I had previously used data for 2006 discs.
| Original Part | Fitted Quantity | Original Part (kg) | Replacement Part (kg) | Sprung Saving (kg) | Unsprung Saving (kg) | Replacement Part |
|---|---|---|---|---|---|---|
| Brake servo & master cylinder - non-CCM | 1 | 3.964 | 2.435 | 1.529 | - | CCM |
| Brake disc, front - non-CCM | 2 | 8.3 | 5.466 | - | 3.06 | CCM - 380mm (alloy bell) |
| Brake disc, rear - non-CCM | 2 | 8.3 | 4.445 | - | 7.38 | CCM (alloy bell) |
| Brake caliper & pads, front - non-CCM | 2 | 4.9 | 5.94 | - | -2.08 | CCM - 380mm |
| Brake caliper & pads, rear - non-CCM | 2 | 4.9 | 4.58 | - | 0.36 | CCM |
| Door handles, exterior | 2 | 0.065 | - | 0.02 | 0.09 | Carbon |
| PAS reservoir cap | 1 | 0 | 0.065 | -0.065 | - | Alloy cover |
| Fuel Flap | 1 | 0.143 | 0.128 | 0.015 | - | Carbon |
| Seats - standard, electric, heated | 2 | 28.2 | 17.9 | 20.6 | - | 16M/Scuderia carbon |
| Seats - mounting bolts and washers - M10 | 8 | 0.028 | 0.017 | 0.088 | - | 16M/Scuderia - M8 |
| Strut & spring, front | 2 | 4.74 | 3.8 | - | 1.88 | 16M/Scuderia Mk2 |
| Strut & spring, rear | 2 | 5.37 | 4.59 | - | 1.56 | 16M/Scuderia Mk2 |
| Anti roll bar, front (19mm) | 1 | 3.04 | 2.73 | 0.21 | 0.1 | 16M/Scuderia |
| Side skirts - standard | 2 | 4.62 | 2.9 | 3.44 | - | 16/Scuderia carbon |
| Kick plates - standard | 2 | 0.841 | 0.163 | 1.356 | - | 16M/Scuderia (carbon) |
| Wheels, front - standard | 2 | 12.9 | 10.5 | - | 4.8 | 16M - optional 5 spoke |
| Tyres, 225/35/19 Pirelli P Zero Rosso (new) | 2 | 10.7 | 10.23 | - | 0.94 | 235/35/19 MPSS (new) |
| Wheels, rear - standard | 2 | 13.7 | 12.3 | - | 2.8 | 16M - optional 5 spoke |
| Tyres, 285/35/19 Pirelli P Zero Rosso (new) | 2 | 13.61 | 13.92 | - | -0.62 | 285/35/19 MPSS (new) |
| Wheel bolts - standard | 20 | 0.128 | 0.065 | - | 1.26 | Titanium |
| Engine lid grilles - standard | 2 | 0.677 | 0.219 | 0.916 | - | 16M (mesh) |
| Engine lid grille brackets | 2 | 0.354 | 0.216 | 0.276 | - | Modified to 16M spec |
| Engine lid grille screws - M6x20 | 14 | 0.007 | 0.002 | 0.07 | - | M5x8 |
| 16M badges, side | 2 | 0 | 0.073 | -0.146 | - | - |
| Anti roll bar, rear - 20mm | 1 | 3.008 | 1.839 | 0.858 | 0.311 | 16M specific (22mm hollow) |
| Air inlet ducts/resonators - Mk2 | 2 | 1.131 | 1.225 | -0.188 | - | Mk1 (single piece) |
| Plenum chamber | 1 | 5.063 | 3.19 | 1.873 | - | Challenge/16M/Scuderia (carbon) |
| Plenum chamber bolts | 1 | 0.176 | 0.1 | 0.076 | - | Titanium |
| Cross member exhaust modifications | 1 | 0 | 0.65 | -0.65 | - | Modified to 16M/Scuderia spec |
| Challenge grille air deflectors | 1 | 0.329 | 0 | 0.329 | - | Removed - Not 16M/Scuderia spec |
| Coil/plug water guards | 2 | 0 | 0.276 | -0.552 | - | Fitted to some 08> Spiders |
| Luggage compartment trim, base - Scuderia | 1 | 1.235 | 0.821 | 0.414 | - | MY08 carpet |
| Luggage compartment trim, bulkhead - Scuderia | 1 | 2.251 | 1.83 | 0.419 | - | Retrimmed F430 Challenge |
| Luggage compartment trim, LH - Scuderia | 1 | 0.855 | 0.572 | 0.283 | - | MY08 carpet |
| Luggage compartment trim, RH - Scuderia | 1 | 1.041 | 0.702 | 0.339 | - | MY08 carpet |
| Luggage compartment trim, front - Scuderia | 1 | 0.156 | 0.127 | 0.029 | - | MY08 carpet |
| CD changer | 1 | 1.5 | 0 | 1.5 | - | Removed |
| Exhaust heat shields, wheelhouse | 2 | 0.401 | 0.151 | 0.499 | - | Bespoke carbon version |
| Exhaust heat shields, wheelhouse - fastening set | 2 | 0.036 | 0.027 | 0.018 | - | 4mm shorter screws |
| Tool case (leather) | 1 | 0.818 | 0.375 | 0.443 | - | 16M (canvas) |
| Battery - FIAMM VRLA760 | 1 | 20.65 | 18.75 | 1.9 | - | Optima 'Red Top' 34R |
| Exhaust valve hoses | 2 | 0.078 | 0.003 | 0.15 | - | Solenoids unused - blanking caps fitted |
| Bumper, F430 rear fastening and spacer set | 1 | 0.76 | 0 | 0.76 | - | Removed - Not 16M/Scuderia spec |
| Bumper, rear - challenge grille, PDC | 1 | 13 | 9 | 4 | - | 16M/Scuderia - PDC added |
| 16M badge, rear | 1 | 0 | 0.122 | -0.122 | - | Added |
| Exhaust - tailpipes and fastenings | 2 | 6.5 | 0.423 | 12.314 | - | 16M/Scuderia - optional titanium |
| Exhaust - silencer | 1 | 13.4 | 9.65 | 3.75 | - | F430 Challenge - modified |
| Header tank | 1 | 0.721 | 0.872 | -0.151 | - | 16M/Scuderia (carbon) trim added |
| Exhaust - mountings and fastening set | 1 | 4.028 | 2.692 | 1.336 | - | Bespoke |
| Tyre repair kit (gel), manual, and packing foam | 1 | 0.877 | 0.189 | 0.688 | - | Replaced with Tyre String kit |
| MAF sensors and bellows (85mm ID) | 2 | 0.473 | 0.495 | -0.044 | - | 16M/Scuderia (90mm ID) |
| Airbox lids | 2 | 0.706 | 0.365 | 0.682 | - | 16M/Scuderia (carbon) |
| PAS cooler (tube) | 1 | 0.425 | 0.651 | -0.226 | - | 16M/Scuderia (bar and plate) |
| Bumper air ducts for radiators, front | 2 | 1.297 | 0.827 | 0.94 | - | 16M/Scuderia |
| Exhaust - mounting system heat shields & fastenings | 2 | 0 | 0.023 | -0.046 | - | Added |
| Rear numberplate plinth | 1 | 0.288 | 0 | 0.288 | - | Not used |
| Diffuser, rear - standard (fibreglass) | 1 | 8.9 | 3.85 | 5.05 | - | 16M (carbon) |
| Bumper, front - with PDC | 1 | 14.45 | 13.5 | 0.95 | - | Scuderia - PDC added |
| Diffuser, front - standard (fibreglass) | 1 | 0.94 | 0.85 | 0.09 | - | 16M (carbon) |
| Bumper, front skid plates | 2 | 0 | 0.385 | -0.77 | - | Added |
| Undertray, front | 1 | 4.74 | 3.065 | 1.675 | - | 16M/Scuderia |
| Engine bay trim heat shields | 2 | 0 | 0.147 | -0.294 | - | Added - 16M/Scuderia |
| Exhaust - manifolds | 2 | 7.85 | 4.75 | 6.2 | - | Capristo |
| Exhaust - manifold blankets | 2 | 0 | 1.9 | -3.8 | - | Capristo |
| Exhaust - catalytic converters | 2 | 5.15 | 3.2 | 3.9 | - | Capristo |
| Exhaust - catalytic converter blankets | 2 | 0 | 1.35 | -2.7 | - | Capristo |
| Engine lid trim piece (aluminium) | 1 | 0.2 | 0.087 | 0.113 | - | Bespoke carbon version |
| Headlamps - standard | 2 | 0.349 | 0.177 | 0.344 | - | 16M (carbon) |
Sprung weight saved: 71.49 kg
Unsprung weight saved: 24.97 kg
Total weight saved: 96.46 kg
I'm looking at at F430 coupe at the moment so thought I'd read this thread. 6 hours later and I've finished it all!
Amazing work Mark, you attention to detail is unbelievable.
It's worrying that these main dealers don't seem to be doing all the work that they should with fluids and filters.
I was dead set on getting a main dealer car with a Ferrari warranty for a bit of a safety net, now I'm unsure.
Have been on the Aldousvoice.com and know about the common faults and what to look out for and saw a few cars this weekend.
I'm thinking now maybe I need someone like Aldous to come and check any car including one from Ferrari!
alec.e said:
This thread just keeps on getting better!
Thanks.pritjh said:
I'm looking at at F430 coupe at the moment so thought I'd read this thread. 6 hours later and I've finished it all!
Amazing work Mark, you attention to detail is unbelievable.
It's worrying that these main dealers don't seem to be doing all the work that they should with fluids and filters.
I was dead set on getting a main dealer car with a Ferrari warranty for a bit of a safety net, now I'm unsure.
Have been on the Aldousvoice.com and know about the common faults and what to look out for and saw a few cars this weekend.
I'm thinking now maybe I need someone like Aldous to come and check any car including one from Ferrari!
Thanks. Yes a PPI is well recommended, either by Aldous if he does one or one of the well known independants. Good luck with the search!Amazing work Mark, you attention to detail is unbelievable.
It's worrying that these main dealers don't seem to be doing all the work that they should with fluids and filters.
I was dead set on getting a main dealer car with a Ferrari warranty for a bit of a safety net, now I'm unsure.
Have been on the Aldousvoice.com and know about the common faults and what to look out for and saw a few cars this weekend.
I'm thinking now maybe I need someone like Aldous to come and check any car including one from Ferrari!
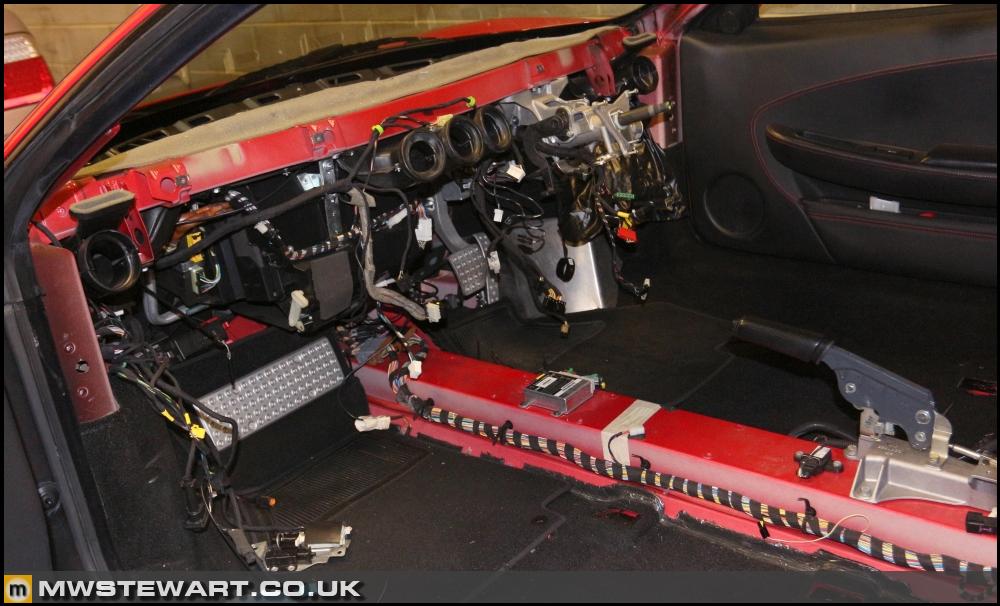
Interior strip out complete.
The dashboard was a bit of a pig; I walked away from it several times to look at photos to ensure I hadn't missed any fastenings. I hadn't. It turned out that a very liberal application of windscreen adhesive at the factory had inadvertently bonded in some of the dashboard!
Now that most of the removable trim panels are removed I've decided to take the opportunity to have them retrimmed in black Alcantara with red stitching. Unlike the luggage compartment trims the internal panels are carpet glued over the base so unlike there I won't gain weight by having them retrimmed, in fact I may lose a small amount if Alcanata works out lighter.
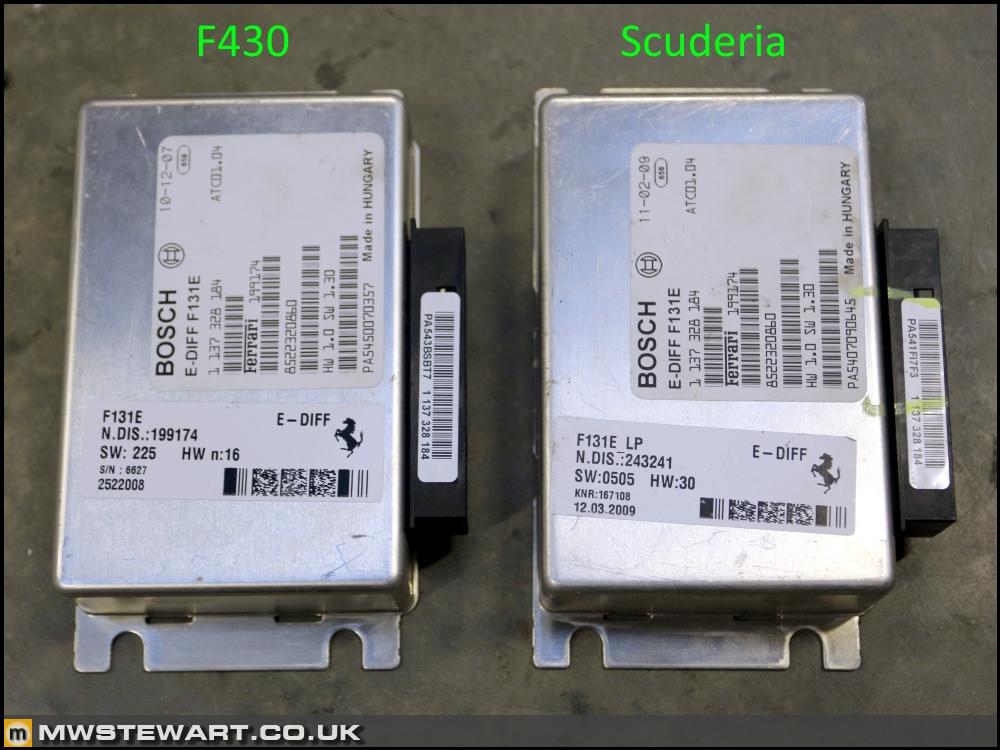
I've fitted the two modules that are easy to get to - 'low hanging fruit', as they say. First the E-Diff module behind the passenger seat.
Comparison of parts.
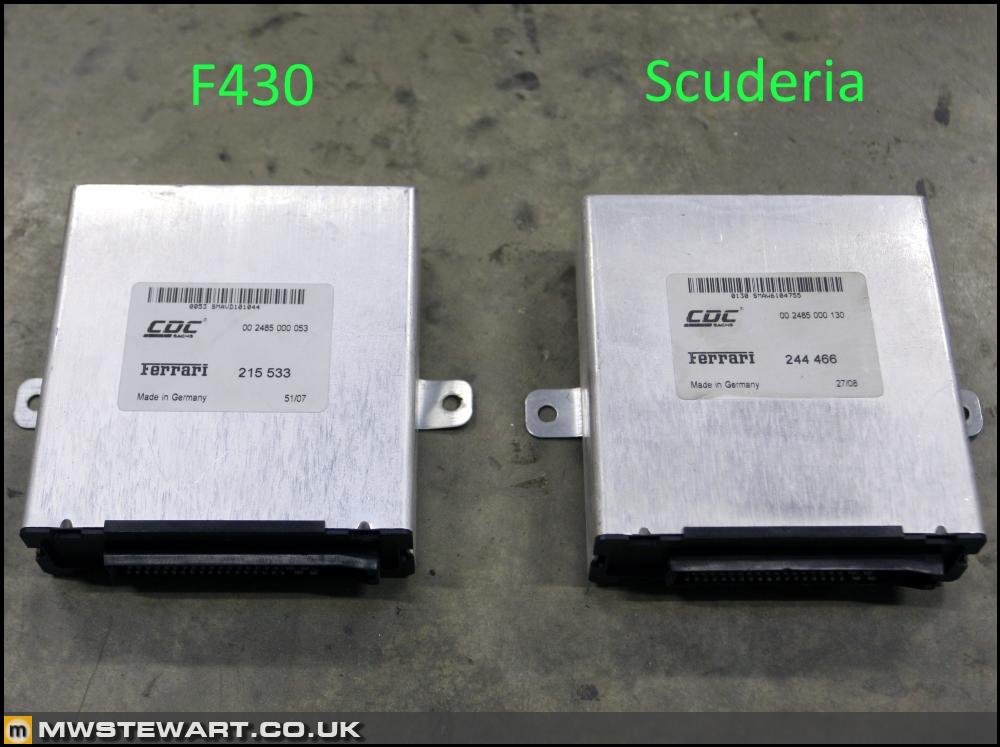
Second, the suspension module which is to the right of the drivers footwall.
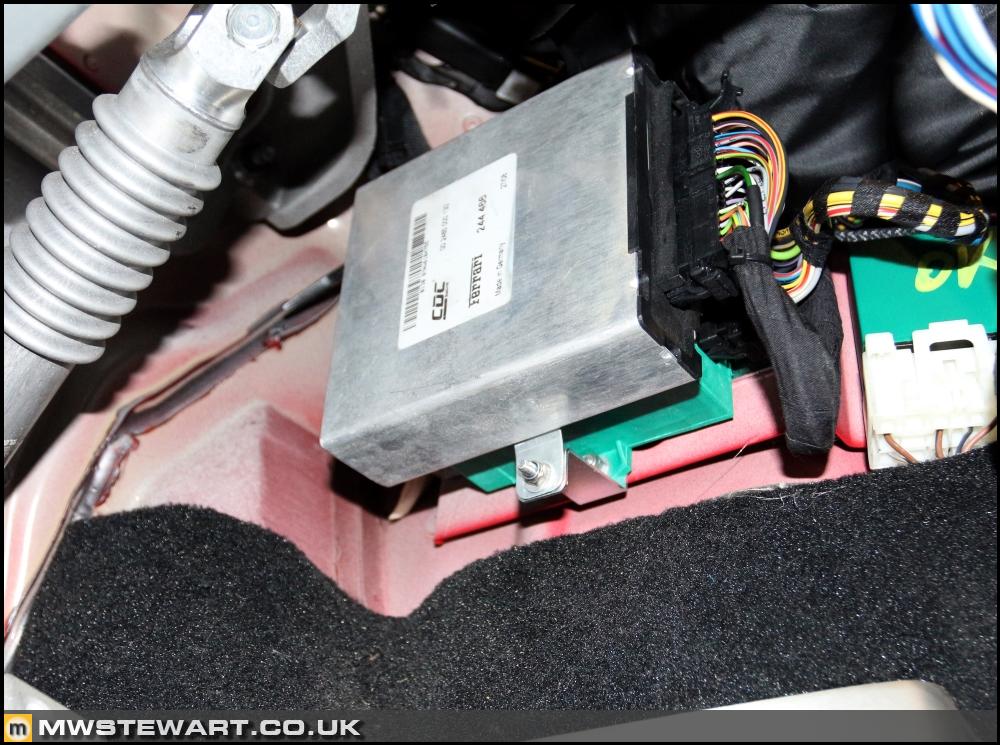
Comparison of parts.
The model designation for the F430 is F131. I've learnt there is a different suffix for the various models and knowing that sometimes aids me when identifying parts.
F131 E - Standard car
F131 EA - Challenge
F131 LP - Scuderia
F131 JD - 16M specific parts
I'll start on the ABS tomorrow and from what I've seen it looks like it'll be a bit of fun getting the module and the its mounting bracket out of the car. I think the bracket is fitted before the steering rack, cooling pipes, and cabin air inlet shroud. Update to follow.
The dashboard was a bit of a pig; I walked away from it several times to look at photos to ensure I hadn't missed any fastenings. I hadn't. It turned out that a very liberal application of windscreen adhesive at the factory had inadvertently bonded in some of the dashboard!
Now that most of the removable trim panels are removed I've decided to take the opportunity to have them retrimmed in black Alcantara with red stitching. Unlike the luggage compartment trims the internal panels are carpet glued over the base so unlike there I won't gain weight by having them retrimmed, in fact I may lose a small amount if Alcanata works out lighter.
I've fitted the two modules that are easy to get to - 'low hanging fruit', as they say. First the E-Diff module behind the passenger seat.
Comparison of parts.
Second, the suspension module which is to the right of the drivers footwall.
Comparison of parts.
The model designation for the F430 is F131. I've learnt there is a different suffix for the various models and knowing that sometimes aids me when identifying parts.
F131 E - Standard car
F131 EA - Challenge
F131 LP - Scuderia
F131 JD - 16M specific parts
I'll start on the ABS tomorrow and from what I've seen it looks like it'll be a bit of fun getting the module and the its mounting bracket out of the car. I think the bracket is fitted before the steering rack, cooling pipes, and cabin air inlet shroud. Update to follow.

mwstewart said:
Ha, no - there's nothing yet that would really go on the Fiesta. If there is I will take the opportunity.
I think you need to be more imaginative, if you can do a Toyota GT86 with a ferrari engine I'm sure a man of your talents can do that to a fiesta. Admittedly it will cannibalise your f430 a little more than you may want.https://www.youtube.com/watch?v=ttM6pHfrhw0
mwstewart said:
I'll start on the ABS tomorrow and from what I've seen it looks like it'll be a bit of fun getting the module and the its mounting bracket out of the car. I think the bracket is fitted before the steering rack, cooling pipes, and cabin air inlet shroud. Update to follow.
Might help, might not, but you can remove the ECU from the modulator itself without any issue. The ECU is completely 'dry' without any direct connection into the 'wet' side of the modulator. Undo the 6 bolts carefully and disconnect the connector, then slowly pull the ECU off axially to its orientation. There are a load of solenoid drivers and the power feed connector that need to be cleared before you can remove the ECU itself, but you'll see what I mean if you remove it. The sealing gasket is also built in to the ECU so won't need replacing, and won't be damaged by removal. Hope that helps!
Edited by RacerMike on Monday 24th October 16:04
marsattacks said:
I think you need to be more imaginative, if you can do a Toyota GT86 with a ferrari engine I'm sure a man of your talents can do that to a fiesta. Admittedly it will cannibalise your f430 a little more than you may want.
https://www.youtube.com/watch?v=ttM6pHfrhw0
It's a question of time. I have a Victorian property back to bare brick internally, and I'm doing everything myself so need to balance it with the cars.https://www.youtube.com/watch?v=ttM6pHfrhw0
gregs656 said:
Very nice work as ever.
Curious as to how much refitting you think you will need to do before you can dry run the systems and see what (if any) faults are thrown up? It would be frustrating to find one of the deeply buried units was throwing a fault after refitting the dash etc.
I'll definitely dry run without the dash in place. I only need the immobiliser module, airbags, and instrument cluster connected - the rest of the stuff is just peripheral and not monitored/error checked, so I can leave it unplugged. The only catch is I most likely need the TCU fault codes cleared from the last attempt before it will allow the DMEs to start the engine. At the moment it will send a start inhibit message. Curious as to how much refitting you think you will need to do before you can dry run the systems and see what (if any) faults are thrown up? It would be frustrating to find one of the deeply buried units was throwing a fault after refitting the dash etc.
Atlas 12v said:
Echoing all the other comments. Amazing build.
Will you sell on the removed parts to recover money spent?
Is there a good market for these parts?
Thank you. I'm selling some of the more interesting parts but there's not a huge market for it.Will you sell on the removed parts to recover money spent?
Is there a good market for these parts?
RacerMike said:
Might help, might not, but you can remove the ECU from the modulator itself without any issue. The ECU is completely 'dry' without any direct connection into the 'wet' side of the modulator. Undo the 6 bolts carefully and disconnect the connector, then slowly pull the ECU off axially to its orientation. There are a load of solenoid drivers and the power feed connector that need to be cleared before you can remove the ECU itself, but you'll see what I mean if you remove it. The sealing gasket is also built in to the ECU so won't need replacing, and won't be damaged by removal. Hope that helps!
Thanks Mike. I'm swapping the whole module for a different generation.Edited by RacerMike on Monday 24th October 16:04
Max_Torque said:
It would be an interesting exercise to attempt to upload the ROM from the old control modules, and see what can be seen...... ;-)
It would - if you want to borrow them for testing send me a PM and I can post them to you.F430 ABS/ESP module removal
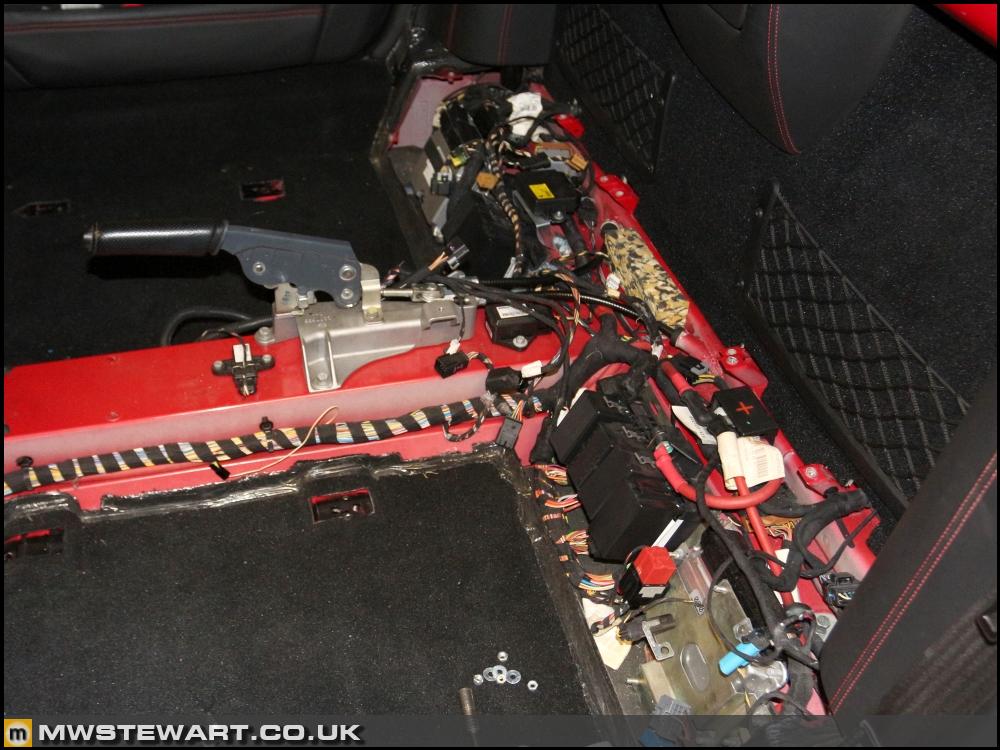
On to the ABS module today. It lives in the passenger side of the void between interior bulkhead and luggage compartment, and to get to it I discarded the weather seal; I will replace it with a new one once the project has been finished and everything tested OK. I also took the opportunity to remove the scuttle trim and bonnet brackets as they were looking a little tatty in places.
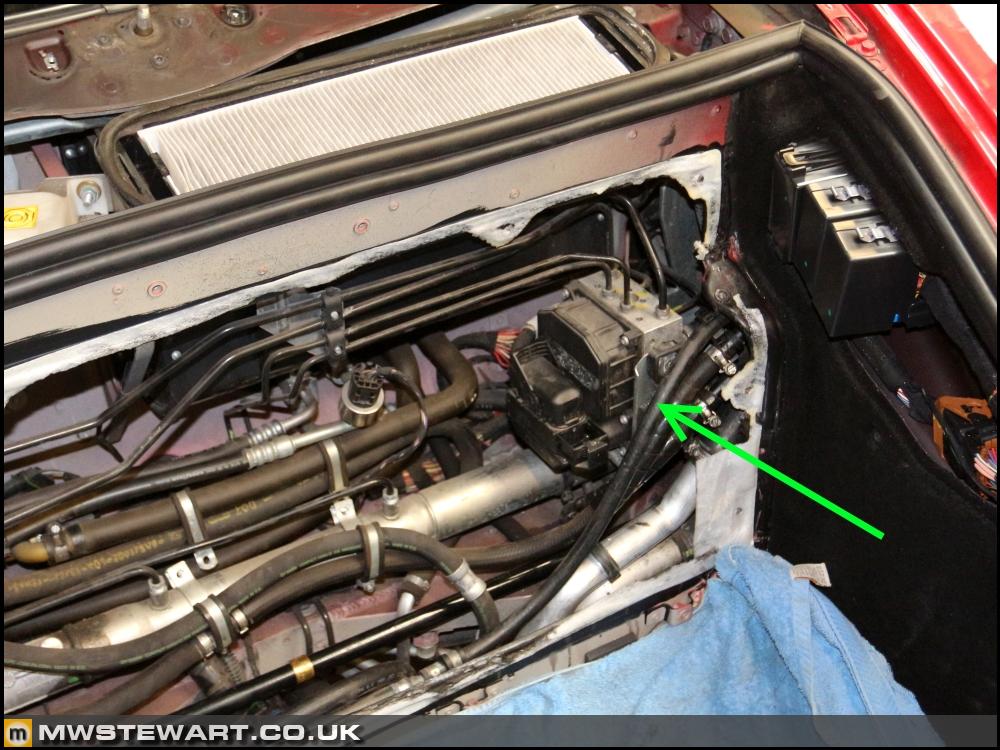
I put the car on axle stands then used my pressure bleeder to force all fluid out of the system - draining each wheel in turn - which saved a lot of mess when removing the pipework. It took me an hour to remove the module with most of that time spent getting to and removing the pipes.
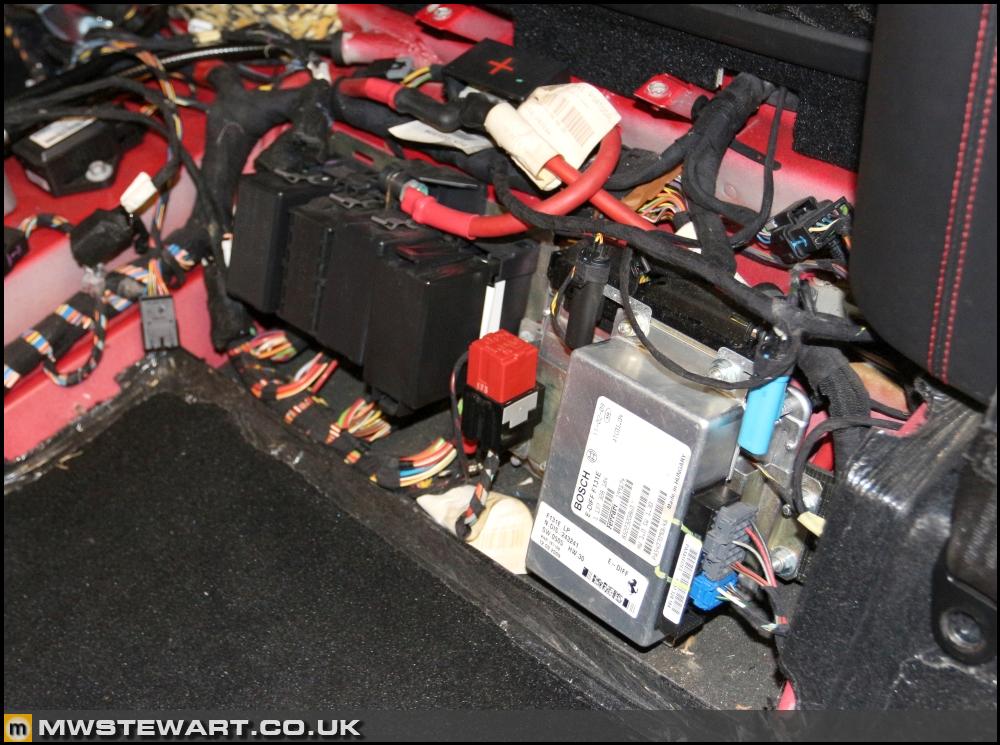
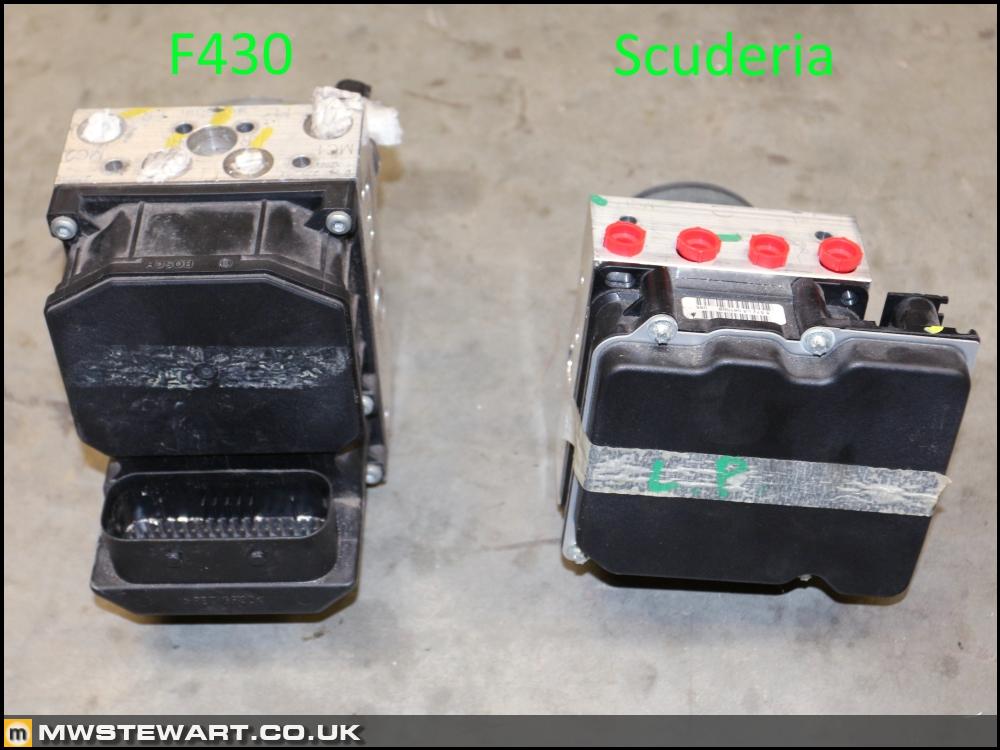
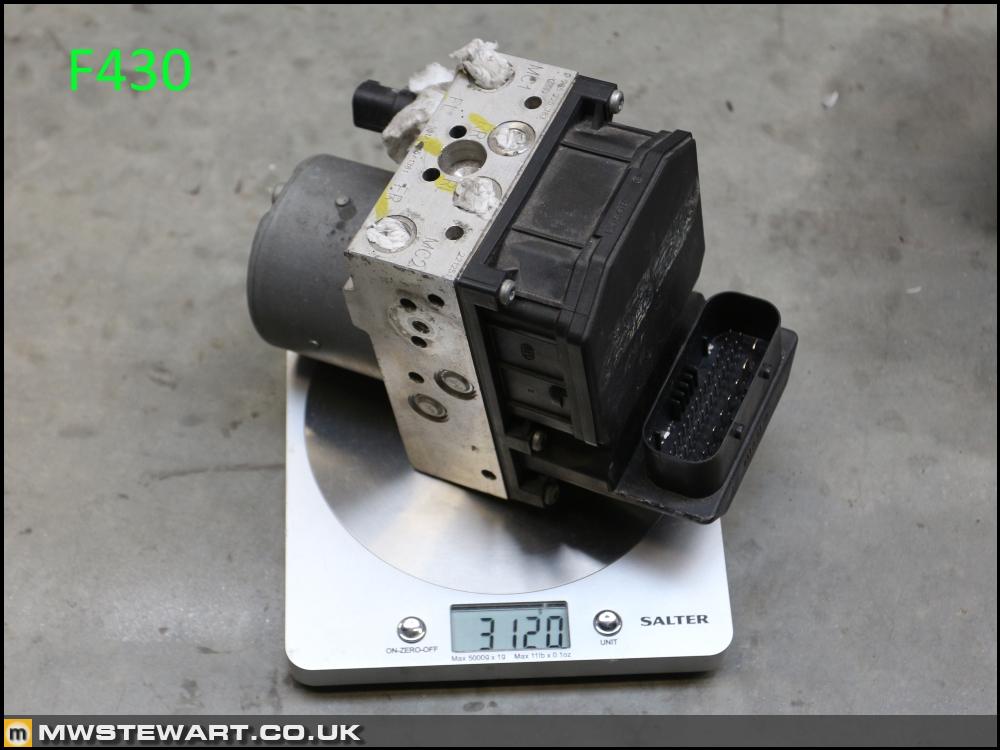
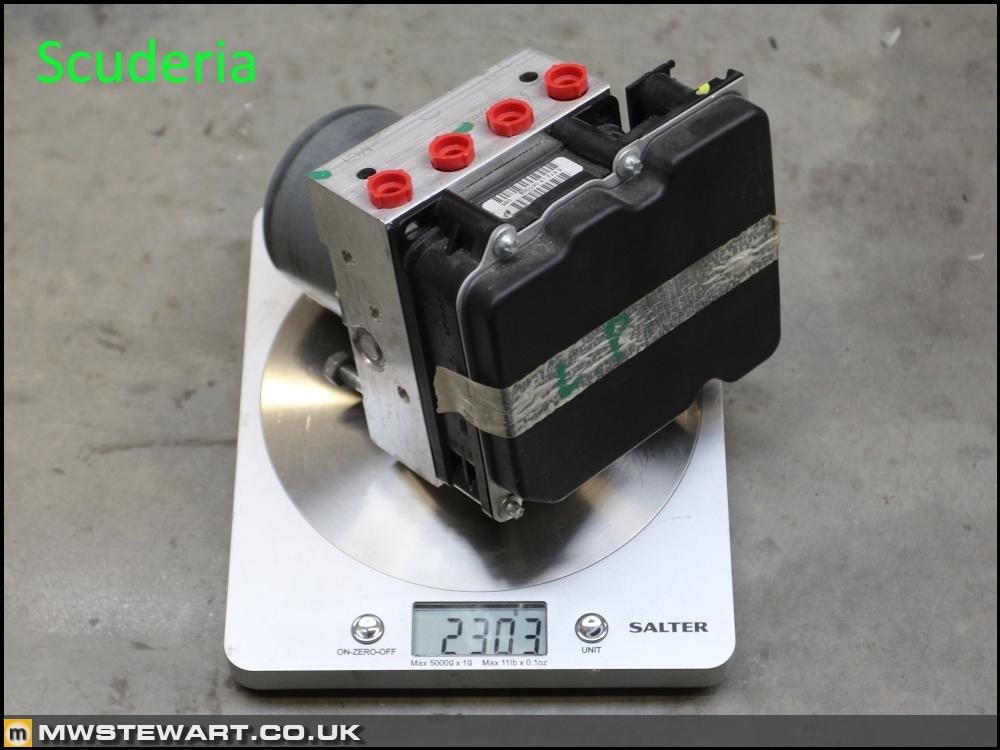
Here's a comparison of the F430 Bosch 5.7 module and the Scuderia Bosch 8 module. There's not a Ferrari parts label on the modules to identify them, just a piece of masking tape with a hand written model code ('E', and 'LP').
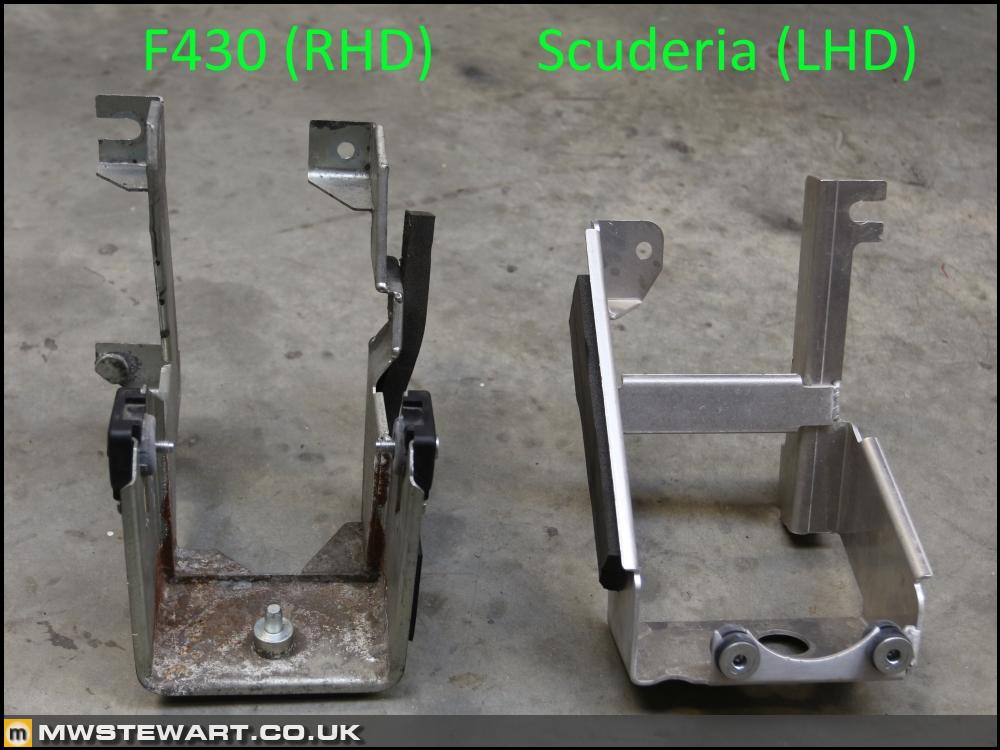
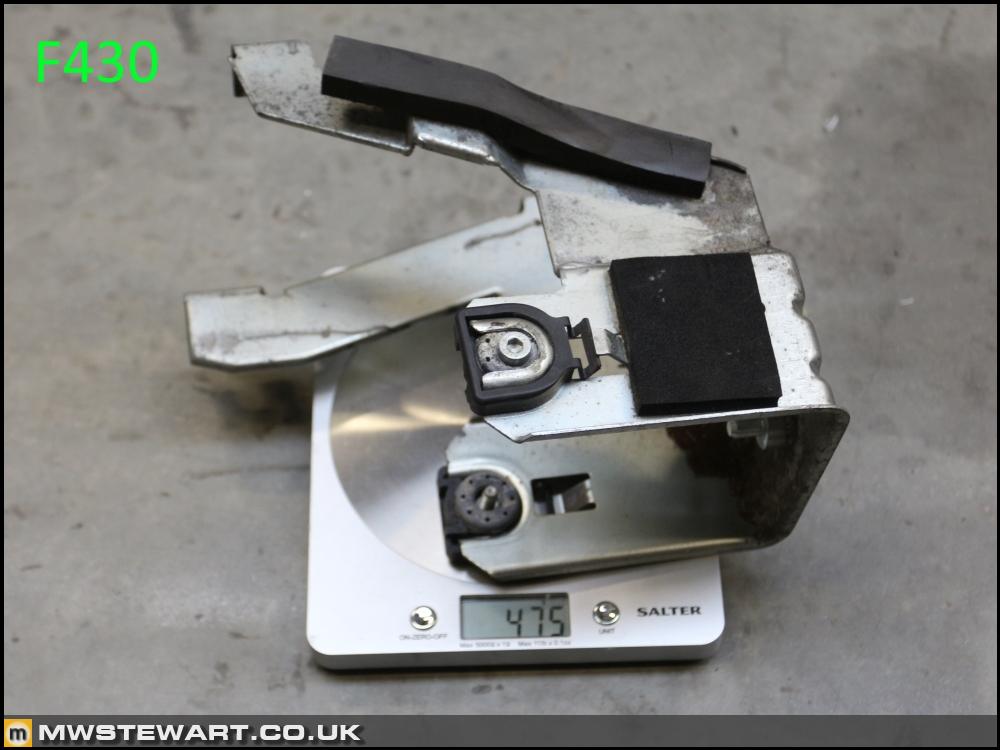
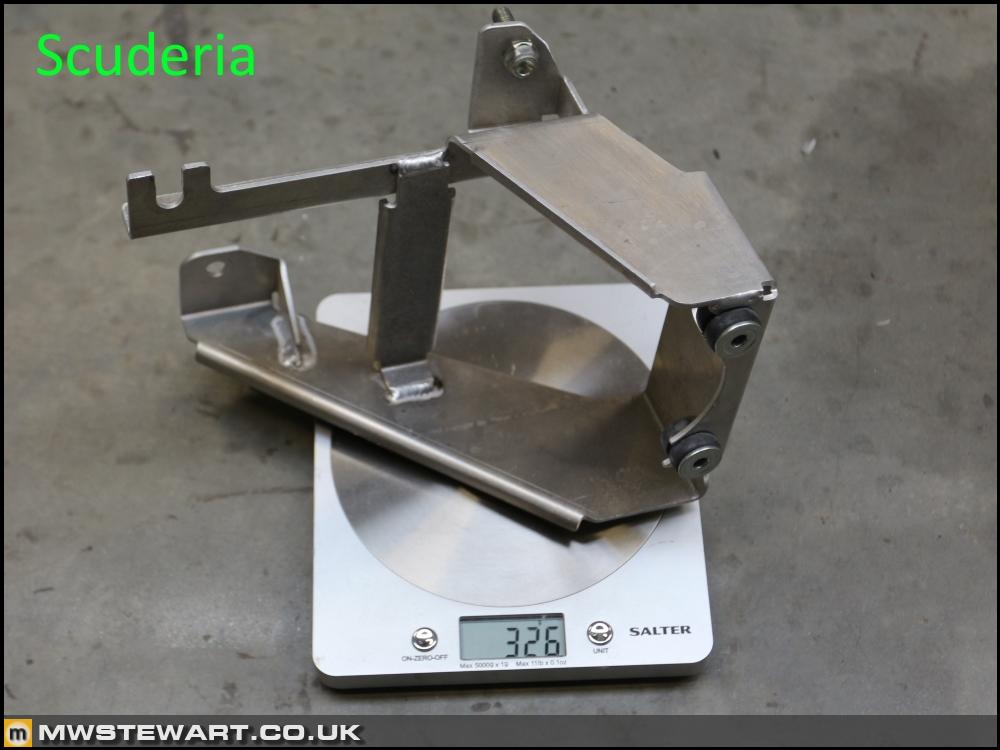
The brackets are different for LHD and RHD cars, and of course for F430 and Scuderia. F430 is steel and Scuderia is aluminium. I've made a bit of a faux pas by not including the RHD Scuderia bracket in my last Eurospares order! They are seeing how soon one can be sent over from Italy.
An added bonus of the Scuderia ABS system is weight reduction. 1.028kg in total due in the main from the lighter Bosch 8 module, but also a lighter mounting bracket, and lighter module multiplug on the ABS loom.
F430 ABS/ESP loom removal
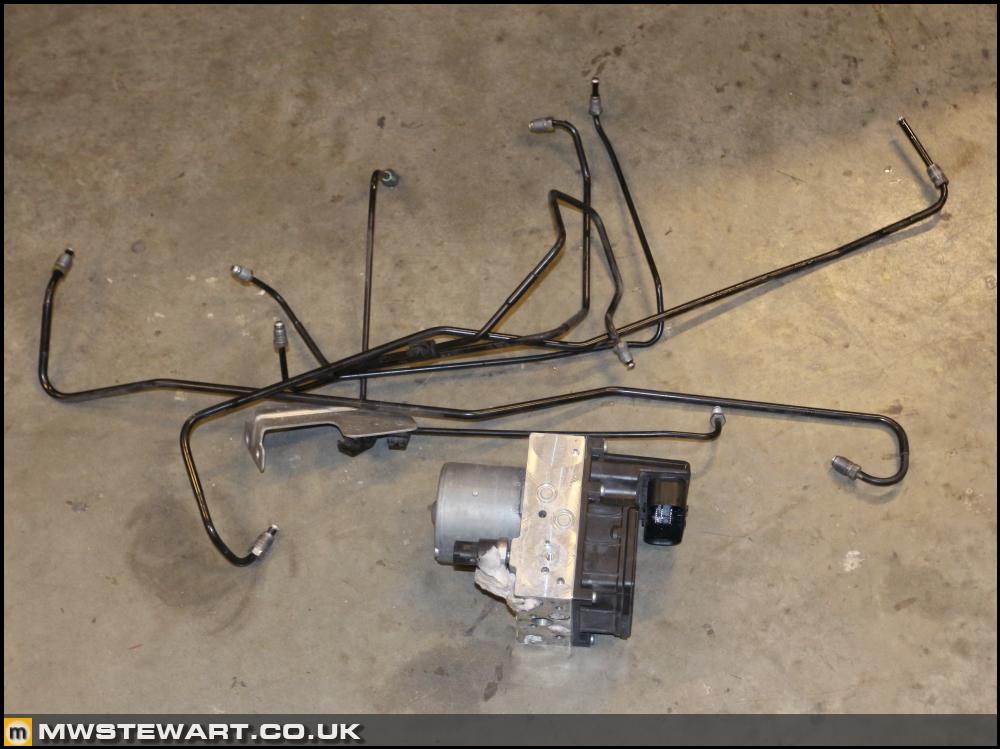
The ABS loom comprises two earth points, the rear ABS sensors & brake pad wear sensors, front ABS sensors (strangely the front pad wear and accelerometers are part of the body loom), module plug, and car interface plug. The routing is as per the diagram below.
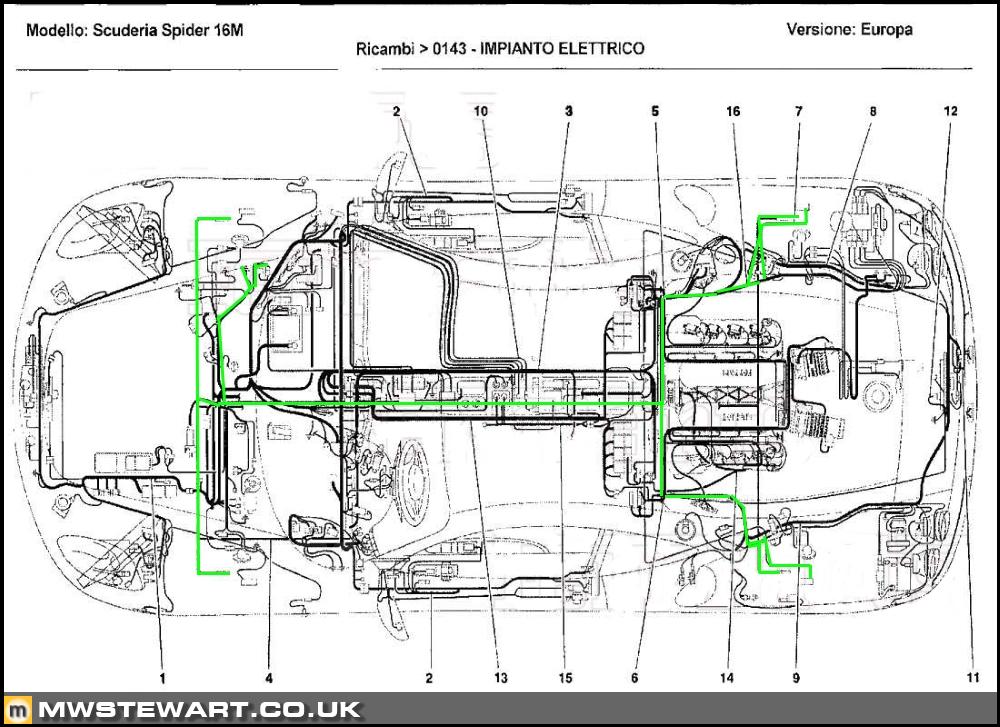
The ABS loom was one of the first to be fitted to the car so access to some parts of it was very tight indeed. I approached removal starting from the module plug and gathered all the rest of the loom to be removed from that point - passing it up behind the steering rack and A/C pipes.
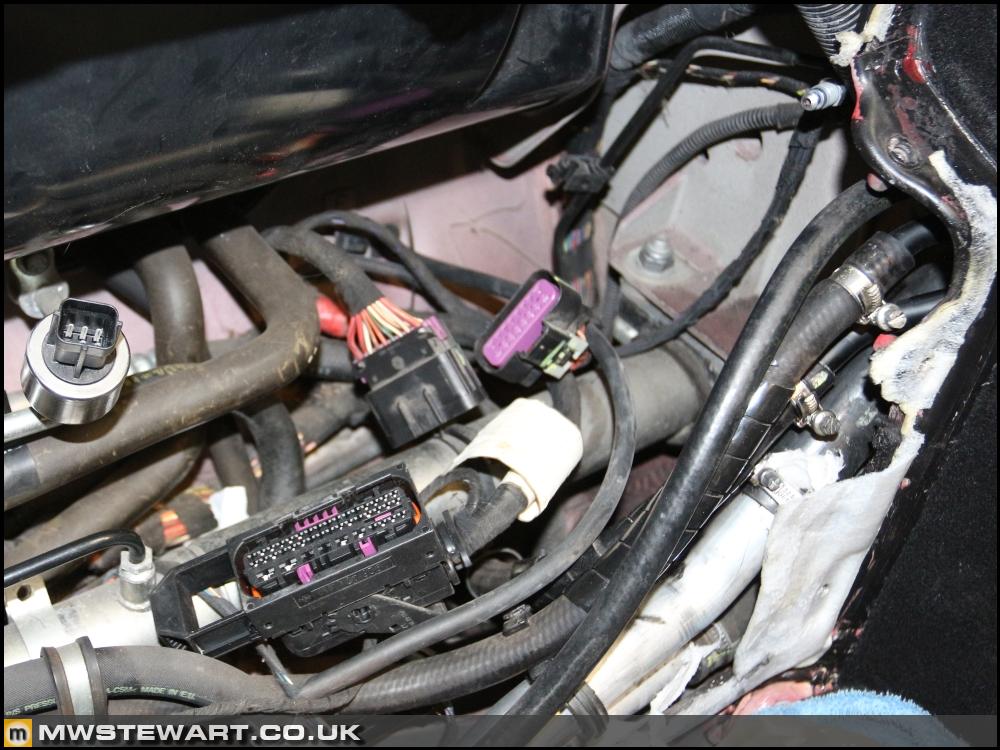
The rear loom splits into two and runs behind the fuel tank shields and for a minute I thought I may have to remove the tanks on each side, which would have taken an age, but thankfully there were no clips behind the shields so once their mounting nuts were removed I could move the shields far enough to remove the loom.
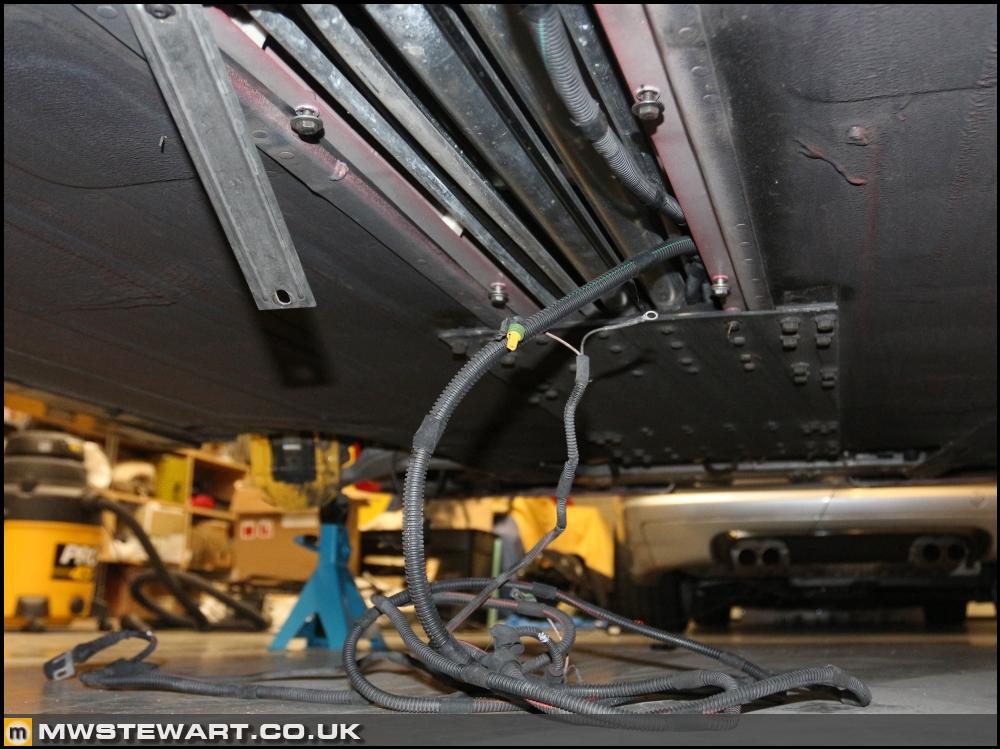
As well as a number of chassis changes the F430 features a reinforcement plate under the central tunnel, and it must be removed to allow the ABS loom to be dropped from the tunnel. Dad helped me today and took one side of the bolts which was good because there are loads of them. Incidentally I've never been happy with the mass of hex head M10 bolts holding on the part given the amount of work that's gone into underbody areo so I’m going to replace them with button heads.
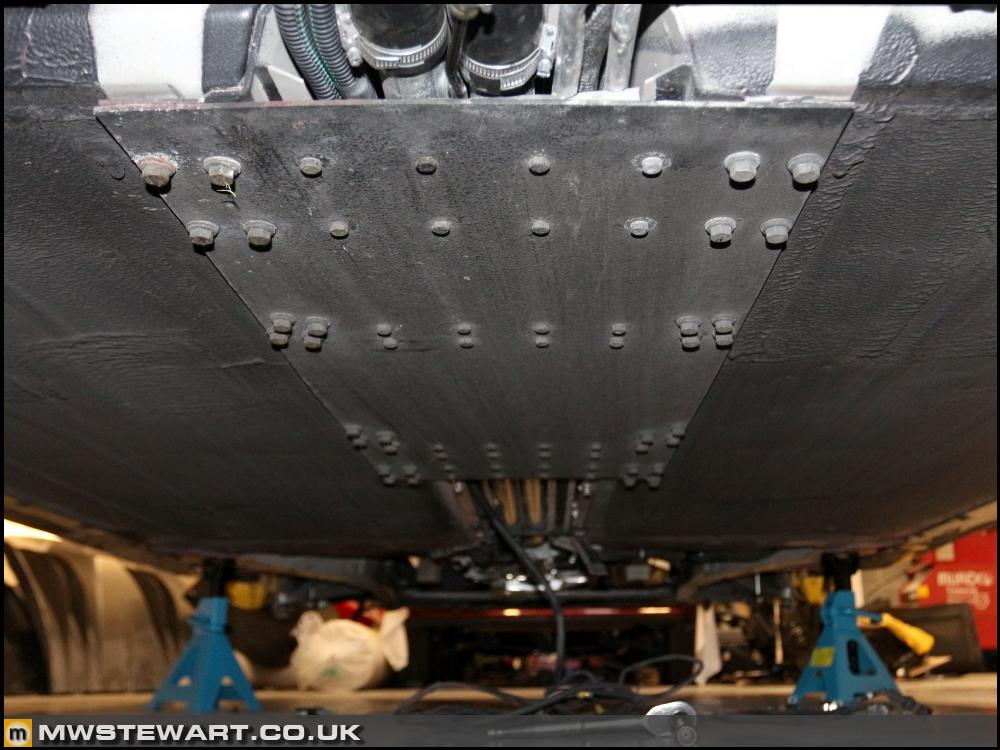
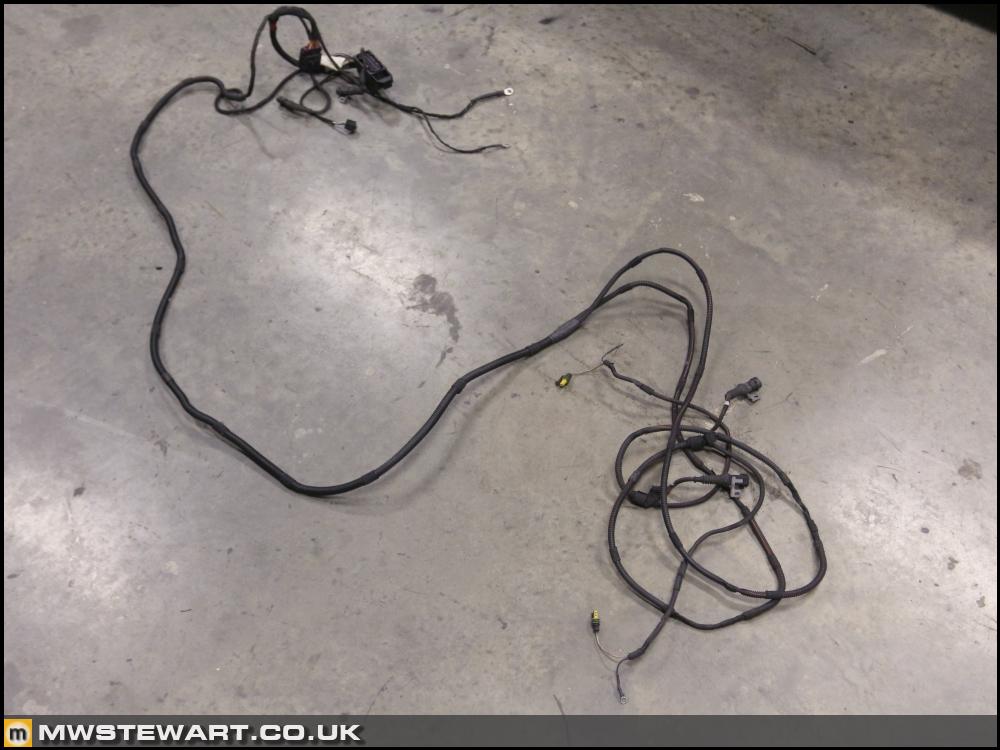
Loom finally removed. Despite looking like a fairly minor sub loom there was actually around four hours work because of minimal access. I had to visit each wheelhouse, remove front & rear under trays the central tunnel reinforcement, fuel tank heat shields, and numerous P clips.
On to the ABS module today. It lives in the passenger side of the void between interior bulkhead and luggage compartment, and to get to it I discarded the weather seal; I will replace it with a new one once the project has been finished and everything tested OK. I also took the opportunity to remove the scuttle trim and bonnet brackets as they were looking a little tatty in places.
I put the car on axle stands then used my pressure bleeder to force all fluid out of the system - draining each wheel in turn - which saved a lot of mess when removing the pipework. It took me an hour to remove the module with most of that time spent getting to and removing the pipes.
Here's a comparison of the F430 Bosch 5.7 module and the Scuderia Bosch 8 module. There's not a Ferrari parts label on the modules to identify them, just a piece of masking tape with a hand written model code ('E', and 'LP').
The brackets are different for LHD and RHD cars, and of course for F430 and Scuderia. F430 is steel and Scuderia is aluminium. I've made a bit of a faux pas by not including the RHD Scuderia bracket in my last Eurospares order! They are seeing how soon one can be sent over from Italy.
An added bonus of the Scuderia ABS system is weight reduction. 1.028kg in total due in the main from the lighter Bosch 8 module, but also a lighter mounting bracket, and lighter module multiplug on the ABS loom.
F430 ABS/ESP loom removal
The ABS loom comprises two earth points, the rear ABS sensors & brake pad wear sensors, front ABS sensors (strangely the front pad wear and accelerometers are part of the body loom), module plug, and car interface plug. The routing is as per the diagram below.
The ABS loom was one of the first to be fitted to the car so access to some parts of it was very tight indeed. I approached removal starting from the module plug and gathered all the rest of the loom to be removed from that point - passing it up behind the steering rack and A/C pipes.
The rear loom splits into two and runs behind the fuel tank shields and for a minute I thought I may have to remove the tanks on each side, which would have taken an age, but thankfully there were no clips behind the shields so once their mounting nuts were removed I could move the shields far enough to remove the loom.
As well as a number of chassis changes the F430 features a reinforcement plate under the central tunnel, and it must be removed to allow the ABS loom to be dropped from the tunnel. Dad helped me today and took one side of the bolts which was good because there are loads of them. Incidentally I've never been happy with the mass of hex head M10 bolts holding on the part given the amount of work that's gone into underbody areo so I’m going to replace them with button heads.
Loom finally removed. Despite looking like a fairly minor sub loom there was actually around four hours work because of minimal access. I had to visit each wheelhouse, remove front & rear under trays the central tunnel reinforcement, fuel tank heat shields, and numerous P clips.
Gassing Station | Readers' Cars | Top of Page | What's New | My Stuff