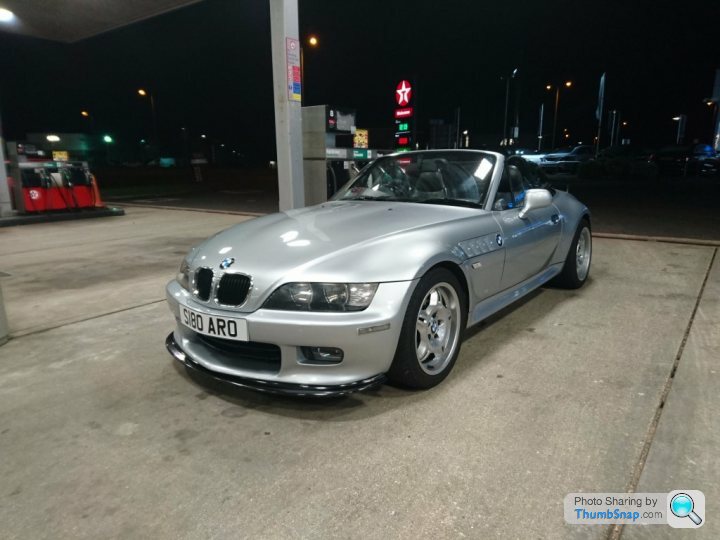
BMW Z3 2.8 - OEM+ long term project
Discussion


HugoFastmann said:
You've definitely pulled that off! I'm doing some similar mods with my 325ti, although some mods are blatantly non-OEM (like the aftermarket wheels I went for). Next I've got lined up in mind is a M135i brake upgrade...
Always liked the Z3, and kind of want one more now.
Tell me more about the brake upgrade? is that to go to monoblock style brakes? Always liked the Z3, and kind of want one more now.
if i needed a daily i'd be looking at 325ti, so much fun and massively underrated
HugoFastmann said:
It is indeed. It's the BMW-performance monoblock brakes - much bigger than the 325ti brakes, but also very expensive to do (although nowhere near as expensive as a Brembo big brake kit...) and you need to get an adaptor made for them to fit, but I've got a friend with a 330 who works for BMW and has done this to his car, so it can be done.
I highly recommend the 325ti if you do decide on a daily. They're great cars!
yeah can imagine they are strong money right now. what size disc? I highly recommend the 325ti if you do decide on a daily. They're great cars!
vsonix said:
5harp3y said:
vsonix said:
How did you wire in the self-dimming mirror? I think I have a spare one in my parts stash might be good to use it up...
tapped it into the interior light which is in the perfect location plus you only need 3 wires, the others are for the alarm LEDs etc.
i'm removing mine if you want it?
exgtt said:
Gorgeous car, was thinking at the start removing the ambers was the wrong move but you have really pulled it off. Love the wheels!
Thanks for the comments. The wheels are my favourite part the ambers often divide opinion and i think they look great on the right colour car but against silver i think they date the car badly
vsonix said:
yeah, wouldn't mind... although am stinging at being £34.00 out of pocket at the moment lol. Might not be able to give you any shekels for it till after payday. How come you're removing it? Size? I am actually surprised at how bulky it is!
ive got a new plan with the e36 mirro so testing that outi like the mini mirror though
i'll happily wait for payday but i'll send you a PM
So massive job half completed this week.
Mrs Sharpey is off in Cape Verde this week celebrating her 30th year with her girly mates. That meant i could take a week off to work on the Zed!!!
So starting Wednesday (i ended up working Monday and Tuesday) i started the process of rebuilding the rear end of the car.
Parts sourced
Revshift rear bushes with 12mm+ diff raising kit
Powerflex rear trailing arm bushes
Pagid brake wear sensor (mines missing)
Pagid handbrake cables
the process as i did it.
jack the car up the day before and Plusgas everything you can see .... especially if your car spent it's life on the coast like mine
Jack up the car and support on 4 x axle stands, making sure the car is as level as can be (my driveway is like the surface of the moon so quite tricky)
unclip all the electrical connectors
2 x ABS
1 x brake pad wear
1 x speedo in the diff
undo the exhaust, luckily being a pre face lift 2.8 my exhaust unbolts in the mid pipe after the cat
undo the 4 x 16mm nuts on the propshaft by the diff (bag the nuts) also mark the position of the diff so you can put it all back the same way
undo the brake calipers and carriers, remove the discs and handbrake shoes, DONT drop the small pin that holds the handbrake cable in place


undo the rear droplinks and push out of the way

undo the rear brake line flexi's near the rear arms, block the pipes or put bags on them
this bit was a pain, make sure you use proper flare spanners otherwise you WILL round off the unions

make sure to bag everything up and label as you go

at this point go get some paracetamol as you will have continuously whacked yourself against the extremely hard metal diff cover
go have a cuppa and some lunch, time to tackle the s ttest part of this job. The horrible little bd 6mm bolts holding the support bracket on
best thing about these are: they are full of crud, a pain to get to (especially the drivers side) and if these don't come off the job is ballsed
take your 6mm 3/4 drive bit and hammer it into the bolt so it is well and truly seated, give a small prayer to the car gods, and unwind. they aren't very tight but they are a pain.
mine all came out without too much difficulty

grab the ends of the handbrake cables in the hubs with some mole grips and just wiggle and pull and mine popped out.
undo the nuts on the lever end in the car and pull the remainder out when the beam is removed.
undo the lower shock mounts
support the diff / subframe on your epic new hulk themed jack
undo diff bolt
undo the large nuts holding the beam on
lower and wiggle / wrestle it out

drag it into your garage, clean up and call that day 1

Mrs Sharpey is off in Cape Verde this week celebrating her 30th year with her girly mates. That meant i could take a week off to work on the Zed!!!
So starting Wednesday (i ended up working Monday and Tuesday) i started the process of rebuilding the rear end of the car.
Parts sourced
Revshift rear bushes with 12mm+ diff raising kit
Powerflex rear trailing arm bushes
Pagid brake wear sensor (mines missing)
Pagid handbrake cables
the process as i did it.
jack the car up the day before and Plusgas everything you can see .... especially if your car spent it's life on the coast like mine
Jack up the car and support on 4 x axle stands, making sure the car is as level as can be (my driveway is like the surface of the moon so quite tricky)
unclip all the electrical connectors
2 x ABS
1 x brake pad wear
1 x speedo in the diff
undo the exhaust, luckily being a pre face lift 2.8 my exhaust unbolts in the mid pipe after the cat
undo the 4 x 16mm nuts on the propshaft by the diff (bag the nuts) also mark the position of the diff so you can put it all back the same way
undo the brake calipers and carriers, remove the discs and handbrake shoes, DONT drop the small pin that holds the handbrake cable in place


undo the rear droplinks and push out of the way

undo the rear brake line flexi's near the rear arms, block the pipes or put bags on them
this bit was a pain, make sure you use proper flare spanners otherwise you WILL round off the unions

make sure to bag everything up and label as you go

at this point go get some paracetamol as you will have continuously whacked yourself against the extremely hard metal diff cover
go have a cuppa and some lunch, time to tackle the s
ttest part of this job. The horrible little bd 6mm bolts holding the support bracket onbest thing about these are: they are full of crud, a pain to get to (especially the drivers side) and if these don't come off the job is ballsed
take your 6mm 3/4 drive bit and hammer it into the bolt so it is well and truly seated, give a small prayer to the car gods, and unwind. they aren't very tight but they are a pain.
mine all came out without too much difficulty

grab the ends of the handbrake cables in the hubs with some mole grips and just wiggle and pull and mine popped out.
undo the nuts on the lever end in the car and pull the remainder out when the beam is removed.
undo the lower shock mounts
support the diff / subframe on your epic new hulk themed jack
undo diff bolt
undo the large nuts holding the beam on
lower and wiggle / wrestle it out

drag it into your garage, clean up and call that day 1

Edited by 5harp3y on Tuesday 20th June 16:40
Day 2
this is the big strip / clean day
time to take the rear beam apart and give it a lick of paint
state of the beam, looks like it's been under the sea


all very easy to take apart
4 x diff bolts
4 x RTAB bolts
then the rear beam is seperate
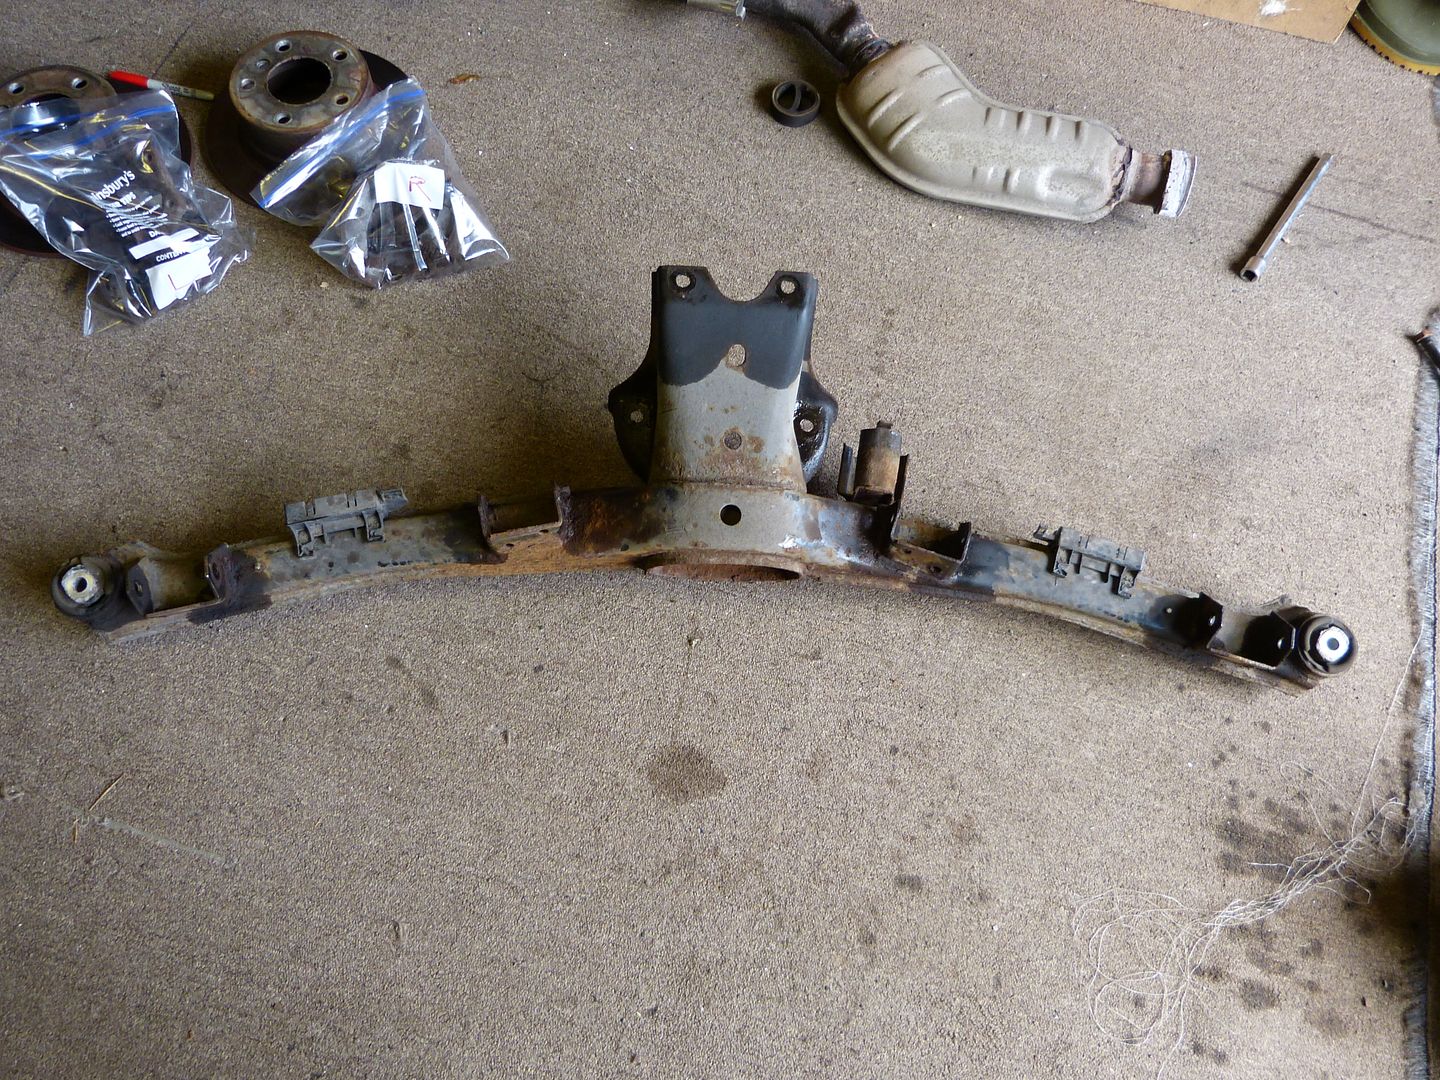
take the beam to your friendly local garage who for £20 cash will press the bushes out for you.
next up time to remove the RTAB for the arms
i saw many ways to do this online, my chosen method was:
Cut the thick ends of the bushes down with a sharp razor blade knife
Trim the smaller end too
Apply heat using a blowtorch
Attach a three arm puller and use an old socket as a drift
Wind it down and it will pop out

I then cleaned up the inner sleeves with a drum sander on a drill
Next up attack everything with an angle grinder and wire brush until it is slightly better than it was (not perfect) and then coat in POR15 metal prep and then POR15 Chassis black
Leave to dry and go inside and wash up
Day 3
fit new handbrake cables to the car end, very easy, just press them in by hand and then attach the cables in the car

press in your new shiny poly bushes by hand and put everything back together.
first also install your Revshift diff spacers and studs, this should help reduce negative camber by 0.5%


get it back under the car and prepare to wrestle with it for an hour or so

BUT THIS IS WHERE THE PROBLEMS STARTED
in the first post i said i have the job half done.
well
it would appear that Hack Engineering very accidentally sent me the wrong bushes to do this job and what you see are Revshifts E30 rear bushes ... which aren't compatible with our Z3's
this is a bit of a watchout, even though everyone says the Z3 uses a E30 rear end there are fundamental differences in how they are mounted.
the mounts are very different and as such the e30 ones are too long for the z3
so long story short, the car is still on axle stands, Revshift are sending me out a set of new bushes this week via UPS
massive bummer as i really wanted the car back together this weekend. but hey ho ... we live to fight another day.
MX6 said:
Nice job, just had a dive through the thread. I guess you'd added a fair bit of value to it?
I hope so, i dont think there are many Z3's available now that have the spec of mine. its got some small bits that need doing and ideally long term a decent quality full respray nearly everything on the car has been renewed or upgraded whilst remaining relatively subtle
i think if it had no splitter and standard wheels you'd be hard pressed to know the difference over a stock looking car.
Podie said:
Ooh... so what's next?
a house looking to buy our first place and moving the car on would be a great first step
technically we dont need to sell it on to move as we have enough saved but it feels like the right thing to do and then come back to something new in a year or so.
i fancy something very old as a long term restoration, thinking beetle or old Fairlady Z

MX6 said:
I'm not really sure of the market for these but last time I looked it seemed like there is quite a premium for a good 2.8. I suppose it depends on now picky would-be buyers are about the paint, many cars at this age need at least a bit of paintwork to look in top shape. I can see from your thread that you've put in quite a lot of work and new parts.
Yeah the pre facelift 2.8's and post facelift 3.0's are the most popular (outside of the Z3M) I want strong money for mine but it's reflective of the overall condition and work done.
the massive benefit of the Z3's is that they dont really rust and the only panels that do are bolt on and cheap
Gassing Station | Readers' Cars | Top of Page | What's New | My Stuff