2003 Porsche Boxster S
Discussion


ATM said:
I put images on a sharing site like postimage.org and then share them via a link on here.
Agreed I personally use imgur which is pretty good. Not sure there's a image limit then as such. And make sure you copy/paste your post into word or similar otherwise to protect against the PH gerbils falling over when you post.

THIS IS A LONG POST.
Where do I start…
So the car was in a bad state for a year or so. A lot of things happened in that time in my personal life (good and bad) so the car was no longer a priority and wasn’t in such a financial place that I could go “Ah let’s just give it to a garage to fix”. I’d either sell it broken, or fix it slowly. Instead, I bought a £500 fiesta run about (1.4 TDCI that does 75mpg) that I still have as a daily, and the Porsche went under wraps for the foreseeable future.

I thought about selling it as is, as there was so much that went wrong on it that I lost any sort of feeling for it. Take a big loss and sell it for a few grand, then get something more sensible.
Instead I stuck at it with the notion of selling it, but fixing it up first and selling it. I got the nut off with a helping hand (either a person from this forum or Boxa.net, who was kind enough to bring a torque gun round). The nut came off with a fight, and revealed something alarming.
This is what the underside should look like (on my newer hub that I had to buy):

And this is what it actually looked like:

The insert was missing, which explains all of the other times that the arm’s bolt had sheered off. Quite worrying.
Nevertheless, I finally put the new subframe in, and went to Canada for a holiday.
Whilst I was there I constantly thought out the plan of what I was going to tackle when I got back, and it was to remove the hub from the shock absorber (as I needed a new one due to it being damaged by having no insert), along with the hand brake cable, brake caliper, etc.
After a few days of being jet lagged, I got to work. First thing was to remove the drop link. I cut off the end to get a breaker bar onto it and… slipped the socket off, which rounded the nut. Game over, need a new shock absorber, spring and hub as now it’s impossible to separate.

Arse. More seems to be going wrong here.
So I bought a second hand shock with a spring (was fantastic condition), and another hub, and also a brand new wheel bearing which a garage fit for me.
Fit the new hub with its shock absorber, but found that the speed sensor that came with it was different.

No bother. Except I couldn’t get it out and it was seized. Tried to take it out and it sheered off in the hub. Lovely, another new hub was needed and I’ve wasted the wheel bearing.
Ordered a second one, and the guy sent the wrong one. Sent that back. Ordered a third and before I confirmed the order, I phoned the guy up and said “I’ll buy it, for as long as you remove your speed sensor first.” to which he replied “in that case, no, it’s seized”.
Ordered a fourth one without a speed sensor in it, everything was fine after a second wheel bearing was purchased and fitted. The shock assembly went in with the hub, and all was fine. Eventually. There were some hiccups along the way, such as fitting the coffin arm to the hub with the wrong speed sensor and not being able to remove the arm, etc. But eventually, the suspension job was fixed and the car was, for the first tine in a long time, sitting on its own four wheels again.

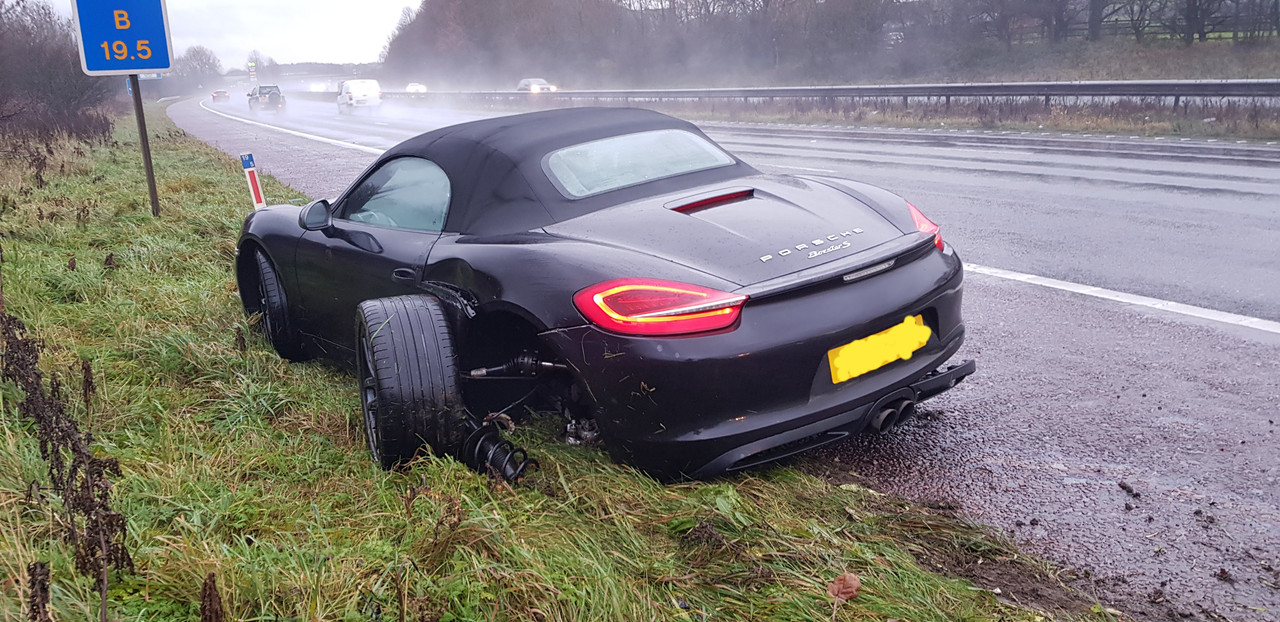
The alignment (as you can probably see from the photo) was way out, so that needed doing asap.
But the main thing was that the car was fixed! I serviced it, put fresh tyres on, and booked it in for an MOT. I hadn’t drove the car in over a year, and it felt amazing driving it to the MOT garage. Even though the alloys and the paint looked like s t (bird poo etched paint, cracked paint on the alloys, etc), it felt good to be back in it. Felt special.
The car passed the MOT first time, with only a drop link as an advisory - something I knew about since the last one but never got round to fitting it. It passed! That same day I got some insurance sorted and took it to get an alignment sorted. The alignment was off the chart, but £90 later and the camber, toe and caster sorted, it felt outstanding to drive.
At this point, I thought about doing it up and keeping it, rather than selling it, but I thought I’d see how I go.
With the mechanics done, cosmetics was the next thing on my list.
Over the next few months, the following was done:
- Rebuilt headlights with new projectors
- Sprayed radio surround gloss black
- Wrapped ashtray gloss black
- Powder coated alloys back to silver
- Full tear-down detail of the car, including:
- All metals beneath bumpers and lights cleaned and polished
- Wheel arches cleaned thoroughly
- Wheels sealed and waxed
- Exhaust re-sprayed to gloss black (and silver bypass pipes)
- Paint work two-stage machine polished
- New number plates
- New number plate mount for the front
- Rewired DRL’s as DRL’s and not sidelights (on with ignition, off with headlights)
And here’s the photo bombardment!
Bought projectors with squared-off halo rings, and sprayed the 4 sides to only reveal the corners. I wanted to give them the newer Porsche look with the 4-LED’s on the corners, and they looked fantastic:


This was before the car was machine polished.
Some photos of the rest of the cosmetic overhaul:


Rear before clean:

Rear after clean:

Exhaust & rear before:

Exhaust & rear after:


Arches cleaned

Engine bay too

All metals cleaned and polished

Alloys detailed


Bumpers cleaned and machine polished


Back ‘PORSCHE’ lettering sprayed gloss black


Number plate mount

Headlights polished


And here’s the car as of this morning!


And there we have it.
If you’ve stayed with me this far, you deserve a pint.
Here’s a few photos took recently.


I’m keeping the car. Here’s to many happy miles
Thanks for reading!
Where do I start…
So the car was in a bad state for a year or so. A lot of things happened in that time in my personal life (good and bad) so the car was no longer a priority and wasn’t in such a financial place that I could go “Ah let’s just give it to a garage to fix”. I’d either sell it broken, or fix it slowly. Instead, I bought a £500 fiesta run about (1.4 TDCI that does 75mpg) that I still have as a daily, and the Porsche went under wraps for the foreseeable future.
I thought about selling it as is, as there was so much that went wrong on it that I lost any sort of feeling for it. Take a big loss and sell it for a few grand, then get something more sensible.
Instead I stuck at it with the notion of selling it, but fixing it up first and selling it. I got the nut off with a helping hand (either a person from this forum or Boxa.net, who was kind enough to bring a torque gun round). The nut came off with a fight, and revealed something alarming.
This is what the underside should look like (on my newer hub that I had to buy):
And this is what it actually looked like:
The insert was missing, which explains all of the other times that the arm’s bolt had sheered off. Quite worrying.
Nevertheless, I finally put the new subframe in, and went to Canada for a holiday.
Whilst I was there I constantly thought out the plan of what I was going to tackle when I got back, and it was to remove the hub from the shock absorber (as I needed a new one due to it being damaged by having no insert), along with the hand brake cable, brake caliper, etc.
After a few days of being jet lagged, I got to work. First thing was to remove the drop link. I cut off the end to get a breaker bar onto it and… slipped the socket off, which rounded the nut. Game over, need a new shock absorber, spring and hub as now it’s impossible to separate.
Arse. More seems to be going wrong here.
So I bought a second hand shock with a spring (was fantastic condition), and another hub, and also a brand new wheel bearing which a garage fit for me.
Fit the new hub with its shock absorber, but found that the speed sensor that came with it was different.
No bother. Except I couldn’t get it out and it was seized. Tried to take it out and it sheered off in the hub. Lovely, another new hub was needed and I’ve wasted the wheel bearing.
Ordered a second one, and the guy sent the wrong one. Sent that back. Ordered a third and before I confirmed the order, I phoned the guy up and said “I’ll buy it, for as long as you remove your speed sensor first.” to which he replied “in that case, no, it’s seized”.
Ordered a fourth one without a speed sensor in it, everything was fine after a second wheel bearing was purchased and fitted. The shock assembly went in with the hub, and all was fine. Eventually. There were some hiccups along the way, such as fitting the coffin arm to the hub with the wrong speed sensor and not being able to remove the arm, etc. But eventually, the suspension job was fixed and the car was, for the first tine in a long time, sitting on its own four wheels again.
The alignment (as you can probably see from the photo) was way out, so that needed doing asap.
But the main thing was that the car was fixed! I serviced it, put fresh tyres on, and booked it in for an MOT. I hadn’t drove the car in over a year, and it felt amazing driving it to the MOT garage. Even though the alloys and the paint looked like s
t (bird poo etched paint, cracked paint on the alloys, etc), it felt good to be back in it. Felt special.The car passed the MOT first time, with only a drop link as an advisory - something I knew about since the last one but never got round to fitting it. It passed! That same day I got some insurance sorted and took it to get an alignment sorted. The alignment was off the chart, but £90 later and the camber, toe and caster sorted, it felt outstanding to drive.
At this point, I thought about doing it up and keeping it, rather than selling it, but I thought I’d see how I go.
With the mechanics done, cosmetics was the next thing on my list.
Over the next few months, the following was done:
- Rebuilt headlights with new projectors
- Sprayed radio surround gloss black
- Wrapped ashtray gloss black
- Powder coated alloys back to silver
- Full tear-down detail of the car, including:
- All metals beneath bumpers and lights cleaned and polished
- Wheel arches cleaned thoroughly
- Wheels sealed and waxed
- Exhaust re-sprayed to gloss black (and silver bypass pipes)
- Paint work two-stage machine polished
- New number plates
- New number plate mount for the front
- Rewired DRL’s as DRL’s and not sidelights (on with ignition, off with headlights)
And here’s the photo bombardment!
Bought projectors with squared-off halo rings, and sprayed the 4 sides to only reveal the corners. I wanted to give them the newer Porsche look with the 4-LED’s on the corners, and they looked fantastic:
This was before the car was machine polished.
Some photos of the rest of the cosmetic overhaul:
Rear before clean:
Rear after clean:
Exhaust & rear before:
Exhaust & rear after:
Arches cleaned
Engine bay too
All metals cleaned and polished
Alloys detailed
Bumpers cleaned and machine polished
Back ‘PORSCHE’ lettering sprayed gloss black
Number plate mount
Headlights polished
And here’s the car as of this morning!
And there we have it.
If you’ve stayed with me this far, you deserve a pint.
Here’s a few photos took recently.
I’m keeping the car. Here’s to many happy miles
Thanks for reading!
Very impressive work - the car looks great and I'm glad to see you've got it back on the road!
I have a question WRT the headlights and the dreaded MOT.
I'm working on fitting a set of projectors from a BMW X3 to my 996 - see here:

Fitting these means the 'flash to pass' functionality (ie. flashing your high beams when your lights are turned off) is now lost as you obviously can't flash bi-xenons without having them on. It looks like you don't have that ability either - have you experienced any issues with this come MOT time or have you got around it another way?
Thanks!
I have a question WRT the headlights and the dreaded MOT.
I'm working on fitting a set of projectors from a BMW X3 to my 996 - see here:
Fitting these means the 'flash to pass' functionality (ie. flashing your high beams when your lights are turned off) is now lost as you obviously can't flash bi-xenons without having them on. It looks like you don't have that ability either - have you experienced any issues with this come MOT time or have you got around it another way?
Thanks!
CornedBeef said:
Good effort, that looks really really good. I've got a few cosmetic bits and general tidying I want to do to the 996 this week - nothing being open and the other half still working this weekend means I've got a clear run. I still want a 986!
I still want a 986 but I have a 981. What's your excuse?rufusgti said:
Good god. That's a clean car. Well done, where do you find the time!?!
Self-isolation, and being a lecturer means I'm working from home, and the times when I'm not lecturing, well... this happened.It's been planned since August last year, so I was waiting for the right time. Two weeks of lovely weather, cloudy in between, made perfect weather for detailing (cloudy for machine polishing and waxing, etc). Maddie (other half) was an absolute gem through it all - she knew it was in the works, but to put up with me being like "Right off to work on the car for hours bye!" was lovely. She's in her last year of University so has a lot of studying and working to do herself, so we were both busy. Don't worry, she's a student at another University, not mine... that would be weird.
shalmaneser said:
Very impressive work - the car looks great and I'm glad to see you've got it back on the road!
I have a question WRT the headlights and the dreaded MOT.
I'm working on fitting a set of projectors from a BMW X3 to my 996 - see here:
Fitting these means the 'flash to pass' functionality (ie. flashing your high beams when your lights are turned off) is now lost as you obviously can't flash bi-xenons without having them on. It looks like you don't have that ability either - have you experienced any issues with this come MOT time or have you got around it another way?
Thanks!
My god that's genius! How? How did you mount the projector?!I have a question WRT the headlights and the dreaded MOT.
I'm working on fitting a set of projectors from a BMW X3 to my 996 - see here:
Fitting these means the 'flash to pass' functionality (ie. flashing your high beams when your lights are turned off) is now lost as you obviously can't flash bi-xenons without having them on. It looks like you don't have that ability either - have you experienced any issues with this come MOT time or have you got around it another way?
Thanks!
Well I have a very bright Cree LED bulb that has a front projector on it, so it's fine for the day time as you can see them flashing. In the night when the low-beams are on, the bi-xenons flick those up, so the full beams in the day time are only ever used to flash people. MOT didn't even question it.
I do have a wiring diagram that turns on your low-beam when you flash your high-beam though, if you're interested? Someone did it for be on 986forum, but never got round to wiring it up. If you implement that, your low beams would always flash. There's a lot of talk of never flashing a HID bulb, but modern cars do it, so I don't see the issue. For as long as it has the hot reignite feature (think that's what it's called?) then it's fine.
Here's the diagram: http://986forum.com/forums/uploads02/gt1574565997.... (the 'solenoid' being the bi-xenon positive wire)
Let me know if you do it! Would want to do it myself.
CornedBeef said:
Good effort, that looks really really good. I've got a few cosmetic bits and general tidying I want to do to the 996 this week - nothing being open and the other half still working this weekend means I've got a clear run. I still want a 986!
They're beautiful cars. My brother in law had a 996 and I must say I did want one for a while, but having already own a 986, I couldn't justify the double-price difference given the fact it wasn't, in my eyes, double the car. But on saying that, if I had one I'd love it. Would love to see yours!ATM said:
I still want a 986 but I have a 981. What's your excuse?
Swap?___
Some final touches to the exterior included some tyre gel:

The new number plates with a nice little 'Porsche Classic' added:

The rear 'Porsche' lettering was added back


Then the interior was finished!

The steering wheel was re-dyed as it was wearing quite substantially

And I also re-dyed the gearstick and handbrake

All interior panels were washed and dressed

Which led to a fresh interior

And there we have it. Detail finished.
Only took me a solid week to do (two weeks but stretched over half days).
Here's a walk-around video showing the car as a whole. Shows off the paint much better!
https://www.youtube.com/watch?v=zVZzGSfBTJ0
...but my number plate fell off this morning

Damn. The number plate tape is perfect for paint, so the rear plate is stuck properly. The front doesn't stick to that plastic very well, so I may need screws. Except how the hell do I mount a plate to the mount? There's 4 rectangular holes, any ideas?
Edited by geraintthomas on Friday 3rd April 09:42
Thanks for your kind words - I work in design so I've got lots of tools to help me do this sort of stuff!
The mount is 3D printed and then the projector has been screwed to that. I had some not so good results using £30 ebay projectors on my old e36 M3 but it's easy to find second hand projectors from BMW/Jag/Audi on Ebay and they're much better quality than the Chinese Ebay specials.
Only problem is they're designed for fitting into a specific housing and that's where the 3D printer comes in.
Currently looks like this:

I need to find a way to hide the gubbins on the inside - probably just another 3D printed part TBH. Then re-attach the lens and we're away.
Progress has stalled slightly however as I managed to pick up a bargain pair of OE projector headlights and while the output is a million times better than the crappy halogens it's not great and having had the projector unit out the silvering is starting to fade. It would be great to have bi-xenons too as the standard ones are main beam xenon only so the work isn't done yet...
The mount is 3D printed and then the projector has been screwed to that. I had some not so good results using £30 ebay projectors on my old e36 M3 but it's easy to find second hand projectors from BMW/Jag/Audi on Ebay and they're much better quality than the Chinese Ebay specials.
Only problem is they're designed for fitting into a specific housing and that's where the 3D printer comes in.
Currently looks like this:
I need to find a way to hide the gubbins on the inside - probably just another 3D printed part TBH. Then re-attach the lens and we're away.
Progress has stalled slightly however as I managed to pick up a bargain pair of OE projector headlights and while the output is a million times better than the crappy halogens it's not great and having had the projector unit out the silvering is starting to fade. It would be great to have bi-xenons too as the standard ones are main beam xenon only so the work isn't done yet...
Edited by shalmaneser on Friday 3rd April 10:57
alpha channel said:
Glue a washer and nut on the backside of the plastic mount and attach to that? Nice work on the car.
Not a bad idea that...shalmaneser said:
Thanks for your kind words - I work in design so I've got lots of tools to help me do this sort of stuff!
The mount is 3D printed and then the projector has been screwed to that. I had some not so good results using £30 ebay projectors on my old e36 M3 but it's easy to find second hand projectors from BMW/Jag/Audi on Ebay and they're much better quality than the Chinese Ebay specials.
Only problem is they're designed for fitting into a specific housing and that's where the 3D printer comes in.
Currently looks like this:
I need to find a way to hide the gubbins on the inside - probably just another 3D printed part TBH. Then re-attach the lens and we're away.
Progress has stalled slightly however as I managed to pick up a bargain pair of OE projector headlights and while the output is a million times better than the crappy halogens it's not great and having had the projector unit out the silvering is starting to fade. It would be great to have bi-xenons too as the standard ones are main beam xenon only so the work isn't done yet...
That's outstanding! How would the light be adjustable? Is the 3D printed mount mounted to the original adjusters? If so, you could just print off another shroud and that would be that. If you manage to do it I'd be interested as the halo rings I have can be disconnected so that they're separate.The mount is 3D printed and then the projector has been screwed to that. I had some not so good results using £30 ebay projectors on my old e36 M3 but it's easy to find second hand projectors from BMW/Jag/Audi on Ebay and they're much better quality than the Chinese Ebay specials.
Only problem is they're designed for fitting into a specific housing and that's where the 3D printer comes in.
Currently looks like this:
I need to find a way to hide the gubbins on the inside - probably just another 3D printed part TBH. Then re-attach the lens and we're away.
Progress has stalled slightly however as I managed to pick up a bargain pair of OE projector headlights and while the output is a million times better than the crappy halogens it's not great and having had the projector unit out the silvering is starting to fade. It would be great to have bi-xenons too as the standard ones are main beam xenon only so the work isn't done yet...
Edited by shalmaneser on Friday 3rd April 10:57
Beautiful work though.
geraintthomas said:
Holy st how did that happen? Were you alright?
Hit a puddle at speed and floated. If you've never experienced it then trust me you dont want to. More info here if you're interested -t how did that happen? Were you alright?https://www.pistonheads.com/gassing/topic.asp?h=0&...
geraintthomas said:
That's outstanding! How would the light be adjustable? Is the 3D printed mount mounted to the original adjusters? If so, you could just print off another shroud and that would be that. If you manage to do it I'd be interested as the halo rings I have can be disconnected so that they're separate.
Adjustments is as per the normal allen key features because as you say it's mounted to the original ball joint fittings.I'll release the 3D file into the wild once I'm happy with it via thingiverse or something.
it is slightly more complicated than just printing off another shroud unfortunately due to the geometry of the space, but definitely doable.
Gassing Station | Readers' Cars | Top of Page | What's New | My Stuff