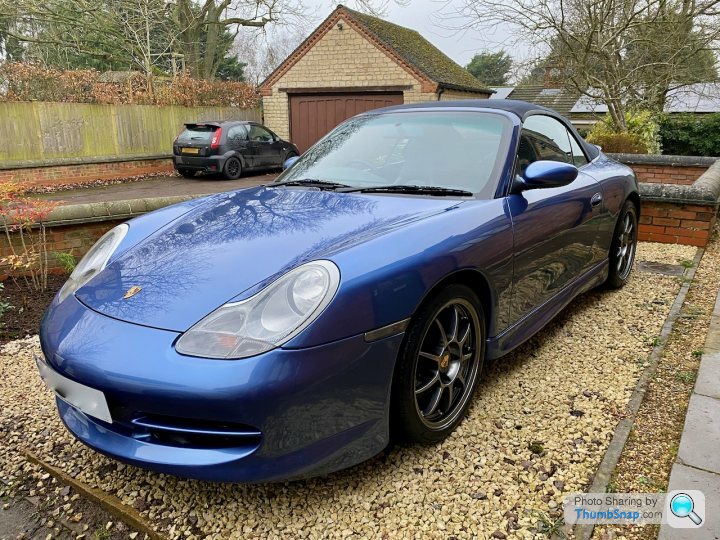
2003 Porsche Boxster S
Discussion


KillerHERTZ said:
Nice project!
Looks loads better with the Porsche logo back on the bootlid.
Not feeling the centre console wrap myself, makes it look cheap IMO.
I would have tried Plastic bumper paint (available from Halfords) - I have done my faded numberplate plinth and wiper cover. its hardwearing and looks original.
I think you're right. I want it gloss black but wrap gloss just isn't cutting it. Taking it off tomorrow, and off to the body shop it goes soon!Looks loads better with the Porsche logo back on the bootlid.
Not feeling the centre console wrap myself, makes it look cheap IMO.
I would have tried Plastic bumper paint (available from Halfords) - I have done my faded numberplate plinth and wiper cover. its hardwearing and looks original.
I think the orange-peel is because of the texturing of the plastic under the wrap no?
If I were you I'd be tempted to get a spare of eBay, flatten and plastic prime it, then spray it body colour yourself. With a bit of care you can get a decent finish using good quality rattle cans; I certainly did on the wing mirror of my M140i.
If I were you I'd be tempted to get a spare of eBay, flatten and plastic prime it, then spray it body colour yourself. With a bit of care you can get a decent finish using good quality rattle cans; I certainly did on the wing mirror of my M140i.
HM-2 said:
I think the orange-peel is because of the texturing of the plastic under the wrap no?
If I were you I'd be tempted to get a spare of eBay, flatten and plastic prime it, then spray it body colour yourself. With a bit of care you can get a decent finish using good quality rattle cans; I certainly did on the wing mirror of my M140i.
Nah it's actually on the vinyl itself. It's quite cheap.If I were you I'd be tempted to get a spare of eBay, flatten and plastic prime it, then spray it body colour yourself. With a bit of care you can get a decent finish using good quality rattle cans; I certainly did on the wing mirror of my M140i.
To be honest, the price of more vinyl, primer, lacquer, spray and another centre console would be the same as getting it sprayed so may as well get it professionally done!
geraintthomas said:
Ah Scott! How's things? Long time no speak. Thanks for the kind words, really appreciate it.
All good here mate, been through a fair few cars since I was last on Celica club, currently running an abarth turismo picked up on a great deal as pre reg.Edited by geraintthomas on Monday 6th April 10:13
The boxster I was looking at was planned to be a toy for the weekend, a Porsche has always been a dream car of mine and my old boss had a Cayman and after traveling it that I have to own one at some point, they just feel like a special car to be in. His was an auto non S model Cayman and it still felt really special.
Yours looks great and the thread is a great read. Will be following the thread.
Roboticarm said:
All good here mate, been through a fair few cars since I was last on Celica club, currently running an abarth turismo picked up on a great deal as pre reg.
The boxster I was looking at was planned to be a toy for the weekend, a Porsche has always been a dream car of mine and my old boss had a Cayman and after traveling it that I have to own one at some point, they just feel like a special car to be in. His was an auto non S model Cayman and it still felt really special.
Yours looks great and the thread is a great read. Will be following the thread.
Oh lovely! Any photos of it?The boxster I was looking at was planned to be a toy for the weekend, a Porsche has always been a dream car of mine and my old boss had a Cayman and after traveling it that I have to own one at some point, they just feel like a special car to be in. His was an auto non S model Cayman and it still felt really special.
Yours looks great and the thread is a great read. Will be following the thread.
That's what I thought when I drove mine. I've driven a 986, 996, 997, 991, Macan, and a Cayenne, and the one consistency throughout all of them (17 years between them all as well) is the sense of something special. I can wholeheartedly recommend any of them!
geraintthomas said:
GR_TVR said:
I've read this thread from start to finish over the last week and thoroughly enjoyed it.
I purchased a 996 at the start of the year which has been keeping me busy - love what you've been doing with your 986!
Mine has an aftermarket double din Kenwood in, which is OK, but getting on a bit now.
Really liking the look of that xtrons unit...especially with your custom templates etc...!
That's beautiful! How are you finding it? I love the GT3 parts, eventually want to get them for mine. The Xtrons radio is nice but by god does it need work to set up right. The wiring is a pain, the harness is almost impossible to fit unless you have the patience of a saint, you need to cut a bit of wood to fill the gap beneath the radio (I wrapped wood in gloss black), then when all that's done you need to wipe the radio, do not sign into google as the account sync will slow it down, and just side-load all APK packages onto it. That's just to get it working normally, without my tweaks! I had to tweak the firmware to patch the start up screens, then design custom icons. But, it's done and it's worth it if you have got the time!I purchased a 996 at the start of the year which has been keeping me busy - love what you've been doing with your 986!
Mine has an aftermarket double din Kenwood in, which is OK, but getting on a bit now.
Really liking the look of that xtrons unit...especially with your custom templates etc...!
Edited by GR_TVR on Thursday 9th April 14:54
The aerokit is lovely - I was really glad I found one with it.
I guess time is something I may have a fair bit of in the short term, so maybe I'll look into the Xtrons...

geraintthomas said:
...but my number plate fell off this morning

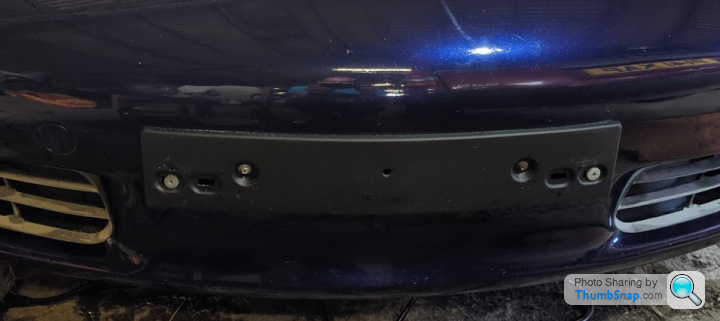
Damn. The number plate tape is perfect for paint, so the rear plate is stuck properly. The front doesn't stick to that plastic very well, so I may need screws. Except how the hell do I mount a plate to the mount? There's 4 rectangular holes, any ideas?
You need the little plastic inserts that go into the slots, part 22 in the diagram belowDamn. The number plate tape is perfect for paint, so the rear plate is stuck properly. The front doesn't stick to that plastic very well, so I may need screws. Except how the hell do I mount a plate to the mount? There's 4 rectangular holes, any ideas?
Edited by geraintthomas on Friday 3rd April 09:42
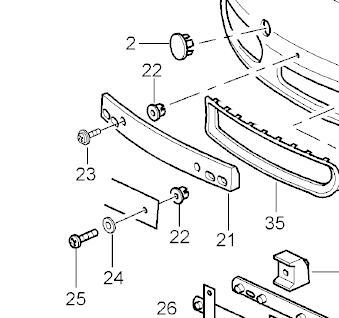
Part number is 999 507 040 40
They let you get a self tapping screw in there and the inserts can slide side to side so you can centre things up nicely. I did mine last year and it should look something like this.
MadRob6 said:
You need the little plastic inserts that go into the slots, part 22 in the diagram below
Part number is 999 507 040 40
They let you get a self tapping screw in there and the inserts can slide side to side so you can centre things up nicely. I did mine last year and it should look something like this.
That's a great help, thanks! I've opted for using sealant for the time being though.Part number is 999 507 040 40
They let you get a self tapping screw in there and the inserts can slide side to side so you can centre things up nicely. I did mine last year and it should look something like this.
ddom said:
This may fly in the face of things but I used standard silicone sealant when the self tapping screws in mine started messing about. If the plate ever needs to be removed it’s easy enough with some dental floss or similar.
Exactly what I've just done. Thanks for the tip.gregs656 said:
Velcro will do it.
Unfortunately it was the adhesive side of any pad onto the plate mount that was the issue. Even with velcro, it would still need adhesive.In the end I've opted for 6 small dabs of tiger seal in each corner and in the middle in conjunction with the pads. It's on there solid now!
Couple of small updates:
Removed the centre console black vinyl as it did indeed start to bubble, so it's now back to black. I've used AutoFinesse Dressle in the meantime which coats all interior/exterior plastics with a deep shine, that dries quite quickly and lasts. You can use it for interior as it doesn't dry sticky. It hides a lot of scratches, too.

You can see where I forgot to apply some when the armrest was down:

Lovely stuff.
I've also just found out that my car was supposed to have heated wing mirrors, which obviously don't work. I'll check the door wires but I suspect it's just the glass elements that have burnt out after 17 years of use. Cheap enough - £11 each on ebay, and that includes blue tinted ones too for night driving. Should be quite a nice upgrade.
Hi ....great thread have been following and impressed by all your work...
Can i ask you about the Dressle stuff.,,,?....have got a 2001 Boxster with black centre console now showing signs of wear...generally just usual scuffs and light scratching nothing too deep....am reluctant to remove and have it resprayed but this sounds a good alternative....Does it really cover light scratches!? and can you use it on other surfaces than plastic?.Cheers..
Can i ask you about the Dressle stuff.,,,?....have got a 2001 Boxster with black centre console now showing signs of wear...generally just usual scuffs and light scratching nothing too deep....am reluctant to remove and have it resprayed but this sounds a good alternative....Does it really cover light scratches!? and can you use it on other surfaces than plastic?.Cheers..
ClaphamBoxS said:
Hi ....great thread have been following and impressed by all your work...
Can i ask you about the Dressle stuff.,,,?....have got a 2001 Boxster with black centre console now showing signs of wear...generally just usual scuffs and light scratching nothing too deep....am reluctant to remove and have it resprayed but this sounds a good alternative....Does it really cover light scratches!? and can you use it on other surfaces than plastic?.Cheers..
It does! Very light marks. It can be applied to metal and rubber, too. But I wouldn't put it ok painted surfaces like the bodywork. Anything you want a sheen on, put it on. Spray it over your engine bay and it makes a gloss, without even rubbing it in.Can i ask you about the Dressle stuff.,,,?....have got a 2001 Boxster with black centre console now showing signs of wear...generally just usual scuffs and light scratching nothing too deep....am reluctant to remove and have it resprayed but this sounds a good alternative....Does it really cover light scratches!? and can you use it on other surfaces than plastic?.Cheers..
Honestly don't be put off by removing the centre console, it's easier than it seems. Primer is easy to do and dries evenly, as does matt spray. Black matt spray is really forgiving and always dries even, then coat with matt lacquer which is also nice. You can remove all bits that aren't plastic too making it easier.
Cheers.....thanks for the info....think i will give that a go first,use it on the centre console and side arm rests...which are also showing signs of wear and tear...
It does look really good in your pics and seeing the bit you didn’t do re arm rest shows it really well...
If it doesn’t work i can think about doing it properly with spray paint etc....not as if i have much else to do in the next few weeks!!lol ..
It does look really good in your pics and seeing the bit you didn’t do re arm rest shows it really well...
If it doesn’t work i can think about doing it properly with spray paint etc....not as if i have much else to do in the next few weeks!!lol ..
ClaphamBoxS said:
Cheers.....thanks for the info....think i will give that a go first,use it on the centre console and side arm rests...which are also showing signs of wear and tear...
It does look really good in your pics and seeing the bit you didn’t do re arm rest shows it really well...
If it doesn’t work i can think about doing it properly with spray paint etc....not as if i have much else to do in the next few weeks!!lol ..
My door bin lids are also showing signs of wear and will need re-doing very soon, but I'll be painting those myself. I've done lots of things in matt black in the past. The side vents on this car is literally one quick spray of matt black spray - no primer, no lacquer. The result is perfect and it's been years with no wear and tear. Ideally I should have done it with primer and lacquer but I wanted to do it quick.It does look really good in your pics and seeing the bit you didn’t do re arm rest shows it really well...
If it doesn’t work i can think about doing it properly with spray paint etc....not as if i have much else to do in the next few weeks!!lol ..
When I get round to spraying my door bin lids I'll show you the result!
Only a small update. The 12v power plug was missing due to replacing it with the USB for Apple CarPlay. I decided to put it here, in the cubby hole:

Problem is, there was no way of keeping it there from the back:

So I've swapped it back to its original place, and put the CarPlay USB & AUX in there instead.

It has a screw on the back to keep in place, so fits perfectly. It's also handy as I can keep the USB cable plugged in and tucked away neatly, rather than hanging from the front of the radio.
Problem is, there was no way of keeping it there from the back:
So I've swapped it back to its original place, and put the CarPlay USB & AUX in there instead.
It has a screw on the back to keep in place, so fits perfectly. It's also handy as I can keep the USB cable plugged in and tucked away neatly, rather than hanging from the front of the radio.
I've realised that the radio installation has had a few people interested, and it's been sporadic across the posts on this forum, so I thought I'd do a wite up of what it is, how I've fitted it, and what it features. Especially given the recent news of Porsche releacing a new PCM head unit to fit into older cars that's £1,200, which is a complete joke.
To start, I had to bodge a laptop charger cable so that it could power the radio inside the living room, just so I could work on it on the table rather than in the car. To get the radio to work in the car (as the fibre optics powered the previous radio), I ran a 12v feed from the fuse box (piggy backed a fuse). I then just plugged in the correct wires for the speakers straight into the car's original brown adapter that originally went into the old radio. The cage was the trickiest part as it doesn't mount well, so a few screws did the trick.
I've modified and re-coded the operating system to show a custom start screen that I've animated to match that of the newer cars. The car silhouette is more inkeeping with a 986 shape, and the Porsche badge before it is that of the newer one. All of the icons are custom designed, and the Torque interface too.
The installation looks like this:

I've installed a USB and AUX port in the cubby holder. The USB links to Apple CarPlay.
The bottom has a small trim piece to fill the gap as it's not a standard fit. This is actually a piece of wood cut to size, trimmed in gloss black.
So a turn of the key initially shows this:

Then this animates:

That's also the screensaver after a while of inactivity, or if you press the power button. Nice for night driving.
Animation looks like this:

It's to match the PCM of the newer cars - a Cayman GT4 was referenced for its boot sequence.
As mentioned, the home screen has custom icons that I've designed to be inkeeping with the car's orange theme. The icons are monochrome and simple, and have been renamed.

The 'CarPlay' icon is exactly that. A push of this shows Apple CarPlay:

It's a £50 dongle bought off Amazon that tricks a phone into thinking that it's connected to a CarPlay headunit. You then sideload the app, and voila.
The 'Porsche' icon on the home screen actually goes to the custom designed Torque layout, with the orange matching the cars lights (although the colour doesn't seem it in the photo):

Without an OBD2 connected, this shows speed, 0-60 time, and average speed. Kind of a track use layout. With the OBD2 connected it can show a lot more (as shown in the video below).
Here's a video showing the whole thing:
https://www.youtube.com/watch?v=HxUy_l2T2IM
Features are:
- Android OS (so infinite possibilities with apps here)
- GPS & Navigation
- WiFi
- Bluetooth
- Apple CarPlay
- USB charging & tethering
- 3.5mm jack
- Reverse camera features (currently not installed)
- Brightness dims with headlights
- DAB radio
- DVD player
- Car diagnostics (thanks to Android's Torque app)
My aim was to make it as factory as possible with absolutely no logos of any kind anywhere, and hopefully it's paid off.
The price in total? About £240. £180 for the head unit (a few years back), £50 for the Apple CarPlay dongle, £5 for the microphone and £5 for the USB & AUX port. So if you're tempted to buy a Porsche PCM for £1,200, try this instead and save yourself about £1,000.
If anyone needs any help with their radios, let me know and I'll do my best. Stay safe!
To start, I had to bodge a laptop charger cable so that it could power the radio inside the living room, just so I could work on it on the table rather than in the car. To get the radio to work in the car (as the fibre optics powered the previous radio), I ran a 12v feed from the fuse box (piggy backed a fuse). I then just plugged in the correct wires for the speakers straight into the car's original brown adapter that originally went into the old radio. The cage was the trickiest part as it doesn't mount well, so a few screws did the trick.
I've modified and re-coded the operating system to show a custom start screen that I've animated to match that of the newer cars. The car silhouette is more inkeeping with a 986 shape, and the Porsche badge before it is that of the newer one. All of the icons are custom designed, and the Torque interface too.
The installation looks like this:
I've installed a USB and AUX port in the cubby holder. The USB links to Apple CarPlay.
The bottom has a small trim piece to fill the gap as it's not a standard fit. This is actually a piece of wood cut to size, trimmed in gloss black.
So a turn of the key initially shows this:
Then this animates:
That's also the screensaver after a while of inactivity, or if you press the power button. Nice for night driving.
Animation looks like this:
It's to match the PCM of the newer cars - a Cayman GT4 was referenced for its boot sequence.
As mentioned, the home screen has custom icons that I've designed to be inkeeping with the car's orange theme. The icons are monochrome and simple, and have been renamed.
The 'CarPlay' icon is exactly that. A push of this shows Apple CarPlay:
It's a £50 dongle bought off Amazon that tricks a phone into thinking that it's connected to a CarPlay headunit. You then sideload the app, and voila.
The 'Porsche' icon on the home screen actually goes to the custom designed Torque layout, with the orange matching the cars lights (although the colour doesn't seem it in the photo):
Without an OBD2 connected, this shows speed, 0-60 time, and average speed. Kind of a track use layout. With the OBD2 connected it can show a lot more (as shown in the video below).
Here's a video showing the whole thing:
https://www.youtube.com/watch?v=HxUy_l2T2IM
Features are:
- Android OS (so infinite possibilities with apps here)
- GPS & Navigation
- WiFi
- Bluetooth
- Apple CarPlay
- USB charging & tethering
- 3.5mm jack
- Reverse camera features (currently not installed)
- Brightness dims with headlights
- DAB radio
- DVD player
- Car diagnostics (thanks to Android's Torque app)
My aim was to make it as factory as possible with absolutely no logos of any kind anywhere, and hopefully it's paid off.
The price in total? About £240. £180 for the head unit (a few years back), £50 for the Apple CarPlay dongle, £5 for the microphone and £5 for the USB & AUX port. So if you're tempted to buy a Porsche PCM for £1,200, try this instead and save yourself about £1,000.
If anyone needs any help with their radios, let me know and I'll do my best. Stay safe!

Gassing Station | Readers' Cars | Top of Page | What's New | My Stuff