1986 Toyota MR2 (AW11)
Discussion


I also set the timing last week.
The factory timing marks are on the front cover, and basically invisible from above.
So I made a new bracket that picks up on 3 sump bolts, and marked a new (tiny) notch on the front pulley. I set TDC off the cam pulley marks, and checked against the 20° mark on the front cover (the only one I could see clearly).
I'll recheck next time I had all the front covers off.
It's a bit awkward to see, but with the long lead timing light I can see the marks without removing a wheel.
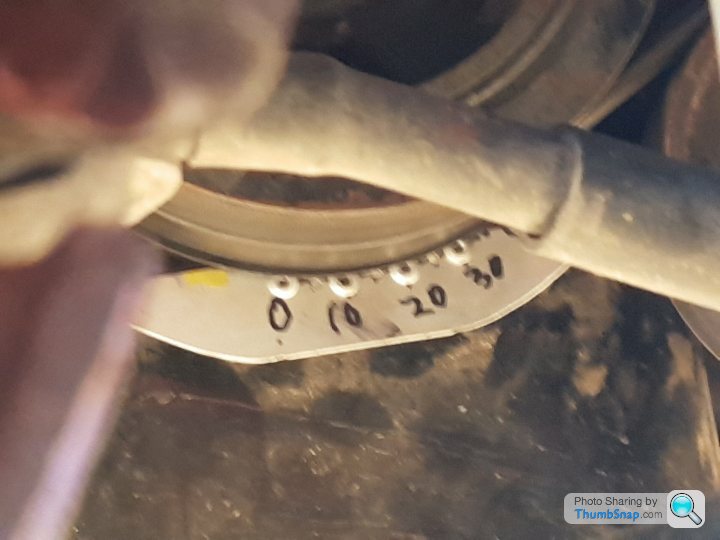
Centre of pop rivets are 10° marks, 1mm hole at 5°.
The factory timing marks are on the front cover, and basically invisible from above.
So I made a new bracket that picks up on 3 sump bolts, and marked a new (tiny) notch on the front pulley. I set TDC off the cam pulley marks, and checked against the 20° mark on the front cover (the only one I could see clearly).
I'll recheck next time I had all the front covers off.
It's a bit awkward to see, but with the long lead timing light I can see the marks without removing a wheel.
Centre of pop rivets are 10° marks, 1mm hole at 5°.
Edited by AW111 on Sunday 2nd April 08:50
No pictures today, but I have the dash dismantled because I bought a new phone.
No, seriously. The new phone is USB-C, and I couldn't get the cigarette lighter charger to work reliably.
To replace the lighter socket requires removing the a/c and heater control panel, which requires disconnecting the vent cables.
It all went ok until reassembling it for the second time (first time I routed a vent cable wrong). I managed to lose the little plastic clip down the centre console. I eventually bodged a solution with some 1mm copper wire and tiny cable ties.
The other cable only took 45 minutes of fiddling about with no access to reattach.
While it was apart I soused the inside of the vent cable with PTFE spray.
I have refitted the heater and a/c controls, and at least they're much less stiff.
But when I went to refit the plastic surround, I found the bottom mounting tabs and top screw holes were broken.
So now the screw holes have been plated with 0.5mm aluminium hammered to shape, and I've remade the bottom tabs with coat-hanger wire hot glued into place.
It's drying out in the shed now.
I'm also fitting a rear stay for the stereo, which is a make, test-fit, remake process, but I think v3 is the right shape.
Having repaired the front surround, I'll probably attack the centre console while it's out, since most of it's mounting holes are broken through as well.
Never stops with these things does it? Got mine back on the road 2 months ago after 2 years of it having sat in my garage blocked in by a mountain of building gear. I finally got around to swapping them around, did 80 miles in the MR2 only to have it spit the dummy ( and coolant ).
Leak from rad, all sorted now, but obviously, the minute it's apart, it means fan shrouds off to get powder coated, and all new stainless bolts, plus paint repairs to anywhere now accessible that I'm not happy with. Just back together last weekend after about 6 weeks of it in bits!
Liking the DIY timing marks!
Heaveho said:
Never stops with these things does it? Got mine back on the road 2 months ago after 2 years of it having sat in my garage blocked in by a mountain of building gear. I finally got around to swapping them around, did 80 miles in the MR2 only to have it spit the dummy ( and coolant ).
Leak from rad, all sorted now, but obviously, the minute it's apart, it means fan shrouds off to get powder coated, and all new stainless bolts, plus paint repairs to anywhere now accessible that I'm not happy with. Just back together last weekend after about 6 weeks of it in bits!
Liking the DIY timing marks!
Did you get the gearbox oil leak sorted?Leak from rad, all sorted now, but obviously, the minute it's apart, it means fan shrouds off to get powder coated, and all new stainless bolts, plus paint repairs to anywhere now accessible that I'm not happy with. Just back together last weekend after about 6 weeks of it in bits!
Liking the DIY timing marks!
Basically on mine every second screw hole in the interior hard plastic has broken out.
The centre a/c surround is now refitted, with multiple glued-in reinforcements where it has cracked. All reinforcement is hidden under the soft vinyl skin.
The rear stay for the radio is now the right shape and ready to refit the radio.
The centre console has four mounting holes that need repair, and a major crack, so I'll find my spare hot-glue sticks and try and finish that tomorrow.
It's an ongoing process - if I had unlimited $$$, I'd get all the cracking internal trim remade in fibreglass / carbon / ally / stainless, and then trimmed in leather. Dream on!
Gassing Station | Readers' Cars | Top of Page | What's New | My Stuff