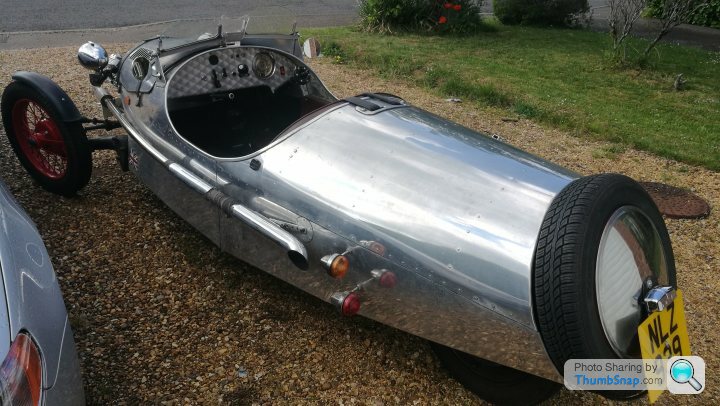
Victoria - Pembleton SuperSport
Discussion


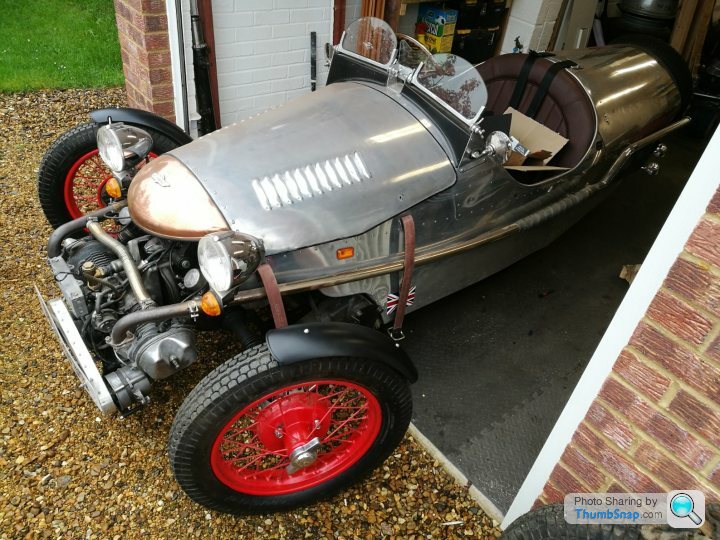
What a weekend!
Yesterday we went to Flywheel at Bicester,, a truly GREAT day out. Fantastic to see so many beautiful cars, bikes and planes. The highlight for me was the 9 first world war planes in the sky (including 4 tri-planes) at the same time and the wall if death.
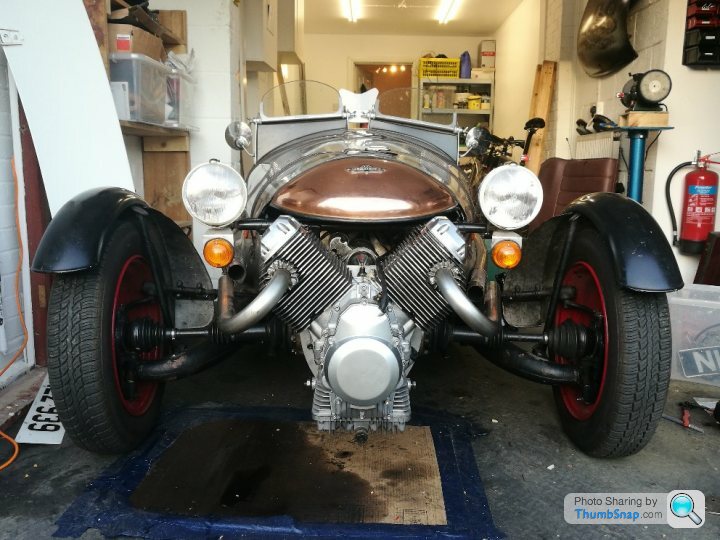
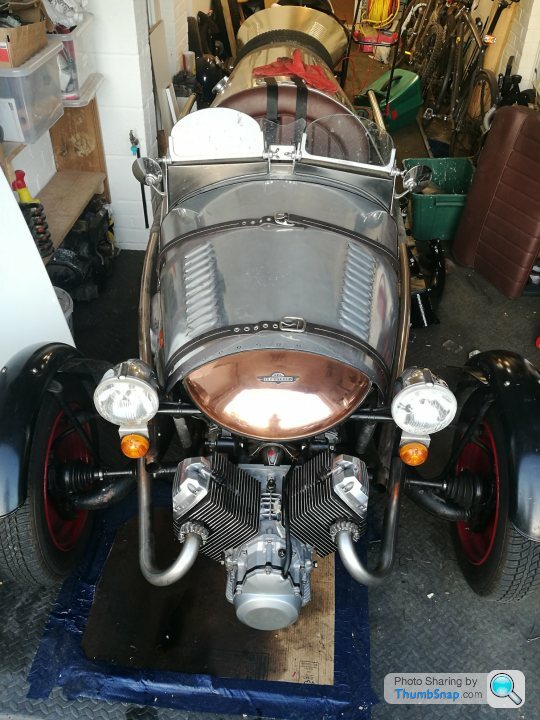
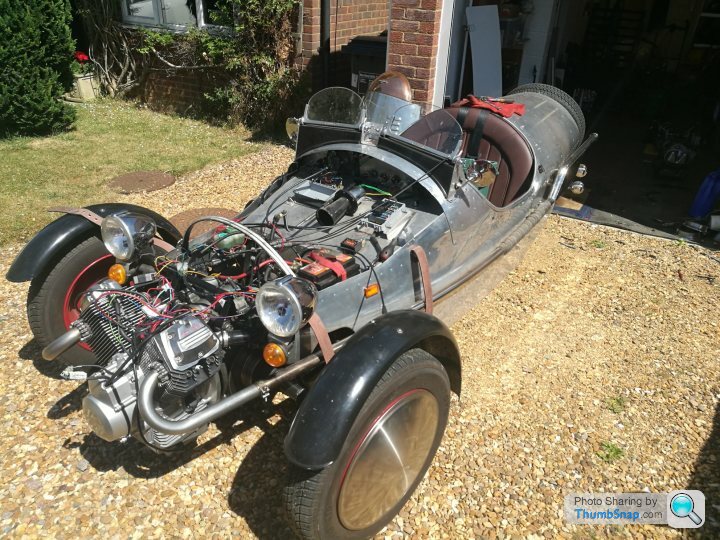
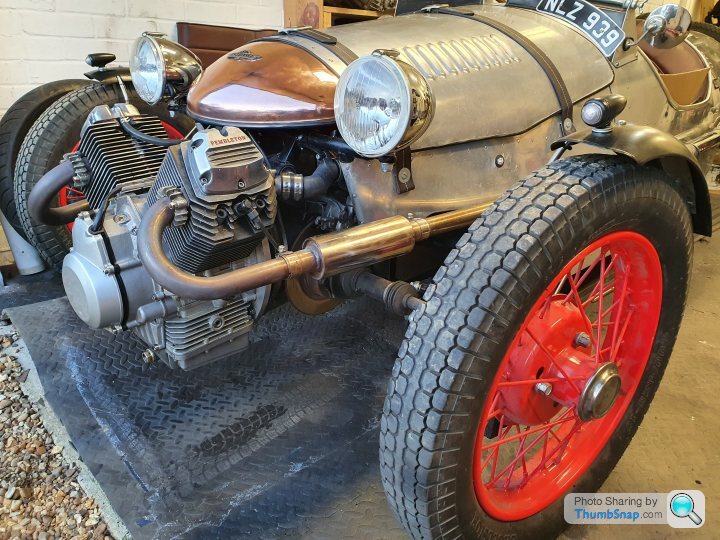
This afternoon my dad and I set about swapping the engine on Victoria. Getting the old engine out and the new engine fitted is a 2 man job. We started out at about 3.30pm and were finished by about 8.30pm, with a 30min food break. Mechanically its fully installed, but I need to sort out fueling, exhaust, ignition and charging now. But they're all one man "fettling" jobs, all the heavy work is now done.
If you're wondering where my wire wheels have gone, I fitted them, but found them out of true with radial run out too, so they're away with a wheelright being rebuilt with new spokes. Should get them back next weekend.
Yesterday we went to Flywheel at Bicester,, a truly GREAT day out. Fantastic to see so many beautiful cars, bikes and planes. The highlight for me was the 9 first world war planes in the sky (including 4 tri-planes) at the same time and the wall if death.
This afternoon my dad and I set about swapping the engine on Victoria. Getting the old engine out and the new engine fitted is a 2 man job. We started out at about 3.30pm and were finished by about 8.30pm, with a 30min food break. Mechanically its fully installed, but I need to sort out fueling, exhaust, ignition and charging now. But they're all one man "fettling" jobs, all the heavy work is now done.
If you're wondering where my wire wheels have gone, I fitted them, but found them out of true with radial run out too, so they're away with a wheelright being rebuilt with new spokes. Should get them back next weekend.
Well I had a very busy weekend last weekend.
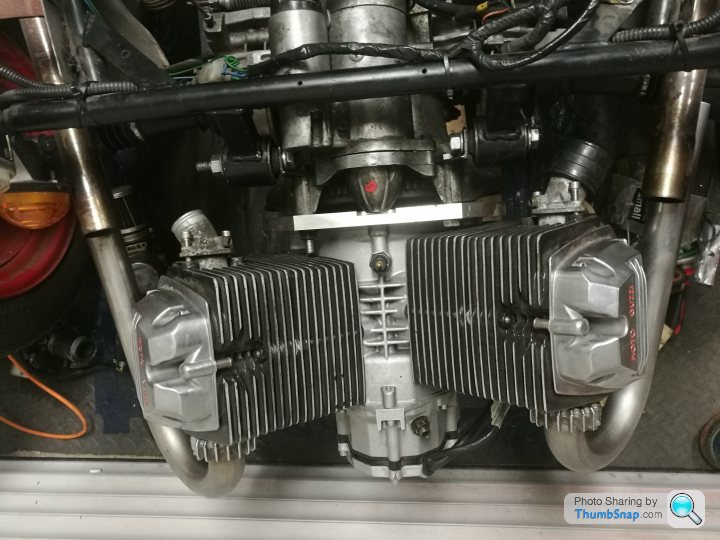
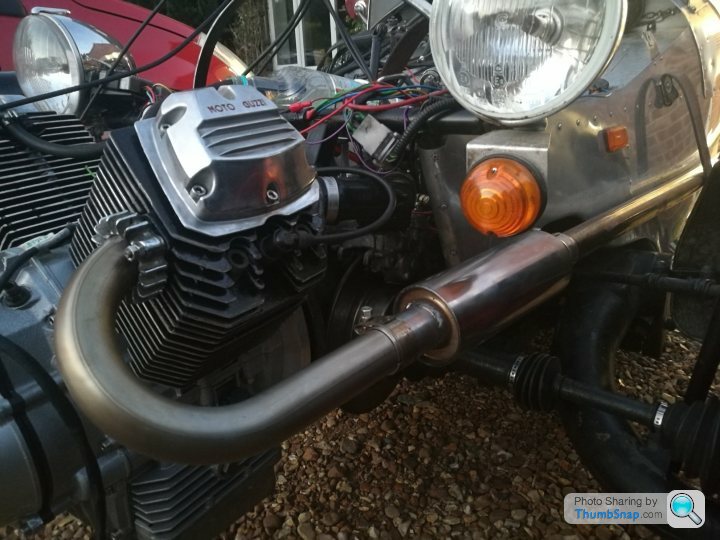
With the engine fitted, I had to sort out fueling and ignition to get the thing running. First port of call was the fuel delivery.
The mechanical pump that I was using before was the original 2cv, mounted to the side of the engine. This means an electric pump is needed. Here there are two options.
1- use virtually any electric facet type pump to the carbs, then a return line back to the tank to prevent flooding. The bike carbs are normally gravity fed from the tank above
2- find a very low pressure pump of circa 1.5psi that replicates a gravity feed situation and let the float valves do their thing. These pumps cut in and out as required to deliver a constant pressure.
As I didn't fancy running a return line back to the tank, I managed to find a late 90s yamaha fuel pump from am injected bike. These run at 1-2psi and it was only £30 so thought it was worth a shot.
The inlet pipes needed rotating 180degs and the use of an elbow to put them in space and not into the cassis or bodywork.
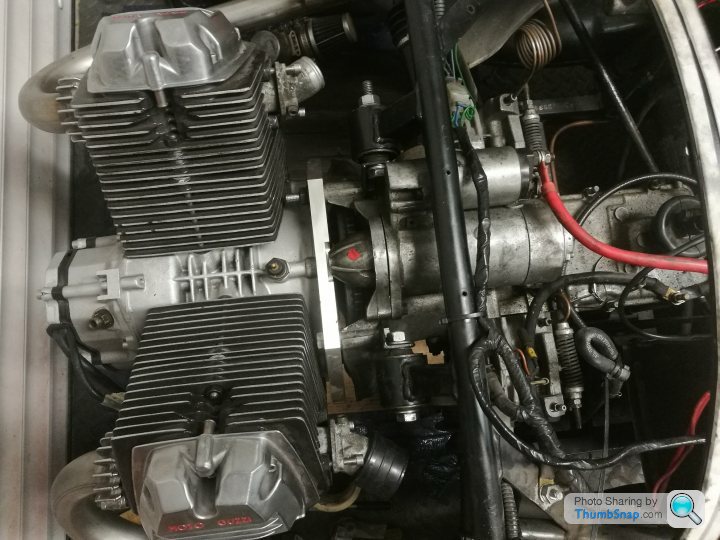
With the fueling sorted it was on to ignition.
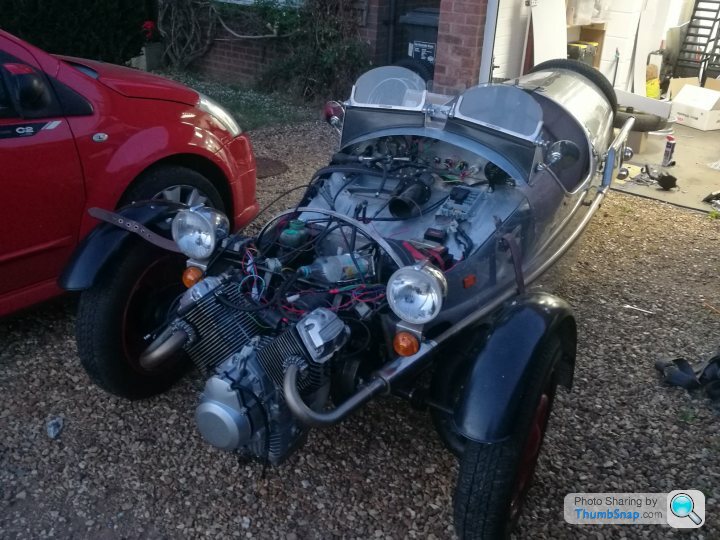
I found a wiring diagram online of a Guzzi Strada from '89. It had all the same hardware, but my loom from the donor was slightly different and I couldnt really work out what was what or why. After a few Heath Robinson attempts to get the wiring lashed up to try and get a spark I decided it was easier to cut all connections and re-wire as per the strada diagram I had. I bought a full set of plastic connectors in ebay and some shrink wrap and set about redoing it all to something I could understand. First attempt at turning the key and boom, I had a spark at both plugs. Phew....
I fiddled around a bit more and held my breath, shut my eyes and prayed the engine didn't s t itself in the first fire up after the rebuild.
It started on the first crank. But only firing on one cylinder.... uh oh.... oh, I forgot to connect the HT lead to the LH cylinder. It sat on my drive happily ticking away for about 15mins.
When the throttle is pulled, ot revs up to about 2500-3000rpm, but then wont rev any more and just barks through the carbs... another problem for another day.....
I know tickover is a bit high in the video, but that's now been reduced. Carbs need tuning and balancing.
https://youtu.be/9KT7Kg_Hu4g
With the engine fitted, I had to sort out fueling and ignition to get the thing running. First port of call was the fuel delivery.
The mechanical pump that I was using before was the original 2cv, mounted to the side of the engine. This means an electric pump is needed. Here there are two options.
1- use virtually any electric facet type pump to the carbs, then a return line back to the tank to prevent flooding. The bike carbs are normally gravity fed from the tank above
2- find a very low pressure pump of circa 1.5psi that replicates a gravity feed situation and let the float valves do their thing. These pumps cut in and out as required to deliver a constant pressure.
As I didn't fancy running a return line back to the tank, I managed to find a late 90s yamaha fuel pump from am injected bike. These run at 1-2psi and it was only £30 so thought it was worth a shot.
The inlet pipes needed rotating 180degs and the use of an elbow to put them in space and not into the cassis or bodywork.
With the fueling sorted it was on to ignition.
I found a wiring diagram online of a Guzzi Strada from '89. It had all the same hardware, but my loom from the donor was slightly different and I couldnt really work out what was what or why. After a few Heath Robinson attempts to get the wiring lashed up to try and get a spark I decided it was easier to cut all connections and re-wire as per the strada diagram I had. I bought a full set of plastic connectors in ebay and some shrink wrap and set about redoing it all to something I could understand. First attempt at turning the key and boom, I had a spark at both plugs. Phew....
I fiddled around a bit more and held my breath, shut my eyes and prayed the engine didn't s
t itself in the first fire up after the rebuild. It started on the first crank. But only firing on one cylinder.... uh oh.... oh, I forgot to connect the HT lead to the LH cylinder. It sat on my drive happily ticking away for about 15mins.
When the throttle is pulled, ot revs up to about 2500-3000rpm, but then wont rev any more and just barks through the carbs... another problem for another day.....
I know tickover is a bit high in the video, but that's now been reduced. Carbs need tuning and balancing.
https://youtu.be/9KT7Kg_Hu4g
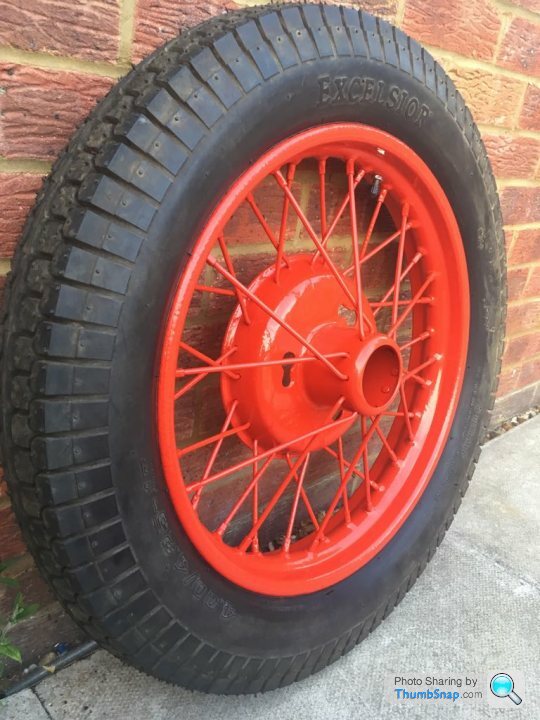
Picked up my wheels this afternoon.
They removed the tyres and put them on a wheel build jig to assess the run out.
They cut out and removed the outer spokes on both wheels. With new outer spokes they trued up okay, one was worse than the other. Once trued and straight, they were sent for blasting, then powder coated in bright pillar box red. They then had the tyres fitted with new tubes.
They look glorious. I've not fitted them yet, and I'm away at the weekend, so they'll have to wait until week to go on the car.

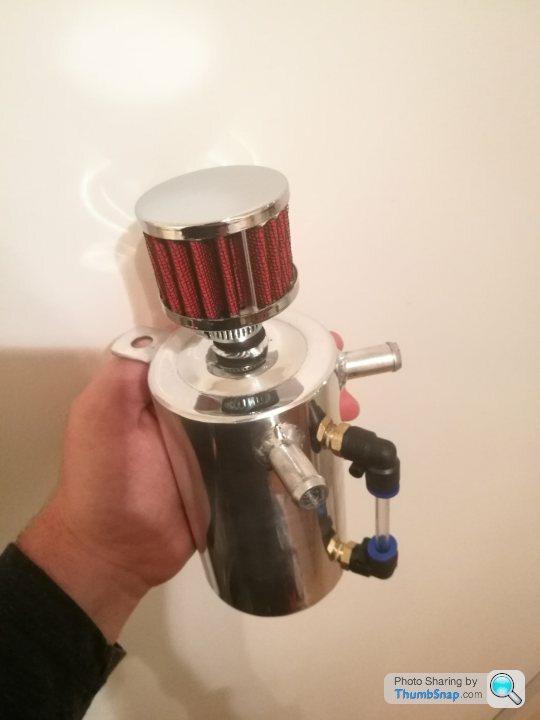
My EBay special polished breather/oil catch tank arrived too. Its baffled and came with a little filter and sight too. Its a 750ml capacity one, about the same size as the original on the bike. I literally have no idea how they can make and post these for £30 and still make a profit!

They removed the tyres and put them on a wheel build jig to assess the run out.
They cut out and removed the outer spokes on both wheels. With new outer spokes they trued up okay, one was worse than the other. Once trued and straight, they were sent for blasting, then powder coated in bright pillar box red. They then had the tyres fitted with new tubes.
They look glorious. I've not fitted them yet, and I'm away at the weekend, so they'll have to wait until week to go on the car.
My EBay special polished breather/oil catch tank arrived too. Its baffled and came with a little filter and sight too. Its a 750ml capacity one, about the same size as the original on the bike. I literally have no idea how they can make and post these for £30 and still make a profit!
After a bit of running, I still hadn't got the carbs dialled in and it wasn't quite right. I treated myself to a colourtune and a carbtune pro.
I removed the plugs and they were caked in carbon... way too rich. I threaded the colourtune in with my fingers.... that's weird.. It's not getting tight... tried to unscrew, not unwinding.... bugger. The spark plug thread was completely stripped.... smooth as a babies bum.
Damn and blast.
Its a 1991 engine and the head is aluminium, so its hardly surprising.
Within the hour the carbs had been removed, the inlets and headers removed and the head off...
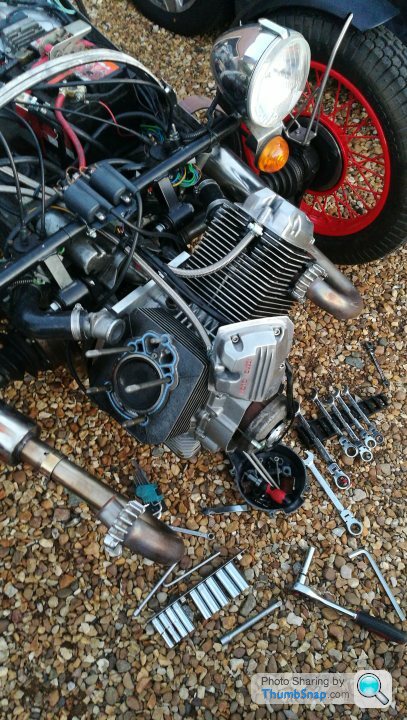
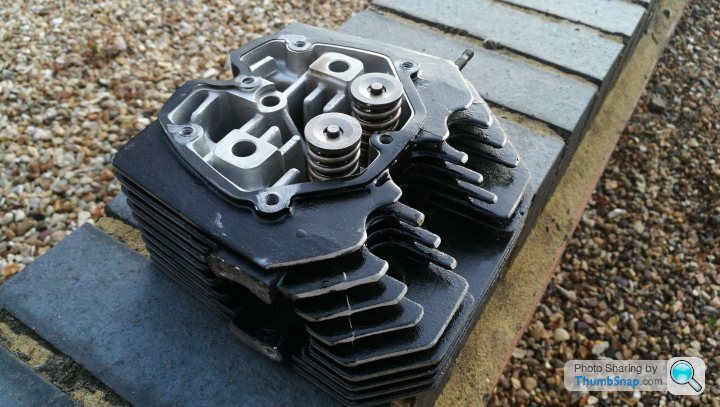
After a bit of research and looking online I decided to give the V-coil spark plug repair kit a go.
Its a tandem tap. With the head off you go in from underneath. The first tap follows what's left of the original thread, then theres a sharp tapered section which bores out the hole, and then a second tap which cuts in the new thread for the helicoil. It worked amazingly well, and was a really sharp tap.
I secured the helicoil in with a permanent, hi temp Loctite, so it should be a one-time fix.
Its running a lot better now, but its still not quite 100%....
I'm also having charging issues. Its not the end of the world as in normal running the battery only operates the ignition and indicators, but it does need to be sorted eventually...

I removed the plugs and they were caked in carbon... way too rich. I threaded the colourtune in with my fingers.... that's weird.. It's not getting tight... tried to unscrew, not unwinding.... bugger. The spark plug thread was completely stripped.... smooth as a babies bum.
Damn and blast.
Its a 1991 engine and the head is aluminium, so its hardly surprising.
Within the hour the carbs had been removed, the inlets and headers removed and the head off...
After a bit of research and looking online I decided to give the V-coil spark plug repair kit a go.
Its a tandem tap. With the head off you go in from underneath. The first tap follows what's left of the original thread, then theres a sharp tapered section which bores out the hole, and then a second tap which cuts in the new thread for the helicoil. It worked amazingly well, and was a really sharp tap.
I secured the helicoil in with a permanent, hi temp Loctite, so it should be a one-time fix.
Its running a lot better now, but its still not quite 100%....
I'm also having charging issues. Its not the end of the world as in normal running the battery only operates the ignition and indicators, but it does need to be sorted eventually...
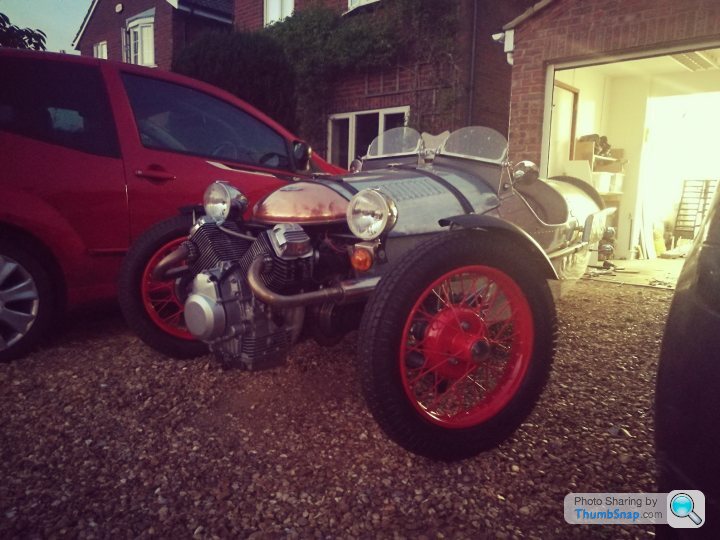
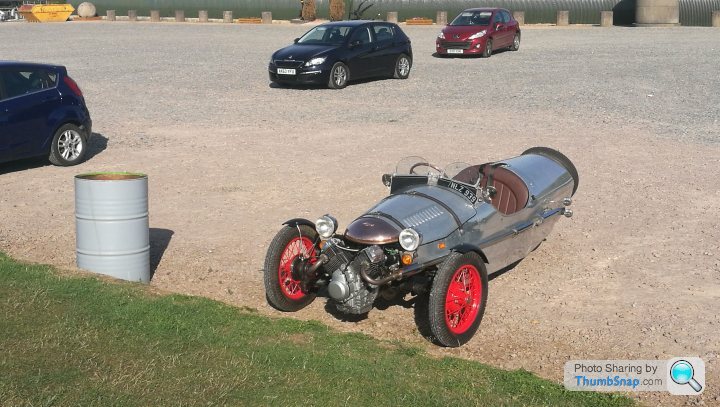
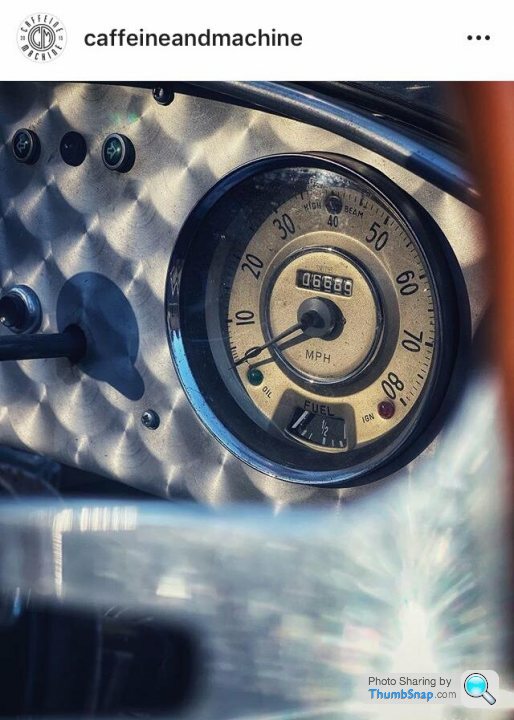
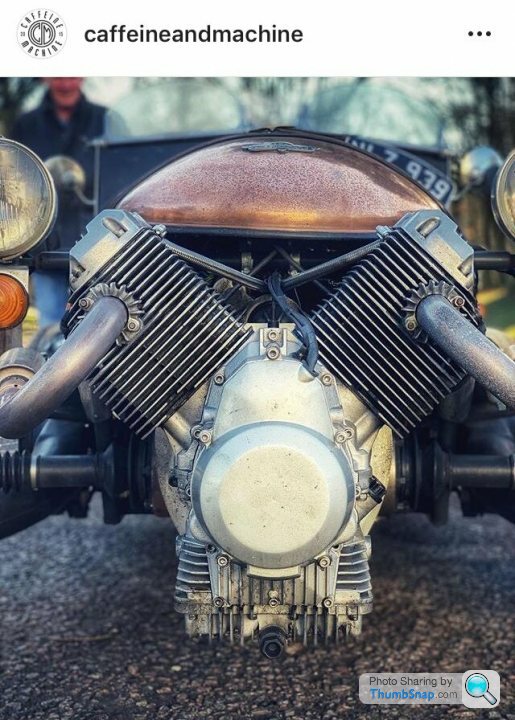
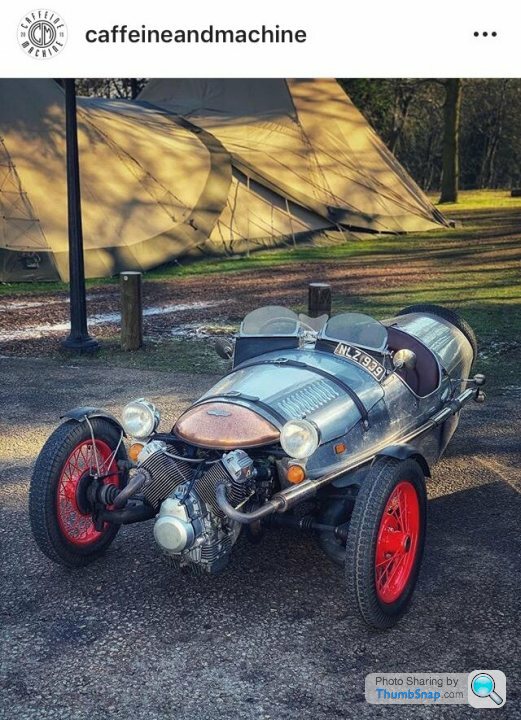
Went over to Caffeine and Machine yesterday morning for breakfast and a look around. Its a great venue and there was loads of super cool cars there.
Was bloody cold though. I kept grabbing onto the exhaust try try and warm my hands up! Team the cold (-2), with damp conditions, 4" tyres and incredibly hard compound and it makes for lots of interesting driving!
The Pembleton went down well and always had a bunch of people taking photos of it. One of the owners came out and took pictures and it made it's way onto the C&M social media..
I managed to spend a few hours yesterday morning tinkering with Victoria and getting a few little jobs done that I had "been living with" since I changed the engine last summer.
My neighbour came round and asked if he could borrow my battery charger as the one in his caravan had gone flat. I agreed and said "there's no rush to return it". As soon as I said it and he'd walked off I realised that if I wanted to go out in Victoria over the BH weekend then I'd need to use it. I decided to pop round the next morning to retrieve it, only to find they'd already packed up and gone off...
This forced my hand into finding the source of my charging issues and fix it, a dodgy connection from the ignition to the VR.
With all the wiring tidied up and wrapped I also fitted a choke lever. Up to now if I wanted to start from cold I'd have to remove the bonnet and manually actuate the chokes, start the engine and hold in place until the engine had warmed up, then release and refit the bonnet.
With the alternator now charging, my tricolour battery status light now holding green (never seen that since I fitted it! ) and a choke lever fitted, my wife and I popped out for a good long drive.
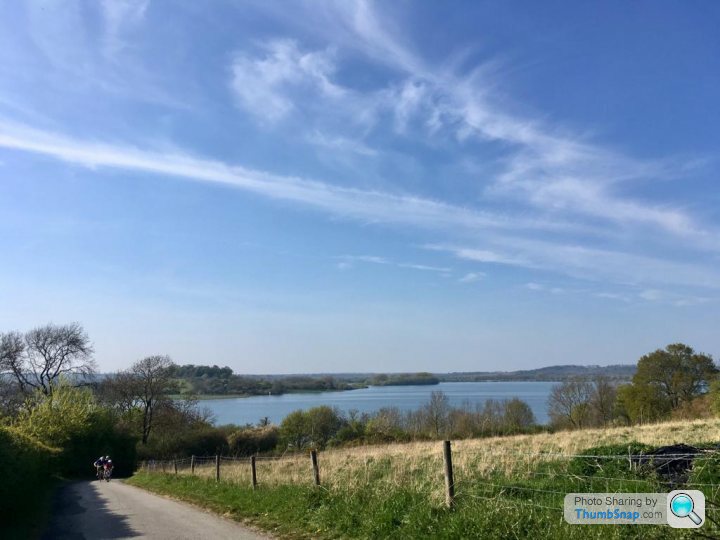
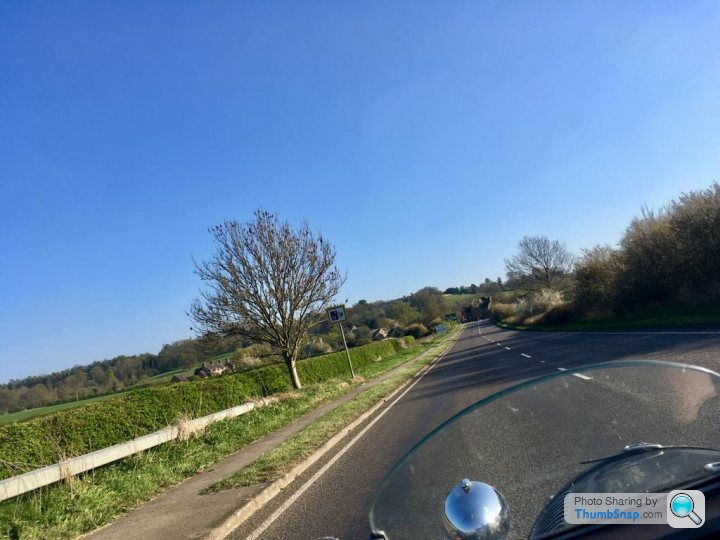
We left just before 3pm From Northampton and we went up to Rutland water nature reserve, strolled around for an hour or so, sat by the water and enjoyed an ice cream, then meandered back on the country lanes via the Seaton Viaduct across the Welland Valley and stopped off at a pub for some grub. Then drove on home. We got back just before 8pm.
She seems to be ticking along better than ever, and looking forward to "drive it day" next sunday.

My neighbour came round and asked if he could borrow my battery charger as the one in his caravan had gone flat. I agreed and said "there's no rush to return it". As soon as I said it and he'd walked off I realised that if I wanted to go out in Victoria over the BH weekend then I'd need to use it. I decided to pop round the next morning to retrieve it, only to find they'd already packed up and gone off...
This forced my hand into finding the source of my charging issues and fix it, a dodgy connection from the ignition to the VR.
With all the wiring tidied up and wrapped I also fitted a choke lever. Up to now if I wanted to start from cold I'd have to remove the bonnet and manually actuate the chokes, start the engine and hold in place until the engine had warmed up, then release and refit the bonnet.
With the alternator now charging, my tricolour battery status light now holding green (never seen that since I fitted it!
) and a choke lever fitted, my wife and I popped out for a good long drive.We left just before 3pm From Northampton and we went up to Rutland water nature reserve, strolled around for an hour or so, sat by the water and enjoyed an ice cream, then meandered back on the country lanes via the Seaton Viaduct across the Welland Valley and stopped off at a pub for some grub. Then drove on home. We got back just before 8pm.
She seems to be ticking along better than ever, and looking forward to "drive it day" next sunday.
Another year and another MOT pass for Victoria without any issues. I had a bit of an exhaust leak, so yesterday I decided to pull the exhausts off, clean up and re-assemble with some DB Killers, some exhaust paste and rewrap. Whilst I was there I put a relief dink in the drivers foot blister to allow the exhaust to run flat.
Without it the exhaust sweep has to run up and over it, and it looked wk.

Without it the exhaust sweep has to run up and over it, and it looked w
k.Probably time for an update.
I had a complete brake failure a few weeks ago, which was pretty arse twitchy. Front brake pipe snapped, lost all the fluid and in the process covered the discs in LHM, rendering the handbrake virtually useless too. Thankfully I was close to home and stationary when it went. I'd stopped at some lights with my foot on the brake and started rolling forward.
With a new brake line fitted (and routed properly, as per original citroen). I found some other issues too as I went over the car properly.
The rear brake was never very effective, and the adjusters were seized solid, so I fitted some new ones and adjusted the eccentrics using a tool I made from a peice of angle, a spare hub nut and a long bolt welded together.
The cylinder was a new one, which means the rubbers are very hard so they push the pistons back in. This means the pistons aren't in contact with the shoes, and a double press of the brake is required. I managed to dig out an original Lockheed 2cv brake cylinder I had spare with nice soft rubbers and hey presto, now a really nice firm brake pedal first time every time.
The rear swing arm was loose due to an original build error, so that had to be removed and remedied, which meant cutting an access panel in the side of the bodywork.
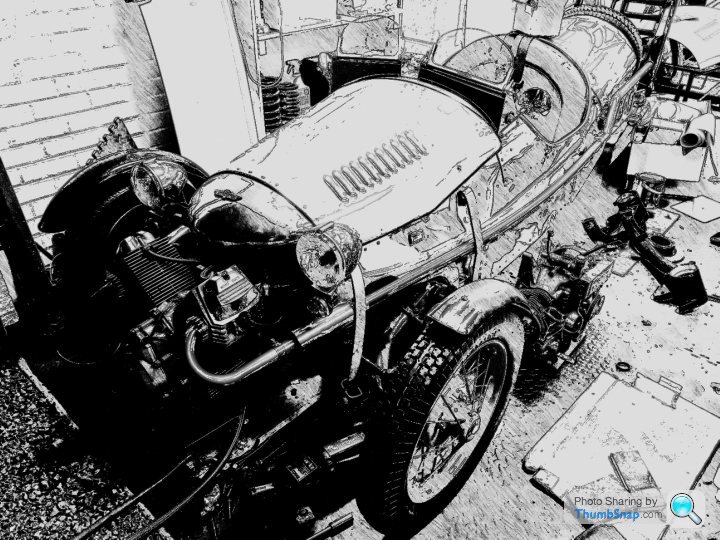
I've added a few upgrades to Victoria in line with what I've been doing to TinTub.
1- 3d printed some inlets to move the carbs back behind the lamp bar and under the bonnet.
2- 3d printed some bracketry and electrical component boxes for the electronic ignition and coils to put them at the front of the car just behind the engine, which has rather simplified the wiring!
3- strengthened all the spring hangers with 4mm steel discs and 5mm gussets to prevent the dreaded spring hangar failure (they're brick st house now)
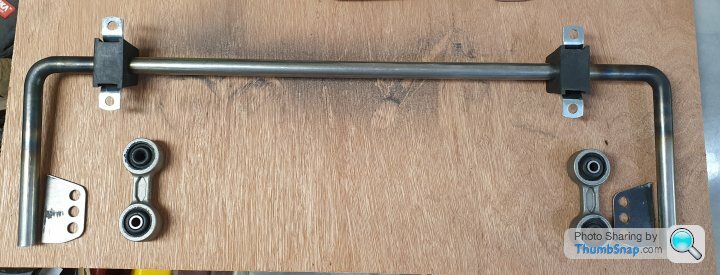
4- I've been toying about with the idea of an anti roll bar too. Citroen did make one for the ami, but the motion ratio is very poor and the way its fitted means that its not actually in torsion as its a fixed bar (no drop links) and the axis isn't concentric with the suspension pivot.
As an experiment I've bent up some EN19 bar and will be trying this out. Nothing off the shelf fits (obviously). I still need to weld the laser cut ends on and weld some angle brackets to the chassis. 5/8 bar, bmw Z3 rear drop links and MG Midget bushes and brackets.
I will get some more pictures of the other work up soon - I just need to take some photos.
I had a complete brake failure a few weeks ago, which was pretty arse twitchy. Front brake pipe snapped, lost all the fluid and in the process covered the discs in LHM, rendering the handbrake virtually useless too. Thankfully I was close to home and stationary when it went. I'd stopped at some lights with my foot on the brake and started rolling forward.
With a new brake line fitted (and routed properly, as per original citroen). I found some other issues too as I went over the car properly.
The rear brake was never very effective, and the adjusters were seized solid, so I fitted some new ones and adjusted the eccentrics using a tool I made from a peice of angle, a spare hub nut and a long bolt welded together.
The cylinder was a new one, which means the rubbers are very hard so they push the pistons back in. This means the pistons aren't in contact with the shoes, and a double press of the brake is required. I managed to dig out an original Lockheed 2cv brake cylinder I had spare with nice soft rubbers and hey presto, now a really nice firm brake pedal first time every time.
The rear swing arm was loose due to an original build error, so that had to be removed and remedied, which meant cutting an access panel in the side of the bodywork.
I've added a few upgrades to Victoria in line with what I've been doing to TinTub.
1- 3d printed some inlets to move the carbs back behind the lamp bar and under the bonnet.
2- 3d printed some bracketry and electrical component boxes for the electronic ignition and coils to put them at the front of the car just behind the engine, which has rather simplified the wiring!
3- strengthened all the spring hangers with 4mm steel discs and 5mm gussets to prevent the dreaded spring hangar failure (they're brick s
t house now)4- I've been toying about with the idea of an anti roll bar too. Citroen did make one for the ami, but the motion ratio is very poor and the way its fitted means that its not actually in torsion as its a fixed bar (no drop links) and the axis isn't concentric with the suspension pivot.
As an experiment I've bent up some EN19 bar and will be trying this out. Nothing off the shelf fits (obviously). I still need to weld the laser cut ends on and weld some angle brackets to the chassis. 5/8 bar, bmw Z3 rear drop links and MG Midget bushes and brackets.
I will get some more pictures of the other work up soon - I just need to take some photos.
Photos of chassis upgrades:
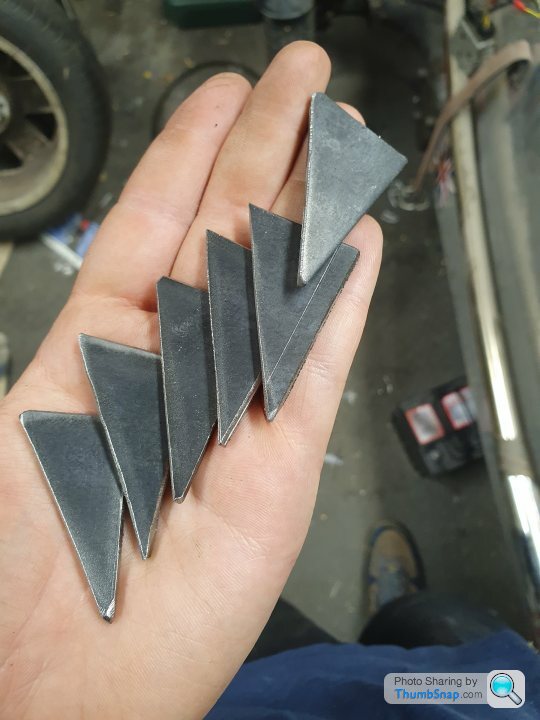
Gussets.

One spring cup - bit dark but you get the idea. Two webs welded on each cup for reinforcement.
Anti roll bar:

Angle brackets welded to the chassis rails and threaded bosses on the arms:
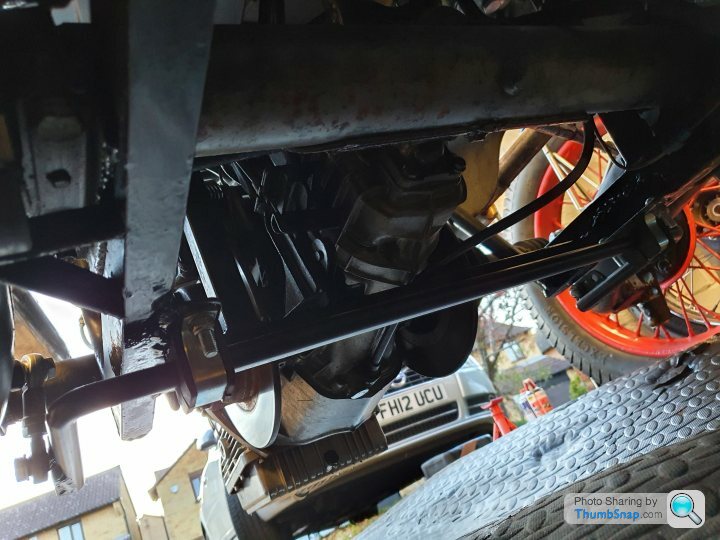
With the anti roll bar fitted I needed to relocate the fuel run slightly, no big deal.
I also modelled up and printed off some bracketry/box for my ignition coils and electronic ignition unit.
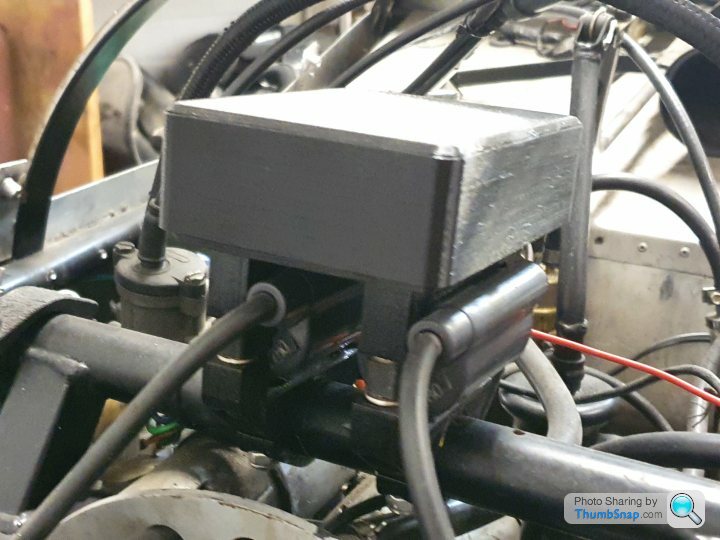
Much neater.
With that done I started butchering into the wiring. It wasn't a complete mess, but wasn't that tidy. It's still far from ideal but it's an improvement.
Something else that was bothering me was the front indicators. The front ones were huge wipac units as found on defenders and trailers, mounted to folded aluminium brackets. And the side repeaters were huge square plastic orange things. God only knows why the builder fitted them.
Anyway, I decided to sack those right off and fit some small lucas bullet type ones to the wings so they turn with the steering, and some clear button LEDs for the side repeaters.
I needed to fit a different relay because the LED lights draw so little current it was flashing at double speed.
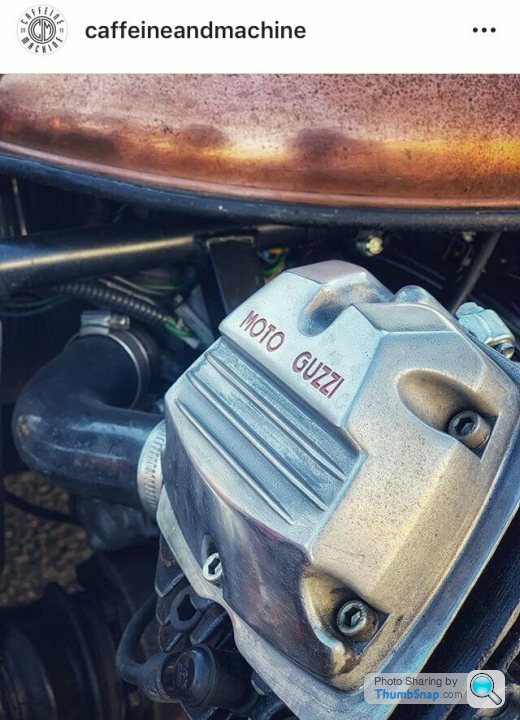
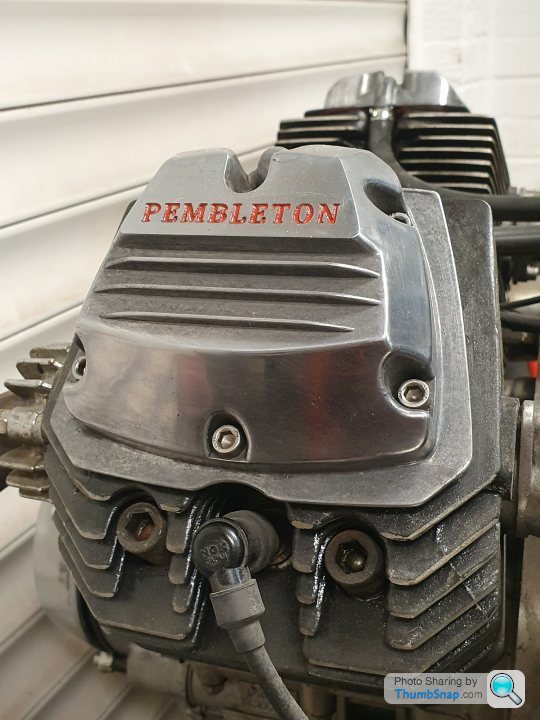
As per the rocker covers for TinTub I also faced them off and engraved them with "pembleton"
Polished my tip
And last but not least fitted the BMW TRE conversion to replace the old and awkward 2cv units. I drilled and tapped the steering arms to M8x1 too as they can be torqued up more and the fixings are easier to get hold of in high tensile. As they are doubling up as wing brackets then this makes sense I think.
Oh and I also smashed together a number plate plinth. Just having it on a bit of sheet aluminium at an angle was annoying me...

(Wiring still not connected as you can see).
Next job is to sort the tracking out and then MOT!!
It's been FAR too long....
Gussets.
One spring cup - bit dark but you get the idea. Two webs welded on each cup for reinforcement.
Anti roll bar:
Angle brackets welded to the chassis rails and threaded bosses on the arms:
With the anti roll bar fitted I needed to relocate the fuel run slightly, no big deal.
I also modelled up and printed off some bracketry/box for my ignition coils and electronic ignition unit.
Much neater.
With that done I started butchering into the wiring. It wasn't a complete mess, but wasn't that tidy. It's still far from ideal but it's an improvement.
Something else that was bothering me was the front indicators. The front ones were huge wipac units as found on defenders and trailers, mounted to folded aluminium brackets. And the side repeaters were huge square plastic orange things. God only knows why the builder fitted them.
Anyway, I decided to sack those right off and fit some small lucas bullet type ones to the wings so they turn with the steering, and some clear button LEDs for the side repeaters.
I needed to fit a different relay because the LED lights draw so little current it was flashing at double speed.
As per the rocker covers for TinTub I also faced them off and engraved them with "pembleton"
Polished my tip
And last but not least fitted the BMW TRE conversion to replace the old and awkward 2cv units. I drilled and tapped the steering arms to M8x1 too as they can be torqued up more and the fixings are easier to get hold of in high tensile. As they are doubling up as wing brackets then this makes sense I think.
Oh and I also smashed together a number plate plinth. Just having it on a bit of sheet aluminium at an angle was annoying me...
(Wiring still not connected as you can see).
Next job is to sort the tracking out and then MOT!!
It's been FAR too long....

Gassing Station | Readers' Cars | Top of Page | What's New | My Stuff