Alfa Romeo 164 Twinspark Super
Discussion


carinaman said:
Thanks for the Auto Italia photos.
Annual pilgrimage for me - sad to see the number of 164s dropping with each visit, but an excellent day out (as long as you bring your own hot food and coffee - those queues/prices are legendarily bad on-site).A candlelit journey into the stores yielded the NOS front exhaust section donated by Phil at Alfacraft many years ago, still bearing all tags and wrapping.
 [
[I have been especially lucky - the bracket that had rusted through is included on this piece! I won't need to fabricate a new one or have to end up contacting the handful of 164 owners for a spare. Excellent! Time to count the pennies for the exhaust...

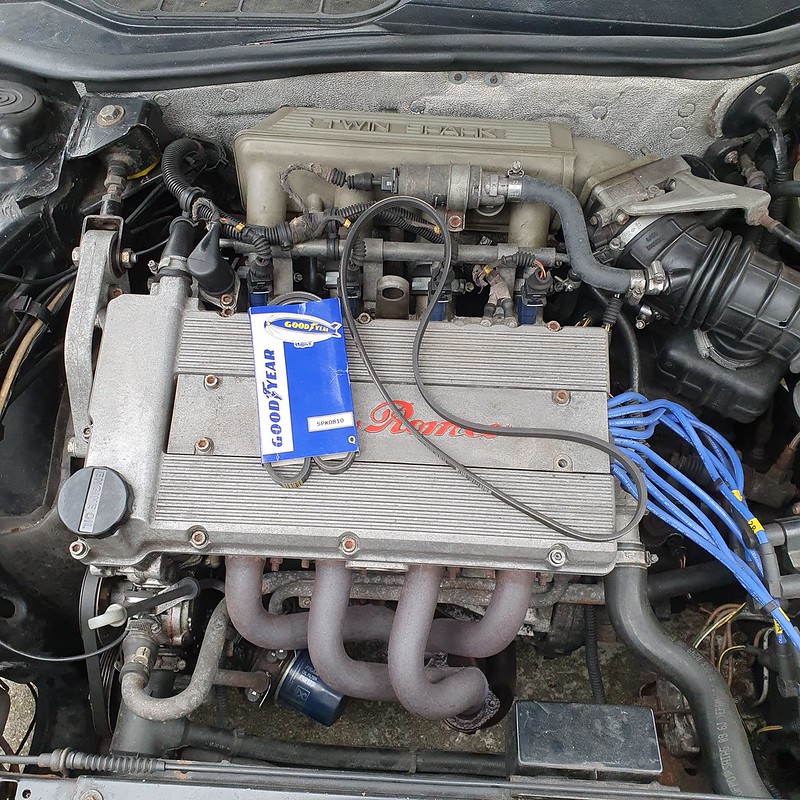
Before the 164 goes in for its exhaust at Redhill Classics I decided to give all the bolts a pre-treatment with PlusGas, and take a good look around the car to ensure nothing was amiss or would disrupt the operation.
I had forgotten the radiator was leaking...

Caught it just before it went below the tank minumim marker, but I think the radiator replacement is going to have to be reprioritised on the schedule, especially as there is evidence of some leaks now at the top of the radiator...

Topped off with some wintery bluejuice, and then I saw the alternator belt was showing signs of decay. I checked my stores and unfurled a new alternator and power steering duo.
This was one of the first jobs I completed on the car 8 years ago. I remember driving the car 'home' to my slightly dodgy old council flat and plenty of head scratching and trips to Halfords to locate a stubby rachet set. This time rounds, I had a good cup of tea, a complete toolset and a photo history.
PS belt requires removal of the pulley, three 10mm bolts and off it slides.

The alternator is a little trickier - at the business end the cam sensor is in the way, so I cleaned the area up and loosened one bolt, removed the other and 'hinged' it back for access. No point taking both bolts out and fumbling later on!

Alternator is in an awkward position, but with careful deployment of the stubby set bought 8 years ago and some needlessly expensive ratchet spanners, the reclusive generator moved just enought to tease the belt off.

Before replacing the belts I decided to remove the dessicated sound deadening on the wing and dose the area in Gunk. A cup of tea later and it cleaned up neatly.

Right. What did I actually start doing? Oh yes, the exhaust.
I coated the bolts for the downpipe and gave them an enthusiastic wire brushing to ensure they were still hexagonal.

I also managed to order two replacement gaskets for this downpipe connection, so that's another useful addition to the parts bin.
It appears the reason the front bracket became loose was the failure of a bush that secures it - the bolt had worked itself out of the centre. I attempted to get the size today but will have to retry tomorrow with trolley jack and Vernier calipers in daylight. If I can order this bush the team at Redhill should be able to replace it all in one go.

I'll keep recoating the bolts in PlusGas and perhaps try taking some other brackets off tomorrow. If I can derust and paint them, I'll have checked they won't hamper the operation and prevent them being an eyesore once the new item is fitted. If only I had the time to paint/power coat the manifold... oh well...
I had forgotten the radiator was leaking...
Caught it just before it went below the tank minumim marker, but I think the radiator replacement is going to have to be reprioritised on the schedule, especially as there is evidence of some leaks now at the top of the radiator...
Topped off with some wintery bluejuice, and then I saw the alternator belt was showing signs of decay. I checked my stores and unfurled a new alternator and power steering duo.
This was one of the first jobs I completed on the car 8 years ago. I remember driving the car 'home' to my slightly dodgy old council flat and plenty of head scratching and trips to Halfords to locate a stubby rachet set. This time rounds, I had a good cup of tea, a complete toolset and a photo history.
PS belt requires removal of the pulley, three 10mm bolts and off it slides.
The alternator is a little trickier - at the business end the cam sensor is in the way, so I cleaned the area up and loosened one bolt, removed the other and 'hinged' it back for access. No point taking both bolts out and fumbling later on!
Alternator is in an awkward position, but with careful deployment of the stubby set bought 8 years ago and some needlessly expensive ratchet spanners, the reclusive generator moved just enought to tease the belt off.
Before replacing the belts I decided to remove the dessicated sound deadening on the wing and dose the area in Gunk. A cup of tea later and it cleaned up neatly.
Right. What did I actually start doing? Oh yes, the exhaust.
I coated the bolts for the downpipe and gave them an enthusiastic wire brushing to ensure they were still hexagonal.
I also managed to order two replacement gaskets for this downpipe connection, so that's another useful addition to the parts bin.
It appears the reason the front bracket became loose was the failure of a bush that secures it - the bolt had worked itself out of the centre. I attempted to get the size today but will have to retry tomorrow with trolley jack and Vernier calipers in daylight. If I can order this bush the team at Redhill should be able to replace it all in one go.
I'll keep recoating the bolts in PlusGas and perhaps try taking some other brackets off tomorrow. If I can derust and paint them, I'll have checked they won't hamper the operation and prevent them being an eyesore once the new item is fitted. If only I had the time to paint/power coat the manifold... oh well...
Edited by Spinakerr on Sunday 21st November 17:52
Part 2 this morning of exhaust bracket preparation - I put the car as high as I dared on the stands and managed to get the 17mm socket on the side of the gearbox.

A few awkward maneuvers and the two nuts mercifully came loosened without drama, and the front bracket was removed, Gunked and inspected.

A 45mm OD, 8mm ID, 16mm OL, 21mm IL bush? I'm not sure where to start with this. ANyone know who I can call to track it down?

A few awkward maneuvers and the two nuts mercifully came loosened without drama, and the front bracket was removed, Gunked and inspected.
A 45mm OD, 8mm ID, 16mm OL, 21mm IL bush? I'm not sure where to start with this. ANyone know who I can call to track it down?
Edited by Spinakerr on Sunday 21st November 17:53
Nice update. I'm looking forward to seeing this next batch of work on the 164.
As for the bush, the two options I'd explore would be to:
1. Get one 3d printed, I've got a 3d printed "poly" bush engine mount on my 172 and that has lasted really well.
Or:
2. Get a polyurethane bush resin kit and make it yourself. Back when i was a lad and owned an MG midget quite a few people were making home made poly bush kits for their cars.
How much stress is the bush under? How precisely does it need to fit?
Edited by Cambs_Stuart on Tuesday 23 November 14:52

Thank you both - I have added a poly kit, should be an enjoyable little project for this weekend! I can also do it in situ, no need for a press.
The Shore rating is a little high om my choice of kit, but I can perhaps insert some air gaps with a tube during the process. I like to experiment.
The Shore rating is a little high om my choice of kit, but I can perhaps insert some air gaps with a tube during the process. I like to experiment.
Successful little morning while the weatehr is miserable - poured my first polyurethane bush.
Thanks to the suggestions above I sourced a realtively cheap two part kit, setup my workstation as below.

First task was to take a reference of the existing bush central metal location - dead centre, and fortunately flush on onside with the oter ring. This makes pouring easier with a single flat surface.
Original bush rubber extracted with a variety of tools - saws, hammer, sandpaper and so forth. Keying the metal surafces is key to good adhesion.

Having watched a number of videos and followed forum posts on the process, it was apparant simple cardboard and wood can bond annoyingly to the poured liquid. Examining the kit I had ordered and a quick check of plastics available, I used a simple mailing envelope as a non-bonding base. Liquid was mixed 1:1 on a scale, and poured in.
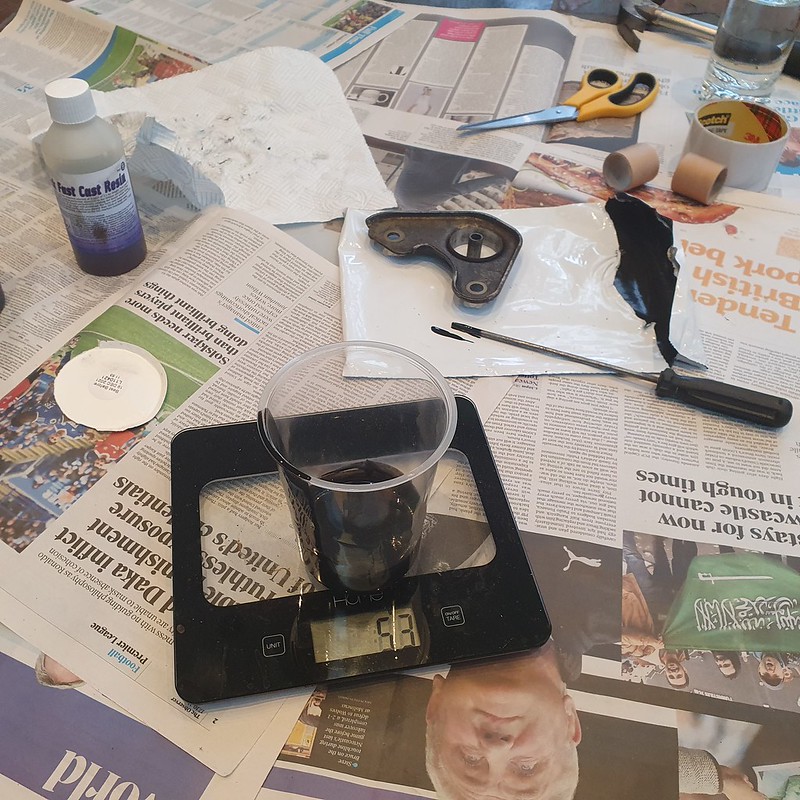

Thirty minutes later, a scalpel and careful fingers peeled away the envelope. It needs further curing but very pleased with my first attempt - hopefully its Shore rating will hold up!

Thanks to the suggestions above I sourced a realtively cheap two part kit, setup my workstation as below.
First task was to take a reference of the existing bush central metal location - dead centre, and fortunately flush on onside with the oter ring. This makes pouring easier with a single flat surface.
Original bush rubber extracted with a variety of tools - saws, hammer, sandpaper and so forth. Keying the metal surafces is key to good adhesion.
Having watched a number of videos and followed forum posts on the process, it was apparant simple cardboard and wood can bond annoyingly to the poured liquid. Examining the kit I had ordered and a quick check of plastics available, I used a simple mailing envelope as a non-bonding base. Liquid was mixed 1:1 on a scale, and poured in.
Thirty minutes later, a scalpel and careful fingers peeled away the envelope. It needs further curing but very pleased with my first attempt - hopefully its Shore rating will hold up!
Thanks all - would not have attempted without your suggestions, so very much appreciate the input!
Shore rating is quoted at 90A... tougher than the original rubber, which looks like it started at 60A and became, well, 0A when the sorry mess detached itself.
As this a single 45mm bush at the back of the gearbox solely for hanging one of the exhaust mounts, I'm hoping the fact that it is simply there will be enough. My experience with polybush engine mounts has been... poor... in that the induced teeth-chattering and mandatory massage-seats quickly lost their allure.
I can always drill a hole or two in it if the new exhaust generates some vibration, but I think the only fair test will be once all the engine mounts have been replaced too. A job for 2022.
Edited by Spinakerr on Sunday 28th November 12:16
For the first time in my ownership, and probably a little longer, the Alfa has a complete exhaust system!

It was a long day - pre 6am start in the first real frost, but thankfully no really issues other than frost on the inside of the winscreen too... Heated seats kept me snug on the dawn drive to Redhill Classics.


I then trudged to Redhill train station for a 07:30 line to London, with an arduous day brightened by a call at 4pm from Dave at Redhill to let me know everything had gone to plan!
Much later... I again trudged from a cold train to a frozen 164, the only outward appearance being the shiny new tip, selected after many searches as a stainless simulucrum of the original. Engine on... windows down... glorious! No rattles, no broken hangers, no vibrations or drooping heatshields. Phew.
A good poke in daylight revealed excellent craftsmanship, wonderful attention to detail on the downpipe and hangers, and a few adjustment to heatshields and fitting to ensure everything was straight and well away from any potential knocking points.


The sound is OEM - CAT is still in(for the moment), the 8V chain driven twinspark having a lavely chainsaw rasp but nothing to drone at speed or be too shouty.
Fortunately my home-made bush has neither generated new vibrations nor made a bid for escape.
Very happy indeed.
It was a long day - pre 6am start in the first real frost, but thankfully no really issues other than frost on the inside of the winscreen too... Heated seats kept me snug on the dawn drive to Redhill Classics.
I then trudged to Redhill train station for a 07:30 line to London, with an arduous day brightened by a call at 4pm from Dave at Redhill to let me know everything had gone to plan!
Much later... I again trudged from a cold train to a frozen 164, the only outward appearance being the shiny new tip, selected after many searches as a stainless simulucrum of the original. Engine on... windows down... glorious! No rattles, no broken hangers, no vibrations or drooping heatshields. Phew.
A good poke in daylight revealed excellent craftsmanship, wonderful attention to detail on the downpipe and hangers, and a few adjustment to heatshields and fitting to ensure everything was straight and well away from any potential knocking points.
The sound is OEM - CAT is still in(for the moment), the 8V chain driven twinspark having a lavely chainsaw rasp but nothing to drone at speed or be too shouty.
Fortunately my home-made bush has neither generated new vibrations nor made a bid for escape.
Very happy indeed.
Just two more to go yes, and I've booked the Saab in for Redhill too. They have demonstrated they do excellent work, as described, for a fair price.
Very happy with the subtle change to stainless with the mesh interior for the tip - just a hint of the work under the skin!
I decided to make an initial investigation of the radiator today - it has been detiorating steadily without drama but I don't want any surprises over the holiday season.
Relatively easy to access - slam panel is four 10mm bolts, a few electrical connectors and then the pipework.

Expansion tank hose is clipped underneath slam panel:

The radiator in place is not original - its about the right size, but the presence of cable ties on the fan shroud has always bothered me!
Top hose off and folded away carefully, coolant caught in receptacle... almost...

Ah yes. The 'Raise The Titanic' vibes are strong in this area of the car...

I spared the belts and pumps as best I could from the antifreeze tsunami...

Radiator and fan out, the true extent of detioration is apparent.
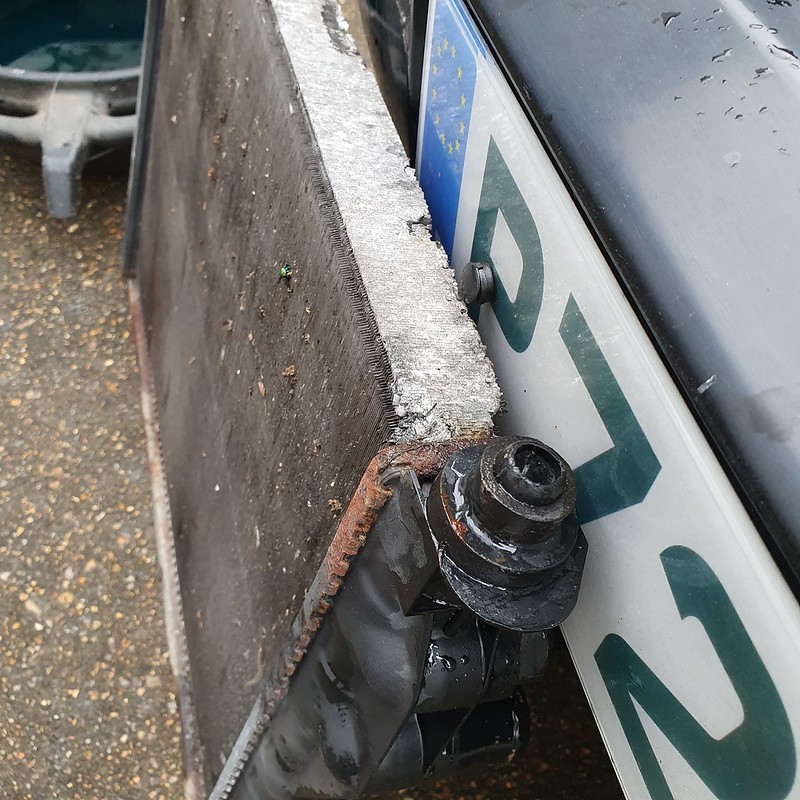

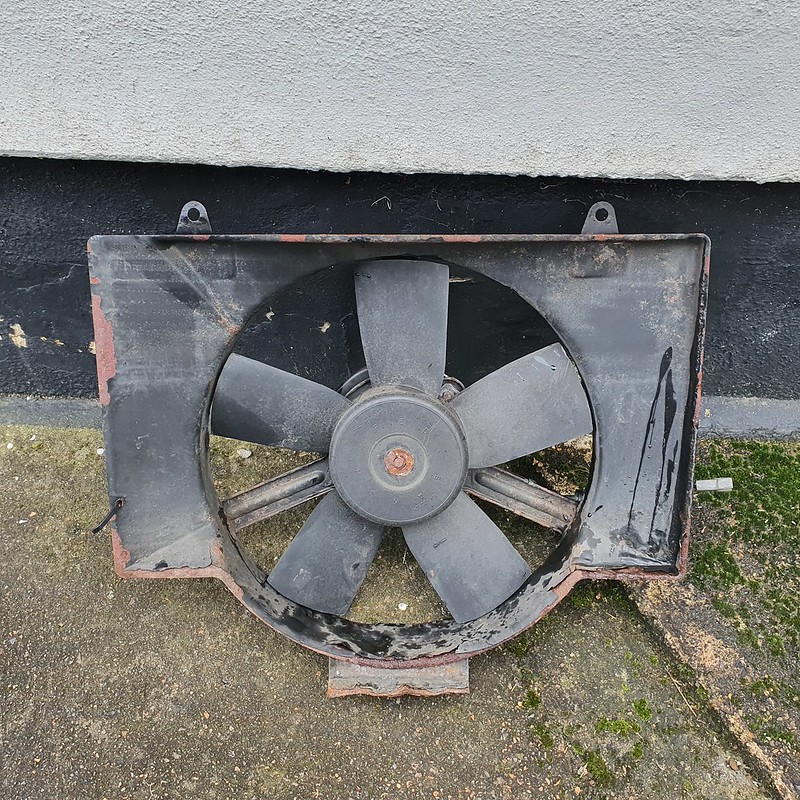
Sadly the fan shroud is much worse than expected in unseen areas. I was hoping to save this with some BiltHamber products but I think I'll have to make a few calls and tranfers the fan & motor over.

29mm spanner saved the fan switch, and the end rubbers for the feet. As the radiator is wrong for the car, one of the feet is deformed and will need some coaxing to fit correctly back.

The new radiator is the correct size, thankfully - 59.5cm from foot to foot.


I sealed off all hoses, rinsed everything down with fresh water to prevent any blue fuzziness upon my return, and scurried inside out of the rain to plot the week of purchases.
I know putting a sparkling new radiator back on a bracket that looks like it was dragged from the wreck of the Maria Doria is slightly strange, but needs must.

In the spirit of true scope creep, it would be the ideal time to give the manifold a coat of black VHT...

Very happy with the subtle change to stainless with the mesh interior for the tip - just a hint of the work under the skin!
I decided to make an initial investigation of the radiator today - it has been detiorating steadily without drama but I don't want any surprises over the holiday season.
Relatively easy to access - slam panel is four 10mm bolts, a few electrical connectors and then the pipework.
Expansion tank hose is clipped underneath slam panel:
The radiator in place is not original - its about the right size, but the presence of cable ties on the fan shroud has always bothered me!
Top hose off and folded away carefully, coolant caught in receptacle... almost...
Ah yes. The 'Raise The Titanic' vibes are strong in this area of the car...
I spared the belts and pumps as best I could from the antifreeze tsunami...
Radiator and fan out, the true extent of detioration is apparent.
Sadly the fan shroud is much worse than expected in unseen areas. I was hoping to save this with some BiltHamber products but I think I'll have to make a few calls and tranfers the fan & motor over.
29mm spanner saved the fan switch, and the end rubbers for the feet. As the radiator is wrong for the car, one of the feet is deformed and will need some coaxing to fit correctly back.
The new radiator is the correct size, thankfully - 59.5cm from foot to foot.
I sealed off all hoses, rinsed everything down with fresh water to prevent any blue fuzziness upon my return, and scurried inside out of the rain to plot the week of purchases.
I know putting a sparkling new radiator back on a bracket that looks like it was dragged from the wreck of the Maria Doria is slightly strange, but needs must.
In the spirit of true scope creep, it would be the ideal time to give the manifold a coat of black VHT...
Whilst you are in there, might I suggest removing that power steering hose/pipe that is very corroded and seeing if your local Pirtek or similar can fab up a replacement - it looks just like the ones on my Monaro did, right before they started letting go....
Radiator shroud looks like it might respond well to blasting and powder coating if you have someone local?
Radiator shroud looks like it might respond well to blasting and powder coating if you have someone local?
Edited by 99t on Monday 6th December 15:22
Thank you both - I've actually managed to secure a replacement power steering hose, NOS, I just remembered I need to pick that up from a very remote location. Christmas road trip!
The shroud is toast - I'm currently awaiting a call back from a fellow 164 driver who may have one in the shed... fingers crossed.
Probably a good time to check the ABS pump and brake lines too, right...oh blast...
The shroud is toast - I'm currently awaiting a call back from a fellow 164 driver who may have one in the shed... fingers crossed.
Probably a good time to check the ABS pump and brake lines too, right...oh blast...
Gassing Station | Readers' Cars | Top of Page | What's New | My Stuff