MX5 Berkeley to MEV Exocet projec
Discussion


Thanks again for the encouragement!
Yes, it is a pity that Stuart has sold off the replicar project, as they can look very nice - I like the idea of one done to look like an old racer built with modern performance bits - so classic paint colours but modern motorsport wheels, cage etc - and with the performance to match! I am sure the new owner will have it back on sale soon!
I am loving the rebody project - looks like a good substantial chassis there - I expect that will be comical nice it is done - although I hope the ride will be raised and springs softened for authentic stance through the corners!
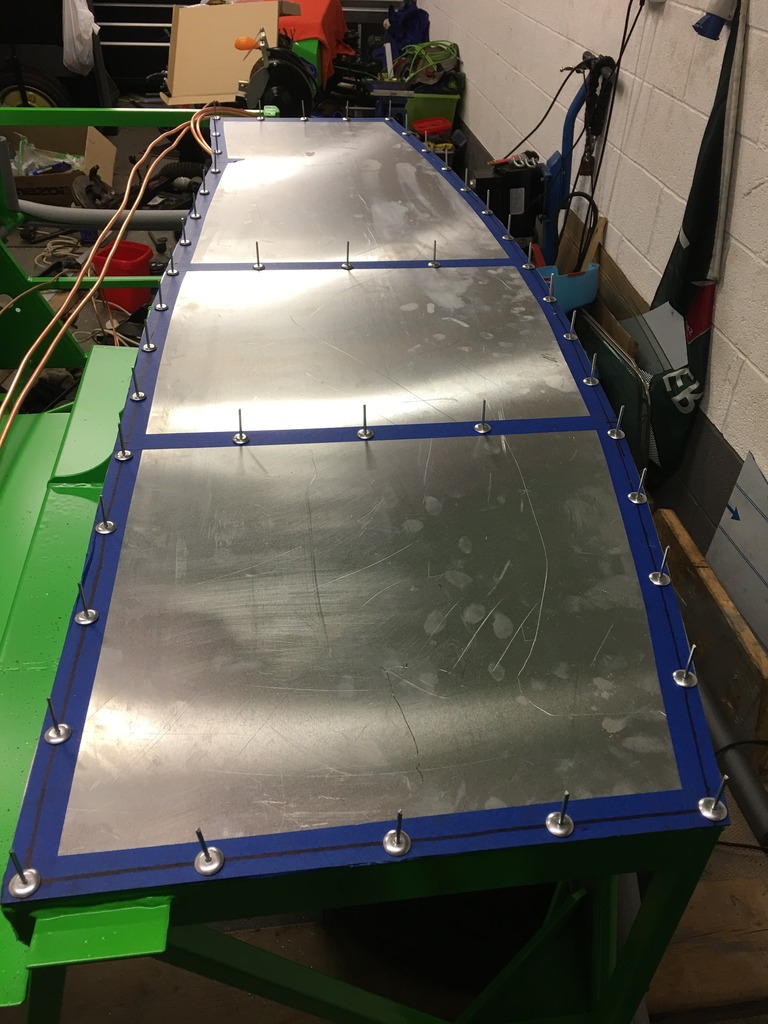
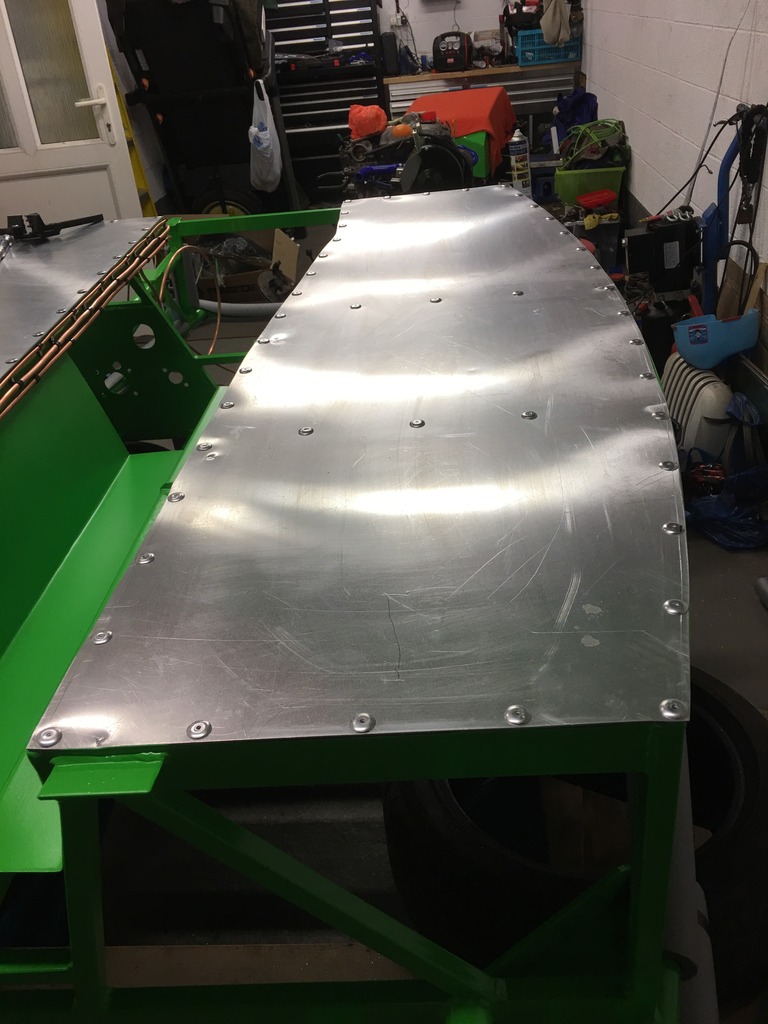
So, time for another instalment in my build, and more progress along the road to having something car-shaped rather than a pile of bits in the garage! So the first job from last time was to get started prepping the floor panels for fitting - so firstly I masked up the edges, then with the panels clamped in position, marked out a 10mm line from the edge right round (the tubing is 20mm, so that will get me central). Then I evenly spaced my holes at approx 100mm centres (variation depending on dividing up the spaces evenly and logically!), and then centre punched and first drilled the panels and deburred before remounting and spotting through to drill the chassis rails.
 B569DF52-55B2-4D84-85DB-64B08D5F8896_zpsxph9avc3 on Flickr
 B831A6D9-D5C7-4703-BAFE-BF677C625978_zpsablebxxb on Flickr
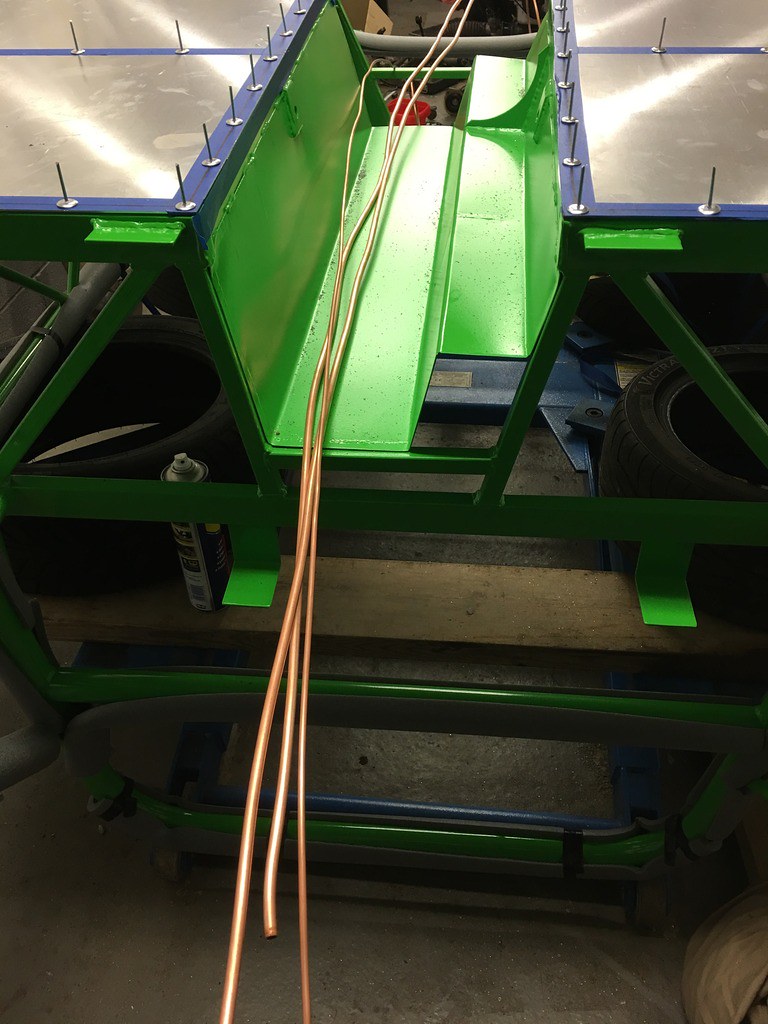
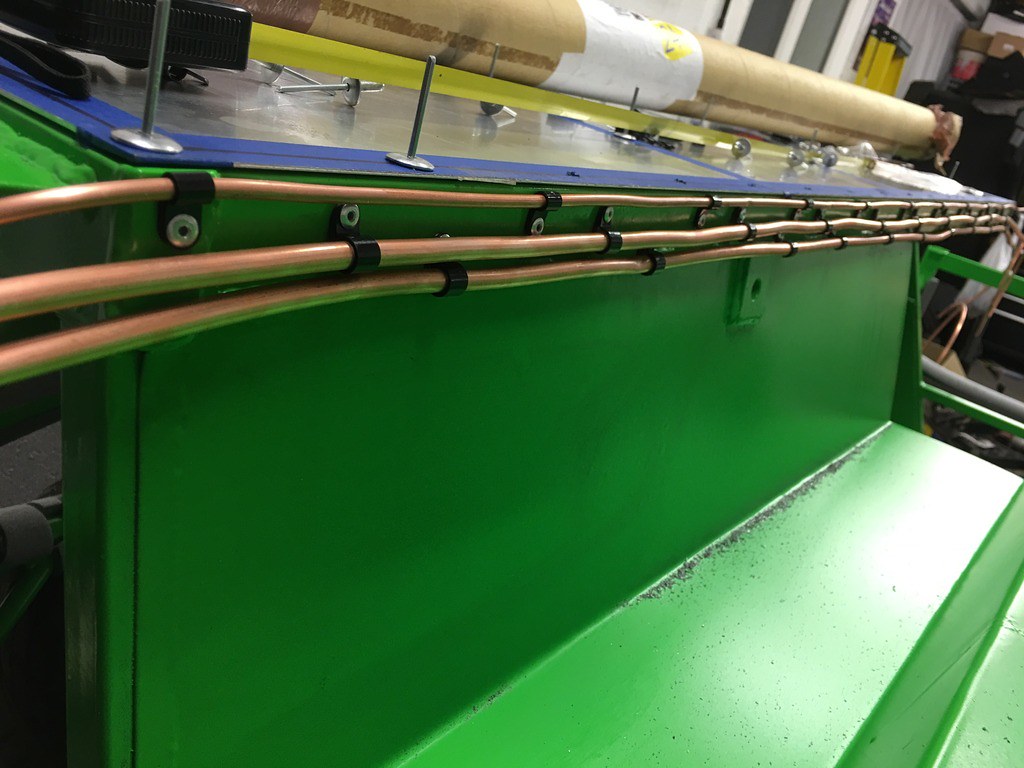
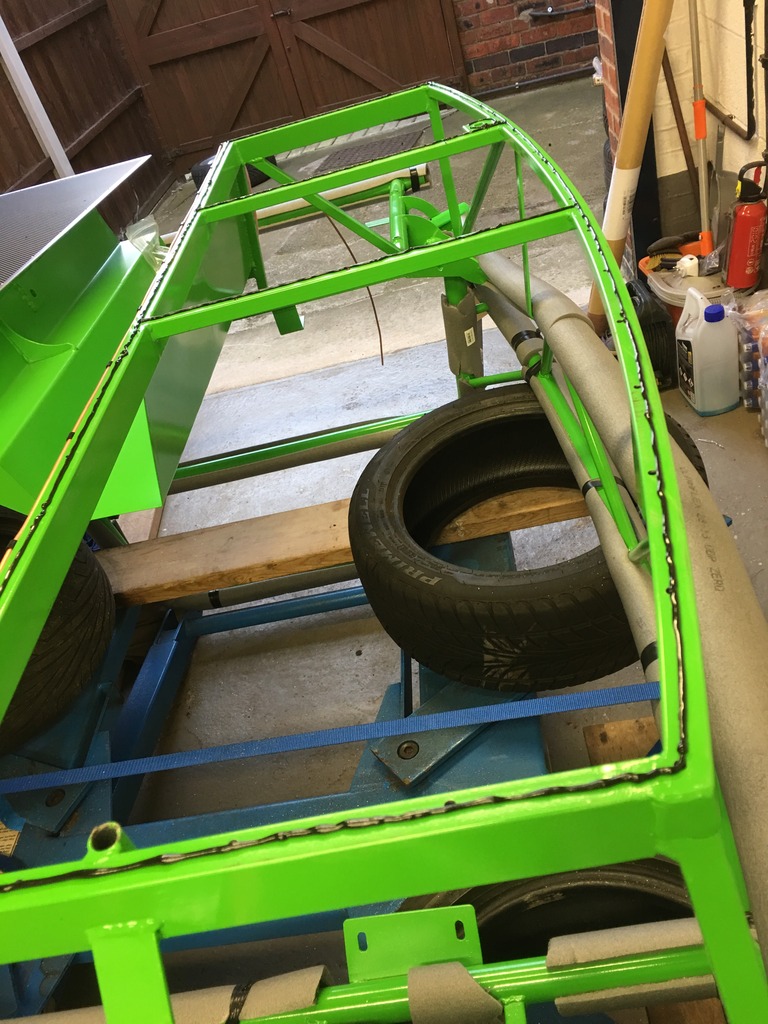
Then I also laid out the hard lines for fuel flow and return and also rear brakes, and after mocking up on a bit of scrap ali, started drilling and fixing the lines with p-clips at 150mm spacing (slight overkill compared to the 200mm recommended by many, but again it fitted nicely into the available space). I have made sure to leave plenty of pipe each end for now to be relatively free with routing of the ends...
 DE20D261-8B90-4B65-85D2-563A1103C82F_zpscielzgra on Flickr
 744A0698-BAE6-4852-9473-0D7F61B3E069_zpstlwpvcg8 on Flickr
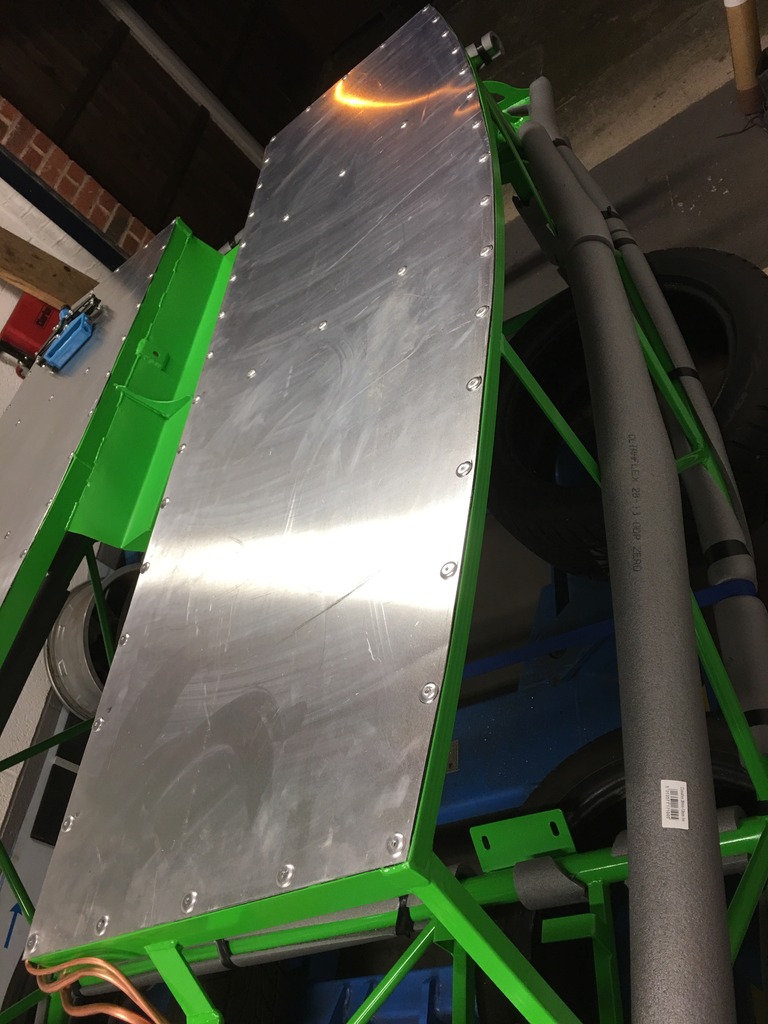
Then today, I had a great help from a colleague (and former vinyl sign maker) to wrap the floors - with the edges left clear to allow some space for a good bead of tiger seal to ensure the ali is gripped and sealed properly.
 9F928DD9-1C54-4996-9937-F1A95045FF75_zps6toxoksv on Flickr
Then I applied a thin bead of tiger seal all around the mating surfaces - thinking that less is more here certainly turned out right - I had a little oozing, but only very slight, and which was easily cleaned up with a solvent-soaked rag.
 5E5EAE1F-E97D-4A9D-90D7-AFBBAAF7FA06_zpsgdh891eg on Flickr
Then having got busy with the lazy-tongs (the cheap silverline ones that I bought having had issues during the line fitting, I used my mate's Clarke ones, which had it all,done super quickly), and I have fitted floors...
 1D5247C9-9971-40E0-A807-97F10391E3D6_zpsyfsiaauh on Flickr
 98DE7551-9D3A-4957-A372-541F61E40226_zpsh5its87m on Flickr
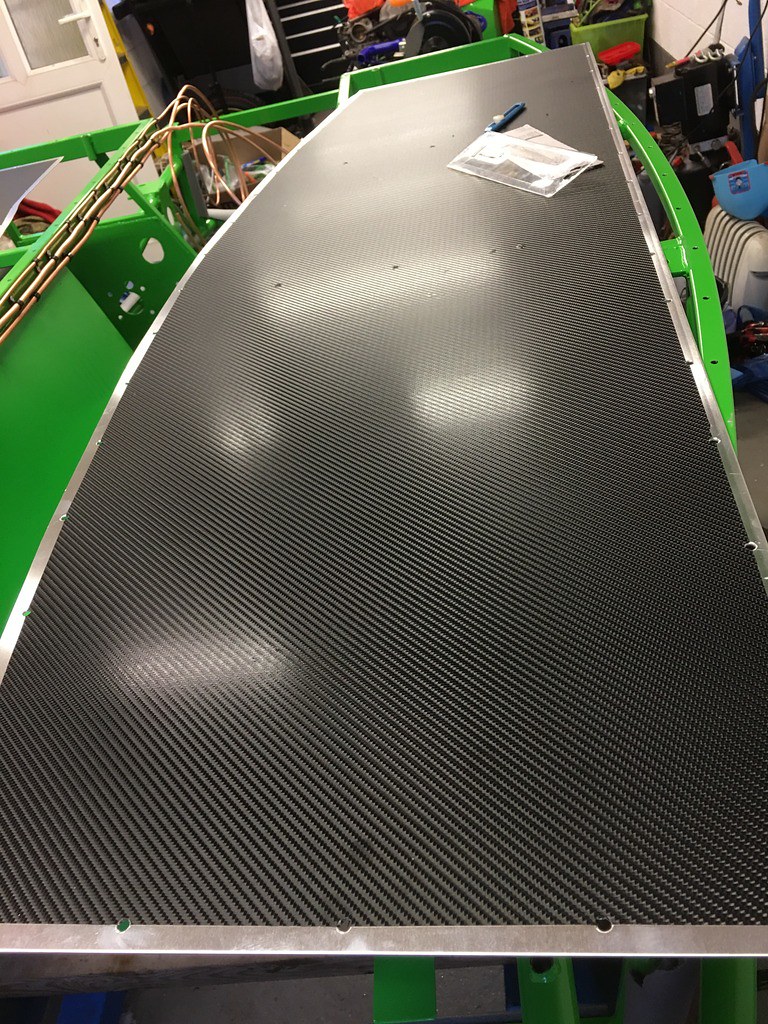
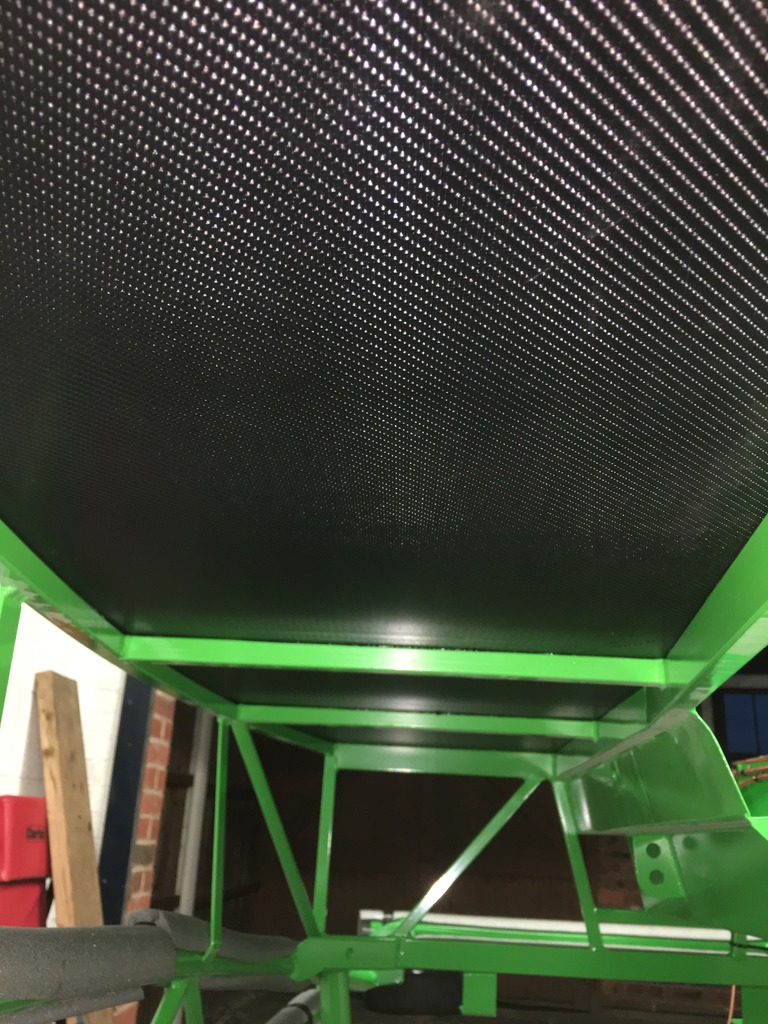
And having debated what to do, I am pleased with how the carbon vinyl works to give a contrast against the green (even with the body still upside-down!)
 2A8509D2-8118-4F26-9B86-38AEF9C059C2_zpsipqijqmi on Flickr
So, I have front upper ball joints to change over tomorrow, and the upper arms to refit, and then it should hopefully be body-on time this week! Exciting times!
Yes, it is a pity that Stuart has sold off the replicar project, as they can look very nice - I like the idea of one done to look like an old racer built with modern performance bits - so classic paint colours but modern motorsport wheels, cage etc - and with the performance to match! I am sure the new owner will have it back on sale soon!
I am loving the rebody project - looks like a good substantial chassis there - I expect that will be comical nice it is done - although I hope the ride will be raised and springs softened for authentic stance through the corners!
So, time for another instalment in my build, and more progress along the road to having something car-shaped rather than a pile of bits in the garage! So the first job from last time was to get started prepping the floor panels for fitting - so firstly I masked up the edges, then with the panels clamped in position, marked out a 10mm line from the edge right round (the tubing is 20mm, so that will get me central). Then I evenly spaced my holes at approx 100mm centres (variation depending on dividing up the spaces evenly and logically!), and then centre punched and first drilled the panels and deburred before remounting and spotting through to drill the chassis rails.
B569DF52-55B2-4D84-85DB-64B08D5F8896_zpsxph9avc3 on FlickrB831A6D9-D5C7-4703-BAFE-BF677C625978_zpsablebxxb on FlickrThen I also laid out the hard lines for fuel flow and return and also rear brakes, and after mocking up on a bit of scrap ali, started drilling and fixing the lines with p-clips at 150mm spacing (slight overkill compared to the 200mm recommended by many, but again it fitted nicely into the available space). I have made sure to leave plenty of pipe each end for now to be relatively free with routing of the ends...
DE20D261-8B90-4B65-85D2-563A1103C82F_zpscielzgra on Flickr744A0698-BAE6-4852-9473-0D7F61B3E069_zpstlwpvcg8 on FlickrThen today, I had a great help from a colleague (and former vinyl sign maker) to wrap the floors - with the edges left clear to allow some space for a good bead of tiger seal to ensure the ali is gripped and sealed properly.
9F928DD9-1C54-4996-9937-F1A95045FF75_zps6toxoksv on FlickrThen I applied a thin bead of tiger seal all around the mating surfaces - thinking that less is more here certainly turned out right - I had a little oozing, but only very slight, and which was easily cleaned up with a solvent-soaked rag.
5E5EAE1F-E97D-4A9D-90D7-AFBBAAF7FA06_zpsgdh891eg on FlickrThen having got busy with the lazy-tongs (the cheap silverline ones that I bought having had issues during the line fitting, I used my mate's Clarke ones, which had it all,done super quickly), and I have fitted floors...
1D5247C9-9971-40E0-A807-97F10391E3D6_zpsyfsiaauh on Flickr98DE7551-9D3A-4957-A372-541F61E40226_zpsh5its87m on FlickrAnd having debated what to do, I am pleased with how the carbon vinyl works to give a contrast against the green (even with the body still upside-down!)
2A8509D2-8118-4F26-9B86-38AEF9C059C2_zpsipqijqmi on FlickrSo, I have front upper ball joints to change over tomorrow, and the upper arms to refit, and then it should hopefully be body-on time this week! Exciting times!
Edited by browno on Wednesday 16th August 23:07
Hello again all - good observation on the vinyl, I am figuring that making sure I keep it covered/protected during the build and using some kind of mats will keep it in reasonable condition for a while - and worst case, I can get it over-wrapped from the inside...
So, thanks to Photobucket, my thread (and all other forums!) has been butchered and none of the images are now showing which is a massive pain - but for now I have rehosted everything onto Flickr - [a href="https://flic.kr/s/aHskXTy3Rh"]HERE[/a]
So, onto progress, and I have made some! First job was to flip the chassis over and turn it round the right way - and I could admire my floors properly...
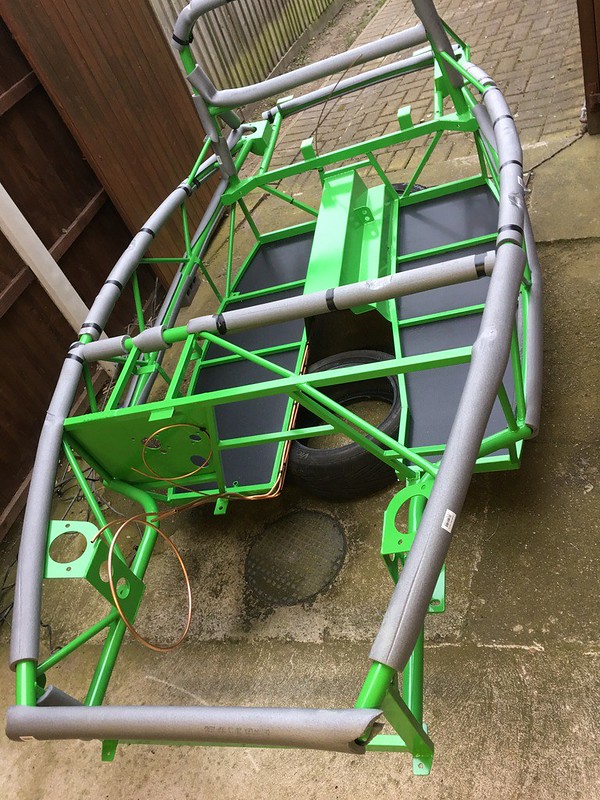 9500EF38-9CE6-47C9-8284-F5FEA2865E6E_zpse5kafsex by Gaz Brown, on Flickr
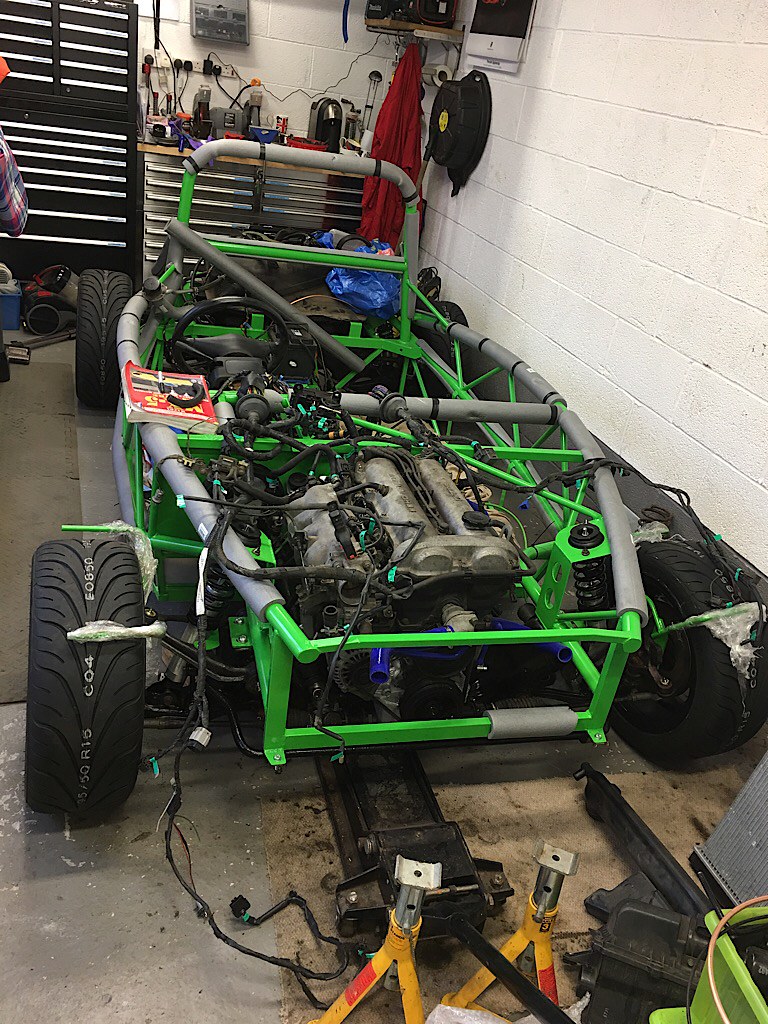
Then we lifted the body carefully through the garage and into position, which was pretty straighforward and everything lined up as it should...
 8A809374-EF30-49A8-A216-DAB43E31526A_zps880fcpqo by Gaz Brown, on Flickr
Then I could build up the rear suspension:
 050066AF-BDEE-44CD-A6F8-6646E4CD3420_zpspo0fgroi by Gaz Brown, on Flickr
and bolt down the chassis - with one minor schoolboy error when I tightened up this bolt with a ratchet spanner and then realised it was trapped (and of course wouldn't allow me to undo the bolt!) - which was easily solved by wedging a pry-bar in the gap to hold the nut!
 17FBEC1A-E840-4E08-BBFD-C880EFE2598E_zps0nnhnajs by Gaz Brown, on Flickr
Next, I replaced both front upper balljoints and that also allowed me to build the front suspension up and fit the cycle wings so that I could torque up the front hubs.
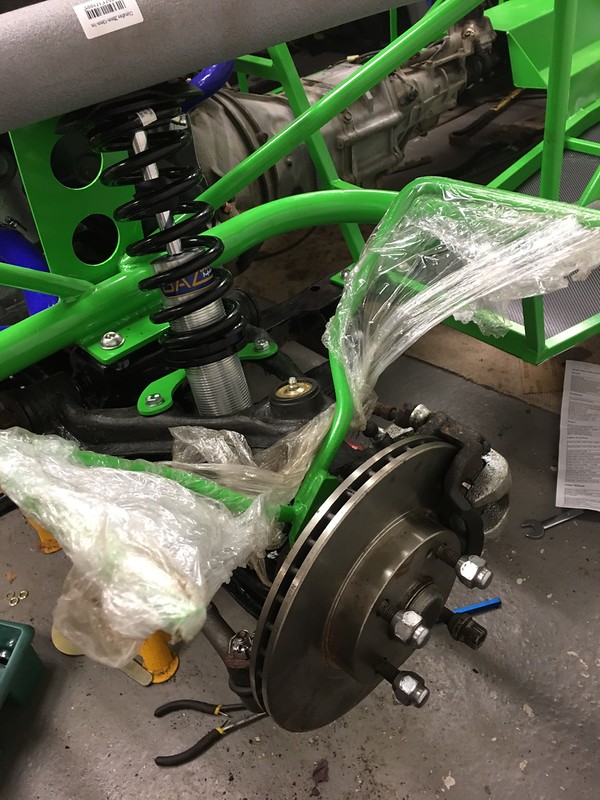 C8E34086-06A9-4878-8251-C9A91B9EB58D_zps26rn92uy by Gaz Brown, on Flickr
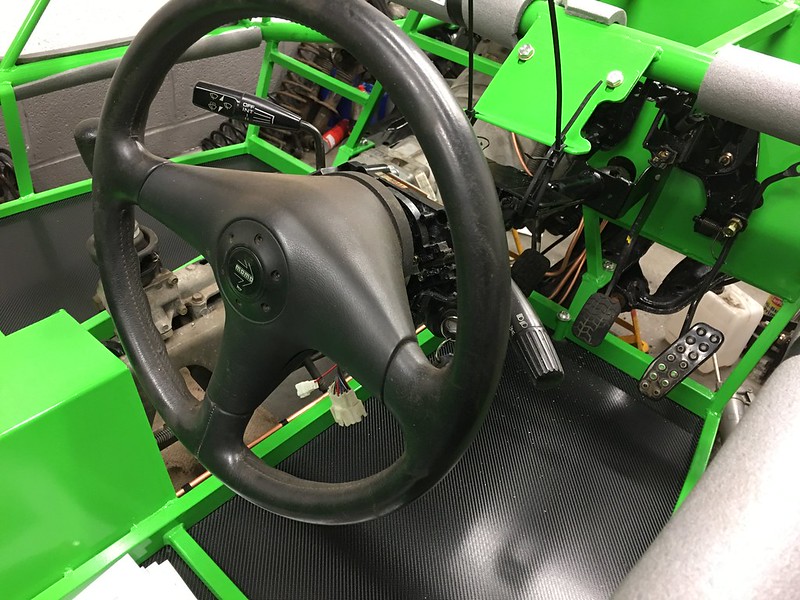
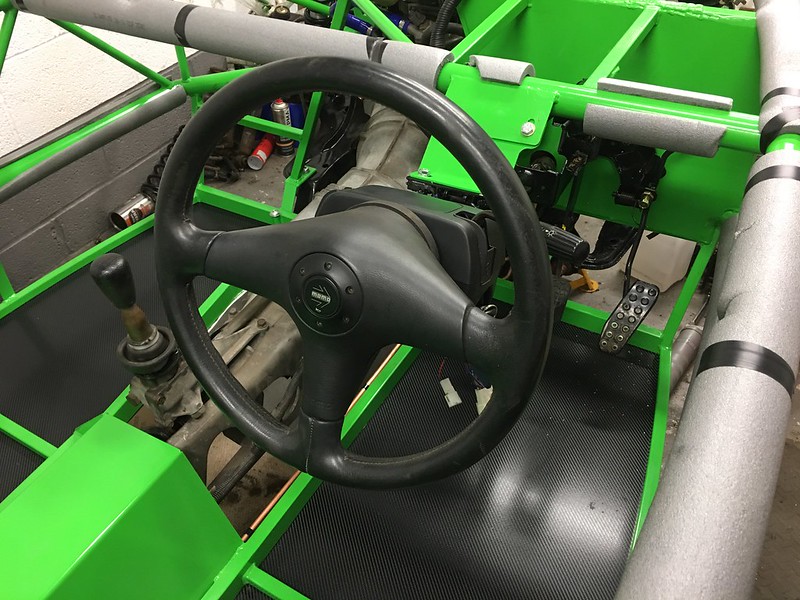
and then I gave my pedal assemblies and steering column a lick of paint to tidy them and started having a go at fitting them. Once I had a feel for what I needed to do re: spacers (I chopped them off the brake pedal and put them on the servo side), and also had removed the stud from the clutch pedal and replaced with a longer nut & bolt, it looked like everything was lining up and the column fitted well with the help of some cable-ties...
 Untitled by Gaz Brown, on Flickr
 Untitled by Gaz Brown, on Flickr
However, the steering column was only just touching the end of the rack fitting:
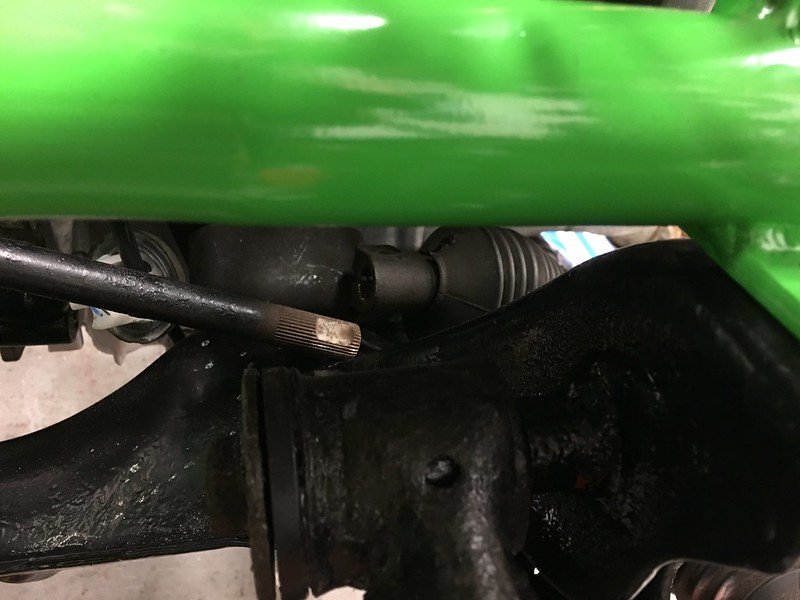 Untitled by Gaz Brown, on Flickr
Having looked online I found reference to this in a few places including the exomotive build guide - [a href="http://exomotive.com/exocet/build-guide/pedals-steering/"]http://exomotive.com/exocet/build-guide/pedals-steering/[/a] which shows that you can extend the lower portion of the column easily... So, having successfully fitted an windscreen to my mate's Tiger kit, we were on a roll and so decided to tackle the column last night.
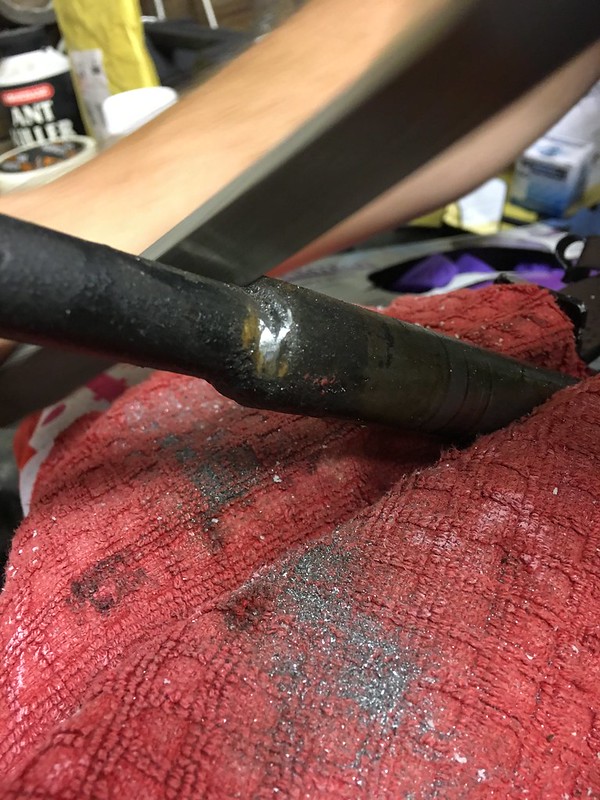
I don't know if there is a difference in LHD and RHD columns (or differences by years) but this didn't work... looking at the lower shaft, we thought it had sealant round the splines - which turned out to be weld... but we persevered anyway, and starting filing away the weld - which revealed the ends of the splines.
 Untitled by Gaz Brown, on Flickr
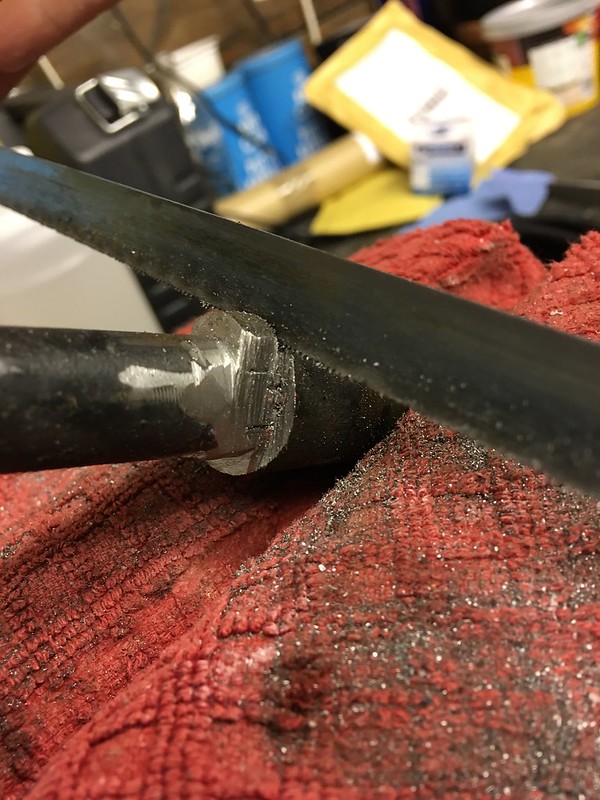 Untitled by Gaz Brown, on Flickr
but once we had the weld clear, we discovered that the splines were only really long enough to locate the shaft for welding...
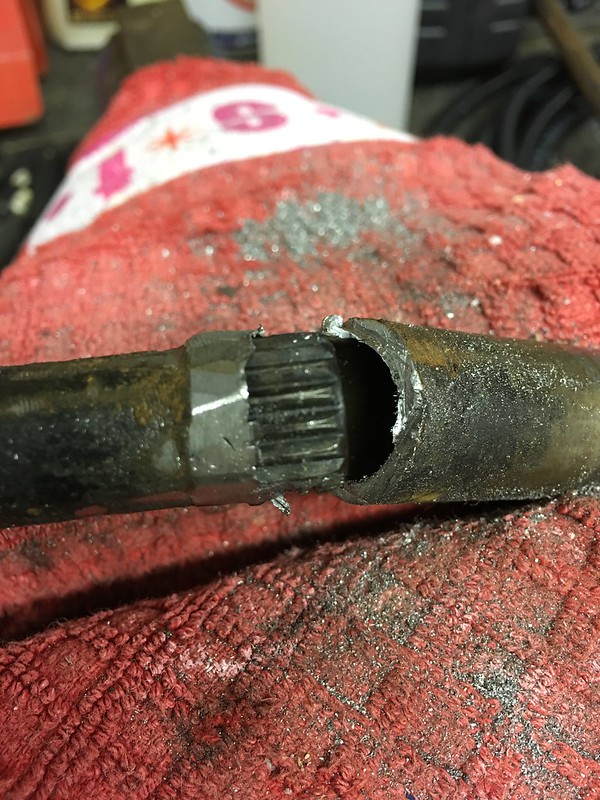 Untitled by Gaz Brown, on Flickr
So now, I am going to be buying a replacement column - and having checked a mate's (also a '98 NA) that has the same shaft as mine - should I be looking to extend from the top half of the column, or are there different designs of column out there that have the extendable bottom section (or is this something that was only on LHD cars?)... At the very least - this might act as a reference for others that might come across the same problem not to get chop-happy!)
So the saga will continue on this one shortly - but for now, I am really happy to be making good progress - I also now have tyres sorted and being fitted to the wheels at the moment - and have my spacers on order from Freaky Parts too...
So, thanks to Photobucket, my thread (and all other forums!) has been butchered and none of the images are now showing which is a massive pain - but for now I have rehosted everything onto Flickr - [a href="https://flic.kr/s/aHskXTy3Rh"]HERE[/a]
So, onto progress, and I have made some! First job was to flip the chassis over and turn it round the right way - and I could admire my floors properly...
9500EF38-9CE6-47C9-8284-F5FEA2865E6E_zpse5kafsex by Gaz Brown, on FlickrThen we lifted the body carefully through the garage and into position, which was pretty straighforward and everything lined up as it should...
8A809374-EF30-49A8-A216-DAB43E31526A_zps880fcpqo by Gaz Brown, on FlickrThen I could build up the rear suspension:
050066AF-BDEE-44CD-A6F8-6646E4CD3420_zpspo0fgroi by Gaz Brown, on Flickrand bolt down the chassis - with one minor schoolboy error when I tightened up this bolt with a ratchet spanner and then realised it was trapped (and of course wouldn't allow me to undo the bolt!) - which was easily solved by wedging a pry-bar in the gap to hold the nut!
17FBEC1A-E840-4E08-BBFD-C880EFE2598E_zps0nnhnajs by Gaz Brown, on FlickrNext, I replaced both front upper balljoints and that also allowed me to build the front suspension up and fit the cycle wings so that I could torque up the front hubs.
C8E34086-06A9-4878-8251-C9A91B9EB58D_zps26rn92uy by Gaz Brown, on Flickrand then I gave my pedal assemblies and steering column a lick of paint to tidy them and started having a go at fitting them. Once I had a feel for what I needed to do re: spacers (I chopped them off the brake pedal and put them on the servo side), and also had removed the stud from the clutch pedal and replaced with a longer nut & bolt, it looked like everything was lining up and the column fitted well with the help of some cable-ties...
Untitled by Gaz Brown, on FlickrUntitled by Gaz Brown, on FlickrHowever, the steering column was only just touching the end of the rack fitting:
Untitled by Gaz Brown, on FlickrHaving looked online I found reference to this in a few places including the exomotive build guide - [a href="http://exomotive.com/exocet/build-guide/pedals-steering/"]http://exomotive.com/exocet/build-guide/pedals-steering/[/a] which shows that you can extend the lower portion of the column easily... So, having successfully fitted an windscreen to my mate's Tiger kit, we were on a roll and so decided to tackle the column last night.
I don't know if there is a difference in LHD and RHD columns (or differences by years) but this didn't work... looking at the lower shaft, we thought it had sealant round the splines - which turned out to be weld... but we persevered anyway, and starting filing away the weld - which revealed the ends of the splines.
Untitled by Gaz Brown, on FlickrUntitled by Gaz Brown, on Flickrbut once we had the weld clear, we discovered that the splines were only really long enough to locate the shaft for welding...
Untitled by Gaz Brown, on FlickrSo now, I am going to be buying a replacement column - and having checked a mate's (also a '98 NA) that has the same shaft as mine - should I be looking to extend from the top half of the column, or are there different designs of column out there that have the extendable bottom section (or is this something that was only on LHD cars?)... At the very least - this might act as a reference for others that might come across the same problem not to get chop-happy!)
So the saga will continue on this one shortly - but for now, I am really happy to be making good progress - I also now have tyres sorted and being fitted to the wheels at the moment - and have my spacers on order from Freaky Parts too...
and here is a quick resolution - within minutes of posting my update on the MEV forum, I had an email from Stuart at MEV with the following information:
I hear you have a column issue. This is resolved with the use of a hammer as in the attached picture. You effectively lengthen the lower part of the shaft by compressing the upper part thus allowing it to protrude further through the bulkhead. Hope this helps, my pictures don’t seem to work on the forum but feel free to use the attached. Hopefully you can get someone to weld it back up. If not send it to me. Stuart
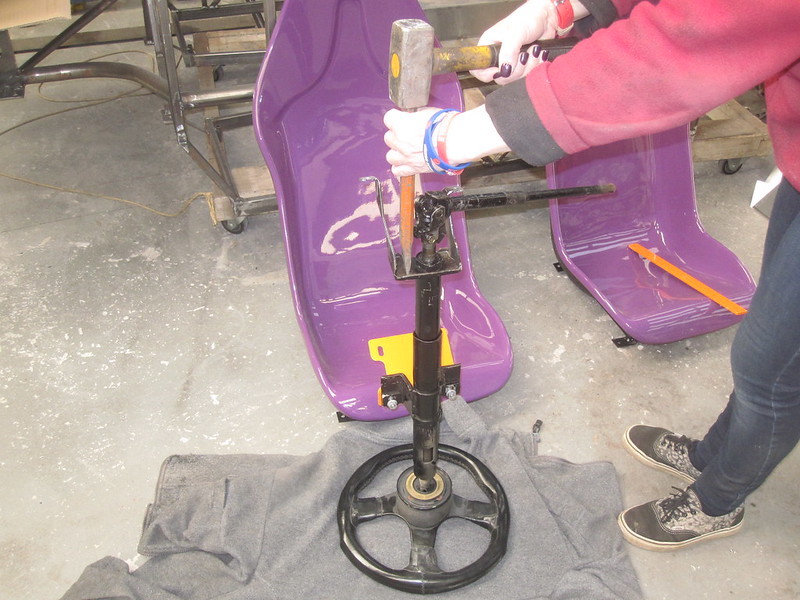 column by Gaz Brown, on Flickr
You wouldn't get that level of rapid support from many places! Now that I have seen Stuart's picture, I can see what he has done - effectively shortened the upper half of the outer - meaning that the lower portion will then fit properly. I will try this tonight on my upper column - and I now have a new lower on order, so can hopefully bolt that in once it arrives.
I am still intrigued by the US approach though - this certainly suggests a significant difference in the columns across the pond (or all LHD)...
I hear you have a column issue. This is resolved with the use of a hammer as in the attached picture. You effectively lengthen the lower part of the shaft by compressing the upper part thus allowing it to protrude further through the bulkhead. Hope this helps, my pictures don’t seem to work on the forum but feel free to use the attached. Hopefully you can get someone to weld it back up. If not send it to me. Stuart
column by Gaz Brown, on FlickrYou wouldn't get that level of rapid support from many places! Now that I have seen Stuart's picture, I can see what he has done - effectively shortened the upper half of the outer - meaning that the lower portion will then fit properly. I will try this tonight on my upper column - and I now have a new lower on order, so can hopefully bolt that in once it arrives.
I am still intrigued by the US approach though - this certainly suggests a significant difference in the columns across the pond (or all LHD)...
It's been a little while, but it is time for another progress update!
I have managed to sort my column issues - following Stuart's instructions, I managed to bash away at my column and gain that vital extra inch!
 Untitled by brownotribbs, on Flickr
Which then allowed me to fit up my column properly... and connect up the (replacement) lower shaft...
 Untitled by brownotribbs, on Flickr
 Untitled by brownotribbs, on Flickr
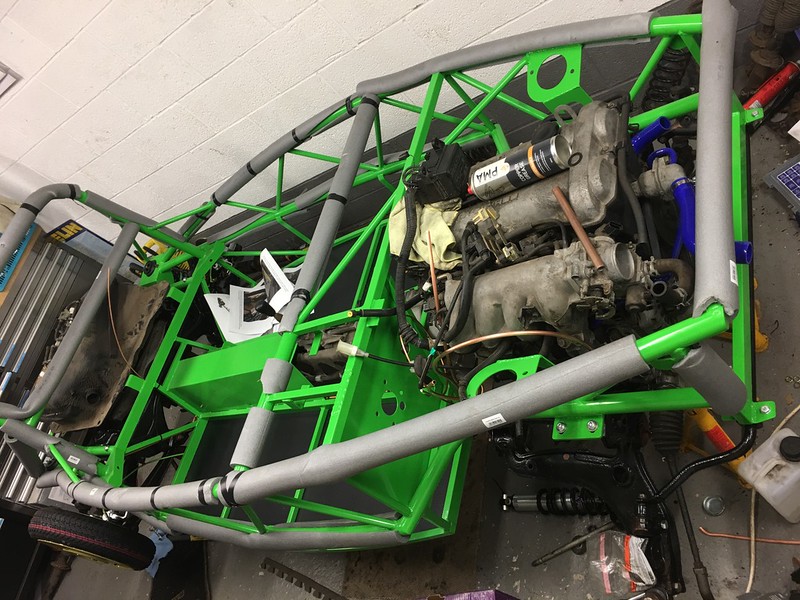
I have then been working to try and begin sorting details - so have the accelerator cable attached, handbrake cables installed and ready to bolt into place and also the clutch plumbed in and bled up, so that is now working. I have also chopped the front end of the fuel hard pipes and have fitted flexible hoses up to the fuel rail (although I have dropped one of the fuel-rail spacers, so will need to sort a replacement if it doesn't turn up on the floor!).
 Untitled by brownotribbs, on Flickr
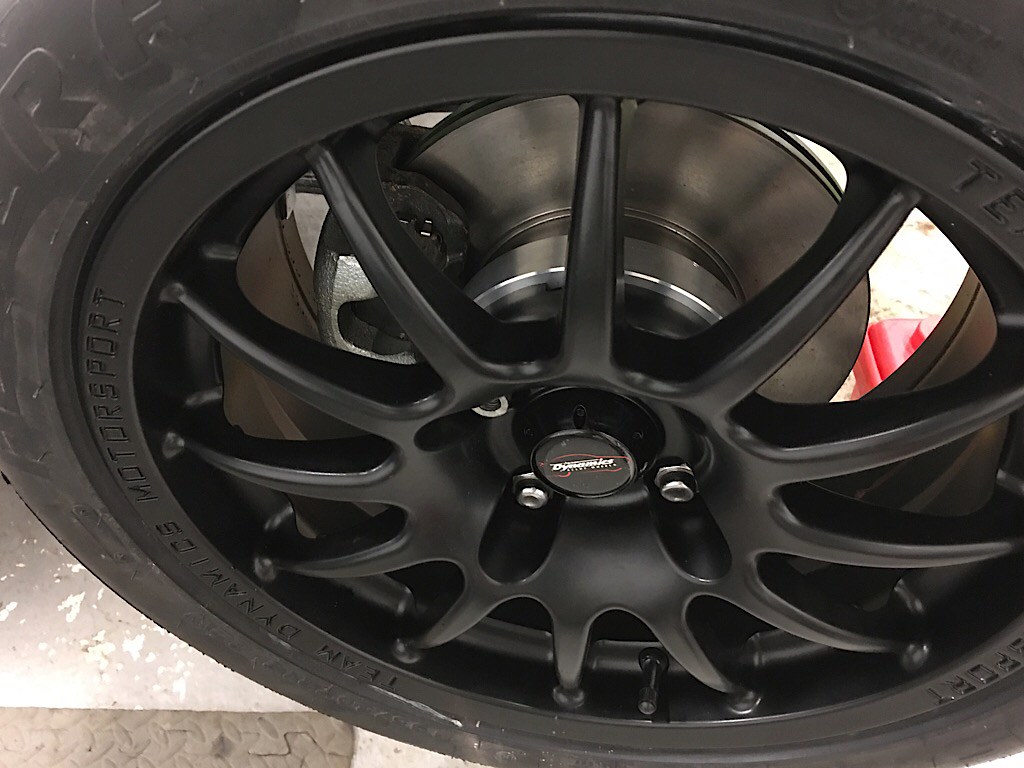
I also got my new tyres (Federal RSRs, which I have been very pleased with on my mk3) fitted onto my new wheels and have trial fitted them in advance of my spacers arriving. Although I am not a big fan of black wheels in general, I think that they are the right choice to provide a good contrast to the green chassis and bodywork...
 Untitled by brownotribbs, on Flickr
And tonight (as I am waiting for my braided hoses to be modified for the brakes, so am holding off on piping them up), I started on the big box of spaghetti otherwise known as the loom!
 Untitled by brownotribbs, on Flickr
Thankfully, my labels appear to be all intact and legible so far, and I have started lying it all into place as a starting point - which means everything looks a little messy! Thankfully everything that I have come across so far has plugged into the right places, and the other connectors all seem to make sense (I predict this being a statement that might come back to haunt me!)
 Untitled by brownotribbs, on Flickr
 Untitled by brownotribbs, on Flickr
So, it is all coming together - I need to bolt in the handbrake, sort the brake pipes and also the rear fuel pipe connections, but then it should be time to get it started and moving!
I have managed to sort my column issues - following Stuart's instructions, I managed to bash away at my column and gain that vital extra inch!
Untitled by brownotribbs, on FlickrWhich then allowed me to fit up my column properly... and connect up the (replacement) lower shaft...
Untitled by brownotribbs, on FlickrUntitled by brownotribbs, on FlickrI have then been working to try and begin sorting details - so have the accelerator cable attached, handbrake cables installed and ready to bolt into place and also the clutch plumbed in and bled up, so that is now working. I have also chopped the front end of the fuel hard pipes and have fitted flexible hoses up to the fuel rail (although I have dropped one of the fuel-rail spacers, so will need to sort a replacement if it doesn't turn up on the floor!).
Untitled by brownotribbs, on FlickrI also got my new tyres (Federal RSRs, which I have been very pleased with on my mk3) fitted onto my new wheels and have trial fitted them in advance of my spacers arriving. Although I am not a big fan of black wheels in general, I think that they are the right choice to provide a good contrast to the green chassis and bodywork...
Untitled by brownotribbs, on FlickrAnd tonight (as I am waiting for my braided hoses to be modified for the brakes, so am holding off on piping them up), I started on the big box of spaghetti otherwise known as the loom!
Untitled by brownotribbs, on FlickrThankfully, my labels appear to be all intact and legible so far, and I have started lying it all into place as a starting point - which means everything looks a little messy! Thankfully everything that I have come across so far has plugged into the right places, and the other connectors all seem to make sense (I predict this being a statement that might come back to haunt me!)
Untitled by brownotribbs, on FlickrUntitled by brownotribbs, on FlickrSo, it is all coming together - I need to bolt in the handbrake, sort the brake pipes and also the rear fuel pipe connections, but then it should be time to get it started and moving!
amstrange1 said:
Does the hammering of the steering column mean that you no longer have a collapsable column in the event of an impact?
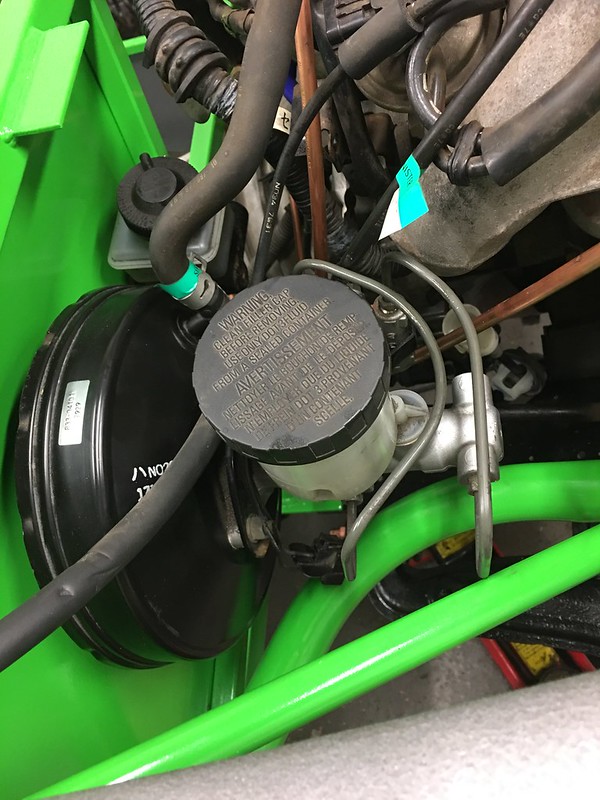
The hammering is (thankfully) only on the outer column (essentially the cover within which the main column rotates) - so this has been shortened by an inch - but the inner collapsible section remains unaffected, and the outer is just a tube within a tube, so has lots of further room to collapse. That was one of the reasons that I wanted to check what to do before proceeding, as I certainly don't want (and IVA wouldn't allow!) a solid column.A little more progress to report today - having put in the fuel lines temporarily (I will finish them off when I fix the tank into place), and lashed up the earth points on the loom, I managed to put some fuel in and prime the fuel system... then I turned the key hopefully...
https://youtu.be/Yk2MgJF6Z5o
So at least I know that the loom is working enough to fire the engine - so I am going to make a start at stripping back some of the wiring that I know is unnecessary (electric windows, heater, heated rear window, speakers, door switches, wipers etc) to begin the process of tidying up the loom... just need to make sure that it continues to work as I remove wires!
Thanks - yes, it was definitely good to get it to fire up again, but a way to get before she is driving I reckon!
I have been making a little more progress, slightly steady as I have been on holiday and also had to replace the brake master cylinder on my mk3 which was leaking between the master and the servo to make sure it stayed safe and got an MOT for another year.
The day before my holidays I received a package from Freaky Parts containing my wheel spacers, which was good (but I was told in no uncertain terms that they would have to wait until I got home!). They look very nicely machined, and also are not quite as weighty as I thought they might be, which is certainly a good thing!.
So, over the weekend, I fitted the spacers and made sure that all studs were firmly thread-locked into place, at which point, I could then fit all four wheels properly.
 Untitled on Flickr
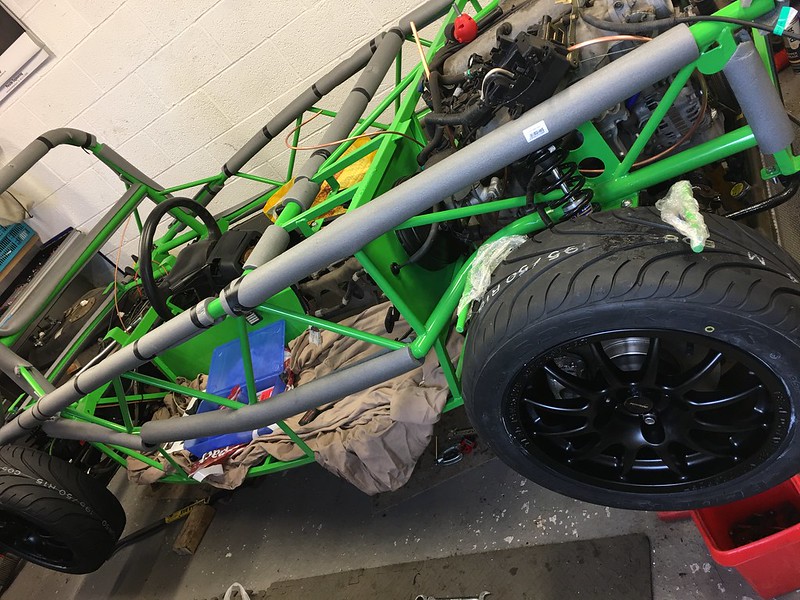
which meant that I could remove the axle-stands and drop the car onto its wheels for the first time! It definitely looks a lot lower than the MX-5 did, but I guess that's part of the point!
 Untitled on Flickr
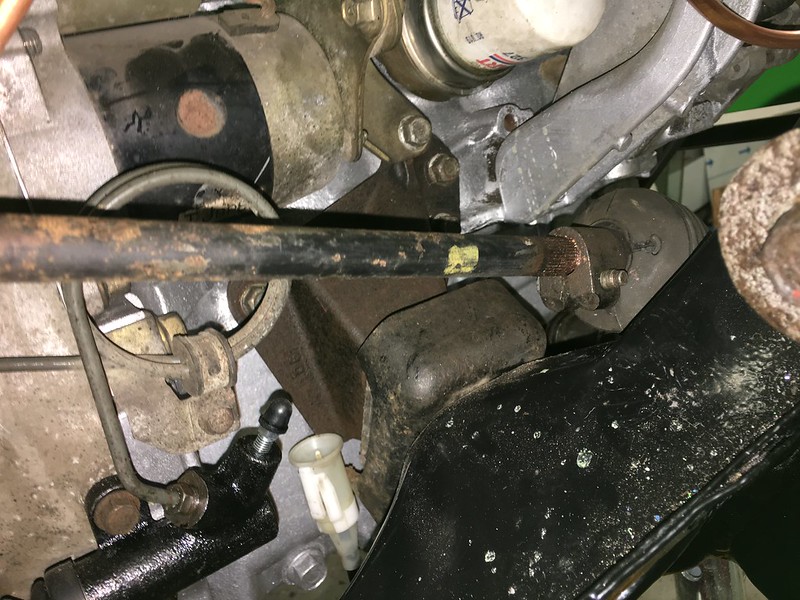
Then last night I had a bit of time to do some more jobs, and was ably assisted by a friend from work (who has worked building some lovely race cars), and he had also modified my final brake flexi- lines. So first job was to loosely put them into place - with the rears run to the t-piece (now centrally located - will be bolted in place when my rivnut tool arrives!). we also did the fronts, but I didn't take any pics (and need to make up some brackets to hold them in an IVA-compliant position). I do then need to p-clip the flexis in place - but need to wait for a set of new banjo bolts to arrive so that I can get the routing perfected.
 Untitled on Flickr
We also removed the loom from the car - as I think I was maybe trying to run before I could walk - and needed the space to be able to fit the bulkhead panels and wiring tray. At least I know it runs, and could mark up all of the connectors that were required to make the car fire!
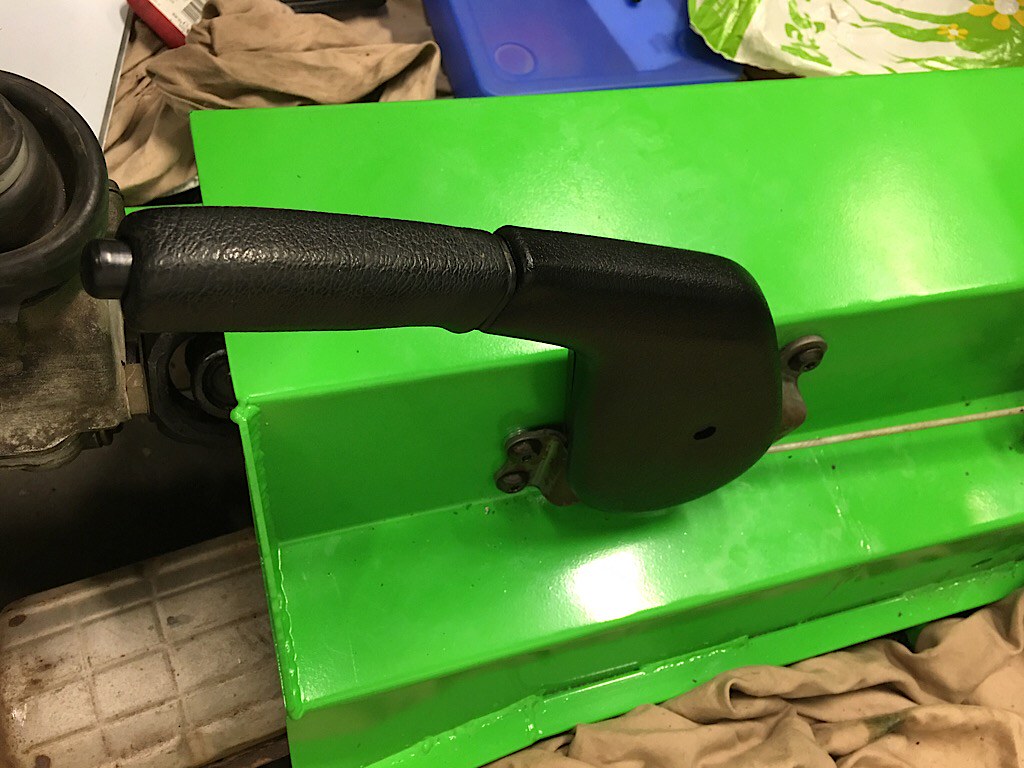
The final job was then to fit up the handbrake lever and get that adjusted up - which worked ok after a bit of double checking t hat everything lined up properly. The good news being that once we had adjusted the new calipers and the cable, that I have the beginnings of some working brakes!
 Untitled on Flickr
So my plan of action now is to get the brake piping/hoses finished and secured then bleed them out, secure the handbrake cables and then start work on getting the bulkhead panels trimmed and fitted up before then fitting and modifying the loom. Oh, and my new (standard) radiator has also arrived, so I have fitted the MEV brackets to it, so I can install that too when I have my rivnut tool.
I have been making a little more progress, slightly steady as I have been on holiday and also had to replace the brake master cylinder on my mk3 which was leaking between the master and the servo to make sure it stayed safe and got an MOT for another year.
The day before my holidays I received a package from Freaky Parts containing my wheel spacers, which was good (but I was told in no uncertain terms that they would have to wait until I got home!). They look very nicely machined, and also are not quite as weighty as I thought they might be, which is certainly a good thing!.
So, over the weekend, I fitted the spacers and made sure that all studs were firmly thread-locked into place, at which point, I could then fit all four wheels properly.
Untitled on Flickrwhich meant that I could remove the axle-stands and drop the car onto its wheels for the first time! It definitely looks a lot lower than the MX-5 did, but I guess that's part of the point!
Untitled on FlickrThen last night I had a bit of time to do some more jobs, and was ably assisted by a friend from work (who has worked building some lovely race cars), and he had also modified my final brake flexi- lines. So first job was to loosely put them into place - with the rears run to the t-piece (now centrally located - will be bolted in place when my rivnut tool arrives!). we also did the fronts, but I didn't take any pics (and need to make up some brackets to hold them in an IVA-compliant position). I do then need to p-clip the flexis in place - but need to wait for a set of new banjo bolts to arrive so that I can get the routing perfected.
Untitled on FlickrWe also removed the loom from the car - as I think I was maybe trying to run before I could walk - and needed the space to be able to fit the bulkhead panels and wiring tray. At least I know it runs, and could mark up all of the connectors that were required to make the car fire!
The final job was then to fit up the handbrake lever and get that adjusted up - which worked ok after a bit of double checking t hat everything lined up properly. The good news being that once we had adjusted the new calipers and the cable, that I have the beginnings of some working brakes!
Untitled on FlickrSo my plan of action now is to get the brake piping/hoses finished and secured then bleed them out, secure the handbrake cables and then start work on getting the bulkhead panels trimmed and fitted up before then fitting and modifying the loom. Oh, and my new (standard) radiator has also arrived, so I have fitted the MEV brackets to it, so I can install that too when I have my rivnut tool.
Edited by browno on Wednesday 16th August 23:14
Turn7 said:
Photobucket - destroying forum thread history across the web.
Bunch of twunts.
Absolutely - I have spent a few hours so far redoing the images back to the point I decided the car was becoming a kit on here (and the other forums I have been posting on) - will try and get the rest done too at some point - but it is just depressing now to see all of that information across so many forums just missing so many of their images...Bunch of twunts.
I have done this as it is a work in progress and I am still adding to the thread - but I can see why you wouldn't bother with going back and doing historical builds - it does take some time!
Great thread, thanks for trying to keep the pictures and replacing the stupid placeholder thats ruined threads all over this board.
My MX5 might be rusted beyond all repair (Wont know till later next year) and i've always had a soft spot for the Exocet, your thread is really detailed and with some great pictures and explanation, will come in handy if my car is beyond worth it to sort out it's rusty ways.
Looking forward to more pics.
Thanks again for all the positive comments - as you will see from the earlier posts here, I was actually a bit unsure whether to go down the kit route or try and save this car, but I am pleased that I have done it now, as I am enjoying the build process, and I think that I will end up with a much better finished end result that if I had tried to weld up the car myself - and it is nice to have something that will be pretty unique too! I have had a look at the BRM thread too - interesting to see a possible workaround on there, although I wonder how long it will be until they get wise to that one? When I have a quiet evening again, I will try to work through and redo the early part of the thread (I have the pictures hosted on flickr - just need to sort the links)
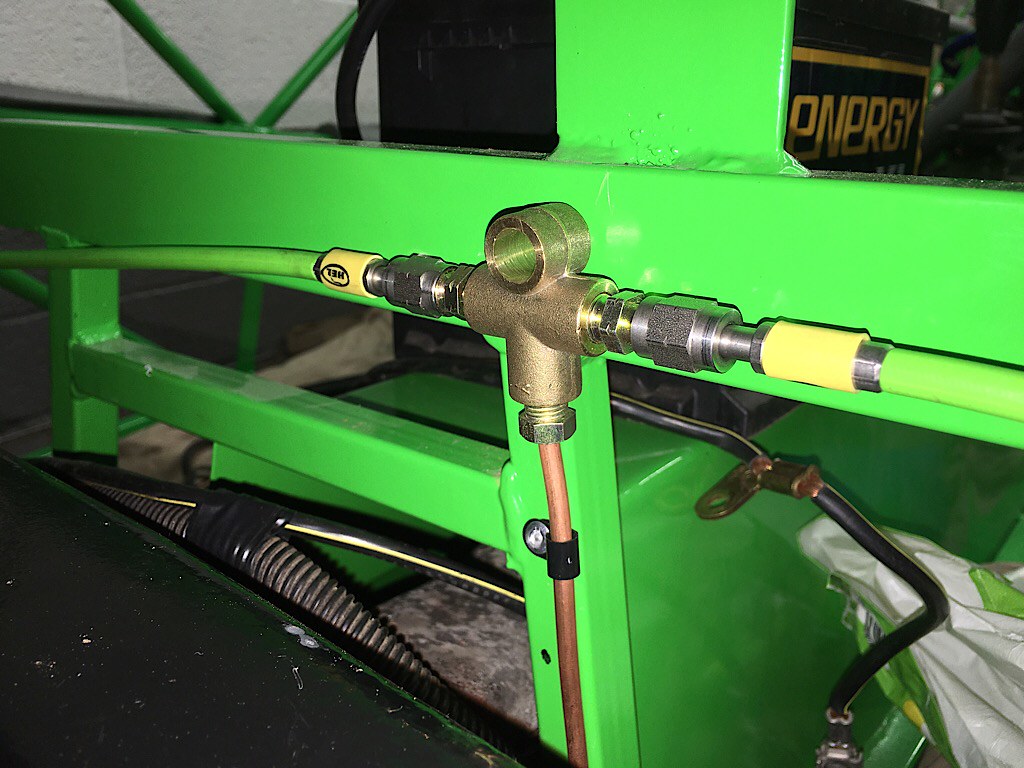
I have made a little more progress over the weekend - I have bled up the brakes, and they all seem to work ok (it is very nice to be able to bleed all 4 brakes with the car on the ground and with the wheels in place!) - just need to p-clip the hoses into place now to make sure they are all ok for IVA.
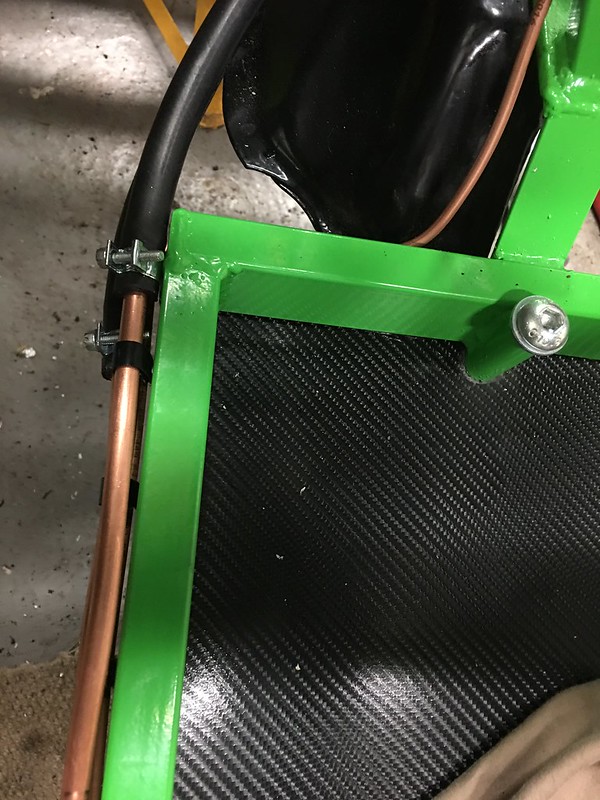
I have also taken a look at what I want to do to fit the radiator. I have the MEV brackets, but since everything else on the car is either green or black, I wasn't sure about having bare alloy on show, so I had a go with teh carbon vinyl - which I am quite pleased with, but am unsure how the heat might affect it. I think I might go with this to begin with and if it looks ropey I can always whip them off and give them a lick of paint... ( I am assuming that I may also need some edge trim to finish this off too)
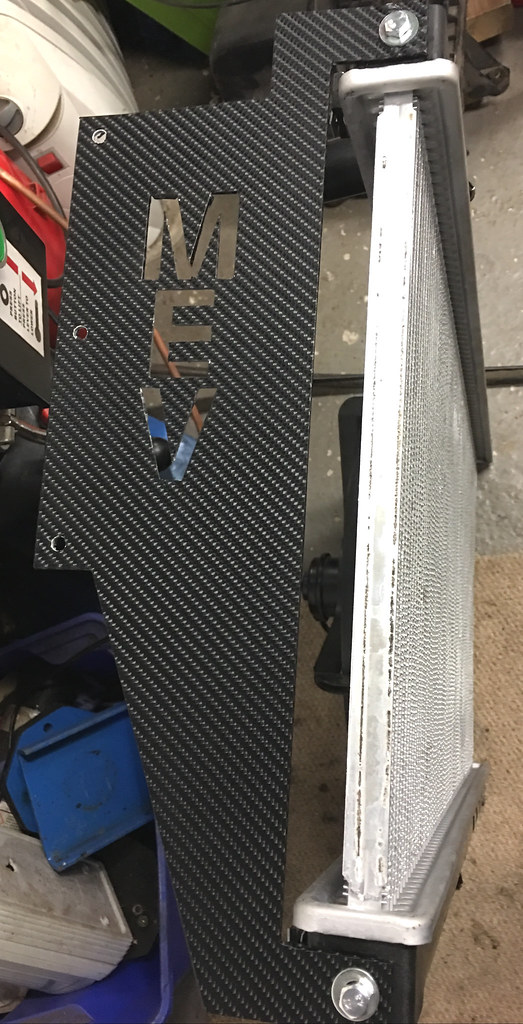 radiator bracket on Flickr
I have made a little more progress over the weekend - I have bled up the brakes, and they all seem to work ok (it is very nice to be able to bleed all 4 brakes with the car on the ground and with the wheels in place!) - just need to p-clip the hoses into place now to make sure they are all ok for IVA.
I have also taken a look at what I want to do to fit the radiator. I have the MEV brackets, but since everything else on the car is either green or black, I wasn't sure about having bare alloy on show, so I had a go with teh carbon vinyl - which I am quite pleased with, but am unsure how the heat might affect it. I think I might go with this to begin with and if it looks ropey I can always whip them off and give them a lick of paint... ( I am assuming that I may also need some edge trim to finish this off too)
radiator bracket on FlickrLoving reading about this. Really would like to build a MEV Replicar, but the timing's all wrong for them and me.
Surely for carbon bits, this is the way to go? http://www.easycomposites.co.uk/#!/cured-carbon-fi...
Make your own!
Surely for carbon bits, this is the way to go? http://www.easycomposites.co.uk/#!/cured-carbon-fi...
Make your own!
Gassing Station | Readers' Cars | Top of Page | What's New | My Stuff