MX5 Berkeley to MEV Exocet projec
Discussion


A mini-update for today, but with a couple of important steps achieved (but a failure to take any new pictures!)!
Firstly, to get ready for the next steps I had a ride over to MEV in Mansfield to meet Julie and Stuart to have a good look over an exocet in the metal (I had had a look at Stoneleigh last year, but at that point was erring towards a restoration!), and more importantly think about options and colours that might work. It was great to spend some time looking over the cars and chassis and get Julie and Stuart's experiences of many different builds.
I had thought of a colour scheme (that I hadn't seen done before), but then having played with photoshop was not convinced by it. I have then been playing around a little more and have a final plan (again a combination that haven't seen) - and after a bit of confirmation with Stuart that it will work, my order is now in - pending confirmation of any very final changes once I have seen the new demo car at Stoneleigh... This should then give me plenty of time to get the body off and everything tidied up before collection day! My plan at this stage being that I want the build to be quicker than the mini... quite a lot quicker in fact, and would like to be on the road by next spring - let's wait and see!
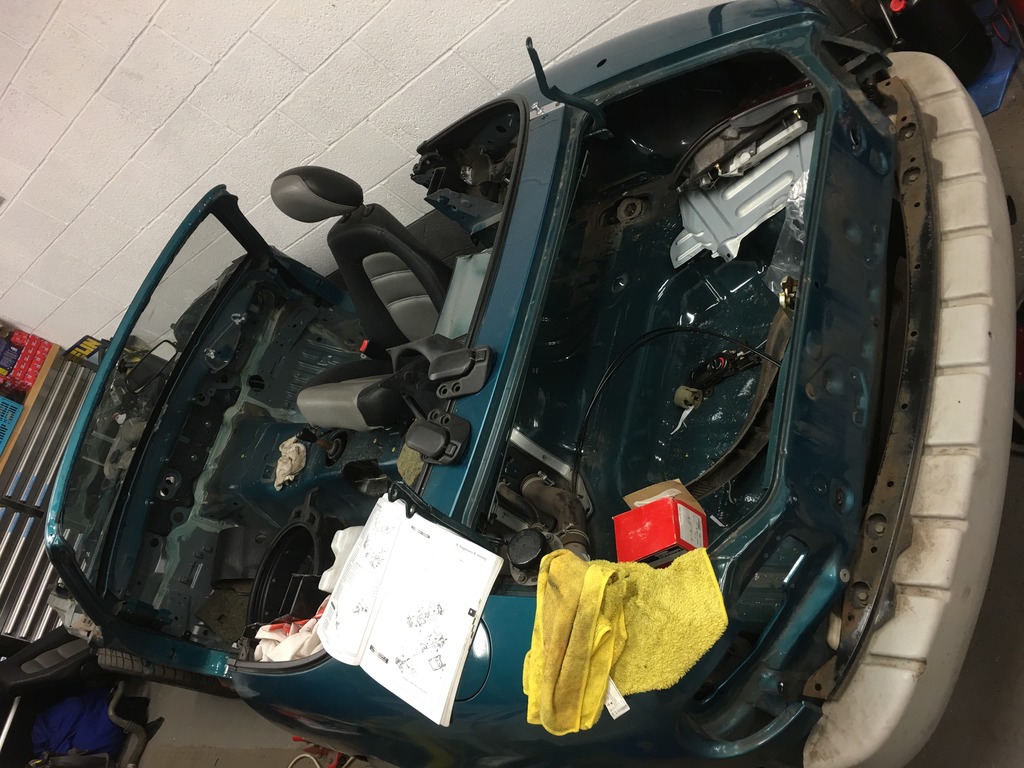
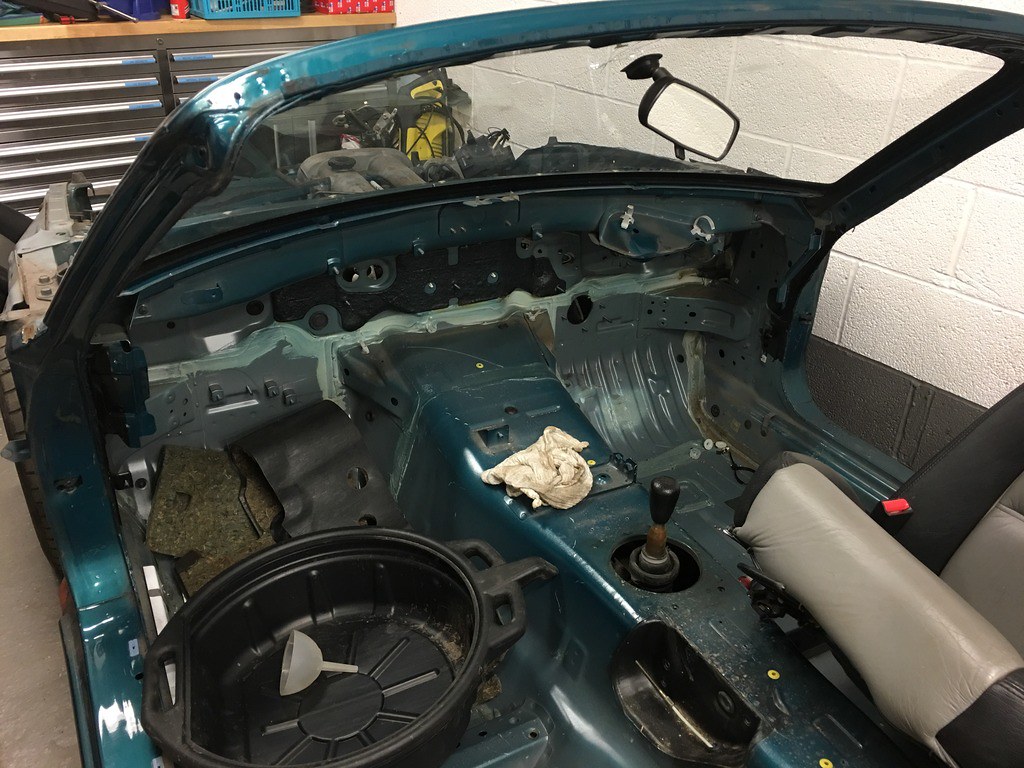
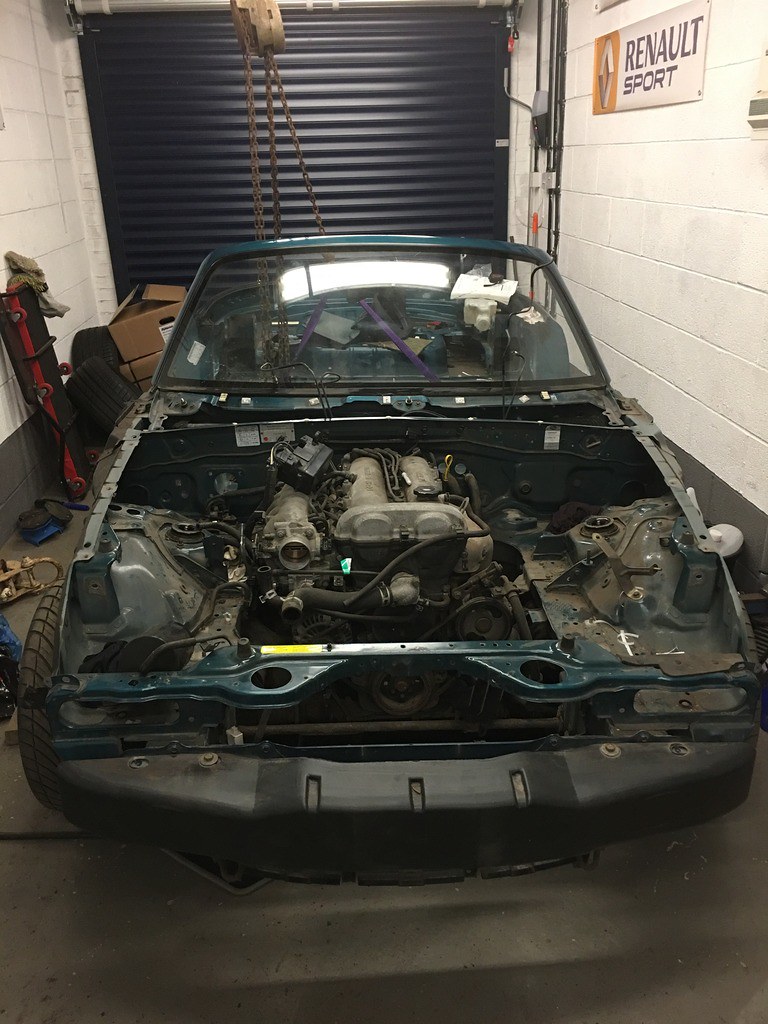
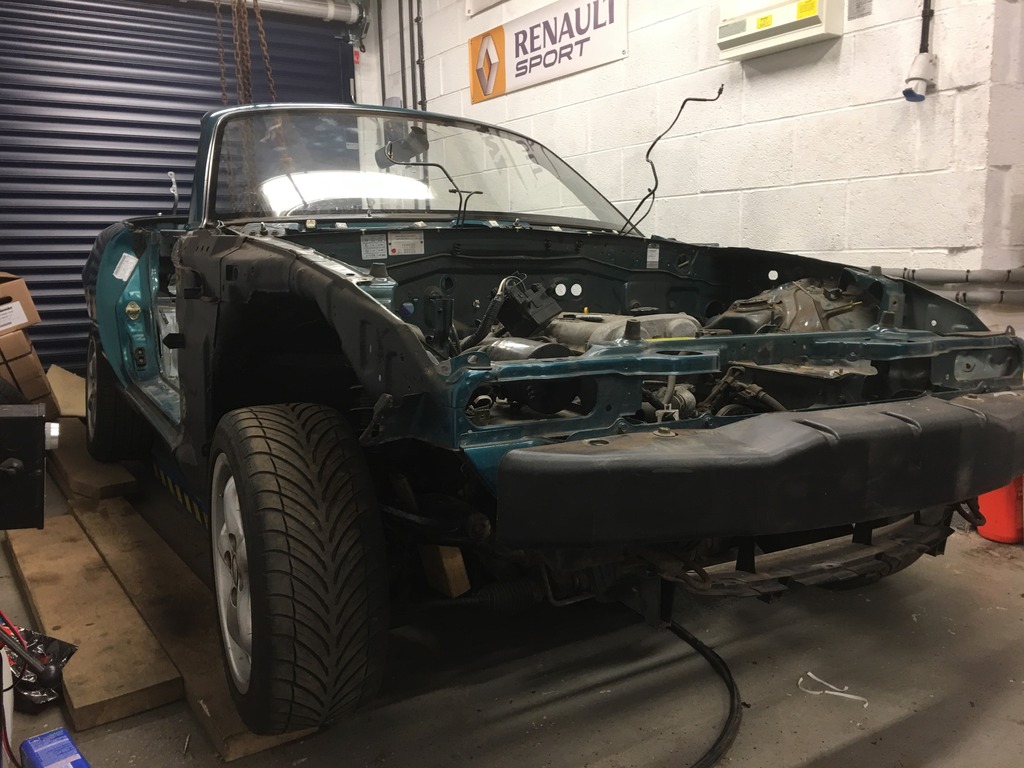
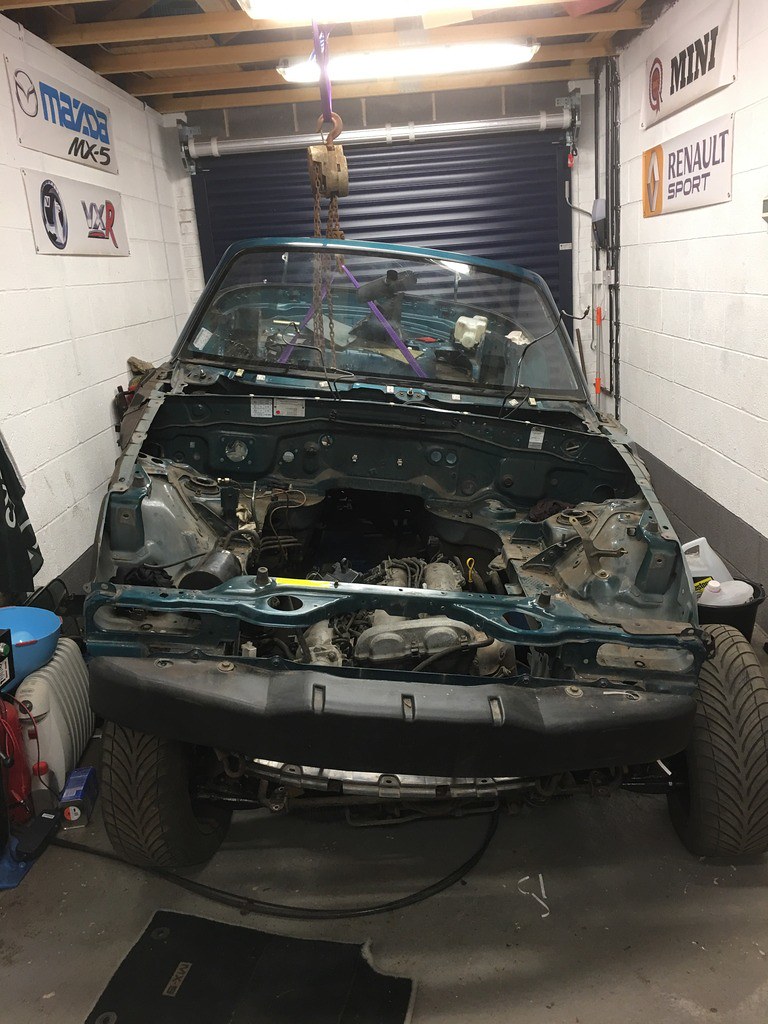
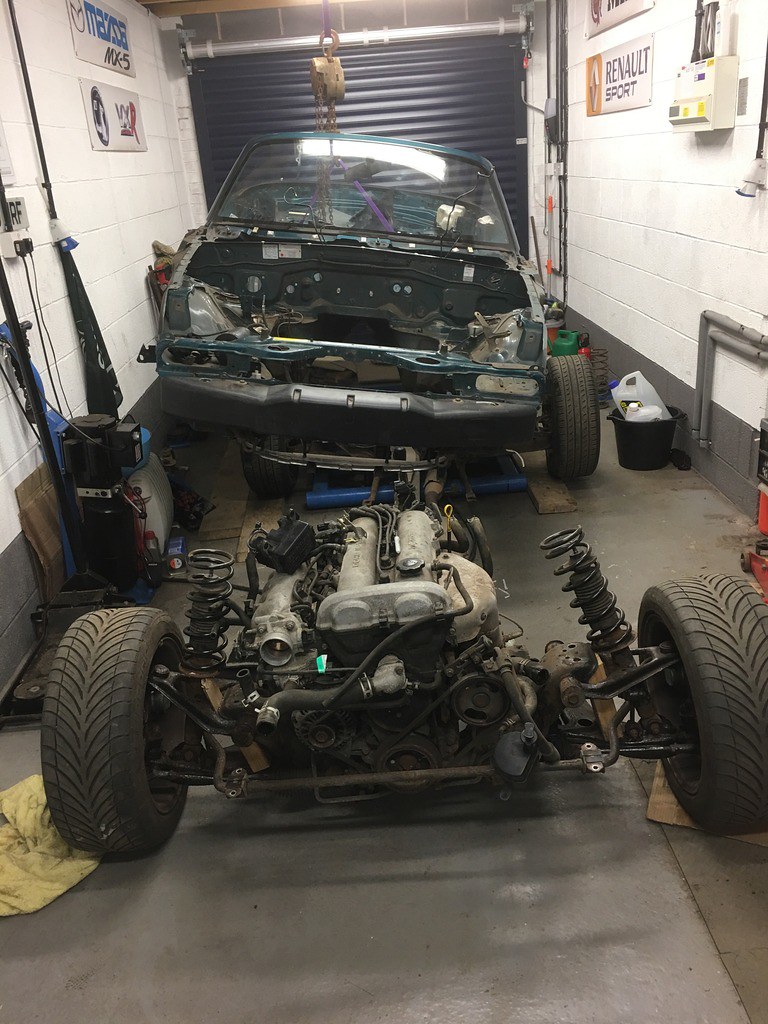
As a result of that, I have been getting the last bits stripped from the donor,so since the last update, I have removed the loom, steering column, handbrake cable, brake lines and fuel pipes and am almost ready to lift the body. One good piece of news is that I stuck it on my lift yesterday and removed a few of the subframe bolts and they all look to be ok to remove with my impact gun - so that's another worry off my mind. Following that, I put in my wooden props in each corner and started removing bolts - it is currently sat with all but 2 subframe bolts out ready for the body to come off later this week.
I have also now provisionally the interior from the donor, so that's a little more into the pot for shiny bits!
Finally, (and slightly prematurely!) I a reasonably priced set of new pro-race 1.2 wheels on ebay, so I snapped them up - 15x7 et25 in matt black - which will suit my colour scheme perfectly. I am a fan of the pro race wheels, having had a set of anthracite 18's on my old Vectra VXR, and I think the style and light weight of them will suit the Exocet well...
Firstly, to get ready for the next steps I had a ride over to MEV in Mansfield to meet Julie and Stuart to have a good look over an exocet in the metal (I had had a look at Stoneleigh last year, but at that point was erring towards a restoration!), and more importantly think about options and colours that might work. It was great to spend some time looking over the cars and chassis and get Julie and Stuart's experiences of many different builds.
I had thought of a colour scheme (that I hadn't seen done before), but then having played with photoshop was not convinced by it. I have then been playing around a little more and have a final plan (again a combination that haven't seen) - and after a bit of confirmation with Stuart that it will work, my order is now in - pending confirmation of any very final changes once I have seen the new demo car at Stoneleigh... This should then give me plenty of time to get the body off and everything tidied up before collection day! My plan at this stage being that I want the build to be quicker than the mini... quite a lot quicker in fact, and would like to be on the road by next spring - let's wait and see!
As a result of that, I have been getting the last bits stripped from the donor,so since the last update, I have removed the loom, steering column, handbrake cable, brake lines and fuel pipes and am almost ready to lift the body. One good piece of news is that I stuck it on my lift yesterday and removed a few of the subframe bolts and they all look to be ok to remove with my impact gun - so that's another worry off my mind. Following that, I put in my wooden props in each corner and started removing bolts - it is currently sat with all but 2 subframe bolts out ready for the body to come off later this week.
I have also now provisionally the interior from the donor, so that's a little more into the pot for shiny bits!
Finally, (and slightly prematurely!) I a reasonably priced set of new pro-race 1.2 wheels on ebay, so I snapped them up - 15x7 et25 in matt black - which will suit my colour scheme perfectly. I am a fan of the pro race wheels, having had a set of anthracite 18's on my old Vectra VXR, and I think the style and light weight of them will suit the Exocet well...
Time for another update on where things have got to... so from the other day I had stripped out most of the stuff I needed to, leaving me with this:
 A2971413-62BA-4FF9-8FF6-05DAA5DB2EB6_zpswqdawqny on Flickr
 42B31158-C04D-453C-B708-3378346D9E91_zpscuoyt9ha on Flickr
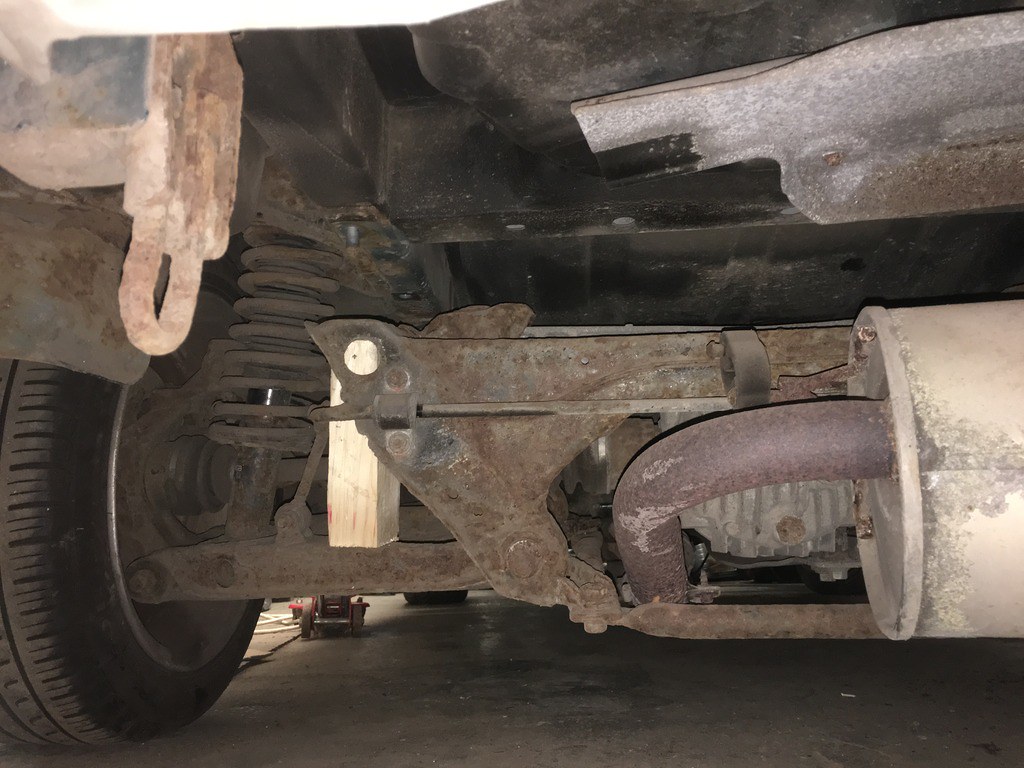
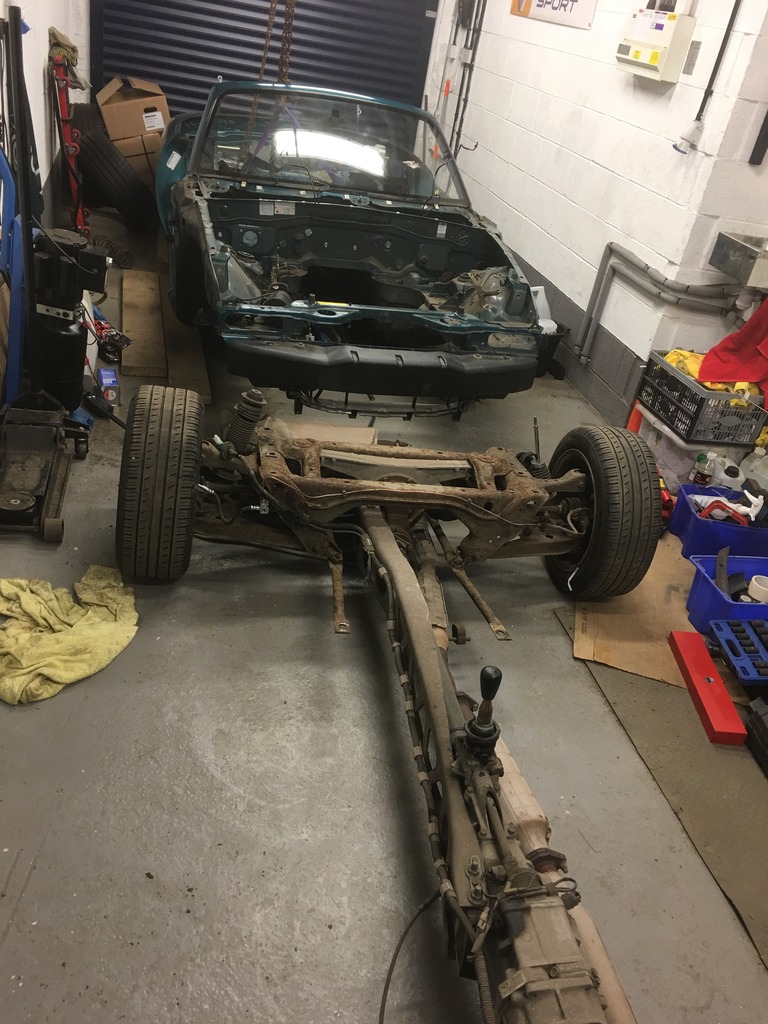
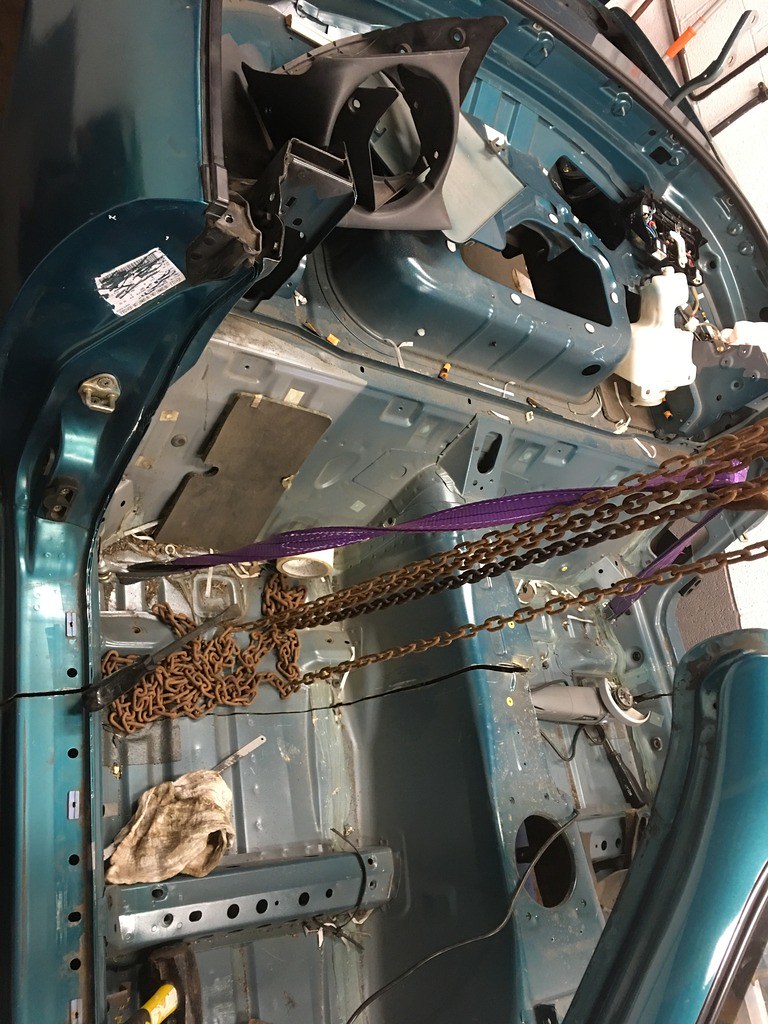
And the rear subframe was separated from the body as it dropped onto its support blocks
 143142BD-86FE-415A-867B-9A6720146C05_zpsqhiujmje on Flickr
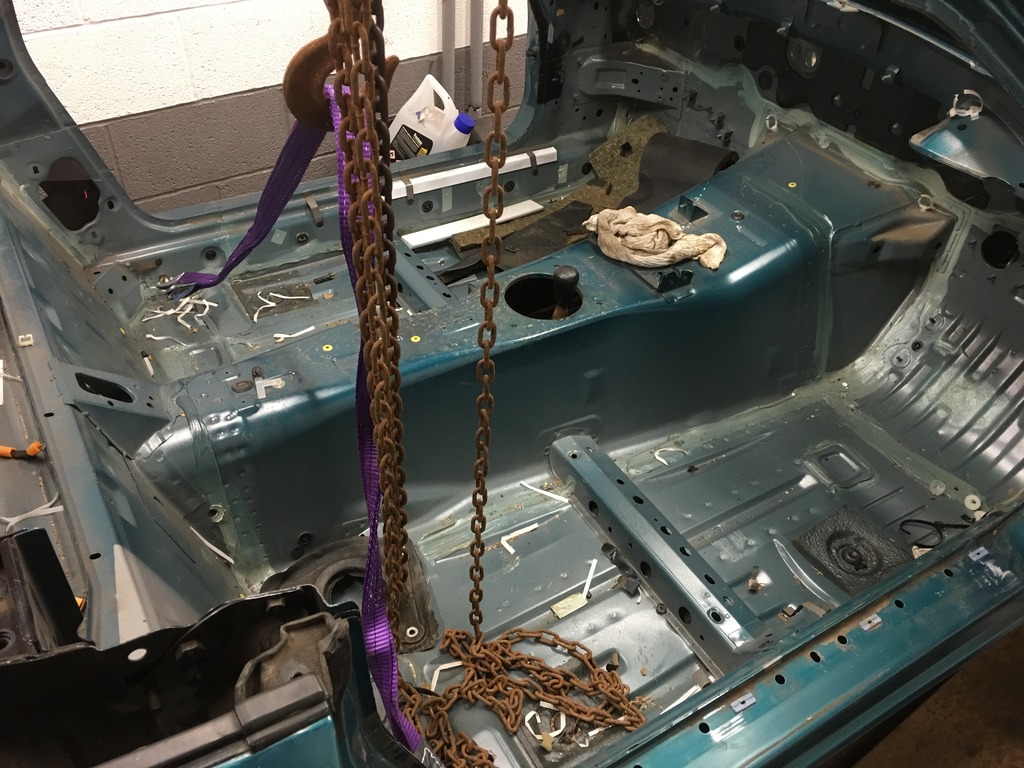
So tonight I rigged the block and tackle in the garage (and swung on it to check it was secure!!)
 EB3A7C78-ECE0-41F2-AB8B-85AFFC100E17_zpsjmmkzxj2 on Flickr
And then released the last couple of bolts to allow the body to move...
 C82839E1-AAEC-40AD-AE34-A6854F11130C_zpswuaejnzc on Flickr
 231E3C62-0D2E-4E04-927D-17688DA0C3BD_zpsbanzngyg on Flickr
 7C839AE2-971B-49C5-93B0-0455E9C30493_zpsbcowuwx5 on Flickr
And up we went:
 F64E1006-C12B-4F5F-90A9-C9766125E438_zpsrl65qjjj on Flickr
And I balanced the shell while I pushed out the roller skate from underneath (having been especially pleased that there was nothing still attached!)...
 8A6C0033-5172-4303-A1DC-5F255916182A_zps29ul8vws on Flickr
 C6306989-9562-4CDF-93B1-BCFBD9977768_zpsc4tsrfdp on Flickr
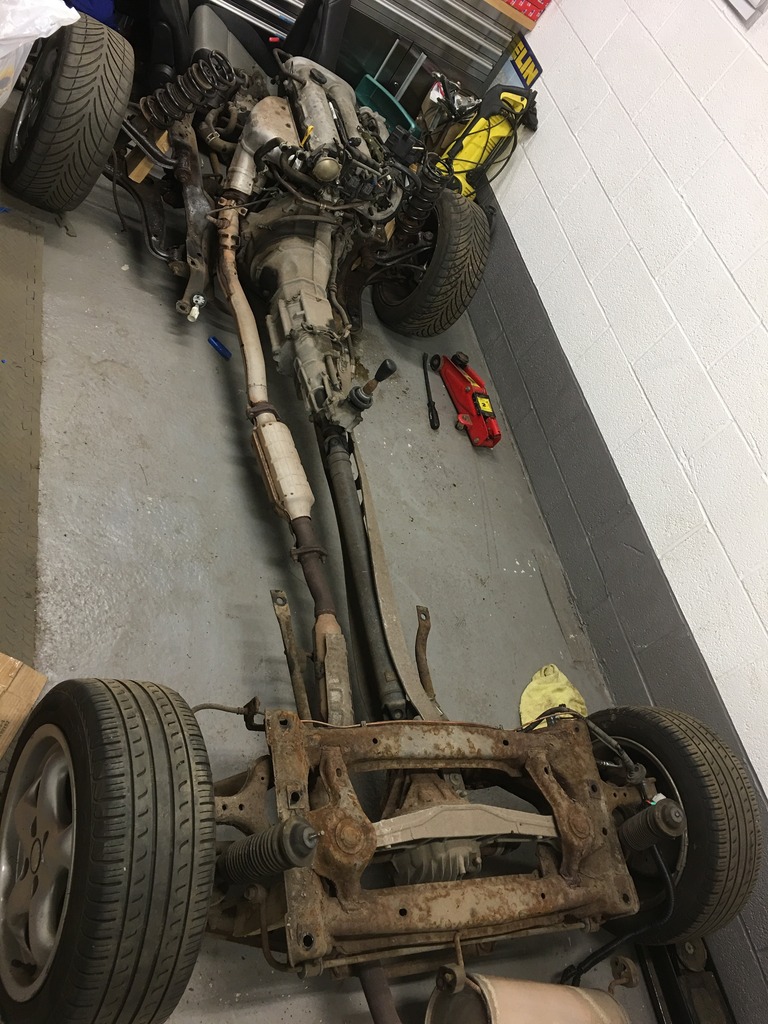
So now I have the running gear separate and ready to start refurbing - and the fuel tank, VIN Numbers and handbrake cable to remove before I can get rid of the remains of the shell - no turning back now!
 A1A20D23-DC0A-4E8A-A32A-0CBC507EABAE_zpsaj7l3veo on Flickr
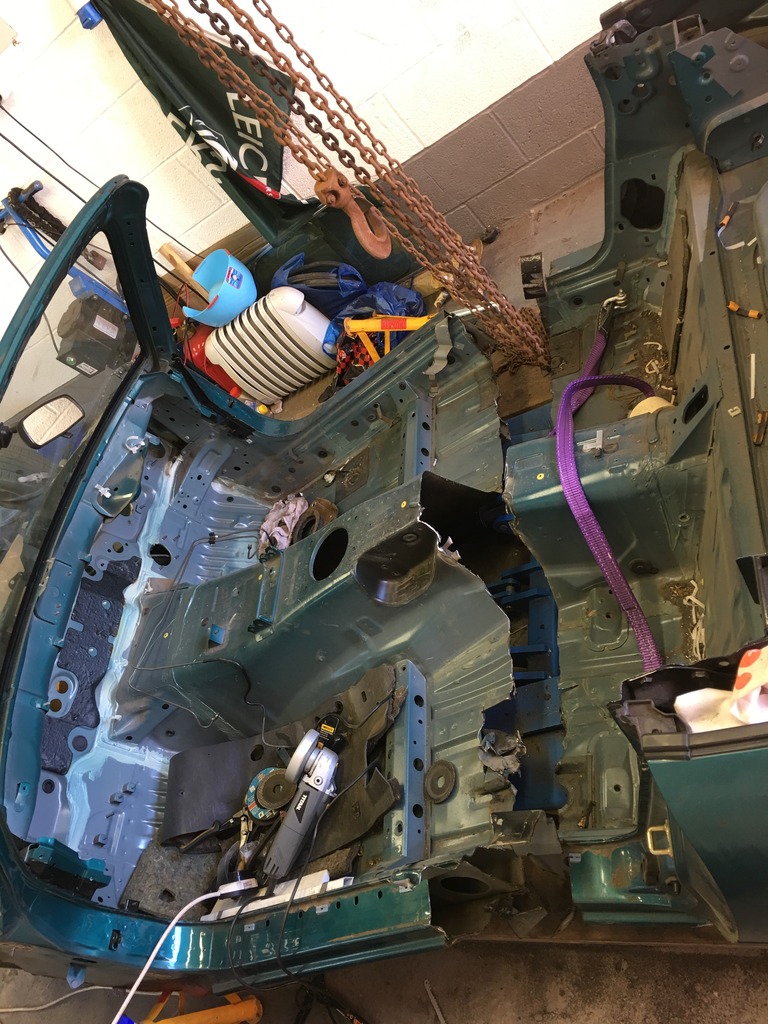
Those of a squeamish persuasion might want to look away now... (MX-5s were harmed in the making of this post)
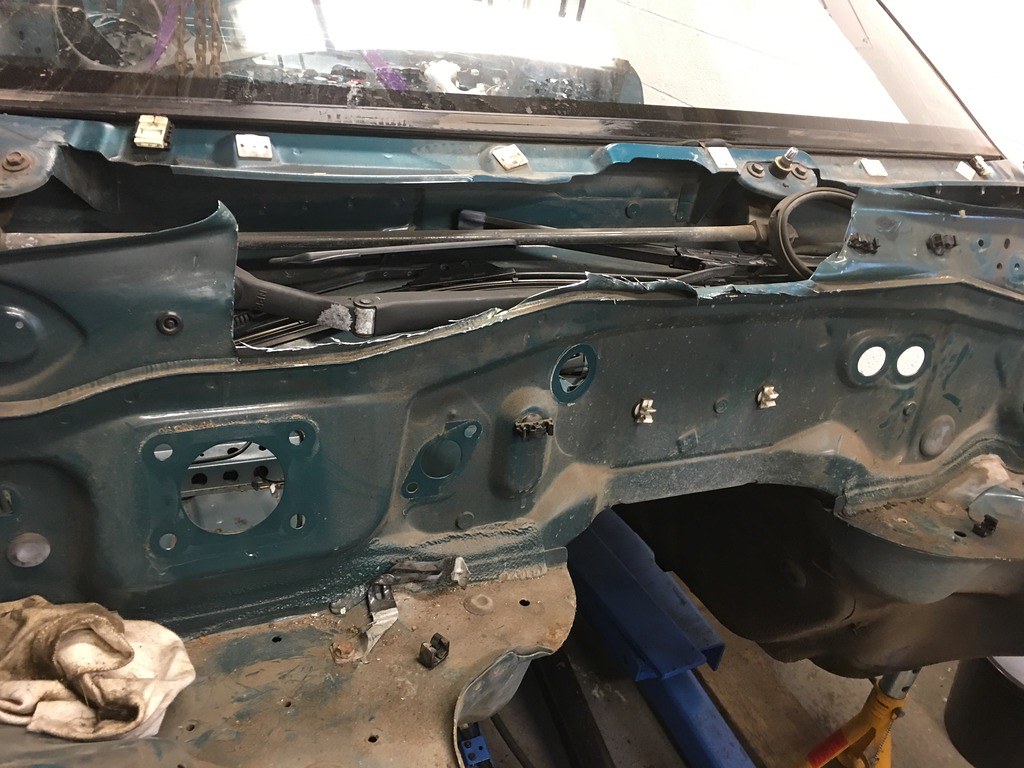
First jobs were to remove the strut tops, fuel tank (and all lines down the tunnel - the reason for which will soon become apparent!) and also remove the VIN plate and stamped in VIN from the shell ready for disposal...
 131F8633-A7A0-49F4-94C3-E035E93FB6C9_zpsek0iroyi on Flickr
Then it was out with the tools to make the shell a bit lighter to remove...
 D960D07C-20D0-4969-8C93-D507AF6622D1_zps4bd64glm on Flickr
and after a bit of swearing and chopping to get through all of the layers of the sills and the chassis rails underneath we had separation again...
 35C6B568-0E15-4534-A87D-70760A690E20_zpssfv5gdol on Flickr
Which resulted in me giving it a stretch...
 BB40FC8A-CD81-406B-A672-7A1C1E3D7998_zpsjarb9glp on Flickr
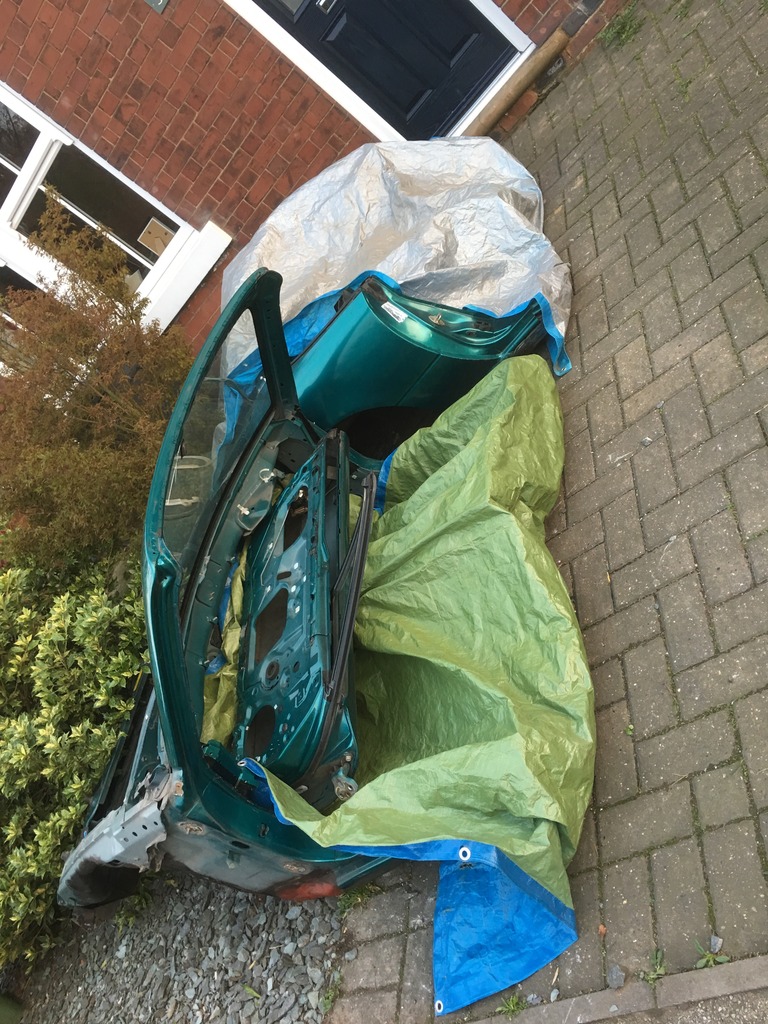
which then allowed me to recruit an extra pair of hands (and a trolley jack and creeper) to get it out of the way and ready to be removed - a sad sight, but at least the rest of the car will live on and the majority of other parts are going on to keep others on the road...
 95DCFA2C-5D95-46D9-9A8D-2AA301614A2A_zpsu8djzfc3 on Flickr
Now I need to get cracking on stripping down the roller-skate ready to get everything looking nice and shiny ready for the kit arriving!
A2971413-62BA-4FF9-8FF6-05DAA5DB2EB6_zpswqdawqny on Flickr42B31158-C04D-453C-B708-3378346D9E91_zpscuoyt9ha on FlickrAnd the rear subframe was separated from the body as it dropped onto its support blocks
143142BD-86FE-415A-867B-9A6720146C05_zpsqhiujmje on FlickrSo tonight I rigged the block and tackle in the garage (and swung on it to check it was secure!!)
EB3A7C78-ECE0-41F2-AB8B-85AFFC100E17_zpsjmmkzxj2 on FlickrAnd then released the last couple of bolts to allow the body to move...
C82839E1-AAEC-40AD-AE34-A6854F11130C_zpswuaejnzc on Flickr231E3C62-0D2E-4E04-927D-17688DA0C3BD_zpsbanzngyg on Flickr7C839AE2-971B-49C5-93B0-0455E9C30493_zpsbcowuwx5 on FlickrAnd up we went:
F64E1006-C12B-4F5F-90A9-C9766125E438_zpsrl65qjjj on FlickrAnd I balanced the shell while I pushed out the roller skate from underneath (having been especially pleased that there was nothing still attached!)...
8A6C0033-5172-4303-A1DC-5F255916182A_zps29ul8vws on FlickrC6306989-9562-4CDF-93B1-BCFBD9977768_zpsc4tsrfdp on FlickrSo now I have the running gear separate and ready to start refurbing - and the fuel tank, VIN Numbers and handbrake cable to remove before I can get rid of the remains of the shell - no turning back now!
A1A20D23-DC0A-4E8A-A32A-0CBC507EABAE_zpsaj7l3veo on FlickrThose of a squeamish persuasion might want to look away now... (MX-5s were harmed in the making of this post)
First jobs were to remove the strut tops, fuel tank (and all lines down the tunnel - the reason for which will soon become apparent!) and also remove the VIN plate and stamped in VIN from the shell ready for disposal...
131F8633-A7A0-49F4-94C3-E035E93FB6C9_zpsek0iroyi on FlickrThen it was out with the tools to make the shell a bit lighter to remove...
D960D07C-20D0-4969-8C93-D507AF6622D1_zps4bd64glm on Flickrand after a bit of swearing and chopping to get through all of the layers of the sills and the chassis rails underneath we had separation again...
35C6B568-0E15-4534-A87D-70760A690E20_zpssfv5gdol on FlickrWhich resulted in me giving it a stretch...
BB40FC8A-CD81-406B-A672-7A1C1E3D7998_zpsjarb9glp on Flickrwhich then allowed me to recruit an extra pair of hands (and a trolley jack and creeper) to get it out of the way and ready to be removed - a sad sight, but at least the rest of the car will live on and the majority of other parts are going on to keep others on the road...
95DCFA2C-5D95-46D9-9A8D-2AA301614A2A_zpsu8djzfc3 on FlickrNow I need to get cracking on stripping down the roller-skate ready to get everything looking nice and shiny ready for the kit arriving!
Edited by browno on Tuesday 15th August 22:32
Edited by browno on Tuesday 15th August 22:39
Here goes with the latest update - and a little more stripping. First job after the last update was to get the roller-skate up on stands and start separating the front and rear halves.
 4CC8D452-200C-4420-9AFC-E3219DC00F57_zpsdq5guthg on Flickr
and one rear shaft even popped out quite easily
 9BFFE99A-D056-4614-B5A5-3A50484312A5_zpsiohlumix on Flickr
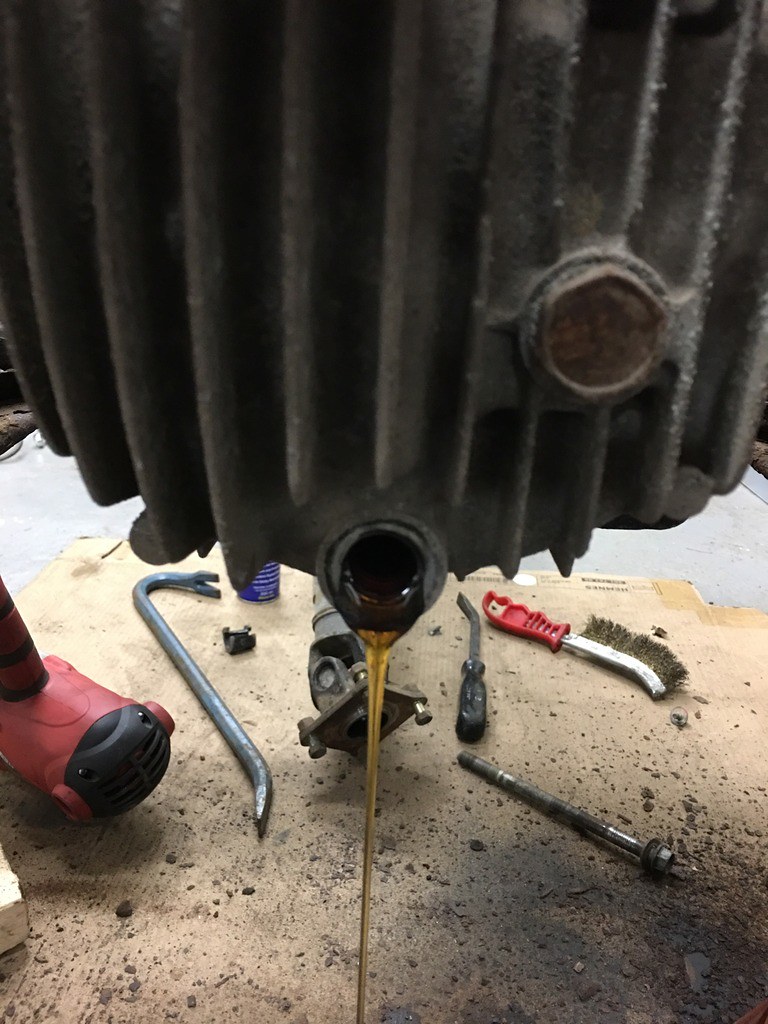
Dropped the diff oil which has clearly been changed recently.
 7AF0E4F9-A829-4C65-9E43-EED396C779AB_zpsa7njbmah on Flickr
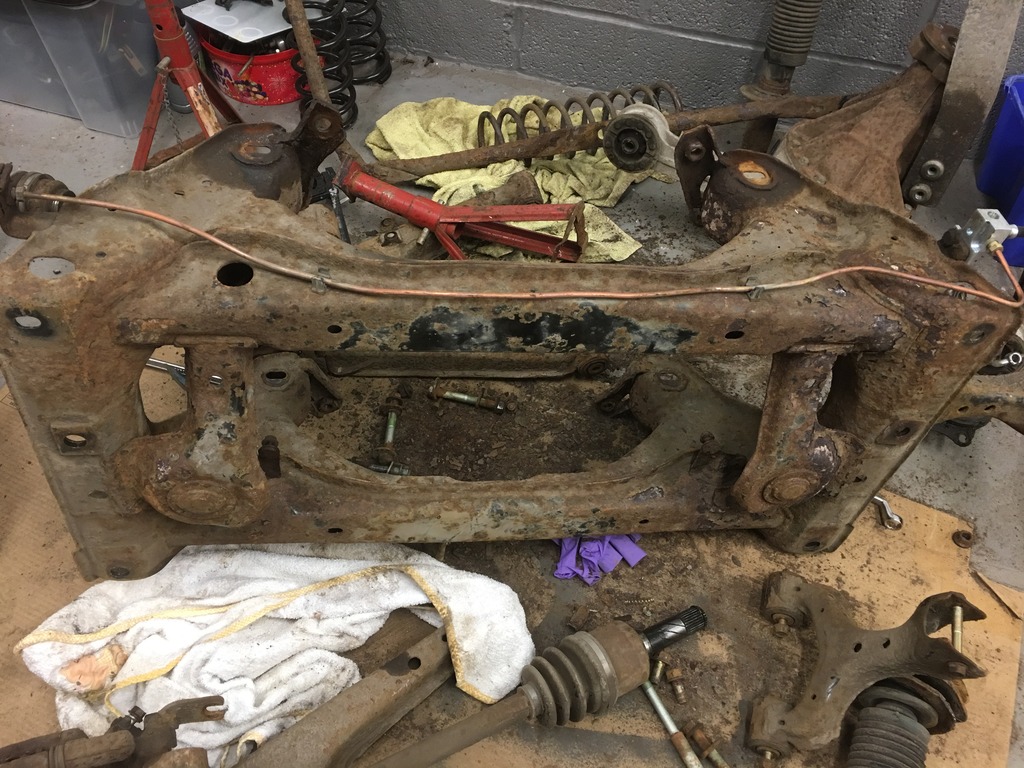
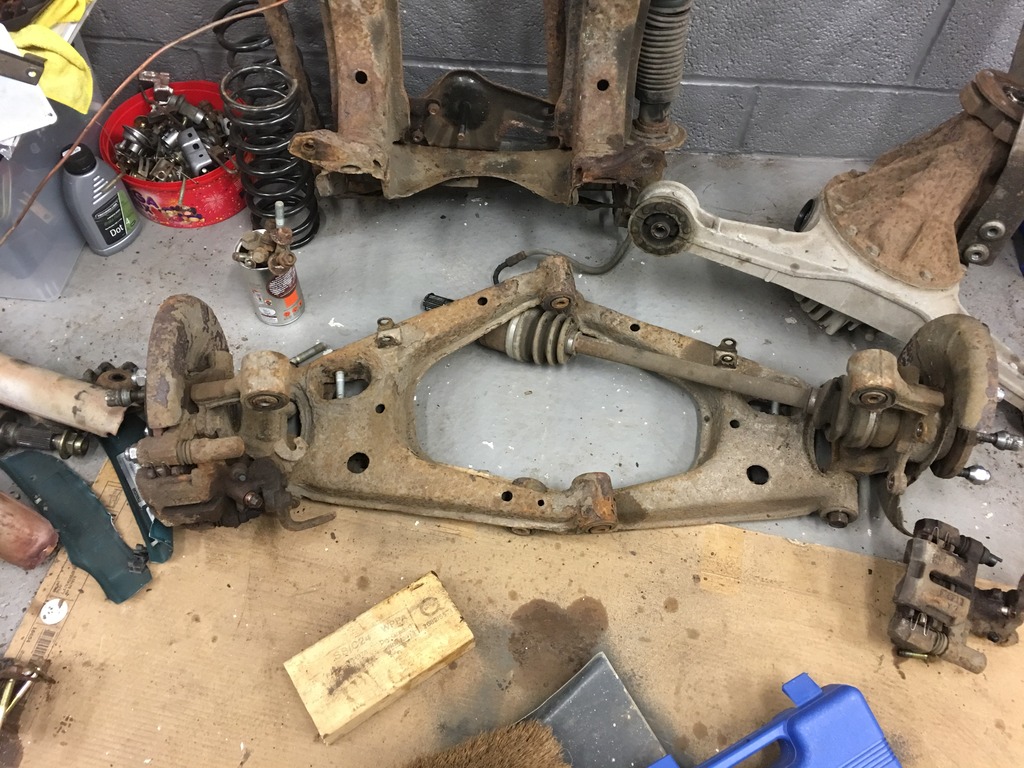
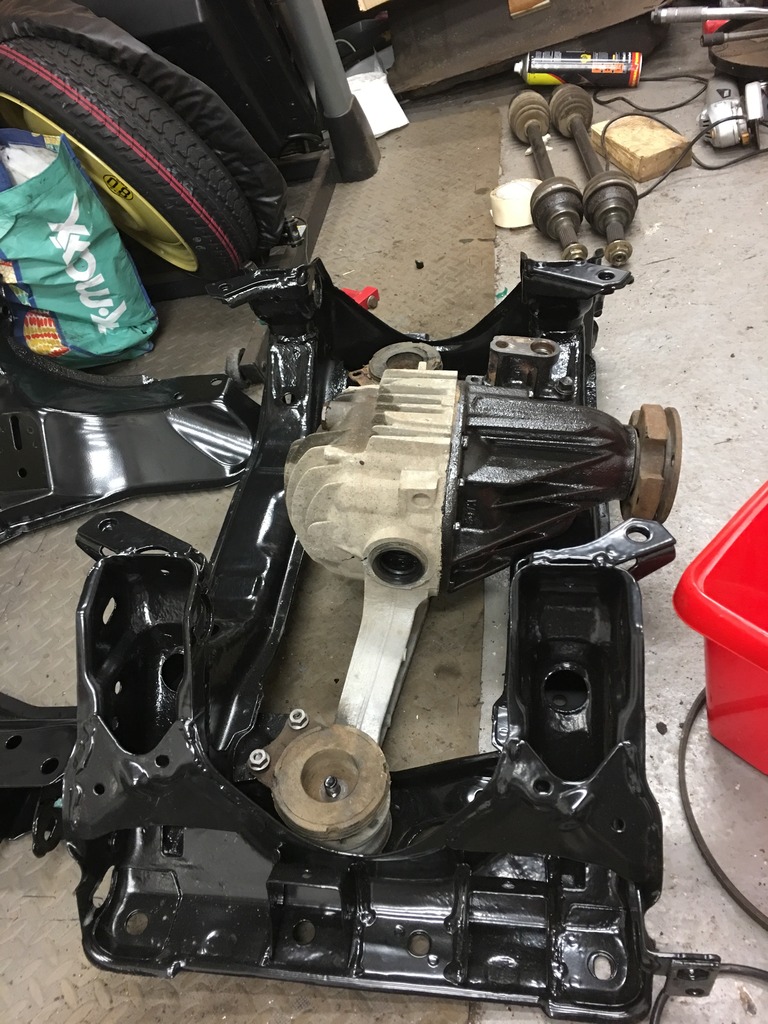
and managed to strip back the subframe. It looks pretty ready for a clean-up, and you can see just how much rubbish had flaked off it in the process of stripping!
 9CF24439-F7D2-44D8-990F-11AEF0F7E551_zpsk8bvfv2g on Flickr
In the meantime, the scrap man came and picked up the shell (and decided to hold it secure on the truck using the winch cable - which the kids found most amusing...)
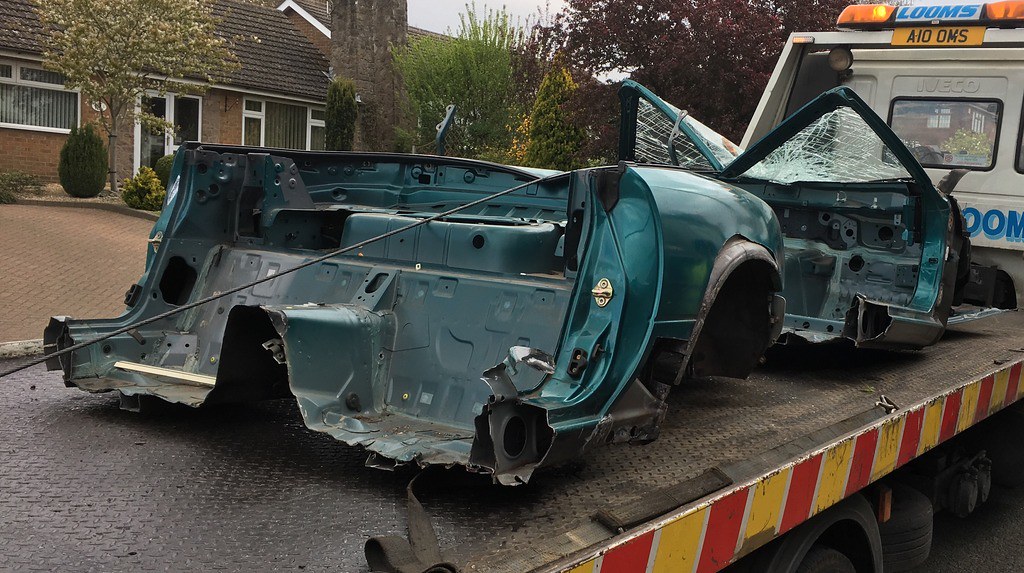 2CA32BD3-D95D-4706-9830-E14FB40D0520_zpswffxvdu8 on Flickr
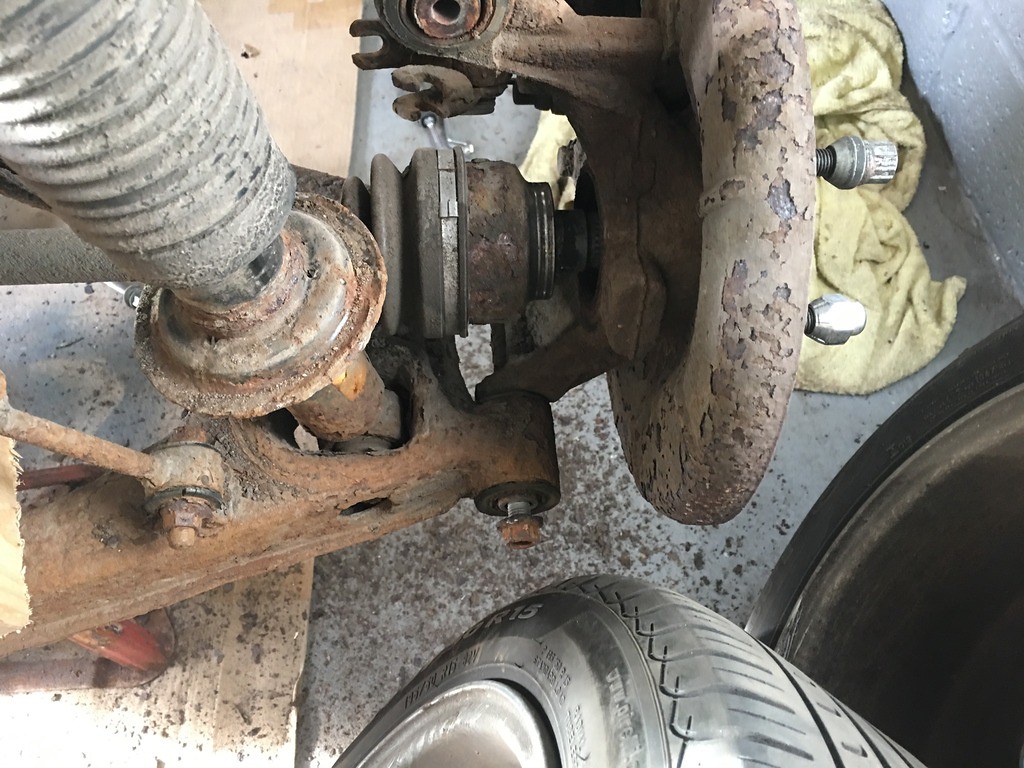
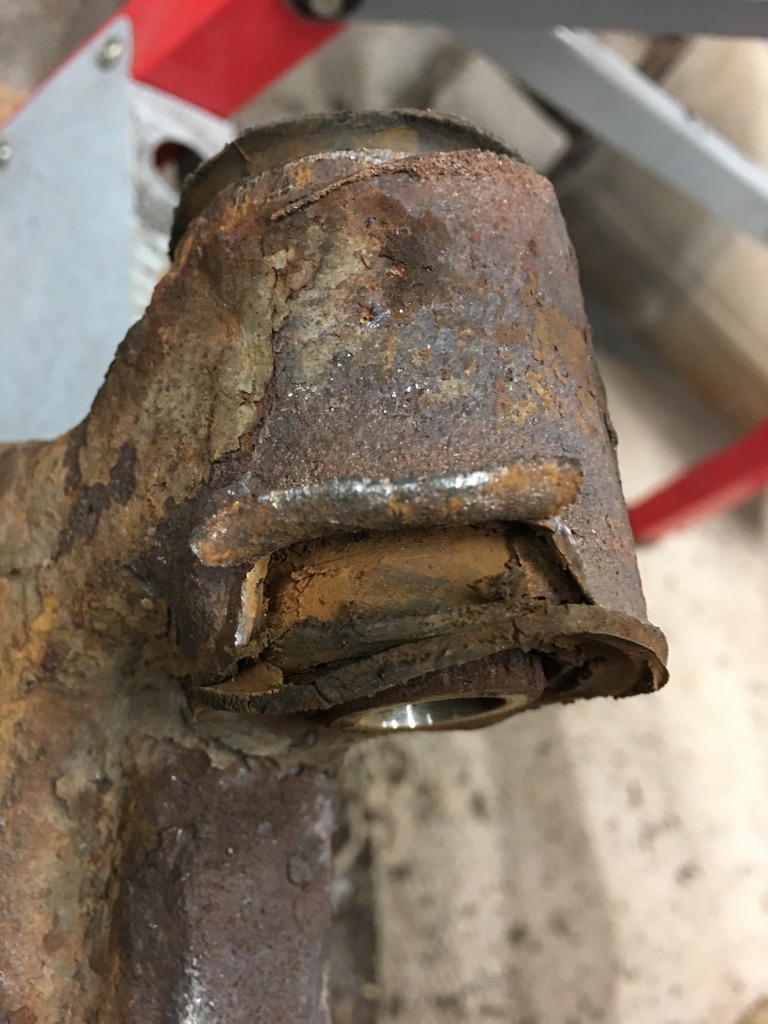
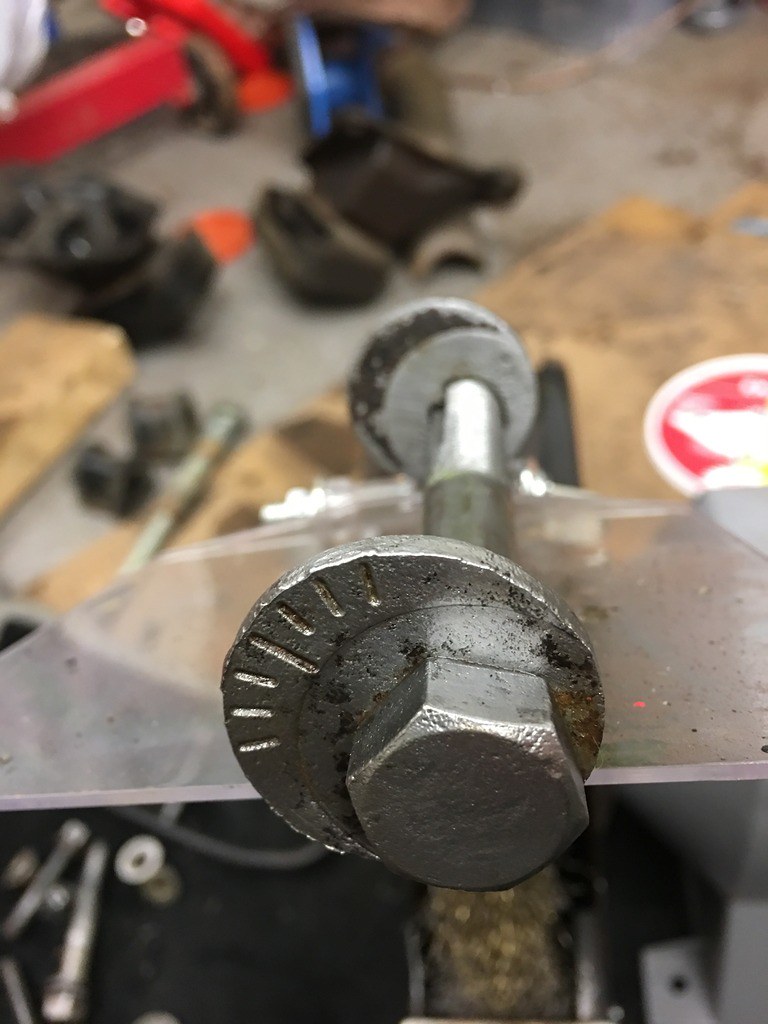
I haven't yet managed to get the long bolts out of the rear hubs, but am working on steadily cleaning up the bolts and getting plenty of penetrating fluid around to avoid chopping them out.
 9D36DC4C-937C-47AC-9E58-022EE180789D_zpsrl4qdm3s on Flickr
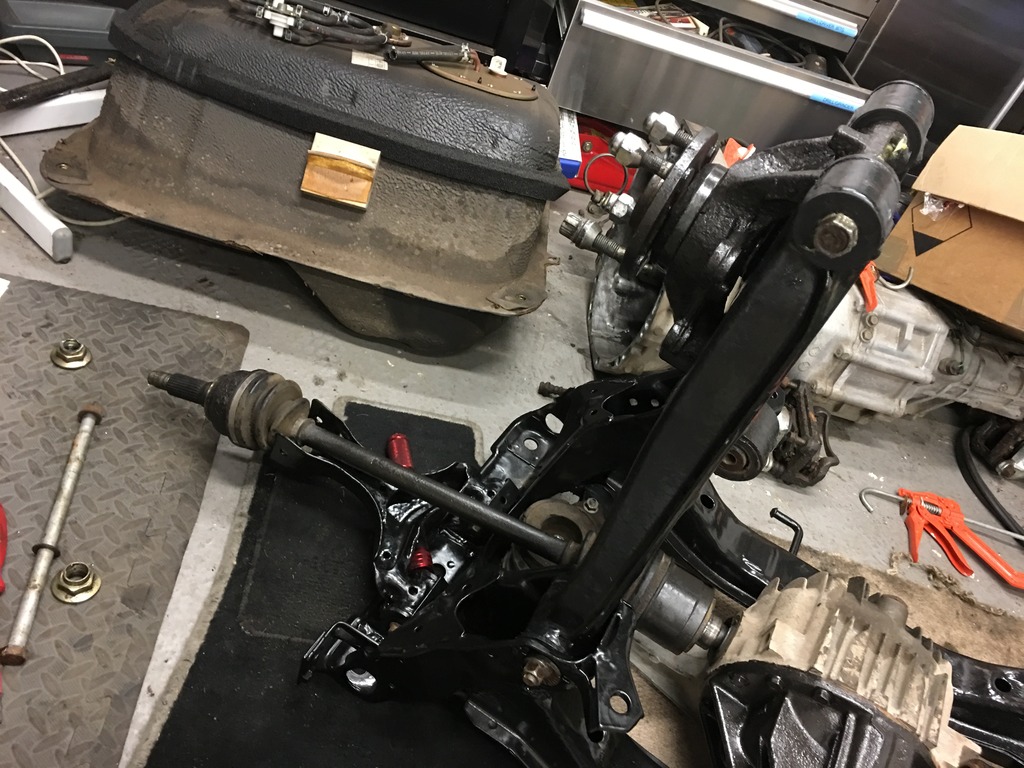
next was to start stripping the front subframe - so I started taking off wishbones and separated the engine and gearbox (and created a bit more mess in the garage in the process!)
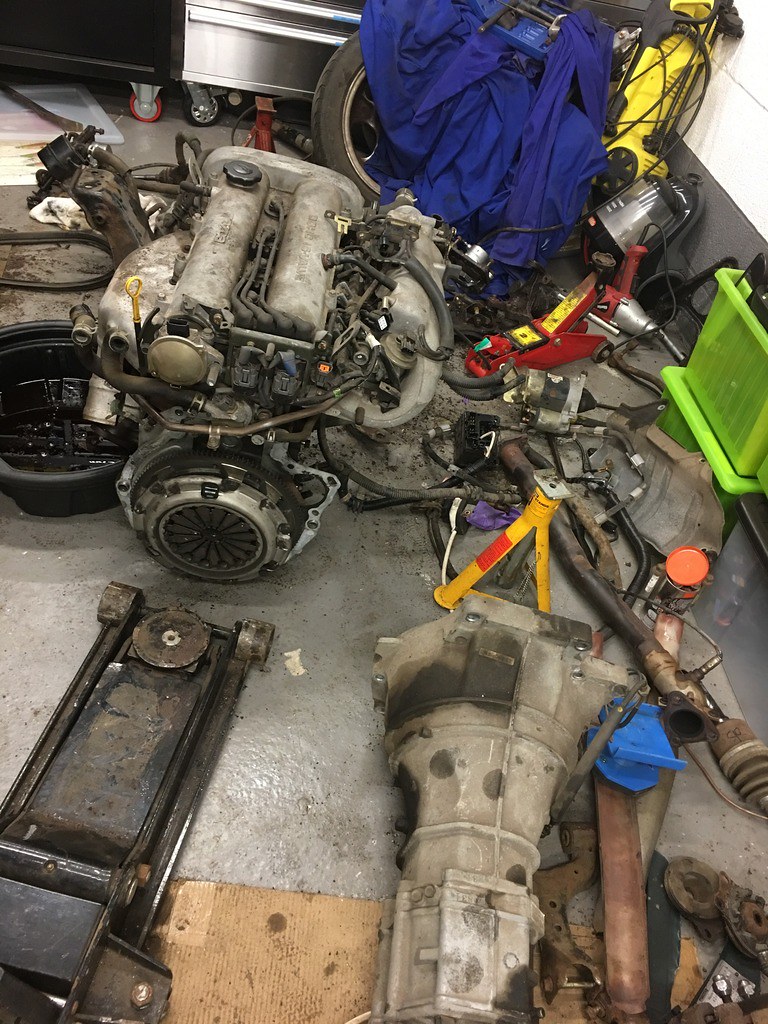 7467B3AC-7669-49A2-AE4C-C92CB3976A82_zpshubpxy0d on Flickr
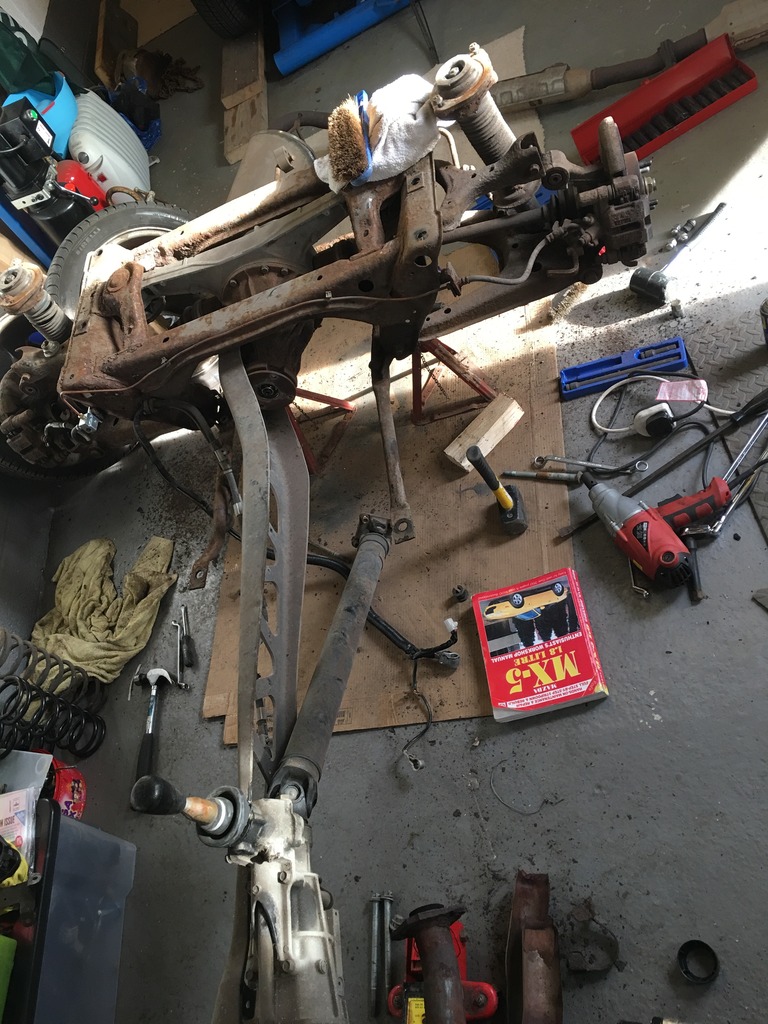
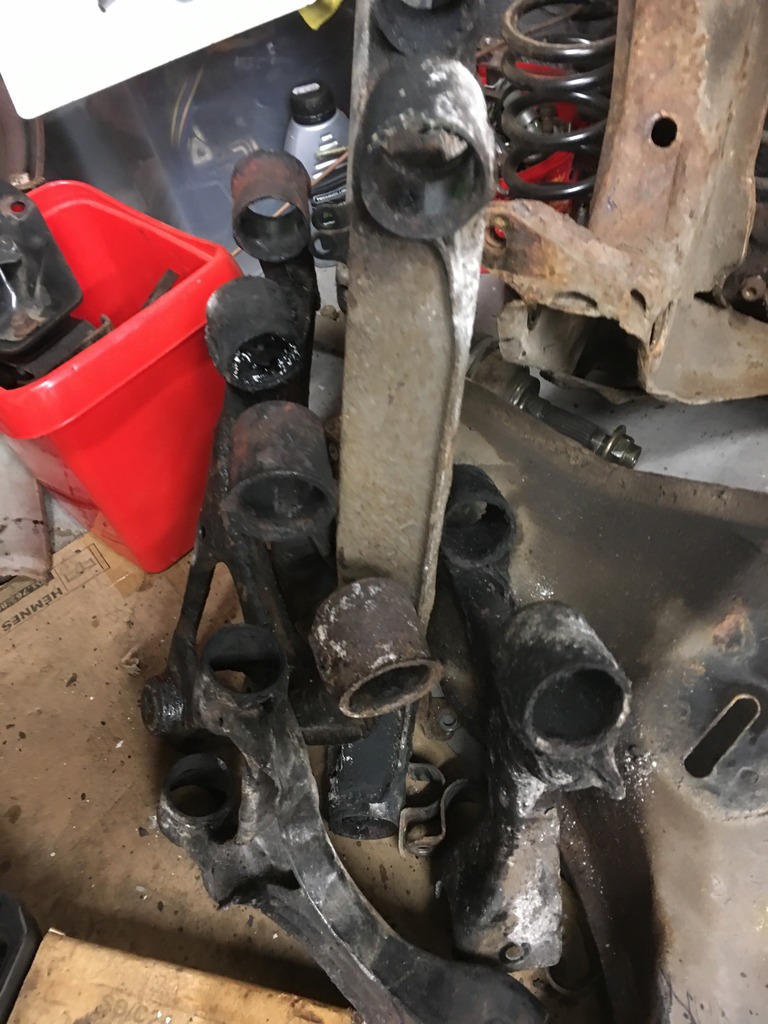
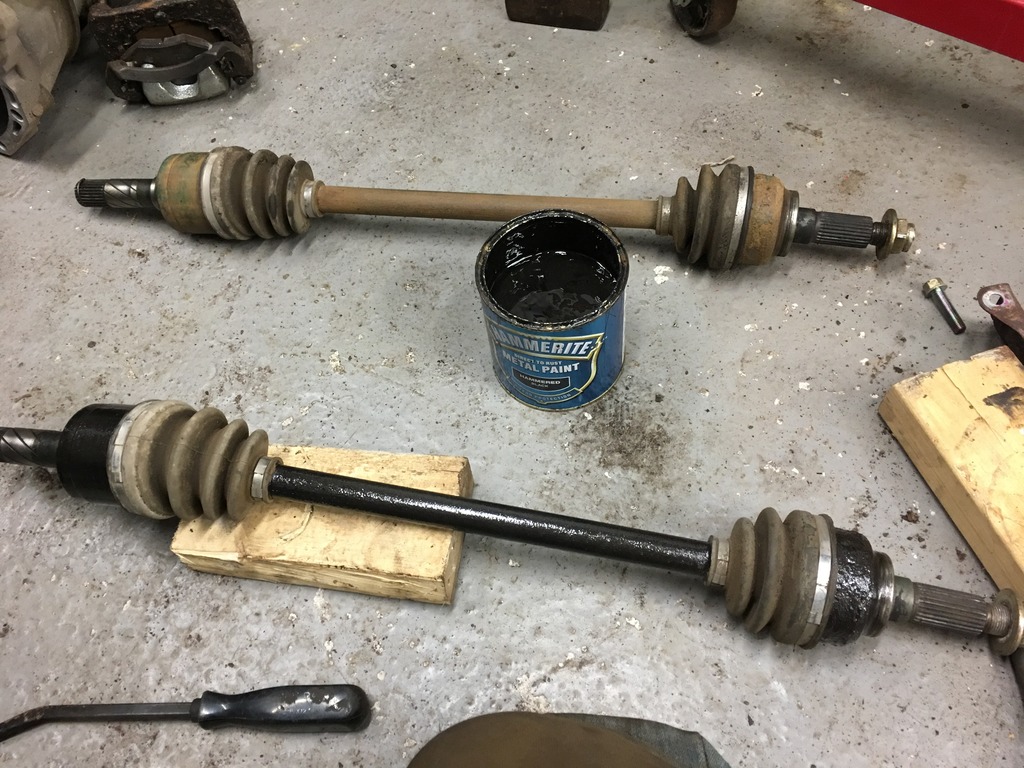
So I now have everything split (and have removed the final wishbone from the front subframe), I have started to get ready to clean things up. I have had a good look over everything and have decided that I am not going to be changing bushes as they are all absolutely fine, and I think decent standard bushes will be as good as cheap poly bushes (and I will see more impact on handling spending the money on decent springs and dampers). As a result, I will paint the wishbones rather than powder coat them, but I am going to get the subframes and other bits off for coating this week.
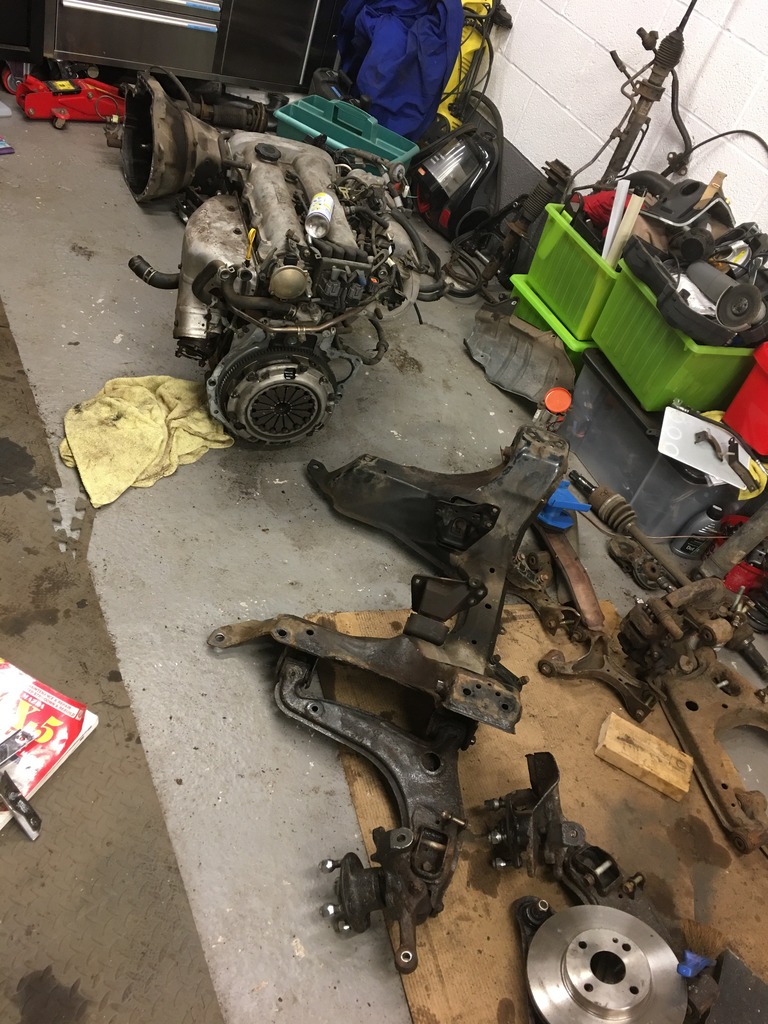 2591DD61-291E-411B-A5CB-5B8C9A4A0052_zpsr4qonbtt on Flickr
4CC8D452-200C-4420-9AFC-E3219DC00F57_zpsdq5guthg on Flickrand one rear shaft even popped out quite easily
9BFFE99A-D056-4614-B5A5-3A50484312A5_zpsiohlumix on FlickrDropped the diff oil which has clearly been changed recently.
7AF0E4F9-A829-4C65-9E43-EED396C779AB_zpsa7njbmah on Flickrand managed to strip back the subframe. It looks pretty ready for a clean-up, and you can see just how much rubbish had flaked off it in the process of stripping!
9CF24439-F7D2-44D8-990F-11AEF0F7E551_zpsk8bvfv2g on FlickrIn the meantime, the scrap man came and picked up the shell (and decided to hold it secure on the truck using the winch cable - which the kids found most amusing...)
2CA32BD3-D95D-4706-9830-E14FB40D0520_zpswffxvdu8 on FlickrI haven't yet managed to get the long bolts out of the rear hubs, but am working on steadily cleaning up the bolts and getting plenty of penetrating fluid around to avoid chopping them out.
9D36DC4C-937C-47AC-9E58-022EE180789D_zpsrl4qdm3s on Flickrnext was to start stripping the front subframe - so I started taking off wishbones and separated the engine and gearbox (and created a bit more mess in the garage in the process!)
7467B3AC-7669-49A2-AE4C-C92CB3976A82_zpshubpxy0d on FlickrSo I now have everything split (and have removed the final wishbone from the front subframe), I have started to get ready to clean things up. I have had a good look over everything and have decided that I am not going to be changing bushes as they are all absolutely fine, and I think decent standard bushes will be as good as cheap poly bushes (and I will see more impact on handling spending the money on decent springs and dampers). As a result, I will paint the wishbones rather than powder coat them, but I am going to get the subframes and other bits off for coating this week.
2591DD61-291E-411B-A5CB-5B8C9A4A0052_zpsr4qonbtt on FlickrEdited by browno on Tuesday 15th August 22:46
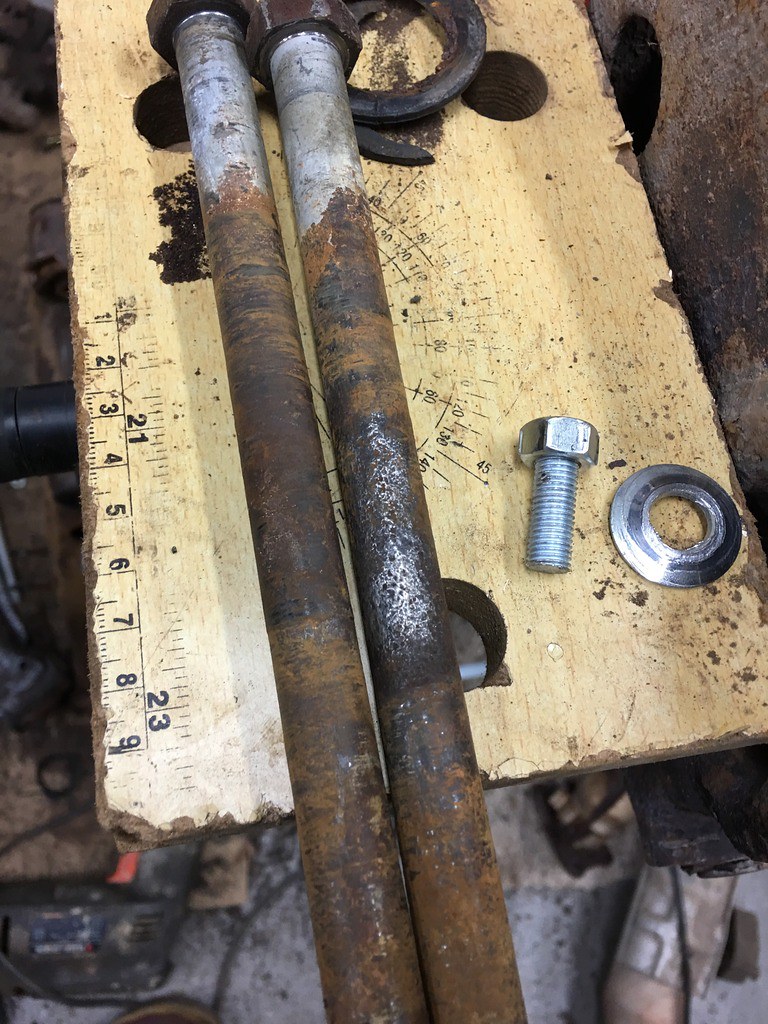
Time for another update, and some good news! Using a combination of 3 mechanical engineers, a 20 Tonne press, a blasting cabinet, a large impact gun and a big bar, we have managed to remove the lower wishbone long bolts and the n/s driveshaft...
 8A1E2EC6-0872-4342-9B58-CF203B4D34D6_zpsip9n2dzj on Flickr
There was, however a casualty in the fight - we (well, ok, I) got a bit keen to load up the press on the first bolt, and while it moved with a bang, we realised that the bang wasn't only down to the bolt moving...
 2B50800A-CF96-43EF-89A4-87B0A42FB56C_zpstveko4qg on Flickr
So, I have ordered a replacement arm from Autolink, which wasn't too costly. One good note was that the bolts both came out good and straight and are reusable with a good clean-up (you can see where I tried to clean up the right-hand one in-situ with the soda blaster, which helped a little).
 3BA26D31-8145-4099-9C43-9CF05BF06F53_zpsjruhylzo on Flickr
The next job was to work on removing the bushes, for which I first planned on making use of the press again - I tried one using sockets and threaded bar and just succeeded in devising a way to tension the threaded bar until it snapped! I then had a go on the press, and was a little worried about how much pressure was needed to push the bushes out, and that this might affect the integrity of the wishbones (I don't want to damage any more!), so I resorted to FIRE!
I set myself up a workstation at the bottom of the garden and attacked the bushes with the blowtorch - which (after I had got a decent technique and replaced the gas canister!) was proving relatively quick at about 5 minutes per bush, and was quite satisfying!
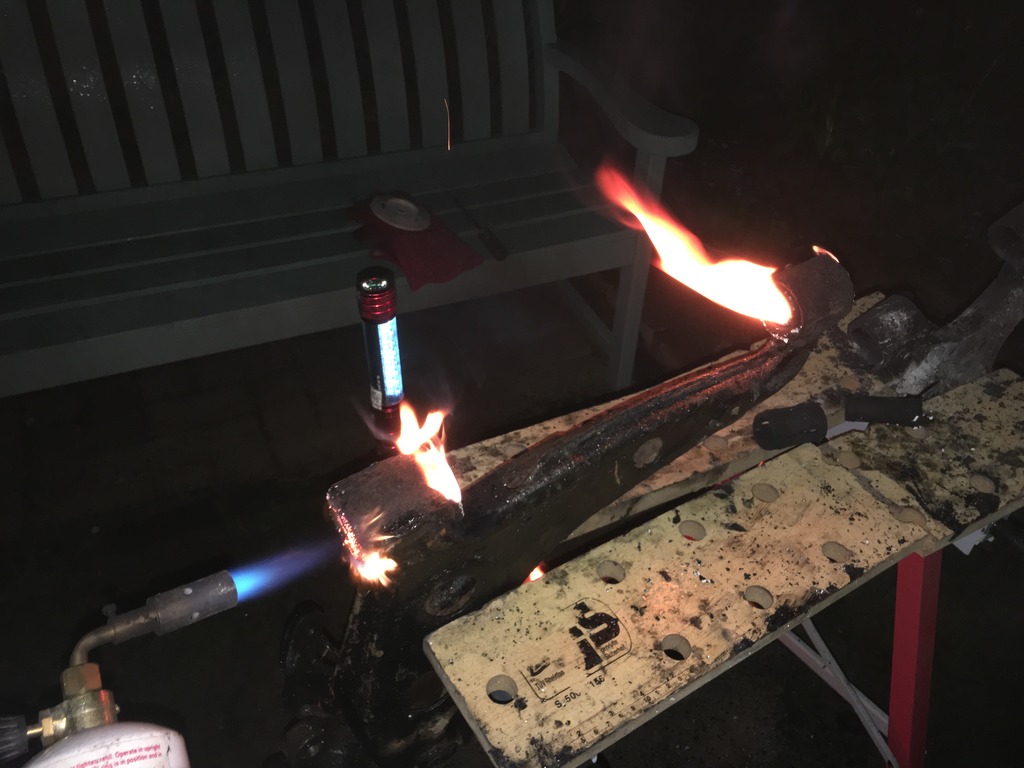 FC53532A-5710-4DFF-A322-D5BF9470A465_zpstqoqhwha on Flickr
So I now have a good pile of wishbones without bushes that just need a bit of a cleanup of the last traces of rubber before I can take them off for powdercoating early next week (hopefully should get the replacement wishbone from Autolink today, so I can get that prepped too).
 6A6B929D-EE1D-4C95-A08C-DC08BDC6DEBF_zpsc7bgpicw on Flickr
Hopefully I can also have a decent weekend - and pick up some more bits and bobs at the kitcar show on Sunday!
8A1E2EC6-0872-4342-9B58-CF203B4D34D6_zpsip9n2dzj on FlickrThere was, however a casualty in the fight - we (well, ok, I) got a bit keen to load up the press on the first bolt, and while it moved with a bang, we realised that the bang wasn't only down to the bolt moving...
2B50800A-CF96-43EF-89A4-87B0A42FB56C_zpstveko4qg on FlickrSo, I have ordered a replacement arm from Autolink, which wasn't too costly. One good note was that the bolts both came out good and straight and are reusable with a good clean-up (you can see where I tried to clean up the right-hand one in-situ with the soda blaster, which helped a little).
3BA26D31-8145-4099-9C43-9CF05BF06F53_zpsjruhylzo on FlickrThe next job was to work on removing the bushes, for which I first planned on making use of the press again - I tried one using sockets and threaded bar and just succeeded in devising a way to tension the threaded bar until it snapped! I then had a go on the press, and was a little worried about how much pressure was needed to push the bushes out, and that this might affect the integrity of the wishbones (I don't want to damage any more!), so I resorted to FIRE!
I set myself up a workstation at the bottom of the garden and attacked the bushes with the blowtorch - which (after I had got a decent technique and replaced the gas canister!) was proving relatively quick at about 5 minutes per bush, and was quite satisfying!
FC53532A-5710-4DFF-A322-D5BF9470A465_zpstqoqhwha on FlickrSo I now have a good pile of wishbones without bushes that just need a bit of a cleanup of the last traces of rubber before I can take them off for powdercoating early next week (hopefully should get the replacement wishbone from Autolink today, so I can get that prepped too).
6A6B929D-EE1D-4C95-A08C-DC08BDC6DEBF_zpsc7bgpicw on FlickrHopefully I can also have a decent weekend - and pick up some more bits and bobs at the kitcar show on Sunday!
Edited by browno on Tuesday 15th August 22:57
So, update time again and more progress (and a trip to the kit car show too)
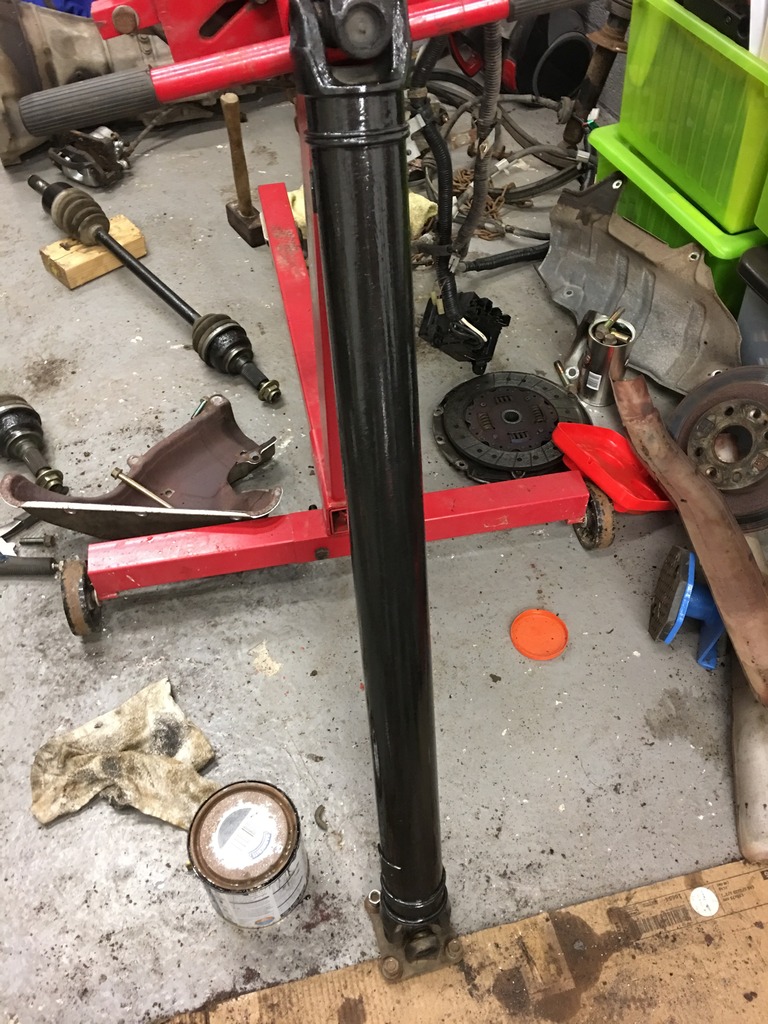
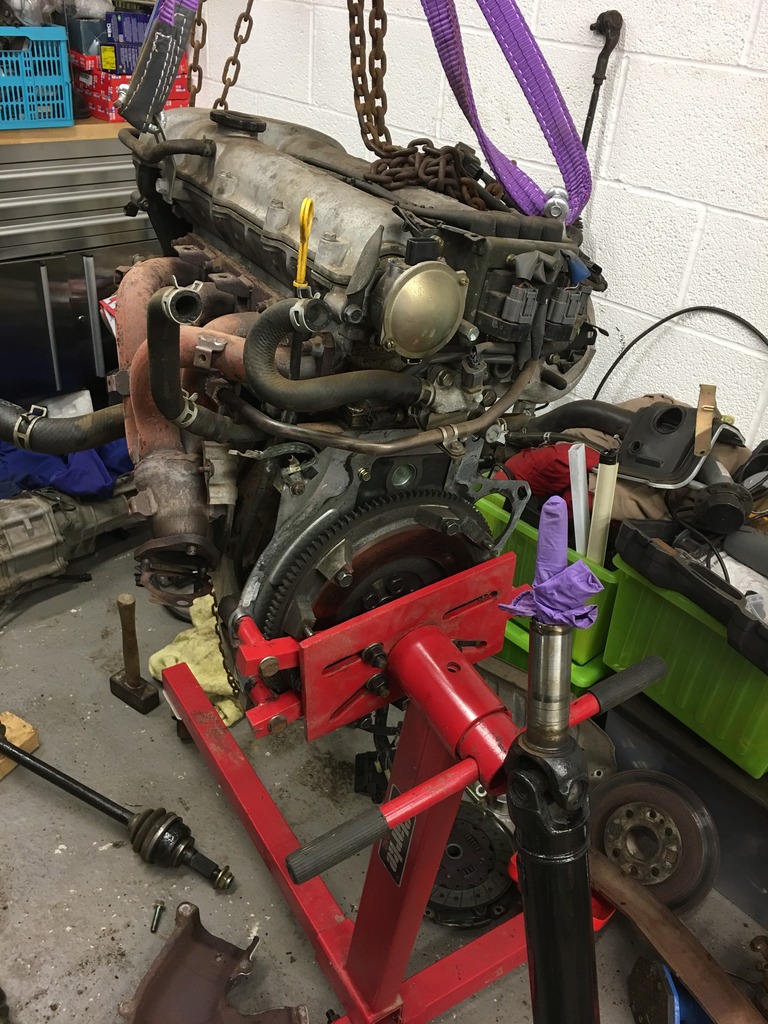
Firstly, while waiting for my bits to arrive, I have got the engine mounted on the engine stand, and have started cleaning and painting some bits, starting with driveshafts, diff housing and engine block...
 6C37449F-52AF-4EEA-87B2-169770DCF018_zpsk9vwnieg on Flickr
 7A68B931-CA8A-4C53-9DA4-DEF8251EE708_zpsjy7ebfxz on Flickr
 F27E9249-4821-443D-93E0-9AA05A6DBB74_zpsu60hhkzz on Flickr
 29FDBD70-C03F-43F0-8ECD-DDC620694840_zps0ekmevl9 on Flickr
 9C1DBBEB-253F-47D1-9067-00CB9761900E_zpsq1kkvfmt on Flickr
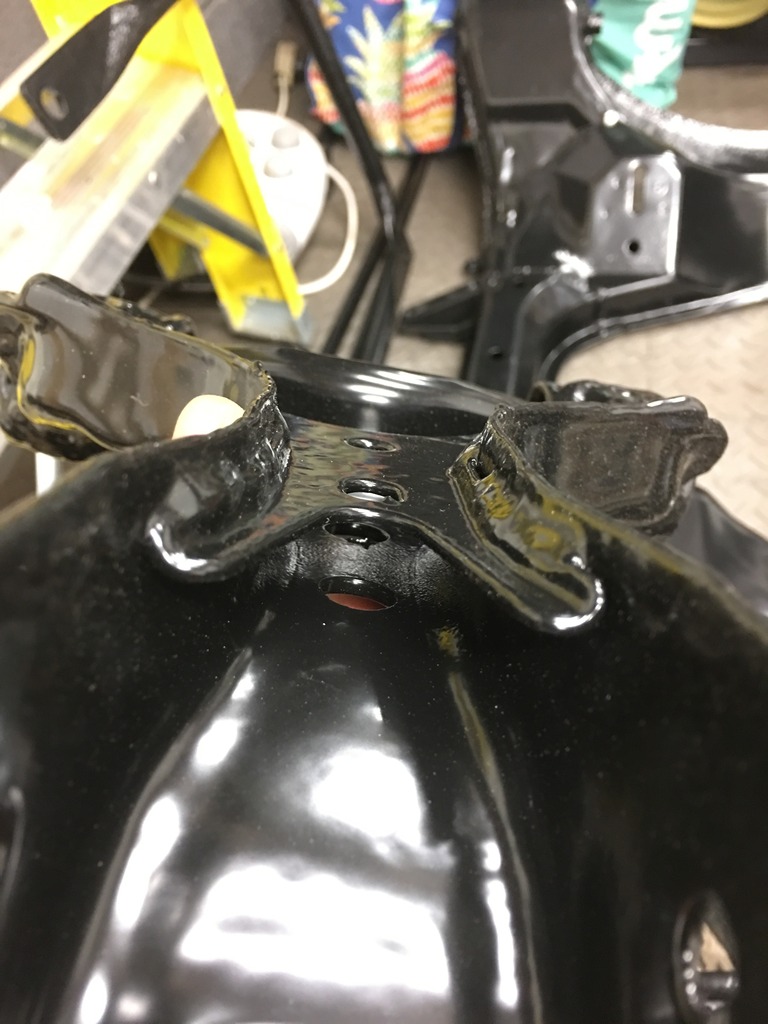
I have also been getting the last bits of pre-powder coat prep done, including trimming the edges of the front subframe to prevent interference with springs (as recommended by Stuart when I visited MEV) - I have chopped back so the edge is now 15mm from the outer edge of the bolt holes.
 B862FCBA-B2B5-448C-BAD2-1BFA8B70851B_zpsserroloh on Flickr
and also trimmed the rear U-brace to remove the extraneous end sections
 DD99206F-DD2E-401C-BBED-031A62626523_zpseqhp5tqp on Flickr
I had a good trip to Stoneleigh on Sunday where I had a good look over all the various cars there, and a chat to a few folks about my build. I did get a bit of a kick to get moving when I went to the MEV stand and Julie told me that my chassis is built and powder coated (and apparently looking very good!) and they are now getting the bodywork made up - so it will be ready imminently!
Today I have been able to make some more progress, as I had still be waiting for my bits from Autolink and had thought that they were delayed due to the bank holiday - and thankfully checked the tracking, which told me that (despite no card being left at my home), the parcel had been taken to the post office in the next village. At least that meant that I could fetch that and now have my final wishbone - so tonight whipped out the bushes from that and have got all my bits ready to drop in for powder coating in the morning, which will be a good step in the right direction.
I also had a second parcel today, in the form of my Energy Suspension bush set - which looks very good, but also makes me think I've still got plenty of work to do to get all of them fitted!
 B8240572-A9CD-42A7-86EC-EE5887672582_zpsenumwsle on Flickr
Firstly, while waiting for my bits to arrive, I have got the engine mounted on the engine stand, and have started cleaning and painting some bits, starting with driveshafts, diff housing and engine block...
6C37449F-52AF-4EEA-87B2-169770DCF018_zpsk9vwnieg on Flickr7A68B931-CA8A-4C53-9DA4-DEF8251EE708_zpsjy7ebfxz on FlickrF27E9249-4821-443D-93E0-9AA05A6DBB74_zpsu60hhkzz on Flickr29FDBD70-C03F-43F0-8ECD-DDC620694840_zps0ekmevl9 on Flickr9C1DBBEB-253F-47D1-9067-00CB9761900E_zpsq1kkvfmt on FlickrI have also been getting the last bits of pre-powder coat prep done, including trimming the edges of the front subframe to prevent interference with springs (as recommended by Stuart when I visited MEV) - I have chopped back so the edge is now 15mm from the outer edge of the bolt holes.
B862FCBA-B2B5-448C-BAD2-1BFA8B70851B_zpsserroloh on Flickrand also trimmed the rear U-brace to remove the extraneous end sections
DD99206F-DD2E-401C-BBED-031A62626523_zpseqhp5tqp on FlickrI had a good trip to Stoneleigh on Sunday where I had a good look over all the various cars there, and a chat to a few folks about my build. I did get a bit of a kick to get moving when I went to the MEV stand and Julie told me that my chassis is built and powder coated (and apparently looking very good!) and they are now getting the bodywork made up - so it will be ready imminently!
Today I have been able to make some more progress, as I had still be waiting for my bits from Autolink and had thought that they were delayed due to the bank holiday - and thankfully checked the tracking, which told me that (despite no card being left at my home), the parcel had been taken to the post office in the next village. At least that meant that I could fetch that and now have my final wishbone - so tonight whipped out the bushes from that and have got all my bits ready to drop in for powder coating in the morning, which will be a good step in the right direction.
I also had a second parcel today, in the form of my Energy Suspension bush set - which looks very good, but also makes me think I've still got plenty of work to do to get all of them fitted!
B8240572-A9CD-42A7-86EC-EE5887672582_zpsenumwsle on FlickrEdited by browno on Tuesday 15th August 23:06
So, a bit more progress again, so time for another update...
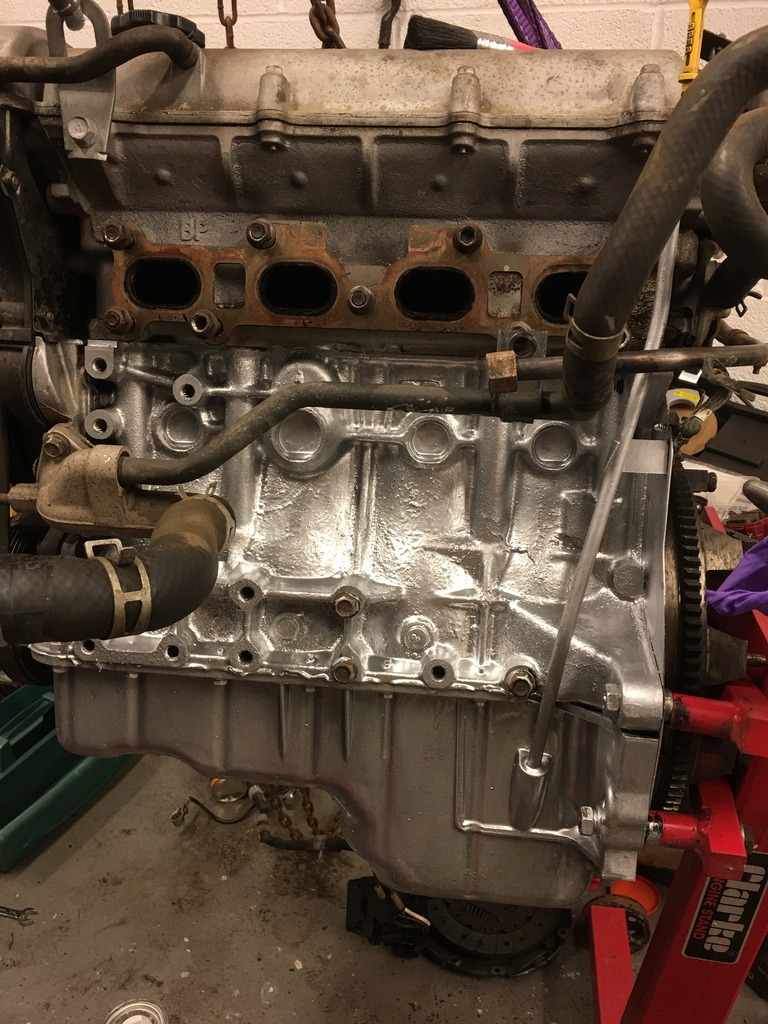
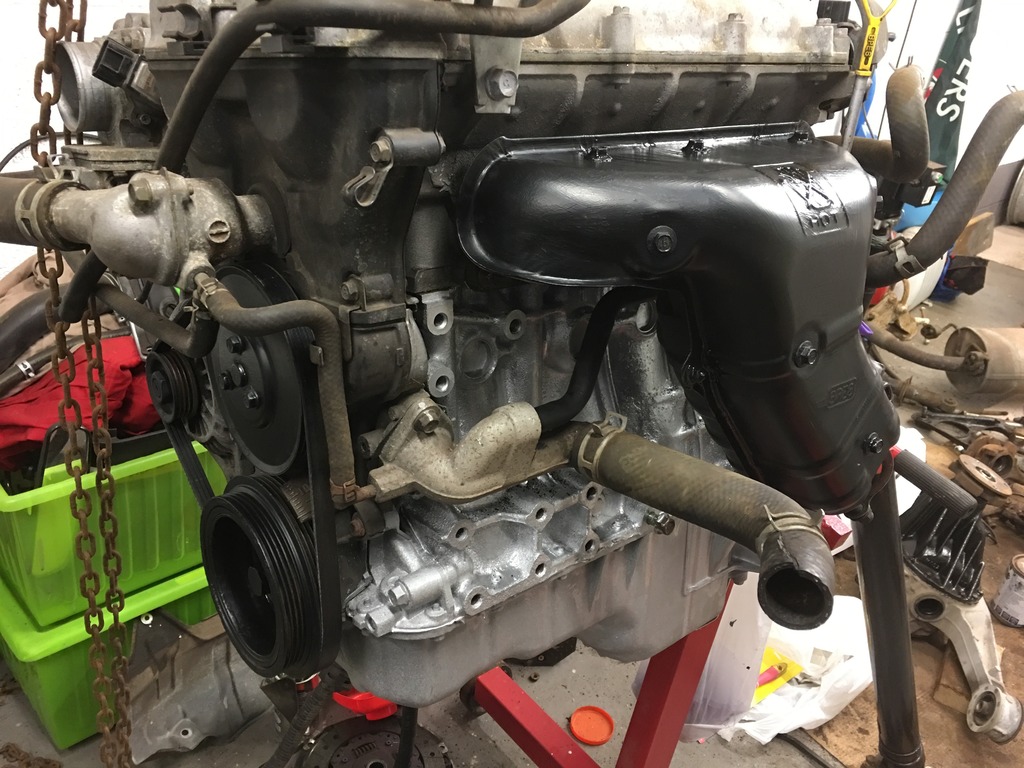
Firstly, I painted up the manifold heatshield and remounted to the block (replacing a downpipe stud that snapped during removal in the process)
 30363948-75BD-40A4-AD90-5CE616ADDA9A_zpspeeppuj2 on Flickr
and started cleaning up my front upper wishbones with rust converter followed by hammerite (I hadn't sent these for blasting and coating due to the upper balljoints), and also my rear hubs.
 4710308A-C38D-4D04-81ED-1DF494C95DC4_zpsrzirtgkh on Flickr
 5B10D8B9-56CF-4C02-8020-C98C5CC5A6A9_zpsmbvxtjrj on Flickr
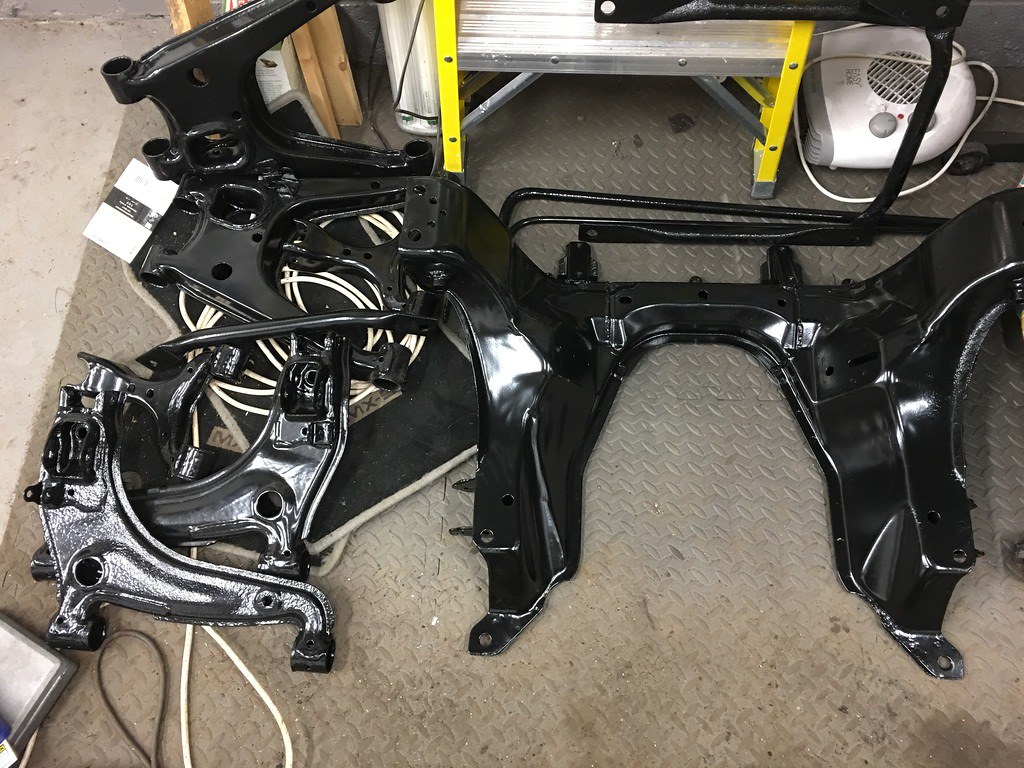
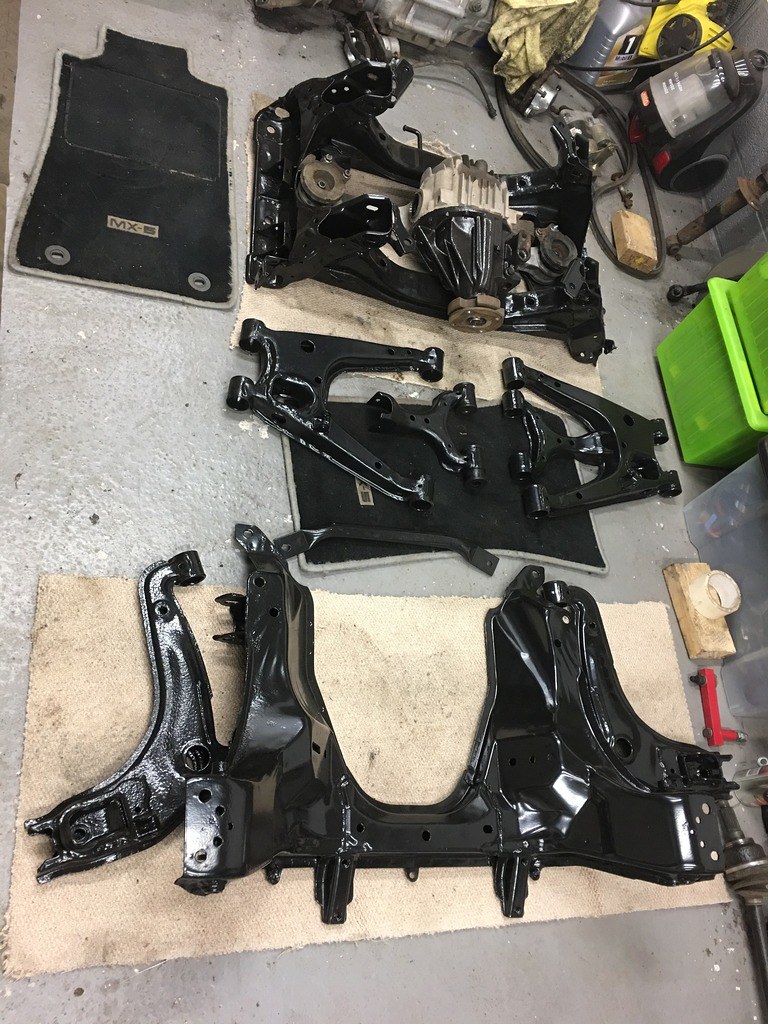
and also picked up a bit pile of now shiny bits from powder coating - which look completely transformed!
 C12E4861-0B47-44EB-9F8A-395ADBF4C939_zpsbl6vvn0b on Flickr
I'm happy with the job they've done at even ensuring that the insides of some of the open sections on the wishbones and subframes are well coated too.
 86A7212A-C665-49DE-93C8-65E60D5805C3_zpskwuyiybp on Flickr
I also started cleaning up some of my nuts and bolts - and to do this, after looking around I used "frost rust remover" which was £25 for 5 litres and is said to remove the rust without the use of acids or alkalis (being an inorganic chemist, this will be using selective chelation of the iron oxide - essentially pulling the rust into solution). So far, I am impressed by the results - essentially leave the parts in the solution overnight and then give them a rinse off and a clean with a wire brush and it has a pretty decent effect (this is a very good one - others have needed a second dunk in the solution).
 C1BACD93-C793-4621-8EC3-9A7E8E77855D_zpsjxbdulso on Flickr
 3F74FA3F-E6C0-4B74-B7AE-A09C4C2893AB_zpskhrpyfbn on Flickr
I have started mounting the diff into the subframe, ready to begin making the pile of parts back into something more like a powertrain, and have given the garage a good clean out, as I am now hopefully finished with having flaky rust and dust everywhere, and can start building in a cleaner environment! Once all was clean, I have then laid out the bits in preparation for a rebuilding session!
 B631132C-EA0B-43F9-8617-709F766A352F_zpsfdbkhbte on Flickr
 59E293AD-B989-411C-B8CE-33E3C37A89D3_zps6j48so1l on Flickr
So, it feels like I am making progress and finally turning the corner from stripping down and dealing with mucky nasty parts into actually being able to start building something that will look nice and clean - hopefully the next update will continue that trend!
Firstly, I painted up the manifold heatshield and remounted to the block (replacing a downpipe stud that snapped during removal in the process)
30363948-75BD-40A4-AD90-5CE616ADDA9A_zpspeeppuj2 on Flickrand started cleaning up my front upper wishbones with rust converter followed by hammerite (I hadn't sent these for blasting and coating due to the upper balljoints), and also my rear hubs.
4710308A-C38D-4D04-81ED-1DF494C95DC4_zpsrzirtgkh on Flickr5B10D8B9-56CF-4C02-8020-C98C5CC5A6A9_zpsmbvxtjrj on Flickrand also picked up a bit pile of now shiny bits from powder coating - which look completely transformed!
C12E4861-0B47-44EB-9F8A-395ADBF4C939_zpsbl6vvn0b on FlickrI'm happy with the job they've done at even ensuring that the insides of some of the open sections on the wishbones and subframes are well coated too.
86A7212A-C665-49DE-93C8-65E60D5805C3_zpskwuyiybp on FlickrI also started cleaning up some of my nuts and bolts - and to do this, after looking around I used "frost rust remover" which was £25 for 5 litres and is said to remove the rust without the use of acids or alkalis (being an inorganic chemist, this will be using selective chelation of the iron oxide - essentially pulling the rust into solution). So far, I am impressed by the results - essentially leave the parts in the solution overnight and then give them a rinse off and a clean with a wire brush and it has a pretty decent effect (this is a very good one - others have needed a second dunk in the solution).
C1BACD93-C793-4621-8EC3-9A7E8E77855D_zpsjxbdulso on Flickr3F74FA3F-E6C0-4B74-B7AE-A09C4C2893AB_zpskhrpyfbn on FlickrI have started mounting the diff into the subframe, ready to begin making the pile of parts back into something more like a powertrain, and have given the garage a good clean out, as I am now hopefully finished with having flaky rust and dust everywhere, and can start building in a cleaner environment! Once all was clean, I have then laid out the bits in preparation for a rebuilding session!
B631132C-EA0B-43F9-8617-709F766A352F_zpsfdbkhbte on Flickr59E293AD-B989-411C-B8CE-33E3C37A89D3_zps6j48so1l on FlickrSo, it feels like I am making progress and finally turning the corner from stripping down and dealing with mucky nasty parts into actually being able to start building something that will look nice and clean - hopefully the next update will continue that trend!
Edited by browno on Tuesday 15th August 23:16
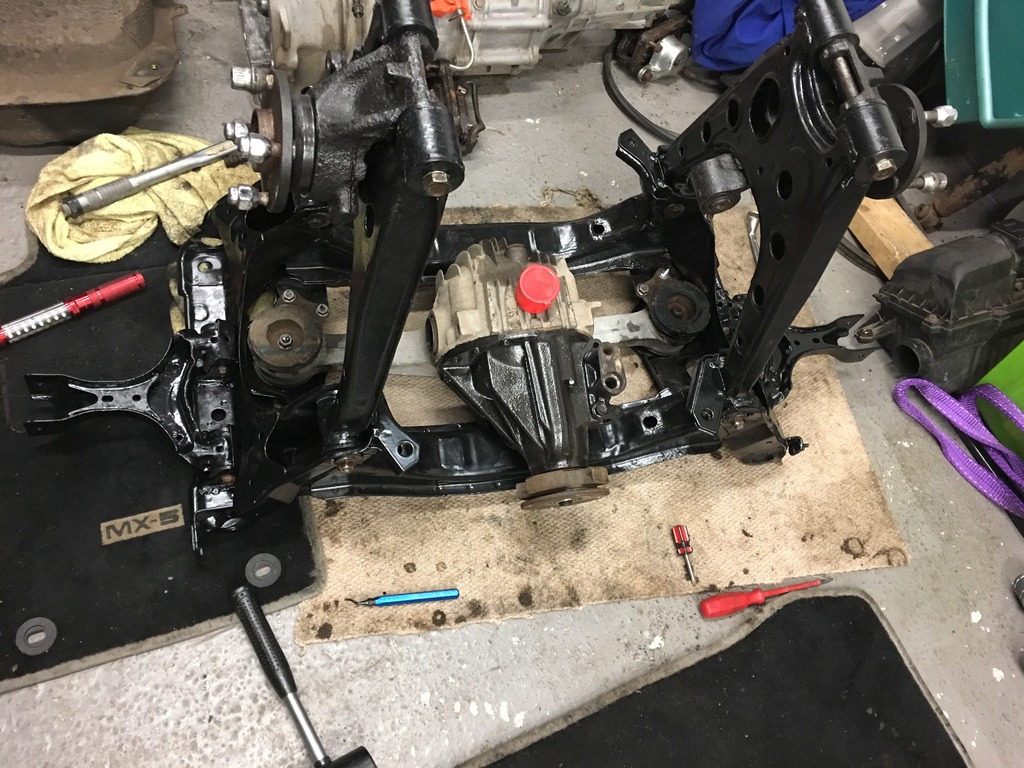
So since the last update I have been cracking on with assembly - and getting sticky polybush grease over everything I touch!
First I started on the back-end and got everything together (although I initially put the hubs on the wrong sides, as I had turned the subframe around while assembling !
!
 C8FED11C-0B97-4B4B-A3FB-7B8A921ACFCC_zpstlniiil4 on Flickr
I haven't yet got the driveshafts located into the diff - they are not locating by simply pushing them in, and I didn't want to get too aggressive with them - will have another go tonight. I guess it is just a case of getting the spring clips to pop into place - I can feel that the splines are lined up, so it is just that last push I think.
 CC0BBBA1-2141-40CB-9653-2F341A676416_zpsmnevkmi5 on Flickr
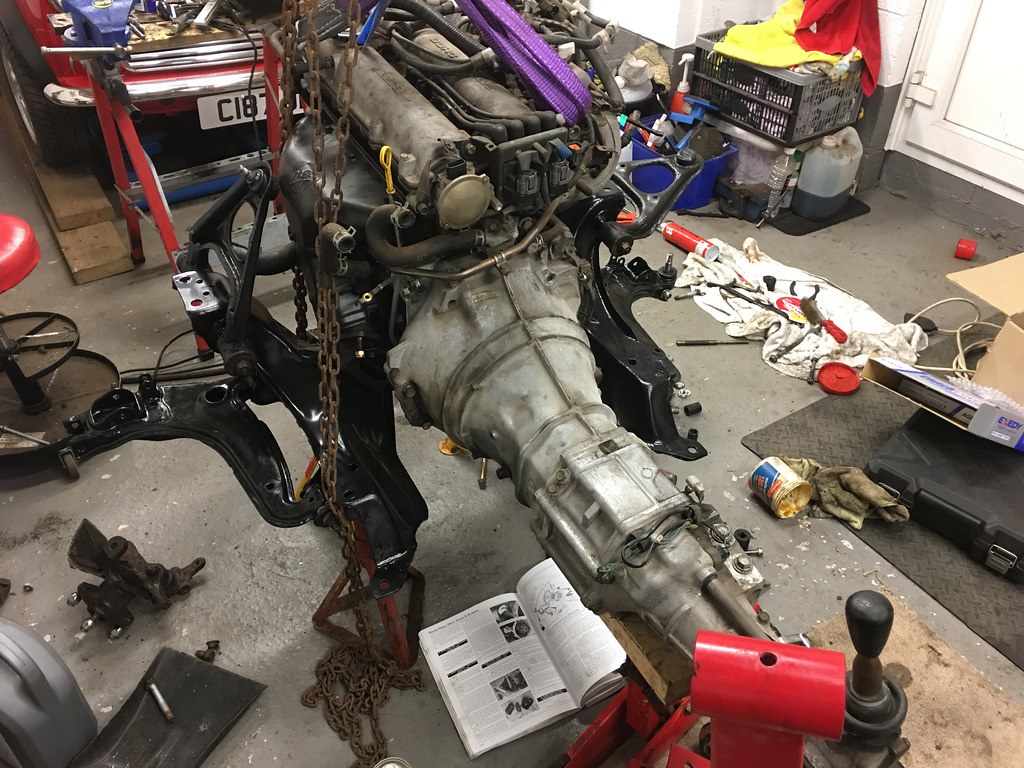
next, I decided to mount the front subframe to the engine while it was on the stand, and got one pair of wishbones fitted
 49210ABB-D209-4E10-9E29-44E7FE6DA5A0_zpsvmsst77d on Flickr
following which I then dropped the assembly onto axle stands to allow me to fit the new clutch - this was a step that I had wondered about, as the clutch was not too worn (but is on 74k) - and I am thinking that FI might eventually be on the cards, but having won some money in our monthly tote at work, I thought I'd get an Exedy clutch kit sorted and put it in while I had everything apart.
 3C2F3E18-70D2-46EE-9EB0-37F6E7B1B956_zpsxpzktsjn on Flickr
So with that done, I could reattach the gearbox - which I haven't painted - since it is bare alloy, I figure is isn't going to corrode, and isn't on display, so I've simply given it a good clean and will put some decent new fluid in it (as it is my job to develop gearbox oils, I am going to make sure of that!). I have also rebuilt the other wishbones too, so I am starting to pull together the powertrain. You will notice that the top end of the engine hasn't been played with yet - I am going to paint/coat the cam cover and change the gasket and CAS o-ring, but figured I can do that at any stage in the build.
 02C40877-53FD-4D34-94A4-DE090750F39F_zps0slhrj6w on Flickr
I have a few more jobs to do tonight, which include fitting up the front hubs (with new upper balljoint boots and one lower balljoint where I had to chop out a stuck bolt), swapping in the new clutch slave cylinder, fitting the rear driveshafts and hubs and then trying to get the PPF and propshaft installed so that I have a complete powertrain! (obviously I then need to add brakes - but they are also ready with new discs, pads and calipers all round to go on).
First I started on the back-end and got everything together (although I initially put the hubs on the wrong sides, as I had turned the subframe around while assembling
!C8FED11C-0B97-4B4B-A3FB-7B8A921ACFCC_zpstlniiil4 on FlickrI haven't yet got the driveshafts located into the diff - they are not locating by simply pushing them in, and I didn't want to get too aggressive with them - will have another go tonight. I guess it is just a case of getting the spring clips to pop into place - I can feel that the splines are lined up, so it is just that last push I think.
CC0BBBA1-2141-40CB-9653-2F341A676416_zpsmnevkmi5 on Flickrnext, I decided to mount the front subframe to the engine while it was on the stand, and got one pair of wishbones fitted
49210ABB-D209-4E10-9E29-44E7FE6DA5A0_zpsvmsst77d on Flickrfollowing which I then dropped the assembly onto axle stands to allow me to fit the new clutch - this was a step that I had wondered about, as the clutch was not too worn (but is on 74k) - and I am thinking that FI might eventually be on the cards, but having won some money in our monthly tote at work, I thought I'd get an Exedy clutch kit sorted and put it in while I had everything apart.
3C2F3E18-70D2-46EE-9EB0-37F6E7B1B956_zpsxpzktsjn on FlickrSo with that done, I could reattach the gearbox - which I haven't painted - since it is bare alloy, I figure is isn't going to corrode, and isn't on display, so I've simply given it a good clean and will put some decent new fluid in it (as it is my job to develop gearbox oils, I am going to make sure of that!). I have also rebuilt the other wishbones too, so I am starting to pull together the powertrain. You will notice that the top end of the engine hasn't been played with yet - I am going to paint/coat the cam cover and change the gasket and CAS o-ring, but figured I can do that at any stage in the build.
02C40877-53FD-4D34-94A4-DE090750F39F_zps0slhrj6w on FlickrI have a few more jobs to do tonight, which include fitting up the front hubs (with new upper balljoint boots and one lower balljoint where I had to chop out a stuck bolt), swapping in the new clutch slave cylinder, fitting the rear driveshafts and hubs and then trying to get the PPF and propshaft installed so that I have a complete powertrain! (obviously I then need to add brakes - but they are also ready with new discs, pads and calipers all round to go on).
Edited by browno on Tuesday 15th August 23:26
So, it has been a couple of weeks since the last update and I have a little more progress to report.
Firstly, continuing from the last update, I got the driveshafts popped into place properly, and then started to reunite both ends.
 IMG_4949_zpsj3d5jg7z on Flickr
 IMG_4951_zpszw4ij2ah on Flickr
Then I fitted up the new slave cylinder and pipework.
 IMG_4956_zps7gxzjsbg on Flickr
I also replaced the bottom ballpoint that I had had to chop out and so could put the front hubs in place (not torqued or finished in this pic).
 IMG_4957_zps7fj17wfr on Flickr
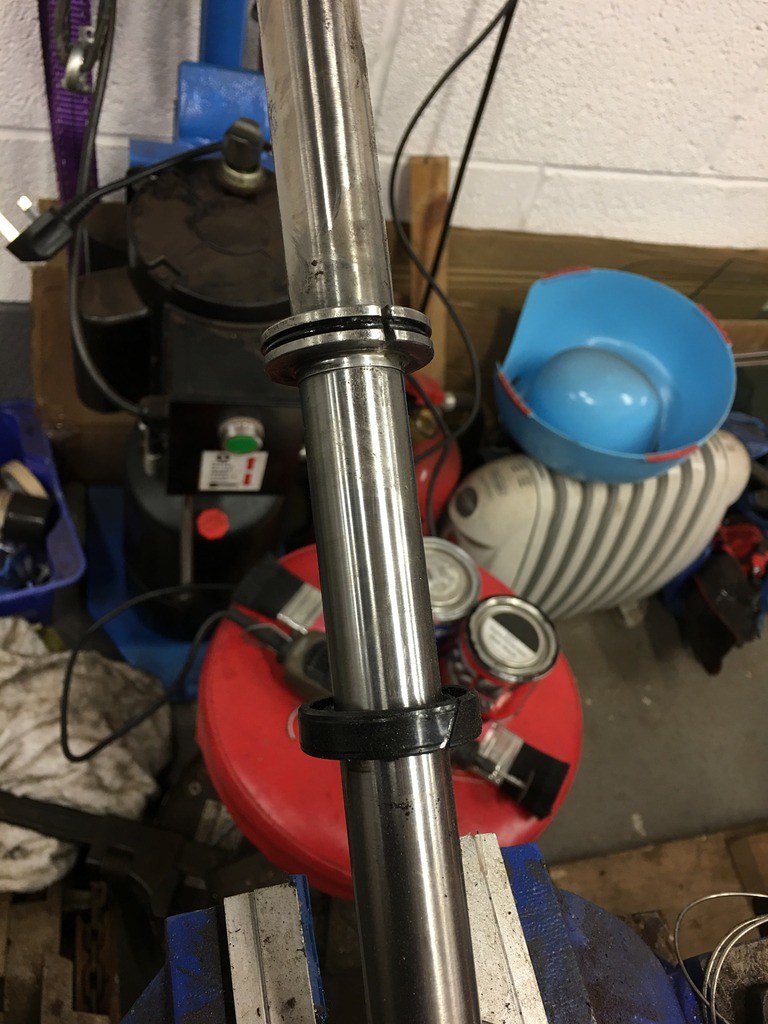
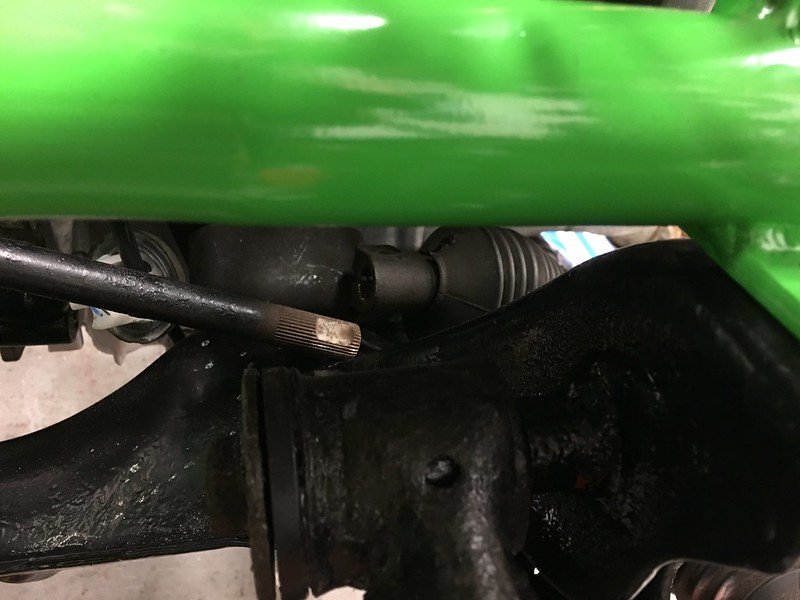
And tonight (after a week's holiday) I have been depowering my steering - getting rid of the seals from the rack by carefully cutting it away.
 7DB4E3B4-239C-4103-BAF9-0F191E0405A9_zps3zbgjf5c on Flickr
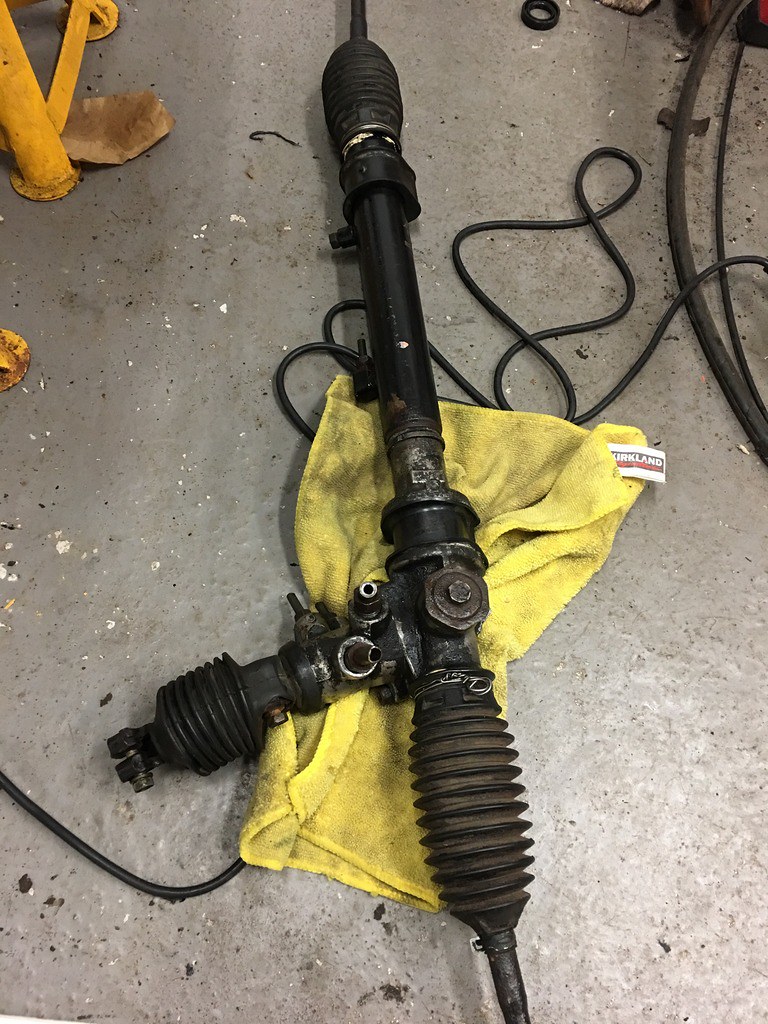
and all rebuilt (but needing a clean off before refitting)...
 1BD853E9-3917-4740-A13E-0DAAB9804D1A_zpsyem4qykk on Flickr
Now I need to get cracking as I have been in touch with MEV and my kit is ready - so I will hopefully be getting a van sorted to go and get the missing bit of the equation sorted out very soon - I just need to shift my Mini out of the garage temporarily so that I will have space to do the floors and pipework prior to fitting the chassis to the rollerskate.
Firstly, continuing from the last update, I got the driveshafts popped into place properly, and then started to reunite both ends.
IMG_4949_zpsj3d5jg7z on FlickrIMG_4951_zpszw4ij2ah on FlickrThen I fitted up the new slave cylinder and pipework.
IMG_4956_zps7gxzjsbg on FlickrI also replaced the bottom ballpoint that I had had to chop out and so could put the front hubs in place (not torqued or finished in this pic).
IMG_4957_zps7fj17wfr on FlickrAnd tonight (after a week's holiday) I have been depowering my steering - getting rid of the seals from the rack by carefully cutting it away.
7DB4E3B4-239C-4103-BAF9-0F191E0405A9_zps3zbgjf5c on Flickrand all rebuilt (but needing a clean off before refitting)...
1BD853E9-3917-4740-A13E-0DAAB9804D1A_zpsyem4qykk on FlickrNow I need to get cracking as I have been in touch with MEV and my kit is ready - so I will hopefully be getting a van sorted to go and get the missing bit of the equation sorted out very soon - I just need to shift my Mini out of the garage temporarily so that I will have space to do the floors and pipework prior to fitting the chassis to the rollerskate.
Edited by browno on Tuesday 15th August 23:33
Another update today, and it is a big milestone!
Firstly, I have been getting a series of little jobs on the mechanicals to get them sorted, and ordered (and quickly received) my suspension. I debated a lot about what to use on the Exocet - whtether to upgrade later or to go straight to coilovers. I have been very happy with the Meister R's that I have on my mk3 - and had thought to go for another set, but I have ended up with a set of Gaz gold pros - as many Exocets seem to use them, and to try something different. So they are ready to be fitted, along with a set of silicone hoses en-route from fast5 to sort the cooling system.
 B670F95B-142C-4EDF-825C-77398BEBF8ED_zpschpwungf on Flickr
Then, the big event - having seen Stuart and MEV getting a bit of coverage on the local news the other night - https://youtu.be/YU67dhQOOP0 with my kit clearly visible in the background, I was keen to see it in the metal!
I was pleased to head out of work early yesterday to pick up a van and head up to Mansfield, where I could pick up my kit. As you will see, I have decided that the car deserved a striking colour scheme - I was originally planning contrasting body and chassis as many (most) builders go for - but after deliberating and playing with photoshop, decided that a single colour would be good and allow me to have the option to add some vinyl to break it up later if it is too much!
 F7075B51-7E7C-4E6A-B61D-57A4F0641BDC_zpsagdvhjzr on Flickr
We were upgraded to a jumbo transit - which was enormous, and so we had no worries about space!
 F4858408-13CD-46B4-8D60-4AB8FC10F334_zpshnuptamj on Flickr
I had taken a trip to screwfix and bought a load of 28mm pipe lagging to make sure I could protect the powder coat - and so got plenty of that on to prevent chips - and after a short drive, we could lift it into the garage...
 AB5CB4E2-8FDE-49CC-8825-840597809E17_zpscv1grxls on Flickr
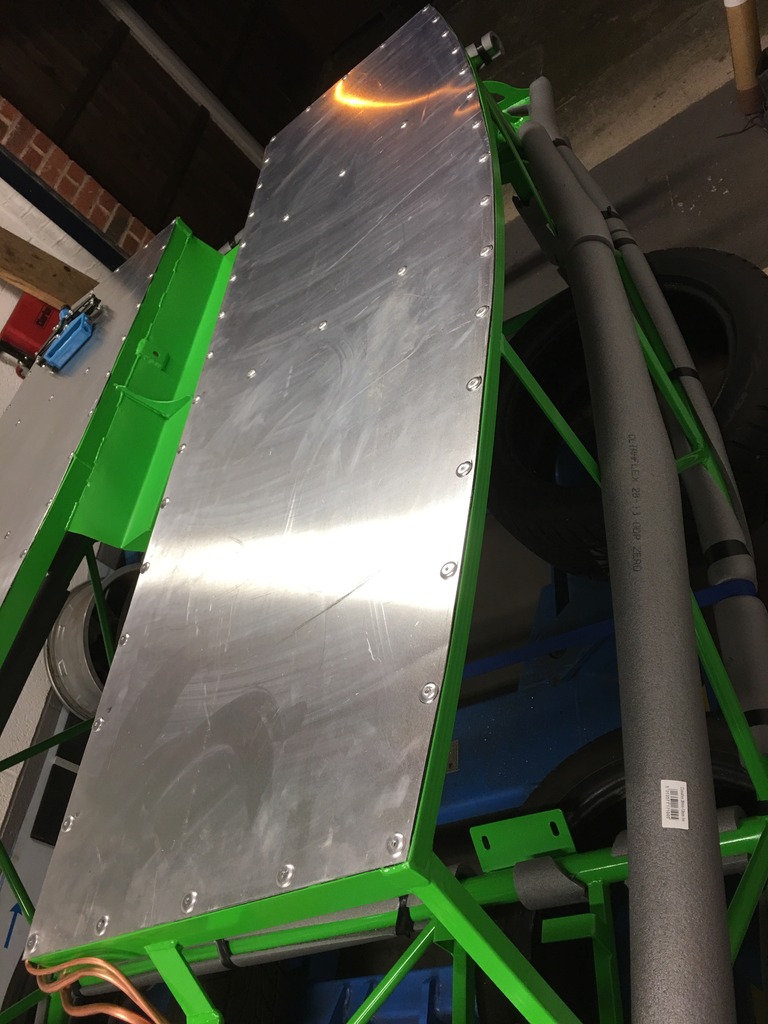
And then set up the inevitable picture with the panels...
 F9D84387-8040-4121-8811-C596D7DA68B4_zps7y9fgu2l on Flickr
 C9C3BFA8-B01D-49C2-B0D1-62D85B4C8AFE_zpsxyaxujgi on Flickr
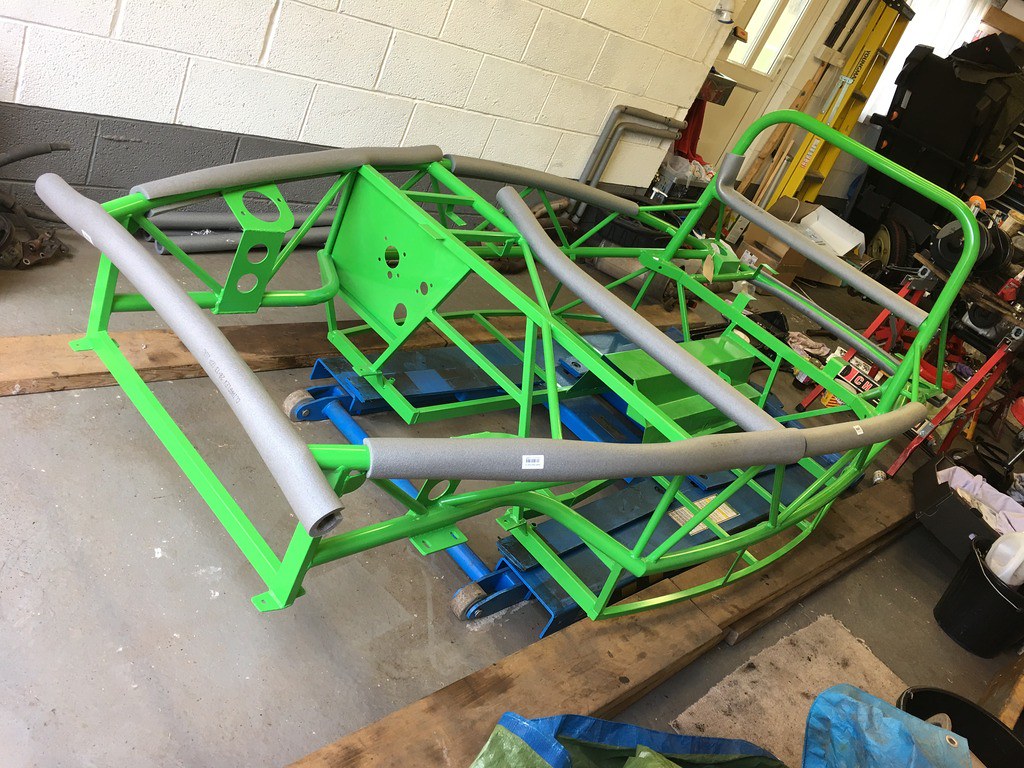
So - thoughts so far are that I am liking the colour (which is a good start!) and I am liking the styling tweaks that have been done - the flat roll hoop is a big one, but also the new rear cover with the flat-top and areas mounded in for fog/reverse lights tidies up the rear end nicely.
Overall, I am a happy customer - now to keep the momentum up and get ready to reunite shell and skate!
Firstly, I have been getting a series of little jobs on the mechanicals to get them sorted, and ordered (and quickly received) my suspension. I debated a lot about what to use on the Exocet - whtether to upgrade later or to go straight to coilovers. I have been very happy with the Meister R's that I have on my mk3 - and had thought to go for another set, but I have ended up with a set of Gaz gold pros - as many Exocets seem to use them, and to try something different. So they are ready to be fitted, along with a set of silicone hoses en-route from fast5 to sort the cooling system.
B670F95B-142C-4EDF-825C-77398BEBF8ED_zpschpwungf on FlickrThen, the big event - having seen Stuart and MEV getting a bit of coverage on the local news the other night - https://youtu.be/YU67dhQOOP0 with my kit clearly visible in the background, I was keen to see it in the metal!
I was pleased to head out of work early yesterday to pick up a van and head up to Mansfield, where I could pick up my kit. As you will see, I have decided that the car deserved a striking colour scheme - I was originally planning contrasting body and chassis as many (most) builders go for - but after deliberating and playing with photoshop, decided that a single colour would be good and allow me to have the option to add some vinyl to break it up later if it is too much!
F7075B51-7E7C-4E6A-B61D-57A4F0641BDC_zpsagdvhjzr on FlickrWe were upgraded to a jumbo transit - which was enormous, and so we had no worries about space!
F4858408-13CD-46B4-8D60-4AB8FC10F334_zpshnuptamj on FlickrI had taken a trip to screwfix and bought a load of 28mm pipe lagging to make sure I could protect the powder coat - and so got plenty of that on to prevent chips - and after a short drive, we could lift it into the garage...
AB5CB4E2-8FDE-49CC-8825-840597809E17_zpscv1grxls on FlickrAnd then set up the inevitable picture with the panels...
F9D84387-8040-4121-8811-C596D7DA68B4_zps7y9fgu2l on FlickrC9C3BFA8-B01D-49C2-B0D1-62D85B4C8AFE_zpsxyaxujgi on FlickrSo - thoughts so far are that I am liking the colour (which is a good start!) and I am liking the styling tweaks that have been done - the flat roll hoop is a big one, but also the new rear cover with the flat-top and areas mounded in for fog/reverse lights tidies up the rear end nicely.
Overall, I am a happy customer - now to keep the momentum up and get ready to reunite shell and skate!
Edited by browno on Wednesday 16th August 22:44
The kit is pretty comprehensive - chassis, panels (bonnet/nose, "bootlid", cycle wings and stays, lower side panels), pre-bent tunnel and sheet to cut the floors, chassis bolts and even some rivets, brake pipe and edge trim. I reckon if you were doing a budget build using as much of the do or as possible, you wouldn't need too much more - although I am going a bit beyond that and will add my own choice of seats, replace all suspension etc.
The build guide is here if you want to take a look - http://www.mevltd.co.uk/assets/documents/MEV_EXOCE... - I like the fact that it uses a lot of the MX-5, but can still be personalised quite a bit, so should be a good first build - I think it is likely to be a different build to a Westfield (I did consider the Westfield SDV kit, but the balance of costs and being a bit different drove me to the Exocet - I reckon I can build a pretty trick exocet for a fair chunk less than a relatively basic Westfield). I am on track at the minute and reckon I will be IVA'd for under £7k all-in with refurbed running gear, coilovers etc (ready for a turbo later!), which I think is great value.
The build guide is here if you want to take a look - http://www.mevltd.co.uk/assets/documents/MEV_EXOCE... - I like the fact that it uses a lot of the MX-5, but can still be personalised quite a bit, so should be a good first build - I think it is likely to be a different build to a Westfield (I did consider the Westfield SDV kit, but the balance of costs and being a bit different drove me to the Exocet - I reckon I can build a pretty trick exocet for a fair chunk less than a relatively basic Westfield). I am on track at the minute and reckon I will be IVA'd for under £7k all-in with refurbed running gear, coilovers etc (ready for a turbo later!), which I think is great value.
Thanks again for the positive feedback! It's good to see that folks are enjoying reading my build!
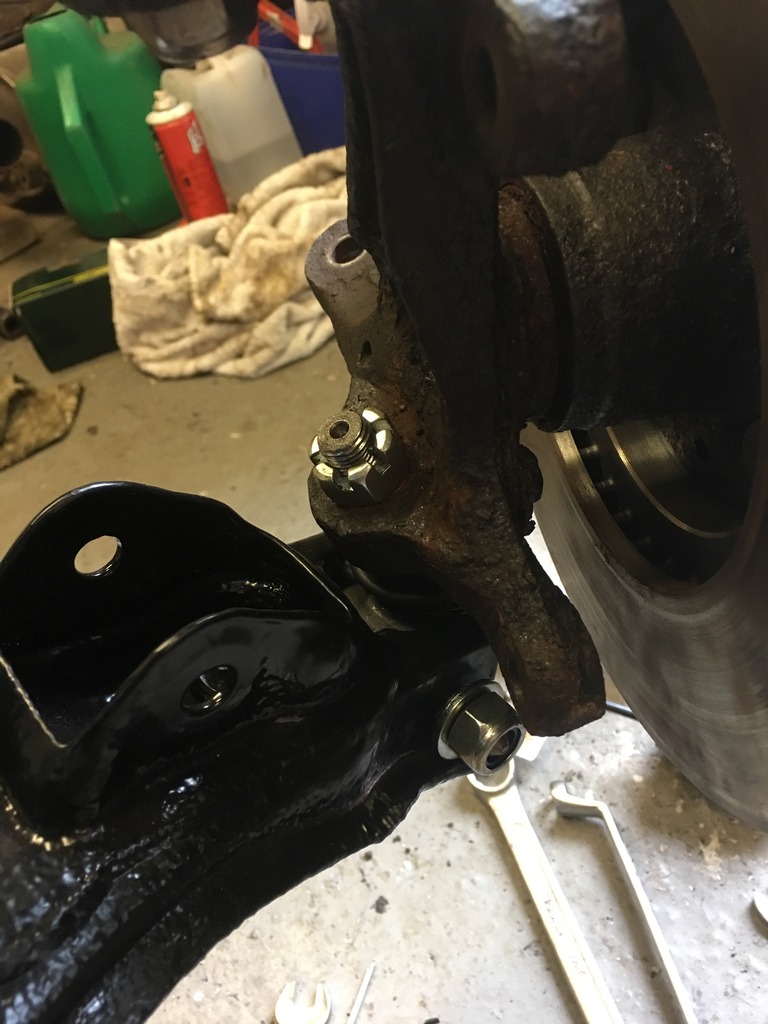
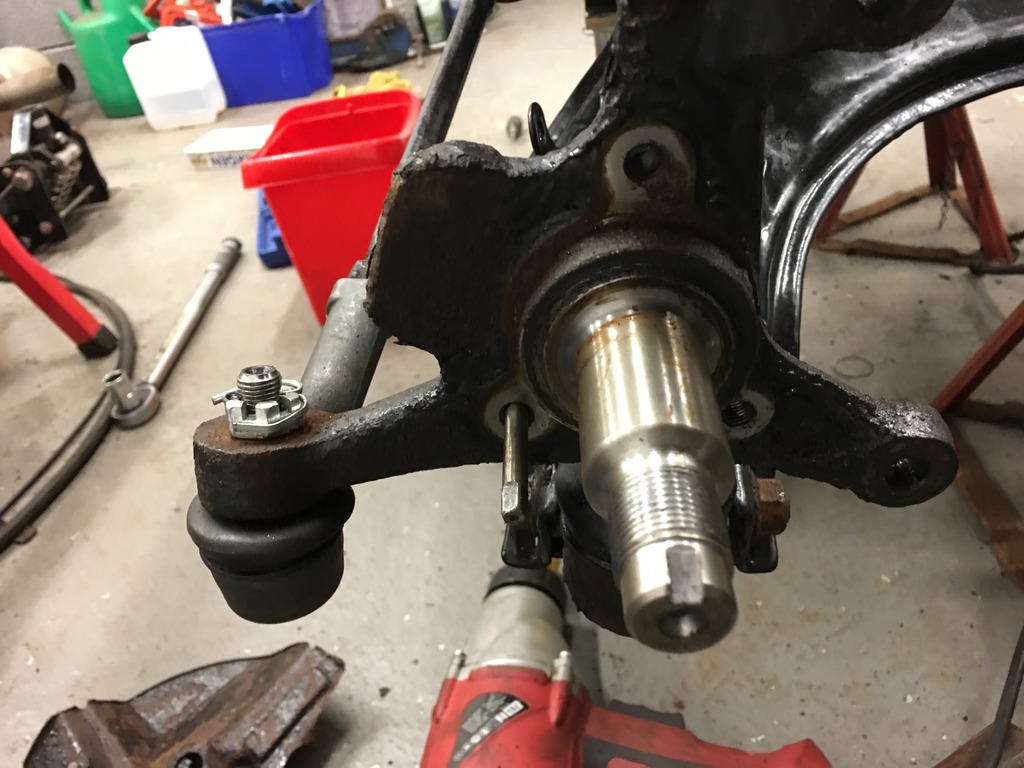
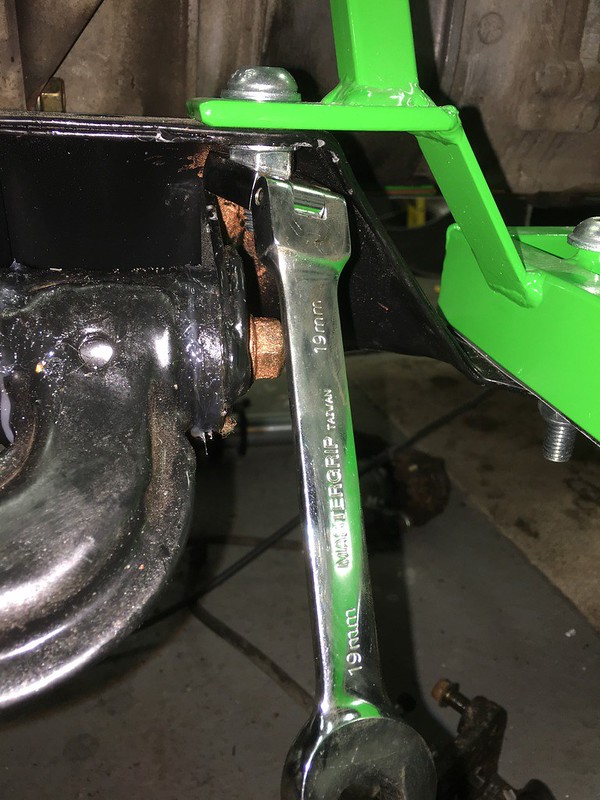
Time for another progress update. First job was to whip off the front hubs and remove the remains of the brake heat shields. Of course, the bolts weren't too happy to be removed, so four of six snapped (despite me carefully trying to work them out!), so it was out with the drill and taps to provide a thread for the next stage - fitting the front wing stays temporarily (I have removed them again until after the body is on, so that I don't damage them in the meantime). As I was looking at the front-end and torquing things up, I discovered that both front upper balljoints have dodgy threads which don't want to tighten up. As a result I ordered a pair of new ones - by searching eBay for MOOG K500210, which I found is the part number for the replacements with built in grease-nipples, I got a pair for £50 posted inc. customs charges - a fair bit cheaper than the £35 each + post from the UK. They should hopefully be here later this week to install using the press at work.
 6463D30C-BCEC-4BC6-882A-8F484B999CE9_zps6dzujmdt on Flickr
 4EBF5B4D-2401-49A0-A69E-D96314681EEF_zpsidd2p1tp on Flickr
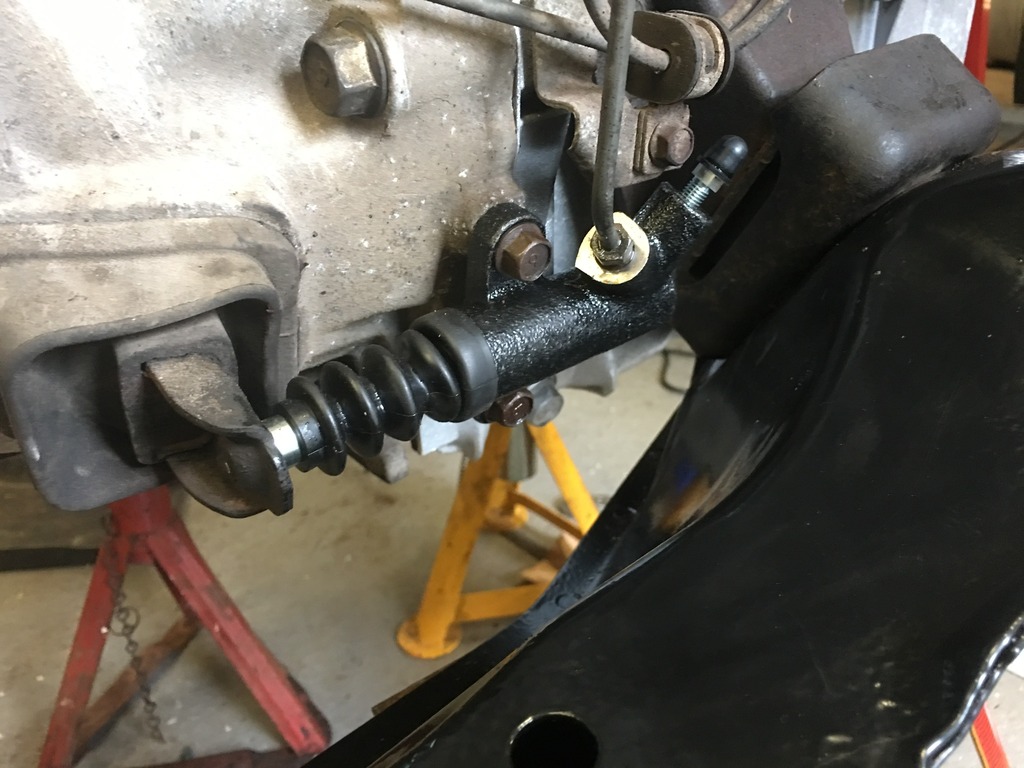
I then finished off fitting the bushes to the ARB drop links now that I have some more grease for the polybushes - I have left off the front ARB until I have the shell on and can bolt it into place.
 64311FBC-3F5C-422A-8284-7400F3D8B06D_zpsapviiagj on Flickr
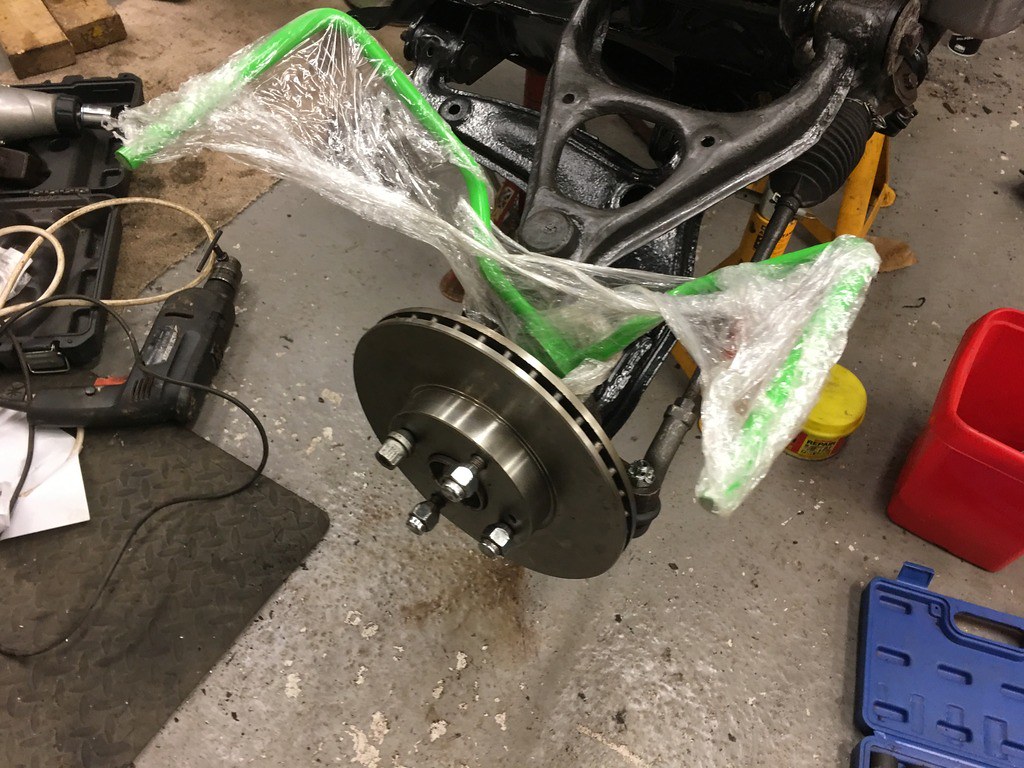
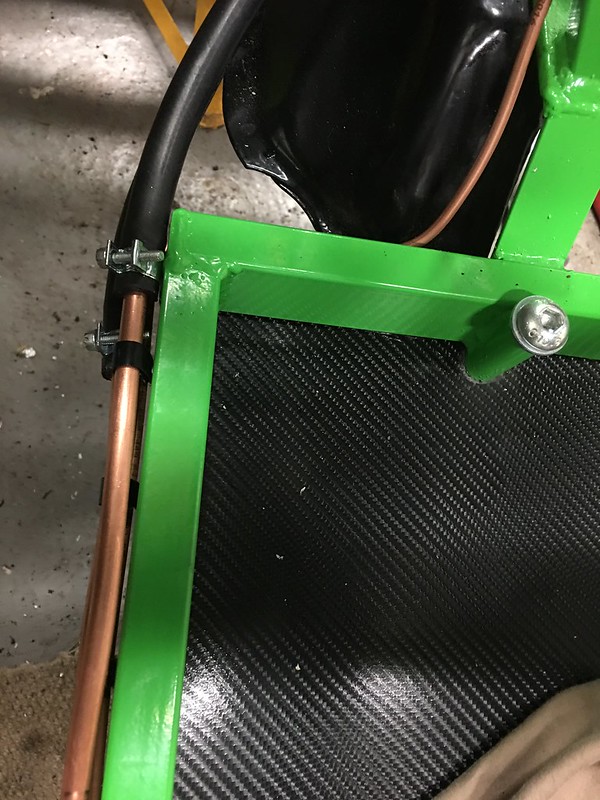
I also rebuilt the rear brakes with new discs and pads and had a look if the lovely green HEL lines that I have acquired from a race-prepped Evo might do the honours - and I think that they will route nicely along the tunnel to meet a hard line along the way (they will be properly secured, I have just used a few cable ties to hold them in place for now).
 B09D22FC-7D6C-4AF1-8DB5-56B2BBBC56D8_zpschajkzcq on Flickr
I then fitted my silicone hose set from Dan at Fast 5 - which are very nice, and should keep things water-tight once it is all up and running - even coming with a full set of replacement hose clamps.
 CC58BAC9-7798-4960-8095-57B4333C7D60_zps1uolbxbv on Flickr
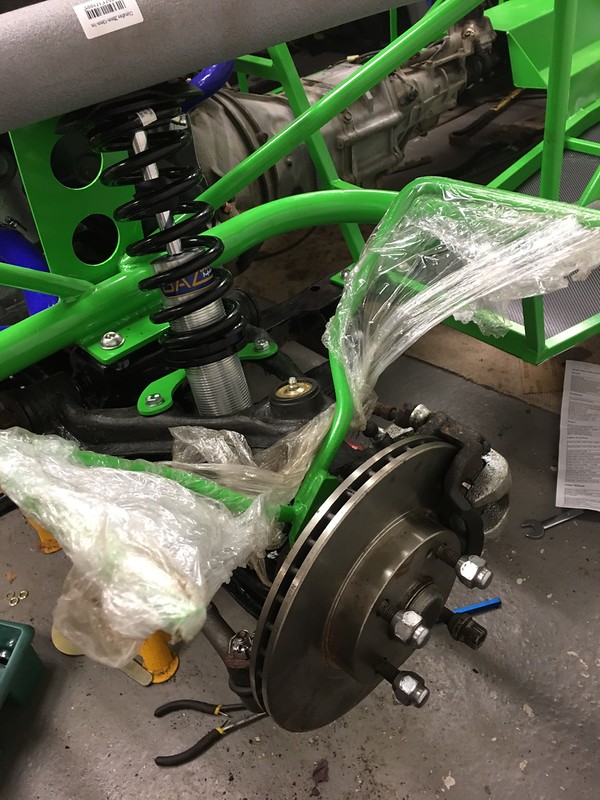
I also tidied up the strut tops (seen here in primer), and have fitted them to my coilovers.
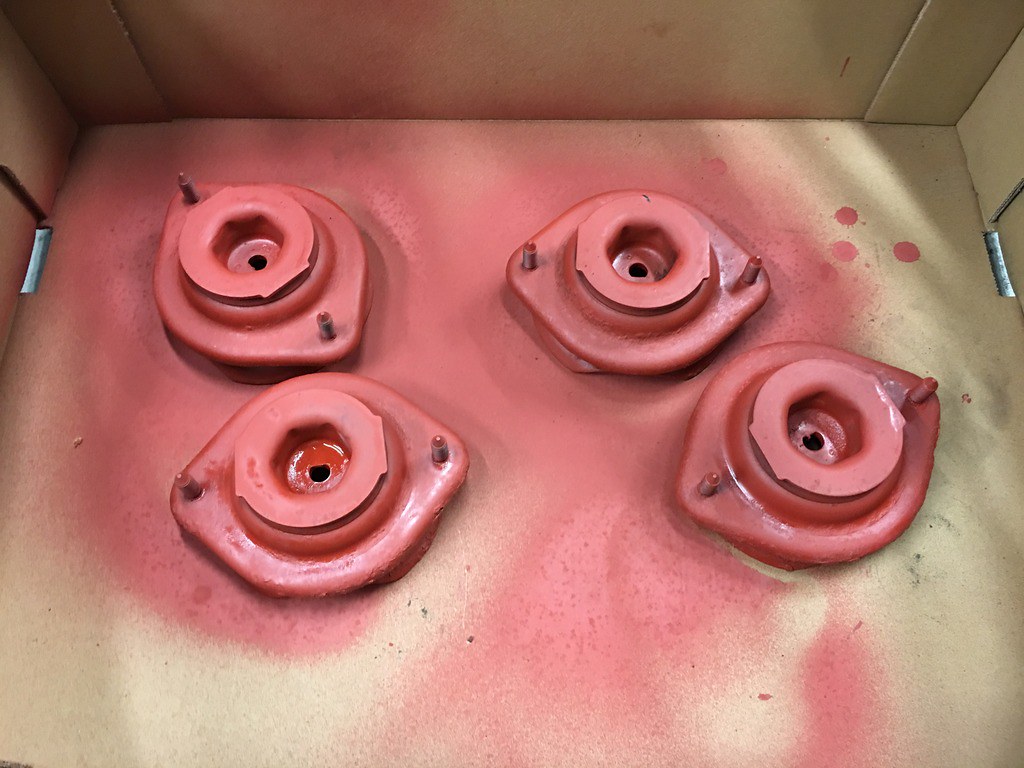 44E78D9E-BA4F-413E-A6D7-EAF36C784008_zpslg7kq4wp on Flickr
and finally, I have suspended the bonnet panel from the roof to keep it out of harm's way while I get busy preparing the floors and pipework into the shell, which is the project for the start of this week.
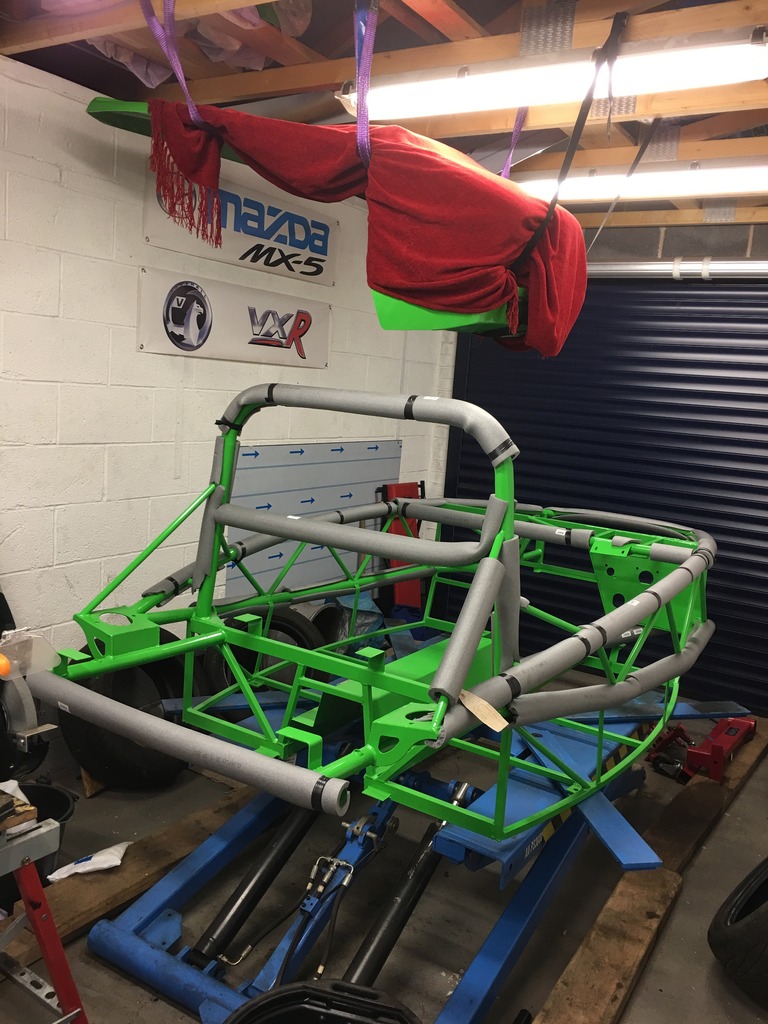 D6B180BE-ECC7-4A4A-BDA0-4590FD600E38_zpsxta6cnrt on Flickr
Time for another progress update. First job was to whip off the front hubs and remove the remains of the brake heat shields. Of course, the bolts weren't too happy to be removed, so four of six snapped (despite me carefully trying to work them out!), so it was out with the drill and taps to provide a thread for the next stage - fitting the front wing stays temporarily (I have removed them again until after the body is on, so that I don't damage them in the meantime). As I was looking at the front-end and torquing things up, I discovered that both front upper balljoints have dodgy threads which don't want to tighten up. As a result I ordered a pair of new ones - by searching eBay for MOOG K500210, which I found is the part number for the replacements with built in grease-nipples, I got a pair for £50 posted inc. customs charges - a fair bit cheaper than the £35 each + post from the UK. They should hopefully be here later this week to install using the press at work.
6463D30C-BCEC-4BC6-882A-8F484B999CE9_zps6dzujmdt on Flickr4EBF5B4D-2401-49A0-A69E-D96314681EEF_zpsidd2p1tp on FlickrI then finished off fitting the bushes to the ARB drop links now that I have some more grease for the polybushes - I have left off the front ARB until I have the shell on and can bolt it into place.
64311FBC-3F5C-422A-8284-7400F3D8B06D_zpsapviiagj on FlickrI also rebuilt the rear brakes with new discs and pads and had a look if the lovely green HEL lines that I have acquired from a race-prepped Evo might do the honours - and I think that they will route nicely along the tunnel to meet a hard line along the way (they will be properly secured, I have just used a few cable ties to hold them in place for now).
B09D22FC-7D6C-4AF1-8DB5-56B2BBBC56D8_zpschajkzcq on FlickrI then fitted my silicone hose set from Dan at Fast 5 - which are very nice, and should keep things water-tight once it is all up and running - even coming with a full set of replacement hose clamps.
CC58BAC9-7798-4960-8095-57B4333C7D60_zps1uolbxbv on FlickrI also tidied up the strut tops (seen here in primer), and have fitted them to my coilovers.
44E78D9E-BA4F-413E-A6D7-EAF36C784008_zpslg7kq4wp on Flickrand finally, I have suspended the bonnet panel from the roof to keep it out of harm's way while I get busy preparing the floors and pipework into the shell, which is the project for the start of this week.
D6B180BE-ECC7-4A4A-BDA0-4590FD600E38_zpsxta6cnrt on FlickrEdited by browno on Wednesday 16th August 22:53
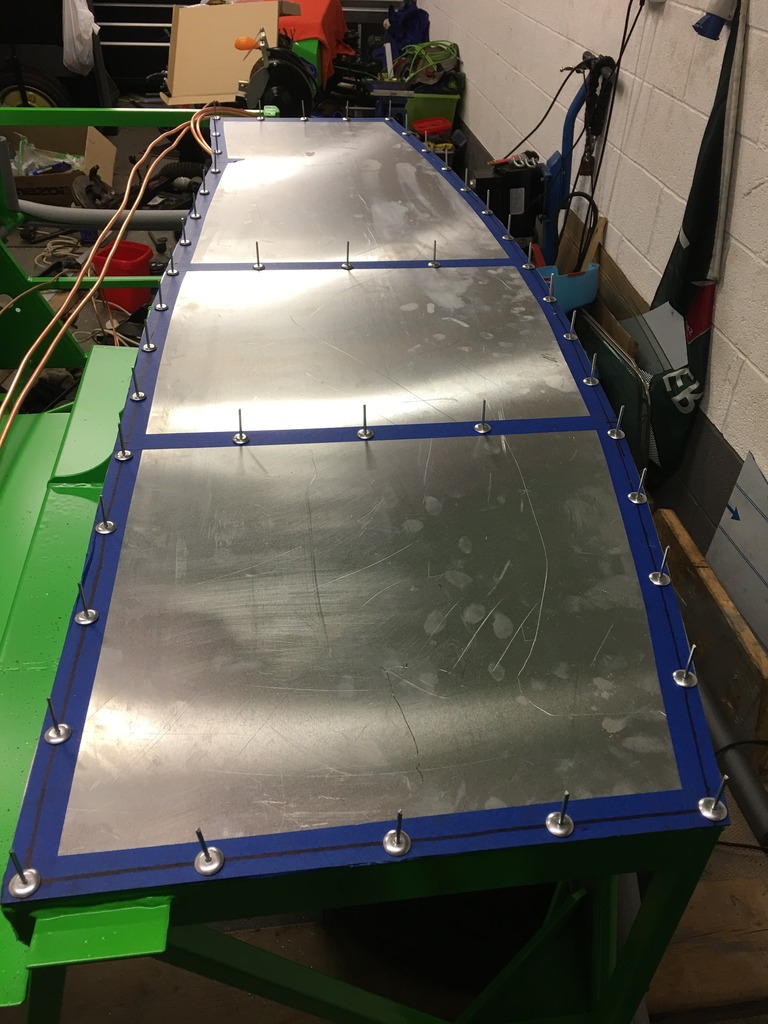
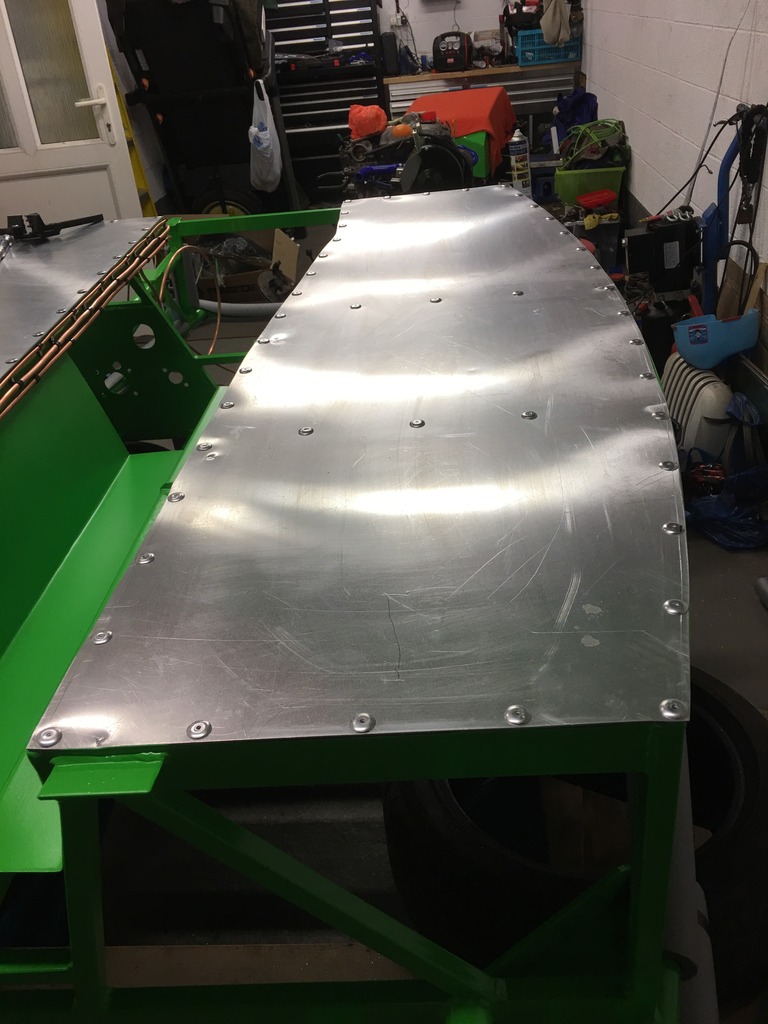
A bit more progress tonight - I have floor panels!
First we marked out the panels and then started cutting - the jigsaw cutting through beautifully with a fine metal blade.
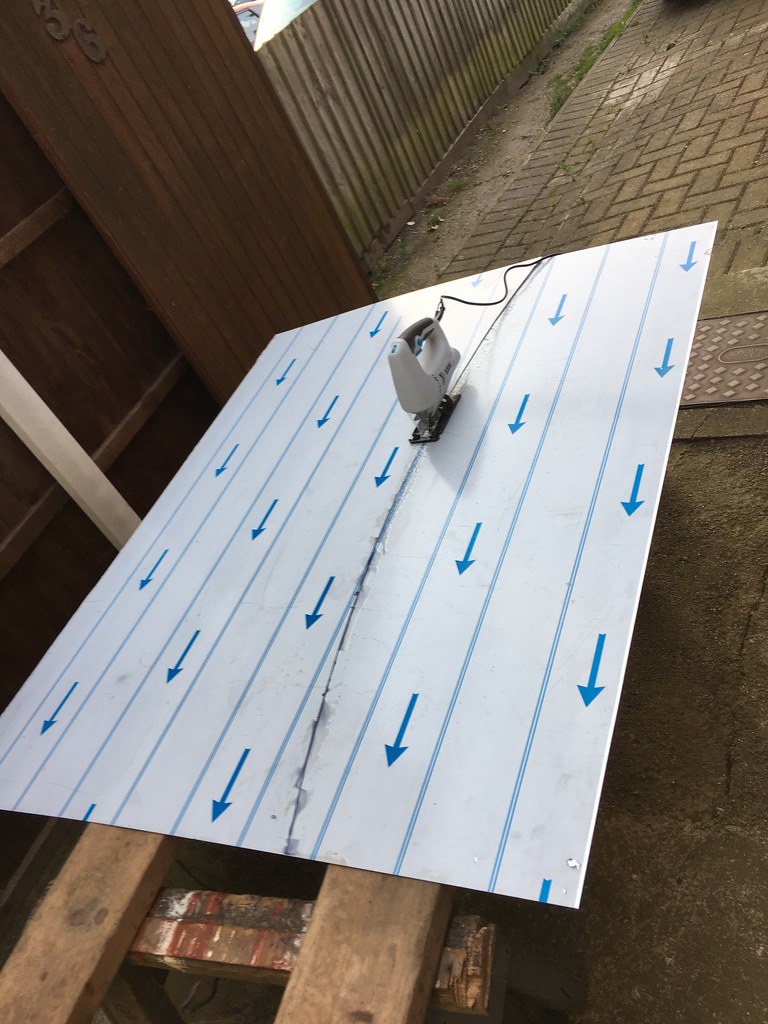 0B0B2548-415F-4D22-ABDE-7558325797E5_zpsk26js15f on Flickr
Then we turned the frame over and made use of my scissor lift as a very good table to keep the rollbar off the floor.
 564E53F4-9C1C-47BA-9555-63561A3BE939_zpsthhn9qgj on Flickr
 66F2A4B8-A508-4818-90F5-C56F3A6691F5_zpshgslgmjw on Flickr
Overall - happy that we have done a good job - just one small area to fettle a little bit and they will fit nicely. Next job is to start marking and drilling and then decide how I am going to finish them off... do I wrap them or coat with bedliner?
 ACE701AE-F074-4D20-A97B-6E0132FDA3FB_zpsjzdasqkc on Flickr
First we marked out the panels and then started cutting - the jigsaw cutting through beautifully with a fine metal blade.
0B0B2548-415F-4D22-ABDE-7558325797E5_zpsk26js15f on FlickrThen we turned the frame over and made use of my scissor lift as a very good table to keep the rollbar off the floor.
564E53F4-9C1C-47BA-9555-63561A3BE939_zpsthhn9qgj on Flickr66F2A4B8-A508-4818-90F5-C56F3A6691F5_zpshgslgmjw on FlickrOverall - happy that we have done a good job - just one small area to fettle a little bit and they will fit nicely. Next job is to start marking and drilling and then decide how I am going to finish them off... do I wrap them or coat with bedliner?
ACE701AE-F074-4D20-A97B-6E0132FDA3FB_zpsjzdasqkc on FlickrEdited by browno on Wednesday 16th August 22:58
Thanks for the positive comments folks - I am really pleased that I have taken the plunge and certainly glad to be seeing some progress! I am glad that the details are of interest - I like to see what is happening in a build and have been taking the approach of making sure I take plenty of pictures and use those rather than long blocks of text, but trying to cover all of the stages I have gone through.
Thanks for the thoughts on the floors Justin - I had been wondering about bedliner as while it is in theory durable (if it sticks!) I am not sure what a textured finish might be like against the other surfaces in the car. After pondering, I have done as many others seem to on exocets and am going to wrap the interior floor - and am likely going to give the underside a coat of paint of some sort.
Thanks for the thoughts on the floors Justin - I had been wondering about bedliner as while it is in theory durable (if it sticks!) I am not sure what a textured finish might be like against the other surfaces in the car. After pondering, I have done as many others seem to on exocets and am going to wrap the interior floor - and am likely going to give the underside a coat of paint of some sort.
Thanks again for the encouragement!
Yes, it is a pity that Stuart has sold off the replicar project, as they can look very nice - I like the idea of one done to look like an old racer built with modern performance bits - so classic paint colours but modern motorsport wheels, cage etc - and with the performance to match! I am sure the new owner will have it back on sale soon!
I am loving the rebody project - looks like a good substantial chassis there - I expect that will be comical nice it is done - although I hope the ride will be raised and springs softened for authentic stance through the corners!
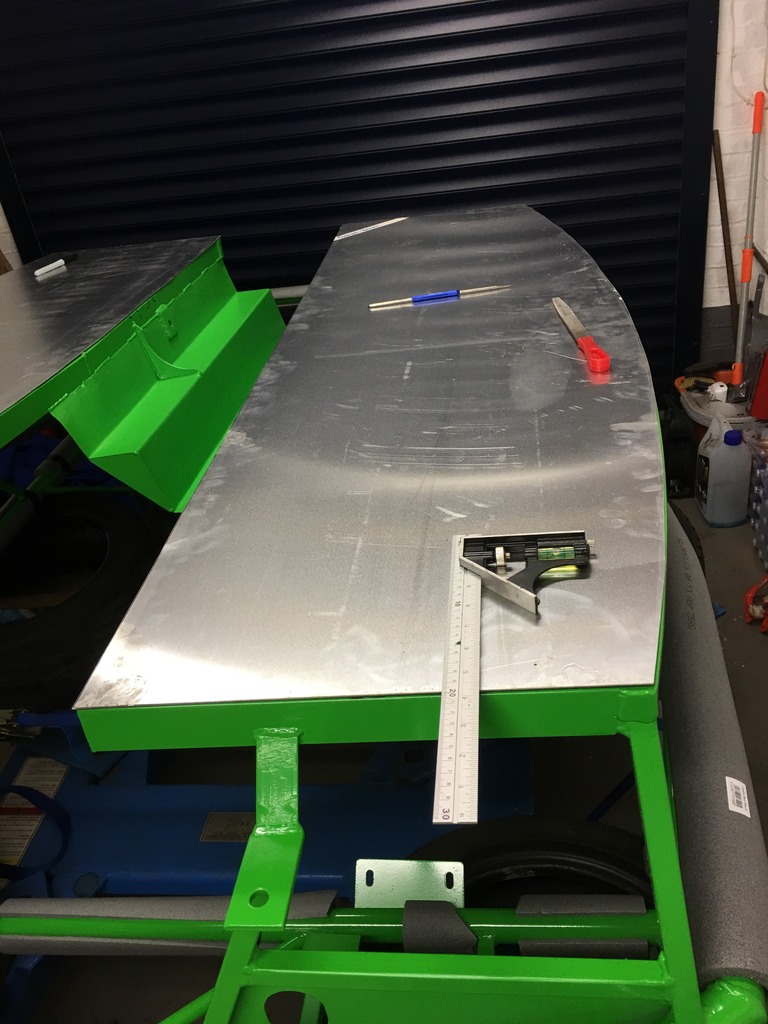
So, time for another instalment in my build, and more progress along the road to having something car-shaped rather than a pile of bits in the garage! So the first job from last time was to get started prepping the floor panels for fitting - so firstly I masked up the edges, then with the panels clamped in position, marked out a 10mm line from the edge right round (the tubing is 20mm, so that will get me central). Then I evenly spaced my holes at approx 100mm centres (variation depending on dividing up the spaces evenly and logically!), and then centre punched and first drilled the panels and deburred before remounting and spotting through to drill the chassis rails.
 B569DF52-55B2-4D84-85DB-64B08D5F8896_zpsxph9avc3 on Flickr
 B831A6D9-D5C7-4703-BAFE-BF677C625978_zpsablebxxb on Flickr
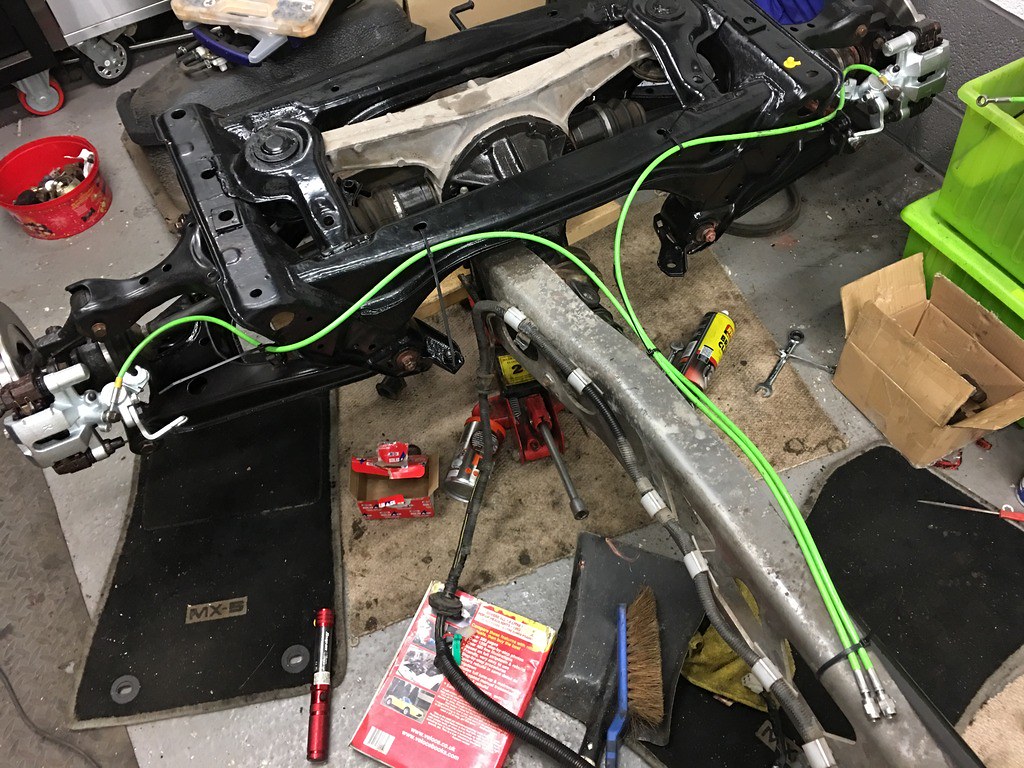
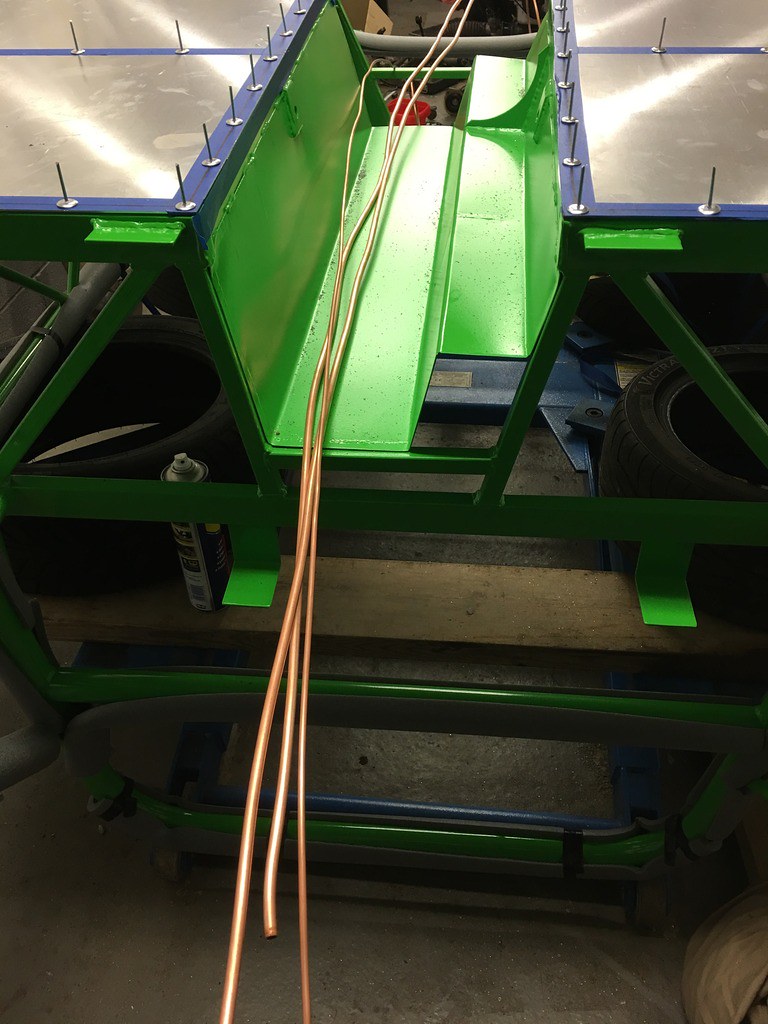
Then I also laid out the hard lines for fuel flow and return and also rear brakes, and after mocking up on a bit of scrap ali, started drilling and fixing the lines with p-clips at 150mm spacing (slight overkill compared to the 200mm recommended by many, but again it fitted nicely into the available space). I have made sure to leave plenty of pipe each end for now to be relatively free with routing of the ends...
 DE20D261-8B90-4B65-85D2-563A1103C82F_zpscielzgra on Flickr
 744A0698-BAE6-4852-9473-0D7F61B3E069_zpstlwpvcg8 on Flickr
Then today, I had a great help from a colleague (and former vinyl sign maker) to wrap the floors - with the edges left clear to allow some space for a good bead of tiger seal to ensure the ali is gripped and sealed properly.
 9F928DD9-1C54-4996-9937-F1A95045FF75_zps6toxoksv on Flickr
Then I applied a thin bead of tiger seal all around the mating surfaces - thinking that less is more here certainly turned out right - I had a little oozing, but only very slight, and which was easily cleaned up with a solvent-soaked rag.
 5E5EAE1F-E97D-4A9D-90D7-AFBBAAF7FA06_zpsgdh891eg on Flickr
Then having got busy with the lazy-tongs (the cheap silverline ones that I bought having had issues during the line fitting, I used my mate's Clarke ones, which had it all,done super quickly), and I have fitted floors...
 1D5247C9-9971-40E0-A807-97F10391E3D6_zpsyfsiaauh on Flickr
 98DE7551-9D3A-4957-A372-541F61E40226_zpsh5its87m on Flickr
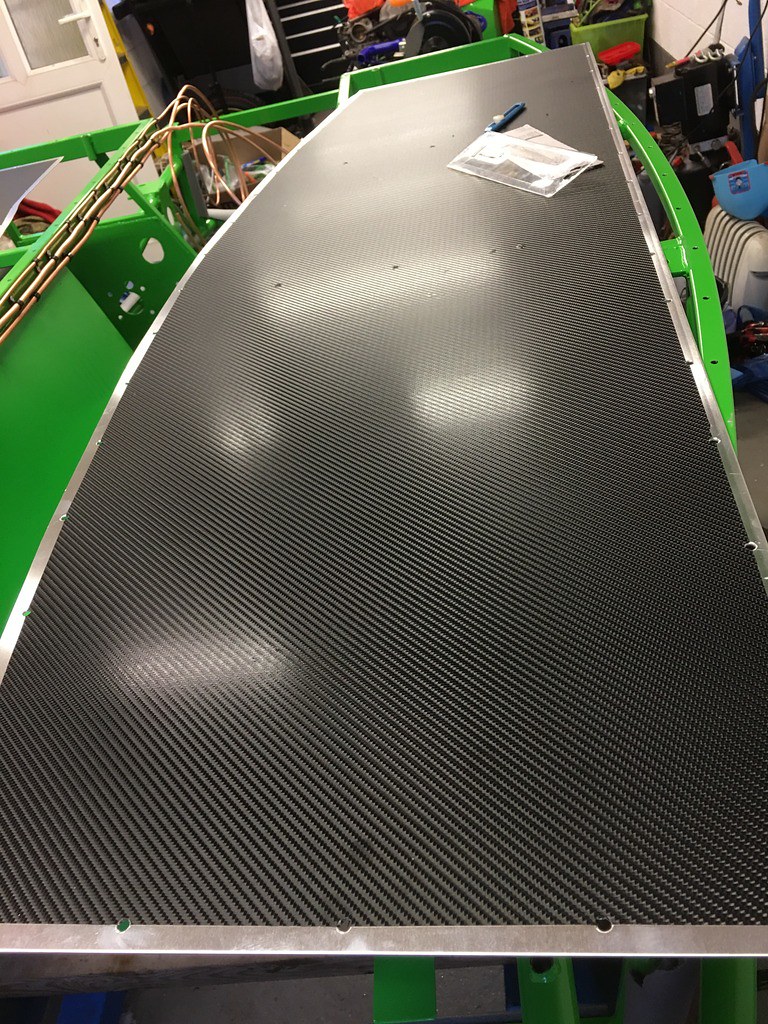
And having debated what to do, I am pleased with how the carbon vinyl works to give a contrast against the green (even with the body still upside-down!)
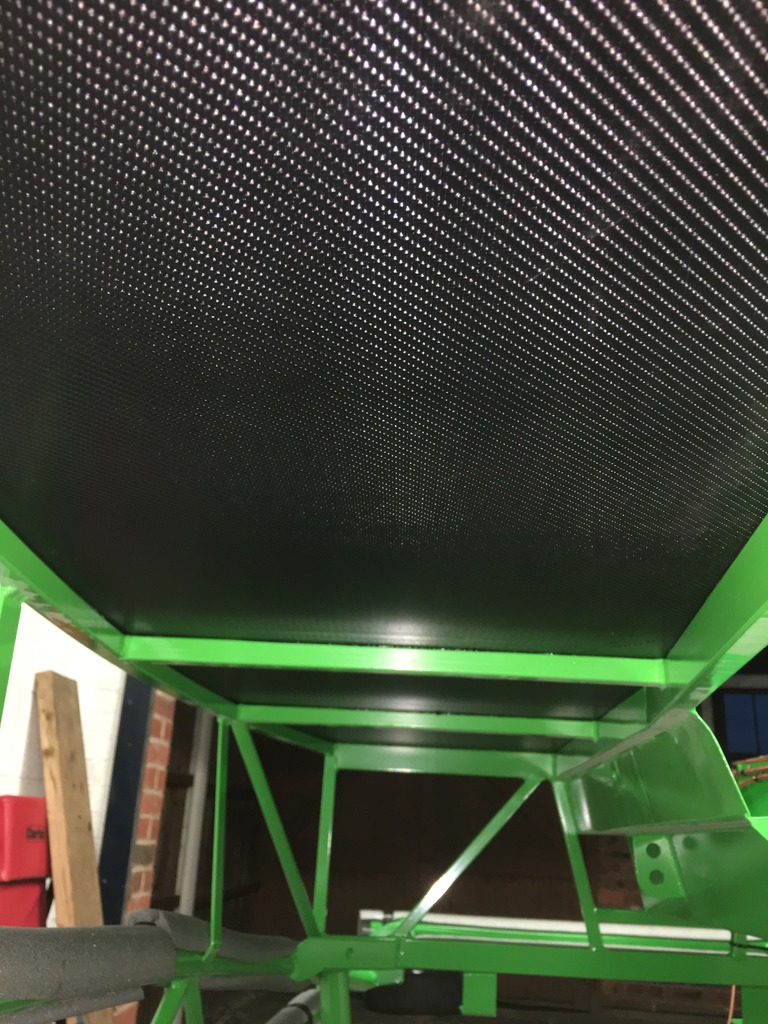 2A8509D2-8118-4F26-9B86-38AEF9C059C2_zpsipqijqmi on Flickr
So, I have front upper ball joints to change over tomorrow, and the upper arms to refit, and then it should hopefully be body-on time this week! Exciting times!
Yes, it is a pity that Stuart has sold off the replicar project, as they can look very nice - I like the idea of one done to look like an old racer built with modern performance bits - so classic paint colours but modern motorsport wheels, cage etc - and with the performance to match! I am sure the new owner will have it back on sale soon!
I am loving the rebody project - looks like a good substantial chassis there - I expect that will be comical nice it is done - although I hope the ride will be raised and springs softened for authentic stance through the corners!
So, time for another instalment in my build, and more progress along the road to having something car-shaped rather than a pile of bits in the garage! So the first job from last time was to get started prepping the floor panels for fitting - so firstly I masked up the edges, then with the panels clamped in position, marked out a 10mm line from the edge right round (the tubing is 20mm, so that will get me central). Then I evenly spaced my holes at approx 100mm centres (variation depending on dividing up the spaces evenly and logically!), and then centre punched and first drilled the panels and deburred before remounting and spotting through to drill the chassis rails.
B569DF52-55B2-4D84-85DB-64B08D5F8896_zpsxph9avc3 on FlickrB831A6D9-D5C7-4703-BAFE-BF677C625978_zpsablebxxb on FlickrThen I also laid out the hard lines for fuel flow and return and also rear brakes, and after mocking up on a bit of scrap ali, started drilling and fixing the lines with p-clips at 150mm spacing (slight overkill compared to the 200mm recommended by many, but again it fitted nicely into the available space). I have made sure to leave plenty of pipe each end for now to be relatively free with routing of the ends...
DE20D261-8B90-4B65-85D2-563A1103C82F_zpscielzgra on Flickr744A0698-BAE6-4852-9473-0D7F61B3E069_zpstlwpvcg8 on FlickrThen today, I had a great help from a colleague (and former vinyl sign maker) to wrap the floors - with the edges left clear to allow some space for a good bead of tiger seal to ensure the ali is gripped and sealed properly.
9F928DD9-1C54-4996-9937-F1A95045FF75_zps6toxoksv on FlickrThen I applied a thin bead of tiger seal all around the mating surfaces - thinking that less is more here certainly turned out right - I had a little oozing, but only very slight, and which was easily cleaned up with a solvent-soaked rag.
5E5EAE1F-E97D-4A9D-90D7-AFBBAAF7FA06_zpsgdh891eg on FlickrThen having got busy with the lazy-tongs (the cheap silverline ones that I bought having had issues during the line fitting, I used my mate's Clarke ones, which had it all,done super quickly), and I have fitted floors...
1D5247C9-9971-40E0-A807-97F10391E3D6_zpsyfsiaauh on Flickr98DE7551-9D3A-4957-A372-541F61E40226_zpsh5its87m on FlickrAnd having debated what to do, I am pleased with how the carbon vinyl works to give a contrast against the green (even with the body still upside-down!)
2A8509D2-8118-4F26-9B86-38AEF9C059C2_zpsipqijqmi on FlickrSo, I have front upper ball joints to change over tomorrow, and the upper arms to refit, and then it should hopefully be body-on time this week! Exciting times!
Edited by browno on Wednesday 16th August 23:07
Hello again all - good observation on the vinyl, I am figuring that making sure I keep it covered/protected during the build and using some kind of mats will keep it in reasonable condition for a while - and worst case, I can get it over-wrapped from the inside...
So, thanks to Photobucket, my thread (and all other forums!) has been butchered and none of the images are now showing which is a massive pain - but for now I have rehosted everything onto Flickr - [a href="https://flic.kr/s/aHskXTy3Rh"]HERE[/a]
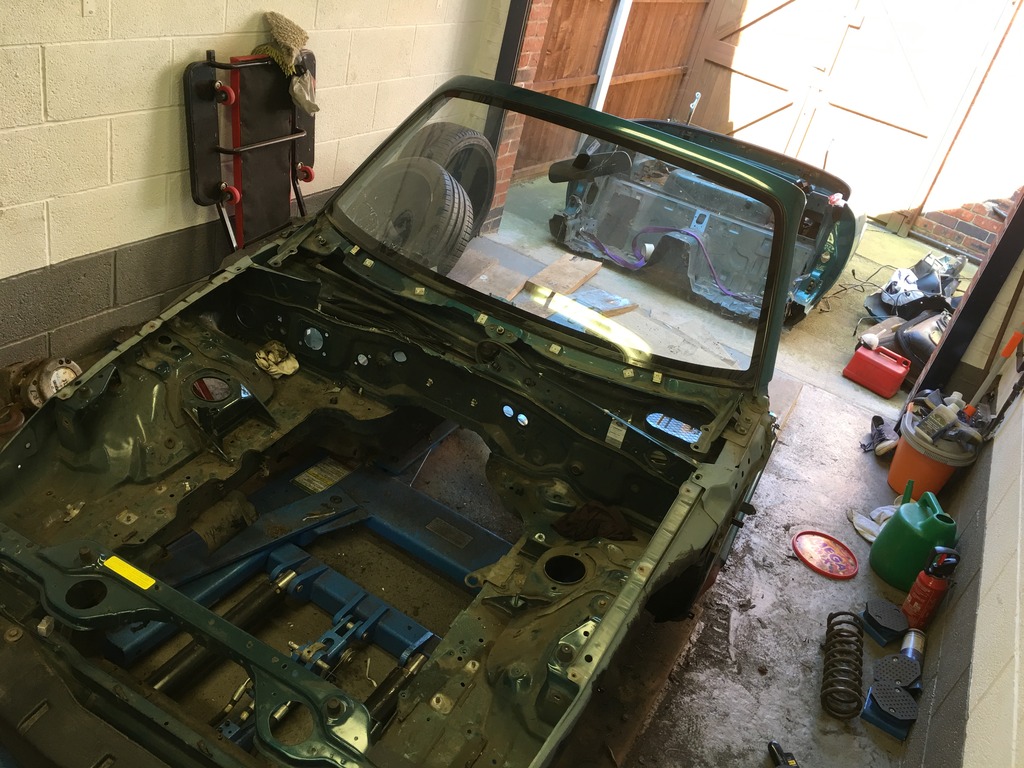
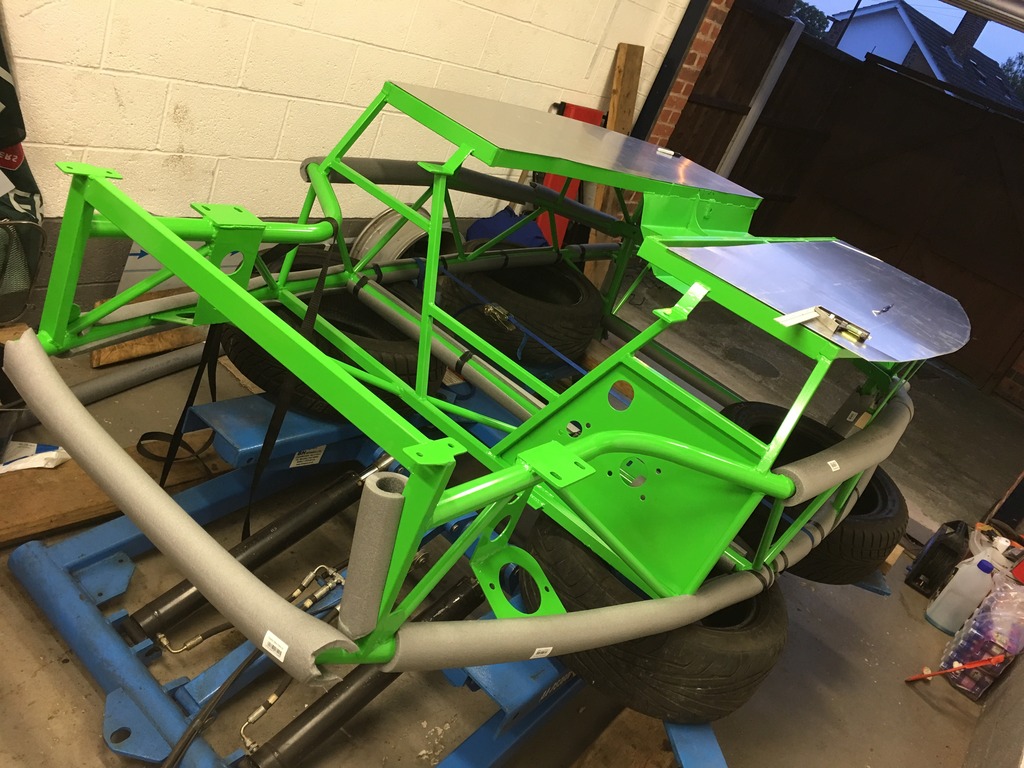
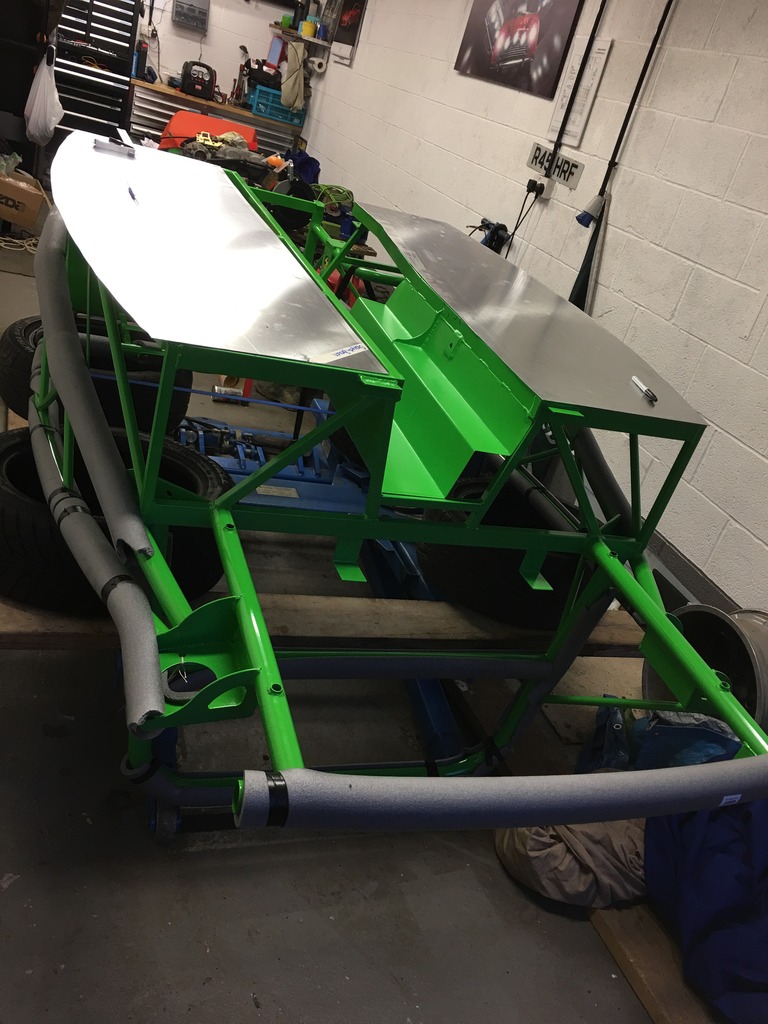
So, onto progress, and I have made some! First job was to flip the chassis over and turn it round the right way - and I could admire my floors properly...
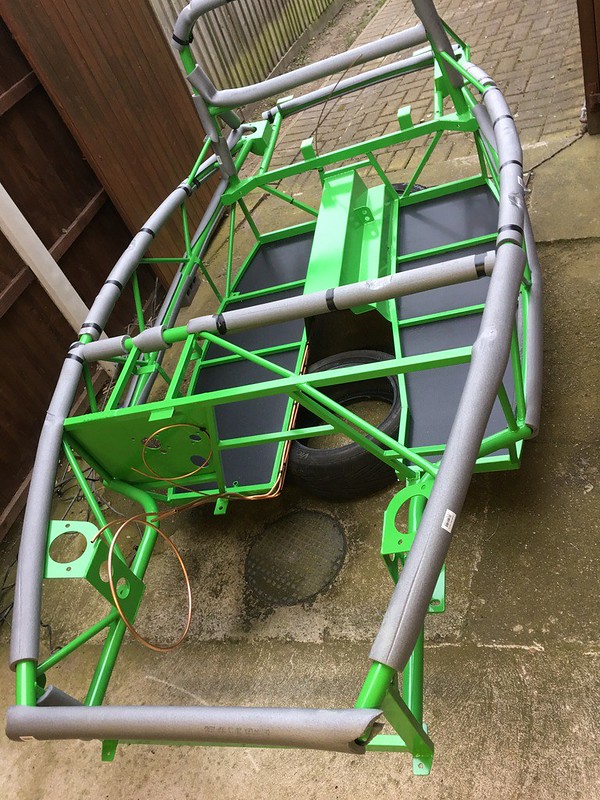 9500EF38-9CE6-47C9-8284-F5FEA2865E6E_zpse5kafsex by Gaz Brown, on Flickr
Then we lifted the body carefully through the garage and into position, which was pretty straighforward and everything lined up as it should...
 8A809374-EF30-49A8-A216-DAB43E31526A_zps880fcpqo by Gaz Brown, on Flickr
Then I could build up the rear suspension:
 050066AF-BDEE-44CD-A6F8-6646E4CD3420_zpspo0fgroi by Gaz Brown, on Flickr
and bolt down the chassis - with one minor schoolboy error when I tightened up this bolt with a ratchet spanner and then realised it was trapped (and of course wouldn't allow me to undo the bolt!) - which was easily solved by wedging a pry-bar in the gap to hold the nut!
 17FBEC1A-E840-4E08-BBFD-C880EFE2598E_zps0nnhnajs by Gaz Brown, on Flickr
Next, I replaced both front upper balljoints and that also allowed me to build the front suspension up and fit the cycle wings so that I could torque up the front hubs.
 C8E34086-06A9-4878-8251-C9A91B9EB58D_zps26rn92uy by Gaz Brown, on Flickr
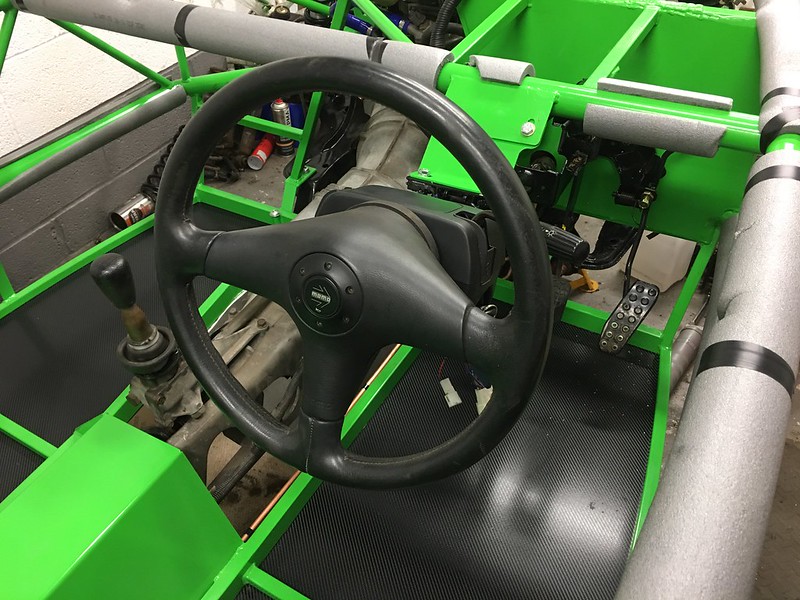
and then I gave my pedal assemblies and steering column a lick of paint to tidy them and started having a go at fitting them. Once I had a feel for what I needed to do re: spacers (I chopped them off the brake pedal and put them on the servo side), and also had removed the stud from the clutch pedal and replaced with a longer nut & bolt, it looked like everything was lining up and the column fitted well with the help of some cable-ties...
 Untitled by Gaz Brown, on Flickr
 Untitled by Gaz Brown, on Flickr
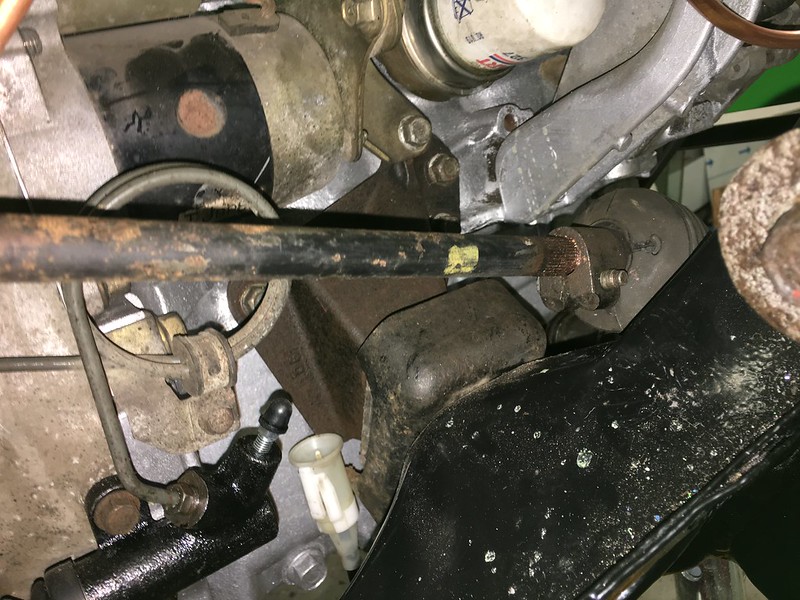
However, the steering column was only just touching the end of the rack fitting:
 Untitled by Gaz Brown, on Flickr
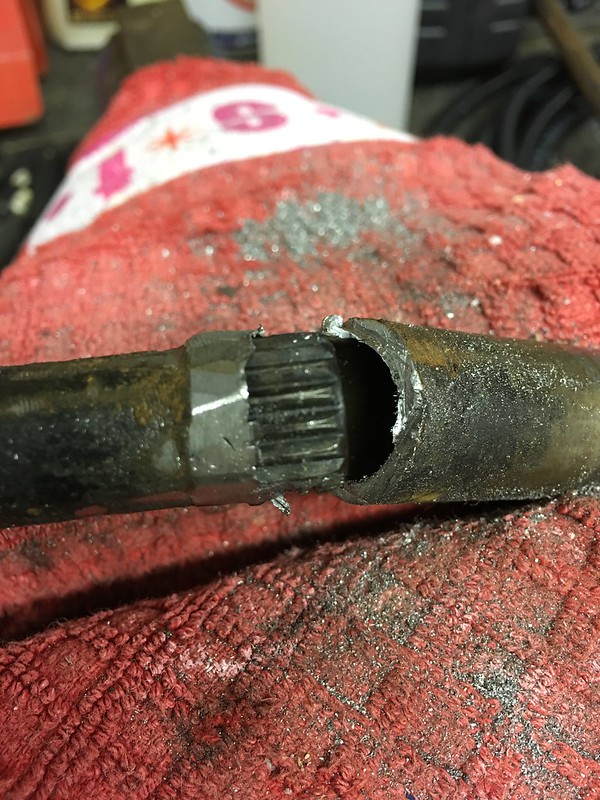
Having looked online I found reference to this in a few places including the exomotive build guide - [a href="http://exomotive.com/exocet/build-guide/pedals-steering/"]http://exomotive.com/exocet/build-guide/pedals-steering/[/a] which shows that you can extend the lower portion of the column easily... So, having successfully fitted an windscreen to my mate's Tiger kit, we were on a roll and so decided to tackle the column last night.
I don't know if there is a difference in LHD and RHD columns (or differences by years) but this didn't work... looking at the lower shaft, we thought it had sealant round the splines - which turned out to be weld... but we persevered anyway, and starting filing away the weld - which revealed the ends of the splines.
 Untitled by Gaz Brown, on Flickr
 Untitled by Gaz Brown, on Flickr
but once we had the weld clear, we discovered that the splines were only really long enough to locate the shaft for welding...
 Untitled by Gaz Brown, on Flickr
So now, I am going to be buying a replacement column - and having checked a mate's (also a '98 NA) that has the same shaft as mine - should I be looking to extend from the top half of the column, or are there different designs of column out there that have the extendable bottom section (or is this something that was only on LHD cars?)... At the very least - this might act as a reference for others that might come across the same problem not to get chop-happy!)
So the saga will continue on this one shortly - but for now, I am really happy to be making good progress - I also now have tyres sorted and being fitted to the wheels at the moment - and have my spacers on order from Freaky Parts too...
So, thanks to Photobucket, my thread (and all other forums!) has been butchered and none of the images are now showing which is a massive pain - but for now I have rehosted everything onto Flickr - [a href="https://flic.kr/s/aHskXTy3Rh"]HERE[/a]
So, onto progress, and I have made some! First job was to flip the chassis over and turn it round the right way - and I could admire my floors properly...
9500EF38-9CE6-47C9-8284-F5FEA2865E6E_zpse5kafsex by Gaz Brown, on FlickrThen we lifted the body carefully through the garage and into position, which was pretty straighforward and everything lined up as it should...
8A809374-EF30-49A8-A216-DAB43E31526A_zps880fcpqo by Gaz Brown, on FlickrThen I could build up the rear suspension:
050066AF-BDEE-44CD-A6F8-6646E4CD3420_zpspo0fgroi by Gaz Brown, on Flickrand bolt down the chassis - with one minor schoolboy error when I tightened up this bolt with a ratchet spanner and then realised it was trapped (and of course wouldn't allow me to undo the bolt!) - which was easily solved by wedging a pry-bar in the gap to hold the nut!
17FBEC1A-E840-4E08-BBFD-C880EFE2598E_zps0nnhnajs by Gaz Brown, on FlickrNext, I replaced both front upper balljoints and that also allowed me to build the front suspension up and fit the cycle wings so that I could torque up the front hubs.
C8E34086-06A9-4878-8251-C9A91B9EB58D_zps26rn92uy by Gaz Brown, on Flickrand then I gave my pedal assemblies and steering column a lick of paint to tidy them and started having a go at fitting them. Once I had a feel for what I needed to do re: spacers (I chopped them off the brake pedal and put them on the servo side), and also had removed the stud from the clutch pedal and replaced with a longer nut & bolt, it looked like everything was lining up and the column fitted well with the help of some cable-ties...
Untitled by Gaz Brown, on FlickrUntitled by Gaz Brown, on FlickrHowever, the steering column was only just touching the end of the rack fitting:
Untitled by Gaz Brown, on FlickrHaving looked online I found reference to this in a few places including the exomotive build guide - [a href="http://exomotive.com/exocet/build-guide/pedals-steering/"]http://exomotive.com/exocet/build-guide/pedals-steering/[/a] which shows that you can extend the lower portion of the column easily... So, having successfully fitted an windscreen to my mate's Tiger kit, we were on a roll and so decided to tackle the column last night.
I don't know if there is a difference in LHD and RHD columns (or differences by years) but this didn't work... looking at the lower shaft, we thought it had sealant round the splines - which turned out to be weld... but we persevered anyway, and starting filing away the weld - which revealed the ends of the splines.
Untitled by Gaz Brown, on FlickrUntitled by Gaz Brown, on Flickrbut once we had the weld clear, we discovered that the splines were only really long enough to locate the shaft for welding...
Untitled by Gaz Brown, on FlickrSo now, I am going to be buying a replacement column - and having checked a mate's (also a '98 NA) that has the same shaft as mine - should I be looking to extend from the top half of the column, or are there different designs of column out there that have the extendable bottom section (or is this something that was only on LHD cars?)... At the very least - this might act as a reference for others that might come across the same problem not to get chop-happy!)
So the saga will continue on this one shortly - but for now, I am really happy to be making good progress - I also now have tyres sorted and being fitted to the wheels at the moment - and have my spacers on order from Freaky Parts too...
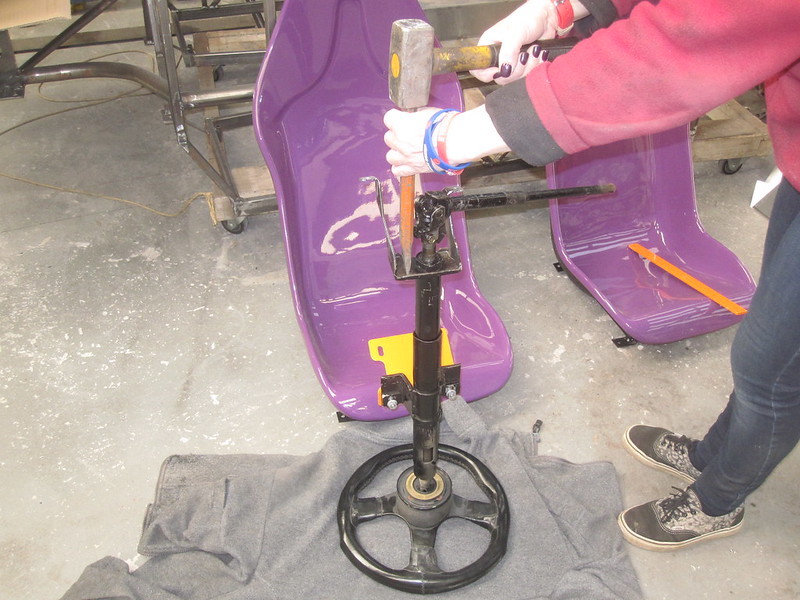
and here is a quick resolution - within minutes of posting my update on the MEV forum, I had an email from Stuart at MEV with the following information:
I hear you have a column issue. This is resolved with the use of a hammer as in the attached picture. You effectively lengthen the lower part of the shaft by compressing the upper part thus allowing it to protrude further through the bulkhead. Hope this helps, my pictures don’t seem to work on the forum but feel free to use the attached. Hopefully you can get someone to weld it back up. If not send it to me. Stuart
 column by Gaz Brown, on Flickr
You wouldn't get that level of rapid support from many places! Now that I have seen Stuart's picture, I can see what he has done - effectively shortened the upper half of the outer - meaning that the lower portion will then fit properly. I will try this tonight on my upper column - and I now have a new lower on order, so can hopefully bolt that in once it arrives.
I am still intrigued by the US approach though - this certainly suggests a significant difference in the columns across the pond (or all LHD)...
I hear you have a column issue. This is resolved with the use of a hammer as in the attached picture. You effectively lengthen the lower part of the shaft by compressing the upper part thus allowing it to protrude further through the bulkhead. Hope this helps, my pictures don’t seem to work on the forum but feel free to use the attached. Hopefully you can get someone to weld it back up. If not send it to me. Stuart
column by Gaz Brown, on FlickrYou wouldn't get that level of rapid support from many places! Now that I have seen Stuart's picture, I can see what he has done - effectively shortened the upper half of the outer - meaning that the lower portion will then fit properly. I will try this tonight on my upper column - and I now have a new lower on order, so can hopefully bolt that in once it arrives.
I am still intrigued by the US approach though - this certainly suggests a significant difference in the columns across the pond (or all LHD)...
It's been a little while, but it is time for another progress update!
I have managed to sort my column issues - following Stuart's instructions, I managed to bash away at my column and gain that vital extra inch!
 Untitled by brownotribbs, on Flickr
Which then allowed me to fit up my column properly... and connect up the (replacement) lower shaft...
 Untitled by brownotribbs, on Flickr
 Untitled by brownotribbs, on Flickr
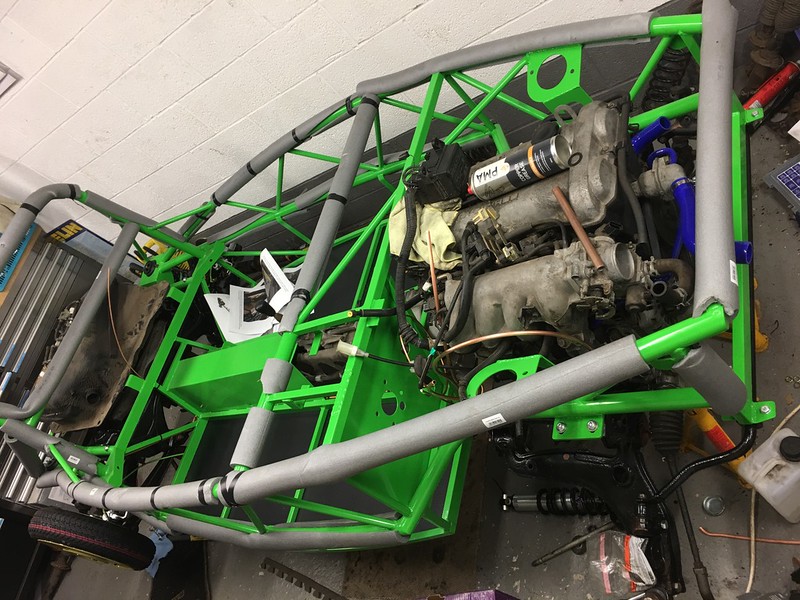
I have then been working to try and begin sorting details - so have the accelerator cable attached, handbrake cables installed and ready to bolt into place and also the clutch plumbed in and bled up, so that is now working. I have also chopped the front end of the fuel hard pipes and have fitted flexible hoses up to the fuel rail (although I have dropped one of the fuel-rail spacers, so will need to sort a replacement if it doesn't turn up on the floor!).
 Untitled by brownotribbs, on Flickr
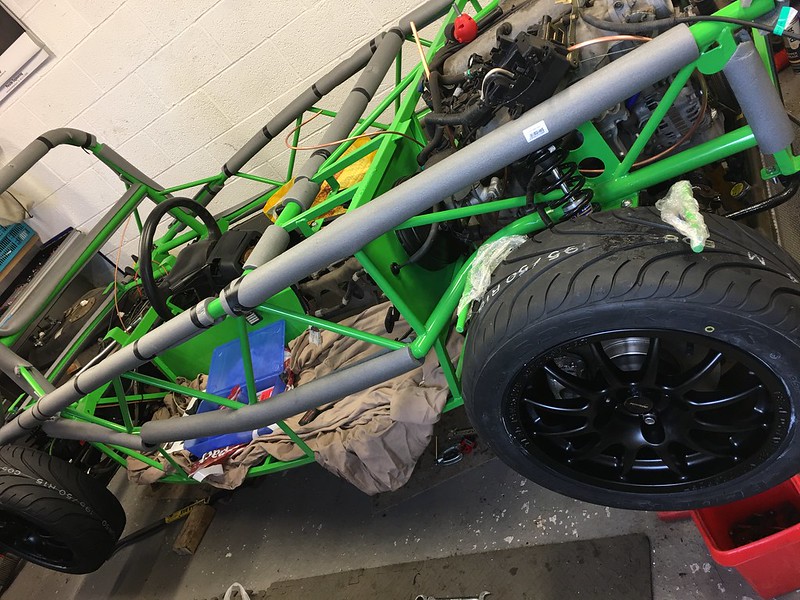
I also got my new tyres (Federal RSRs, which I have been very pleased with on my mk3) fitted onto my new wheels and have trial fitted them in advance of my spacers arriving. Although I am not a big fan of black wheels in general, I think that they are the right choice to provide a good contrast to the green chassis and bodywork...
 Untitled by brownotribbs, on Flickr
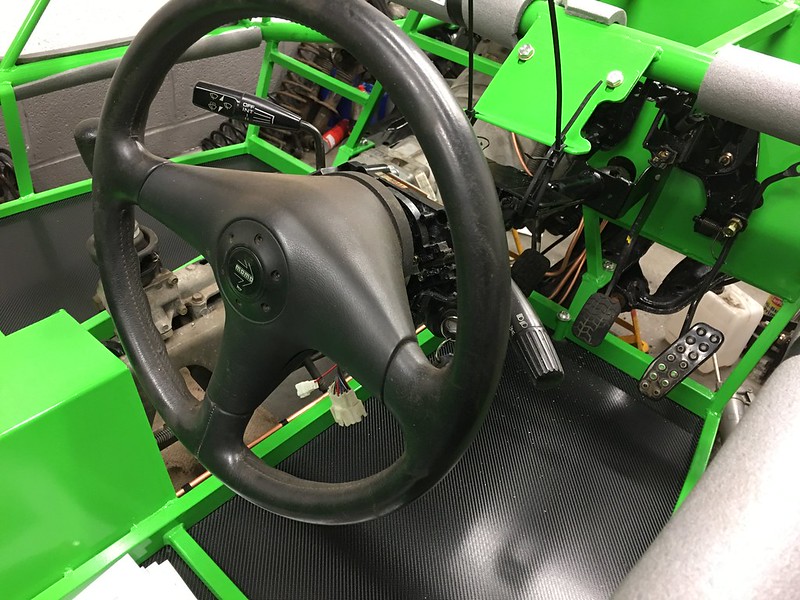
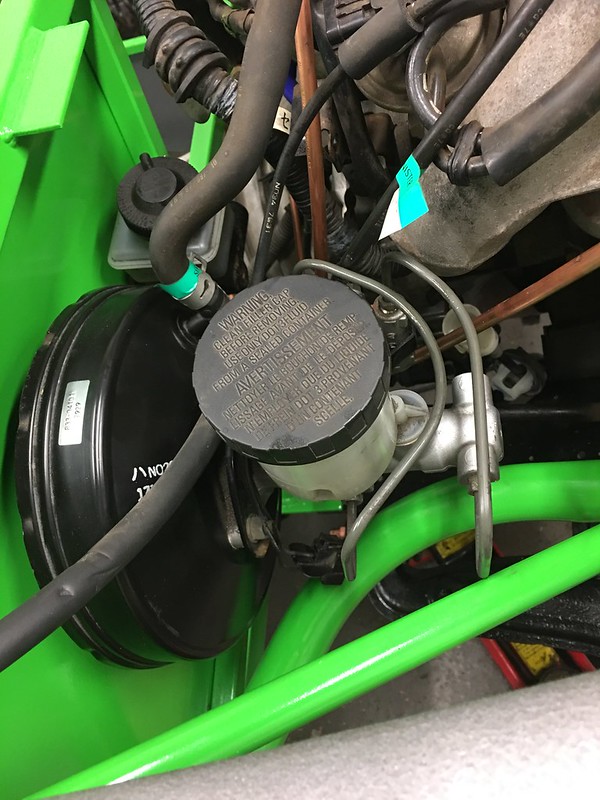
And tonight (as I am waiting for my braided hoses to be modified for the brakes, so am holding off on piping them up), I started on the big box of spaghetti otherwise known as the loom!
 Untitled by brownotribbs, on Flickr
Thankfully, my labels appear to be all intact and legible so far, and I have started lying it all into place as a starting point - which means everything looks a little messy! Thankfully everything that I have come across so far has plugged into the right places, and the other connectors all seem to make sense (I predict this being a statement that might come back to haunt me!)
 Untitled by brownotribbs, on Flickr
 Untitled by brownotribbs, on Flickr
So, it is all coming together - I need to bolt in the handbrake, sort the brake pipes and also the rear fuel pipe connections, but then it should be time to get it started and moving!
I have managed to sort my column issues - following Stuart's instructions, I managed to bash away at my column and gain that vital extra inch!
Untitled by brownotribbs, on FlickrWhich then allowed me to fit up my column properly... and connect up the (replacement) lower shaft...
Untitled by brownotribbs, on FlickrUntitled by brownotribbs, on FlickrI have then been working to try and begin sorting details - so have the accelerator cable attached, handbrake cables installed and ready to bolt into place and also the clutch plumbed in and bled up, so that is now working. I have also chopped the front end of the fuel hard pipes and have fitted flexible hoses up to the fuel rail (although I have dropped one of the fuel-rail spacers, so will need to sort a replacement if it doesn't turn up on the floor!).
Untitled by brownotribbs, on FlickrI also got my new tyres (Federal RSRs, which I have been very pleased with on my mk3) fitted onto my new wheels and have trial fitted them in advance of my spacers arriving. Although I am not a big fan of black wheels in general, I think that they are the right choice to provide a good contrast to the green chassis and bodywork...
Untitled by brownotribbs, on FlickrAnd tonight (as I am waiting for my braided hoses to be modified for the brakes, so am holding off on piping them up), I started on the big box of spaghetti otherwise known as the loom!
Untitled by brownotribbs, on FlickrThankfully, my labels appear to be all intact and legible so far, and I have started lying it all into place as a starting point - which means everything looks a little messy! Thankfully everything that I have come across so far has plugged into the right places, and the other connectors all seem to make sense (I predict this being a statement that might come back to haunt me!)
Untitled by brownotribbs, on FlickrUntitled by brownotribbs, on FlickrSo, it is all coming together - I need to bolt in the handbrake, sort the brake pipes and also the rear fuel pipe connections, but then it should be time to get it started and moving!
amstrange1 said:
Does the hammering of the steering column mean that you no longer have a collapsable column in the event of an impact?
The hammering is (thankfully) only on the outer column (essentially the cover within which the main column rotates) - so this has been shortened by an inch - but the inner collapsible section remains unaffected, and the outer is just a tube within a tube, so has lots of further room to collapse. That was one of the reasons that I wanted to check what to do before proceeding, as I certainly don't want (and IVA wouldn't allow!) a solid column.A little more progress to report today - having put in the fuel lines temporarily (I will finish them off when I fix the tank into place), and lashed up the earth points on the loom, I managed to put some fuel in and prime the fuel system... then I turned the key hopefully...
https://youtu.be/Yk2MgJF6Z5o
So at least I know that the loom is working enough to fire the engine - so I am going to make a start at stripping back some of the wiring that I know is unnecessary (electric windows, heater, heated rear window, speakers, door switches, wipers etc) to begin the process of tidying up the loom... just need to make sure that it continues to work as I remove wires!
Thanks - yes, it was definitely good to get it to fire up again, but a way to get before she is driving I reckon!
I have been making a little more progress, slightly steady as I have been on holiday and also had to replace the brake master cylinder on my mk3 which was leaking between the master and the servo to make sure it stayed safe and got an MOT for another year.
The day before my holidays I received a package from Freaky Parts containing my wheel spacers, which was good (but I was told in no uncertain terms that they would have to wait until I got home!). They look very nicely machined, and also are not quite as weighty as I thought they might be, which is certainly a good thing!.
So, over the weekend, I fitted the spacers and made sure that all studs were firmly thread-locked into place, at which point, I could then fit all four wheels properly.
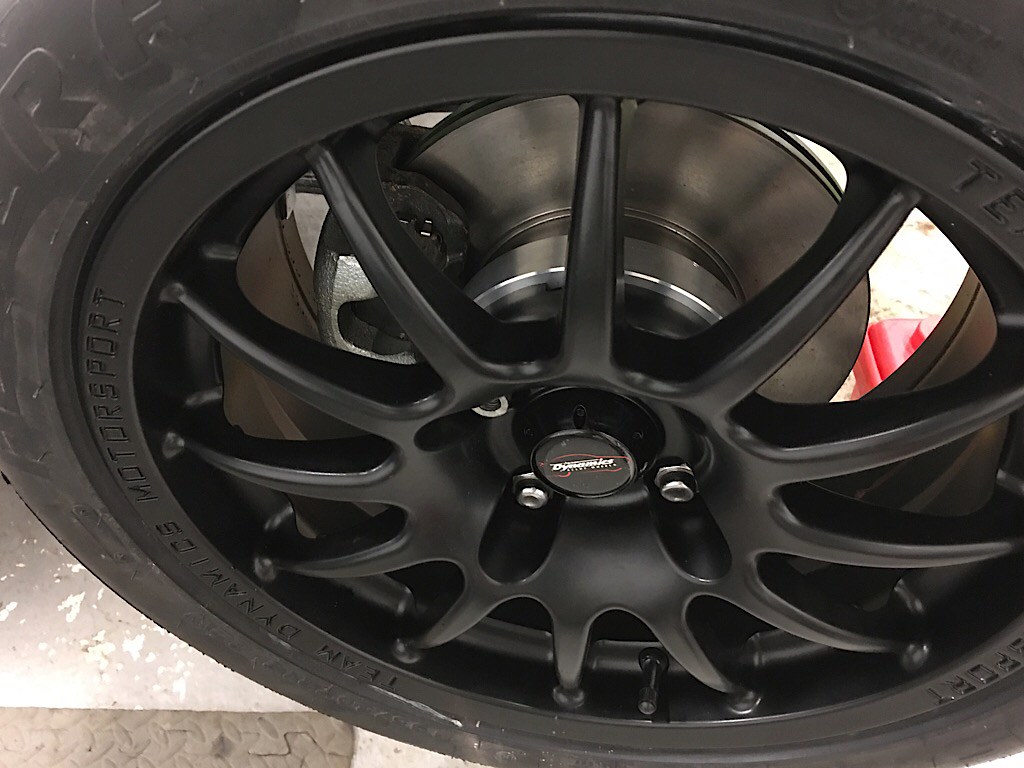 Untitled on Flickr
which meant that I could remove the axle-stands and drop the car onto its wheels for the first time! It definitely looks a lot lower than the MX-5 did, but I guess that's part of the point!
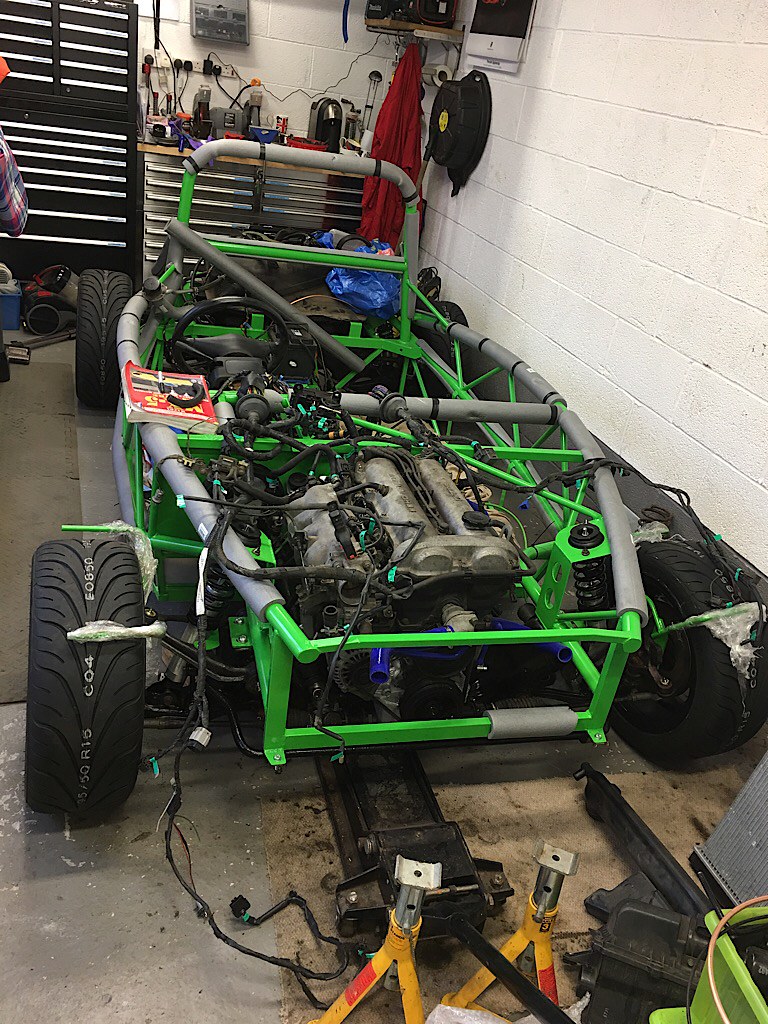 Untitled on Flickr
Then last night I had a bit of time to do some more jobs, and was ably assisted by a friend from work (who has worked building some lovely race cars), and he had also modified my final brake flexi- lines. So first job was to loosely put them into place - with the rears run to the t-piece (now centrally located - will be bolted in place when my rivnut tool arrives!). we also did the fronts, but I didn't take any pics (and need to make up some brackets to hold them in an IVA-compliant position). I do then need to p-clip the flexis in place - but need to wait for a set of new banjo bolts to arrive so that I can get the routing perfected.
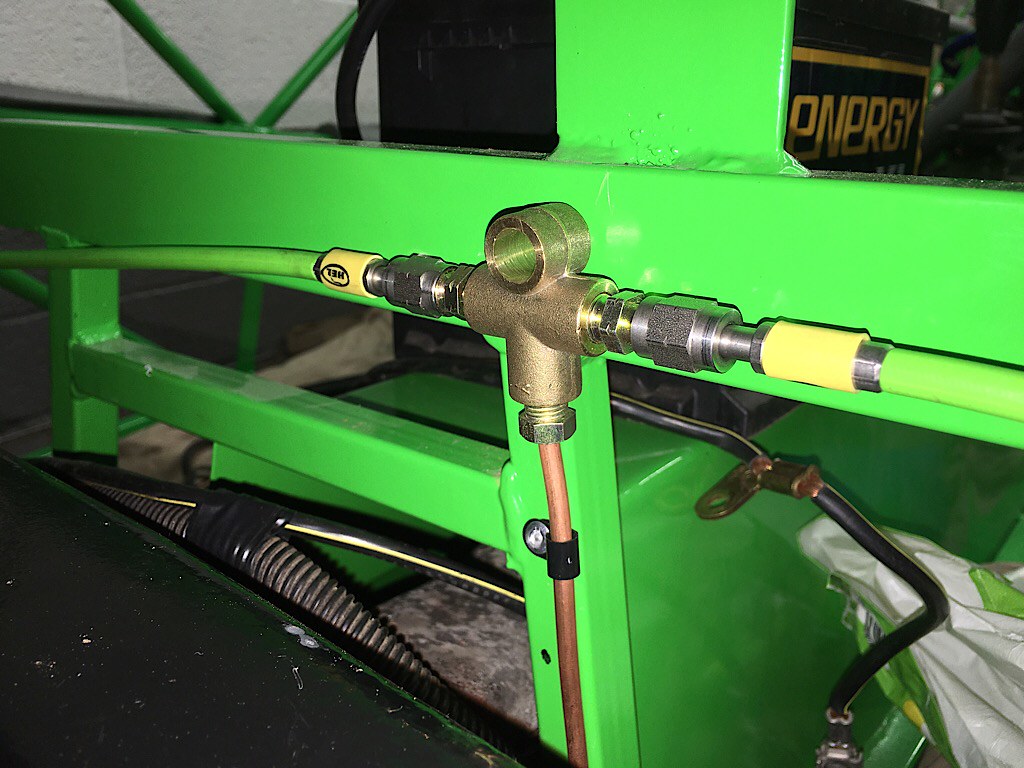 Untitled on Flickr
We also removed the loom from the car - as I think I was maybe trying to run before I could walk - and needed the space to be able to fit the bulkhead panels and wiring tray. At least I know it runs, and could mark up all of the connectors that were required to make the car fire!
The final job was then to fit up the handbrake lever and get that adjusted up - which worked ok after a bit of double checking t hat everything lined up properly. The good news being that once we had adjusted the new calipers and the cable, that I have the beginnings of some working brakes!
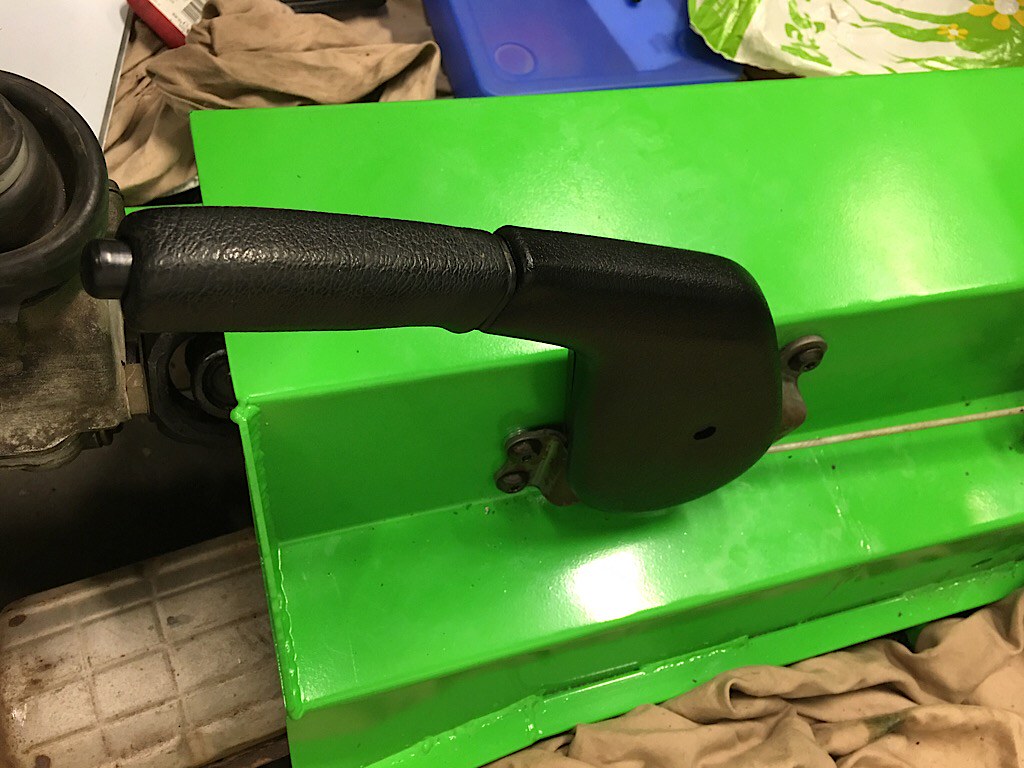 Untitled on Flickr
So my plan of action now is to get the brake piping/hoses finished and secured then bleed them out, secure the handbrake cables and then start work on getting the bulkhead panels trimmed and fitted up before then fitting and modifying the loom. Oh, and my new (standard) radiator has also arrived, so I have fitted the MEV brackets to it, so I can install that too when I have my rivnut tool.
I have been making a little more progress, slightly steady as I have been on holiday and also had to replace the brake master cylinder on my mk3 which was leaking between the master and the servo to make sure it stayed safe and got an MOT for another year.
The day before my holidays I received a package from Freaky Parts containing my wheel spacers, which was good (but I was told in no uncertain terms that they would have to wait until I got home!). They look very nicely machined, and also are not quite as weighty as I thought they might be, which is certainly a good thing!.
So, over the weekend, I fitted the spacers and made sure that all studs were firmly thread-locked into place, at which point, I could then fit all four wheels properly.
Untitled on Flickrwhich meant that I could remove the axle-stands and drop the car onto its wheels for the first time! It definitely looks a lot lower than the MX-5 did, but I guess that's part of the point!
Untitled on FlickrThen last night I had a bit of time to do some more jobs, and was ably assisted by a friend from work (who has worked building some lovely race cars), and he had also modified my final brake flexi- lines. So first job was to loosely put them into place - with the rears run to the t-piece (now centrally located - will be bolted in place when my rivnut tool arrives!). we also did the fronts, but I didn't take any pics (and need to make up some brackets to hold them in an IVA-compliant position). I do then need to p-clip the flexis in place - but need to wait for a set of new banjo bolts to arrive so that I can get the routing perfected.
Untitled on FlickrWe also removed the loom from the car - as I think I was maybe trying to run before I could walk - and needed the space to be able to fit the bulkhead panels and wiring tray. At least I know it runs, and could mark up all of the connectors that were required to make the car fire!
The final job was then to fit up the handbrake lever and get that adjusted up - which worked ok after a bit of double checking t hat everything lined up properly. The good news being that once we had adjusted the new calipers and the cable, that I have the beginnings of some working brakes!
Untitled on FlickrSo my plan of action now is to get the brake piping/hoses finished and secured then bleed them out, secure the handbrake cables and then start work on getting the bulkhead panels trimmed and fitted up before then fitting and modifying the loom. Oh, and my new (standard) radiator has also arrived, so I have fitted the MEV brackets to it, so I can install that too when I have my rivnut tool.
Edited by browno on Wednesday 16th August 23:14
Gassing Station | Readers' Cars | Top of Page | What's New | My Stuff