MG Midget - My First Classic
Discussion


Thanks!
I did think about doing some engine upgrades but I've left it standard apart from a stainless exhaust system (not yet fitted) for now as I want to experience a standard car and see how I feel when I'm using it as to whether I modify it or not.

I did think about doing some engine upgrades but I've left it standard apart from a stainless exhaust system (not yet fitted) for now as I want to experience a standard car and see how I feel when I'm using it as to whether I modify it or not.
Straff99 said:
Cleaning the INSIDE of the header tank with a toothbrush? You're a very sad man. Wonderful; keep it up!!
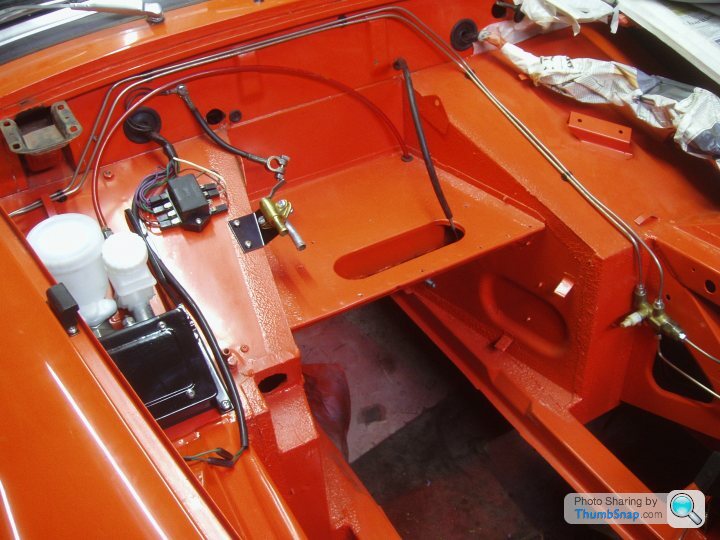
I've not managed to get that much done lately, got a couple more bits fitted in the engine bay;

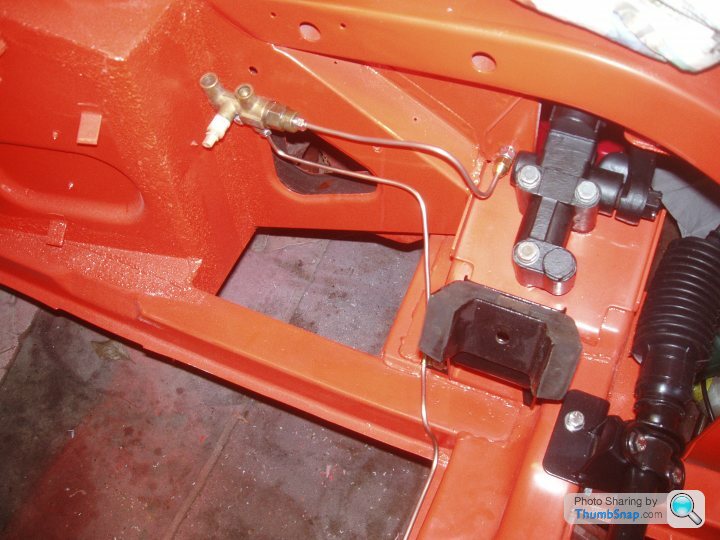
I tried to copy the brake pipe which runs from the brake distributor thingy on the left hand inner wing to the brake hose on the right hand inner wing.
Trying to copy the intricate curves of a brake pipe, as I've just realised, is not easy at all. I'm sure there is a knack but I've certainly not found it yet and finished the evening with 4' of scrap brake pipe!
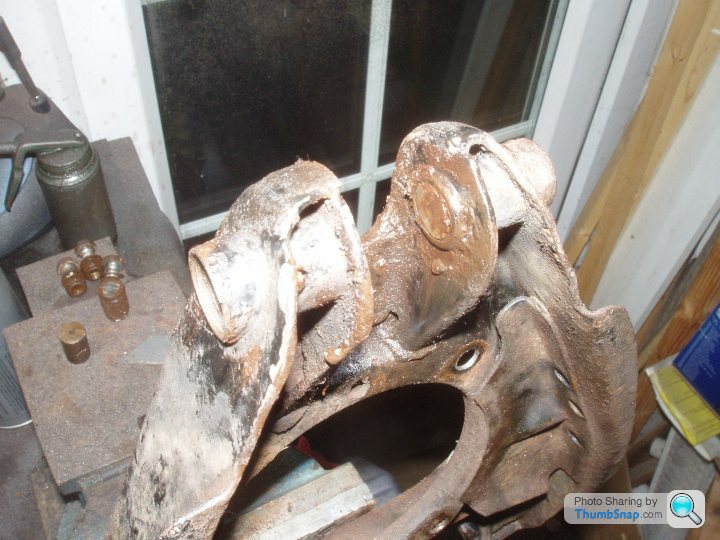
I'm going to give the front suspension and brakes a good refresh, they are all off the car already, but that's not been without its challenges.

The lower fulcrum pin has a slot in one end, behind a screw on cover that was a pain to get undone, but turning it with a big screwdriver and with a big screwdriver with locked spanners on the hex just below the handle, did nothing.
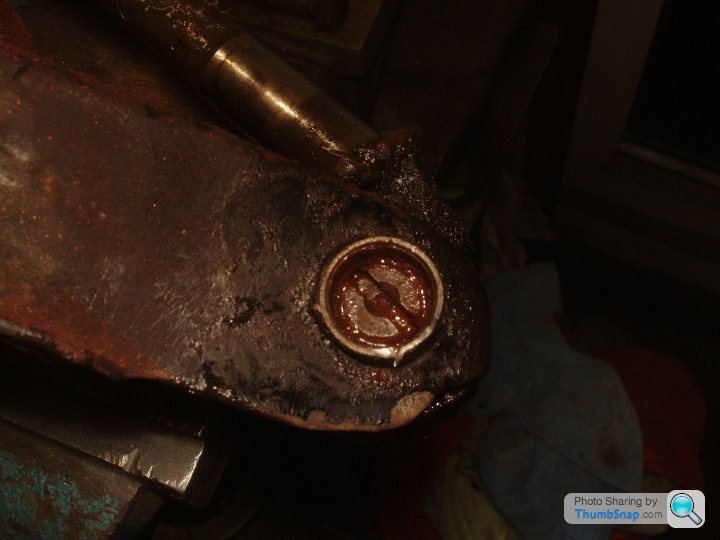
It turned out that the fulcrum pin was seized in the kingpin so the fulcrum pin was cut both sides of the kingpin to release the kingpin from the arm.
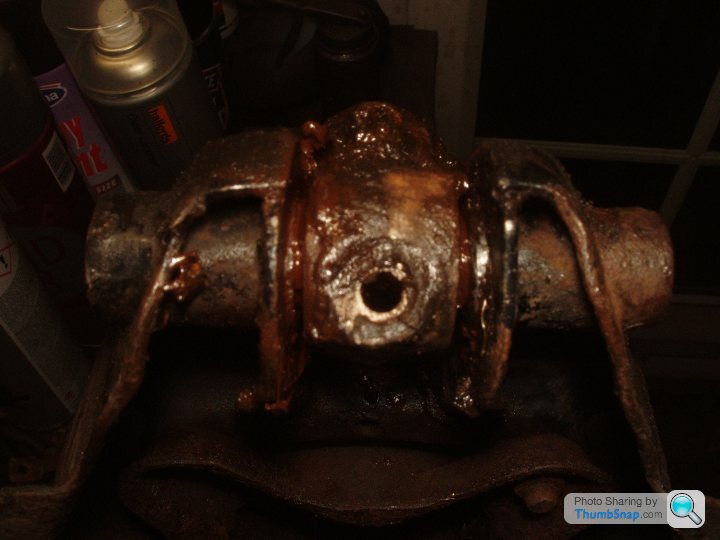
The seized part of the fulcrum pin was pressed out of the kingpin, it took around 3 tons in my press, so I'm not surprised I couldn't undo it with a screwdriver!

The end of the fulcrum pin with the slot came out of the suspension arm easily with a screwdriver.
The other end of the pin doesn't have a slot and is more than finger tight, so I'm not sure yet how I'm going to get this bit out.
A little challenge for the weekend, perhaps.
I tried to copy the brake pipe which runs from the brake distributor thingy on the left hand inner wing to the brake hose on the right hand inner wing.
Trying to copy the intricate curves of a brake pipe, as I've just realised, is not easy at all. I'm sure there is a knack but I've certainly not found it yet and finished the evening with 4' of scrap brake pipe!
I'm going to give the front suspension and brakes a good refresh, they are all off the car already, but that's not been without its challenges.
The lower fulcrum pin has a slot in one end, behind a screw on cover that was a pain to get undone, but turning it with a big screwdriver and with a big screwdriver with locked spanners on the hex just below the handle, did nothing.
It turned out that the fulcrum pin was seized in the kingpin so the fulcrum pin was cut both sides of the kingpin to release the kingpin from the arm.
The seized part of the fulcrum pin was pressed out of the kingpin, it took around 3 tons in my press, so I'm not surprised I couldn't undo it with a screwdriver!
The end of the fulcrum pin with the slot came out of the suspension arm easily with a screwdriver.
The other end of the pin doesn't have a slot and is more than finger tight, so I'm not sure yet how I'm going to get this bit out.
A little challenge for the weekend, perhaps.
Edited by Martin350 on Friday 17th February 01:54
Just a quick update.
Tinkering time has been sparse, as usual, and I had a couple of weeks where I lost my mojo with it a little after unsuccessfully trying to remove seized suspension pins and stuff, but the other day I got back out there and managed to get things moving again, so there was a little bit of progress and now I'm back on it!
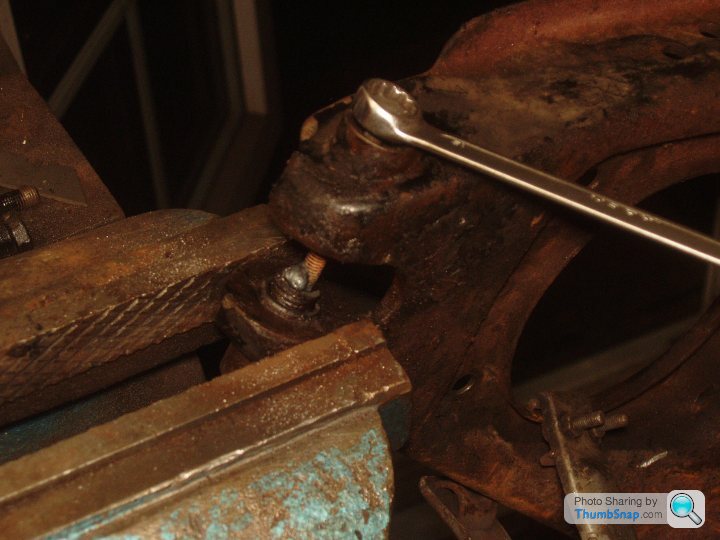
The fulcrum pin I mentioned earlier, and the one from the other side, were removed by welding a long thin bolt to it and unwinding it.
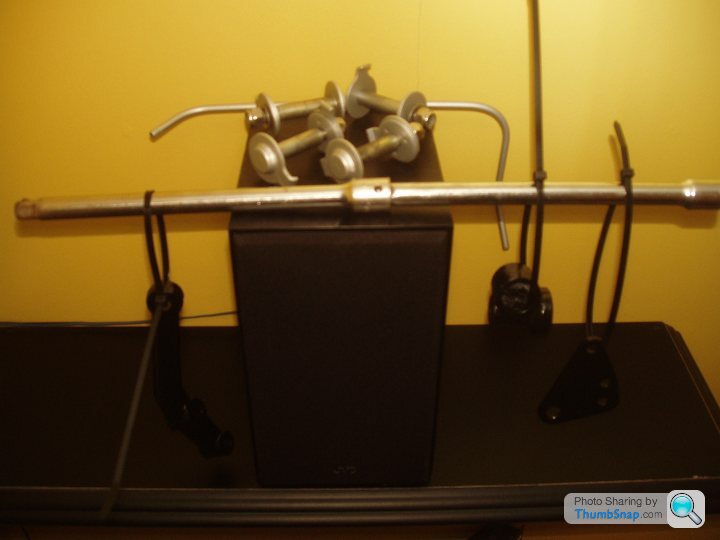
I've also spent quite a few hours dismantling, cleaning and painting some of the other front suspension bits.
And found a good use of a speaker on a shelf indoors, to get the painted parts out of the cold garage to dry / harden.
The cable ties on the gaiters of my new steering rack were bugging me, being white, I had to change them to black ones so they don't stand out.

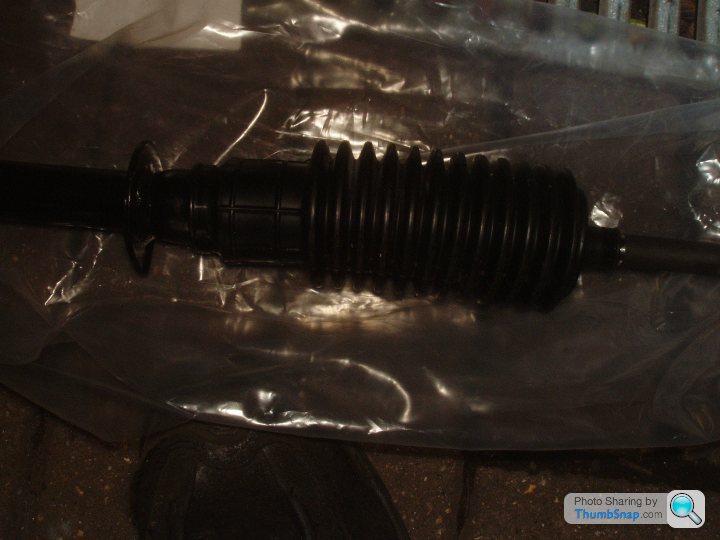
And the rack has been put into place, loosely for now, until I put the column and stuff back in.

I want to de-rust and paint the lower suspension arms, the springs and the brake backplates, but they are really corroded, so I'm considering sending them away to be powder coated.
Tinkering time has been sparse, as usual, and I had a couple of weeks where I lost my mojo with it a little after unsuccessfully trying to remove seized suspension pins and stuff, but the other day I got back out there and managed to get things moving again, so there was a little bit of progress and now I'm back on it!
The fulcrum pin I mentioned earlier, and the one from the other side, were removed by welding a long thin bolt to it and unwinding it.
I've also spent quite a few hours dismantling, cleaning and painting some of the other front suspension bits.
And found a good use of a speaker on a shelf indoors, to get the painted parts out of the cold garage to dry / harden.
The cable ties on the gaiters of my new steering rack were bugging me, being white, I had to change them to black ones so they don't stand out.
And the rack has been put into place, loosely for now, until I put the column and stuff back in.
I want to de-rust and paint the lower suspension arms, the springs and the brake backplates, but they are really corroded, so I'm considering sending them away to be powder coated.
Edited by Martin350 on Saturday 18th March 02:30
Thank you! 
As for the springs, I get what you're saying.
They aren't broken, just a little rusty, and as this was never intended to be a cost-no-object restoration, I'm reluctant to buy new ones.
On the other hand, parts for these cars are so cheap it might not be worth bothering having work done, or even doing work, to the old parts and just get new parts instead.
Apart from the lower suspension arms, they are a bit pricey.
I've got time to ponder and weigh up my options.
I got a few more front hub/suspension parts dismantled and cleaned this evening.
This is a tiny part of the side that you don't think about when doing some fairly major work on a car with very little space to do it in.
My desk at home has looked similar to this for several months now, as I organise buying the new parts, particularly as I'm replacing nuts, bolts, washers etc. with new stainless fixings where possible.

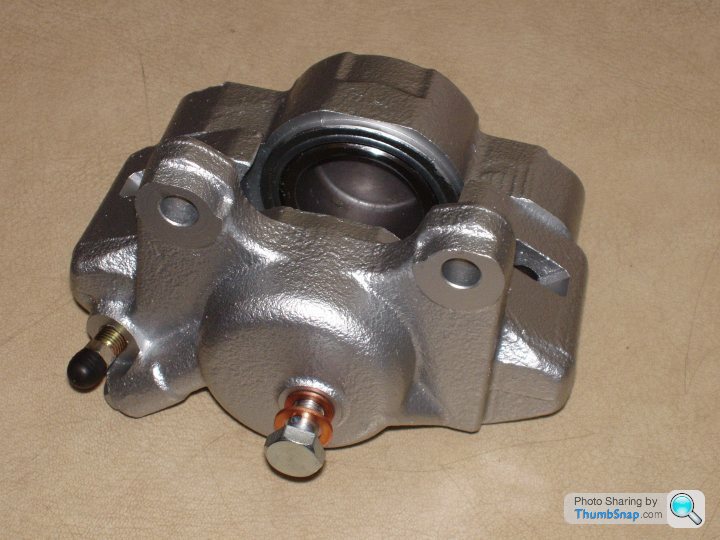
And I'm in a bit of a dilemma with the new brake calipers that I've bought for it (both the old ones had a seized piston and they cost about £72 for a pair of brand new ones!).
They look great, all brand new and that, but I know that it will only be a matter of months before that silver coating will start showing corrosion and begin to look tatty, but painting brand new calipers won't look as nice but will probably preserve a smarter look for longer...

My desk at home has looked similar to this for several months now, as I organise buying the new parts, particularly as I'm replacing nuts, bolts, washers etc. with new stainless fixings where possible.
And I'm in a bit of a dilemma with the new brake calipers that I've bought for it (both the old ones had a seized piston and they cost about £72 for a pair of brand new ones!).
They look great, all brand new and that, but I know that it will only be a matter of months before that silver coating will start showing corrosion and begin to look tatty, but painting brand new calipers won't look as nice but will probably preserve a smarter look for longer...


AW111 said:
Check the temperature rating of the paint before spraying the calipers.
Will do! 
Progress has been slow, as usual, but I'm pleased about getting one little thing done this evening that I've failed at before, then failed again, and now just about done.
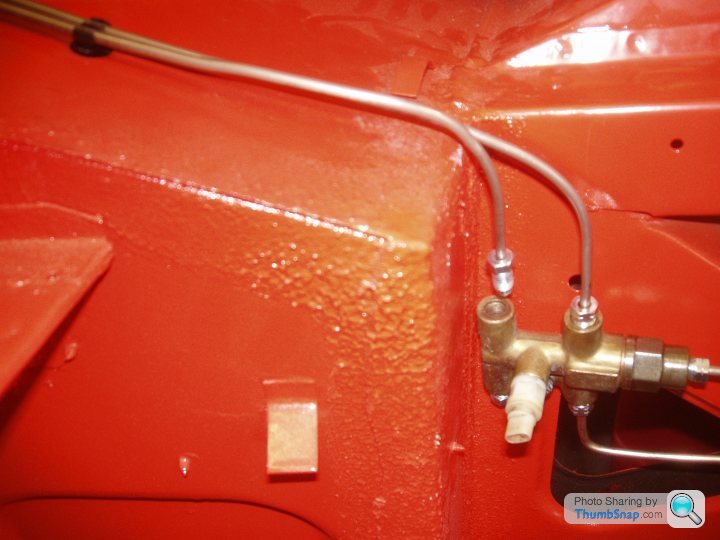
It's the side to side front brake pipe, and the (much easier) small pipe from the brake distributor thingy to the left hand front flexi hose.
It is such an utter arse of a job to get all the bends right so the pipe fits without touching anywhere it shouldn't, there must be a knack to it..?
(They are just laid in place for the photo as I haven't trimmed and flared the ends yet).
And that's another thing.
My (not particularly good) flaring tool doesn't seem to like the copper nickel pipe I'm using and I can't grip it hard enough to prevent it slipping back so not making a good flare.
Time for a new and better flaring tool, I think.

Edited by Martin350 on Thursday 6th April 01:59
Thanks!
A little bit more progress to report.
I've trimmed, flared and fitted the two new metal brake pipes in the engine bay, which was still a heck of a lot of faffing, even though I thought they were nearly done.
I f king hate brake pipes!
I have also taken the front suspension springs, lower arms, anti roll bar and brake back plates to be blasted and powder coated.
They were a little beyond my capabilities at home with an electric drill & wire brush and a few coats of Smoothrite.
It could be up to a couple of weeks before I have those back, but when I do the front end should be built up again quite quickly.
I've got this week off work so I'm hoping to get a bit more done...
A little bit more progress to report.
I've trimmed, flared and fitted the two new metal brake pipes in the engine bay, which was still a heck of a lot of faffing, even though I thought they were nearly done.
I f
king hate brake pipes! I have also taken the front suspension springs, lower arms, anti roll bar and brake back plates to be blasted and powder coated.
They were a little beyond my capabilities at home with an electric drill & wire brush and a few coats of Smoothrite.
It could be up to a couple of weeks before I have those back, but when I do the front end should be built up again quite quickly.
I've got this week off work so I'm hoping to get a bit more done...
Thanks!


I had a few other little setbacks and minor challenges, such as this brake pipe which took a good hour to get shaped correctly, and I went and cut it about an inch too short!
Despite that I got quite a lot put back on the car today.
To save you looking back that is pedals, pedal box and master cylinders, fuse box, heater valve, clutch hose and the two other metal brake pipes.

TheLordJohn said:
I can't be the only one who's done a perfect flare then noticed there's no union on the pipe...? Lol.
I might have done that today! I had a few other little setbacks and minor challenges, such as this brake pipe which took a good hour to get shaped correctly, and I went and cut it about an inch too short!
Despite that I got quite a lot put back on the car today.
To save you looking back that is pedals, pedal box and master cylinders, fuse box, heater valve, clutch hose and the two other metal brake pipes.
Edited by Martin350 on Wednesday 12th April 20:21
Thanks!
I'm very pleased with them, and I used a cunning trick to mask the tricky piston and seals.
I tried tape but it was just too fiddly and my rubbish tape wasn't sticky enough, so I covered the pistons and seals with grease, painted them, then a few days later wiped the grease off with tissue paper and brake cleaner.
Hopefully they will last much longer before looking tatty than they would have.
New banjo bolts and sealing washers too.
Frustratingly slow progress lately, but I've just ordered another little batch of new parts, and that always cheers me up when they arrive!
Martin350 said:
I'm in a bit of a dilemma with the new brake calipers that I've bought for it
They look great, all brand new and that, but I know that it will only be a matter of months before that silver coating will start showing corrosion and begin to look tatty, but painting brand new calipers won't look as nice but will probably preserve a smarter look for longer...
I decided to paint them silver, sprayed with aerosol caliper paint.They look great, all brand new and that, but I know that it will only be a matter of months before that silver coating will start showing corrosion and begin to look tatty, but painting brand new calipers won't look as nice but will probably preserve a smarter look for longer...
I'm very pleased with them, and I used a cunning trick to mask the tricky piston and seals.
I tried tape but it was just too fiddly and my rubbish tape wasn't sticky enough, so I covered the pistons and seals with grease, painted them, then a few days later wiped the grease off with tissue paper and brake cleaner.
Hopefully they will last much longer before looking tatty than they would have.
New banjo bolts and sealing washers too.
Frustratingly slow progress lately, but I've just ordered another little batch of new parts, and that always cheers me up when they arrive!
Thank you!
But, this is far from what I would call a restoration, it will be far from concours when finished, and it isn't a cost no object project so I have to draw the line at certain things which I deem not necessary to replace if they are in good working order.
Costs can spiral, even on a cheap car like this, very quickly indeed if you're not a little bit careful. In fact they already have a bit!
I agree, it would have been nice to replace it all, though.
I like the Elan story, I love those cars, but way out of my price range now.
Don't be too fooled by the photos, they are flattering, it's clearly not to anyone's eyes a bodyshop finish under the bonnet, but I've tried quite hard.
I suppose it doesn't help that I know where all the mistakes are!
It's hard to say when I'll have it on the road as I've got quite a lot going on in general life at the moment (nothing bad, just lots of stuff) so spare tinkering time is often brief and sporadic.
When I started back in July I thought it would be up and running in a few weeks.
Then as I delved deeper and got a bit carried away I was thinking late this summer. That could still be a feasible goal but probably with the whole refresh not complete.
And by that I mean paint, interior, wheels, hood and bumpers not having been worked on, but the car mechanically sorted.
I have actually been keeping a rough time log of the work I've done on the car, as well as the time looking up and ordering parts, going to buy parts etc. and so far it's around 190 hours.
I recently read that a nut and bolt restoration an a classic Aston Martin or Jag E-Type can take up to 2,000 hours!
Paul S4 said:
I would have renewed those front suspension bits personally, especially as they need greasing regularly (?) but that's just IMHO.
!
I did consider it.!
But, this is far from what I would call a restoration, it will be far from concours when finished, and it isn't a cost no object project so I have to draw the line at certain things which I deem not necessary to replace if they are in good working order.
Costs can spiral, even on a cheap car like this, very quickly indeed if you're not a little bit careful. In fact they already have a bit!
I agree, it would have been nice to replace it all, though.
I like the Elan story, I love those cars, but way out of my price range now.
Chester draws said:
Another first time reader here.
Great job showing what can be done with minimal experience, space and time.
How far off having it on the road would you say you are? Weather's looking not far off being perfect for a Sunday afternoon run somewhere nice in it.
Thank you too! Great job showing what can be done with minimal experience, space and time.
How far off having it on the road would you say you are? Weather's looking not far off being perfect for a Sunday afternoon run somewhere nice in it.
Don't be too fooled by the photos, they are flattering, it's clearly not to anyone's eyes a bodyshop finish under the bonnet, but I've tried quite hard.
I suppose it doesn't help that I know where all the mistakes are!
It's hard to say when I'll have it on the road as I've got quite a lot going on in general life at the moment (nothing bad, just lots of stuff) so spare tinkering time is often brief and sporadic.
When I started back in July I thought it would be up and running in a few weeks.
Then as I delved deeper and got a bit carried away I was thinking late this summer. That could still be a feasible goal but probably with the whole refresh not complete.
And by that I mean paint, interior, wheels, hood and bumpers not having been worked on, but the car mechanically sorted.
I have actually been keeping a rough time log of the work I've done on the car, as well as the time looking up and ordering parts, going to buy parts etc. and so far it's around 190 hours.
I recently read that a nut and bolt restoration an a classic Aston Martin or Jag E-Type can take up to 2,000 hours!
Edited by Martin350 on Wednesday 26th April 00:50
Ta!
When I was talking to the previous owner it turned out he regularly visits family who live about twenty minutes drive away from me.
I am thinking of writing to him, letting him know what I've been doing, and offering for him to come and see it.
He looked genuinely sad when I took it away, but he did also have an MGB Roadster undergoing a full restoration at the time.
A little update, a few quite minor things to report.
With the help of a burly mate I backed the car out of the tiny garage on a trolley jack and a bread crate trolley with blocks of wood on instead of front wheels, turned it around, moved the engine and gearbox to the back of the garage, then pushed the car back in.
It sounds simple, but it took us about an hour and a half, it was a right faff, especially as the drive immediately slopes upwards straight out of the garage!
But I did also end up with a slightly tidier space to work in.
The suspension parts are taking longer at the powder coater place than expected, but when I do get them back I can start getting that lot back together, and there is more room at this end of the garage to work.
There's still some work to be done there, that bumper bracket will be cleaned up and some tidying up and undersealing inside that wheel arch, etc.
This evening I removed the left hand front wing, another reason that I turned the car around, as it was too tight for space previously.
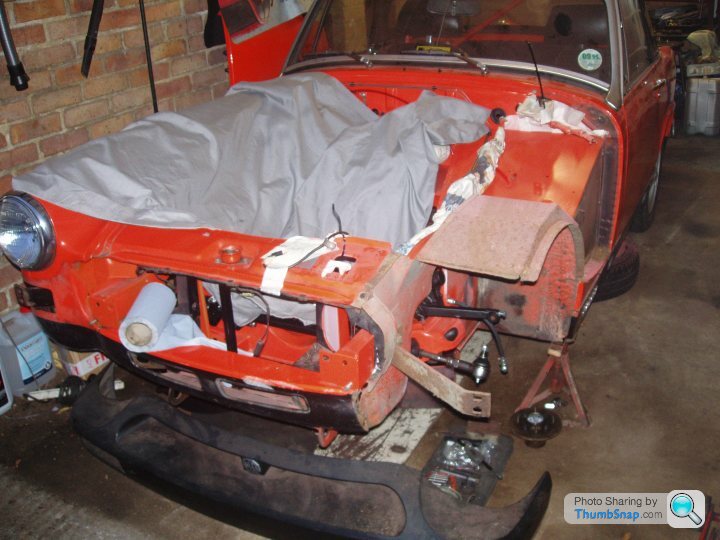
The wing was removed as it gives me much easier access to a little bit of corrosion on the flitch panel that I need to sort out.
I'll grind / cut this back to good metal, replace, tidy up and repaint as necessary.
I'll also clean and treat the panels that aren't visible behind the front wing.
They are in remarkably good condition but I'll do some preventative maintenance anyway, before the wing goes back on.
I've decided that I'll also take the right hand wing off later as well so I can inspect the bodywork more thoroughly and repair / treat as required.
With the help of a burly mate I backed the car out of the tiny garage on a trolley jack and a bread crate trolley with blocks of wood on instead of front wheels, turned it around, moved the engine and gearbox to the back of the garage, then pushed the car back in.
It sounds simple, but it took us about an hour and a half, it was a right faff, especially as the drive immediately slopes upwards straight out of the garage!
But I did also end up with a slightly tidier space to work in.
The suspension parts are taking longer at the powder coater place than expected, but when I do get them back I can start getting that lot back together, and there is more room at this end of the garage to work.
There's still some work to be done there, that bumper bracket will be cleaned up and some tidying up and undersealing inside that wheel arch, etc.
This evening I removed the left hand front wing, another reason that I turned the car around, as it was too tight for space previously.
The wing was removed as it gives me much easier access to a little bit of corrosion on the flitch panel that I need to sort out.
I'll grind / cut this back to good metal, replace, tidy up and repaint as necessary.
I'll also clean and treat the panels that aren't visible behind the front wing.
They are in remarkably good condition but I'll do some preventative maintenance anyway, before the wing goes back on.
I've decided that I'll also take the right hand wing off later as well so I can inspect the bodywork more thoroughly and repair / treat as required.

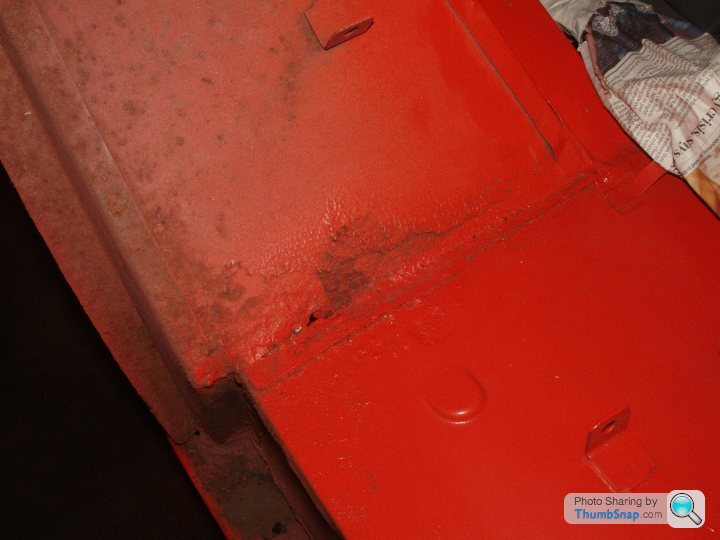
I've got round to attacking the little (not quite so little as it turned out, unsurprisingly) patch of corrosion on the flitch panel.
I cut it out back to good metal, did a little c.a.d. (cardboard aided design) and replicated that in steel.

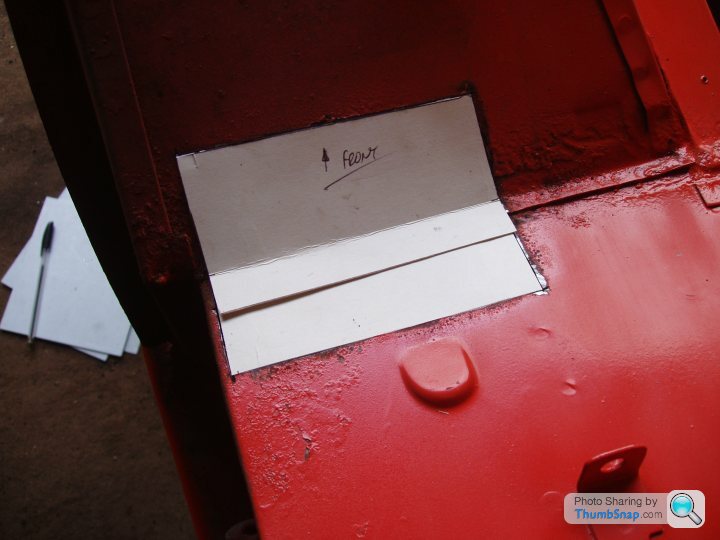
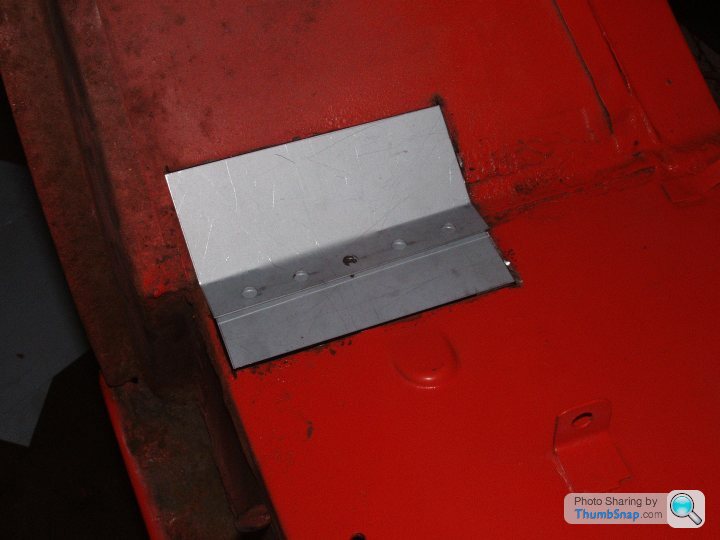
I put the holes in the repair panel so I can plug weld it to the panel below.
It was spot welded originally, but as I don't have a spot welder it is an accepted alternative.
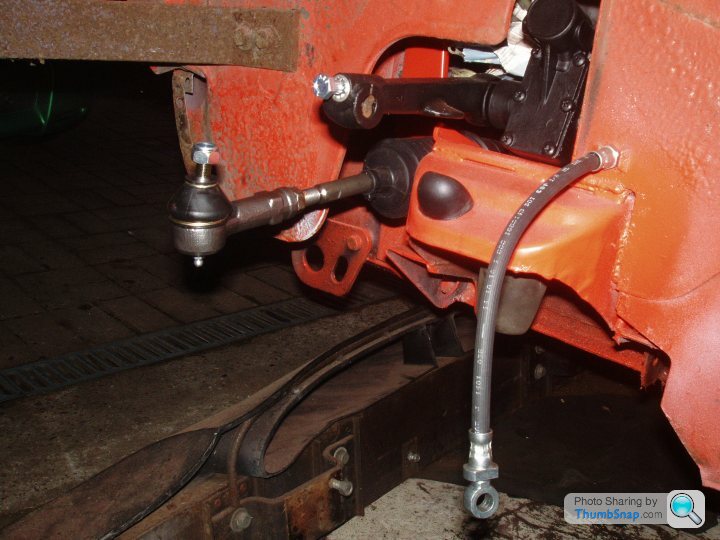
The powder coating place finally got my front suspension parts done, and I got a few hours in this week putting one side back together.
For a supposedly very simple car the front suspension is actually slightly fiddly to assemble, nothing very difficult, just a little time consuming.
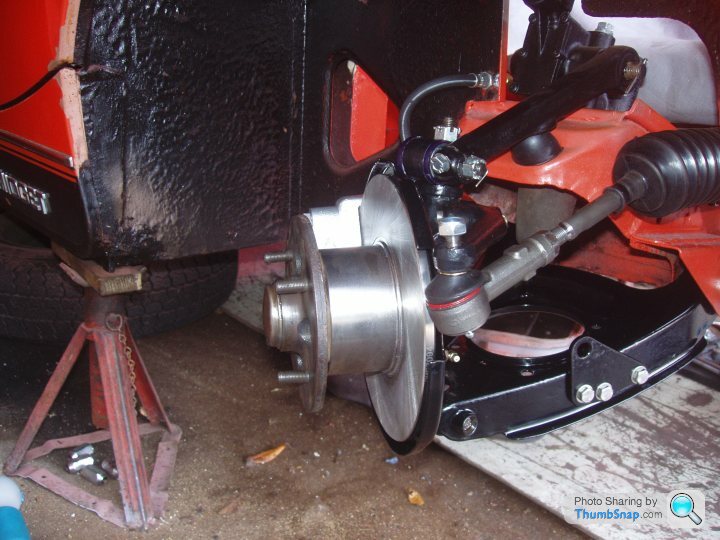
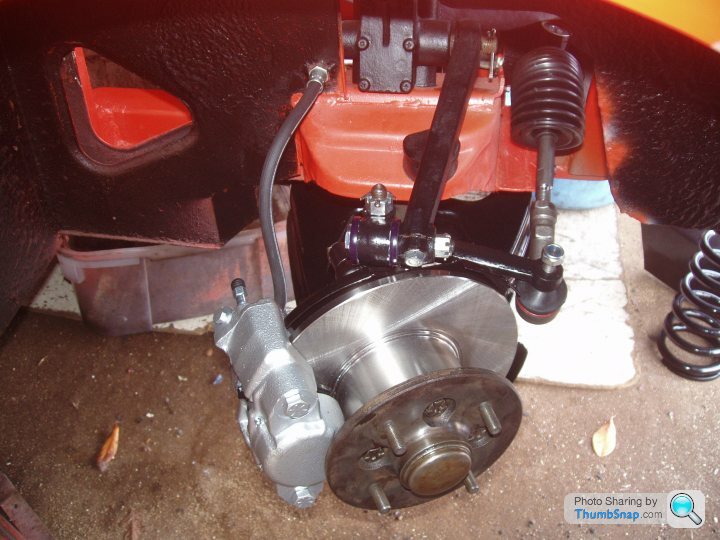
The road spring still needs to be fitted, and there are a couple of methods. I'm going with the 'long bolt' method, but I need to source some long bolts before I can do that.
I'll explain the long bolt method with photos when I get to do it.
I've got next week off work, and although it's mostly to deal with other commitments, I'm hoping to get a good chunk of work done on the MG.
My goal is to get the patches of bodywork on the flitch panel welded in and painted, the front suspension & brakes all back on and the car back on all four wheels, so I can turn it around again much easier and get the rear axle / suspension / brakes out and sorted.
I cut it out back to good metal, did a little c.a.d. (cardboard aided design) and replicated that in steel.
I put the holes in the repair panel so I can plug weld it to the panel below.
It was spot welded originally, but as I don't have a spot welder it is an accepted alternative.
The powder coating place finally got my front suspension parts done, and I got a few hours in this week putting one side back together.
For a supposedly very simple car the front suspension is actually slightly fiddly to assemble, nothing very difficult, just a little time consuming.
The road spring still needs to be fitted, and there are a couple of methods. I'm going with the 'long bolt' method, but I need to source some long bolts before I can do that.
I'll explain the long bolt method with photos when I get to do it.
I've got next week off work, and although it's mostly to deal with other commitments, I'm hoping to get a good chunk of work done on the MG.
My goal is to get the patches of bodywork on the flitch panel welded in and painted, the front suspension & brakes all back on and the car back on all four wheels, so I can turn it around again much easier and get the rear axle / suspension / brakes out and sorted.
Edited by Martin350 on Sunday 28th May 01:32
Gassing Station | Readers' Cars | Top of Page | What's New | My Stuff