Mazda MX6 2.5 V6 manual
Discussion


Thanks for the comments folks. 
197. said:
In regards to the air intake, how about adding louvres to the wheel arch liner to aid airflow to the cone filter?
That's an interesting idea, I will consider that. I do think it would benefit from some kind of air ventilation, not too sure exactly what though at the moment.nicfaz said:
Plus we must preserve v6’s to show the yoof what a proper engine sounds like ??
Indeed, that's one of the reasons why I went for a V6, these do sound great. There aren't that many cheaper V6 coupe options around, certainly not in my £500 budget, and new models will likely all be replaced by turbo 4 pots sooner or later...nicfaz said:
It’ll be fascinating to see the turbo set up. Chinese turbos aren’t all bad, they just lack quality control because it costs money. I hope RNGesus has been kind.
Yeah it's going to be fun to see how it does! I'm into Youtube and there are loads of guys out there successfully running Chinese turbo's, so I think they have improved in quality in recent years. I was really impressed with this T3/T4 I bought, the machining looks very good. And at £83.99 (via Toyosport) it was significantly cheaper than a tired secondhand Garrett, it's practically a service item at that price! I'm initially only going to be on 4psi so it shouldn't have too much stress in that respect.Paul S4 said:
How about using the fog aperture to get a cool air feed in...but then you would have to blank off the other fog, or modify both fogs to smaller LED lamps so you can have the best of both! Not explained that very well but I am sure you know what I mean !
I've been thinking along those lines, the fog lamps are quite big lumps so I could fit some that are more compact as you suggest. I had a quick look last night and there is a space in the corner of the bumper, above the fog and next to the bumper mount that looks suitable. Here's a previous pic' that I cropped down, it's not the best but you can see the open space at the right above the fog, this is where the bumper starts to bend around to the side. I've had a look at a few brake duct intakes that could be suitable.
No more work done, but I did receive the new 10AN oil drain fitting in the post. I test fitted it and the tighter angle does now allow it to clear the wastegate housing, so that's another little problem solved.

Another part I needed was some kind of bung for the rear exhaust manifold, it has a boss on it for fitment of the EGR gear, but since I've binned all that it's not required and I'd be left with an opening. I measured the boss and it has a 22mm thread, so I ordered an M22 oil pan sump plug, with a 1.5mm thread pitch. I've not fitted it yet but am confident that's something else to cross off the to-do list.


Well, not a particularly exciting update but incremental progress. Nothing major done really but little bits and bobs sorted and buttoned up. I've put the jubilee clips onto the pipe couplers, got some wiring done for things like the newly fitted lambda sensors, and fitted the power cable for the battery relocation to the boot. Body wise I've thrown the headlamps back in and refitted the drivers side front wing, so there is actually the appearance of a complete car now.


I did a spot of recent payday shopping for some outstanding parts I need. I bought a couple of 12" slimline fans as the standard pair don't fit well with the turbo gubbins, plus a set of aftermarket horns as the old ones looked like they have been at the bottom of the sea for the last 22 years. I also got a exhaust extension sleeve so that I can get the exhaust connected, as the cat doesn't meet up with the downpipe.

The horn were very cheap and looked correct, though when they arrived I found them to be about twice the size of the standard items, they just about fitting with a bit of finessing. Plus they are rated as 110dB, could be interesting...
Another little thing done was to design an enclosure to mount the VAF to MAF PCB I will be using, I knocked it up in Solidwork's during a lunchbreak. I'm just going to 3D print it. Nothing fancy, I'm thinking that I'll locate it in the glove box. The PCB has a bluetooth transceiver so I don't need to physically connect a cable to it to adjust the mapping. The opening in the box is for the 10 way wiring terminal block.

The main jobs still outstanding to get done soon are: connect up the zorst, properly install the battery in the boot, drop the uprated fuel pump in the tank, and fit the bigger injectors. Speaking of which, I'm sending the bigger Millenia S injectors off to be professionally cleaned. Not that cheap but they are secondhand units that I don't know the history of, and it's obviously important that I don't have a blocked injector running lean on a turbo'ed motor.
I did a spot of recent payday shopping for some outstanding parts I need. I bought a couple of 12" slimline fans as the standard pair don't fit well with the turbo gubbins, plus a set of aftermarket horns as the old ones looked like they have been at the bottom of the sea for the last 22 years. I also got a exhaust extension sleeve so that I can get the exhaust connected, as the cat doesn't meet up with the downpipe.
The horn were very cheap and looked correct, though when they arrived I found them to be about twice the size of the standard items, they just about fitting with a bit of finessing. Plus they are rated as 110dB, could be interesting...
Another little thing done was to design an enclosure to mount the VAF to MAF PCB I will be using, I knocked it up in Solidwork's during a lunchbreak. I'm just going to 3D print it. Nothing fancy, I'm thinking that I'll locate it in the glove box. The PCB has a bluetooth transceiver so I don't need to physically connect a cable to it to adjust the mapping. The opening in the box is for the 10 way wiring terminal block.
The main jobs still outstanding to get done soon are: connect up the zorst, properly install the battery in the boot, drop the uprated fuel pump in the tank, and fit the bigger injectors. Speaking of which, I'm sending the bigger Millenia S injectors off to be professionally cleaned. Not that cheap but they are secondhand units that I don't know the history of, and it's obviously important that I don't have a blocked injector running lean on a turbo'ed motor.
The Milly S injectors have been ultrasonically cleaned and returned, so they are ready to be installed at some point soon. As mentioned previously, these are the only bigger injectors available that are a drop in replacement for the standard MX6 parts. In the UK they came in a Xedos 9 2.3 miller cycle supercharged, but I couldn't find one of these being borken for parts anywhere in Europe, such is the rarity. I wanted to get these cleaned due to them being secondhand parts of unknown condition that I bought from the US and had shipped over, I was a bit nervous about a clogged injector running a cylinder lean and causing detonation problems when on boost.
I used an outfit called Injectortune who list their services on ebay, they provided a report showing the before and after perfromance which is interesting. The report shows that all 6 injectors were flowing well before cleaning with no significant imbalance to speak of, the improvement in spray pattern on 1, 2 and 4 is probably the best benefit of the cleaning. The cost was £12.50 per injector plus £8.50 postage, so quite an expense in terms of my budget build (the injectors themselves cost less) but it's peace of mind to know that they function properly, and if I do have any fueling issues at least I'll know not to point the finger at these.

As standard the KL-DE 2.5 V6 motor in the MX6 produces 168bhp, and uses injectors that are apparently around 220cc. These alternative injectors are from the KJ-ZEM 2.3 V6 supercharged which has 217bhp as standard, and flow the 300cc as shown in the report. So these ought to get me to my 250bhp goal, with maybe a small-ish increase in fuel pressure just to be sure that they don't run out of duty cycle.
The Milly S injectors:
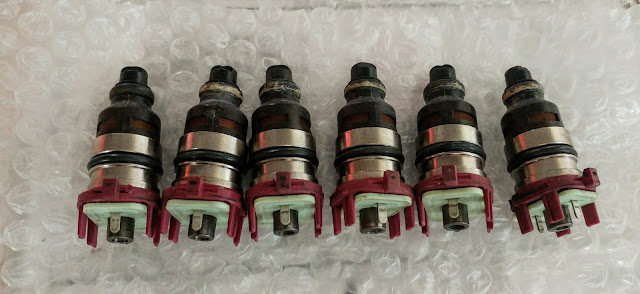
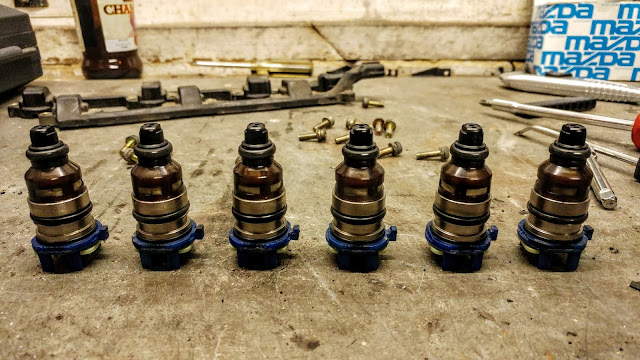
The MX6 injectors:
I used an outfit called Injectortune who list their services on ebay, they provided a report showing the before and after perfromance which is interesting. The report shows that all 6 injectors were flowing well before cleaning with no significant imbalance to speak of, the improvement in spray pattern on 1, 2 and 4 is probably the best benefit of the cleaning. The cost was £12.50 per injector plus £8.50 postage, so quite an expense in terms of my budget build (the injectors themselves cost less) but it's peace of mind to know that they function properly, and if I do have any fueling issues at least I'll know not to point the finger at these.
As standard the KL-DE 2.5 V6 motor in the MX6 produces 168bhp, and uses injectors that are apparently around 220cc. These alternative injectors are from the KJ-ZEM 2.3 V6 supercharged which has 217bhp as standard, and flow the 300cc as shown in the report. So these ought to get me to my 250bhp goal, with maybe a small-ish increase in fuel pressure just to be sure that they don't run out of duty cycle.
The Milly S injectors:
The MX6 injectors:
Edited by MX6 on Friday 12th April 09:55
I imagine many older petrol injection cars could benefit from professionally cleaned injectors. To be honest it's not something I'd ever really thought about or considered, it was only the fact that I was buying used replacement injectors that made me think about the potential benefits of having them properly cleaned and tested while they are out of the car. I am pleased I had them done for peace of mind if nothing else.
I was previously having these problems with the MX6 running lean and failing the fast idle MOT emissions test, I did wonder then if there could be a partial blocked injector or two. Once the turbo conversion work is complete I will have fitted a replacement fuel pump, fuel pressure regulator, fuel filter, lambda sensors, and catalytic converter along with the cleaned injectors, so with the mappable piggyback ECU there ought to be no fuel sysytem issues to cause a emissions test failure...
I was previously having these problems with the MX6 running lean and failing the fast idle MOT emissions test, I did wonder then if there could be a partial blocked injector or two. Once the turbo conversion work is complete I will have fitted a replacement fuel pump, fuel pressure regulator, fuel filter, lambda sensors, and catalytic converter along with the cleaned injectors, so with the mappable piggyback ECU there ought to be no fuel sysytem issues to cause a emissions test failure...
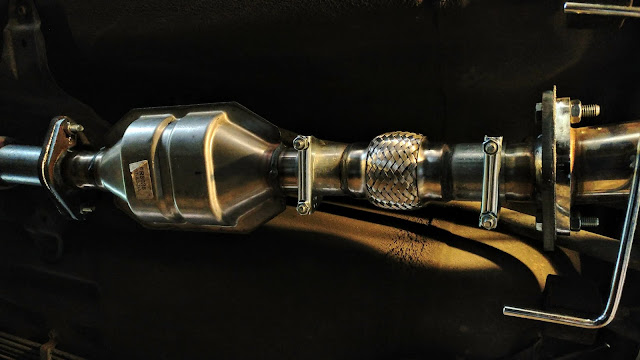
I got the 'zorst plumbed in this afternoon. I previously bought a cheap generic ebay catalytic converter to replace the rusted standard item, needless to say it didn't mate up with the stainless steel turbo downpipe, there was a gap of around 10cm. My solution was to buy a 2" sleeve with a flexible section in the middle to extend the cat.


The extended cat length worked out perfectly, so I got it fitted up with the sleeve clamps and new gaskets.
The standard radiator fans didn't fit with the tubular exhaust manifold and charge piping, so I bought these two slimline fans. I fitted them with the provided fixings and trial fitted the rad again, a much better clearance now.


I trimmed the bumper so that is fits over the intercooler, as it was interfering with it on the left side.

The extended cat length worked out perfectly, so I got it fitted up with the sleeve clamps and new gaskets.
The standard radiator fans didn't fit with the tubular exhaust manifold and charge piping, so I bought these two slimline fans. I fitted them with the provided fixings and trial fitted the rad again, a much better clearance now.
I trimmed the bumper so that is fits over the intercooler, as it was interfering with it on the left side.
So, I've actually done a bit of work on the car yesterday. It seems quite hard to believe that I bought this car 2.5 years ago and it's pretty much spent most of the intervening period sat in the garage not being worked on. To be honest the motivation has vaned at times but there is some light at the end of the tunnel and surely a first boosted start can't be too far off. The latest developments on the life front is that we are having our first child in a few months time and I've bought a larger house so will be moving. Yes it has a decent sized garage, but unfortunately not a pit though.
Anyhow, the first job was to fit the recently ultrasonically cleaned larger capacity fuel injectors. These have a red/pink top and are replacing the standard MX-6 items which have the blue top.

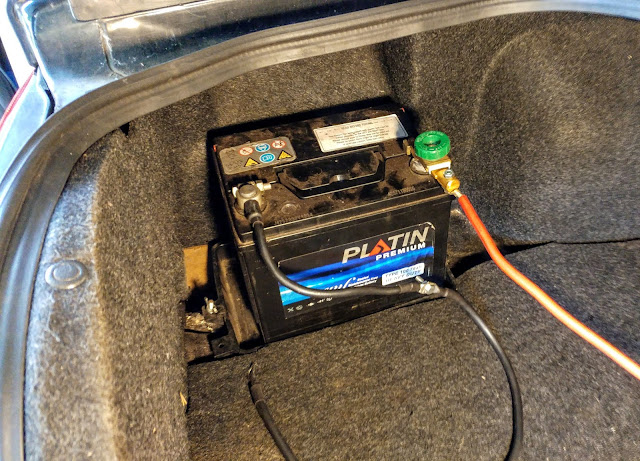
I did some work on relocating the battery, I need to finish modifying the retaining bracket and make a connection to the body for the ground.
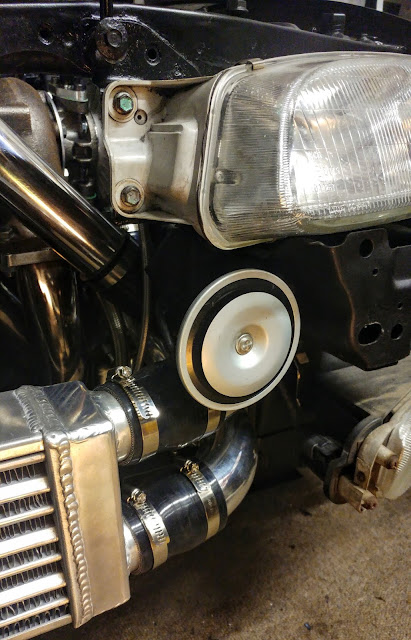
I painted some stuff with satin black. These are the front fog light bezels, rear badges, and clamps for the coolant hoses.

I fitted the bolt I bought to plug the EGR pipe which is part of the rear exhaust manifold, it's actually a oil sump drain plug that happened to be the correct size.

Anyhow, the first job was to fit the recently ultrasonically cleaned larger capacity fuel injectors. These have a red/pink top and are replacing the standard MX-6 items which have the blue top.
I did some work on relocating the battery, I need to finish modifying the retaining bracket and make a connection to the body for the ground.
I painted some stuff with satin black. These are the front fog light bezels, rear badges, and clamps for the coolant hoses.
I fitted the bolt I bought to plug the EGR pipe which is part of the rear exhaust manifold, it's actually a oil sump drain plug that happened to be the correct size.
A few more bits done. I bought a new 3 way din gauge box to mount the gauges in the spot where the digital clock used to be, I was using a gauge panel but wasn't satisfied with the fitment to the instrument bezel. I had to trim off the protrusions from the side of the box so that it would slide into the din slot.


I've been taking the front bumper on and off quite a bit so decided to install some exterior fixings, a latch and a rubber tie on both sides. The latched were riveted on and the bumper tie fixings fitted with a nut and bolt for each. I was planning to keep the car looking fairly standard but I'm bored of that idea now so I've decided to go for the nailed-on tat track car look.

Refitted the recently black painted fog light bezels.

Fitted an aftermarket gearknob.

Made a start with wire wheeling off the body rust that there is in place around the car.

The current to-do list to get the car running:
Wire up gauges.
Wire up aftermarket fans.
Drill and tap some more holes to better secure the oil pan, then put oil in the engine
Mount the radiator and coolant hoses properly with jubilee clips, then put coolant in the engine.
Fit the FMU to allow sufficient fueling under boost.
Temporarily refit the VAF in place of the MAF to run the standard ECU with the FMU.
I've been taking the front bumper on and off quite a bit so decided to install some exterior fixings, a latch and a rubber tie on both sides. The latched were riveted on and the bumper tie fixings fitted with a nut and bolt for each. I was planning to keep the car looking fairly standard but I'm bored of that idea now so I've decided to go for the nailed-on tat track car look.
Refitted the recently black painted fog light bezels.
Fitted an aftermarket gearknob.
Made a start with wire wheeling off the body rust that there is in place around the car.
The current to-do list to get the car running:
Wire up gauges.
Wire up aftermarket fans.
Drill and tap some more holes to better secure the oil pan, then put oil in the engine
Mount the radiator and coolant hoses properly with jubilee clips, then put coolant in the engine.
Fit the FMU to allow sufficient fueling under boost.
Temporarily refit the VAF in place of the MAF to run the standard ECU with the FMU.
Cookeh said:
Glad to see you're still making progress with this!
It's been a bit of a struggle for time recently and the enthusiasm has waned somewhat, but committed to getting the thing finished, or at least the motor running fairly soon! clarkson22 said:
Just sent you a email mate , good work so far dude
Thanks, sorry for the sluggish responce to your message I will get back to you shortly.Dabooka said:
Just spent a great but of time at my desk reading this thread. Great build, I'm envious of your skills and vision. I should take the inspiration to sort out my aging (and unpopular) V6....
Congratulations on the upcoming addition too, I bet that's helping to focus the mind.
Thank you, the life changes are focusing the mind for sure. I want to have the '6 runnning and driving before we move and the baby arrives, so have a deadline to aim for...Congratulations on the upcoming addition too, I bet that's helping to focus the mind.
It's nice to read compliments like this as I don't really consider myself particularly skilled when it comes to car mechanics, I've some experience with working on cars over the years but I've not done a turbo conversion project like this before. I am a mechanical design engineer which obviously helps, I do try to approach and resolve things from a technical perspective rather than just fit parts because other people have fitted them and found them to work on their car. I've tried to plan things out, but as it evident in the thread, have had to improvise at times.
What unpopular car do you have the V6 in?
SlimJim16v said:
Be careful with fans fixed through the radiator. I had a custom rad ruined by the fixings wearing holes in it.
I'm sure someone with your skill can knock up a proper bracket.
Thanks for the advise there, I will keep an eye on those fixings to see if they do start to cause some wear. Sorry to hear about the custom rad, at least mine is a £60 standard off-the-shelf item so it's not the end of the world to replace it.I'm sure someone with your skill can knock up a proper bracket.
I did a bit of work on the fuel system on Saturday afternoon. My plan to get things running with the turbo conversion initially is to simply use the standard ECU with the standard VAF (vane air flow) sensor, plus an AFPR (adjustable fuel pressure regulator) and an FMU (fuel management unit, essentially a rising rate fuel pressure regulator). I've mentioned this before, but basically, the fueling should run as standard until the turbo spools and comes onto boost, at which point the FMU will start to pinch off the fuel return line, raising pressure in the fuel rail to push more fuel through the injectors (for a given duty cycle). Since I'm running larger injectors I will use the AFPR to lower the base fuel pressure to compensate for this...
I already had a cheap ebay chinese AFPR, but when I ran the engine previously (before it was turbo'ed) it didn't seem to work correctly and adjust the fuel pressure up or down. So I recently bought an Epman AFPR as a replacement, a slightly more expensive cheap ebay chinese product, with a brand name. This came with both 3AN or push-on type fuel line fittings, I elected to go with the push-on types for my set up.

The OBX Racing FMU was fitted with the 3AN fuel line connectors, but I swapped these for the push-on type fitting that I stole from the old APFR that I am replacing, the housing has 1/8 NPT threads.


I fitted the new parts, the AFPR is to the left next to the fuel rail. I will need a longer vac/boost hose to connect the FMU to the intake manifold, then I will mount the FMU properly on the side of the strut tower, since this is close to the fuel return line location.

The above pic' shows the MAF sensor still in place in the intake. I still intend to use this down the line with the Pilot Engineering VAF to MAF converter piggy-back PCB that I have, but to run the engine with the FMU for starters I'm going to refit the VAF. I will need to a 2.25" to 2.5" silicone coupler to mount this.

The VAF has a lip around the front edge that I will have to chop off with the dremel to allow the coupler to fit.

I already had a cheap ebay chinese AFPR, but when I ran the engine previously (before it was turbo'ed) it didn't seem to work correctly and adjust the fuel pressure up or down. So I recently bought an Epman AFPR as a replacement, a slightly more expensive cheap ebay chinese product, with a brand name. This came with both 3AN or push-on type fuel line fittings, I elected to go with the push-on types for my set up.
The OBX Racing FMU was fitted with the 3AN fuel line connectors, but I swapped these for the push-on type fitting that I stole from the old APFR that I am replacing, the housing has 1/8 NPT threads.
I fitted the new parts, the AFPR is to the left next to the fuel rail. I will need a longer vac/boost hose to connect the FMU to the intake manifold, then I will mount the FMU properly on the side of the strut tower, since this is close to the fuel return line location.
The above pic' shows the MAF sensor still in place in the intake. I still intend to use this down the line with the Pilot Engineering VAF to MAF converter piggy-back PCB that I have, but to run the engine with the FMU for starters I'm going to refit the VAF. I will need to a 2.25" to 2.5" silicone coupler to mount this.
The VAF has a lip around the front edge that I will have to chop off with the dremel to allow the coupler to fit.
Edited by MX6 on Monday 22 July 13:19
On the cooling system front, I hadn't fitted the radiator properly yet as I noticed that it has a couple of threaded holes in it. I thought I ordered the correct OEM spec rad for the car so I'm not quite sure what the holes are for, could be for an auto transmission MX6. Anyhow, I measured the inside diameter and bought a couple of M14 x 1.5 bolts to bung the holes, I had to chop them down from 30mm long to about 10mm.


I'm not into those springy clips that secure the coolant hoses, so bought some more jubilee clips to replace them with (75p each from Wilko). I had to cut down the coolant hose that fits to the bottom right side of the radiator so that it would clear the exhaust and charge pipes in that area, so now the radiator is ready to properly install again. I think/hope the only thing left to do is wire the aftermarket fans...

Another job I'd been meaning to see off was securing the oil sump pan better. I had a few of the bolt heads shear off, so I bought some 3.3mm drills, M4 bolts, and an M4 thread tap to put some new fixings in, I don't want any oil leaks under there.


I've not found any of these recent jobs particularly interesting to do, but all necessary stuff to get things buttoned up ready for that first start attempt. I feel like I'm getting close to filling the motor with oil and coolant. I still need to fit this fuel pump in the tank so that there is enough fuel pressure for boost, but I'm thinking that I'm going to get the engine started and idling first just to make sure it will actually run. Plus I need to turn the car around so that it faces forwards, so I can actually access the fuel tank in the inspection pit...

I'm not into those springy clips that secure the coolant hoses, so bought some more jubilee clips to replace them with (75p each from Wilko). I had to cut down the coolant hose that fits to the bottom right side of the radiator so that it would clear the exhaust and charge pipes in that area, so now the radiator is ready to properly install again. I think/hope the only thing left to do is wire the aftermarket fans...
Another job I'd been meaning to see off was securing the oil sump pan better. I had a few of the bolt heads shear off, so I bought some 3.3mm drills, M4 bolts, and an M4 thread tap to put some new fixings in, I don't want any oil leaks under there.
I've not found any of these recent jobs particularly interesting to do, but all necessary stuff to get things buttoned up ready for that first start attempt. I feel like I'm getting close to filling the motor with oil and coolant. I still need to fit this fuel pump in the tank so that there is enough fuel pressure for boost, but I'm thinking that I'm going to get the engine started and idling first just to make sure it will actually run. Plus I need to turn the car around so that it faces forwards, so I can actually access the fuel tank in the inspection pit...
Edited by MX6 on Monday 22 July 17:16
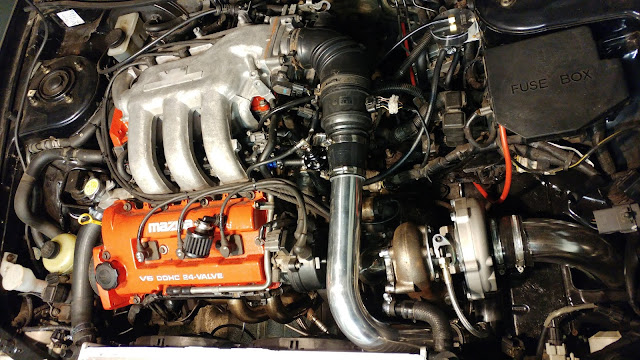
I've been continuing to button things up. The rad is installed, the hoses are all in place. I had an overflow reservoir whatsit that was in an annoying position so I removed it - I measured the internal diameter of the hoses and bought an ebay reducer coupler to replace it and join the hoses.

It's position is too close to the turbo, so like other bits and piece I will revisit this to find a better solution, I just want to get things running at the moment. I'm not too keen on the charge pipe coming up over the exhaust side of the turbo, there could be a bit of heat soak there, but I went for the shortest pipe length and routing so this is where it is. I'm planning to put a turbo blanket on when the car is on the road so that should help matters.

I refitted the VAF in place of the MAF, this is so the engine will run boosted on the standard ECU with the FMU. There was a protruding lip on the end of the VAF opening, I trimmed this off with the dremel so I could fit a regular silicone coupler.

Since I am running 2.25" charge pipes I bought a reducer coupler to fit this to the 2.5" diameter VAF, it's all fitted up and wired again. This below pic also shows the recently fitted FMU and adjustable fuel pressure regulator, I needed to buy some longer 4mm vac/boost hose to get these hooked in.
I'd finished putting additional bolts into the sump pan so that should seal okay. Basically everything that is required for the engine to run is now fitted. This is essentially a turbocharged MX6 now. I've dropped some super-duper premium special racing performance turbo engine oil in, so oil's well. I should be good to go ahead and turn the key now(!)

I do still need to wire up the gauges and fit the higher flow fuel pump in the tank, but I don't need these to start and run the motor on idle and light throttle. I obviously want to check for oil, water, fuel and boost leaks, fingers crossed...

It's position is too close to the turbo, so like other bits and piece I will revisit this to find a better solution, I just want to get things running at the moment. I'm not too keen on the charge pipe coming up over the exhaust side of the turbo, there could be a bit of heat soak there, but I went for the shortest pipe length and routing so this is where it is. I'm planning to put a turbo blanket on when the car is on the road so that should help matters.
I refitted the VAF in place of the MAF, this is so the engine will run boosted on the standard ECU with the FMU. There was a protruding lip on the end of the VAF opening, I trimmed this off with the dremel so I could fit a regular silicone coupler.
Since I am running 2.25" charge pipes I bought a reducer coupler to fit this to the 2.5" diameter VAF, it's all fitted up and wired again. This below pic also shows the recently fitted FMU and adjustable fuel pressure regulator, I needed to buy some longer 4mm vac/boost hose to get these hooked in.
I'd finished putting additional bolts into the sump pan so that should seal okay. Basically everything that is required for the engine to run is now fitted. This is essentially a turbocharged MX6 now. I've dropped some super-duper premium special racing performance turbo engine oil in, so oil's well. I should be good to go ahead and turn the key now(!)
I do still need to wire up the gauges and fit the higher flow fuel pump in the tank, but I don't need these to start and run the motor on idle and light throttle. I obviously want to check for oil, water, fuel and boost leaks, fingers crossed...
Edited by MX6 on Friday 9th August 12:27
Gassing Station | Readers' Cars | Top of Page | What's New | My Stuff