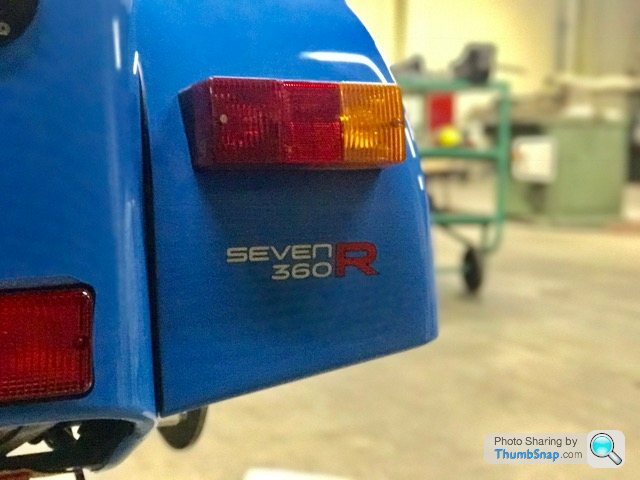
Caterham Seven 360R
Discussion


Little bit more progress last night.
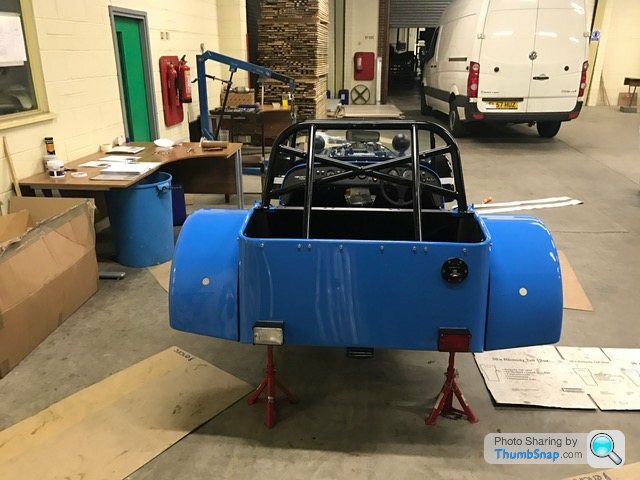
It was time to get the rear suspension/axle assembly started.
Luckily I have found a very useful blog of a fellow builder which has some nice pictures in and good descriptions. This really helps fill in the blanks where the instructions can leave you guessing: 'Use bolt (18) from fastener pack 30ZA011C'------- "Oh, you mean bolt (3) from fastener pack 30ZA011B"...
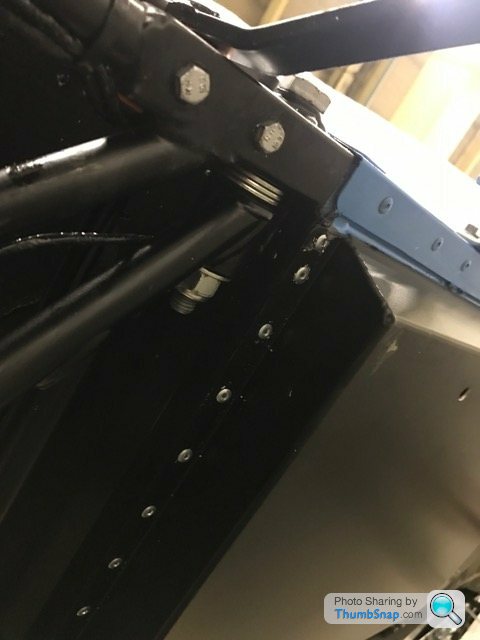
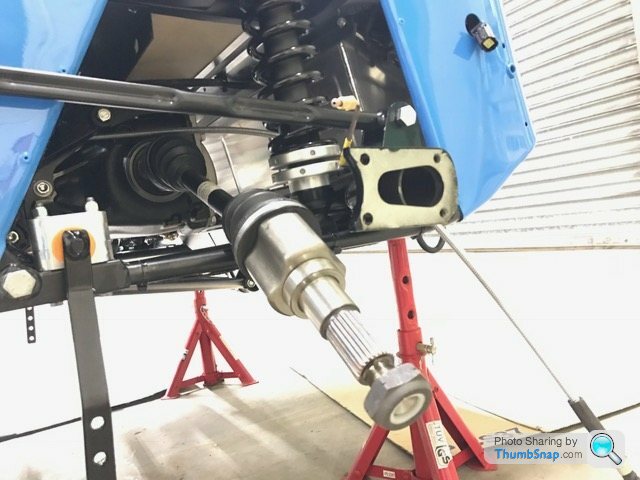
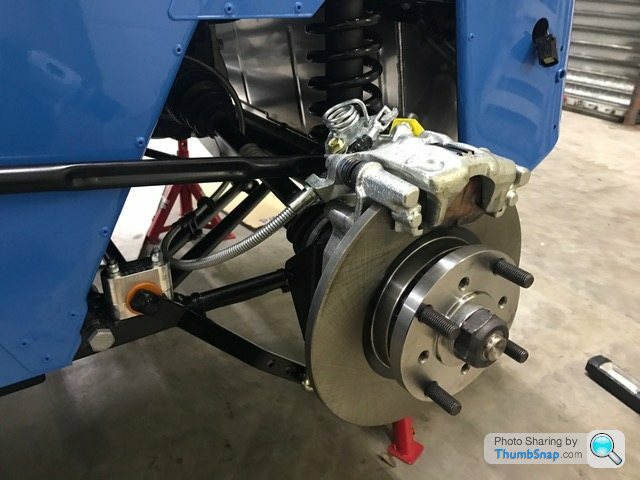
First job was to feed the de-dion tube through the chassis. Not too tricky will a little bit of twisting and limbo-ing here and there. Just had to be careful not to pinch the brake lines.
Once that was in place, the brake hose bolts to the chassis and connects up to the hard line that runs down the transmission tunnel.
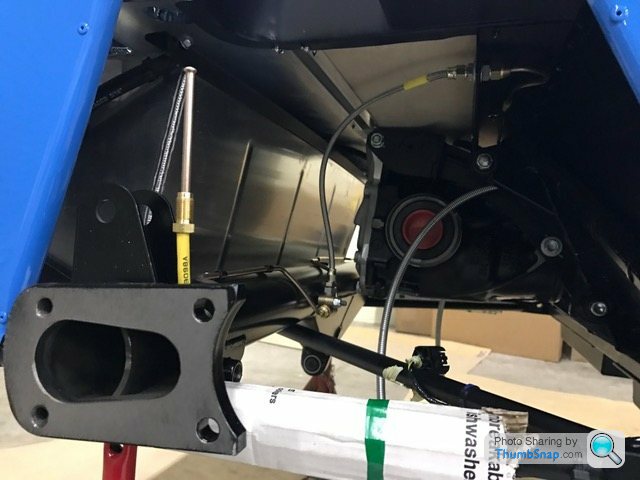
Now the radius arms need to go on. All pretty straight forward again cross referencing the blog and instructions. The smaller ends of the arms attach to a bolt you poke through the bodywork from inside the chassis. There are a choice of two holes. I'm told the lower one is more in favour of handling, whilst the upper is more for comfort... We shall see.
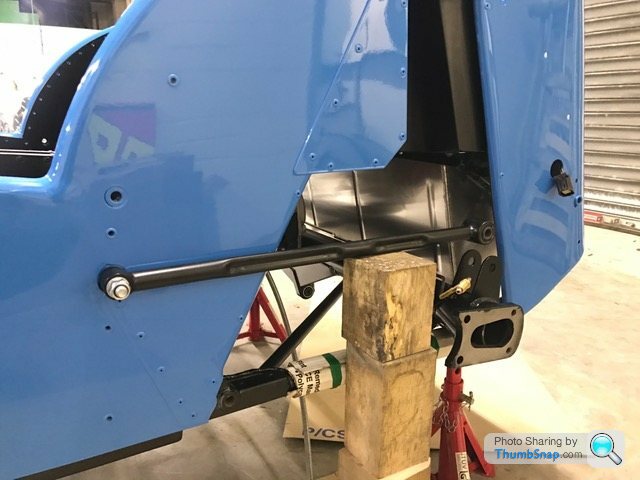
Wooden blocks in place as the arms need torqueing up parallel to the ground.
The larger ends then slot into the brackets on the de-dion tube to be bolted in place. When I say slot, it's more like shove - very hard. Nothing the persuader couldn't handle though...

Onto the rear anti-roll-bar.
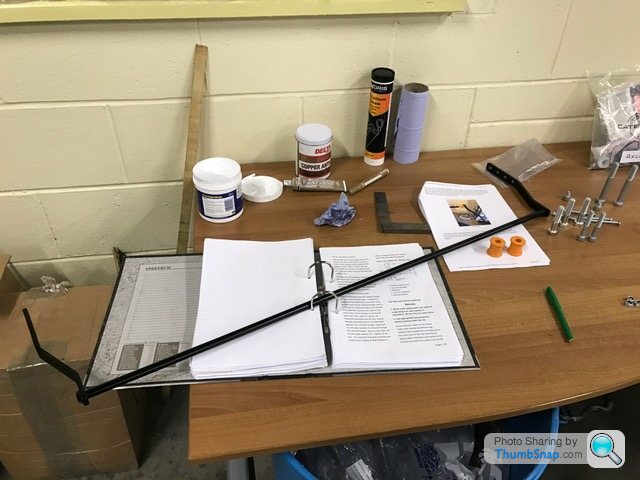
First job is to slide the rubber bushes into place. This requires Forcing them round a right angle. With the rubber being so tight, it's very hard work unless you know a little trick. Blog to the rescue again, a well aimed flat headed screw driver helps to prise them round the right angle.
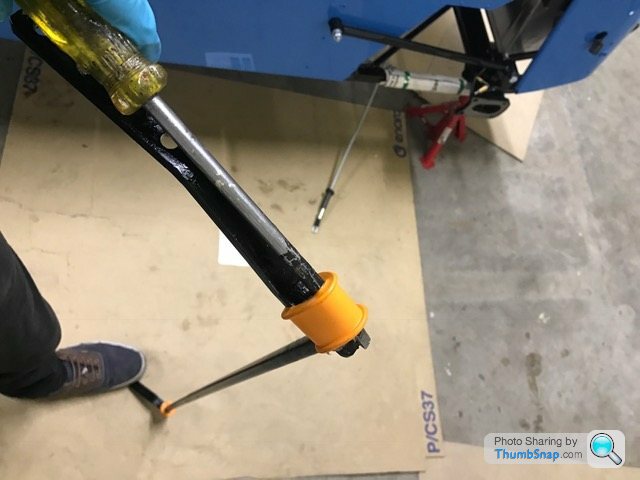
Now to clamp the ARB to the chassis. This process uses two sets of paired clamps - just like the steering rack, only smaller. I'm once bitten twice shy on this one so was very careful not to mix them up.
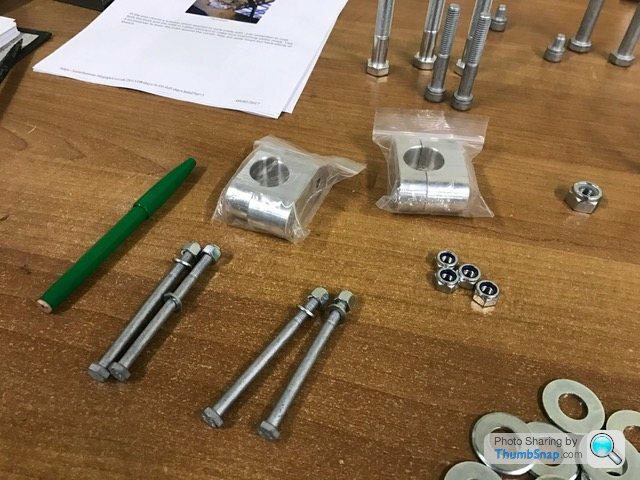

A-Frame time. More 'centralise' as the instructions put it. More lying on my back fiddling with shim washers, as I put it.
The tip of the 'A' bolts simply to the buttress on the de-dion tube.
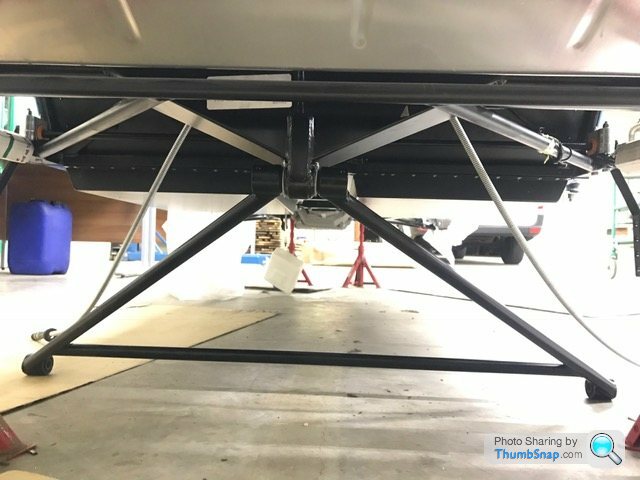
Then the forward ends need attaching to the chassis with a combination of shim washers slotted in with the aim of centralising the de-dion tube.
Got there in the end within the 2mm +/- tolerance specified within the manual. Although I wouldn't object to it being looked over in the post build inspection..
That was it for the night.
Next on the list is to fit the roll hoop, followed by the rear spring/damper units. This can't be done in reverse order due to the relevant bolts for each item getting in the way of each other.
Lots of green ticks!

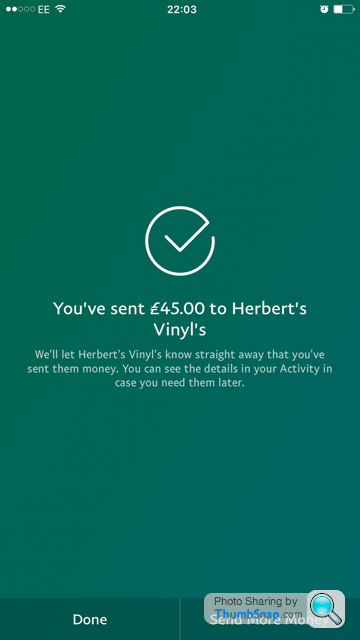
When I got home, I paid Herbert's Vinyl's (thanks for the heads up Smitters!) for my stripes at a fraction of the cost the factory charge. Just hope I can stick them on straight.
For the eagle eyed amongst you, you may notice a lack of copper slip being used on bolts... I'm using silicone grease instead. It's supposed to ward off rusted bolts better so I'm told by someone who has been assembling and dismantling cars for years. Silicone on everything unless it's likely to get hot, then the copper comes out. Time will tell...
More next time!
It was time to get the rear suspension/axle assembly started.
Luckily I have found a very useful blog of a fellow builder which has some nice pictures in and good descriptions. This really helps fill in the blanks where the instructions can leave you guessing: 'Use bolt (18) from fastener pack 30ZA011C'------- "Oh, you mean bolt (3) from fastener pack 30ZA011B"...
First job was to feed the de-dion tube through the chassis. Not too tricky will a little bit of twisting and limbo-ing here and there. Just had to be careful not to pinch the brake lines.
Once that was in place, the brake hose bolts to the chassis and connects up to the hard line that runs down the transmission tunnel.
Now the radius arms need to go on. All pretty straight forward again cross referencing the blog and instructions. The smaller ends of the arms attach to a bolt you poke through the bodywork from inside the chassis. There are a choice of two holes. I'm told the lower one is more in favour of handling, whilst the upper is more for comfort... We shall see.
Wooden blocks in place as the arms need torqueing up parallel to the ground.
The larger ends then slot into the brackets on the de-dion tube to be bolted in place. When I say slot, it's more like shove - very hard. Nothing the persuader couldn't handle though...
Onto the rear anti-roll-bar.
First job is to slide the rubber bushes into place. This requires Forcing them round a right angle. With the rubber being so tight, it's very hard work unless you know a little trick. Blog to the rescue again, a well aimed flat headed screw driver helps to prise them round the right angle.
Now to clamp the ARB to the chassis. This process uses two sets of paired clamps - just like the steering rack, only smaller. I'm once bitten twice shy on this one so was very careful not to mix them up.
A-Frame time. More 'centralise' as the instructions put it. More lying on my back fiddling with shim washers, as I put it.
The tip of the 'A' bolts simply to the buttress on the de-dion tube.
Then the forward ends need attaching to the chassis with a combination of shim washers slotted in with the aim of centralising the de-dion tube.
Got there in the end within the 2mm +/- tolerance specified within the manual. Although I wouldn't object to it being looked over in the post build inspection..
That was it for the night.
Next on the list is to fit the roll hoop, followed by the rear spring/damper units. This can't be done in reverse order due to the relevant bolts for each item getting in the way of each other.
Lots of green ticks!
When I got home, I paid Herbert's Vinyl's (thanks for the heads up Smitters!) for my stripes at a fraction of the cost the factory charge. Just hope I can stick them on straight.
For the eagle eyed amongst you, you may notice a lack of copper slip being used on bolts... I'm using silicone grease instead. It's supposed to ward off rusted bolts better so I'm told by someone who has been assembling and dismantling cars for years. Silicone on everything unless it's likely to get hot, then the copper comes out. Time will tell...
More next time!
Edited by ECG1000 on Friday 10th February 12:48
scz4 said:
Glad you're back in town, that was a long 2 weeks without an update 
Do you mind sharing the useful blogs you're referencing as you go?
Cheers mate! Yeah, I was itching to get back. Ski holidays take it out of you a bit though...Do you mind sharing the useful blogs you're referencing as you go?
I've bookmarked these (plenty more available if you Google):
http://caterham360rbuildblog.blogspot.co.uk/2016/0...
https://caterhamssr.blogspot.co.uk/2013/08/days-9-...
http://www.caterham-build.co.uk/index.php?cat=&...
There is the Lotus 7 club which I'm in no doubt has a huge wealth of knowledge. It requires a subscription fee to join giving you access to everything.
For some reason I've been trying to resist joining until I've built the car. No doubt I'll be kicking myself when I do - might have made the build a lot easier and given Derek at Caterham a break from all my questions!
scz4 said:
Brilliant! I'll add that to my list. Thank you!bobski1 said:
Where about are you based? I wouldn't mind lending a hand on a weekend or 20?
I'm just outside of Huddersfield if that helps? Hopefully it won't be taking me 20 more weekends though!Update time!
First job after last time's effort was to finish off the rear end.
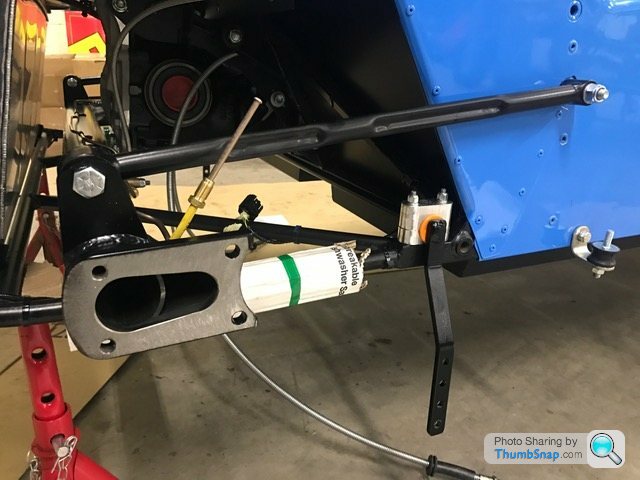
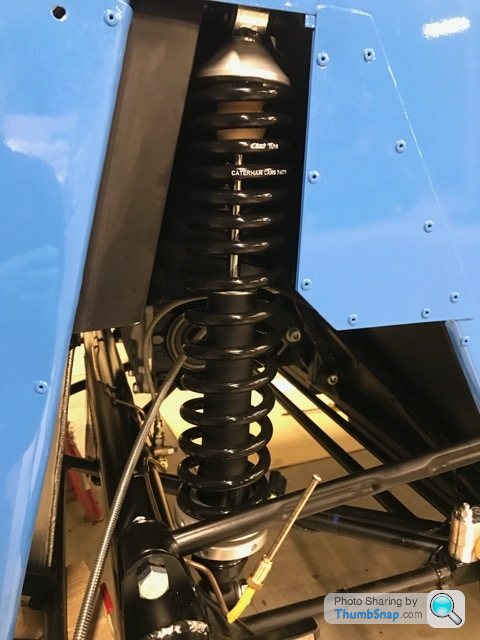
This started with fitting the rear spring/damper units. Fairly straight forward job. Sleeves have to be slotted into the top mounts which are then lined up into the brackets in the chassis. Cap head bolts get inserted through the rear bulkhead then through the top-mount.
The lower mount then bolts to the de-dion tube. All went pretty smoothly.
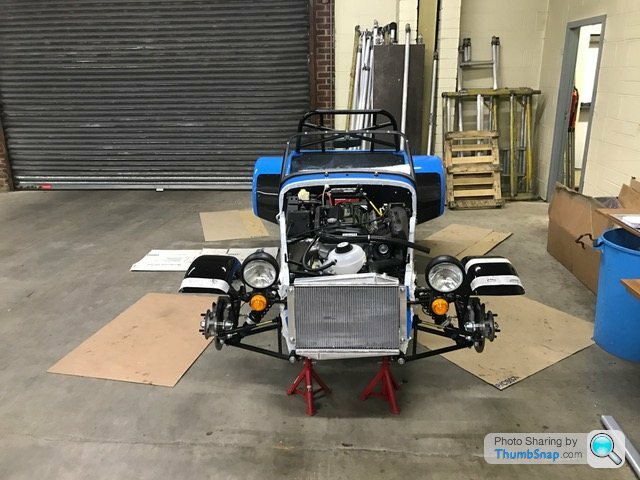
Now it was the driveshafts.
Slotted into pace:
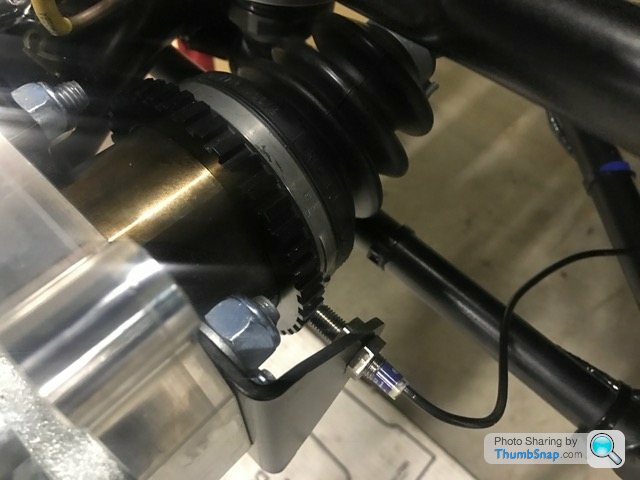
Then the de-dion ears get placed over the driveshafts and bolted to the tube ends with the aid of a drop or two of Loctite:

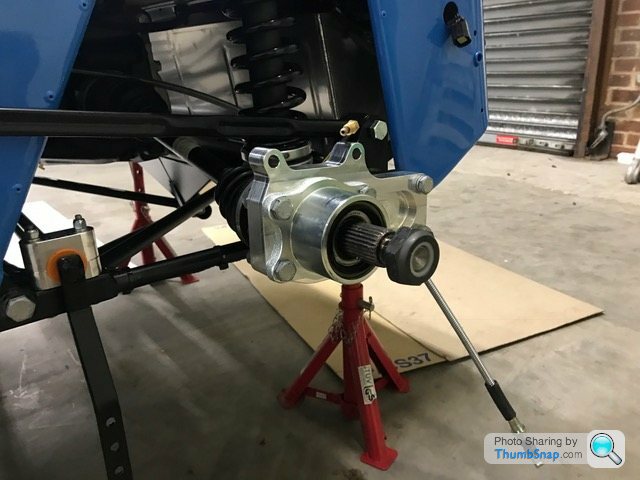
The rear hubs go on next.
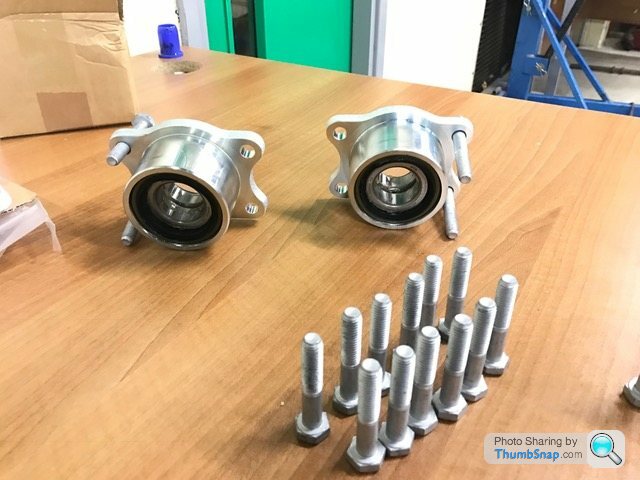
These slip over the driveshafts and bolt into the de-dion ears. When flush with the ears, the driveshafts are held firmly in place.
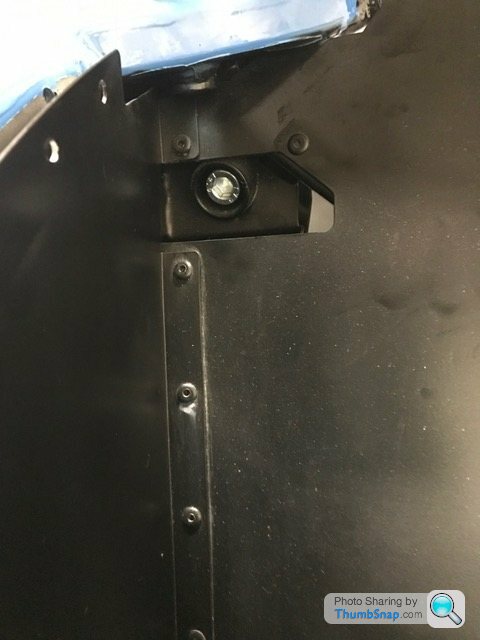
Now the ARB end brackets attach to the inboard side of the ears. These are in place to take the ARB drop links and also the speed sensor:
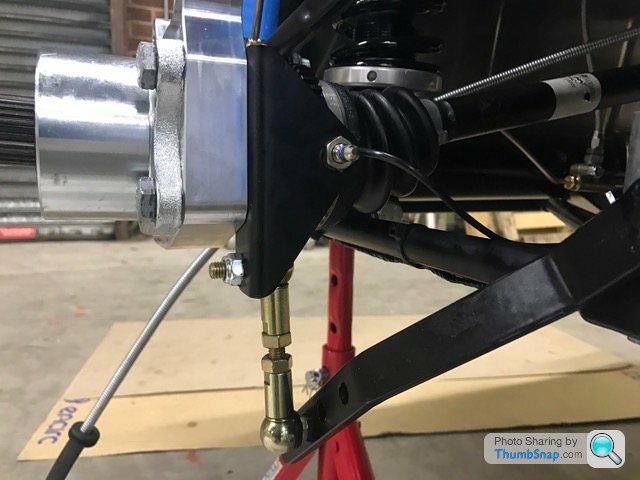
The instructions tell you to fix a hexagonal spacer onto the bracket which allows you to then fit the drop link in the state it comes out of the box. Reading one of the blogs, it looks like the spacer idea has been binned. Instead you just rotate one end of the drop link 180 degrees.
The speed sensor needs to be 1mm away from the driveshaft. I found a washer that was exactly 1mm thick and used that as a guide. Time will tell how far wrong I am with that measurement!
Next the disks go on. These just slip over the driveshafts and sit against the hubs.
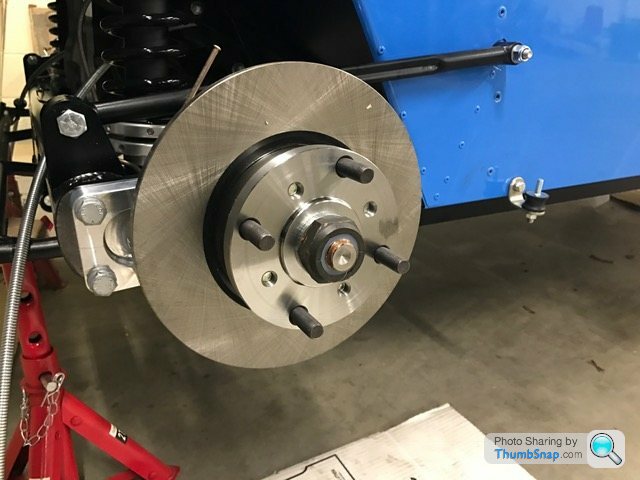
Once the discs are on, a thrust (think that's what they're called) washer and 41mm nyloc nut fasten everything together. This nut needs tightening to 250nm once the brakes are fully functional. I've done it up as tight as I can for now.
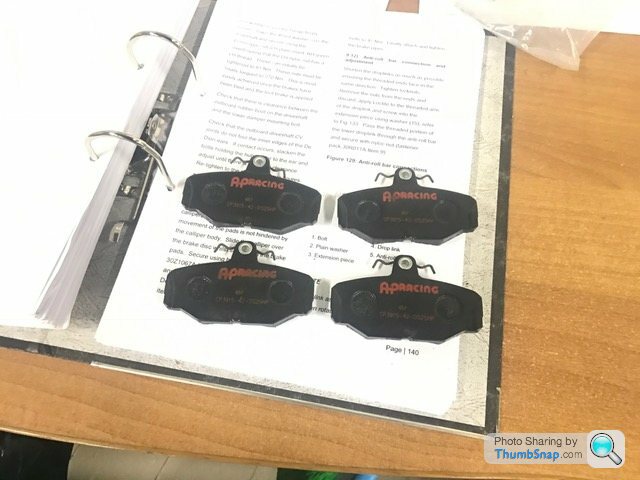
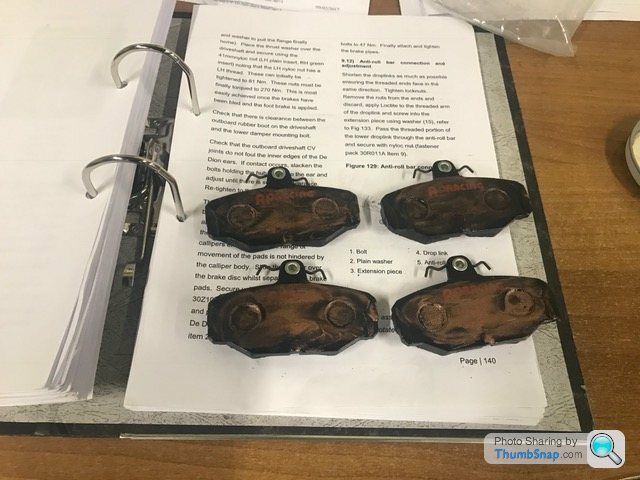
Onto the pads, calipers and handbrake cables. All pretty straight forward again - just common sense fitting everything together.
I had to slacken the handbrake adjuster to fit the cables to the calipers. No idea how I'm going to adjust it when the car is on the road. The wheel you rotate (to tighten/loosen) is wedged between the diff and chassis make it extremely hard to turn.
Now the car is mechanically pretty much done! Bar a couple of minor jobs I need to do.
Almost forgot, I bolted the roll bar on before the dampers.

I supposed I should really think about putting some fluids in a starting it up soon...
Once help had arrived, we had a go at fitting the front cycle wings. I've read some people just bond theirs on so they don't have bolts sticking through the wing. Whilst this may look nicer, I think it will be more practical using the bolts so removal (when needed) of the wing is easy.
Anyway, this is a massive ball-ache of a job! The wings are supposed to be marked for you so it's plain to see where to drill the holes. Mine weren't... This required a lot of measuring and gentle tweaks of the wing positions. Luckily my helper is very good at measuring and likes to do things thoroughly. If I'd attempted this alone, I would have just lined everything up by eye and hoped it was straight.
Drilling the wing-stays:
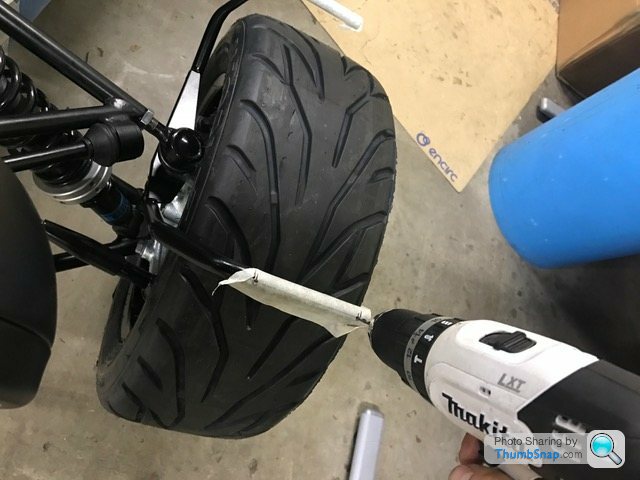
After a couple of hours measuring, marking, more measuring and more marking, we had four holes in each wing-stay and one in each wing.
The wings were pinned to their respective wing-stays with the hope I could get underneath with the drill, poke the drill-bit through the holes in the stay and drill three new holes in each wing.
Unfortunately the front discs and calipers get in the way and I don't have the correct sockets to remove them! We called it a day here and will return with a right angle drill to finish the job. Then it will be fixing the side repeaters and wiring them in.
More next time...
First job after last time's effort was to finish off the rear end.
This started with fitting the rear spring/damper units. Fairly straight forward job. Sleeves have to be slotted into the top mounts which are then lined up into the brackets in the chassis. Cap head bolts get inserted through the rear bulkhead then through the top-mount.
The lower mount then bolts to the de-dion tube. All went pretty smoothly.
Now it was the driveshafts.
Slotted into pace:
Then the de-dion ears get placed over the driveshafts and bolted to the tube ends with the aid of a drop or two of Loctite:
The rear hubs go on next.
These slip over the driveshafts and bolt into the de-dion ears. When flush with the ears, the driveshafts are held firmly in place.
Now the ARB end brackets attach to the inboard side of the ears. These are in place to take the ARB drop links and also the speed sensor:
The instructions tell you to fix a hexagonal spacer onto the bracket which allows you to then fit the drop link in the state it comes out of the box. Reading one of the blogs, it looks like the spacer idea has been binned. Instead you just rotate one end of the drop link 180 degrees.
The speed sensor needs to be 1mm away from the driveshaft. I found a washer that was exactly 1mm thick and used that as a guide. Time will tell how far wrong I am with that measurement!
Next the disks go on. These just slip over the driveshafts and sit against the hubs.
Once the discs are on, a thrust (think that's what they're called) washer and 41mm nyloc nut fasten everything together. This nut needs tightening to 250nm once the brakes are fully functional. I've done it up as tight as I can for now.
Onto the pads, calipers and handbrake cables. All pretty straight forward again - just common sense fitting everything together.
I had to slacken the handbrake adjuster to fit the cables to the calipers. No idea how I'm going to adjust it when the car is on the road. The wheel you rotate (to tighten/loosen) is wedged between the diff and chassis make it extremely hard to turn.
Now the car is mechanically pretty much done! Bar a couple of minor jobs I need to do.
Almost forgot, I bolted the roll bar on before the dampers.
I supposed I should really think about putting some fluids in a starting it up soon...
Once help had arrived, we had a go at fitting the front cycle wings. I've read some people just bond theirs on so they don't have bolts sticking through the wing. Whilst this may look nicer, I think it will be more practical using the bolts so removal (when needed) of the wing is easy.
Anyway, this is a massive ball-ache of a job! The wings are supposed to be marked for you so it's plain to see where to drill the holes. Mine weren't... This required a lot of measuring and gentle tweaks of the wing positions. Luckily my helper is very good at measuring and likes to do things thoroughly. If I'd attempted this alone, I would have just lined everything up by eye and hoped it was straight.
Drilling the wing-stays:
After a couple of hours measuring, marking, more measuring and more marking, we had four holes in each wing-stay and one in each wing.
The wings were pinned to their respective wing-stays with the hope I could get underneath with the drill, poke the drill-bit through the holes in the stay and drill three new holes in each wing.
Unfortunately the front discs and calipers get in the way and I don't have the correct sockets to remove them! We called it a day here and will return with a right angle drill to finish the job. Then it will be fixing the side repeaters and wiring them in.
More next time...
Nearly a week since the last update.
With the car being pretty much mechanically done, it's mainly been fiddly cosmetic jobs to do.
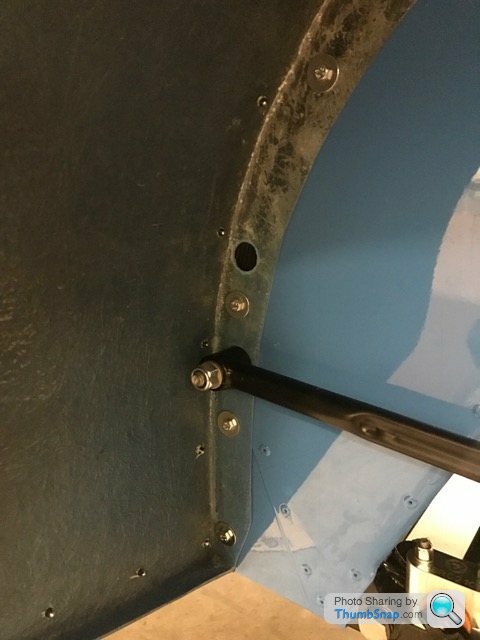
Previously fed up with the front cycle wings I thought I may as well crack on with the rear wings instead.
Pretty simple, just time consuming messing about with rubber 'P' trim.
I started off by sticking the trim to the back of the carbon stone protectors:

Then it was a case of offering the protectors up to the wings, drilling holes into the wings, and riveting everything into place:

Now the wings had to be attached to the car itself. Everything was pre-drilled here - the wings just needed bolting into place with more 'P' trim between them and the car body. The trim requires V slots cutting into it when it has a corner to go round:

There are slightly larger pre-drilled holes in the wings. These are for the rear radius arms to go through. Most people cut into the holes making a slot that sits onto the arms. Instead, I unbolted the arms, fitted the wings, and then torqued them back up again. Looks neater to me this way. Queue lots of cracking sounds as I tightened!
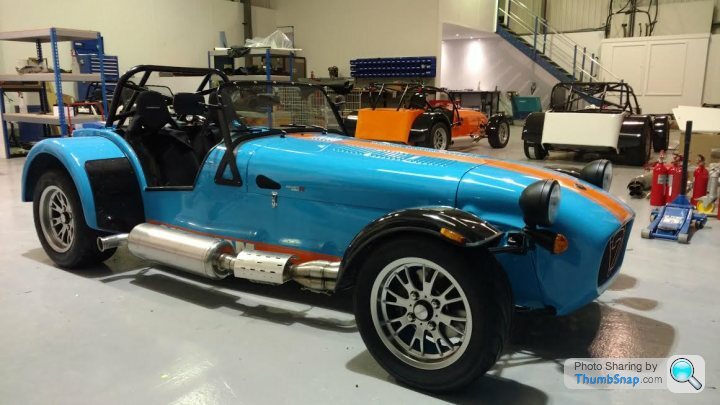
Starting to look more like a Caterham now:

As a reward I decided to stick the side stripes on:


I might have to re-do these if it bothers me when the car is on the road. I stuck them on parallel to the ground rather than following the lines of the car. Didn't realise this until I stood back...
Now to revisit the front cycle wings.
Using a right angle drill, I drilled up through the wingstays and through the wings. Now they were ready to go on. But not before the side repeaters were fitted. Once I had got the first repeater into a wing. I took it apart again and made a rubbing to tranfer over onto the other wing ensuring they'd be near enough a mirror image of each other:


Now the dreaded job of threading the repeater wire through the wingstay. I put some welding wire up through the stay, attached it to the repeater wire and pulled it through. This went well until the wire needed to exit the stay. The spade connector on the end of the wire is a bit long to get out of the hole. Eventually I managed to hook a bit more welding wire round the connector pulling it out enough to grab it with some pliers:
Then I heat-shrinked the wire protruding from the wingstay and slipped a couple of bits of washer hose over to stop it chafing on the chassis on its way into the engine bay:


Job done - repeat on the other side.
With the front end wiring all sorted, it was time to move to the back.
The rear light clusters needed screwing into the rear wings. Pretty simple job with minimal fuss.
I stripped the lights down to their bases and lined them to the wings. To ensure they were level, I put a spirit level across the boot of a car, noted the bubble was slightly off to the right and replicated this on the bases:
Four self tappers (more horrible cracking noises) into each base ended up with this:
As another reward, I decided to do some more sticking:

On went the number plate light:

For some reason, I still hadn't fitted the air intake yet. No time like the present and all that...

No instructions for this but it's pretty self explanatory. Really helps that the correct fixings come in the same box.
Another job I wasn't looking forward to was fitting the knee trims and sill protectors. I read somewhere that is was a massive faff getting everything lined up, especailly the knee trims.
Wasn't too bad in the end. I just used some thicker welding wire to poke through the cockpit skin, and into the knee trims and finally into the chassis. This held everything in place whilst I slid the 'P' trim in between the trims and cockpit skin then riveted everything into place.
The sill protectors were more straightforward. Luckily I had a spare pair of hands to hold them in place whilst I drilled and riveted.

Next up was to rivet (there's a theme here) three popper bases into the footwell, fix three popper heads into the rubber matts, then (you guessed it) pop the matts into place.
That's it for now.
The car is being collected by Caterham on Tuesday (28th) so It's all systems go at the moment!
More next time...
With the car being pretty much mechanically done, it's mainly been fiddly cosmetic jobs to do.
Previously fed up with the front cycle wings I thought I may as well crack on with the rear wings instead.
Pretty simple, just time consuming messing about with rubber 'P' trim.
I started off by sticking the trim to the back of the carbon stone protectors:
Then it was a case of offering the protectors up to the wings, drilling holes into the wings, and riveting everything into place:
Now the wings had to be attached to the car itself. Everything was pre-drilled here - the wings just needed bolting into place with more 'P' trim between them and the car body. The trim requires V slots cutting into it when it has a corner to go round:
There are slightly larger pre-drilled holes in the wings. These are for the rear radius arms to go through. Most people cut into the holes making a slot that sits onto the arms. Instead, I unbolted the arms, fitted the wings, and then torqued them back up again. Looks neater to me this way. Queue lots of cracking sounds as I tightened!
Starting to look more like a Caterham now:
As a reward I decided to stick the side stripes on:
I might have to re-do these if it bothers me when the car is on the road. I stuck them on parallel to the ground rather than following the lines of the car. Didn't realise this until I stood back...
Now to revisit the front cycle wings.
Using a right angle drill, I drilled up through the wingstays and through the wings. Now they were ready to go on. But not before the side repeaters were fitted. Once I had got the first repeater into a wing. I took it apart again and made a rubbing to tranfer over onto the other wing ensuring they'd be near enough a mirror image of each other:
Now the dreaded job of threading the repeater wire through the wingstay. I put some welding wire up through the stay, attached it to the repeater wire and pulled it through. This went well until the wire needed to exit the stay. The spade connector on the end of the wire is a bit long to get out of the hole. Eventually I managed to hook a bit more welding wire round the connector pulling it out enough to grab it with some pliers:
Then I heat-shrinked the wire protruding from the wingstay and slipped a couple of bits of washer hose over to stop it chafing on the chassis on its way into the engine bay:
Job done - repeat on the other side.
With the front end wiring all sorted, it was time to move to the back.
The rear light clusters needed screwing into the rear wings. Pretty simple job with minimal fuss.
I stripped the lights down to their bases and lined them to the wings. To ensure they were level, I put a spirit level across the boot of a car, noted the bubble was slightly off to the right and replicated this on the bases:
Four self tappers (more horrible cracking noises) into each base ended up with this:
As another reward, I decided to do some more sticking:
On went the number plate light:
For some reason, I still hadn't fitted the air intake yet. No time like the present and all that...
No instructions for this but it's pretty self explanatory. Really helps that the correct fixings come in the same box.
Another job I wasn't looking forward to was fitting the knee trims and sill protectors. I read somewhere that is was a massive faff getting everything lined up, especailly the knee trims.
Wasn't too bad in the end. I just used some thicker welding wire to poke through the cockpit skin, and into the knee trims and finally into the chassis. This held everything in place whilst I slid the 'P' trim in between the trims and cockpit skin then riveted everything into place.
The sill protectors were more straightforward. Luckily I had a spare pair of hands to hold them in place whilst I drilled and riveted.
Next up was to rivet (there's a theme here) three popper bases into the footwell, fix three popper heads into the rubber matts, then (you guessed it) pop the matts into place.
That's it for now.
The car is being collected by Caterham on Tuesday (28th) so It's all systems go at the moment!
More next time...
Edited by ECG1000 on Wednesday 22 February 16:28
scz4 said:
Great progress!
Are going to get the engine fired up before Caterham take it away? Is that to get it through the IVA? (If it's still called that)
Random question, I assume Caterham fit the rear fog and reverse lights? Just wondering if there is scope to move them in a little, the gap can look odd when running a shorter private plate.
Thank you Are going to get the engine fired up before Caterham take it away? Is that to get it through the IVA? (If it's still called that)
Random question, I assume Caterham fit the rear fog and reverse lights? Just wondering if there is scope to move them in a little, the gap can look odd when running a shorter private plate.

There might be a tiny bit of scope to move the lights in a touch. I'd imagine it'll be only a few mm though. Then you'd have to re-drill into the body which could end up being messy due to the proximity of the proposed new holes to the old. Don't forget there's a big hole for all the wires to go through.
After putting all the necessary fluids in last night, I had a go at starting the car. No dice sadly...
I checked and double checked all the connections and everything seemed fine but still nothing. In the end, we cheated and put a wire directly from the battery + terminal to the starter solenoid. Thankfully the engine turned over and registered oil pressure. A small victory but I went to bed fairly disappointed.
After a quick chat with Derek this morning, it turns out the immobiliser wasn't disarming (indicated by a flashing red light on dash) - the wires for this coil are around the ignition barrel.
Anyway, I put down the phone and went for another try: Key in the ignition, turn to position 2, push the immobiliser fob up against the wire, red light out, press starter button and grin widely as the engine turns over!
Next job is to get it running....
Edited by ECG1000 on Thursday 23 February 12:09
marcusgrant said:
fantastic, look great.
How many hours do you think you'll have put in once complete?
Thank you. How many hours do you think you'll have put in once complete?
I honestly have no idea... Started on the 6th of January and hope to be finished on the 28th of February. I've had a couple of 10 hour stints on it, otherwise it's been 4 to 5 hour slogs on an evening after work. There's been a week's skiing thrown in there and most weekends spent away.
At a wild guess, I'd say the 80 hour prediction from Caterham could be correct...
Who knows though, time seems to go very quickly whenever I pick up a spanner!
Well, the car is finished. Sort of.... We'll get to that in a bit.
After the last update, all that was left to do was put all the necessary fluids in and press the starter button.
Only got one photo during this process:

Anyway, as I'd mentioned before I had a little hiccup getting the engine to turn over. Turned out to be an immobiliser issue that was easily sorted.
With oil pressure registering, it was time to re-connect the inertia switch (so the fuel pump will work) and fire her up for the first time.
Key to position II, hear fuel pump prime, press starter button, engine turns over....turns over....nothing. I'd sort of expected this thinking that maybe the engine needed time to suck fuel through the pipes.
So I repeated the above process and still nothing... And again....nothing.
Hmmm, I'd read somewhere a lot of fuel is needed in the tank on the initial start up. There was about 10 litres in to start off with, so I filled it up to about 30.
Still couldn't get the bloody thing to start!
I put the battery on charge (since it had taken a bit of hammer relentlessly turning the starter motor over) and pottered around the car doing IVA stuff like sticking rubber trim to the front cycles wings.
It was getting quite late now but I thought I'd give it one more try. This time it did start but only ran on one cylinder....sounding like a tarmac roller.
I checked and re-checked all the connections in the engine bay and nothing was amiss. At that point, I called it a day hoping that I could ring Caterham in the morning and they'd have a miraculous answer for me which would spark the car into life.
As I found out the next day, this was not the case. They think it's an ECU issue. Something that will be sorted during the post build check.
Pretty disappointed as the 'first start' is THE landmark moment when building your own car but there's not much else I can do.
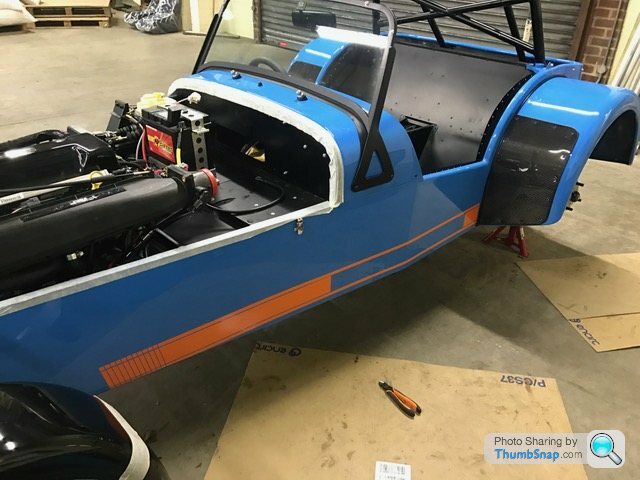
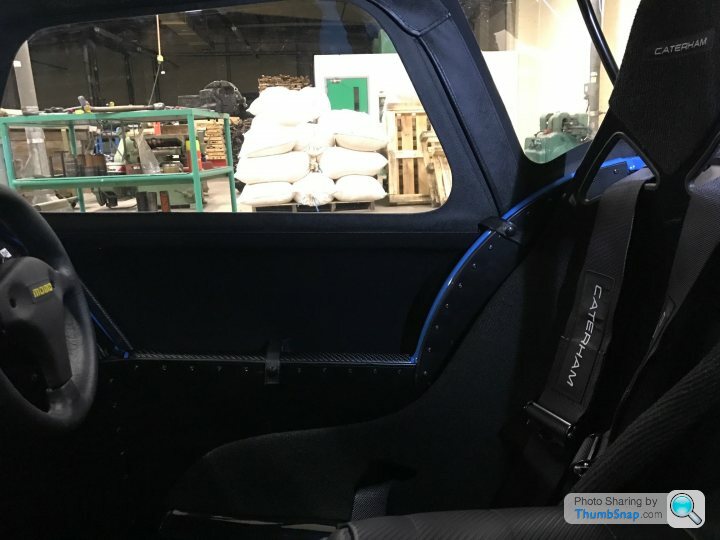
After this drama, all that was left to do was fit the transmission tunnel cover, gearknob, harnesses and seats:
In went the lap belts and tunnel cover. These both must be fitted before the seats due to restricted access!

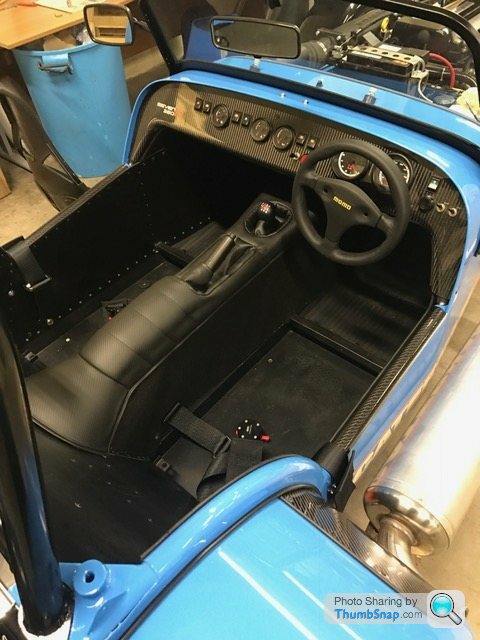
Then the seats and shoulder straps:


All pretty easy if a little fiddly.
I ended up gluing the bolts (that fix the seat rails to the chassis) to the rails making it easier lining them up with the holes in the floor.
So that, was it... the car is pretty much done. If only it would f-ing start!

As a finishing touch, I stuck on the remaining go-faster stripes:


I've still got the brakes and clutch to bleed once more but I couldn't resist sticking some wheels on:
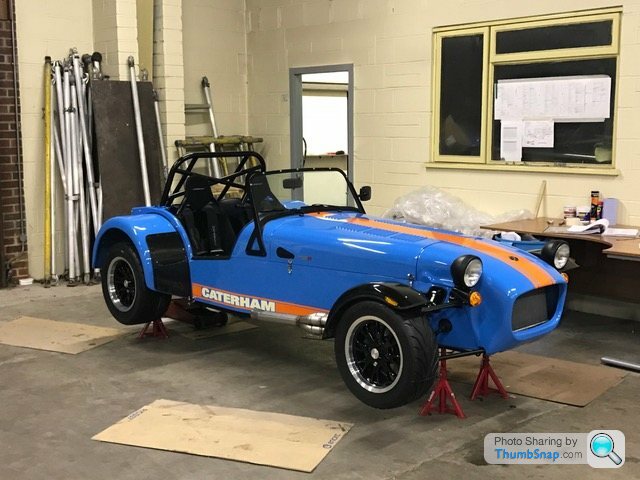
You may have spotted the lack of front grill. I'm in the process of spraying the '7' orange to match the stripes:
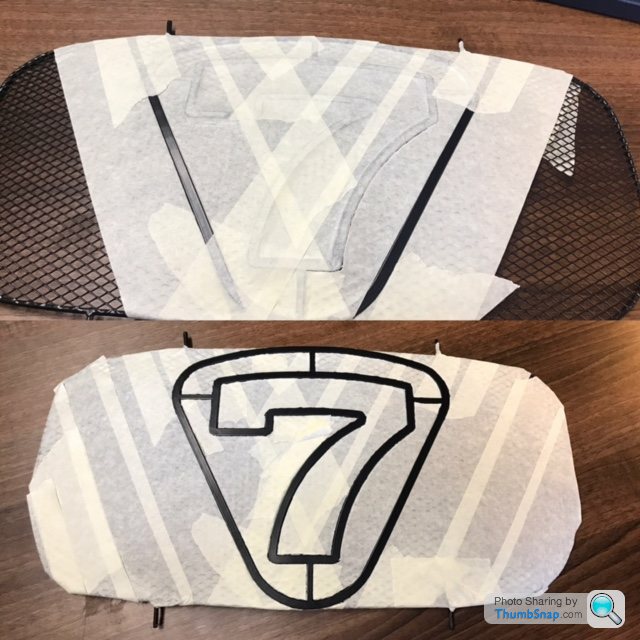
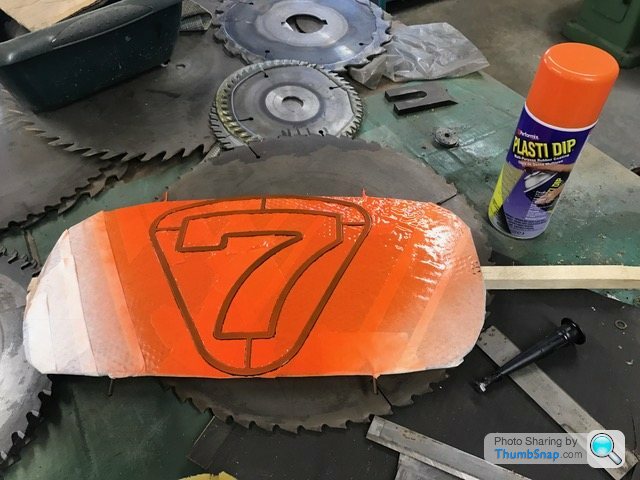
I'll upload a picture of this fitted later once the car is sitting on terra firma.
Going to have one more crack at starting later too. I took the rear silencer off last night and noticed un-burnt fuel lining the collector pipe. This leads me to believe the problem is something to do with spark, or lack thereof. Might be something simple like the spark plugs are gobbed etc. If not, then I'll leave it to the pros down at Caterham unless anyone has any bright ideas...?!
After the last update, all that was left to do was put all the necessary fluids in and press the starter button.
Only got one photo during this process:
Anyway, as I'd mentioned before I had a little hiccup getting the engine to turn over. Turned out to be an immobiliser issue that was easily sorted.
With oil pressure registering, it was time to re-connect the inertia switch (so the fuel pump will work) and fire her up for the first time.
Key to position II, hear fuel pump prime, press starter button, engine turns over....turns over....nothing. I'd sort of expected this thinking that maybe the engine needed time to suck fuel through the pipes.
So I repeated the above process and still nothing... And again....nothing.
Hmmm, I'd read somewhere a lot of fuel is needed in the tank on the initial start up. There was about 10 litres in to start off with, so I filled it up to about 30.
Still couldn't get the bloody thing to start!
I put the battery on charge (since it had taken a bit of hammer relentlessly turning the starter motor over) and pottered around the car doing IVA stuff like sticking rubber trim to the front cycles wings.
It was getting quite late now but I thought I'd give it one more try. This time it did start but only ran on one cylinder....sounding like a tarmac roller.
I checked and re-checked all the connections in the engine bay and nothing was amiss. At that point, I called it a day hoping that I could ring Caterham in the morning and they'd have a miraculous answer for me which would spark the car into life.
As I found out the next day, this was not the case. They think it's an ECU issue. Something that will be sorted during the post build check.
Pretty disappointed as the 'first start' is THE landmark moment when building your own car but there's not much else I can do.
After this drama, all that was left to do was fit the transmission tunnel cover, gearknob, harnesses and seats:
In went the lap belts and tunnel cover. These both must be fitted before the seats due to restricted access!
Then the seats and shoulder straps:
All pretty easy if a little fiddly.
I ended up gluing the bolts (that fix the seat rails to the chassis) to the rails making it easier lining them up with the holes in the floor.
So that, was it... the car is pretty much done. If only it would f-ing start!
As a finishing touch, I stuck on the remaining go-faster stripes:
I've still got the brakes and clutch to bleed once more but I couldn't resist sticking some wheels on:
You may have spotted the lack of front grill. I'm in the process of spraying the '7' orange to match the stripes:
I'll upload a picture of this fitted later once the car is sitting on terra firma.
Going to have one more crack at starting later too. I took the rear silencer off last night and noticed un-burnt fuel lining the collector pipe. This leads me to believe the problem is something to do with spark, or lack thereof. Might be something simple like the spark plugs are gobbed etc. If not, then I'll leave it to the pros down at Caterham unless anyone has any bright ideas...?!
_Neal_ said:
Sorry to hear of your starting issues, but if it helps the car does look superb, great work!
Maybe some kind of cool head checkover of coils, ignition wiring, plugs may yield something, otherwise I'm sure Caterham will have it sorted quickly.
Thanks mate! Maybe some kind of cool head checkover of coils, ignition wiring, plugs may yield something, otherwise I'm sure Caterham will have it sorted quickly.
I took out the coils and spark plugs last night and turned the engine over. All plugs have a good spark. Hmmmm more head scratching... So there's fuel and spark but no bang... I'm guessing (wildly) that maybe the injectors are 'injecting' at the wrong time perhaps?
Anyway, I'll leave that for Caterham to sort out. Talking of which, the car was collected this morning to be taken off for it PBC and IVA.
The eagle has landed:

Off down to Donington:
So that is essentially IT. For now anyway....
Still got the weather gear to fit, - they take it all off for the IVA test so didn’t rush to fit it - then it's 500 miles of running in. I'll probably change the oil after that and start driving the car with intent.
Until next time.... Or as Vinnie Jones would say “It’s been emotional”....
TheDukeGTi said:
Amazing how quickly you got this done! Looks awesome. Good luck with the IVA!
Thanks mate! Fingers crossed it makes it through ok.Greg_D said:
that does look great, it's a credit to you
Thank you! Catweazle said:
Well done ECG1000.
Cheers!toastyhamster said:
Nice one, been looking forward to the updates. Was with a customer today, turns out he has a Westfield as a sprint car and won his championship last year, cue lots of ooh and ahhing at various sideways pictures on his phone while the account manager got bored.
Cheers mate. I successfully manage to bore my girlfriend whenever I mention the word Caterham!
FELIX_5 said:
Well done, top work! I've really enjoyed this thread, in fact, I've enjoyed it so much, any chance you can buy another one so we can go through it all again?! 
Thank you! Glad you enjoyed the thread. I'd definitely like to build another one day. I'm working on persuading any of my mates to buy one, then I can lend a hand putting it together.Tickle said:
Great read! Look forward to seeing pics of it out in the wild. Enjoy OP, you have earned it.
Thank you very much. It means a lot!I'll be sure to keep the thread updated with pictures of the car out and about, plus any changes I make to it.
p1stonhead said:
This.
It would take me years
Honestly, it's all nuts and bolts with a bit of fiddling thrown in for fun. Prior to the Caterham, the most in depth thing I'd done to a car is changing the lower wishbone bushes on my GT86. It would take me years
Peanut Gallery said:
Congrats! - looks ace!
n_const said:
Car looks cracking and a good read. Good luck with the IVA.
Thanks mate. IVA test taking place tomorrow morning!_Neal_ said:
Yeah, sure Caterham will sort it. I'm guessing ECU/injector issue as you say.
Good luck with the IVA!
Cheers!Good luck with the IVA!
It turned out to be a faulty injector. All sorted now
Thank you everyone for the kind words. It really does mean a lot! I've really enjoyed building the car and would like to think I've learnt a bit in doing so.
With nothing to build on an evening, I've found myself looking for things to tinker with. Good job the front pads on my 86 need changing! That's a job for tonight.
Thread here if anyone's interested: http://www.pistonheads.com/gassing/topic.asp?h=0&a...
outnumbered said:
Interesting thread - you made it look pretty simple !
Thanks. It really isn't that tricky. Sometimes when I read the instuctions away from the car, it didn't make much sense. However, as soon as I started that particular job, it all comes together nicely._Neal_ said:
Nice! Look forward to the first drive report.
Hopefully not too far off now. Just had word back from Caterham to say it's passed the IVA test!Edited by ECG1000 on Thursday 2nd March 13:30
_Neal_ said:
Great news!
wrayvon said:
Brilliant news!
Also, great thread - enjoyed reading it.
Hopefully I'll see you out and about in it - if you see a yellow and blue MK Indy give me a wave (I live near Bingley so there is a small chance...)
Thanks mate. I'll keep my eyes peeled!Also, great thread - enjoyed reading it.
Hopefully I'll see you out and about in it - if you see a yellow and blue MK Indy give me a wave (I live near Bingley so there is a small chance...)
AndrewGP said:
Agreed, great news and seemed to happen quickly too!
Did you test drive any of the other variants before settling on the 360R? I only ask as I loved my R300K spec'd Superlight, so want to replicate that as much as possible in my next Seven.....but it's got me thinking about the merits of the 310 vs the 360!
Thank you.Did you test drive any of the other variants before settling on the 360R? I only ask as I loved my R300K spec'd Superlight, so want to replicate that as much as possible in my next Seven.....but it's got me thinking about the merits of the 310 vs the 360!
I wanted to test a 310 but BookaTrack didn't have any in at the time. So I gave a 270 a go as well as the 360 round a damp and very greasy Donington.
Whilst I really enjoyed the 270, I got comfortable with it fairly quickly. The 360 was more of an eye opener for me. Whilst being noticeably quicker and more exciting, it felt like a steeper learning curve too.
I'm not suggesting I'm a driving God (I'm quite the opposite), but as a car I could improve my pedalling skills in whilst having room to upgrade power if needs be, the 360 got my vote.
I'm sure the 310 would have been more exciting than the 270, but with it still being a 1.6, you're pretty much at the top of its tuning/power potential. The 360 can be upgraded to a 410 quite easily. I'd imagine it'll be a very long time until I do this, if ever – but it's nice to know I can.
scz4 said:
Congratulation on the pass! Look forward to your first on the road review. How long until you get the V5?
Been great watching it progress, but without meaning to sound like I'm pissing on your fire, was it the challenge you thought it would be? Certainly looked quite straight forward during your updates and you looked to make light work of it. I've always hoped to build one for my 40th, but wonder if it would be an anti climax, although I'm sure ownership definitely wouldn't be.
So I guess my question is do you think Caterham do too much at the factory prior to collection?
I've had a Westfield before and I know they are a start froms scrarch build, wiring loom, brake lines, bodywork, everything! Now, that would be beyond my skills\patience, but suspect something in-between would be great.
As I quoted a few pages back:
You assemble a Caterham
You build a Westfield
You engineer a Dax, Tiger etc
Thank you!Been great watching it progress, but without meaning to sound like I'm pissing on your fire, was it the challenge you thought it would be? Certainly looked quite straight forward during your updates and you looked to make light work of it. I've always hoped to build one for my 40th, but wonder if it would be an anti climax, although I'm sure ownership definitely wouldn't be.
So I guess my question is do you think Caterham do too much at the factory prior to collection?
I've had a Westfield before and I know they are a start froms scrarch build, wiring loom, brake lines, bodywork, everything! Now, that would be beyond my skills\patience, but suspect something in-between would be great.
As I quoted a few pages back:
You assemble a Caterham
You build a Westfield
You engineer a Dax, Tiger etc
I'm not sure how long it'll be. I'm sorting out insurance at the moment, once that's done and I've got a copy of the IVA certificate I can send off for the V5. Then I'm at the mercy of the DVLA.
I suppose building the car was how I had imagined. I'd read a few build blogs before I picked the car up so I kind of knew what to expect and where the 'challenging' bits were, such as the differential.
I wouldn't say I made light work of it; there were some bits I really struggled with because they were so fiddly! The steering column was a tw4t for example! Once I had taken a step back and re-thought the problem I could usually become unstuck.
It definitely would not be an anticlimax. When you've put in a fair amount of hours and finally get to take the car off its stands and revel in your creation, it's a pretty special feeling.
I definitely wouldn't have liked the job of fitting the loom and brake lines into the chassis. The prep-work put in before you receive the kit is supposed to take Caterham 20 hours. God knows how long that would have taken me!
In other news, Caterham have sent me a photo of my car sitting in their workshop read to be collected.
I asked them to change the wheels over to silver instead of black. Not to everyone’s tastes but I prefer them. I used to have a Racing Blue Clio 200 with black wheels so silver is a welcome change:
theturbs said:
Many congratulations OP. A superb achievement. You made the build process look pretty smooth and straightforward! Best of luck.
Thank you very much!luggie said:
Really like the body & stripe colour choices on this. Enjoy !
Cheers mate All the relevant documents filled in and sent off to the DVLA:
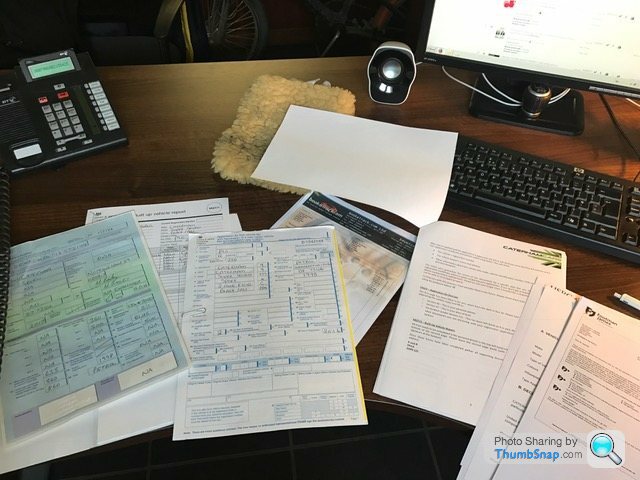
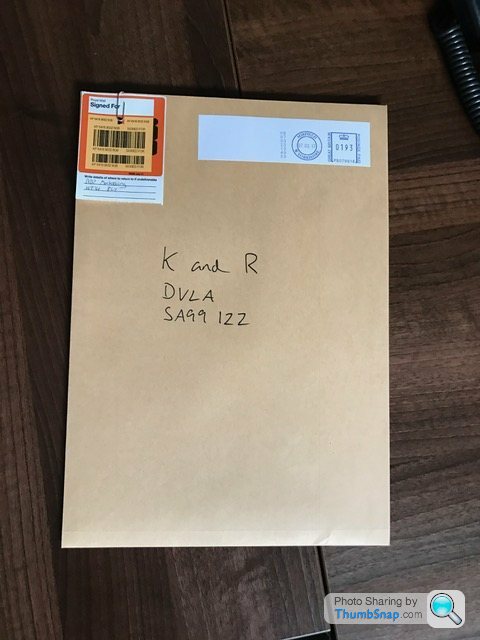
Fingers crossed I did everything correctly!
Now it's just a waiting game...
Well, my V5 came through the letterbox at the weekend. The Caterham is now ready to drive in the road!
But first I must collect it from the dealership at Donington who did the PBC and presented the car for its IVA.
Looking at the weather, it appears we may have a dry afternoon/evening, so off down the M1 I go.
I'm not averse to driving cars in the wet, it can be quite entertaining actually. However I haven't fitted the weather gear yet and the roads are covered in salt. I'd be pretty upset if it started to rust. Or are modern Caterhams suppose to be more resistant to this?
Anyway, I'll report back after the first drive once ive warmed up a bit.
More next time....
nigelpugh7 said:
Great stuff!,was it the one that Greg from Bat posted about to be collected?.
The roads have been gritted, but I don't think they are too bad, plus some rain to wash it away, so should be ok.
It better not to get that nice new chassis dirty, and ideally keep,the salt off it too, but a quick wash should be fine!
Enjoy.,
On Facebook? That was someone else picking up a 310 I believe.The roads have been gritted, but I don't think they are too bad, plus some rain to wash it away, so should be ok.
It better not to get that nice new chassis dirty, and ideally keep,the salt off it too, but a quick wash should be fine!
Enjoy.,
Your 620 looks like an animal! Have you driven it much since taking delivery?
nigelpugh7 said:
Pure coincidence then, must be a popular choice from Bookatrack!
Yes done almost 450 miles in my 620R now, loving every minuite!
It's properly mental, but in a really really good way!
Yeah, I very nearly went for a 310 but chose the 360 in the end. Glad I did as there's torque in any gear. I can't imagine what a 620 is like! Yes done almost 450 miles in my 620R now, loving every minuite!
It's properly mental, but in a really really good way!
Well, that was a baptism of fire (ice). By far the coldest I have ever been.
I foolishly thought my legs would be warm wearing jeans due to them being down below the door-line - I was wrong.
On top, I had my ski thermals and a puffer jacket, with a neck snood thing and beanie hat. This kept me warm for all of 10 minutes. My Grandfather's old driving gloves weren't much help either!
After queuing to get onto the M1 in light rain I thought I could get the hammer down and get home quickly. Wrong again.... 60mph traffic most of the way with added sleet.
Because I didn't have any side screens, said sleet was being sucked into the cabin and wetting the inside of the screen. And then there was the wind noise. I've seen people wearing ear plugs in Caterhams before - I had assumed they were all nancys and didn't like the noise of an exhaust. Nope this is a sensible precaution to prevent deafness by wind! My ears are still ringing.
On the plus side, the road remained pretty dry so I'm not too worried about the chassis being splattered in salt. I also had the warming comfort of the exhaust silencer within arm's reach. I could rest my right hand on it when it went numb.
Whinge over, lesson learnt. Weather gear going on ASAP, and a re-think of my cold weather attire.
Despite that, I'm excited to have the car home and very eager to get the 500 run in miles done so I can start learning how to drive it properly.
Couple of snaps of me leaving Donington:
More next time...
_Neal_ said:
Excellent stuff, made me smile that. My experience is:
1. Windscreen and no doors is the worst of all worlds - noise, cold, air being sucked onto the screen as you describe etc. Also at very high speeds I found the air going around the screen made it tricky to breathe on occasion. Not fun.
2. Earplugs are a must on long journey (used to drive mine to and from trackdays)
3. Mine both had heaters and as such legs stayed warm. Upper body not so much.
PS - IIRC Henry Catchpole (of EVO fame) used to wear some kind of Henri Lloyd ocean racing gear when driving his Caterham. Looked odd but apparently effective. I just went with base layers and a good waterproof, plus side doors/half hood. And heater. And was still cold.
ETA - http://www.evo.co.uk/caterham/7/9295/caterham-supe... - see here, Henri Lloyd sailing smock.
I'd imagine everyone else on the M1 was smiling too 1. Windscreen and no doors is the worst of all worlds - noise, cold, air being sucked onto the screen as you describe etc. Also at very high speeds I found the air going around the screen made it tricky to breathe on occasion. Not fun.
2. Earplugs are a must on long journey (used to drive mine to and from trackdays)
3. Mine both had heaters and as such legs stayed warm. Upper body not so much.
PS - IIRC Henry Catchpole (of EVO fame) used to wear some kind of Henri Lloyd ocean racing gear when driving his Caterham. Looked odd but apparently effective. I just went with base layers and a good waterproof, plus side doors/half hood. And heater. And was still cold.
ETA - http://www.evo.co.uk/caterham/7/9295/caterham-supe... - see here, Henri Lloyd sailing smock.
Edited by _Neal_ on Wednesday 22 March 11:47
Yep, definitely going to be using the doors on long journeys from now on - and possibly the hood! I've taken the pedal box cover off to fiddle with pedal positions. I may leave it off for the time being to see if a nice breath of warmth comes through from the engine bay. I've been advised against this due to the cover being part of the fire wall so I'll probably end up chickening out and fixing it back into place!
Did you wear earplugs even with the doors on? What's the longest journey you did in yours?
Thank you for the info on Mr. Catchpole, I'll see if I can find the poncho online.
Greg_D said:
racing onesie and karting wet weather gear to keep the wind out and you'd be sweating...
Really? Have you got a link so something suitable?7Fan7 said:
Hey ECG1000,
I hope your project works out! Certainly a great investment and pride to be able to build your own kit car. I'm currently working on a university project that has to do with Caterham 7 -style kit cars. Essentially, the tub (developed with Axon Automotive) where you and the passenger sit is made of carbon fibre; while the front and back chassis frame is maintained at the original steel.
I'm conducting a very quick survey to find out kit car owner's perception of the carbon fibre tub (explained further in the survey). I'd really appreciate if you could spare a couple of minutes to answer the survey in the link below. At the end of the day, this carbon fibre tub has its benefits, which is listed in the survey, but additionally we believe that it is a new innovative product to the Caterham 7/Lotus 7 kit cars that have not had much change in the chassis over the past 20 years. If you have any questions, don't hesitate to ask!
https://goo.gl/forms/kyjYgLPVGPcp3OaE3
Cheers,
7Fan7
Thanks mate. I'll take a look.I hope your project works out! Certainly a great investment and pride to be able to build your own kit car. I'm currently working on a university project that has to do with Caterham 7 -style kit cars. Essentially, the tub (developed with Axon Automotive) where you and the passenger sit is made of carbon fibre; while the front and back chassis frame is maintained at the original steel.
I'm conducting a very quick survey to find out kit car owner's perception of the carbon fibre tub (explained further in the survey). I'd really appreciate if you could spare a couple of minutes to answer the survey in the link below. At the end of the day, this carbon fibre tub has its benefits, which is listed in the survey, but additionally we believe that it is a new innovative product to the Caterham 7/Lotus 7 kit cars that have not had much change in the chassis over the past 20 years. If you have any questions, don't hesitate to ask!
https://goo.gl/forms/kyjYgLPVGPcp3OaE3
Cheers,
7Fan7
Master Bean said:
The whine/noise from your diff is normal. You'll get used to it after a while.
Cheers mate. Getting used to it now thank fully. All part and parcel of Caterham ownership!SteveJL said:
I always use earplugs when I'm out in the Westie, I do wear a crash helmet too as I only have an aero screen. Most of my mates who own Caterhams or westies use ear plugs too.
When I used to ride bikes there was an article in one of the mags testing the noise levels and it made for interesting reading on how it can be.
Your build looked fun and it looks like you enjoyed it. Well done on the IVA pass.
I was working on mine yesterday and got asked if I was going to build another...time will tell
Thank you. I definitely wouldn't turn down the chance to build another!When I used to ride bikes there was an article in one of the mags testing the noise levels and it made for interesting reading on how it can be.
Your build looked fun and it looks like you enjoyed it. Well done on the IVA pass.
I was working on mine yesterday and got asked if I was going to build another...time will tell
I spent Thursday night getting the weather gear fitted to the car. Took longer than expected due to fiddly-ness.
The hood goes on first, followed by the side screens. Fairly simple process, requiring a lot of hole-punching and durable-dotting.
Hood back off, then out for a quick rip to see if the side-side screens make life more comfortable:
With the pedal box lid off and side-screens fitted, the Caterham is semi-cosy. No more deafening wind noise, and a nice warm draft blowing over the exhaust manifolds.
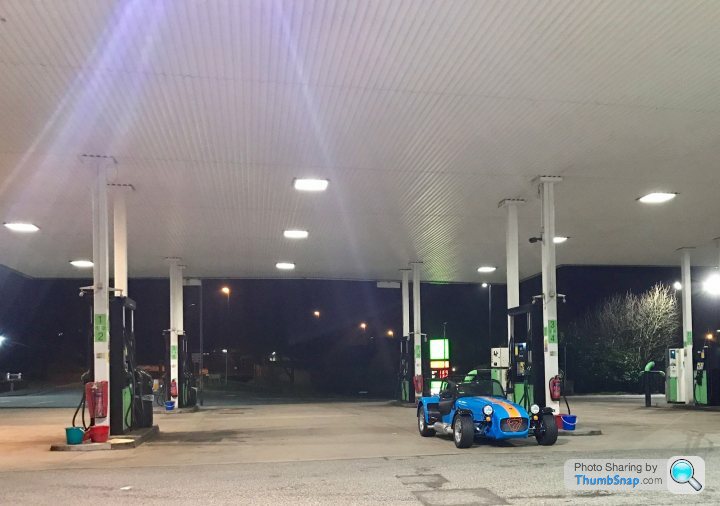
The weather over the weekend was awesome so I spent the majority of it getting the 500 run in miles done. Which meant no going over 4k rpm. Despite this, I still had a ball. I've never driven a car that requires so little braking for corners!
Last night, I reached the 500 mile marker:
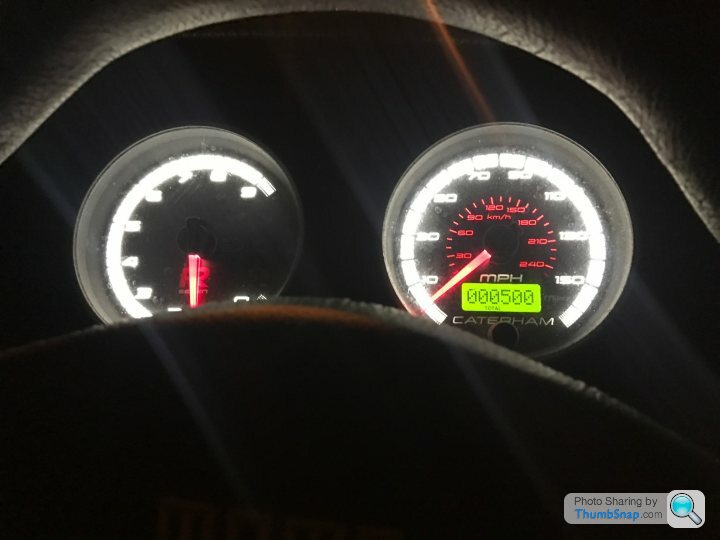
I've got some replacement oil and a filter on the way, so there won't be any more driving until then. After that, I'll gradually build up to using all the revs.
I did have a little "try" before putting the car away last night and was fairly speechless. The acceleration is nothing short of savage! God knows how anyone has the balls to fully commit in a 620!
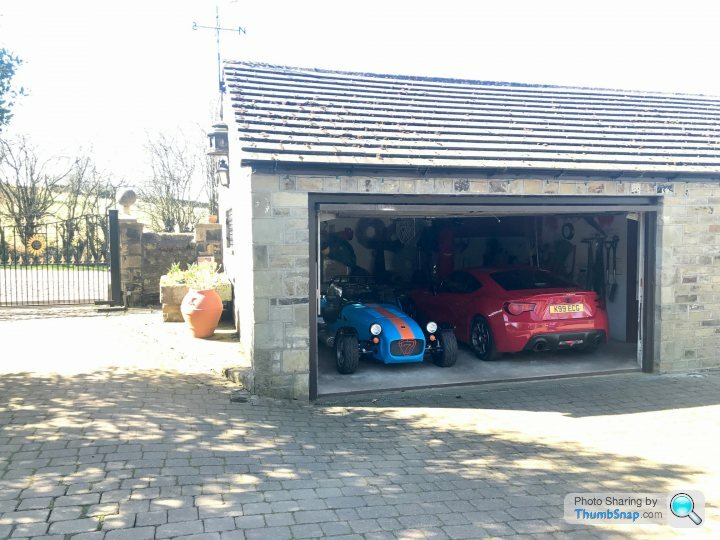
I don't have any snaps of the 360 out an about - was far too busy having fun.
Here's one of the toy box instead:
Arty one I got of my Grand Father's driving gloves:
And of course the obligatory PH sticker:
More next time...
Master Bean said:
Things to buy: half hood and a decat pipe - flames
My sidescreens or doors as I call them have an armrest. Not sure if you can add them on but they make cruising really relaxing.
Does a half hood fold up and fit in the boot by any chance? My sidescreens or doors as I call them have an armrest. Not sure if you can add them on but they make cruising really relaxing.
Very tempted for a decat but worry about going over the noise limit on track. My car was originally specced with a rear exit exhaust to quieten it down a bit. Of course I scrubbed that tick out before putting the order in! Will have to see if I get black flagged or not.
My side-screens don't have arm rests but I’ve found (with the lowered floors) I can comfortably rest my arm on the door sill.
jimbobs said:
Fantastic work - the car looks great. Earplugs and side screens are a must for motorways. i once did the Nurburgring to Nottingham in one day in October so long journeys are definitely do-able!
Thank you. Nurburgring to Nottinham is a sterling effort! How long did that take?!SidewaysSi said:
Try with an aeroscreen aswell. The cornering speed of a Seven is pretty astonishing - you do need to be careful at roundabouts as people don't expect you to come around quite so quickly
I see you have gone for the no number plate look - I tried it a few years ago for a bit but got stopped by the Boys in Blue. I figured if I am going to properly enjoy the car on road, I don't need another reason for them to stop me so put it back on.
As much as I'd love an aeroscreen, I don't want to be driving round wearing a full face helmet all the time. I see you have gone for the no number plate look - I tried it a few years ago for a bit but got stopped by the Boys in Blue. I figured if I am going to properly enjoy the car on road, I don't need another reason for them to stop me so put it back on.
Yeah, I need to do something about the front plate, or lack thereof. I just think a full size one spoils the front end a bit. I may look into a getting a shrunken one...
Gassing Station | Readers' Cars | Top of Page | What's New | My Stuff