Classic Aston Martin V8's
Discussion


That's a good question but until we start building it back up we won't know.
I've been through all the boxes and catalogued everything I have but I'm sure there are going to be numerous missing bits that crop up. I know now why everyone advises against buying a project in pieces!
The one part I know is missing is the accelerator pedal and linkages through to the Mechanical Fuel Injection system. On the MFI cars (DBS V8 and Series 2 AM V8 like mine), it's a floor hinged pedal whereas the later carb'd cars use a hanging accelerator pedal. I'm sure a solution can be come up with though...
Another brief update.
At last the shell is painted in it's final colour which, having seen it in the flesh, I'm very happy with.

The restorer has also spent time protecting the underneath of the car.


I've delivered a whole load of parts up to him, mostly running gear as the next stage is to get the car to a rolling shell. Psychologically that will be a major milestone.
In addition, a lot of time has been spent compiling lists of bits that are missing, scouring eBay and other places for parts. We will start building it up again very soon, which is exciting. There are a lot of shiny parts to fit, and some not so shiny. But I really do understand why people say never take on a dismantled project! There are so many little bits and pieces and they all add up. For example, I needed to buy some trim clips for the front and rear screen. No problem, they are available still from Aston Martin and cost £3.50 each (inc. Vat). I had to order 100 so that's £350. Ouch!
Another area that I've been giving some thought to is the interior and I spent some time with the trimmer last month trying to make a decision on colour... and failing. I've ordered some more samples so hopefully that will help. I need to make a decision soon, the car is booked in for the interior to be done in the Spring.
Other than that, it's been abit of a battle with the DVLA and HMRC trying to progress the registration but I'll save that for another update.
Thanks Dr G.
Original interior colours were:
Off White
Natural
Burgundy
Olive
Blue
Black
One option I am considering is burgundy as this is what my car came with from new. "For the Love of Cars" restored this six cylinder Aston Martin DBS in Olive Green with burgundy interior.


Olive and blue would not work with the exterior colour and I don't like Off White. I had black in my DBS V8 so fancy something different which just leaves Natural as my other option. This would be a tan colour and I'm waiting for various samples of different shades of tan to arrive in the post.
I'm also looking at a couple of non-standard colours but I think most likely I'm going to go for a variation of Natural. It does look good agains the green paint.
Here are a couple of pics of this colour combination I took a few years ago. You have to look closely to see the interior as they were just snaps I took in passing. If I saw either car again I would take more close up photos.
1972 V8 - exactly how my V8 will look when finished.

DBS

If anyone has any thoughts, ideas or comments I would be interested to hear them.
Thank you all for your opinions on the interior. I really like the burgundy but I think I'm going to go with the more neutral tan.
I've been ordering lots of parts this week, some small some big. Still so many missing or damaged pieces to find though.

I've been ordering lots of parts this week, some small some big. Still so many missing or damaged pieces to find though.
Astacus said:
Quick question: Do the man maths still add up? 
The man maths, by their very definition, should always add up! If it doesn't you're not interpreting the numbers correctly... Small update from the restorer...
Some parts cleaned and painted

Steering rack and column mostly in place

Fuel filter: As you can see the condition was poor, but we have managed to clean-up the inside and have a new filter element awaiting to be fitted.

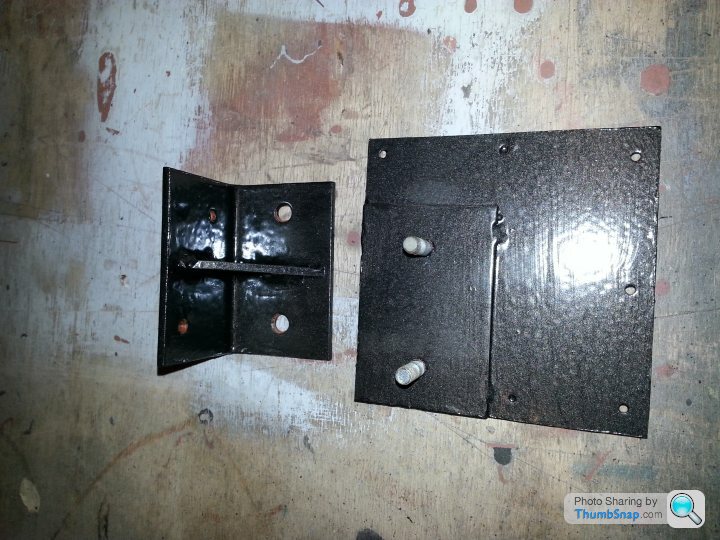
Brake/clutch fluid reservoir bracket assembly: These were missing and so we remade new from stainless steel. Originally they would be painted black, and we will replicate that finish.

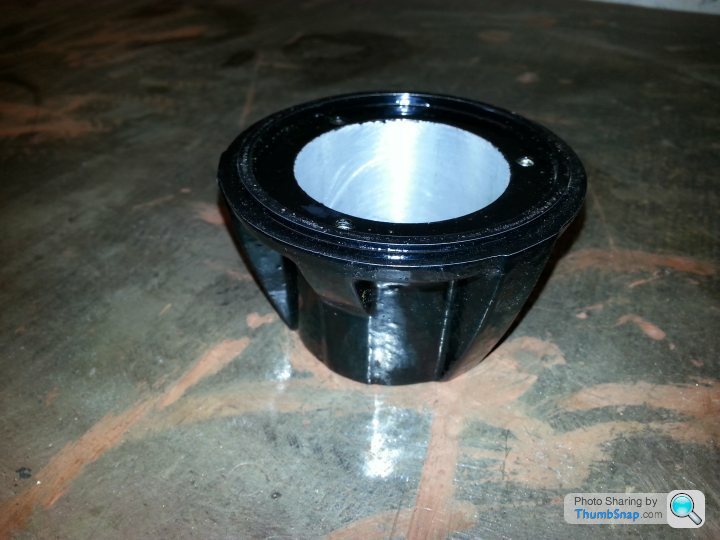
Steering wheel hub assembled

Steering wheel hub inner section: When coming to fit together with the steering wheel, this inner section has been broken. I had a spare but sadly it’s different and for another style steering wheel. But I've tracked one down at a specialist so this will be going on shortly.

Vacuum tank bracket: This was corroded and required some repairs.

Vacuum tank: Was rusty, scruffy and required paint for protection.

I have also been getting hold of leather samples to try and narrow down the final colour. Who knew there were so many variations of tan! I'm waiting for three more samples and then a decision can be made....
It really feels like the project is starting to come together now. I'm about to send off another box of bits to the restorer, things like front and rear lights, windscreen wipers, rear view mirror, and various other bits and pieces. Most of what I have left in my garage is for the interior and will be going to the trimmer in the next few weeks.
I've also been emptying the bank account getting hold of various pieces that have been sent straight to the restorer. Clutch slave cylinder, clutch master cylinder, diff brackets etc etc. So hopefully we will start to see more and more parts added to the shell and it will start to look like an Aston again.
There are still quite a few bits that are missing or so damaged they are unusable but slowly we are finding the bits we need.
Some parts cleaned and painted

Steering rack and column mostly in place

Fuel filter: As you can see the condition was poor, but we have managed to clean-up the inside and have a new filter element awaiting to be fitted.

Brake/clutch fluid reservoir bracket assembly: These were missing and so we remade new from stainless steel. Originally they would be painted black, and we will replicate that finish.

Steering wheel hub assembled

Steering wheel hub inner section: When coming to fit together with the steering wheel, this inner section has been broken. I had a spare but sadly it’s different and for another style steering wheel. But I've tracked one down at a specialist so this will be going on shortly.

Vacuum tank bracket: This was corroded and required some repairs.

Vacuum tank: Was rusty, scruffy and required paint for protection.

I have also been getting hold of leather samples to try and narrow down the final colour. Who knew there were so many variations of tan! I'm waiting for three more samples and then a decision can be made....
It really feels like the project is starting to come together now. I'm about to send off another box of bits to the restorer, things like front and rear lights, windscreen wipers, rear view mirror, and various other bits and pieces. Most of what I have left in my garage is for the interior and will be going to the trimmer in the next few weeks.
I've also been emptying the bank account getting hold of various pieces that have been sent straight to the restorer. Clutch slave cylinder, clutch master cylinder, diff brackets etc etc. So hopefully we will start to see more and more parts added to the shell and it will start to look like an Aston again.
There are still quite a few bits that are missing or so damaged they are unusable but slowly we are finding the bits we need.
Dr G said:
Great to see things progressing; I dare not imagine how much elusive bits of classic Aston martin can fetch but hopefully seeing nice, fresh parts go onto the finished shell makes it worthwhile.
I've been pleasantly surprised so far. The odd thing like the windscreen clips I mentioned add up because you need quite a lot of them. But nothing has been ruinous. I don't think I've spent over £500 on a single piece yet. Which is not too bad as some of these parts are bespoke to the Aston. At the same time though a lot of parts are shared with classics of the same era. For example, we've decided to replace the door locks as they are abit scruffy and will stand out against the new paintwork. They're the same as used by the original Lotus Elan so I've just ordered a new set with keys for under £50.hondansx said:
This has been a great read over the last few hours whilst I've been in-between things at work! Nice to see someone so dedicated to their Aston - your DBS looked great.
I much prefer the wheels you sold the DBS on, for what it's worth.
I'm with you there, I do love the look of those. For this one, I'm going to use the 16" Ronal wheels that were fitted to the later V8's such as this Series 5 Efi coupeI much prefer the wheels you sold the DBS on, for what it's worth.

The wheels fitted to my DBS V8 were very similar to the Ronals but were BBS and not quite the same.
The hubs need to be machined to fit these wheels but as my V8's hubs were re-drilled for Virage Volante wheels by a previous owner this would need to be done even if I went back to the original GKN wheels (the same as fitted to my DBS V8 on page 1 before I changed them and the green Series 2 V8 I posted).
I am having the hubs cleaned up and machined at the moment, and the reproduction Ronal wheels are available from Works Service. I will need to order them fairly soon as they will be needed to get the shell rolling.
Apologies, I have not been very good at updating this thread.
Firstly let me get the thread upto date with the progress on the car. Then I'll post some more background on the HMRC/DVLA issue, which is thankfully now resolved. I will also explain the change of direction, it's not ski's or turbocharging though! Please bear with me, there's a lot to cover.
November 2018
Accelerator pedal: This part has so far eluded us, so the restorer has made one by copying a borrowed piece and finished it in black. Originally they were zinc plated, but I prefer the black.


Drivers foot rest: Again we managed to copy a borrowed pieces and make one knowing these are going to be hard to find and one of those parts I doubt few people bothered to save. The actual rest will have a rubber pad, surprisingly there was one of these in the boxes!
Door handle bracket: The original bracket was broken as were all the spares we had. These brackets were cheaply made of die-cast – easy to brake but difficult to repair so a new one was fabricated in steel.

Passenger foot rest: The supporting angle brackets are missing so we have made some in stainless steel which will polish up reasonably and will not go rusty like the original chrome plated ones.

In preparation for re-fitting the suspension parts, it became clear that the rubber bushes that we have are many pieces short – probably somebody had a better use for them along with the discs at some point! So another order to place with Works Service...!
Firstly let me get the thread upto date with the progress on the car. Then I'll post some more background on the HMRC/DVLA issue, which is thankfully now resolved. I will also explain the change of direction, it's not ski's or turbocharging though! Please bear with me, there's a lot to cover.
November 2018
Accelerator pedal: This part has so far eluded us, so the restorer has made one by copying a borrowed piece and finished it in black. Originally they were zinc plated, but I prefer the black.
Drivers foot rest: Again we managed to copy a borrowed pieces and make one knowing these are going to be hard to find and one of those parts I doubt few people bothered to save. The actual rest will have a rubber pad, surprisingly there was one of these in the boxes!
Door handle bracket: The original bracket was broken as were all the spares we had. These brackets were cheaply made of die-cast – easy to brake but difficult to repair so a new one was fabricated in steel.
Passenger foot rest: The supporting angle brackets are missing so we have made some in stainless steel which will polish up reasonably and will not go rusty like the original chrome plated ones.
In preparation for re-fitting the suspension parts, it became clear that the rubber bushes that we have are many pieces short – probably somebody had a better use for them along with the discs at some point! So another order to place with Works Service...!
December 2018
We were missing the rear axle cradle so a good secondhand one was purchased from an Aston specialist.
Rear axle members: These required some through cleaning especially the recently purchased cradle, along with other parts these were sent for bead blasting which cleaned away all the grime and rust from those hard to reach areas. They are now painted.


Coil springs: Again these were scruffy looking and were also bead blasted and finished off with black powder coating.

Steering column hand lock nut: Although its condition was good, they were originally black so this was powder coated too as I felt would be a more durable finish.
We were missing the rear axle cradle so a good secondhand one was purchased from an Aston specialist.
Rear axle members: These required some through cleaning especially the recently purchased cradle, along with other parts these were sent for bead blasting which cleaned away all the grime and rust from those hard to reach areas. They are now painted.
Coil springs: Again these were scruffy looking and were also bead blasted and finished off with black powder coating.
Steering column hand lock nut: Although its condition was good, they were originally black so this was powder coated too as I felt would be a more durable finish.
January 2019
Works Service turn around the orders pretty quickly so with the order delivered for the new suspension bushes, we could get on with refitting the front suspension and steering.
Front suspension spring stop plates

Near side front suspension assembly

Off side front suspension assembly (paintwork is a little dusty in the photo)

Works Service turn around the orders pretty quickly so with the order delivered for the new suspension bushes, we could get on with refitting the front suspension and steering.
Front suspension spring stop plates
Near side front suspension assembly
Off side front suspension assembly (paintwork is a little dusty in the photo)
February 2019
It was time to make a final run to the restorer with everything I had left in the barn. This included all the components for the dash but not the other trim panels and seats (as they will go straight to the trimmer).
There was a fair amount of stuff still to go, including the engine, and I also had to collect the headliner from the trimmer. I hired a van, loaded everything up and drove across the country.
V8 engine in the back of the van (again)

Part of the haul that I was taking down was all the major components for the brake system which I had purchased from an Aston specialist. This included front and rear discs, as well as front and rear calipers. Not a cheap acquisition! Another part I acquired was a fuel pump for the boot. We later found out the impeller was missing, but we're having another fabricated.
With regard to the interior, the original headlining was grey to go with the burgundy interior. However, I wanted a natural beige that wasn't too orange so my final decision on interior finish was as follows:
Leather - Conolly Vaumol Luxan Stone (VM847)
Carpet - Boyriven Wilton CPW 926
Headliner - Boyriven Union Cloth hlun2362 fawn
With a natural beige finish to the leather, I wanted something that would contrast nicely with this for the headliner. I didn't like the grey do went with a neutral beige. It's important to get the headliner in because you can then fit the front and rear screens.
Dropping the parts off also gave me chance to see the car in the flesh and run through everything with the restorer. Here's the car with the door frames and glass in and other bits, such as the sill trims, fitted temporarily to look at what needs adjusting for the right line.

It was time to make a final run to the restorer with everything I had left in the barn. This included all the components for the dash but not the other trim panels and seats (as they will go straight to the trimmer).
There was a fair amount of stuff still to go, including the engine, and I also had to collect the headliner from the trimmer. I hired a van, loaded everything up and drove across the country.
V8 engine in the back of the van (again)
Part of the haul that I was taking down was all the major components for the brake system which I had purchased from an Aston specialist. This included front and rear discs, as well as front and rear calipers. Not a cheap acquisition! Another part I acquired was a fuel pump for the boot. We later found out the impeller was missing, but we're having another fabricated.
With regard to the interior, the original headlining was grey to go with the burgundy interior. However, I wanted a natural beige that wasn't too orange so my final decision on interior finish was as follows:
Leather - Conolly Vaumol Luxan Stone (VM847)
Carpet - Boyriven Wilton CPW 926
Headliner - Boyriven Union Cloth hlun2362 fawn
With a natural beige finish to the leather, I wanted something that would contrast nicely with this for the headliner. I didn't like the grey do went with a neutral beige. It's important to get the headliner in because you can then fit the front and rear screens.
Dropping the parts off also gave me chance to see the car in the flesh and run through everything with the restorer. Here's the car with the door frames and glass in and other bits, such as the sill trims, fitted temporarily to look at what needs adjusting for the right line.
March 2019 - This pretty much brings us up to date.
The diff has been stripped down and checked. It was in good condition and just needed some new bearings and a few other bits.
Diff primered and ready for paint.
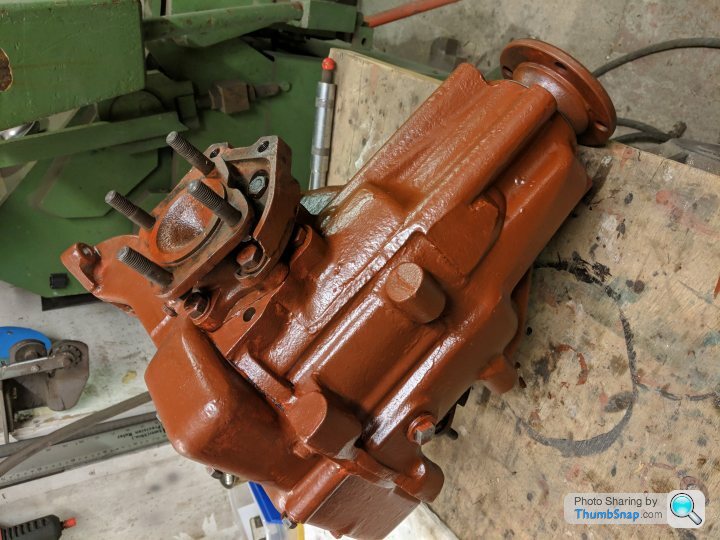
Diff with cradle, about to be installed

With the diff assembly installed, here you can see the inboard rear brake discs and callipers (that sit either side of the diff) viewed through the inspection panel that accessed from behind the rear seat.

The manual ZF gearbox is also in position, although it is simply suspended and located by the rear cross-member, ready for engine coupling at some point.
The diff has been stripped down and checked. It was in good condition and just needed some new bearings and a few other bits.
Diff primered and ready for paint.
Diff with cradle, about to be installed
With the diff assembly installed, here you can see the inboard rear brake discs and callipers (that sit either side of the diff) viewed through the inspection panel that accessed from behind the rear seat.
The manual ZF gearbox is also in position, although it is simply suspended and located by the rear cross-member, ready for engine coupling at some point.
The joy of dealing with HMRC and other bureaucratic numpties...
I already knew the car was an original UK RHD delivered vehicle when it was new. According to the Heritage Certificate, it was supplied by the same dealer as my 1971 DBS V8: Plough Motors in Stroud, Gloucestershire. I also now had the date of manufacture and the date of delivery from the certificate.
Unusually though, my V8 did not appear in any of the AMOC registers so I could not track down any details or history about it.
The Aston Martin Heritage Trust will write you a dating letter for a fee (something the DVLA has outsourced to Owner's Clubs to save on admin) and I thought this was the route I would have to go down. When I contacted them, they advised me to get back in touch when the car was MOT'd and they would inspect it.
First things first though, as part of the application for an imported vehicle, I needed a NOVA letter from HMRC stating that no taxes were due on the car. This letter took an age to get as nobody at HMRC seemed able to tell me what the correct forms I needed to fill out were. I kept getting passed from department to department and back again. The problem they said was that in theory the tax would have been paid when it was sold new in the U.K. but someone could (theoretically but extremely unlikely) have claimed it back when it was exported. But nobody knew, or was that interested, in resolving the issue. They all spoke with great authority but had little clue what they were talking about.
Eventually, after several weeks of trying, I got through to a very helpful lady who told me to just fill out a standard NOVA form and ignore all the other forms I had been told to fill out. A lot of time and effort wasted but once this was done, the NOVA Letter appeared very quickly.
I then thought about the DVLA and registration side some more. As an MOT was no longer required due to the age, I decided to ask the AMHT to write my dating letter even though the car didn't have an MOT as it was still being built. Unfortunately, the AMHT were not very enthused by that idea, "We value cars not parts" they said.... I'm not sure how the age of the car was effected by having the engine installed or not but this was their view and they were immovable.
Anyway, I decided to skip them and go directly to the DVLA as I realised I probably don’t need their assistance after all. The car is an original UK vehicle so all the info should be on the DVLA system already. Consequently, I should not need a dating letter from AMHT, that's really for cars that have never been in the UK before. Although other car clubs have been more than happy to write a dating letter for me based on build certificates from the manufacturer....
Another very nice lady, this time at the DVLA, agreed and said I just needed to fill out the V55 and send it in and they would only charge me £25 for issuing a new V5! A few more weeks later and, in January, the new V5 arrived. The best news is I appear to have retained the original number plate.
So in the next few weeks, I will be ordering some number plates!
Thank you for the comments, it's very much appreciated and good to know people are reading an enjoying the thread.
One thing this V8 has over my DBS V8 is a/c so hopefully once the car is sealed I won't need to open the windows as much!
bigfella70 said:
I'm sure you already know this however just to reference the diff inspection panel in the rear floorpan - they need really careful sealing otherwise ingress of fumes can occur. From my AMOC days I seem to recall reports of a tragic fatality years ago where the panel had not been sealed correctly and fumes entered the cabin.
Yes, very good advice. I know from my previous DBS V8 that fumes into the car are a serious problem. You need to seal the access panel and loads of bits in the boot as well. The design of the car ensures that fumes are sucked back inside, especially when you open a window. There was a very good article in the Owner's Club magazine, I think by Andy Chapman, detailing all of these problems.One thing this V8 has over my DBS V8 is a/c so hopefully once the car is sealed I won't need to open the windows as much!
NDA said:
A couple of huge projects! I admire the dedication.
I had a Vantage for a while, I spent more on it than the purchase price too.

I remember your car, saw it at Rikki's? Was it the South African big bore spec that was the precursor to the X-Pack? Beautiful car.I had a Vantage for a while, I spent more on it than the purchase price too.
I mentioned a change of direction earlier in the thread and now is probably the right time to go into that in more detail….
When I bought this 1972 V8, it was to replace my much missed 1971 DBS V8. It was not my intention to ever sell this Aston. No, this one was a keeper. I wanted it to be even better than my DBS V8 so I could enjoy driving and owning it.
However, last Spring I was ill with a chest infection and flu while skiing in France. A routine chest X-Ray at the GP’s surgery in the resort (imagine that in the UK!) showed up something unrelated but I was advised to get it checked when I got home… To cut a long story short, it turns out I had a malignant tumour between my lungs. Complete chance that they found it as I had no symptoms at all. Fortunately the surgeon was able to remove it and, as it was such early stages, the tumour was fully encapsulated and no further treatment was required. I only mention this as it has completely changed my outlook on life and I now very much believe in seizing the day…
Late last year an opportunity came up to buy a late seventies V8 Vantage. Now a V8 Vantage is the only car I would have chosen over my 1972, as for me it’s the pinnacle of the Newport Pagnell V8. But usually they are way out of my price range and were going up rapidly so I was content to stick with the 72 and admire them from afar. However, this particular car was also a project and, thanks to a very understanding wife who loaned me the money from a recent inheritance, I was able to scrape together enough money to purchase it!
This means that the 1972 V8 will need to be sold when it’s completed in order to pay for the restoration of the V8 Vantage. I’d love to keep both but I cannot afford to do the work unless the 1972 is sold… and believe me the new car needs A LOT of work! I won’t be posting anymore about it just yet, as not a great deal will happen until the 1972 is sold. But I will do a full thread on it when the time comes to reveal all.
As a result, I have decided to keep the 1972 V8 completely standard as any changes may affect it’s desirability to a prospective owner. I am keeping the stock GKN wheels for example, and their refurbishment will be the subject of my next update.
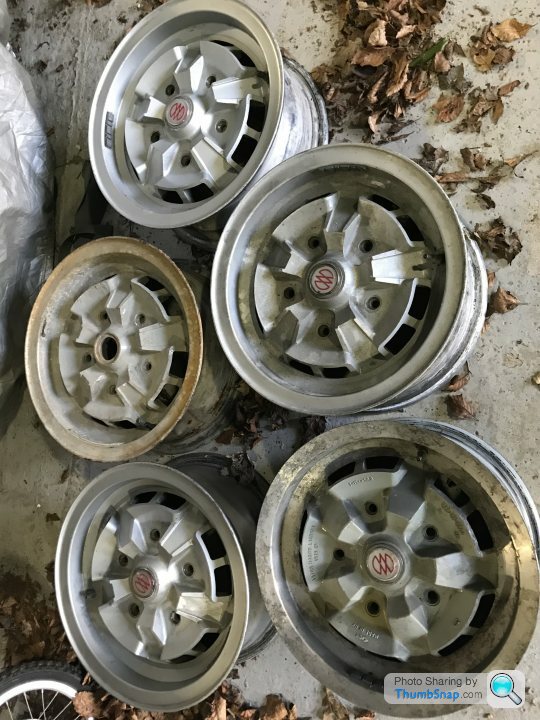
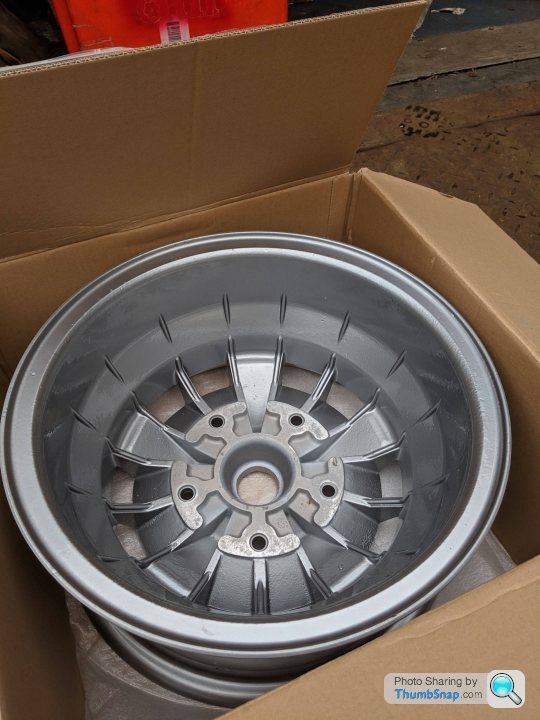
As I was now keeping the GKN wheels, I needed to have a look at what I actually had. Five wheels came with the car, four were the correct earlier style to accept a tubed tyre and the last was from a later V8 for a tubeless tyre. They were in poor cosmetic condition but looked solid. The later wheel is the bottom right, without a lip around the outside edge of the rim and now ridges on the outside of the internal spokes.
I was recommended Prestine wheels in Milton Keynes by a number of people and a phone call confirmed they were the right people for the job. I took them up there and we went through the different finishes available. Although when new the wheels were finished in a sort of cream colour (which I had on my DBS V8 - see photo on page 1), I don't like that finish. So I went for a finish that was 80% silver with a small amount of anthracite and diamond finish around the edges of the rim. It's come out a little darker than I'd like but I'm happy with the result.


I was recommended Prestine wheels in Milton Keynes by a number of people and a phone call confirmed they were the right people for the job. I took them up there and we went through the different finishes available. Although when new the wheels were finished in a sort of cream colour (which I had on my DBS V8 - see photo on page 1), I don't like that finish. So I went for a finish that was 80% silver with a small amount of anthracite and diamond finish around the edges of the rim. It's come out a little darker than I'd like but I'm happy with the result.
With the wheels ready, next on the list was tyres. I wanted to fit the correct spec size, as I've seen so V8's many with tyres that are either too big (SUV style tyres) or too modern with a profile that's too low. Both look wrong but given the much higher cost of the correct size, it's understandable why owners fit them.
I spoke with Longstone tyres who were extremely helpful. When new the Aston came with either 235/70R15 or 225/70R15 depending on whether the car was manual or automatic, both made by Avon. As mine was now a manual, I went for the 225/70 tyres and the best option was the Michelin XWX.
Here's how they look on the wheel.

The suspension is sitting high in this photo but will settle when driven, it's just come off the jack.
I spoke with Longstone tyres who were extremely helpful. When new the Aston came with either 235/70R15 or 225/70R15 depending on whether the car was manual or automatic, both made by Avon. As mine was now a manual, I went for the 225/70 tyres and the best option was the Michelin XWX.
Here's how they look on the wheel.
The suspension is sitting high in this photo but will settle when driven, it's just come off the jack.


Gassing Station | Readers' Cars | Top of Page | What's New | My Stuff