Classic Aston Martin V8's
Discussion


Accelerator pedal and all linkages in place. This doesn't look like much but there are a ridiculous number of components that run from the pedal upto the main hex bar on the engine. Some were available from Works Service, others we had to manufacture.
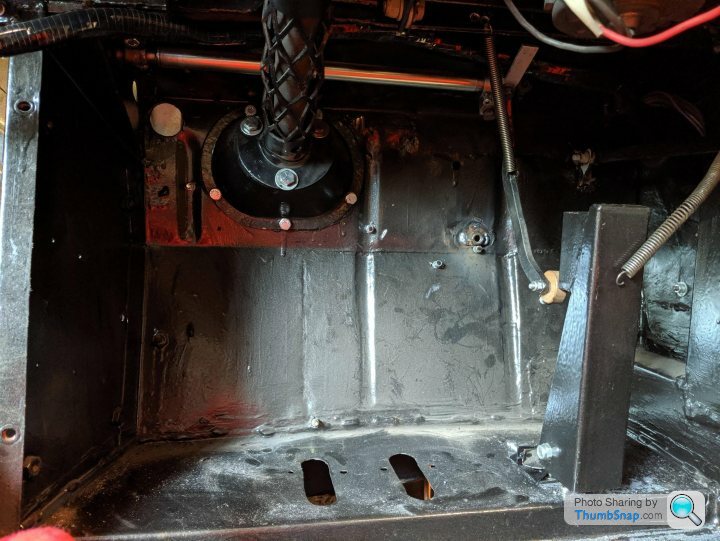
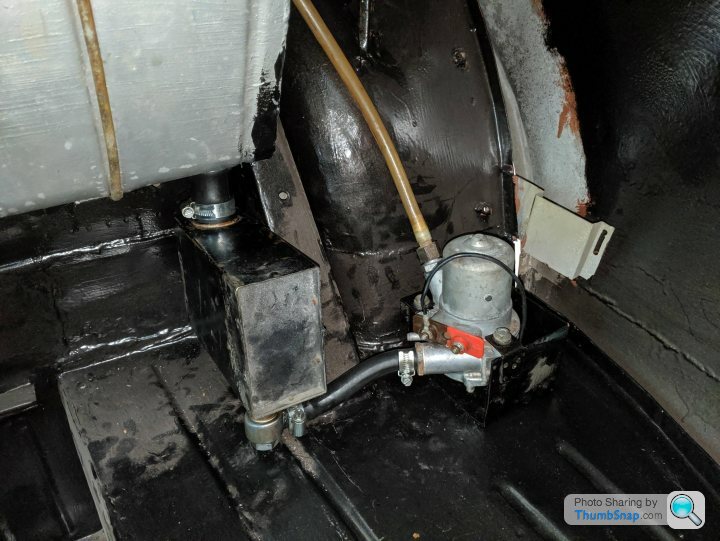
Fuel tank fitted. The fuel pump is also now installed in the car and the other attachments into the tank fitted.

We have managed to track down the correct door mirrors. They are shared with the Mercedes W115 and a set was ordered from an Ebay seller in Holland. The stem has to be at a particular angle to stop the mirror hitting the window.

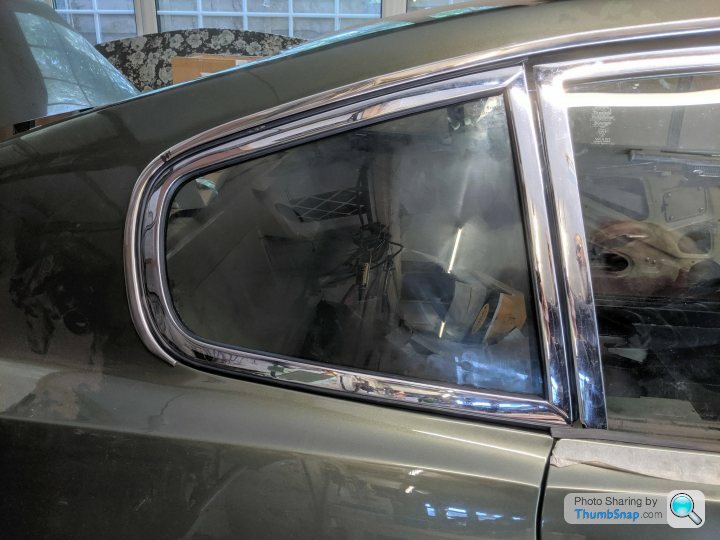
All the side glass is in the car, including the OS rear quarter. I had the frame but not the glass, but we found a firm that could cut the required piece.
That brings us pretty much upto date. I will continue posting bits and pieces as and when things happen. But at the moment it's mostly sourcing lots of small parts that are missing, which isn't very exciting!
Fuel tank fitted. The fuel pump is also now installed in the car and the other attachments into the tank fitted.
We have managed to track down the correct door mirrors. They are shared with the Mercedes W115 and a set was ordered from an Ebay seller in Holland. The stem has to be at a particular angle to stop the mirror hitting the window.
All the side glass is in the car, including the OS rear quarter. I had the frame but not the glass, but we found a firm that could cut the required piece.
That brings us pretty much upto date. I will continue posting bits and pieces as and when things happen. But at the moment it's mostly sourcing lots of small parts that are missing, which isn't very exciting!

Apologies, it's been a while since I've updated this thread. Things are moving... slowly but surely.
June 2019
Another one of the parts missing from my car was the speedo assembly drive. This sits at the back of the gearbox and is where the speedo cable attaches from the back of the dial to the gearbox.

My gearbox came from a race car and it seems this part was removed. I tried all the Aston specialists but nobody had the part in stock. One specialist, who shall remain nameless told me.."if I can find one its going to be around £2000 plus any shipping costs and vat etc, if that’s acceptable let me know and I will check.." Needless to say I told him not to bother! Another specialist was sitting on a gearbox with exactly the same part missing and told me it was a very difficult part to find and they had had no luck so far...
The gearbox is made by ZF, specifically it's a ZF S5-24-2. I then spent a huge amount of time looking pictures of various different gearboxes to see if the part was common to other ZF's. But sadly no other ZF's came with a part like this
However, I knew that as well as Aston V8's, the gearbox was also used in the Maserati Khamsin, Maserati Kyalami and the Maserati Quattroporte III.
So, due to the Maserati connection and the fact I was sure it was a ZF part rather than an Aston Martin part, I decided to start contacting Maserati specialists in the UK and also the US where they were perhaps sold in greater numbers. Within no time at all, I found a Maserati parts supplier in the US and, as luck would have it, he had one new old stock speedo assembly on the shelf! It was $600 but that was cheaper than trying to re-manufacture this part. The only other option was to look at an electronic option but this would have meant changing the speedo and I did not want to do that.

But these things are never straightforward and we have hit a stumbling block! The part arrived and the cog that is visible in the photo above slots into the gearbox, with the speedo cable going into the bottom of the sleeve at a 90 degree right angle. Unfortunately, the cog will not slide into place in our gearbox. We think that although the part is the same for both the Aston and the Maserati, the actual cog on the end is different. We think we may have located the correct one via a contact a specialist has with ZF so fingers crossed.
June 2019
Another one of the parts missing from my car was the speedo assembly drive. This sits at the back of the gearbox and is where the speedo cable attaches from the back of the dial to the gearbox.
My gearbox came from a race car and it seems this part was removed. I tried all the Aston specialists but nobody had the part in stock. One specialist, who shall remain nameless told me.."if I can find one its going to be around £2000 plus any shipping costs and vat etc, if that’s acceptable let me know and I will check.." Needless to say I told him not to bother! Another specialist was sitting on a gearbox with exactly the same part missing and told me it was a very difficult part to find and they had had no luck so far...
The gearbox is made by ZF, specifically it's a ZF S5-24-2. I then spent a huge amount of time looking pictures of various different gearboxes to see if the part was common to other ZF's. But sadly no other ZF's came with a part like this
However, I knew that as well as Aston V8's, the gearbox was also used in the Maserati Khamsin, Maserati Kyalami and the Maserati Quattroporte III.
So, due to the Maserati connection and the fact I was sure it was a ZF part rather than an Aston Martin part, I decided to start contacting Maserati specialists in the UK and also the US where they were perhaps sold in greater numbers. Within no time at all, I found a Maserati parts supplier in the US and, as luck would have it, he had one new old stock speedo assembly on the shelf! It was $600 but that was cheaper than trying to re-manufacture this part. The only other option was to look at an electronic option but this would have meant changing the speedo and I did not want to do that.
But these things are never straightforward and we have hit a stumbling block! The part arrived and the cog that is visible in the photo above slots into the gearbox, with the speedo cable going into the bottom of the sleeve at a 90 degree right angle. Unfortunately, the cog will not slide into place in our gearbox. We think that although the part is the same for both the Aston and the Maserati, the actual cog on the end is different. We think we may have located the correct one via a contact a specialist has with ZF so fingers crossed.
June 2019
The front valance and the 3 rear sections (after some repairs) have been painted in the correct matt back finish.

For the rear, you have two side pieces and a centre piece where the number plate sits.


The head light cowls have both been painted the same olive green along with the side vent funnels too. Also the headlight apertures have been painted after riveting the support rims in place after having to re-make one which was unuseable.


The front valance and the 3 rear sections (after some repairs) have been painted in the correct matt back finish.
For the rear, you have two side pieces and a centre piece where the number plate sits.
The head light cowls have both been painted the same olive green along with the side vent funnels too. Also the headlight apertures have been painted after riveting the support rims in place after having to re-make one which was unuseable.
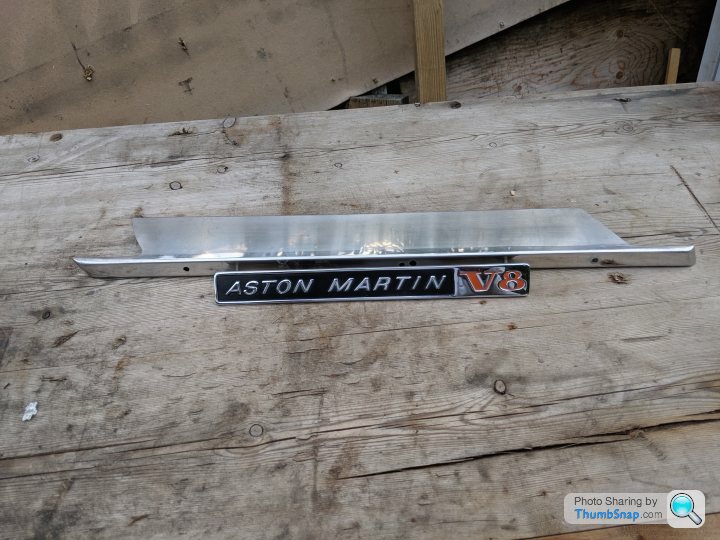
On aligning side trims with the badges, its clear by the exposed holes that these trims should have had the earlier and longer “Aston Martin DBSV8 “ strip badges.
However, although the early AM V8 single headlight mechanically fuel injected cars were indeed fitted with the DBS V8 badges, this was just to use up existing stock. Mine is not an early car therefore it's unlikely that Aston Martin were still using up the supply of these badges on my car so it remains a mystery why I have these.
Anyway, we decided to still fit the shorter badges as I felt these were correct, and weld up the exposed end holes, then metal finish and polish.
I think hey've come out very well.

July 2019

The new air con radiator is loosely in place on the car as the hoses still need to be sorted and fitted.
We had to make bespoke brackets to fit to the original locations.

Bonnet springs: we have eventually got around to painting these!
Dash sections: These sections are in place between threading the wires and cables into place.

The new air con radiator is loosely in place on the car as the hoses still need to be sorted and fitted.
We had to make bespoke brackets to fit to the original locations.
Bonnet springs: we have eventually got around to painting these!
Dash sections: These sections are in place between threading the wires and cables into place.
Edited by CQ8 on Tuesday 10th September 21:17
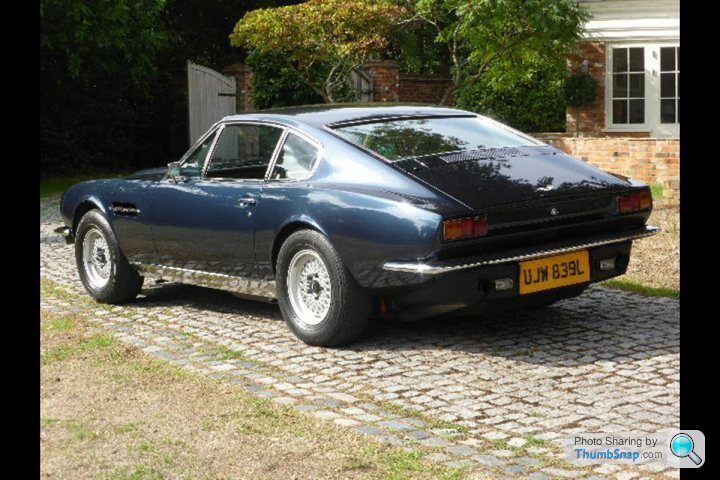
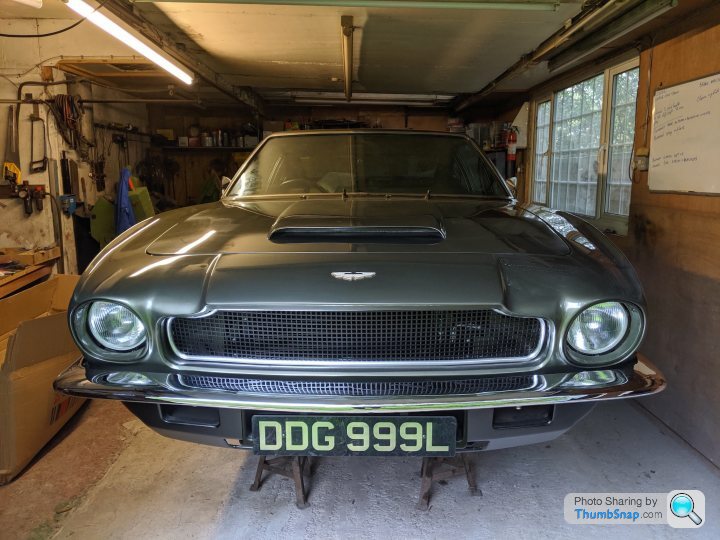
Front view of the car with the number plate fitted. Being a 1972 car, it's debatable if it should have black and silver plates or white and yellow. I like the black and silver but may change to the later style at some point.

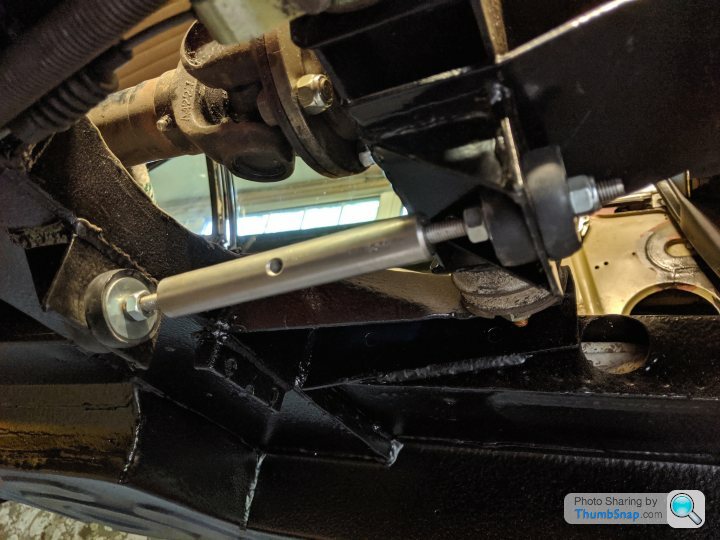
Gearbox reaction rod: The actual rod is obsolete from the factory, so we have made a new one in stainless steel, which saves painting it. The rod is secured in place with the new rubbers and washers.
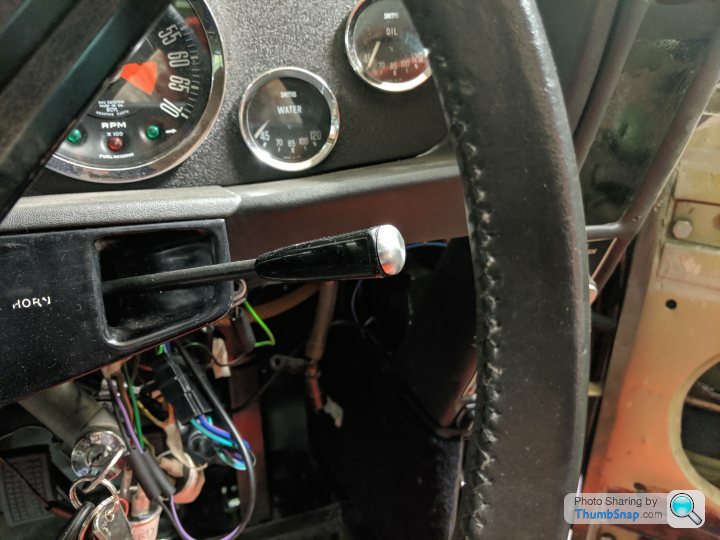
Horn switch: This was the switch I managed to find which has the end cap missing. I’m not sure how the original switch was to fit inside the housing as this switch has 2 bolt holes but seemingly nowhere to attach. By checking one on another car, the problem was solved by fixing 2 studs inside the casing.

Gearbox reaction rod: The actual rod is obsolete from the factory, so we have made a new one in stainless steel, which saves painting it. The rod is secured in place with the new rubbers and washers.
Horn switch: This was the switch I managed to find which has the end cap missing. I’m not sure how the original switch was to fit inside the housing as this switch has 2 bolt holes but seemingly nowhere to attach. By checking one on another car, the problem was solved by fixing 2 studs inside the casing.

Oil filter and hoses : This unit is now secured in place with the new hoses we had made up copied from the old hoses.

Pedal box: The long awaited pedal box is now in place with all new copper brake pipes connected.

Radiator & cowling: The cowling sections needed repairing and black powder-coating. All the water hoses are now attached with new hose clips.

Trimmed roof panel: Fitted in place but electric cables had to be made up which connect to the courtesy lights above the doors. The old cables had been previously removed and replacements were not in the collection of wires with the new harness. It was a bit tricky threading them up through the inside of the screen pillars!
ndtman said:
Great updates. Silver on black plates although, as you say are, correct seem to date the car too much if that makes sense
jamesson said:
Silver and black plates look soooooo much better than white and yellow.
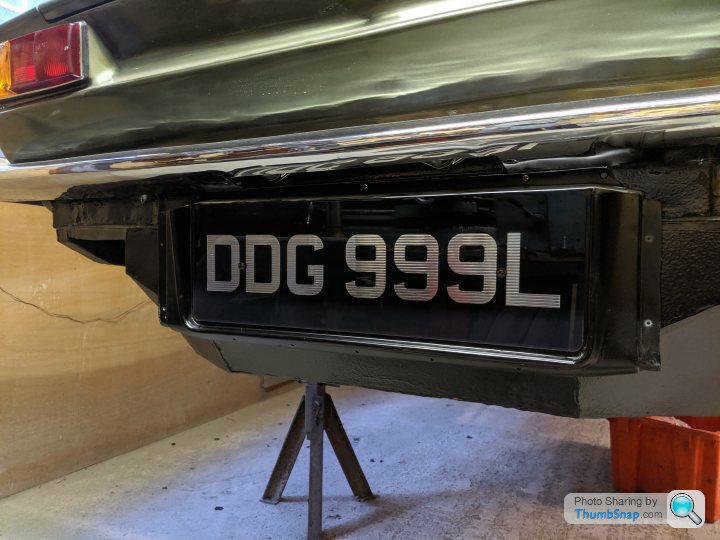
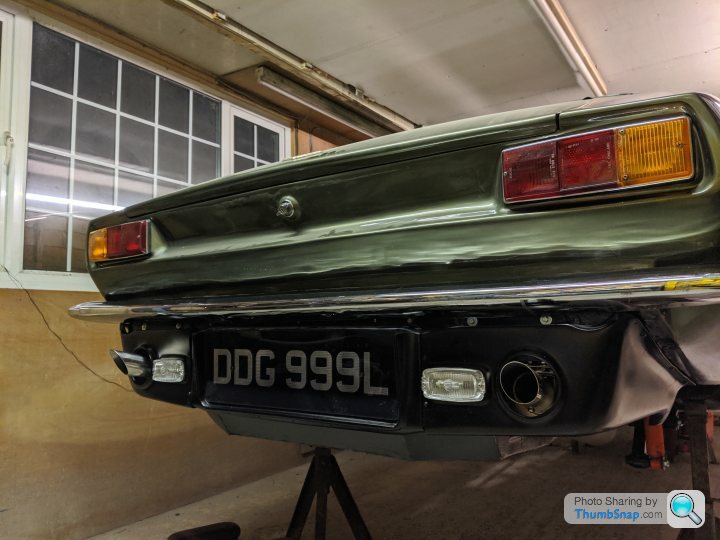
I can really see the benefits of both options! I like the silver on black, that's what I had on my DBS V8 and they looked right. My main issue with them on the AM V8 relates to the rear valance. On the DBS V8, the spare wheel sits upright against the fuel tank so the rear valence is thin as there is not much to cover below the rear bumper. Whereas on the AM V8 the spare wheel was moved and sits flat in the boot floor, requiring a bigger valance to cover the spare wheel well.The middle section of the rear valance, where the plate sits, is now larger than a standard UK number plate. So if you put a regular sized one in there, the number plate is too small and looks abit lost. I saw my car today and it just didn't look right.
I didn't take a picture of mine but I saw this 1973 V8 at the Bonhams Auction in 2016 and it had the same issue:
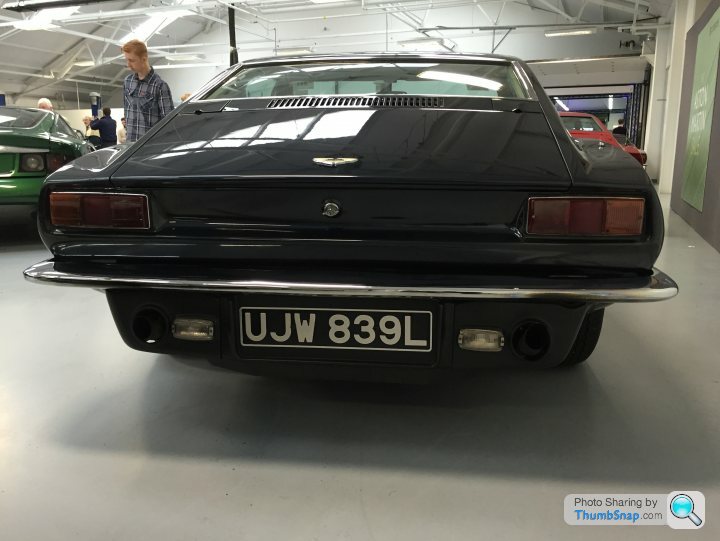
It's not the best photo but you can see the outline of the area and there is quite a gap between the top and bottom of the plates and the border. The cars I've seen have with the white and yellow plates, seem to have a custom size for the rear yellow plate which fills the entire space. Here's the same car, currently for sale, but now fitted with white and yellow plates, and here is the larger yellow rear:
As the single headlight cars were produced all the way through to the late 1980's, they are perhaps best fitted with the later style white and yellow plates? I'm really torn on this. Maybe the solution is to see if I can get hold of a larger rear silver on black plate, and a set of the white and yellow plates.
Thank you for the words of encouragement.
We are really getting close to finishing. The restorer is currently testing all the switches and other items within the electrical system to make sure everything is working. It's a massive fault finding mission because despite the harness being brand new, there are still issues with it. Or there's issues with the switches. Or the component itself that has an issue. The wiring diagram is no help at all and the manufacturer of the harness will not accept that their product is not 100% perfect. So it's a time consuming job that doesn't have the satisfaction of seeing another piece bolted to the car. Fortunately the restorer is incredibly patient and is working through it all wire by wire.
Lights are in and the "To Do" list actually looks reasonable. It could be done by the end of next month...
It's been a while so time for an update on the work...
August 2019
Exhaust manifolds installed after fitting the new studs.
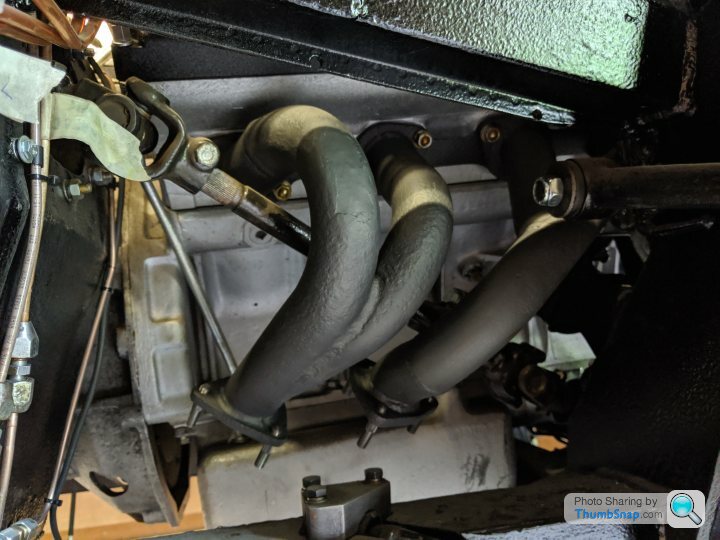


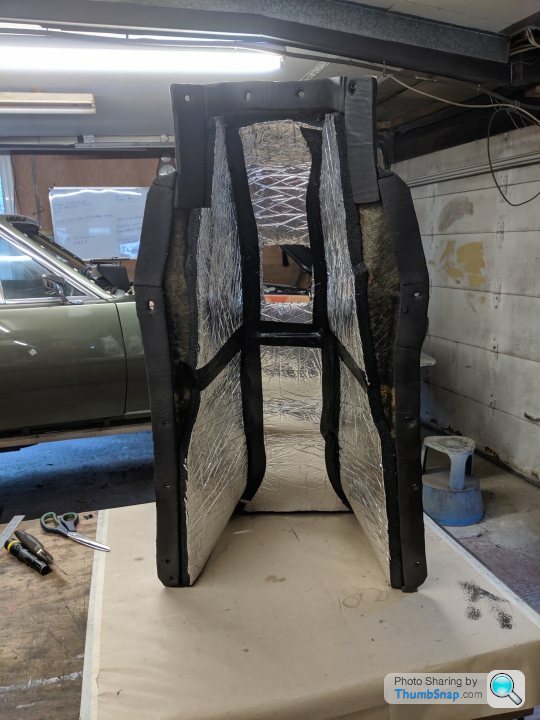
Exhaust heat shields: These were missing and all that could be found on-line were for later cars which will not fit. We have made these to original shape and dimensions and fitted the front and rear sections with spacers. We are in the process of making the two middle sections.

Wiring for the Bonnet Light was completed

August 2019
Exhaust manifolds installed after fitting the new studs.
Exhaust heat shields: These were missing and all that could be found on-line were for later cars which will not fit. We have made these to original shape and dimensions and fitted the front and rear sections with spacers. We are in the process of making the two middle sections.
Wiring for the Bonnet Light was completed

The Speedo drive saga....
As mentioned earlier, one of the parts we were missing for the 72 V8 was the speedo drive for the manual ZF box. Nobody in the UK had one however, I managed to track down one in the USA with a Maserati specialist (the ZF Box was also fitted to the Khamsin and Kyalami).
But we have a problem! Basically the unit is the correct one, but does not fit all the way into the gearbox casing. We have spent quite some time on this problem and after making a dummy shaft we have concluded that the external gear has the wrong number of teeth to mesh with the worm drive inside the gearbox. The drive assembly would be a universal unit but the gear and the worm drive inside the gearbox are matched together so they will mesh giving a specific ratio to drive the speedo, which in turn is specific to each manufacturer( Aston Martin, Maserati , Mercedes etc) using the same model ZF gearbox.
On discussion with a UK Aston specialist, he contacted a source at ZF and turned up another speedo drive. It was different to the first one so we had high hopes but sadly this one would not mesh with the teeth inside the gearbox either!
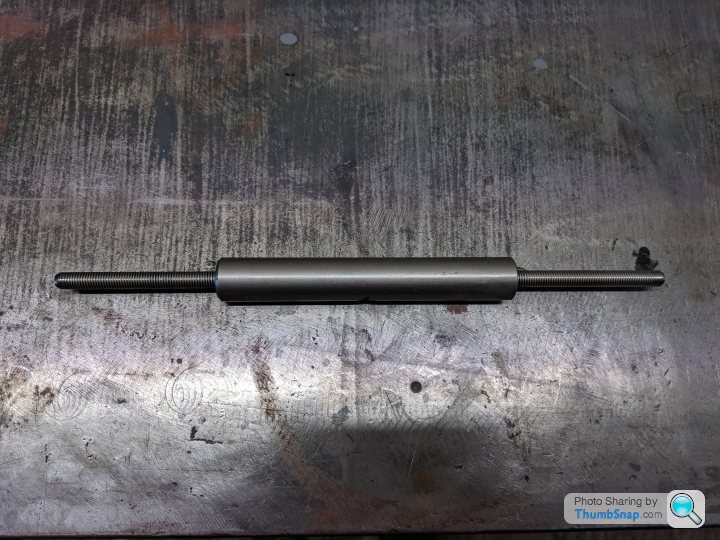
Here's a pic to illustrate the issue:
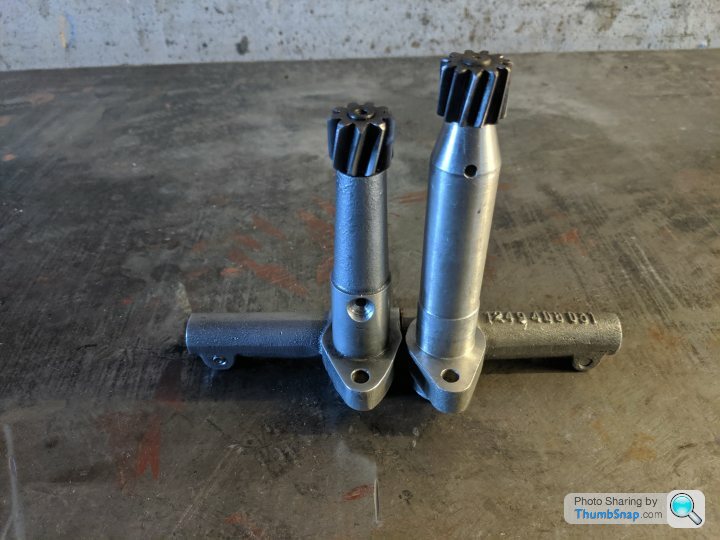
As you can see, visually the speedo drive supplied by ZF via the specialist is different from the one purchased direct from the Maserati supplier in America, they look the same but are different lengths. The shorter one on the left (from ZF) is the opposite hand too.
However, although the gears are the same diameter the number of teeth per gear are different being 11 or 9.
We would have been stuck but fortunately I have the V8 Vantage project. We extracted the speedo drive from that and it slotted straight in! This head has 10 teeth per gear. The restorer would have been happy to leave it at that and move on but that would just leave with the same problem down the line. So we decided to send the speedo drive from the Vantage to a machining company to make a new one.
The restorer sent it via recorded delivery..... and it got lost! You couldn't make it up. So we decided the only option was to try and remake it using the two incorrect ones as a template but finishing with a 10 teeth head. The two parts were couriered this time to the machining company. As we waited for them to start work, miraculously the correct speedo drive from the V8 Vantage was found! Phew! This saga was dragged out over the course of a month, so although it doesn't seem like long when I type it, believe me there were many nights of being seriously annoyed!!
The machine shop delivered the new drive, which was slotted in the V8 and fitted perfectly. The V8 Vantage one was returned to the car and the incorrect one from ZF was returned for a refund.
Another problem solved.
As mentioned earlier, one of the parts we were missing for the 72 V8 was the speedo drive for the manual ZF box. Nobody in the UK had one however, I managed to track down one in the USA with a Maserati specialist (the ZF Box was also fitted to the Khamsin and Kyalami).
But we have a problem! Basically the unit is the correct one, but does not fit all the way into the gearbox casing. We have spent quite some time on this problem and after making a dummy shaft we have concluded that the external gear has the wrong number of teeth to mesh with the worm drive inside the gearbox. The drive assembly would be a universal unit but the gear and the worm drive inside the gearbox are matched together so they will mesh giving a specific ratio to drive the speedo, which in turn is specific to each manufacturer( Aston Martin, Maserati , Mercedes etc) using the same model ZF gearbox.
On discussion with a UK Aston specialist, he contacted a source at ZF and turned up another speedo drive. It was different to the first one so we had high hopes but sadly this one would not mesh with the teeth inside the gearbox either!
Here's a pic to illustrate the issue:
As you can see, visually the speedo drive supplied by ZF via the specialist is different from the one purchased direct from the Maserati supplier in America, they look the same but are different lengths. The shorter one on the left (from ZF) is the opposite hand too.
However, although the gears are the same diameter the number of teeth per gear are different being 11 or 9.
We would have been stuck but fortunately I have the V8 Vantage project. We extracted the speedo drive from that and it slotted straight in! This head has 10 teeth per gear. The restorer would have been happy to leave it at that and move on but that would just leave with the same problem down the line. So we decided to send the speedo drive from the Vantage to a machining company to make a new one.
The restorer sent it via recorded delivery..... and it got lost!
You couldn't make it up. So we decided the only option was to try and remake it using the two incorrect ones as a template but finishing with a 10 teeth head. The two parts were couriered this time to the machining company. As we waited for them to start work, miraculously the correct speedo drive from the V8 Vantage was found! Phew! This saga was dragged out over the course of a month, so although it doesn't seem like long when I type it, believe me there were many nights of being seriously annoyed!!The machine shop delivered the new drive, which was slotted in the V8 and fitted perfectly. The V8 Vantage one was returned to the car and the incorrect one from ZF was returned for a refund.
Another problem solved.
October 2019
We are in that exciting stage of refitting bits to the car, which really helps you see the progress you are making. Things like lights, bumpers, radiator grill, badges etc.

You can see in this shot of the rear the larger number plate fitted. This fills the aperture and looks much better than the standard size number plate.
I have also ordered a complete stainless steel exhaust system for the car. The exhausts for the early mechanical fuel injection cars are different to the later carb'd cars so it's important you get the right one as these are not off the shelf items and are custom made. Here it is all in the box and ready to be fitted.

We are in that exciting stage of refitting bits to the car, which really helps you see the progress you are making. Things like lights, bumpers, radiator grill, badges etc.
You can see in this shot of the rear the larger number plate fitted. This fills the aperture and looks much better than the standard size number plate.
I have also ordered a complete stainless steel exhaust system for the car. The exhausts for the early mechanical fuel injection cars are different to the later carb'd cars so it's important you get the right one as these are not off the shelf items and are custom made. Here it is all in the box and ready to be fitted.
uncleluck said:
Cool thread.
I did a fair bit of work on one last year, had been left and the fuel surge tank was rusted inside. Car had been sat inside but out of fuel. Owner chucked some fuel in & then the fun started as the rust blocked the pump screens and the fuel turned brown and everything was a mess.
The fuel injection setup is pretty fun on them!
That sounds like a nightmare! Yes, the fuel injection system requires a lot of fiddling to get set up correctly but it is possible with the right tools.I did a fair bit of work on one last year, had been left and the fuel surge tank was rusted inside. Car had been sat inside but out of fuel. Owner chucked some fuel in & then the fun started as the rust blocked the pump screens and the fuel turned brown and everything was a mess.
The fuel injection setup is pretty fun on them!
uncleluck said:
Yeah, It’s worth keeping an eye on yours as they rot well and they’re baffled so was a pain to clean. I think he should have had a new one made up honestly as looking at the fuel filter it’d been sending a tea of rust through the fuel system before as the filter was sludged with it too. Be a shame for yours to have done the same if it’s been dry in there?
The tank has been cleaned and treated so we should be okay.
Exhaust fitted! There were a lot of pieces, which went together reasonably straight forward once the first connection was corrected. Where the exhaust connects the manifolds, each pipe connects with 3 studs but unfortunately they didn’t fit. Closer inspection and comparison to another set of manifolds demonstrated the exhaust flange holes were too wide apart, clarified with some measurements. This was remedied by elongating the flange holes to the smaller pitch circle of the manifold studs. Problem solved.
Gassing Station | Readers' Cars | Top of Page | What's New | My Stuff