Pembleton mkII - Tin Tub
Discussion


Retroguy said:
One of my problems is indecision.... For example, I'm not sure whether to go short or long wheelbase (am just over 6ft, medium build) and can't make up my mind on original or wire wheels.
Retroguy - I replied to your PM on the email address included in your message. Have you seen it? 
Ambleton said:
Yazza54 said:
Nice work mate
Thanks Ryan, Are you planning on racing again this year?
Looking forward to seeing your updates.
Yep thread running here:
https://www.pistonheads.com/gassing/topic.asp?h=0&...

Another reasonably productive evening in the garage!
I had another little go at wiring an edge tonight and documented the whole process in case anyone is interested or can provide any hints n tips.
With a 10mm slot cut in a short length of bar, I nibbled around the edge. About 4 or 5 passes to get it to 90degrees.
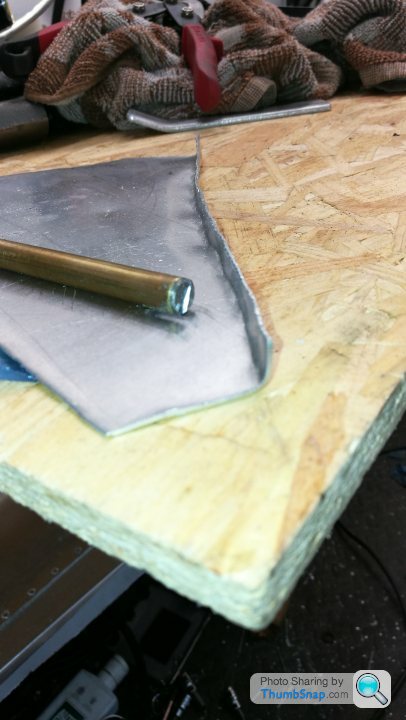
I then used a dolly and hammer to knock it over to maybe 130 degrees.

Then a 5mm kinked bit of plate with a rounded end takes it to 180degs.

Then inserted the wire and staked at the end, then knocked along the length to contain it.


I also got the rear wheel on tonight, which meant I could finally position the rear wheel housing. Once it was bonded and riveted in place I went underneath and bashed the lip up against the skin and sealed it with tigerseal all along the seams... I may have gone a bit mad...


I also modified and fitted the gearbox mount. With captain hindsight to the rescue I realise I should've done this before fixing the front bulkhead in place. It's tight... too tight... its very tight on Victoria, and I don't like it...


There's only one thing for it... make a recess panel and cut out part of the bulkhead...
CAD (cardboard aided design) to the rescue and I soon had a pattern for a blister...
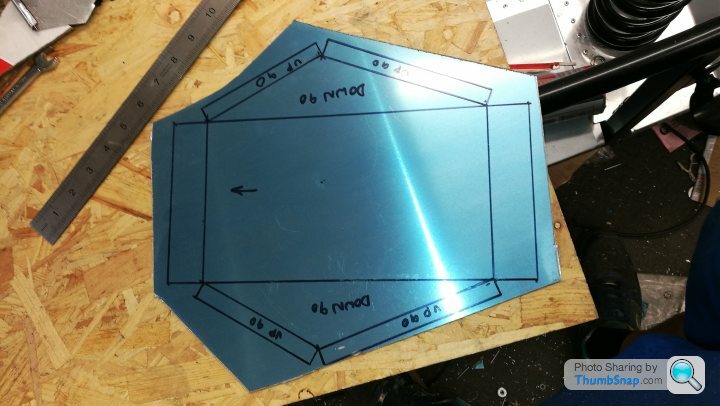
All cut out and folded up I offered it up to the bulkhead and marked for surgery...

Cutting it out in situ was an absolute see you next tuesday of a job, but I had no choice...

And clecod in place! Much happier now and once fully bonded and riveted in will make the front bulkhead stiffer anyway... plus gives plenty of room for getting a spanner on the gearbox mounts (it'll move around a bit anyway whilst driving)


I had another little go at wiring an edge tonight and documented the whole process in case anyone is interested or can provide any hints n tips.
With a 10mm slot cut in a short length of bar, I nibbled around the edge. About 4 or 5 passes to get it to 90degrees.
I then used a dolly and hammer to knock it over to maybe 130 degrees.
Then a 5mm kinked bit of plate with a rounded end takes it to 180degs.
Then inserted the wire and staked at the end, then knocked along the length to contain it.
I also got the rear wheel on tonight, which meant I could finally position the rear wheel housing. Once it was bonded and riveted in place I went underneath and bashed the lip up against the skin and sealed it with tigerseal all along the seams... I may have gone a bit mad...
I also modified and fitted the gearbox mount. With captain hindsight to the rescue I realise I should've done this before fixing the front bulkhead in place. It's tight... too tight... its very tight on Victoria, and I don't like it...
There's only one thing for it... make a recess panel and cut out part of the bulkhead...
CAD (cardboard aided design) to the rescue and I soon had a pattern for a blister...
All cut out and folded up I offered it up to the bulkhead and marked for surgery...
Cutting it out in situ was an absolute see you next tuesday of a job, but I had no choice...
And clecod in place! Much happier now and once fully bonded and riveted in will make the front bulkhead stiffer anyway... plus gives plenty of room for getting a spanner on the gearbox mounts (it'll move around a bit anyway whilst driving)
choogh said:
Excellent work, and development, that modification should be incorporated within. PMC design for new builds.
Great blog.
Charlie
Thanks for your kind words. There's lots about the standard build that I'm not super happy with, which is one of the reasons I'm building this one.Great blog.
Charlie
I want this one to be a keeper, and an hour or two spent getting these things right now will pay dividends in the future. I can imagine myself in 5 years changing that gearbox mount and using many expletives without the extra room I've just created. It should make it a doddle now.
Not a huge amount to update. I tidied the front end of the garage on sunday and reorganised a bit.
The offside suspension is now all fitted along with the drive shafts, hubs and wheels adaptors. Next up is the wheels! Then she'll be rolling!
A development that I did not foresee, is that (apparently) Ami tie rods are shorter than 2cv ones. I only found out because I fitted my freshly restored ami tie rods with the new ball joint conversion and they didn't fit!
At first I assumed that the ball joint conversion kit was wrong. I removed and refitted them (just to make sure, almost in the hope that they'd suddenly fit). No matter what I did the hubs pointed out, even with only a few threads engaged.... surely this cant be right...
I remembered that i had a spare pair of 2cv tie rods and steering arms tucked away in the corner of the garage. Old, rusted and covered in s te.
te.
I dragged them out, cracked off the nuts and removed the adjusters and arms. A side-side comparison shows that the 2cv tie rods are about 45mm longer than the Ami rods....
I've cleaned them up on the wire wheel and wiped them down and they currently in the garage after their first coat of paint. I'm just glad I had some 2cv ones knocking about!

I also wiped down the rear deck/wheel housing with a light spray of cleaner and a soft brillo pad. Its taken the shine off and left a nice uniform brushed type finish... I quite like it so I may do the bodywork like this... keeping it polished is a total PITA.

The offside suspension is now all fitted along with the drive shafts, hubs and wheels adaptors. Next up is the wheels! Then she'll be rolling!
A development that I did not foresee, is that (apparently) Ami tie rods are shorter than 2cv ones. I only found out because I fitted my freshly restored ami tie rods with the new ball joint conversion and they didn't fit!
At first I assumed that the ball joint conversion kit was wrong. I removed and refitted them (just to make sure, almost in the hope that they'd suddenly fit). No matter what I did the hubs pointed out, even with only a few threads engaged.... surely this cant be right...
I remembered that i had a spare pair of 2cv tie rods and steering arms tucked away in the corner of the garage. Old, rusted and covered in s
te. I dragged them out, cracked off the nuts and removed the adjusters and arms. A side-side comparison shows that the 2cv tie rods are about 45mm longer than the Ami rods....
I've cleaned them up on the wire wheel and wiped them down and they currently in the garage after their first coat of paint. I'm just glad I had some 2cv ones knocking about!
I also wiped down the rear deck/wheel housing with a light spray of cleaner and a soft brillo pad. Its taken the shine off and left a nice uniform brushed type finish... I quite like it so I may do the bodywork like this... keeping it polished is a total PITA.
I've just noticed you mentioned using Sikaflex up there somewhere...before this job I was temping at JLR Solihull in the Body in White shed on the production line of the new (then) XE. Us temps used to squirt this incredibly sticky stuff all day long on all sorts of brackets and body parts...if it's good enough for them, it'll probably do you, eh?
Pothole said:
I've just noticed you mentioned using Sikaflex up there somewhere...before this job I was temping at JLR Solihull in the Body in White shed on the production line of the new (then) XE. Us temps used to squirt this incredibly sticky stuff all day long on all sorts of brackets and body parts...if it's good enough for them, it'll probably do you, eh?
Indeed! It was used at Princess yachts too (when I was there) for bonding various bits together, windows, frames, trims etc. There's about a dozen different grades available though so who knows what type it used at JLR/princess. I'm using 552, which is a flexible structural adhesive (in addition to the rivets obviously). Comparison chart here:
https://www.jamestowndistributors.com/userportal/d...


Thanks schmeeky, when I picked them up they were a bit brighter than I wanted. I thought they were going to be more maroon/wine, but I really like them now as the blood red. I think classier than the pillar box red wheels on Victoria.
I had today off work so thought id have a go at making a seat...


I had today off work so thought id have a go at making a seat...
Gassing Station | Readers' Cars | Top of Page | What's New | My Stuff