Pembleton mkII - Tin Tub
Discussion


Well...
Time is dwindling fast!
The passenger seat still wasn't finished so I thought I'd spend the weekend setting the latch and putting the upholstery cover on. My wife proclaimed the seat wasn't padded enough either...
After pissing about for a few hours It was clear It needed a rethink and doing again a bit different/better...
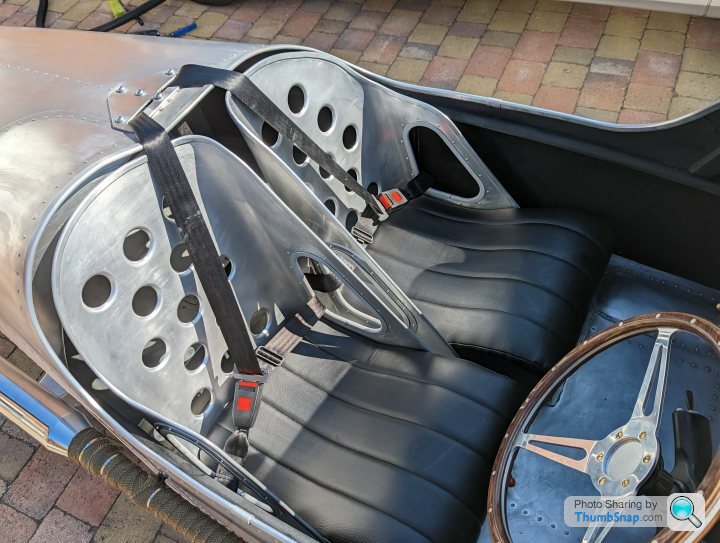
So I remade the seat base and remounted the latch in the floor. Keen motorcyclists among us may recognise the latch/striker as it's fitted to a tonne of Jap bikes (Yamaha. Kawasaki, Suzuki). Seat base cut, front hinge fitted first, then the seat latch. Once I was happy with that I could turn it into the seat. next up drilling off the holes for the seat back and then rebuild the seat base before padding (a lot more at the request of my wife) and fitting the cover she made, before then refitting the seat back, hinge and striker. The latch is under the floor operated by a push button next to the seat.
Seat fit and belts bolted in. Pleased now though.


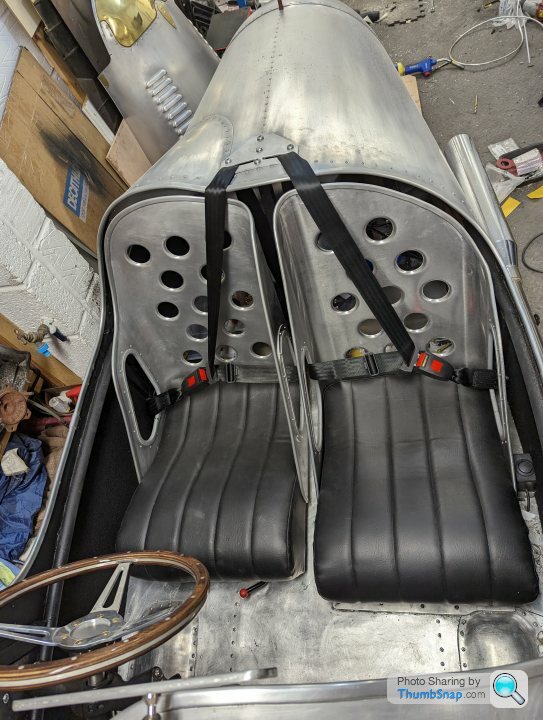
Wife is happy too as theres now 2.5" of foam padding in there instead of 1.5".
Next up is just odds n sods.
Need to check the valve clearances, headlight aim, make sure all the radii are good for the MSVA. Secure the gear leaver pass through surround, tidy up some cable and pipe routing.
Time is dwindling fast!
The passenger seat still wasn't finished so I thought I'd spend the weekend setting the latch and putting the upholstery cover on. My wife proclaimed the seat wasn't padded enough either...
After pissing about for a few hours It was clear It needed a rethink and doing again a bit different/better...
So I remade the seat base and remounted the latch in the floor. Keen motorcyclists among us may recognise the latch/striker as it's fitted to a tonne of Jap bikes (Yamaha. Kawasaki, Suzuki). Seat base cut, front hinge fitted first, then the seat latch. Once I was happy with that I could turn it into the seat. next up drilling off the holes for the seat back and then rebuild the seat base before padding (a lot more at the request of my wife) and fitting the cover she made, before then refitting the seat back, hinge and striker. The latch is under the floor operated by a push button next to the seat.
Seat fit and belts bolted in. Pleased now though.
Wife is happy too as theres now 2.5" of foam padding in there instead of 1.5".
Next up is just odds n sods.
Need to check the valve clearances, headlight aim, make sure all the radii are good for the MSVA. Secure the gear leaver pass through surround, tidy up some cable and pipe routing.
85Carrera said:
Ambleton said:
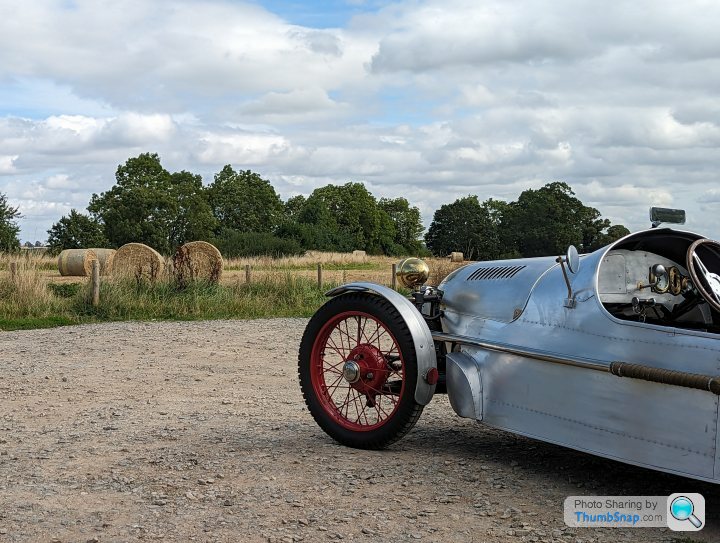
Armed with a bucket of soapy water and a scouring pad (I know that sounds wrong!) I gave her a rub down and towel dried. It's uneven at the minute but once it oxidises it goes to a more even dull all over finish.
Can I ask why you’re using a scouring pad? Presumably on aluminium?My last one was polished and it was an absolute pain in the ass. As soon as you polish it, it picks up marks and or oxides and needs doing again. With a dull/brushed finish you don't have to worry about any of that
Well.... Test on Wednesday....
Had a panicked weekend of jobs to do!! Mainly radiusimg parts. Wrap exhaust to cover joins, brackets and clamps, nut covers, shrink wrap, dome nuts. Double checking hose and cable routings, wiping it down etc.
I also removed the sump extension as it meant I had to increase ride height and it looked like it was on stilts. I have fitted a bulk oil temp gauge though with the sensor in the sump.
I think I'm about ready for my first stab of the test. I'm hoping for a pass, but I wouldn't be surprised if they fail it on something. Better to expect a fail and then I won't be disappointed!
Final few jobs left to do. Need to double check the Speedo calibration and also tracking, then I can shrink the shrink wrap to cover the edges of the track adjusters.


The fire guard ain't pretty...

Trailer hired for mid week. Hiring a trailer was more troublesome than I thought. Has to be a flatbed (for the third wheel, and my Volvo is only rated to tow 2tonnes most flat bed trailers are rated at 2.7t and are twin axle.

Had a panicked weekend of jobs to do!! Mainly radiusimg parts. Wrap exhaust to cover joins, brackets and clamps, nut covers, shrink wrap, dome nuts. Double checking hose and cable routings, wiping it down etc.
I also removed the sump extension as it meant I had to increase ride height and it looked like it was on stilts. I have fitted a bulk oil temp gauge though with the sensor in the sump.
I think I'm about ready for my first stab of the test. I'm hoping for a pass, but I wouldn't be surprised if they fail it on something. Better to expect a fail and then I won't be disappointed!
Final few jobs left to do. Need to double check the Speedo calibration and also tracking, then I can shrink the shrink wrap to cover the edges of the track adjusters.
The fire guard ain't pretty...
Trailer hired for mid week. Hiring a trailer was more troublesome than I thought. Has to be a flatbed (for the third wheel, and my Volvo is only rated to tow 2tonnes most flat bed trailers are rated at 2.7t and are twin axle.
Konrod said:
Good luck for Wednesday. It's nerve wracking - take the MSVA instruction book with you - I didn't and failed on points I shouldn't have. The testers are human so talk to them as you go through the process. Very good presentation and prep by the looks of it which will create the right impression
Your fireguard is definitely better than the one I came up with........mine didn't last long.
Thanks. My fire guard is now third or fourth hand Your fireguard is definitely better than the one I came up with........mine didn't last long.

Tony (WEG3) made it for when he tested daisy and it's since "gone around the block".
I'm expecting questions on lights and belts but I'm prepped for those. Will take a digital copy to refer to just in case.
Everyone I've spoken to said that the testers are thorough but fair and want you to pass as ultimately they want to see cool stuff on the road (so long as it's safe). It's a great thing we do in this country. In the rest of Europe it's very very hard.
ivanhoew said:
i reckon it will pass .
(pocket full of brillo pads to stuff up the pipes .... just in case its too loud ?)
It's actually not that loud to be honest. A fair bit quieter than the last one!(pocket full of brillo pads to stuff up the pipes .... just in case its too loud ?)
Picked up the hire trailer last night to take it to the test, trailer is a fair bit heavier than the Pembleton! And it's a "lightweight"
single axle trailer
Douchebag of the day award goes to a younger chap walking past. His face lights up and says
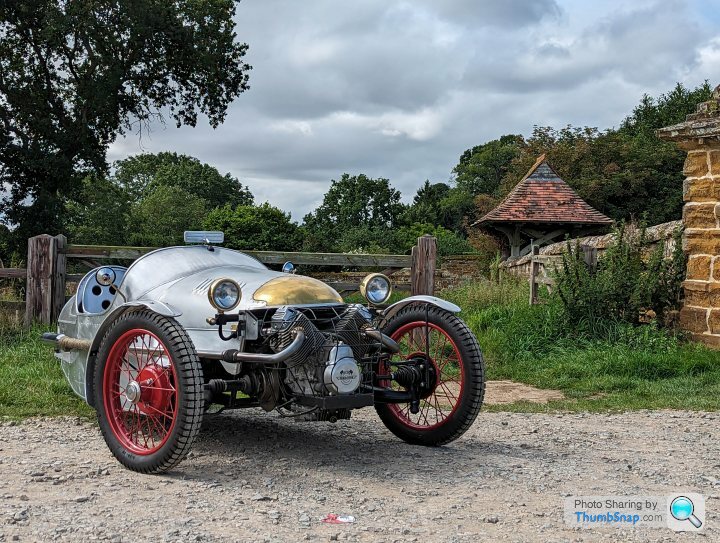
"it's beautiful, is it a Morgan?"
I say no and shake my head, about to explain what it is, his shoulders drop and his face changes to as if I've just insulted his sainted grandmother and he just says "oh" and walks off....
Glad really as I didn't have to take time out explaining everything to the millionth person who walked past. Would've been wasting my breath anyway by his reaction...

Test was about 2.5hrs long.
Failed on three things. Some fair enough, some a bit up for debate IMO but them the rules.
In fairness the inspector was very good and very thorough, he was overall very complimentary on the build and said generally it was much better presented than nearly all other kits/homebuilds.
He also said he'd never looked over a car that was a worthy pass first time round and my three "minors" were a good sign in his book.
Fail 1:
He didn't agree that the removable steering wheel was (by the rules) an acceptable anti theft device. Double checking the wording I think he's probably right. We discussed it at the time and I conceded.
"
• The device may be mechanical or electrical, or an electronic
immobiliser or a combination of these in addition to any switch normally used to start the engine.
• Mechanical devices must act positively to lock the steering or transmission system or both.
Requirements and Procedures
1. Check that the vehicle is fitted with an operational device or system intended to prevent the unauthorised use of the vehicle such that it shall be necessary to disable it in order to point, drive or move the vehicle straight ahead.
2. Check that any device fitted does not act on any part of the braking system.
3. Check that the protective device cannot accidentally jam when the vehicle is
in motion."
A removable steering wheel, in his reading of it, whilst is a mechanical device. Does not positively lock the steering.
Fail 2:
Two studs underneath are a smidge short of protruding through the locking feature on nuts, and therefore need addressing. Either with half locking nuts or slightly longer studs. (Fair one and easy to rectify)
Fail 3:
This one is slightly more tricky to resolve and is actually not my bad, but the chassis as supplied from PMC. Through the suspension articulation the suspension tie rods rub/foul on the chassis. The spring cups have been welded on a bit high. I have a plan for sorting it out (I think) but it's gonna be a bit of a mission to sort it out
Konrod said:
Well done. Getting through with minors like that is a positive achievement an you can be confident of it passing next time - they will only look at the fails, not re-asses the whole car again.
1 and 2 are easy to sort. The last one sounds more painful - I can't just remember the details but is there scope to move the rods where they locate through the tabs on the suspension arm (further down). Or could you add some bump stops so that the rod never gets to foul the chassis?
Let us know how you get on.
No. It's as if the spring cups are welded in too high. As I see it there are three potential resolutions...1 and 2 are easy to sort. The last one sounds more painful - I can't just remember the details but is there scope to move the rods where they locate through the tabs on the suspension arm (further down). Or could you add some bump stops so that the rod never gets to foul the chassis?
Let us know how you get on.
1- move the connection point on the suspension arm vertically down on all three arms. (Means cutting and welding the suspension arms). This also firms up the suspension as the action ratio is reduced.
2- remove the spring cups and reattach them slightly further down (that's a lot of work and could damage the floor)
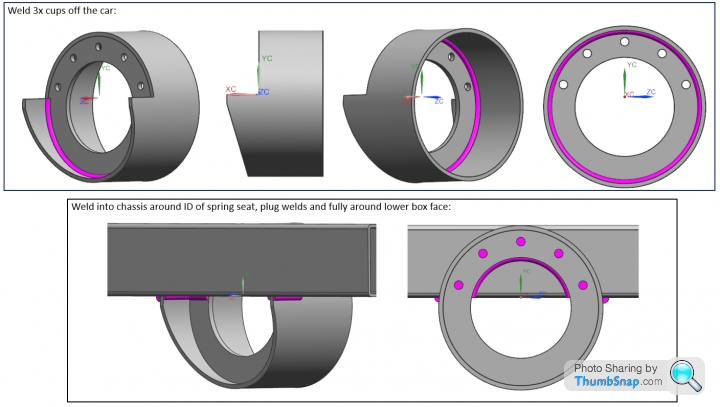
3- scolloping the chassis by ~5-8mm with a section of tube and adding in reinforcer plates to the sides and closing it off.


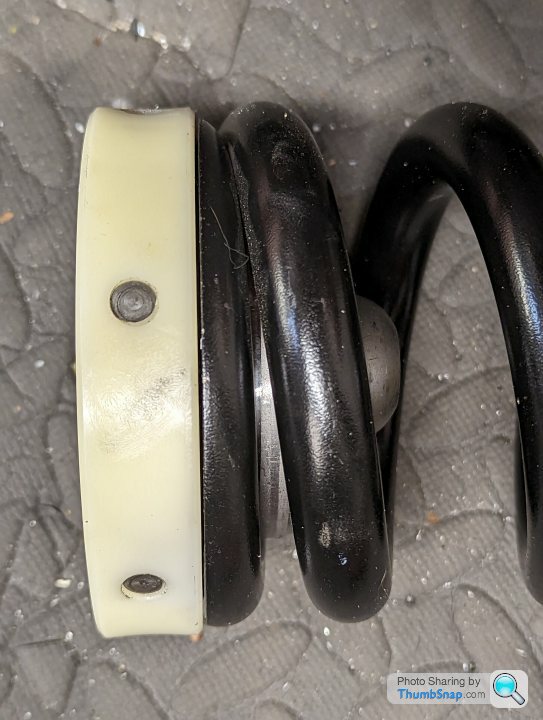
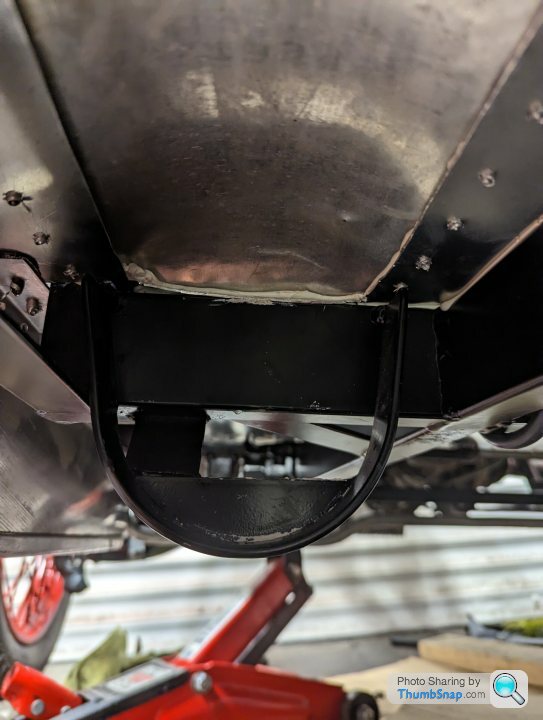
This is the area I'm talking about. You can see the spring in the cup with the tie rod here.
Changing the ride height doesn't increase clearance perceptibly because it's a horizontal linear motion.
Notching the chassis isn't ideal. I might look and see what mig torch access is like. The spring cups are fairly crude so I'm sure I could make something nicer. Cut the existing ones off and relocate new ones 5mm further down. Just need to make sure I can get welding access first....
It's very simple and very clever and the reason 2cvs lean a lot. Normally suspension is around 1.5:1 or something and are as such a rising rate. IE, the more travel, the firmer it gets.
On a 2cv design the ratio is about 4.5:1. The springs are much much stiffer and as such, the suspension travel is (basically) constant rate.
The suspension pulls on the back of the spring, rather than compressing it from the front, taking advantage that steel is excellent in tension and rubbish in compression.
The damper is a separate unit that lies parallel with the tie rod.
Found the problem.
I've removed the tie rods and springs.
The spring cups in the chassis have a smaller radius than the springs and then they taper out.
This means that it's not possible for the spring to sit at the bottom of the cup. There's a gap of approx 6-7mm!! Which is about the clearance I need
All cups are the same so I think I'm going to have to cut out all the spring hangers/cups, make new ones and weld them in.
What a pain in the sack.
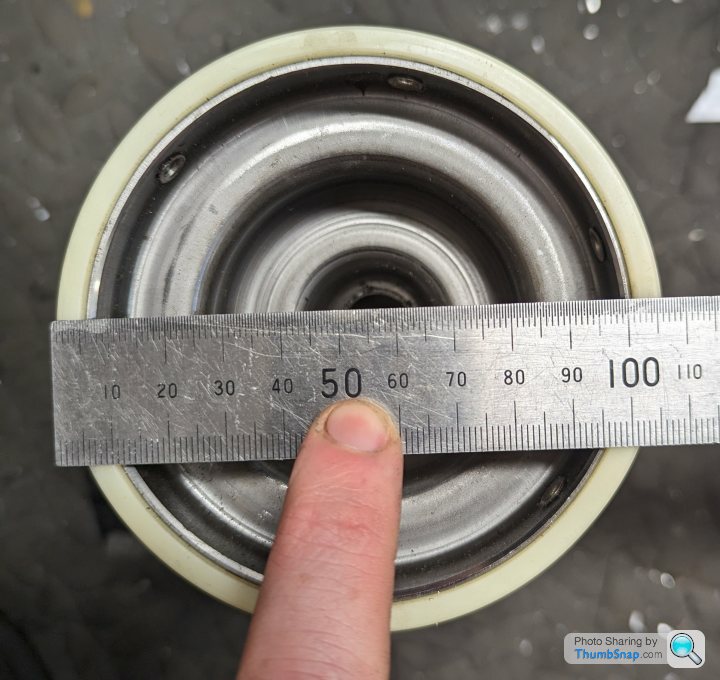
Spring and end pull for the tie rod:
Spring DIA =105:
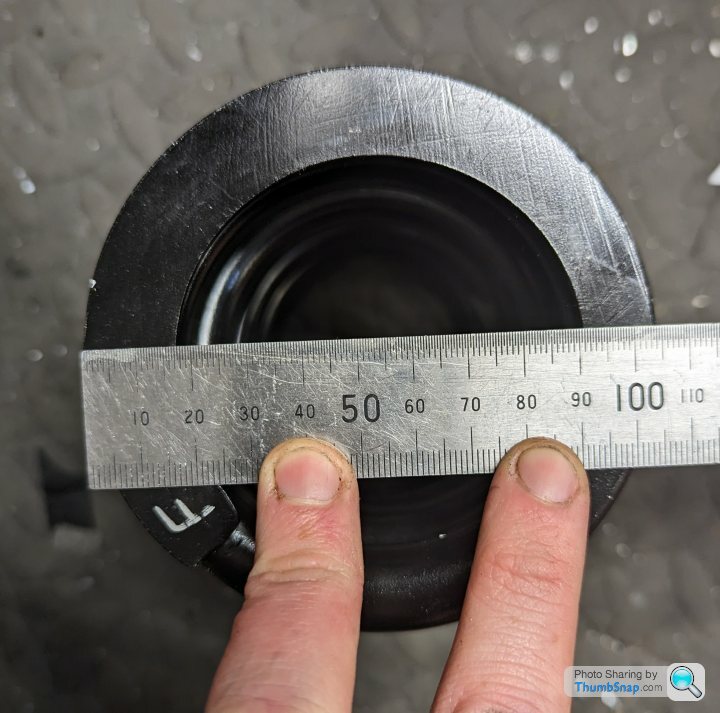
End pull DIA =106:
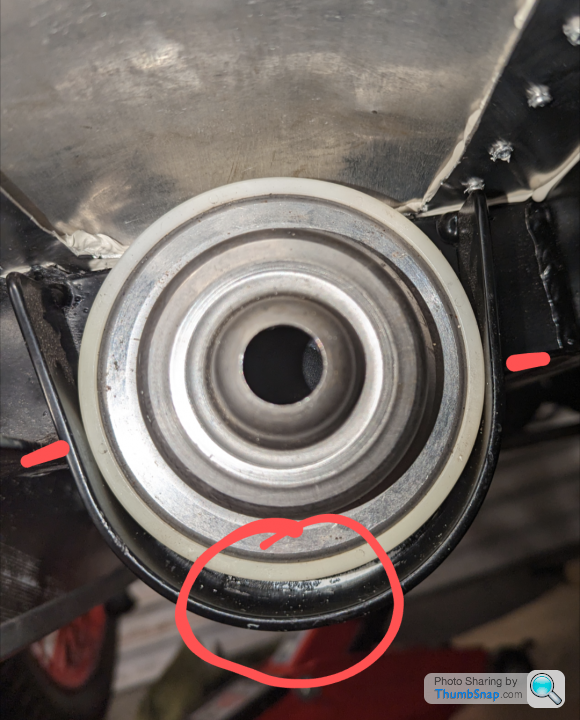
Spring hanger/cup in the chassis (from rear):
Spring end pull in cup to check how much it doesn't fit! Pinch points and gap highlighted:
I've removed the tie rods and springs.
The spring cups in the chassis have a smaller radius than the springs and then they taper out.
This means that it's not possible for the spring to sit at the bottom of the cup. There's a gap of approx 6-7mm!! Which is about the clearance I need
All cups are the same so I think I'm going to have to cut out all the spring hangers/cups, make new ones and weld them in.
What a pain in the sack.
Spring and end pull for the tie rod:
Spring DIA =105:
End pull DIA =106:
Spring hanger/cup in the chassis (from rear):
Spring end pull in cup to check how much it doesn't fit! Pinch points and gap highlighted:
never_thought_id_buy said:
That looks like a very poor ‘design’. There’s nothing except friction and gravity stopping the spring end riding up. I’m slightly surprised that the assessor didn’t demand a more positive location.
And suspension pull rod keeping it taught into the cup, but yes, you're right. I've ordered the materials to fab up some much better ones. I also need to draw up some plates to get laser cut.
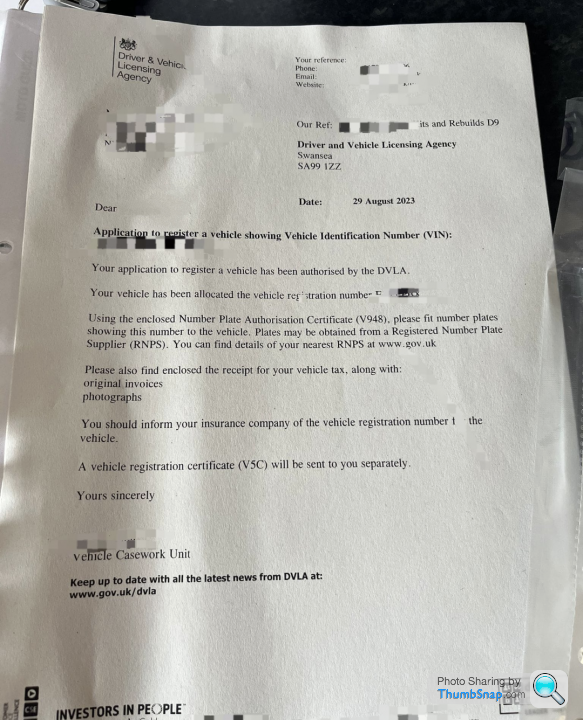
MSVA retest this morning and we have a pass!
Now to register it with the DVLA!
My slot was booked for 9am. I turned up at 8.30 allowing plenty of time to get there. The tester wandered over, looked at the bits it failed on last time to ensure they'd been rectified and issued me a ministry approval certificate by 8.45am!
This moment has been 6years in the making and I've had a really s tty year so far. I'm not afraid to say I might have shed a little tear on the way home!
Now to register it with the DVLA!
My slot was booked for 9am. I turned up at 8.30 allowing plenty of time to get there. The tester wandered over, looked at the bits it failed on last time to ensure they'd been rectified and issued me a ministry approval certificate by 8.45am!
This moment has been 6years in the making and I've had a really s
tty year so far. I'm not afraid to say I might have shed a little tear on the way home!Thanks all.
Just spent what seems like forever filling if the forms for the DVLA.
Original paper copies of stuff, cheque or postal order payment! Really is in the dark ages.
Why it isn't electronic/automated I don't know. I don't even own a chequebook! Will pop to the PO in the morning and send it with a postal order....
Next project on the trailer ready to go to it's new home...
Worthless, yet priceless!
https://www.pistonheads.com/gassing/topic.asp?h=0&...
Worthless, yet priceless!
https://www.pistonheads.com/gassing/topic.asp?h=0&...
Gassing Station | Readers' Cars | Top of Page | What's New | My Stuff