1964 Alvis Stalwart
Discussion


Saw a Stalwart at Wings and Wheels over the weekend. I tried to go in for a closer look but there was nobody obviously as an "owner" nearby for me to ask about it. There was also a nice Bedford RL, and a Bedford 4 ton radio truck, again, noone around to ask for a closer look with them!
What a pain! Good that you've seen them in the flesh though.
Today has been a bloody nightmare working on her as we tried to disconnect the transfer box from the bevel box drives to the centre wheels. In theory all through the little inspection hole in the top of the bevel box you undo two bolts, which releases two clamps, then the shaft can be pushed back into the transfer box. Some larger clamps on the outside are then undone and the the whole lot can then be separated.
Unfortunately the clamps inside rotate with the assembly so when it comes to removing them the bolt heads have to be pointing upwards at the inspection hole. You'd achieve this by turning the driveline/transfer box. This is all good and well when everything actually turns, but unfortunately ours doesn't and the bolts are in totally the wrong place. Of the four I've managed to get one out
We even tried putting the sun gear back in the centre wheel to reconnect the drive and tried towing it free with the Bedford, we just dug a trench instead! Had to borrow the farmer's tractor to pull it back as the Bedford kept spinning its wheels

Unfortunately the only way forward that I can see is a bit of butchery in there with a cutting torch or something, very frustrating as knackered or not I don't like doing that sort of thing!
Today has been a bloody nightmare working on her as we tried to disconnect the transfer box from the bevel box drives to the centre wheels. In theory all through the little inspection hole in the top of the bevel box you undo two bolts, which releases two clamps, then the shaft can be pushed back into the transfer box. Some larger clamps on the outside are then undone and the the whole lot can then be separated.
Unfortunately the clamps inside rotate with the assembly so when it comes to removing them the bolt heads have to be pointing upwards at the inspection hole. You'd achieve this by turning the driveline/transfer box. This is all good and well when everything actually turns, but unfortunately ours doesn't and the bolts are in totally the wrong place. Of the four I've managed to get one out
We even tried putting the sun gear back in the centre wheel to reconnect the drive and tried towing it free with the Bedford, we just dug a trench instead! Had to borrow the farmer's tractor to pull it back as the Bedford kept spinning its wheels
Unfortunately the only way forward that I can see is a bit of butchery in there with a cutting torch or something, very frustrating as knackered or not I don't like doing that sort of thing!
On the plus side it's not all bad news, I spoke to a chap named Colin who used to work for Fazakerley Engineering, a company that worked as contractors on MOD equipment, predominantly Stollies doing rebuilds and modifications on them. Fazakerley is mentioned twice in its history, first in 1974 and the next 1980, on both occasions she would've had a full strip down to a bare hull and rebuild, then a thorough inspection and road/water test afterwards.
He sent me these photos of one he believes may well be ours, taken 1974

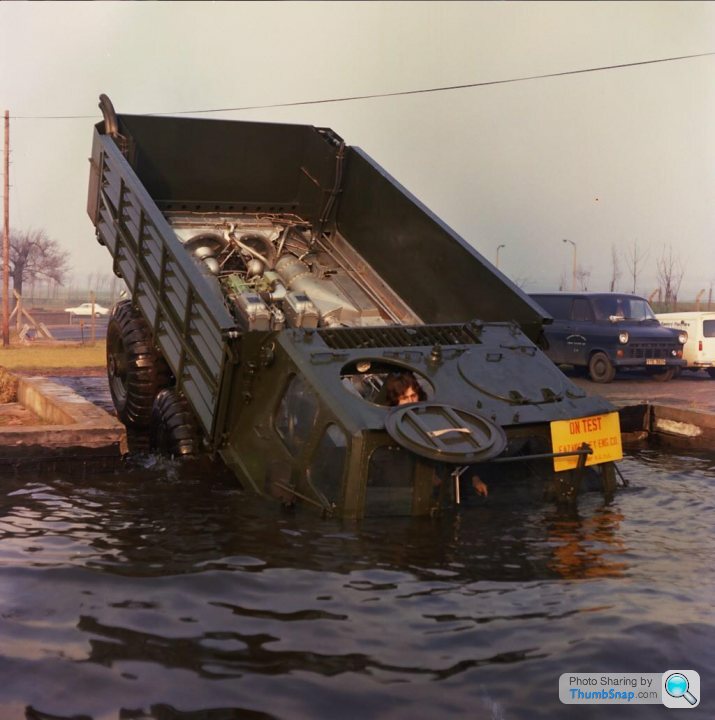
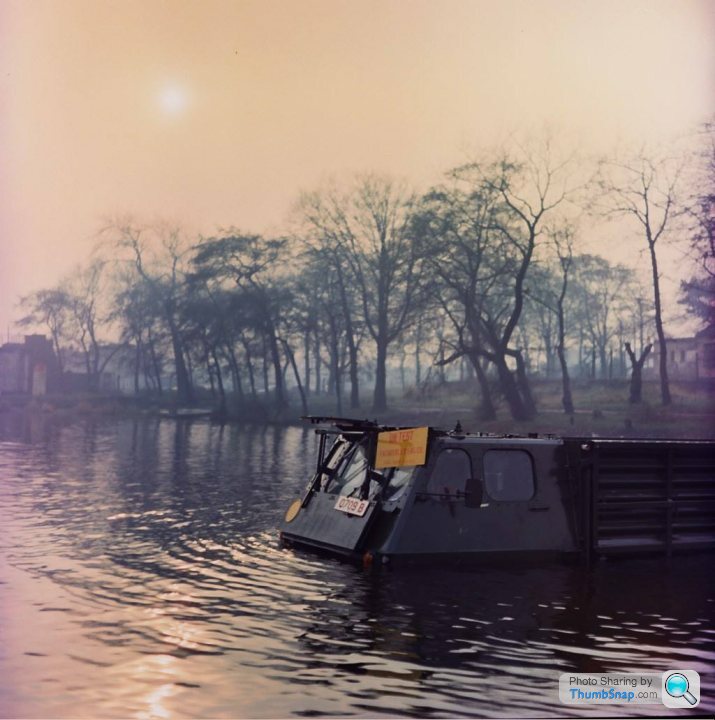
He sent me these photos of one he believes may well be ours, taken 1974


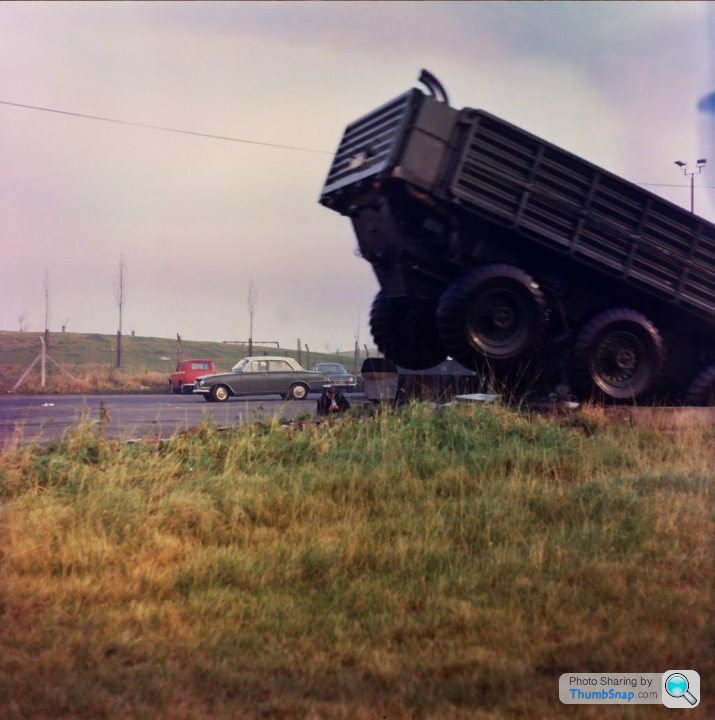
Cheers Shadow! As my dad said 'you really couldn't have put any more force through that if you'd tried'
We took the PTO gearbox off the top of the main gearbox mid week to have a good look in there, wondering if that had somehow jammed up causing the transfer box to lock up. It sounds silly but we were almost disappointed to find that it all looked very clean and gearboxy in there, with a lever bar we turned it over and pushed the selector dogs into place. It was tight but all seems to work relatively well.
The plan has changed slightly in that we're going to try and pull the front casing off of the transfer box to try and work out what the hell has gone on in there. It must be pretty awful to resist 9 tonnes trying to turn it!
Friday should be the big shopping day for the truck, we are sending our shopping list off for parts we need at the moment and should be getting a quote for the sum total of parts very shortly. The plan is to combine collection of those with the collection of the tyres as well. I have spoken to Trevor regarding our troubles with the driveline and he reckons they have the cut up remains of another Mk1 including centre bevel boxes etc so that could be another good source of spares there. I am looking at getting some EMERs as well, a sort of thoroughly detailed military Haynes manual as I think we'll be needing them for this drivetrain stuff!
Well there's no doubt about it my wallet has definitely returned from that trip a bit lighter! We got down to East Sussex yesterday afternoon and collected a reconditioned transfer box and gearbox assembly for the Stolly, along with several other bits and pieces like a set of belts, new plugs, filters, clutch plates, drive joints, you name it. Richard's place was fantastic, a properly old fashioned farm with ancient wooden barns in various states of decay, stillages of military parts everywhere, all set in the most beautiful countryside.
We then had the pleasure of making our way back to the M25 to get to Mark's so that we could collect the tyres, the Maps app on my phone was showing red traffic right the way round going clockwise so we had the pleasure of going over Dartford and right the way round anticlockwise instead! Having unloaded it wasn't far off midnight by the time we walked in.
Came home with a fair pile of parts for our hard earned monies
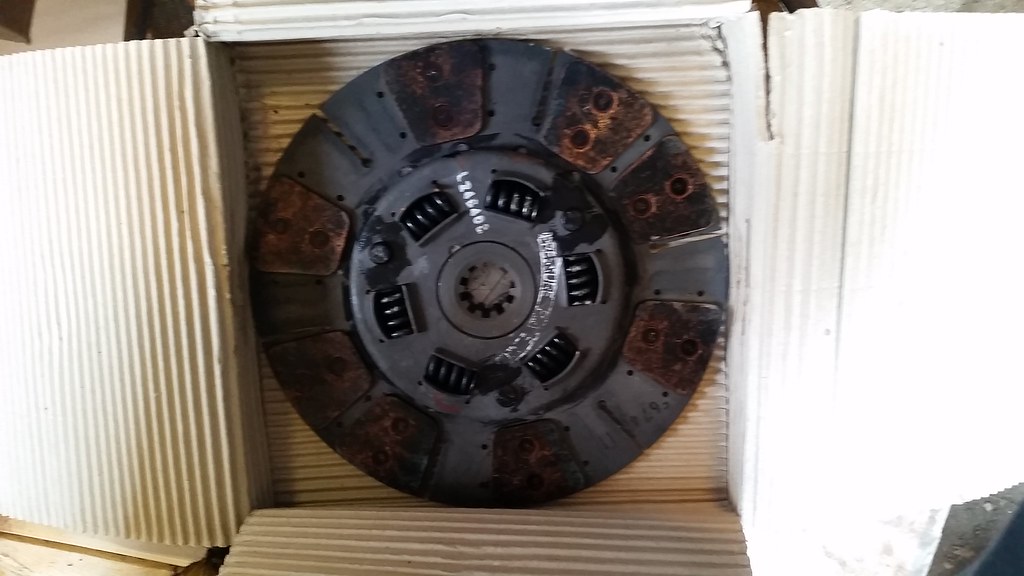
Sintered bronze clutch plates x2
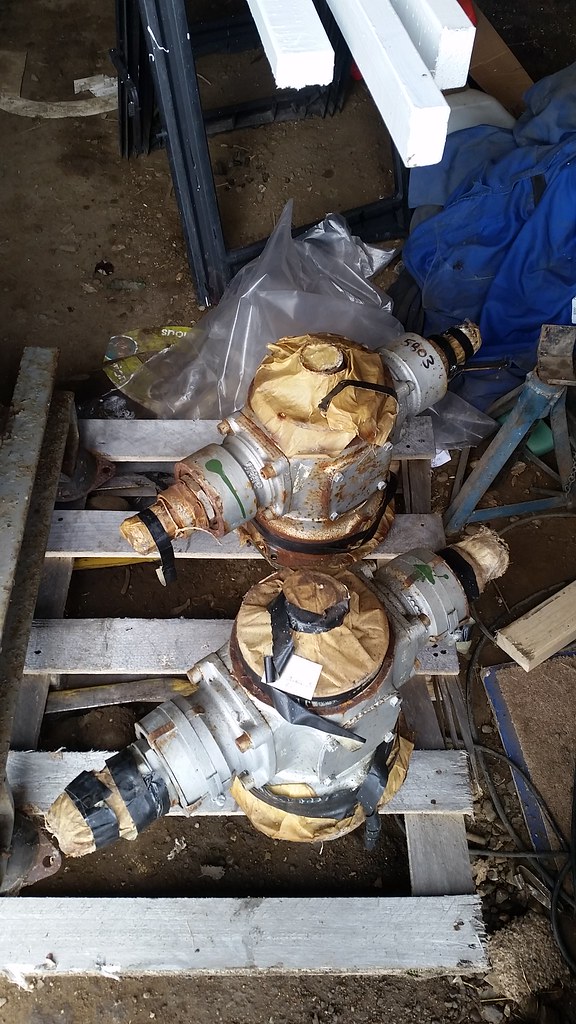
These are rebuilt bevel boxes, you can see more clearly how it drives the centres and then sends two shafts out to either end like a 'T' shape
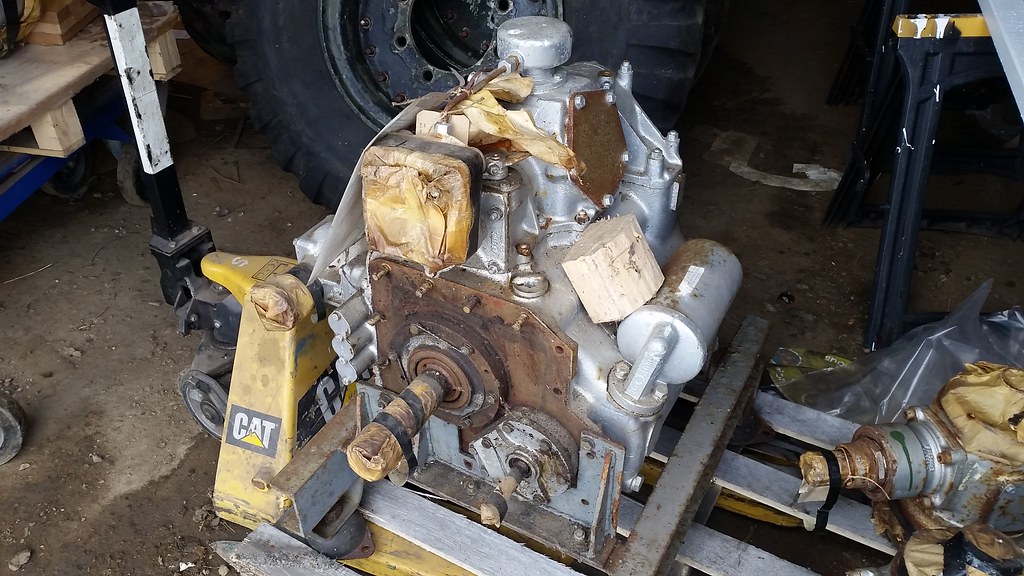
The big old gearbox, this appears to have the upper PTO gearbox from a Mk2 Stalwart as it's different from ours and has the outlet for a small hydraulic pump at the top, on ours it is driven by a shaft that runs underneath the exhaust manifold from the timing case, in tandem with the compressor
All nice recent stuff
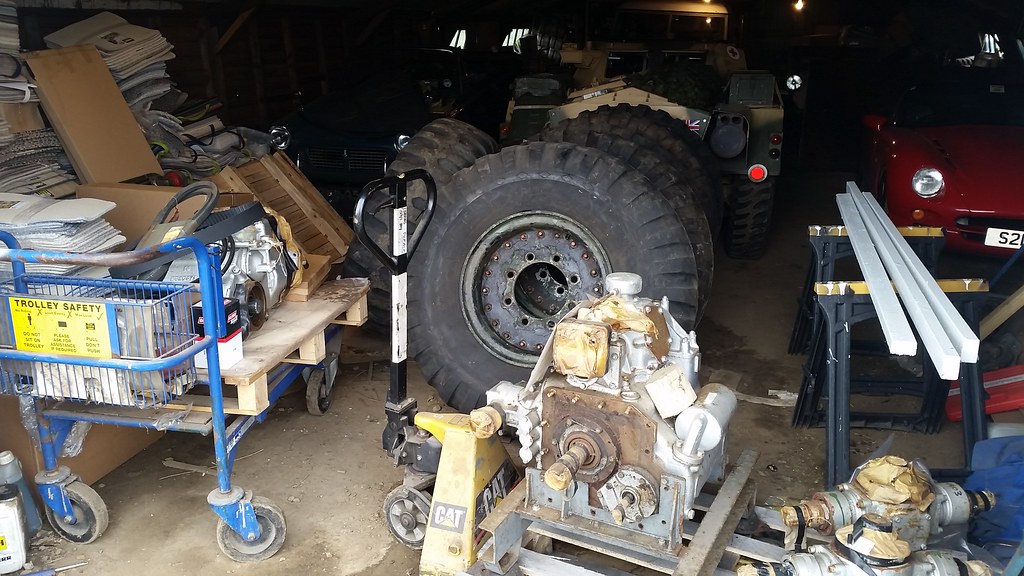
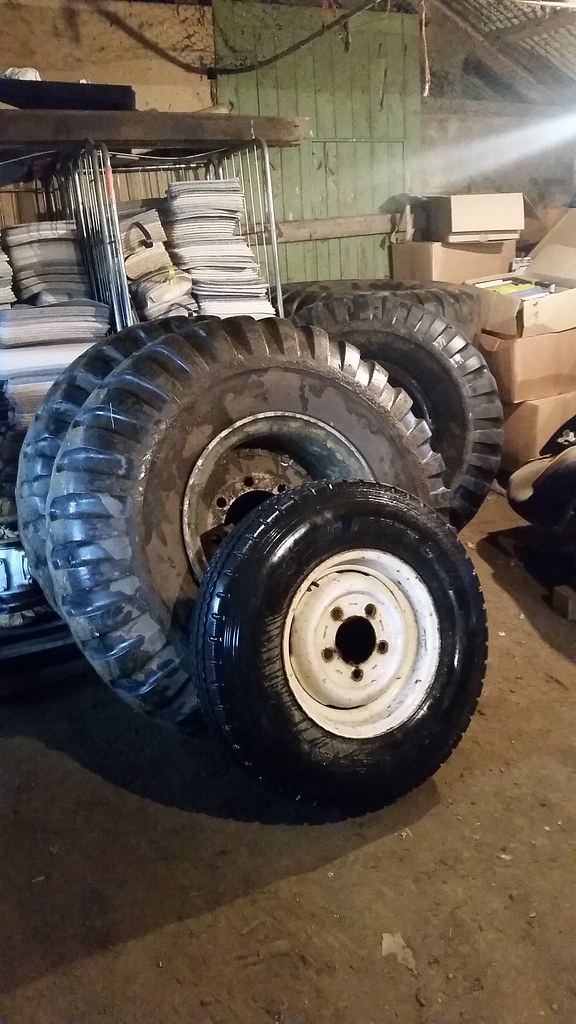
This gives some indication as to how hefty the wheels/tyres are, my oversized Land Rover tyre for comparison...
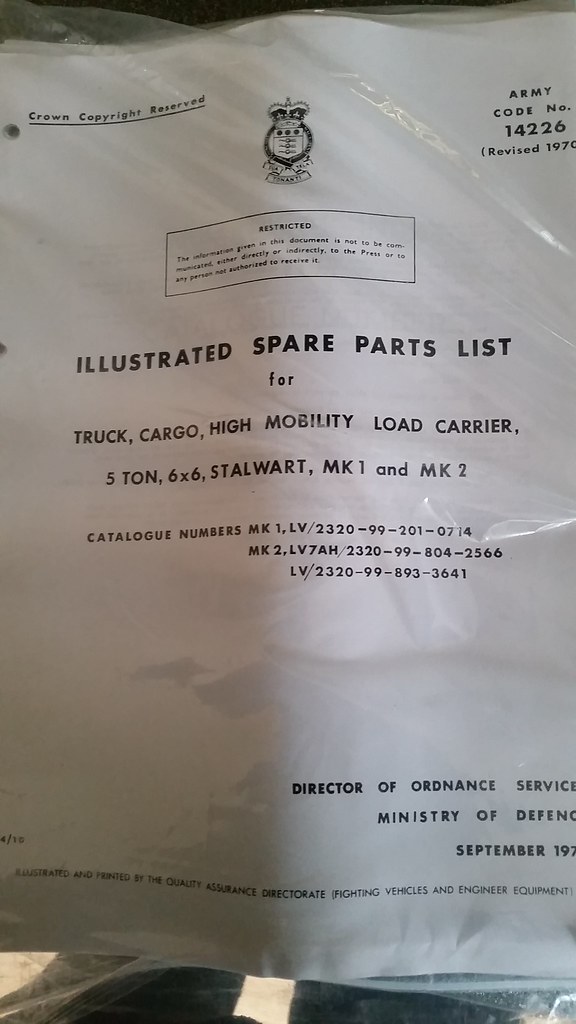
Finally we bit the bullet and bought a parts list, this is extremely helpful as it has breakdown diagrams of each component so even if nothing else it's helpful in working out how stuff comes apart
We then had the pleasure of making our way back to the M25 to get to Mark's so that we could collect the tyres, the Maps app on my phone was showing red traffic right the way round going clockwise so we had the pleasure of going over Dartford and right the way round anticlockwise instead! Having unloaded it wasn't far off midnight by the time we walked in.
Came home with a fair pile of parts for our hard earned monies
Sintered bronze clutch plates x2
These are rebuilt bevel boxes, you can see more clearly how it drives the centres and then sends two shafts out to either end like a 'T' shape
The big old gearbox, this appears to have the upper PTO gearbox from a Mk2 Stalwart as it's different from ours and has the outlet for a small hydraulic pump at the top, on ours it is driven by a shaft that runs underneath the exhaust manifold from the timing case, in tandem with the compressor
All nice recent stuff
This gives some indication as to how hefty the wheels/tyres are, my oversized Land Rover tyre for comparison...
Finally we bit the bullet and bought a parts list, this is extremely helpful as it has breakdown diagrams of each component so even if nothing else it's helpful in working out how stuff comes apart
LewG said:
...Finally we bit the bullet and bought a parts list, this is extremely helpful as it has breakdown diagrams of each component so even if nothing else it's helpful in working out how stuff comes apart
Good to see you bought 'The Bible' along with some spares. Under appreciated things, ISPLs. The drawings themselves are fabulous things, created on drawing boards before 3D cad imaging, etc. Invaluable tool for getting to the bottom of issues without resorting to guesswork too. Good to see that the beast is getting some love now. You'll have it right as rain in no time now... 
LewG said:
 IMG-20170813-WA0002 by Lew Garner
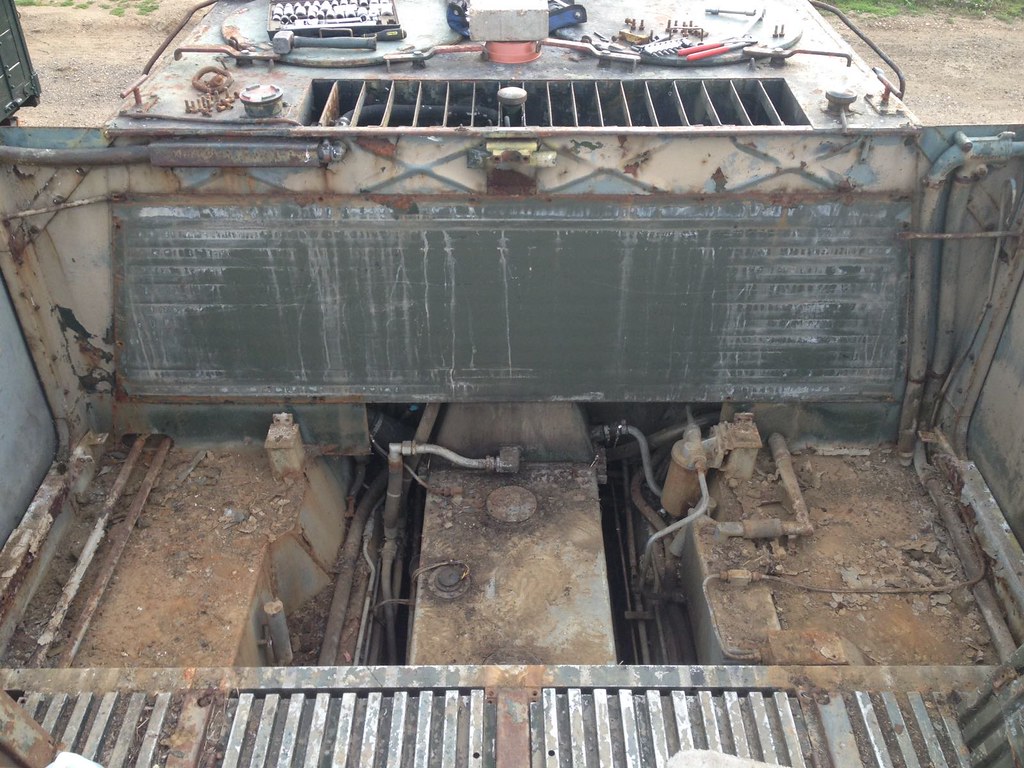
We have stripped out one beam, some floor plates and some of the bulkhead to get better access for removing the fuel tank. The plan after this is to remove the engine, gearbox and transfer box as one lump. A chap on the farm has a Ford Cargo lorry with 3 tonne Atlas crane so that should be the perfect tool for the job.
Tomorrow night I am heading down to view some part worn tyres for it from a fellow Stolly owner, he owns the white one pictured swimming earlier in the thread.

I would've thought it does Shadow yes, we shall see when we separate the two!
Dead right about the exploded diagrams, they are all amazing hand drawn illustrations. Amazing skill to make them so accurate really.
Progress has been nil on her as we've been very busy tarting up the workshop before winter sets in.
I had a text through from Mark on Friday asking had we managed to remove the rims from the tyres he sold us as he wanted those back for another set of more modern tyres he has to fit to his Stolly. All but two came off with a selection of big levers and a wrecking bar, the remaining two needed lots of soapy water.... and some 'out of the box' thinking
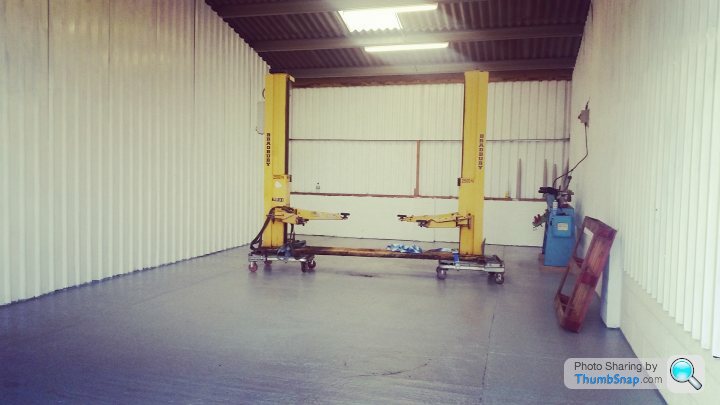
It worked great as a platform for the ladder when we were putting up fluorescent tubes too! Pretty good tool to have at our disposal.
The floor in the unit is fully painted now but ideally I'd like to get another coat down in the centre part as it'll have a fair bit of foot and tyre traffic over it on a regular basis, so the harder wearing we can make it, the better.
It'd be ideal to have the drivetrain out of the Stalwart before it enters storage next door so that we can crack on with stripping all the small bits out of the hull and painting/repairing as we go. We shall see about that though, there's a few other projects further up the list that are nearing completion and can be sold to free up time and funds, made easier by the installation of a two post ramp in the next couple of weeks or so.
Shame it's not still there Mikey, I could do with another one... Not
As you may remember the problem we faced last time was that we needed to separate transfer box from centre bevel box, to do this the driveline must be turned allowing some clamps around the centre drive couplings either side to be removed. Something in our transfer box had jammed and stuck solid.
Unfortunately our storage shed got broken into by some thieving b ds the other night and they took my big pry bars and variable pressure applicators so that didn't make the job any easier. I've had a think about it over the past few weeks and decided the solution was quite simple, give it a clout with a big hammer.
I hit the casing with a sledge and noticed it had actually 'broke the seal' between the outer and the main body of the transfer box, I then got two big cold chisels in there and kept hitting, prying at the bottom with heel bars and working it off the many studs. Eventually it came free and we were faced with a horrible sight.
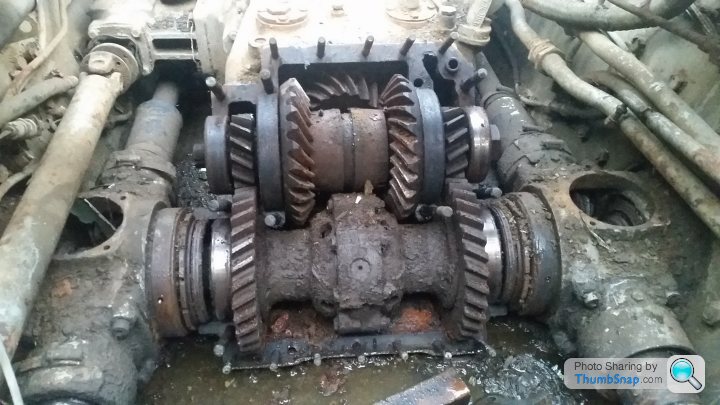
On looking closely it looked as if the drive dog for forward and reverse was stuck between gears, no amount of prying or tapping would shift it so we prised the whole assembly out instead, hopefully this should leave the remaining assembly able to turn, grotty though it looks!
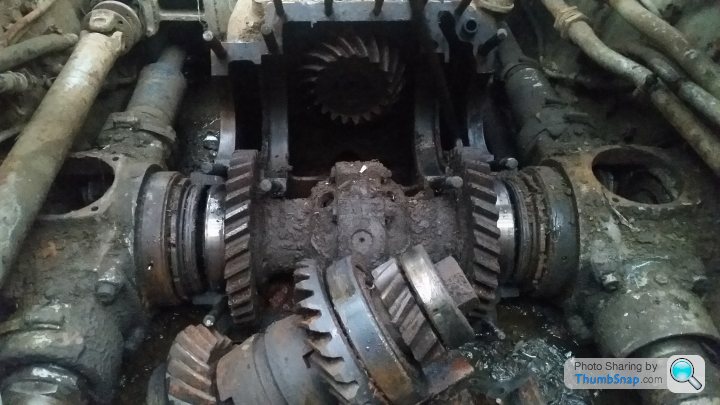
As you may remember the problem we faced last time was that we needed to separate transfer box from centre bevel box, to do this the driveline must be turned allowing some clamps around the centre drive couplings either side to be removed. Something in our transfer box had jammed and stuck solid.
Unfortunately our storage shed got broken into by some thieving b
ds the other night and they took my big pry bars and variable pressure applicators so that didn't make the job any easier. I've had a think about it over the past few weeks and decided the solution was quite simple, give it a clout with a big hammer.I hit the casing with a sledge and noticed it had actually 'broke the seal' between the outer and the main body of the transfer box, I then got two big cold chisels in there and kept hitting, prying at the bottom with heel bars and working it off the many studs. Eventually it came free and we were faced with a horrible sight.
On looking closely it looked as if the drive dog for forward and reverse was stuck between gears, no amount of prying or tapping would shift it so we prised the whole assembly out instead, hopefully this should leave the remaining assembly able to turn, grotty though it looks!
Cheers Nick, we tried giving her a tow again today but still no joy! We now think it's stuck in the 'no spin' diff which is like a big load of sprung dog clutches inside. I've tried undoing the middle and can get to all but one bolt with difficulty. Both Matt and I have decided that rather than buggering about any longer with an assembly that is effectively knackered, we're going to put a grinder through it either side of this and remove it out the equation all together. It's the very last thing it can be and it's preventing us from moving on any further with the project at the end of the day. Will be interesting once it's cut out to actually take it apart and see what's inside
Gassing Station | Readers' Cars | Top of Page | What's New | My Stuff