BMW 2002Tii (ish)
Discussion


deadslow said:
Christ No!! This is the best thread on PH.
Mark Benson said:

There are still some of us nerds that like to see CRs and stuff.
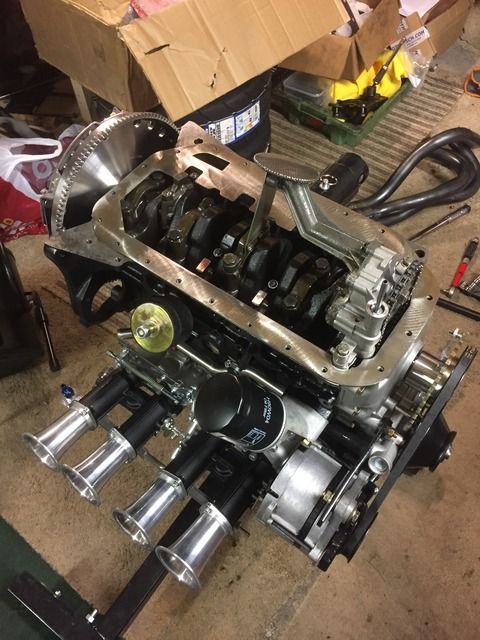
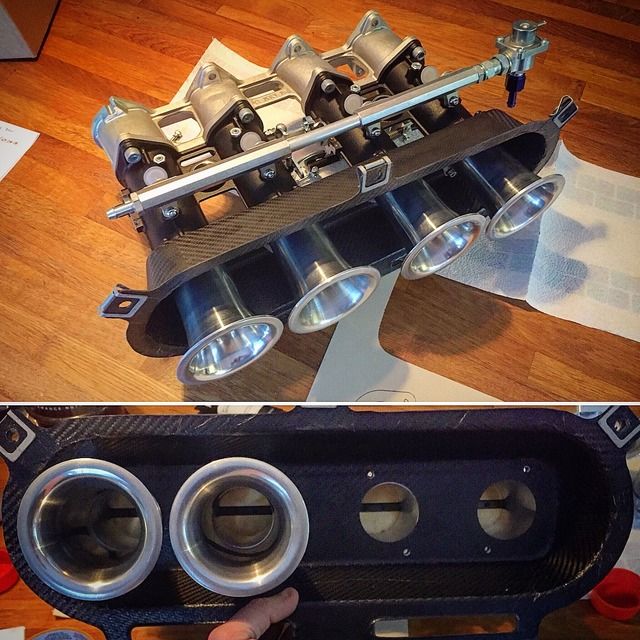
Not a massive amount to update, i basically built the engine up after doing the CR calc and valve clearance checks. I then fitted the itb's and the Tii water housing, which needed the gasket 'modifying' as the itb's are o-ring sealed. I could have used the standard gaskets but the jenvey inlet manifold is perfectly port matched without!


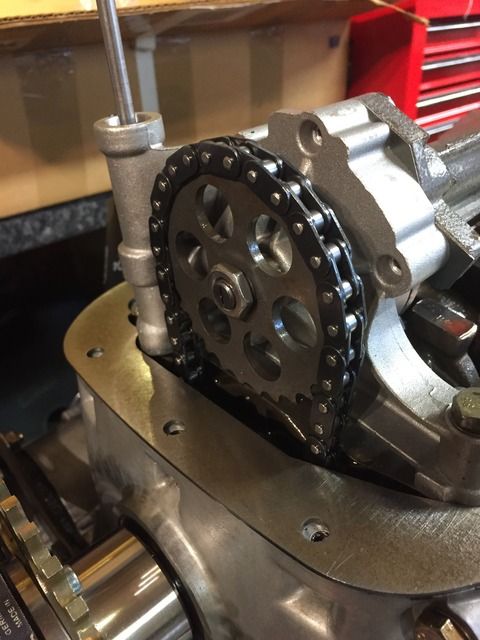
Front timing cover tip by my boss, a little bit of gasket seal in the corners when installing. Apparently prone to leaking here!


Finished (ish)


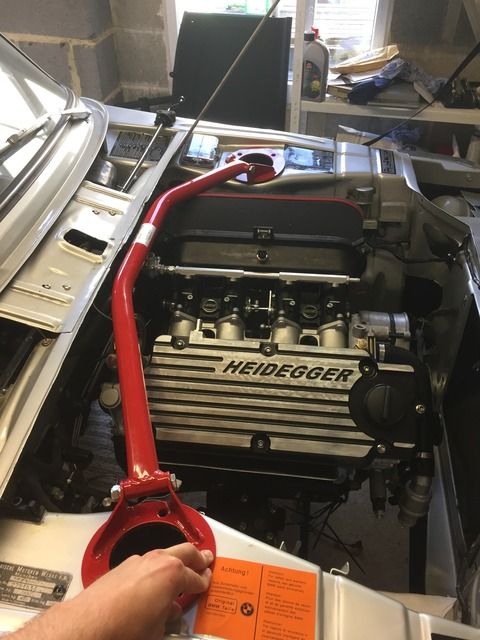
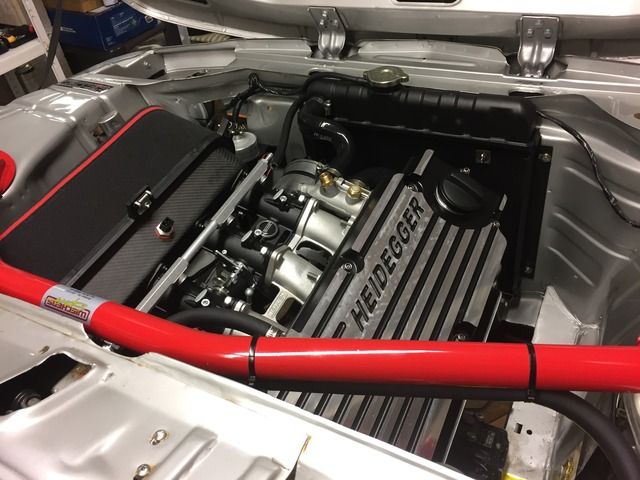
Im waiting on the windage tray and i can install the sump (again) but with better gaskets. I also ran into a problem with the rocker cover once i built the engine up and installed the oil spray bar. The button head bolts i thought id get away with catch on the spray bar, you can see this below after i 'blued' up the bolt heads. I could make up and alloy plate instead and get it welded but i think ill use it as an excuse to get a Heidegger rocker cover as a nod to the privateers who managed to win Le Man in a 2002! (there's that man maths again)


I ordered the wheels a couple of weeks ago and heard nothing since, i was hoping to have them for Christmas as i intend to take the springs off the car and get the wheels on to tuck them right up for clearance checks and so i can decide on a tyre.
I've also been in talks with Nitron who seem willing to do me a kit for the car. I wasnt intending to do the suspension yet but i know when i get the car running that if it doesn't sit exactly as i have an image in my head then ill be disappointed. I also figure if im going to cut up some hens teeth Tii/ Turbo struts i may as well have them done by one of the best. It'll be a stretch to afford these but i think it'll be one of the most important parts on the car. Once i've done the wheel checks and some parts arrive i hope to get this suspension underway!
I've also asked for a brake pipe flaring tool for Christmas off the missus so it seems a good time to practice by removing the twin remote servo set up. Now it seems a common thing to do but people seem 50/50 whether to run the standard MC or the slightly bigger 22mm e9 variant so i think ill do the delete with the standard and see what sort of pedal i can achieve. I'm not up to scratch on braking systems to be honest so nervously looking forward to it!
I've also made inquiries on the seats and the roll cage now my recaros have sold. I think ill take the plunge on both in the new year. More beans on toast for me in 2018!
Thanks again for reading,
Scott
RDMcG said:
Brilliant job and very impressed with your ability and progress !
Thankyou, i've even surprised myself in some ways. I've always understood a lot of theory behind things but until you're there doing it its hard to grasp what you need to put into the job. Lots of things wont be perfect but it's been a steep learning curve!avenger286 said:
Brilliant work and can't wait to see what happens in 2018 with this.
ZX10R NIN said:
Superb work.
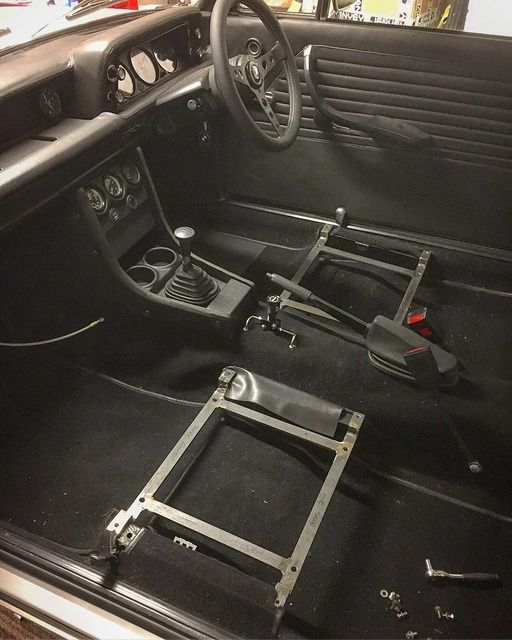
Cheers Guys, quite a lot to update but want to get a few jobs finished first rather than post half-finished updates. Brief one below anyhow!Parts have been showing up thick and fast, most importantly my seats and my wheels! I've only had time to mock the seat up on the driver’s side but need to find time to bolt it in on the mock strips of steel I cut, then I can draw up a proper sub frame cad drawing to have cut.
Ill experiment in seating position too, whether I move it more towards the centre tunnel or not and whether I hard mount to get the seat lower or keep it on the runners. Ideally I’d like to keep it on the runners so my other half can have a go! Few pics of the chosen seats below, over the moon with them!


My tyres showed up a good few weeks ago and the wheels have taken around 8 weeks at least, worth the wait and they are exactly what I wanted. I played it safe with a 195-50 all round and with the rear tyres being 8 inch wide they are a tiny bit stretched, in hindsight I should have just risked it with a 205-50 out back as there’s plenty of clearance, the fronts sit perfect!
Some pics below, you’ll be able to tell which ones were by the better half! (She’s a photographer)


Sensible daily coming in handy!

On the car:


With the engine as it stands:


Manifold, oil pump, windage tray are all due to show up this week and then I can get my engine buttoned up at last. I’ve a few little bits and bobs to have made, gauge take off adapters and the like and then we can start on getting all the sensors and injectors ordered up and do an engine wiring loom whilst it is out of the car.
I’m also looking to bin off the servos whilst the engine is out and it’ll be easier to do the kunifer lines. Does anyone have a rough schematic of how I should run the lines off the master cylinder? I’ve seen it done a number of ways is all, some seem to split up the dual lines to the fronts between the two cylinders on the MC, some seem to do 1 line to them with a T nearer the calliper? Also where’s the best place to get fittings/ the correct size brake pipe? I’ve never made up or even looked into brake lines before really.
Thanks for reading,
Scott
Edited by scottos on Monday 5th February 12:55
e30m3Mark said:
Looks great as ever. Wheels are perfect.
Give James a call re the brake lines and ditching the servo.
Any idea when you'll be up and running? Been chatting to James and we are going to organise a Cornwall ''drive it day'' weekend. Will include some dyno runs (hopefully) and ramp time for any maintenance or running repairs. There are some great roads down here and some stunning rendezvous points, as you can imagine.
Cheers Mark, i was like a little kid when i got them on and into place with the wood! The rear could have potentially come out another 5mm, even with a 205 on at a guess but i'd rather they were 5mm too far in than 5mm too far out!Give James a call re the brake lines and ditching the servo.
Any idea when you'll be up and running? Been chatting to James and we are going to organise a Cornwall ''drive it day'' weekend. Will include some dyno runs (hopefully) and ramp time for any maintenance or running repairs. There are some great roads down here and some stunning rendezvous points, as you can imagine.
I've not idea if im honest, i was hoping for summer but we'll see. One of the DID's will be on the cards as soon as the car is ready, if not this year then it will be next!
I've got a friend with one of james old cars so he's going to send me some pics when he can. I dont much like hassling people when im not sending much their way in terms of buying associated parts etc. Hassling anyone tends to be my last port of call haha
A few bits and bobs have happened, I find that as im getting older im turning into more of a fair weather person in all aspects, gym, mountain biking, working on the car…
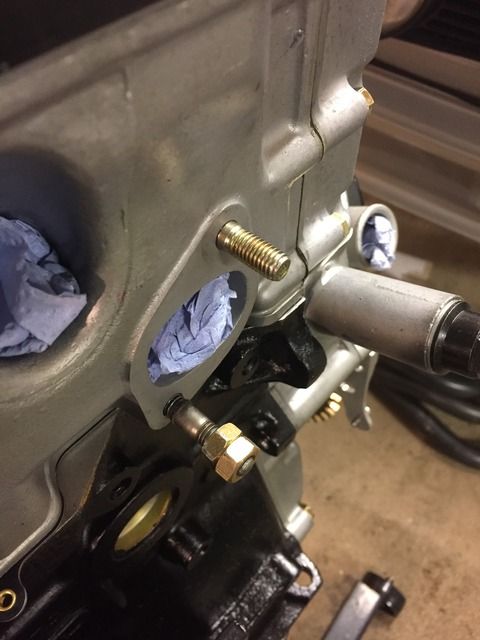
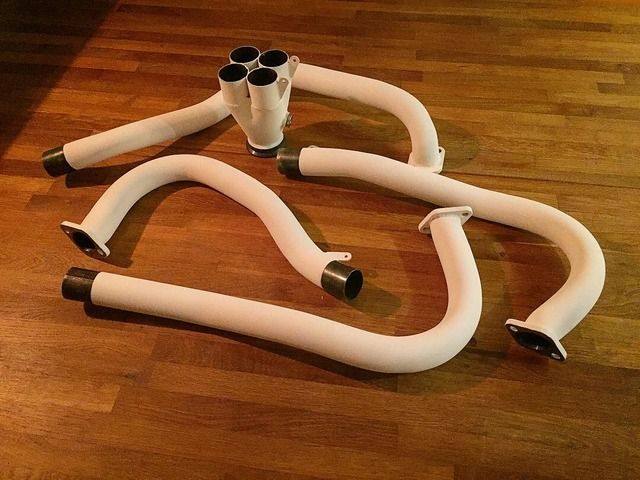
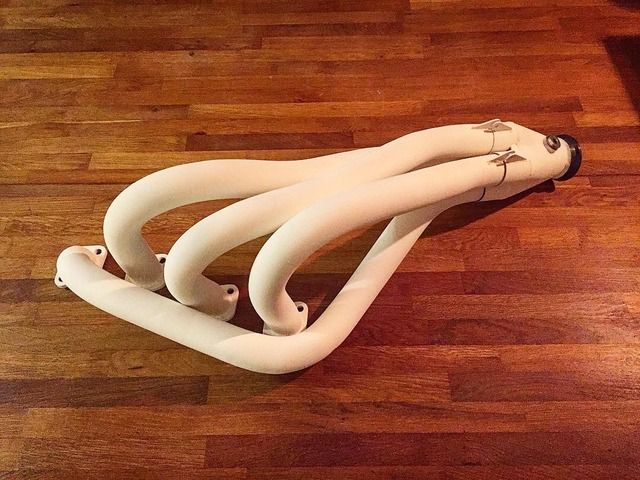
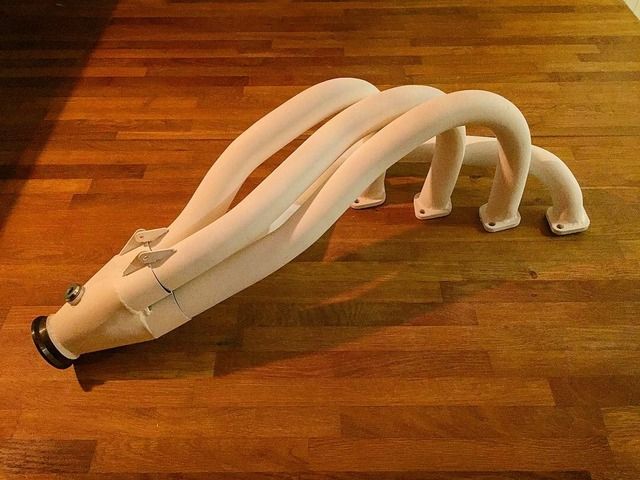
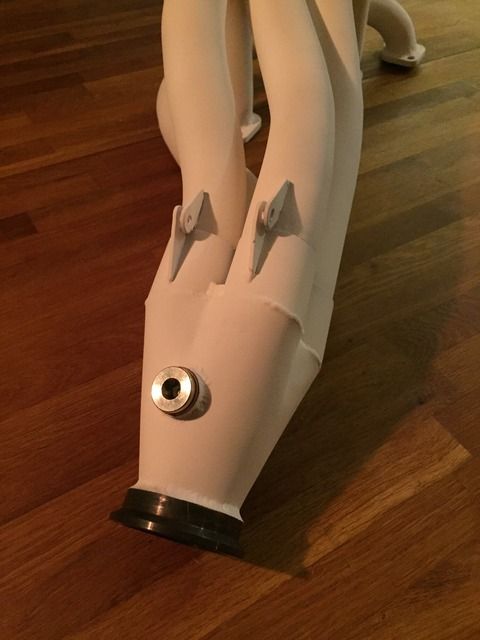
First off my care package from Jaymic turned up, this included one of their race manifolds, an e21 oil pump (the one I had was on its wear limits), a windage tray and a few other bits and bobs. This all allowed me to get my engine buttoned up!

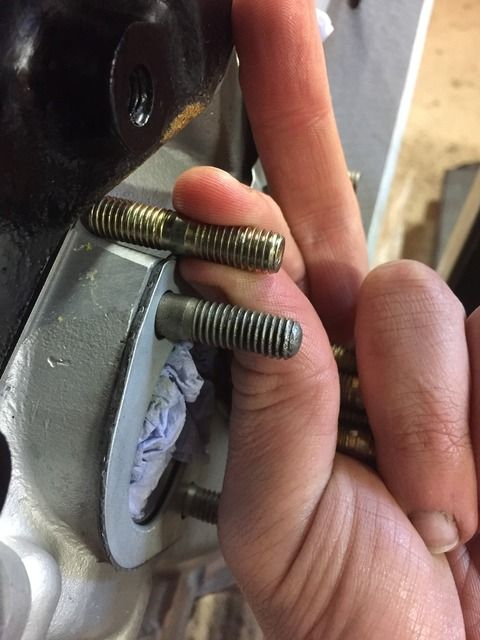
The manifold is going to be tricky to fit once the engine is in, shorter studs were in order but these seem like hens teeth to find but there was 8 on a shelf at the engine builders I help out at, very handy! It needed new studs anyway but these saved me lots of sawing time!
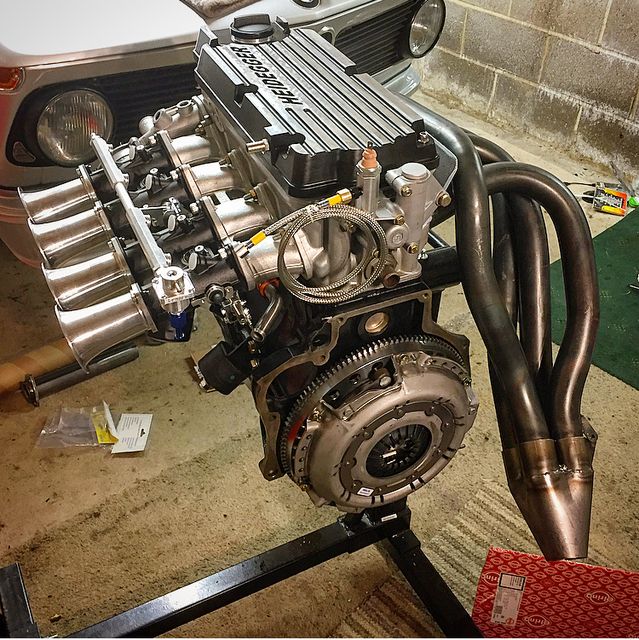
The money shot!
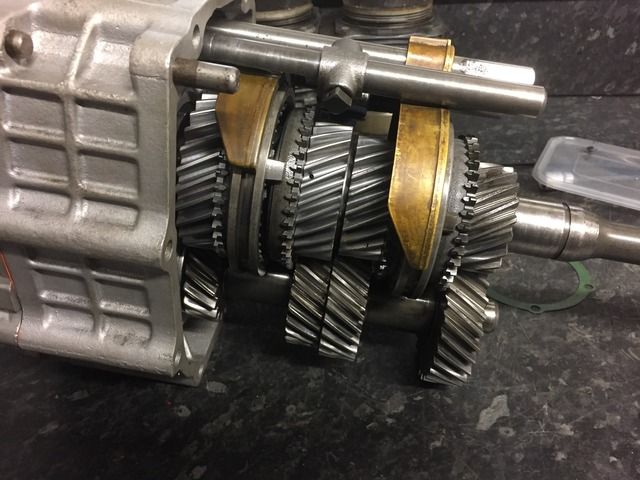
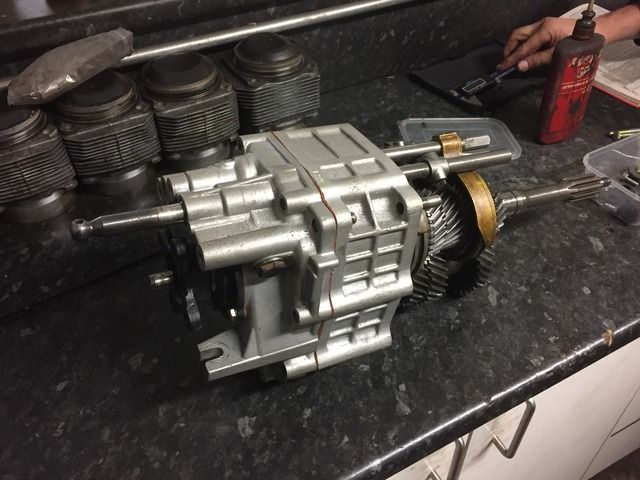
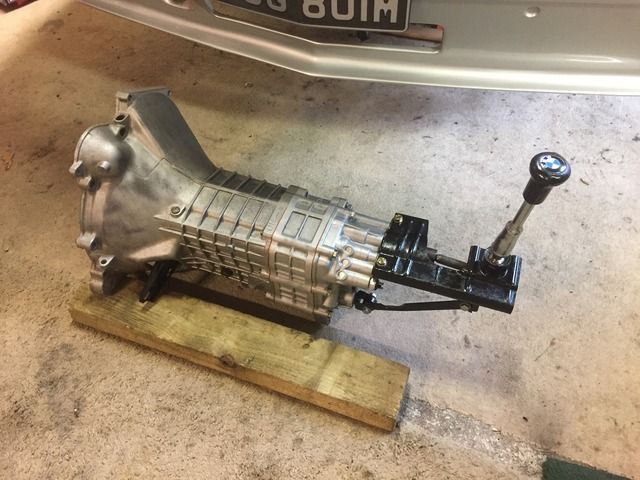
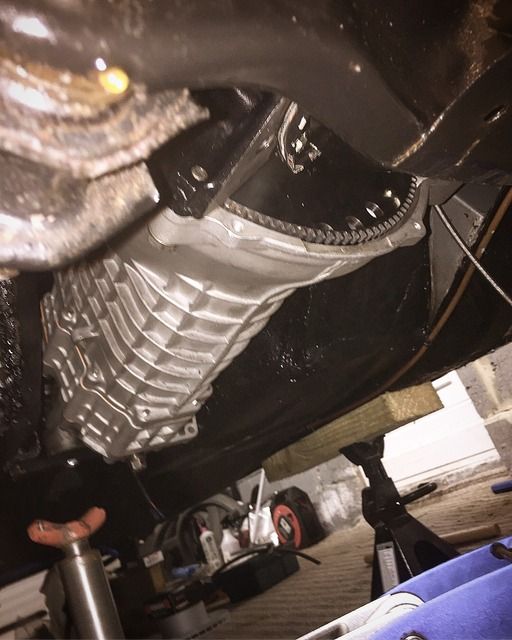
Finally getting the gearbox back together too, 4 new gears and all new syncro’s plus a rebuild kit with gasjets and seals etc.

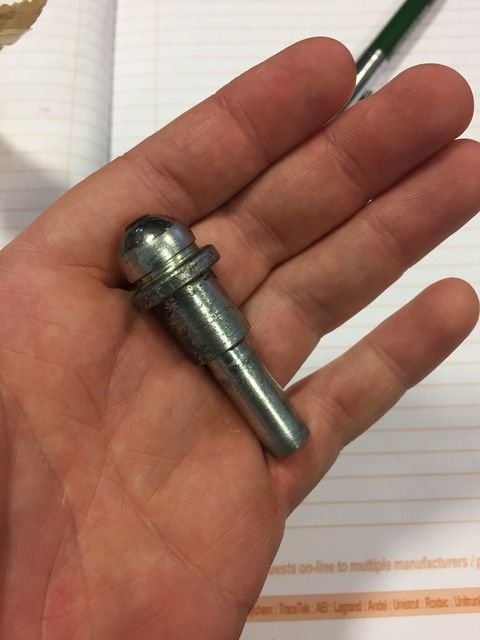
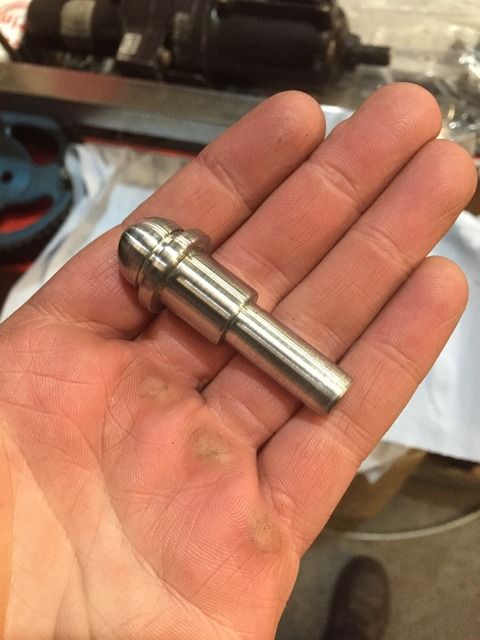
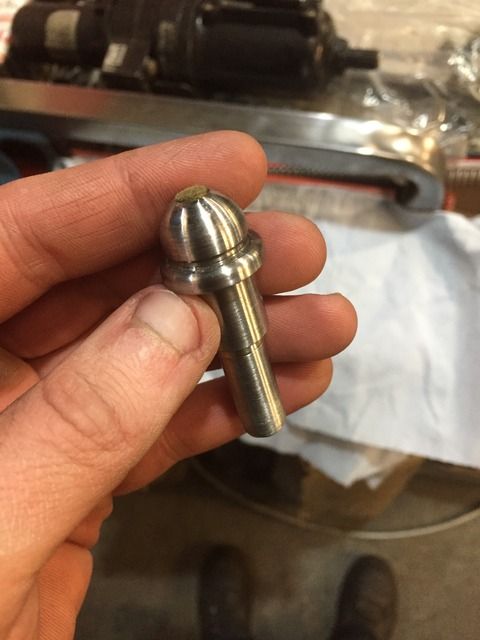
All was going great until we noticed the clutch pivot pin was bent, on closer inspection the casing has cracked too. Turns out these clutch pivot pins were only steel in really early boxes and doubly hard to find! I’ve got the measurements as I was going to have one machined, if anyone struggles in the future then let me know and I could get one made.
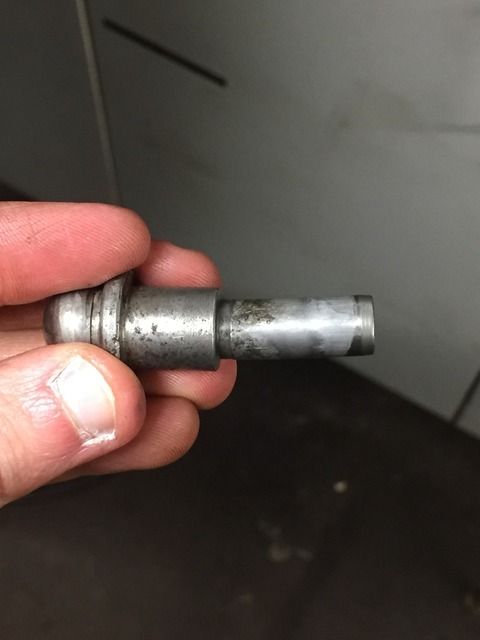
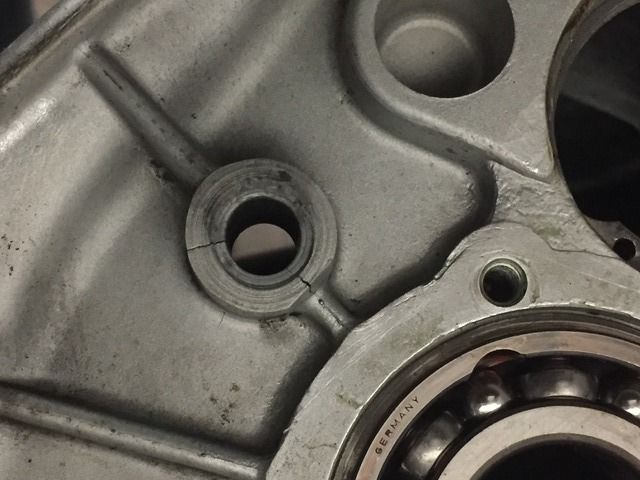
The casing it being welded up/ machined this week or next then we should be back in business! Hugely thankful to a great fella called Luke who sent me a clutch pivot pin FOC, stating a donation to a charity would suffice! I like to try and donate monthly to some form of cause anyway so was only too happy to oblige. Received in quick time and was chuffed with how well it dressed up, it even still has the oiling felt intact!
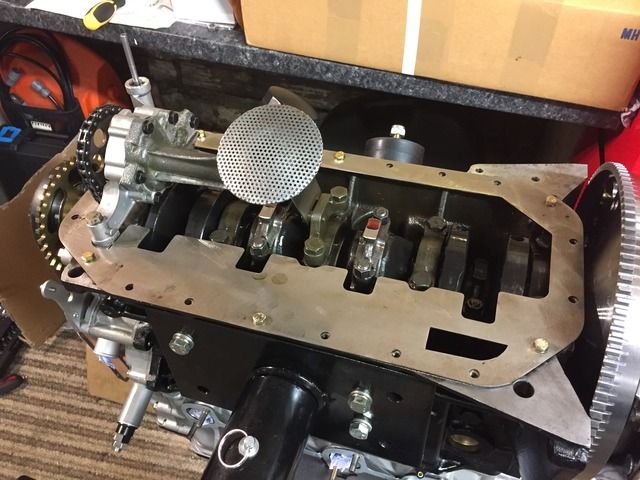
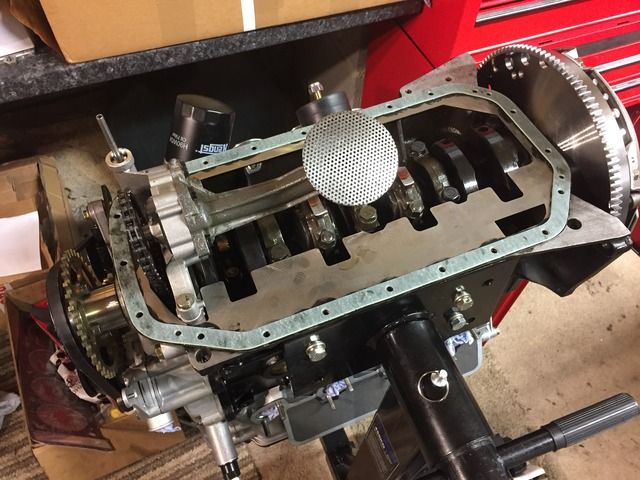
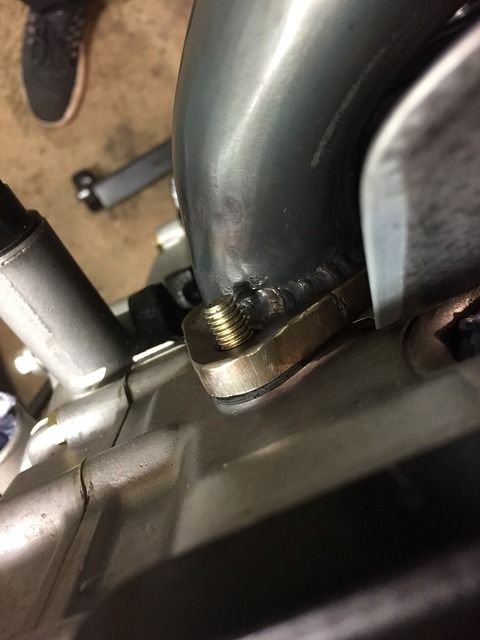
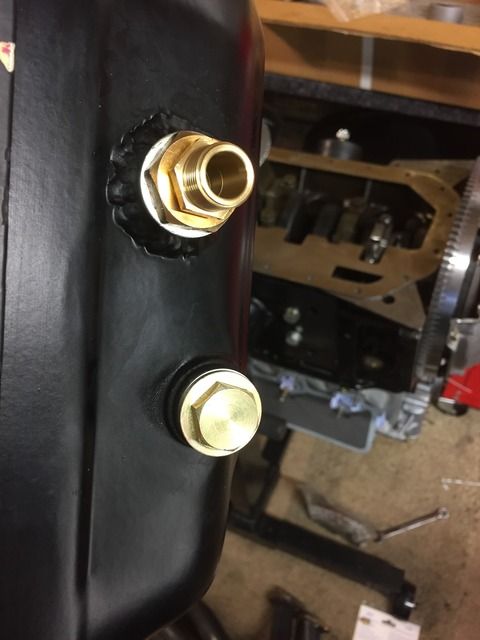
The sump I got with the car had already had a boss welded on when I got it so I got an adapter and had it machined to accept the temp sender for the gauge I’ve got. You may notice the oil pressure adapter/ braided line off the back of the cylinder head in the full engine shot too.
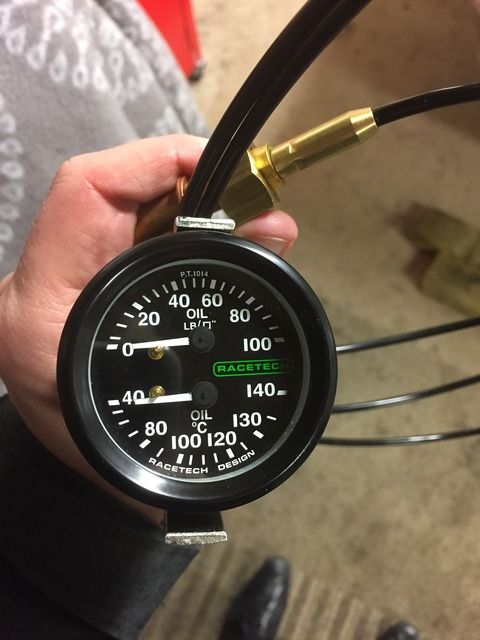
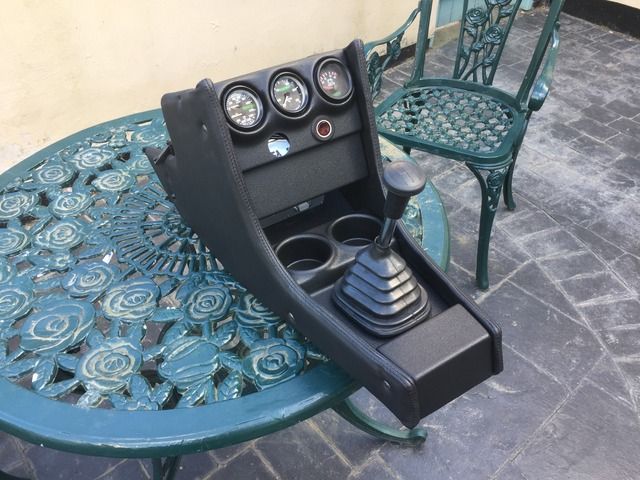
Im going to fit this where the Tii clock should be, sacrilege to some I know but my clock is quite scruffy and doesn’t work and fitting this dual gauge there will keep the centre console less cluttered as someday I may end out doing a console delete. I need to get an adapter made up to make up the difference between the size of my Racetech gauge and the Tii clock.
Another little progression was the badges on the car. A friend, Gordon, dropped some struts off a couple of months back and pointed out my badges were too new! He kindly donated some old metal enamelled badges which I was hugely chuffed with, they are nicely ‘patina’d’ and intend to leave them like this.
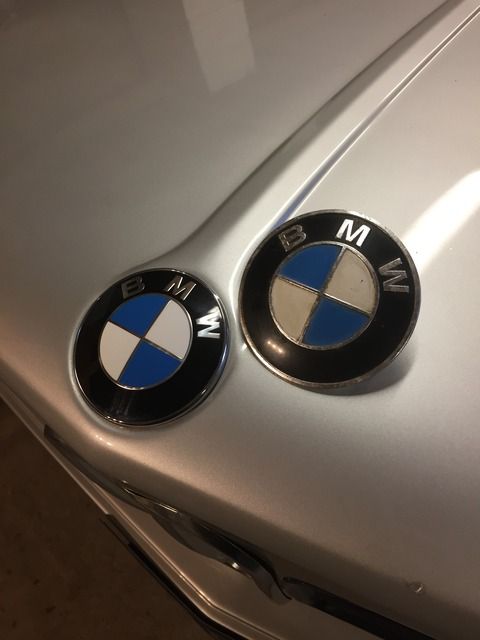
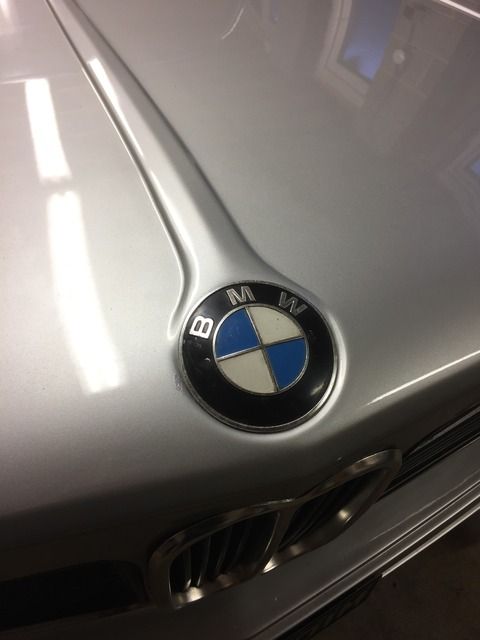
It turns out the rear badge on my car was actually the same as the front badge that had been fitted, only with the pegs taken off and blu-tacked on… The holes have been filled during previous restoration. For now I’m going to leave the car badgeless at the back.
Im currently collecting brake line parts inc a new master cylinder. I’ll be removing the servo’s so if anyone wants a working set for a not silly amount then fire me a message. Just trying to get hold of the rest of the fitting now and I can set about making the lines up and ill be running a bias valve to the rear.
Other than this I’ve still got the suspension to strip off again and send away to be converted. I cant wait for the return product, really excited for that one!
Plenty to do but hopefully have it running for summer in some form or another!
Thanks for reading,
Scott
First off my care package from Jaymic turned up, this included one of their race manifolds, an e21 oil pump (the one I had was on its wear limits), a windage tray and a few other bits and bobs. This all allowed me to get my engine buttoned up!


The manifold is going to be tricky to fit once the engine is in, shorter studs were in order but these seem like hens teeth to find but there was 8 on a shelf at the engine builders I help out at, very handy! It needed new studs anyway but these saved me lots of sawing time!


The money shot!

Finally getting the gearbox back together too, 4 new gears and all new syncro’s plus a rebuild kit with gasjets and seals etc.


All was going great until we noticed the clutch pivot pin was bent, on closer inspection the casing has cracked too. Turns out these clutch pivot pins were only steel in really early boxes and doubly hard to find! I’ve got the measurements as I was going to have one machined, if anyone struggles in the future then let me know and I could get one made.


The casing it being welded up/ machined this week or next then we should be back in business! Hugely thankful to a great fella called Luke who sent me a clutch pivot pin FOC, stating a donation to a charity would suffice! I like to try and donate monthly to some form of cause anyway so was only too happy to oblige. Received in quick time and was chuffed with how well it dressed up, it even still has the oiling felt intact!


The sump I got with the car had already had a boss welded on when I got it so I got an adapter and had it machined to accept the temp sender for the gauge I’ve got. You may notice the oil pressure adapter/ braided line off the back of the cylinder head in the full engine shot too.


Im going to fit this where the Tii clock should be, sacrilege to some I know but my clock is quite scruffy and doesn’t work and fitting this dual gauge there will keep the centre console less cluttered as someday I may end out doing a console delete. I need to get an adapter made up to make up the difference between the size of my Racetech gauge and the Tii clock.
Another little progression was the badges on the car. A friend, Gordon, dropped some struts off a couple of months back and pointed out my badges were too new! He kindly donated some old metal enamelled badges which I was hugely chuffed with, they are nicely ‘patina’d’ and intend to leave them like this.


It turns out the rear badge on my car was actually the same as the front badge that had been fitted, only with the pegs taken off and blu-tacked on… The holes have been filled during previous restoration. For now I’m going to leave the car badgeless at the back.


Im currently collecting brake line parts inc a new master cylinder. I’ll be removing the servo’s so if anyone wants a working set for a not silly amount then fire me a message. Just trying to get hold of the rest of the fitting now and I can set about making the lines up and ill be running a bias valve to the rear.
Other than this I’ve still got the suspension to strip off again and send away to be converted. I cant wait for the return product, really excited for that one!
Plenty to do but hopefully have it running for summer in some form or another!
Thanks for reading,
Scott
e30m3Mark said:
The devil is in the detail.
I like the small roundel early cars had to the right of the rear plate. Would be ideal here.
That cam cover is rather swish. As is the 4 branch.
Really looking forward to seeing it fire up.
Thanks Mark, my pal gave me a small rear one but sadly there's no holes in the rear panel any more so it'll just have to do without for now. Maybe a small sticker in the future!I like the small roundel early cars had to the right of the rear plate. Would be ideal here.
That cam cover is rather swish. As is the 4 branch.
Really looking forward to seeing it fire up.
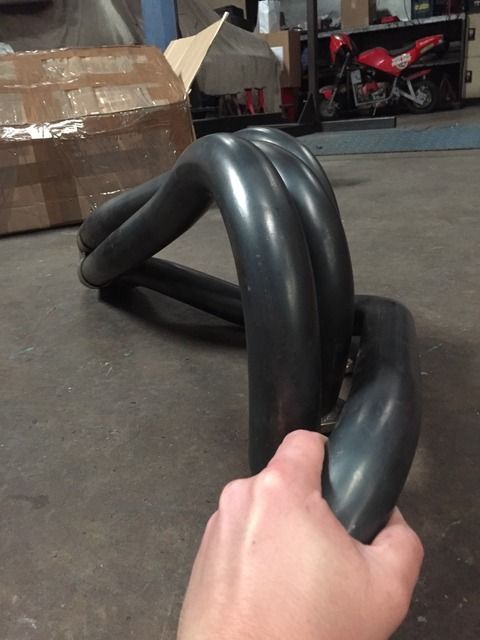
The cam cover was a bit extravagant but i was sick of mucking on with the breather plate and i thought the nod to Heideggers Le Man win was apt for the build! Manifolds for RHD 02's are thin on the ground as im sure you're aware and this seemed the best option, just a bonus it looks great too

I cant wait for it to fire up too, im hoping itll be a day i remember forever (and for the right reasons haha)
Hoping yours is going well, not noticed any further updates as yet which i hope means youve been getting some seat time!
Richair said:
Looking good, not far to go now I guess?
Cheers, i keep thinking that in my head for a split second then remember everything there is to do haha it's certainly getting there and ill feel a lot better once the gearbox is back together! Hopefully after that it'll be engine wiring to do, general wiring to link it all up, i need to redo the brake lines to bin the dual servos off and then get it all fitted in the car. Then there's the seat mounting to finish, suspension to get made, exhaust to get made and all the other bits and bobs then see about getting it fired up and moving. Im hoping for summer this year and hopefully get it ran in, then cage over next winter and track it/ euro trip it in 2019, time will tell i suppose.
e30m3Mark said:
Actually I'm on holiday in Barbados but whilst here ARM are doing a few of the smaller finishing touches, like AFR gauge and fitting my 4 branch. Hopefully I can then enjoy using it. 
haha awesome, barbados will do instead, Mark! Plus if you're coming back to the car with all those bits sorted you'll be doubly as happy!
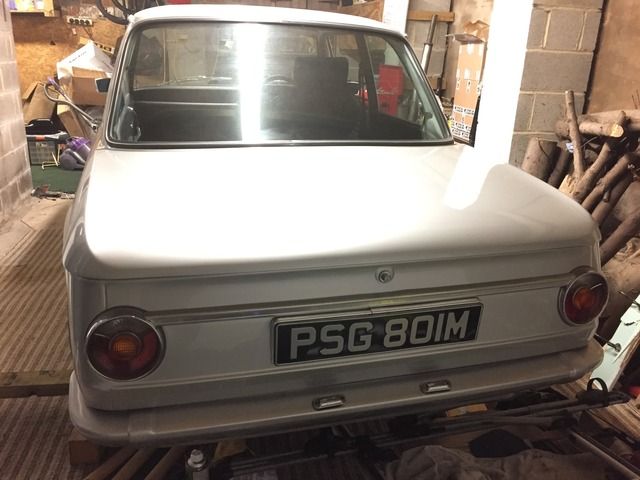
Hit a decent milestone last weekend so thought i'd drop this picture in!
I've done a terrible job at keeping up to date on this thread, a lot has happened since the last update and its literally just fitting it all back together now!
Im waiting on suspension (approx 3 more weeks), then can fit the brakes out and bleed everything through, my custom short shifter, rejigged exhaust mani and then onto wiring and what not. Still need to make up the recessed sub frames too and sort the interior out but its getting there. Will retrospectively update the thread at some point!
Thanks,
Scott
Thanks for the comments guys, a long over due update. I've summarised it rather a lot though!
Time for an update, I’ve been pretty useless at updating this post the last few months but lifes just been busy I guess. The below is a brief skim over the progress.
First off was the gearbox, this had been in bits for nearly a year and it really needed to go back together to get the enthusiasm up! We got it all together and it ran through the gears great but the gear stick wasn’t self centering. Having no experience with 2002’s or old gearboxes I thought this was just how they were until I did some digging on the internet. It turns out the selector shaft bushing was turned 180 degrees the wrong way so the indent for the spring and plunger self center system didn’t work. We had this back apart and sorted in double quick time.
Lever test fitted again and now returns the centre, happy days!
Next job was to bin the servos off and fit a new master cylinder, time to remove these big lumps and the rats nest of brake pipes!
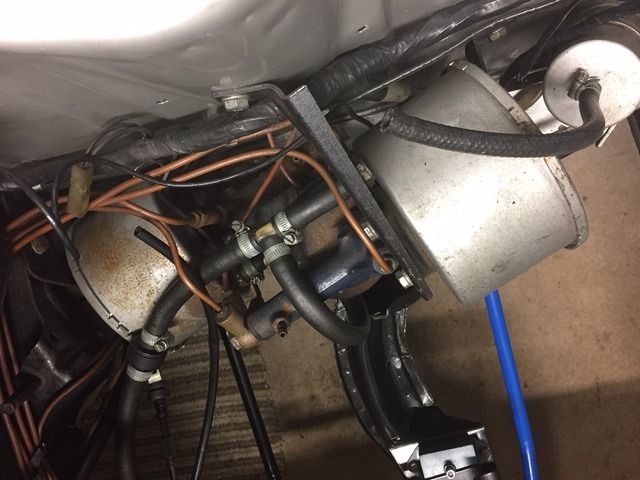
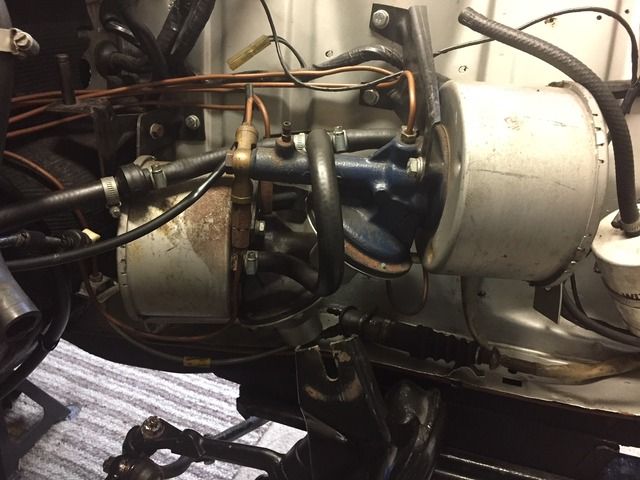
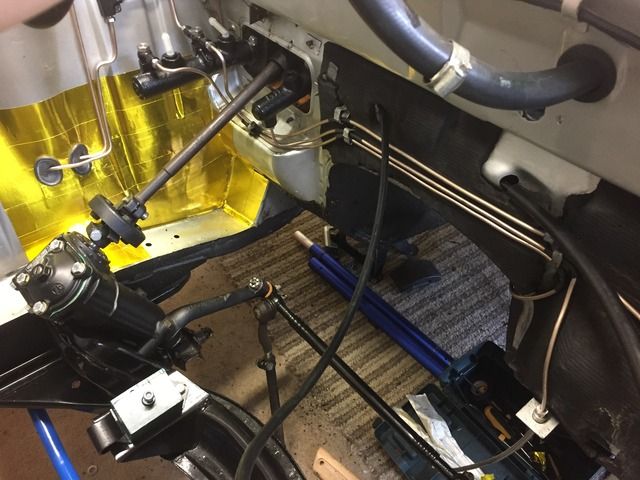
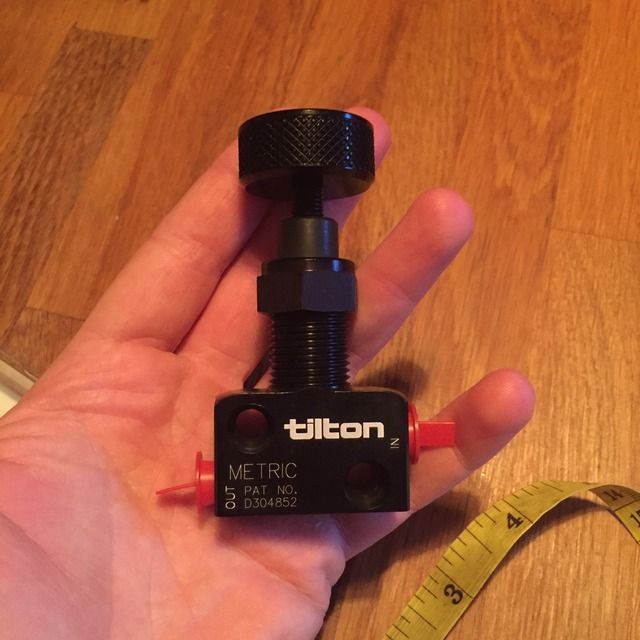
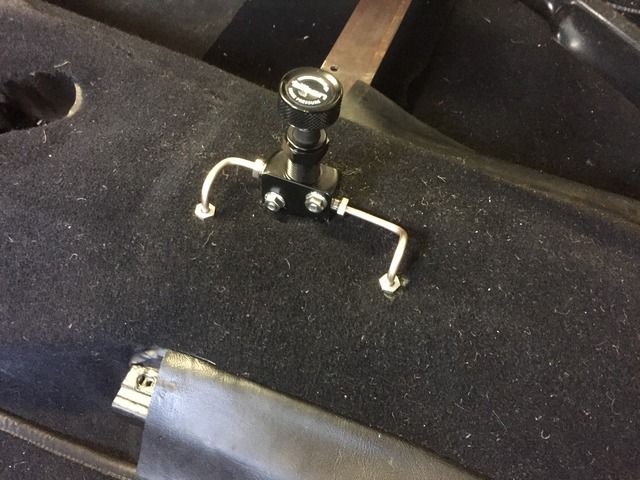
I also bought a bias valve to place in the cabin which will help with the rear brake bias. I used some bulkhead fittings in the transmission tunnel to pipe this in.
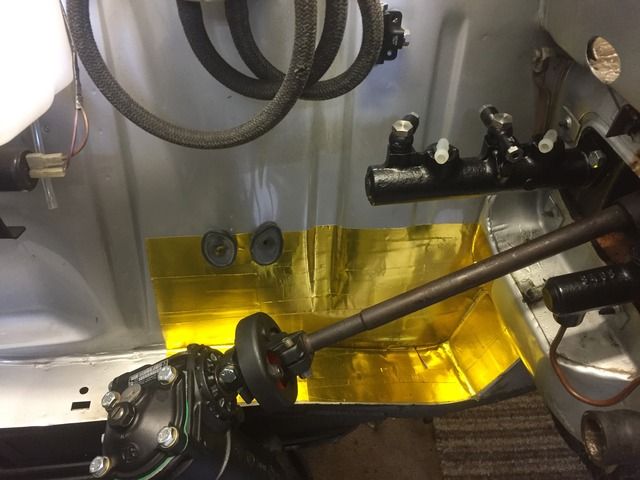
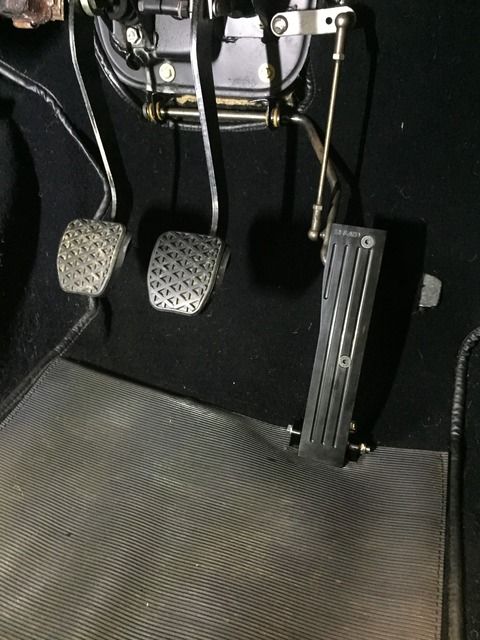
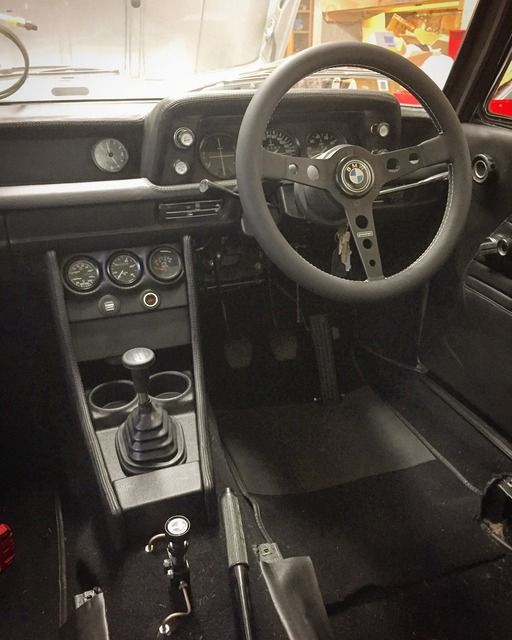
Whilst inside I fitted the Ireland Engineering accelerator pedal and also sorted my centre console out. Kooglewerks in USA do a very nice gauge console and dual cup holder so these were duly purchased and fitted up. The Ireland Engineering pedal wasn’t a straight fit on a RHD car but wasn’t much of a problem. I measured up and ordered a needle roller bearing ad a clip which I fitted on the pedal rod, it’s very smooth now and springs back itself.

Finished article, just wiring of the gauges:
With the brake/ clutch lines all done it was time to get the engine back in:
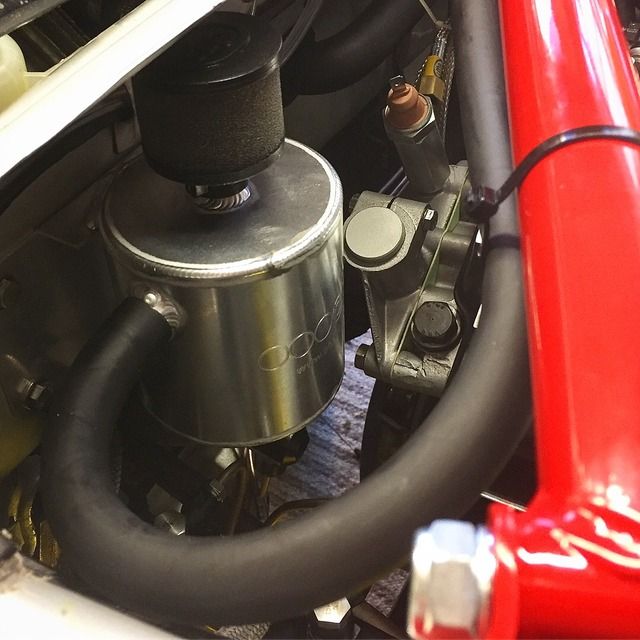
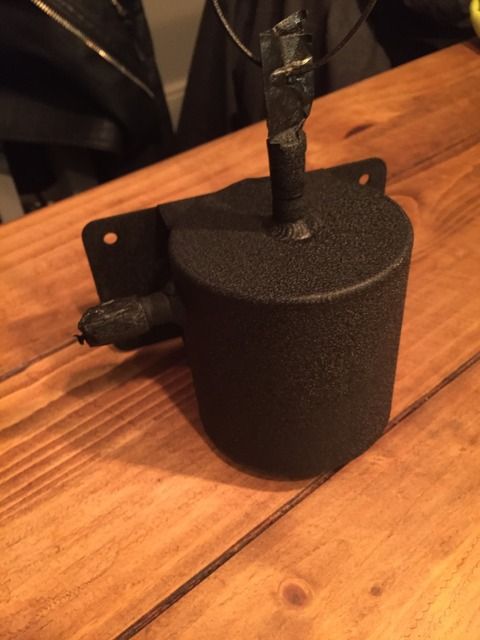
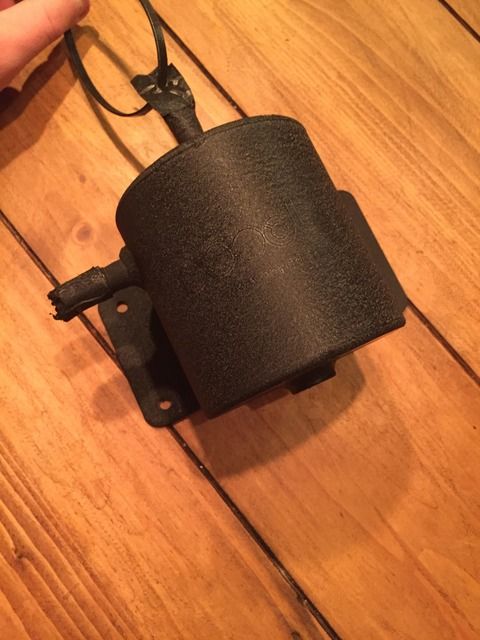
Started fitting other bits and bobs, catch can for instance and also sorted the blank air filter backplate for the itb’s:
Also received the short shifter back that I had had made, really chuffed with this:
And with that the gearbox went in along with the newly refurbished prop shaft which gave the correct alignment of the engine to start test fitting the exhaust manifold in the car. This has been a bit of a pain but will hopefully be worth it. It had to be sent back to have Number 4 rebent, which solved the clash against the side of the engine bay. The rest of the primaries went on fine but number 2 is still a bit too close for comfort, this cant be rebent as it will hit the steering coupling so the engine bay has been ‘massaged’. The collector was supposed to be 2.25 outlet but arrived as 2 inch, this worked out for the best though as a flared it out so it would meet the V band fitting perfectly. This is getting welded on and a lambda boss putting in.

Excuse the duct tape, it’s about the extent of my fab skills!
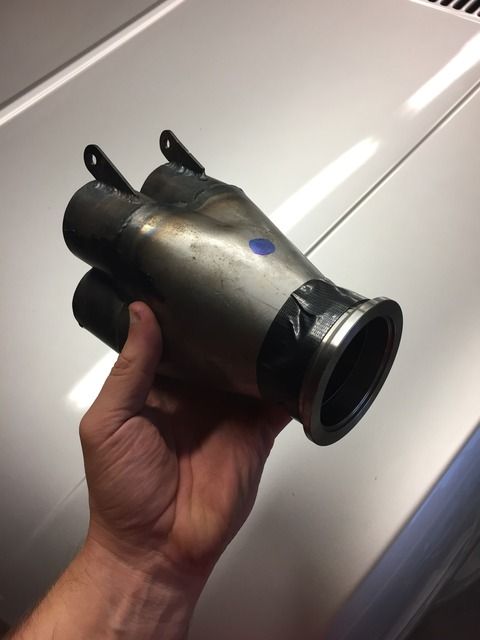
Ill hopefully get all that sent away for ceramic coating soon, as you can see this is needed as it comes close to EVERYTHING!
Now the next item is one of my favourite parts of the car. It’s been a long time in the making, where I initially made contact with Nitron before Christmas, half hoping they would tell me they weren’t interested. They were though so that was that! Fast forward and the end result is below:
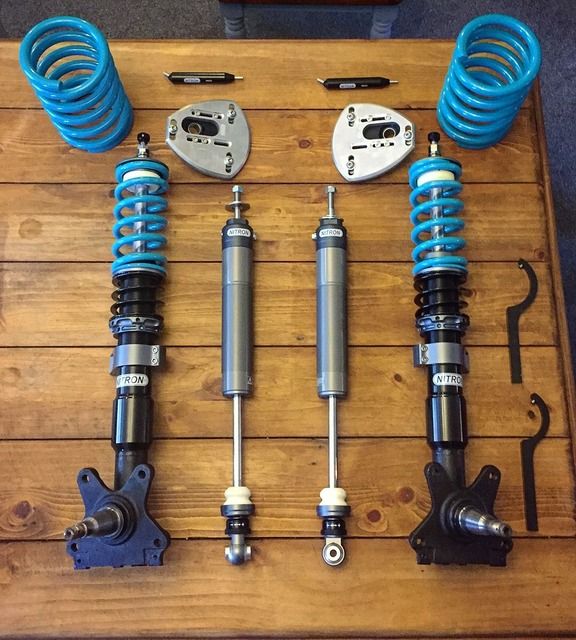
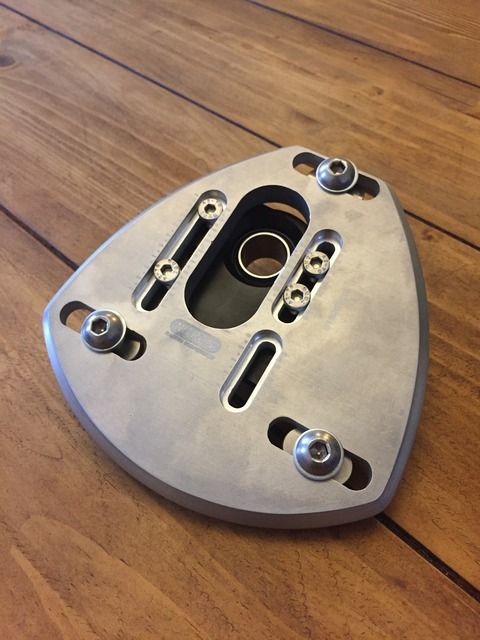
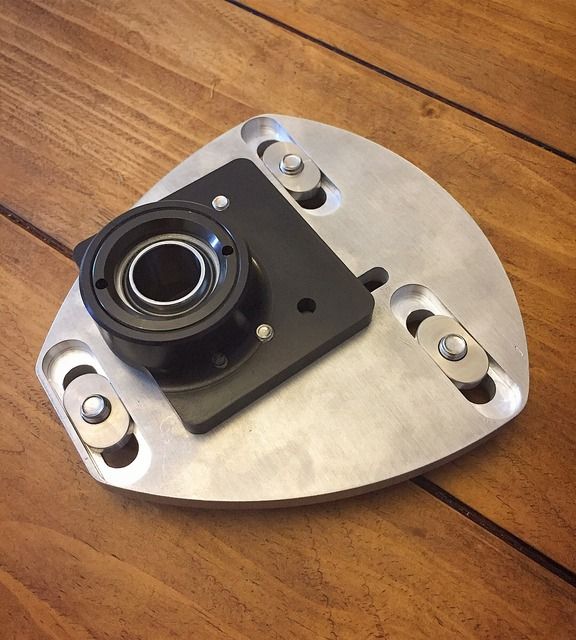
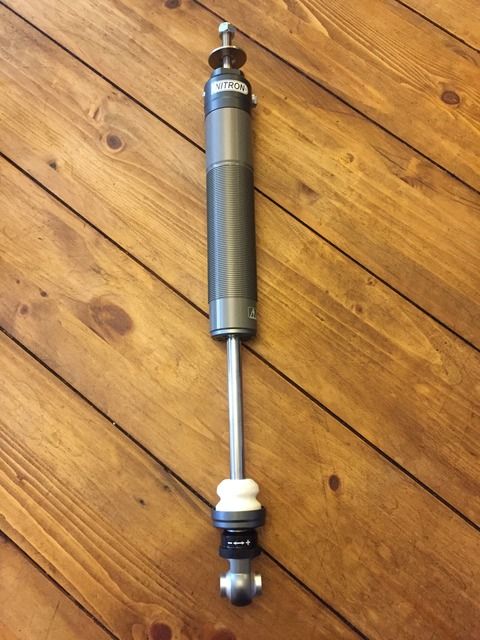
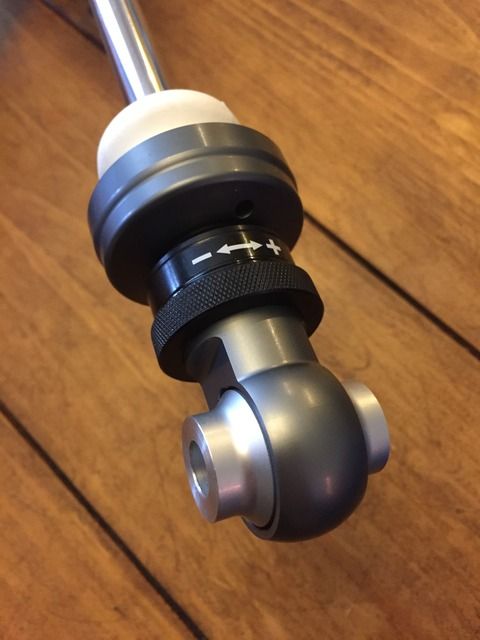

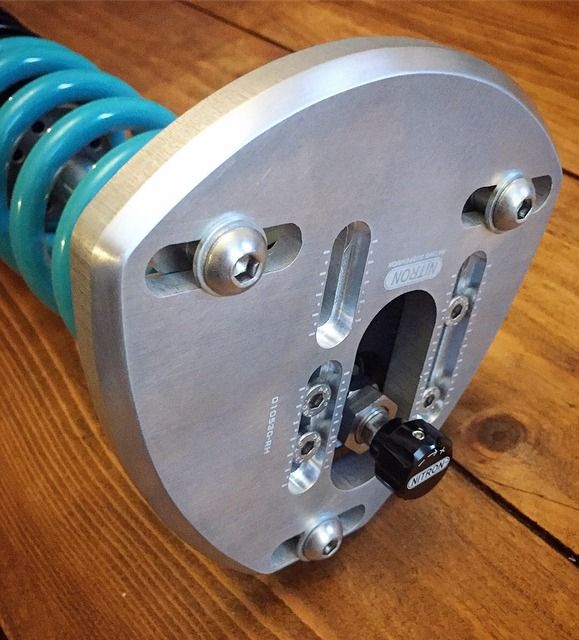
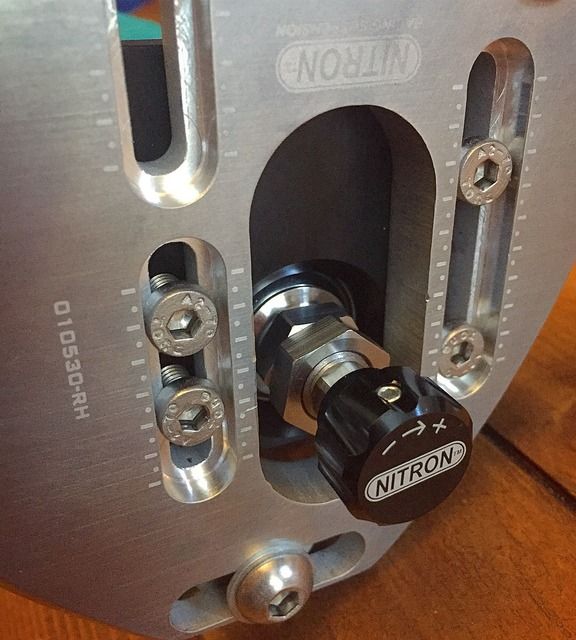
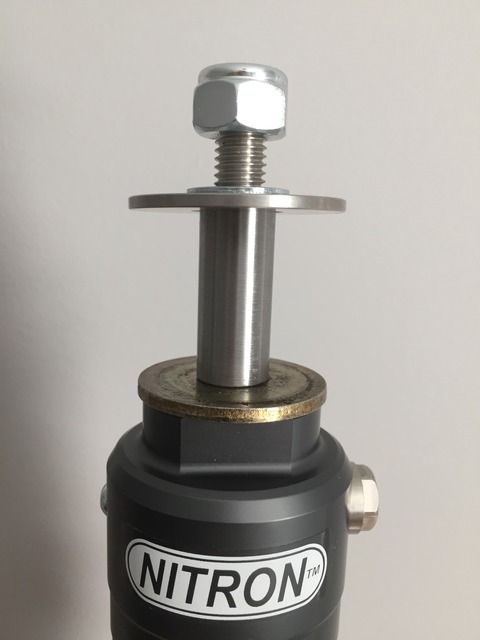
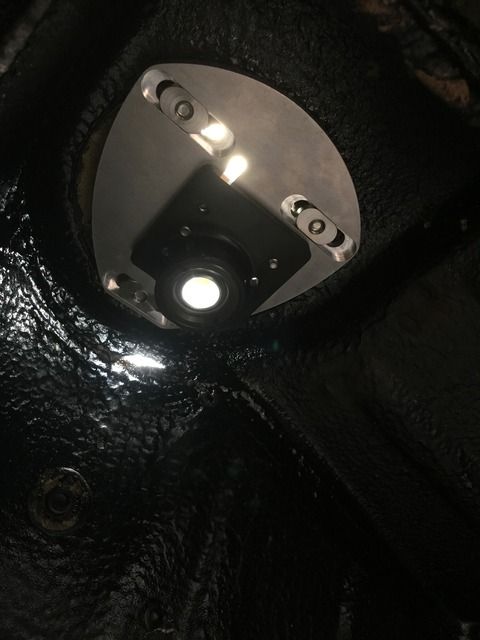
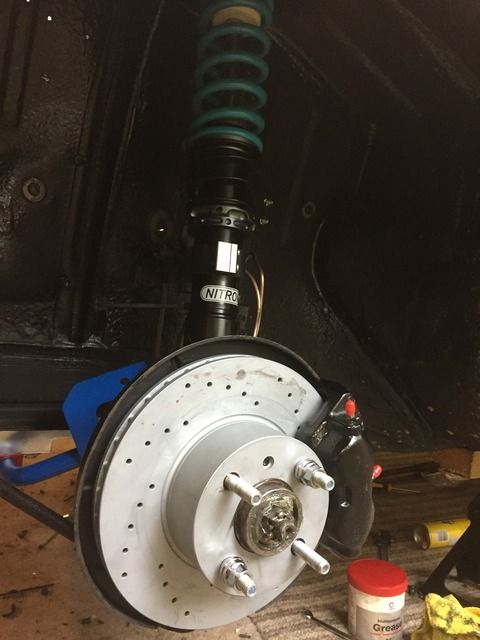
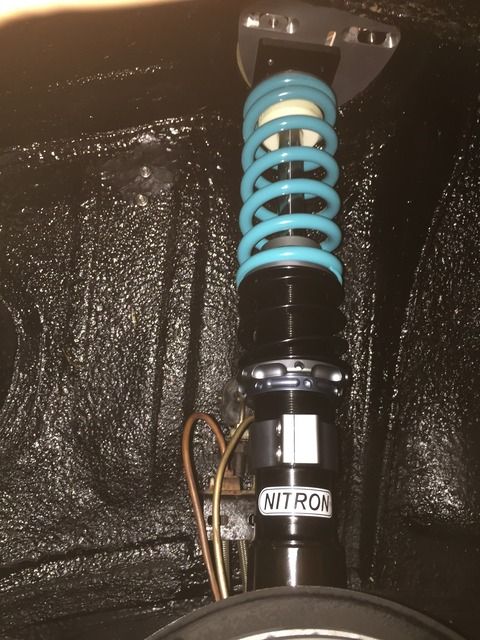
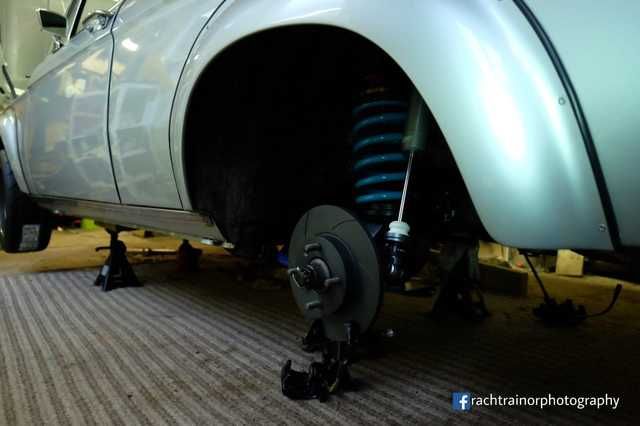
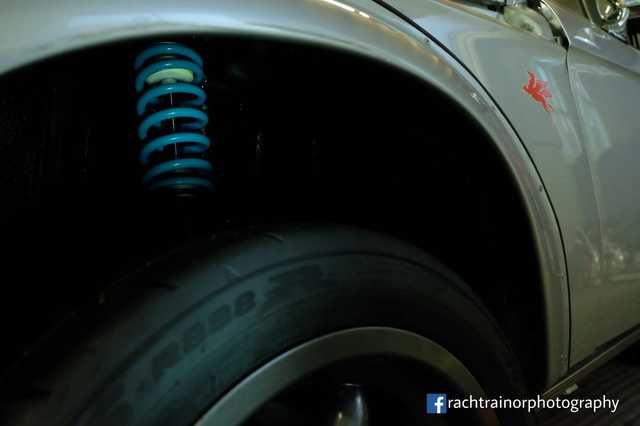
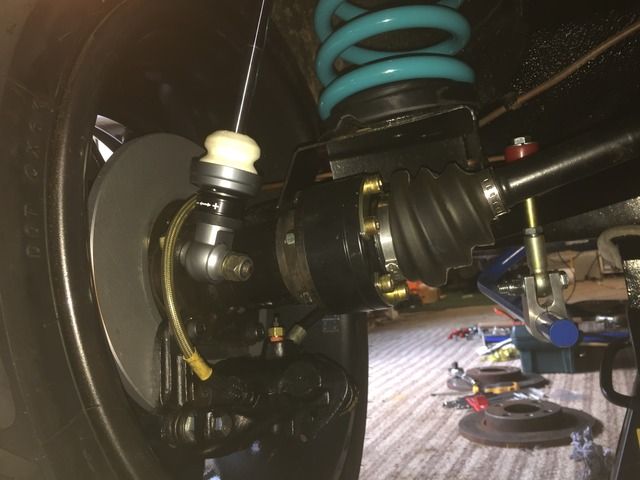
This is their R1 kit which features combined compression and rebound adjustment. Castor and camber are adjustable up front via the top mounts. I wanted to keep the rear divorced spring/ shock but they will do coilover rears too. The shocks are designed to be mounted with OEM rubber top mounts, I fitted polybushed ones where the hole was larger than OEM so I had to have a sleeve made up to suit.
These are all now fitted up and im extremely happy with the quality of the kit, certainly a ‘you get what you pay for’ part. With them fitted I could get the brakes on. I hit a snag with the rears as the VW discs come in 10 & 12mm and I didn’t realised. Typically I ordered the wrong ones, waiting for the right ones to turn up and hopefully that’ll be that sorted.
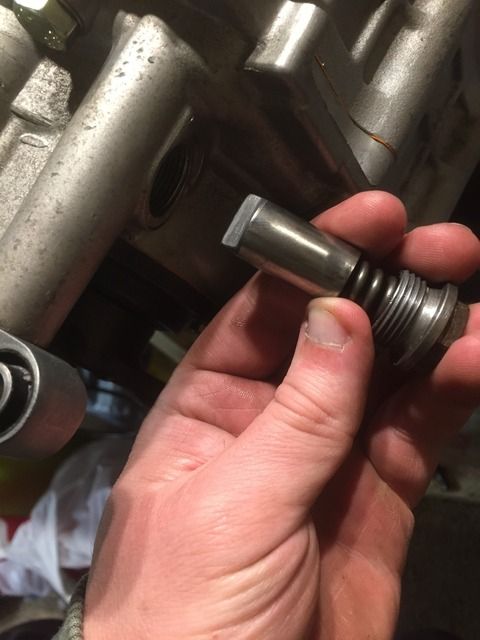
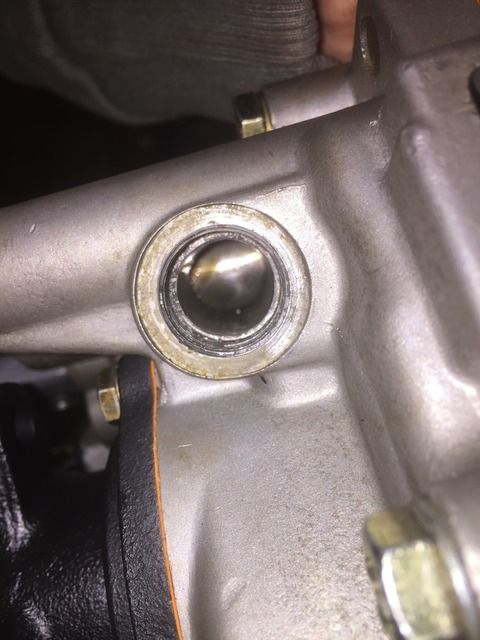
In the meanwhile I’ve fitted the new slave cylinder for the clutch and refitted a new OEM centre tie rod. The New Moog one has perished even just fitted to the car with 0 miles!
Not a millions miles off now, still need to make seat sub frames, do all the wiring. Send it off for an exhaust once the manifold has been coated, then hopefully itll just be snagging and setting up. I’ve missed the summe deadline now which sucks but not to worry, here’s to enjoying the car in 2019 I hope!
Thanks for reading,
Scott
Time for an update, I’ve been pretty useless at updating this post the last few months but lifes just been busy I guess. The below is a brief skim over the progress.
First off was the gearbox, this had been in bits for nearly a year and it really needed to go back together to get the enthusiasm up! We got it all together and it ran through the gears great but the gear stick wasn’t self centering. Having no experience with 2002’s or old gearboxes I thought this was just how they were until I did some digging on the internet. It turns out the selector shaft bushing was turned 180 degrees the wrong way so the indent for the spring and plunger self center system didn’t work. We had this back apart and sorted in double quick time.


Lever test fitted again and now returns the centre, happy days!

Next job was to bin the servos off and fit a new master cylinder, time to remove these big lumps and the rats nest of brake pipes!


I also bought a bias valve to place in the cabin which will help with the rear brake bias. I used some bulkhead fittings in the transmission tunnel to pipe this in.


Whilst inside I fitted the Ireland Engineering accelerator pedal and also sorted my centre console out. Kooglewerks in USA do a very nice gauge console and dual cup holder so these were duly purchased and fitted up. The Ireland Engineering pedal wasn’t a straight fit on a RHD car but wasn’t much of a problem. I measured up and ordered a needle roller bearing ad a clip which I fitted on the pedal rod, it’s very smooth now and springs back itself.


Finished article, just wiring of the gauges:

With the brake/ clutch lines all done it was time to get the engine back in:

Started fitting other bits and bobs, catch can for instance and also sorted the blank air filter backplate for the itb’s:


Also received the short shifter back that I had had made, really chuffed with this:

And with that the gearbox went in along with the newly refurbished prop shaft which gave the correct alignment of the engine to start test fitting the exhaust manifold in the car. This has been a bit of a pain but will hopefully be worth it. It had to be sent back to have Number 4 rebent, which solved the clash against the side of the engine bay. The rest of the primaries went on fine but number 2 is still a bit too close for comfort, this cant be rebent as it will hit the steering coupling so the engine bay has been ‘massaged’. The collector was supposed to be 2.25 outlet but arrived as 2 inch, this worked out for the best though as a flared it out so it would meet the V band fitting perfectly. This is getting welded on and a lambda boss putting in.


Excuse the duct tape, it’s about the extent of my fab skills!

Ill hopefully get all that sent away for ceramic coating soon, as you can see this is needed as it comes close to EVERYTHING!
Now the next item is one of my favourite parts of the car. It’s been a long time in the making, where I initially made contact with Nitron before Christmas, half hoping they would tell me they weren’t interested. They were though so that was that! Fast forward and the end result is below:


This is their R1 kit which features combined compression and rebound adjustment. Castor and camber are adjustable up front via the top mounts. I wanted to keep the rear divorced spring/ shock but they will do coilover rears too. The shocks are designed to be mounted with OEM rubber top mounts, I fitted polybushed ones where the hole was larger than OEM so I had to have a sleeve made up to suit.
These are all now fitted up and im extremely happy with the quality of the kit, certainly a ‘you get what you pay for’ part. With them fitted I could get the brakes on. I hit a snag with the rears as the VW discs come in 10 & 12mm and I didn’t realised. Typically I ordered the wrong ones, waiting for the right ones to turn up and hopefully that’ll be that sorted.
In the meanwhile I’ve fitted the new slave cylinder for the clutch and refitted a new OEM centre tie rod. The New Moog one has perished even just fitted to the car with 0 miles!


Not a millions miles off now, still need to make seat sub frames, do all the wiring. Send it off for an exhaust once the manifold has been coated, then hopefully itll just be snagging and setting up. I’ve missed the summe deadline now which sucks but not to worry, here’s to enjoying the car in 2019 I hope!
Thanks for reading,
Scott
deadslow said:
sir, you are a legend! 
Ha, thanks, too kind.Mark Benson said:
Always enjoy these updates.
shalmaneser said:
This is going to be such a lovely car!
Thanks, i hope so!e30m3Mark said:
Really nice work. The suspension kit looks great and I'm half tempted to see what they offer for the E30?
When the time comes I would certainly speak with Compbrake re callipers, although the one's your running work really well in my experience.
Thanks Mark, they've done e30 kits for a long while now. Their e30 m3 kit is awesome, available in R1 spec (same as mine, combined compression and rebound) and R3 which is 3 way adjustable, external reservoirs etc.When the time comes I would certainly speak with Compbrake re callipers, although the one's your running work really well in my experience.
When i looked into the brakes it certainly seems that what i've got will be plenty good enough but i think i'd like to get some weight out of the front end at some point and those e12 calipers are real heavy!
Hey all, a brief update following on from the last one.
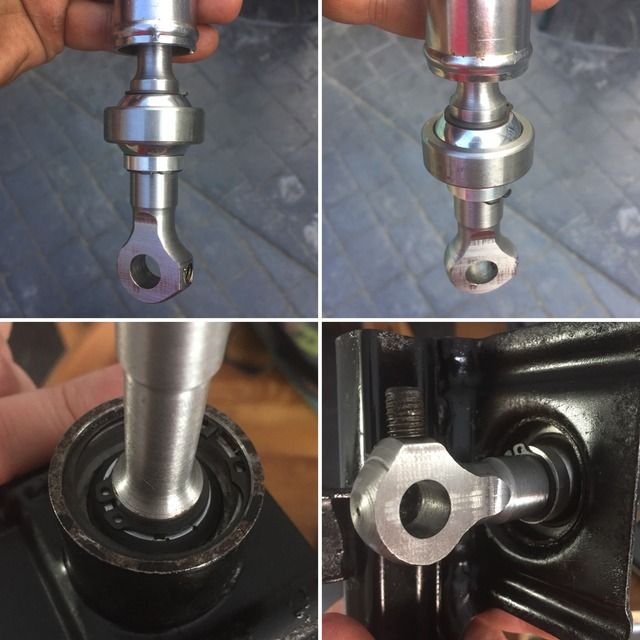
I had a bit of a chew on with the rear brakes, the kit was on the car when I bought it and came from America. I knew they used Jetta GLA callipers/ carriers and mk1 golf front discs but that was about it. The first set of discs I bought required me to shim out the calliper but were too thick for me to fit the DS2500 pads I’d got hold of. I then bought a different set of discs that were 2mm thinner, thinking this is where I had gone wrong. It turned out the disc offset was different too so I had to get the carrier skimmed:
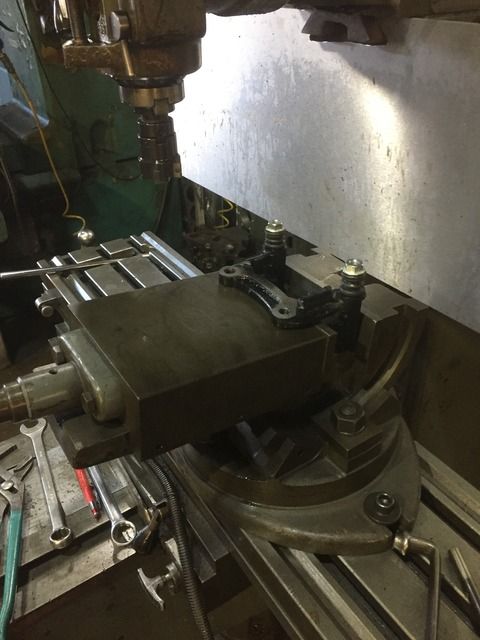
This was a bit of a pain and they could maybe do with a tiny bit more off but ill see how they get on. Quick enough to do! The idea for now is that I can buy easily available off the shelf parts as replacements. In the future ill re-visit the brakes and go for a more lightweight set-up but I think what I’ve got should be great until then.
This finally allowed me to bleed the system, it all went rather well until I noticed a bit of a weep on the footwell side of the pedal box on the clutch master cylinder about 2 weeks after bleeding. I’d replaced the brake master cylinder but at the time the clutch one seemed fine, typical! You can see where the weep has taken the paint off the pedal box:
I’ve removed this to be sent off for sleeving/ refurbishment this week.
Hopefully this can return soon and I can get it refitted and re-bled again!
I also finally sorted the exhaust manifold out, im still anxious about how close it is to everything and may end out using a solid passenger side engine mount to keep it all in check. Im still running a new 'track and road' spec gearbox mount so dont think it'll be too bad either way.
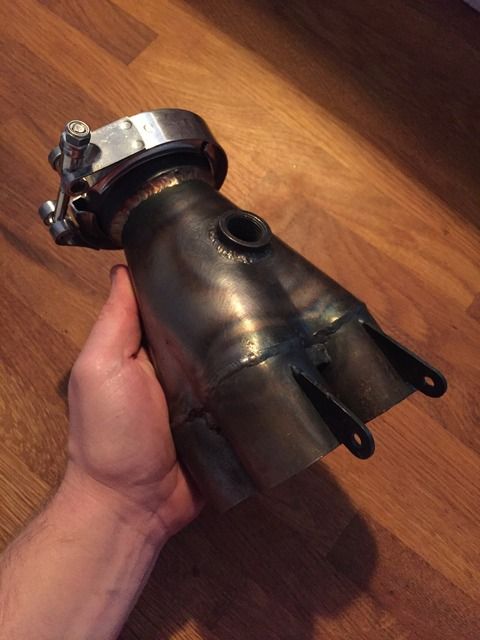
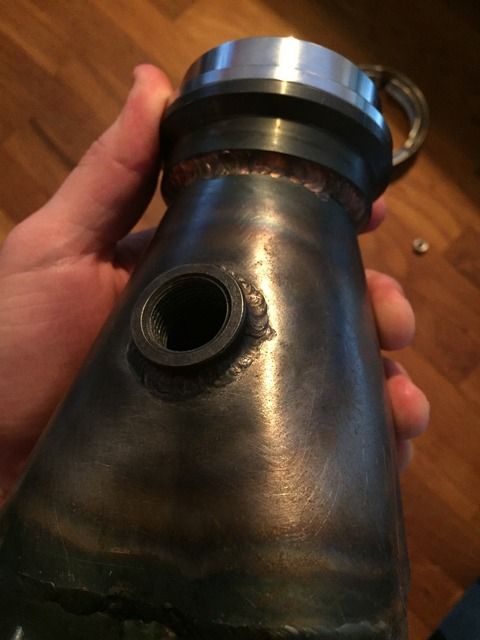
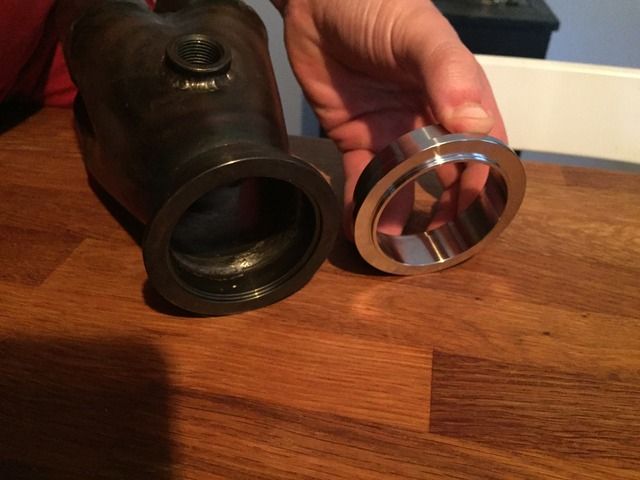
Anyway, i had to send it away for coating before fitting and the best option seemed to be to get a V-band tig'd onto the end of the collector, luckily the competition engine builders i help out at are very good at this! I also had them weld in a lambda boss, just in case. I flared the end out so it matched the recess on the inside of the flange and had it welded:
The other half is stainless ready for the rest of the system down the line:
The exit is spot on to carry the exhaust on when it comes to it:

Manifold back from coating following the above:
I was over the moon with how it came out but I’m still in shock at the price. I could have had it done in a cheaper coating but the thermal properties didn’t make it worth getting done at all. In for a penny, in for a pound (or lots of them!). Luckily I hadn’t fitted the manifold otherwise removing the clutch master would have been a nightmare! To be honest im not looking forward to fitting the manifold at all, half because of the colour and half because its just a chew but it’ll hopefully pay off!
Meanwhile I got the higher cooling capacity radiator fitted and the electric cooling fan. Im hoping I’ll run this automatically off the ecu! Along with this came the Ireland Engineering water hose kit, new thermostat and stainless water bypass pipe. The hoses out of site didn’t fit properly so I re-used the good condition original ones, they look like they’ve been replaced in recent years anyway, I was just being a tart with the IE ones.
You can also see the fuel filter mount I knocked up quickly out of a bracket and new bosch filter.
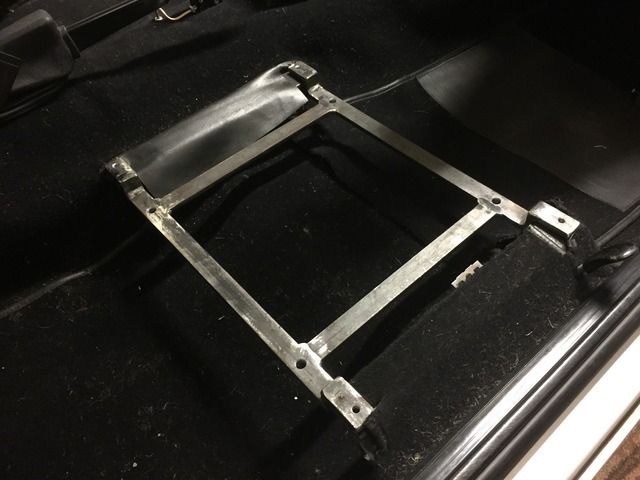
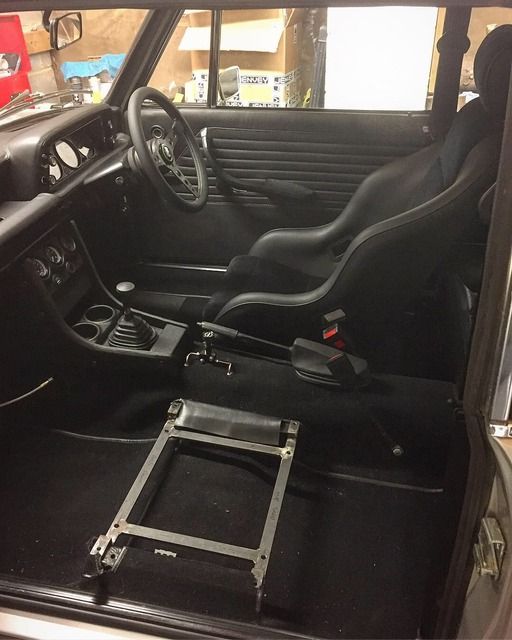
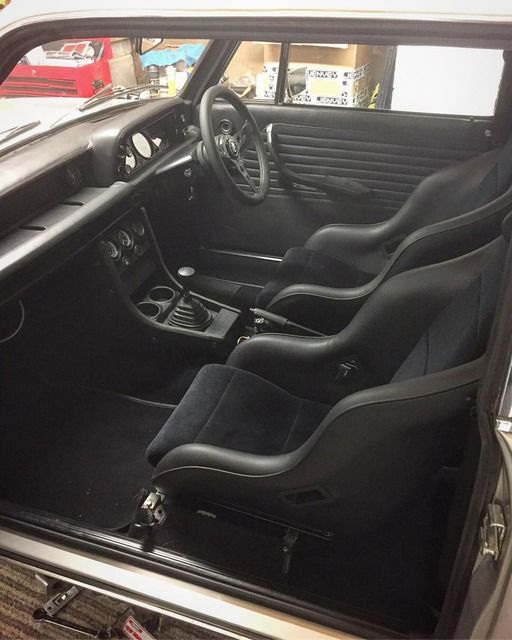
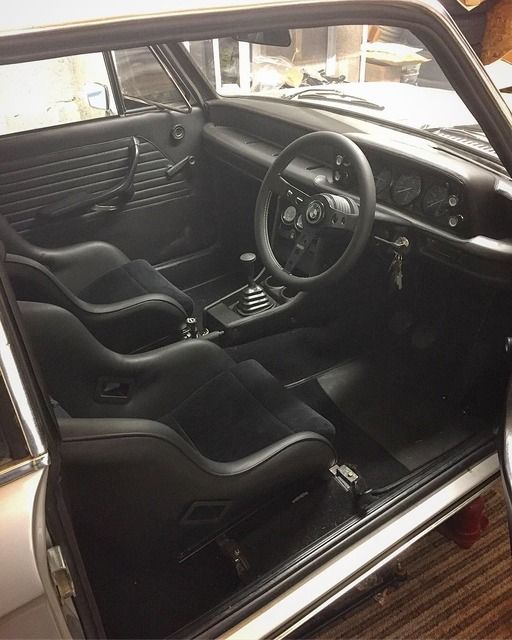
Lastly for this update I asked a local fabricator if he’d be willing to knock up some seat frames for my seats. I tried them in with some flat bar and they felt too high so I asked if he could make them recessed, I then used inboard cobra runners that mounted direct to the base of the seats. This allowed us to get them around an inch lower and the seating position feels great. These need a small amount more fettling and ill get them in satin black. You’ll notice a theme with my interior and satin black ha!
As the last update, the wiring is one of the last things now before I can get it fired up, this includes all the gauges etc too. I got some injectors off my friend (left over Porsche 964 injectors from his race car that should see me fine up to 200hp) that’s going to help with the wiring so hopefully that’s the last piece of the puzzle and we can crack on over winter.
This brings the thread more or less up to date. Not a massive amount of progress but at the same time these little bits were all playing on my mind so it feels great. I’ve got a bit of saving to do and hopefully in the next month or two ill get the cage and harnesses ordered up. This car is an absolute dream for me and I’ve probably spent more time than I should have sat in the driver’s seat procrastinating since I got it in!
As always, thanks for reading and I hope it may be of interest to some!
I had a bit of a chew on with the rear brakes, the kit was on the car when I bought it and came from America. I knew they used Jetta GLA callipers/ carriers and mk1 golf front discs but that was about it. The first set of discs I bought required me to shim out the calliper but were too thick for me to fit the DS2500 pads I’d got hold of. I then bought a different set of discs that were 2mm thinner, thinking this is where I had gone wrong. It turned out the disc offset was different too so I had to get the carrier skimmed:

This was a bit of a pain and they could maybe do with a tiny bit more off but ill see how they get on. Quick enough to do! The idea for now is that I can buy easily available off the shelf parts as replacements. In the future ill re-visit the brakes and go for a more lightweight set-up but I think what I’ve got should be great until then.


This finally allowed me to bleed the system, it all went rather well until I noticed a bit of a weep on the footwell side of the pedal box on the clutch master cylinder about 2 weeks after bleeding. I’d replaced the brake master cylinder but at the time the clutch one seemed fine, typical! You can see where the weep has taken the paint off the pedal box:

I’ve removed this to be sent off for sleeving/ refurbishment this week.

Hopefully this can return soon and I can get it refitted and re-bled again!
I also finally sorted the exhaust manifold out, im still anxious about how close it is to everything and may end out using a solid passenger side engine mount to keep it all in check. Im still running a new 'track and road' spec gearbox mount so dont think it'll be too bad either way.
Anyway, i had to send it away for coating before fitting and the best option seemed to be to get a V-band tig'd onto the end of the collector, luckily the competition engine builders i help out at are very good at this! I also had them weld in a lambda boss, just in case. I flared the end out so it matched the recess on the inside of the flange and had it welded:


The other half is stainless ready for the rest of the system down the line:

The exit is spot on to carry the exhaust on when it comes to it:

Manifold back from coating following the above:


I was over the moon with how it came out but I’m still in shock at the price. I could have had it done in a cheaper coating but the thermal properties didn’t make it worth getting done at all. In for a penny, in for a pound (or lots of them!). Luckily I hadn’t fitted the manifold otherwise removing the clutch master would have been a nightmare! To be honest im not looking forward to fitting the manifold at all, half because of the colour and half because its just a chew but it’ll hopefully pay off!
Meanwhile I got the higher cooling capacity radiator fitted and the electric cooling fan. Im hoping I’ll run this automatically off the ecu! Along with this came the Ireland Engineering water hose kit, new thermostat and stainless water bypass pipe. The hoses out of site didn’t fit properly so I re-used the good condition original ones, they look like they’ve been replaced in recent years anyway, I was just being a tart with the IE ones.


You can also see the fuel filter mount I knocked up quickly out of a bracket and new bosch filter.
Lastly for this update I asked a local fabricator if he’d be willing to knock up some seat frames for my seats. I tried them in with some flat bar and they felt too high so I asked if he could make them recessed, I then used inboard cobra runners that mounted direct to the base of the seats. This allowed us to get them around an inch lower and the seating position feels great. These need a small amount more fettling and ill get them in satin black. You’ll notice a theme with my interior and satin black ha!


As the last update, the wiring is one of the last things now before I can get it fired up, this includes all the gauges etc too. I got some injectors off my friend (left over Porsche 964 injectors from his race car that should see me fine up to 200hp) that’s going to help with the wiring so hopefully that’s the last piece of the puzzle and we can crack on over winter.
This brings the thread more or less up to date. Not a massive amount of progress but at the same time these little bits were all playing on my mind so it feels great. I’ve got a bit of saving to do and hopefully in the next month or two ill get the cage and harnesses ordered up. This car is an absolute dream for me and I’ve probably spent more time than I should have sat in the driver’s seat procrastinating since I got it in!
As always, thanks for reading and I hope it may be of interest to some!
e30m3Mark said:
Interior looks absolutely bang on.
I recall back in the day, the 4 branches available for RHD cars ran very close to the steering box and heat transfer could be an issue. I seem to recall wrapping mine in heat reflective cloth but hopefully that coating will keep things in check?
Overall it's looking awesome though. You must be very happy?
Cheers Mark, i love the interior and very happy how its turned out so far. Just needs the cage and Schroth's ordering and fitting to finish it off!I recall back in the day, the 4 branches available for RHD cars ran very close to the steering box and heat transfer could be an issue. I seem to recall wrapping mine in heat reflective cloth but hopefully that coating will keep things in check?
Overall it's looking awesome though. You must be very happy?
Yes you're right there, that's half the thinking around the ceramic coating, the coating i've gone for reduces surface temps up to 33%. I've also bought a universal heat blanket i may be able to trim to suit the steering box. I'll hopefully get all that stuff out of the way when i fit the exhaust mani, once the clutch master cylinder comes back.
Mark Benson said:
I agree, it's looking great, real attention to detail.
Cheers Mark, appreciate it!e30m3Mark said:
Those seats look 100 times better than e21 Recaro's did.
So how long till you're power sliding out of corners?
Im glad you think that, i think they do as well. The e21's were comfortable but just didn't look right and the seat swap has worked out pretty cost neutral with the price the recaros fetch.So how long till you're power sliding out of corners?
There's no rush now with us going into winter so it'll probably just be a slow plod until the spring but i'd like it to be ready for then so i can start getting some miles on the thing!
One step closer mind, I got a spare bit of time in the garage last night. Porsche 964 injectors fitted great with the Jenvey supplied fuel rail spacers. Luckily my mate has a surplus of these with all the 964’s he does, the injectors max out at 300ish hp so are often swapped out, hopefully they’ll do my 2002 good until later down the line when I’ll need to go bigger.
Few pics:


daniel-5zjw7 said:
Wow what an awesome build, hats off to you, love seeing cars rebuilt & modified in this way. Guessing using your own skills and those around you has saved you a fortune!!
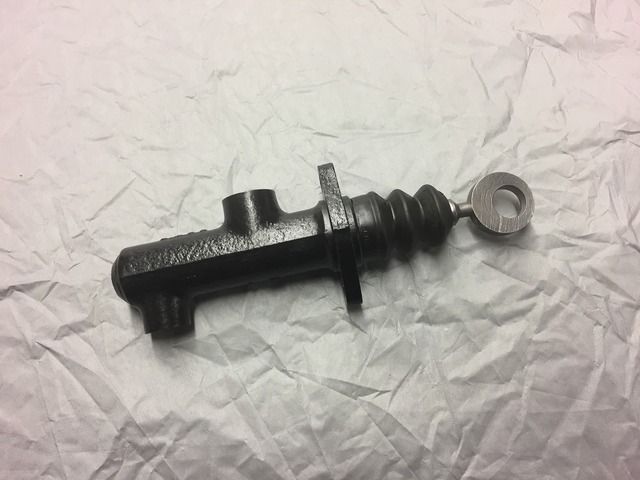
Thanks! Yes it has, its the only way i could (barely) afford to do it. If i had to pay others it either wouldnt happen or it would take 5 times longer. It's been great learning along the way too!Small update, my clutch master has returned after a few weeks away, it’s been bored out and sleeved/ refurbished. It looks and feels great so im looking forward to refitting it:
Following on from this I plan to make the brake lines in the front wheel wells from the flexi’s to the callipers. These are the only lines I’ve not redone and it appears they may be leaking from the sleeve nuts that go into the callipers. Now is the time to remake them being that ill need to bleed the system anyway, teaches me for trying to cut corners eh! Hopefully that’ll be that sorted! Once this is sorted I can fit the new tie arms that showed up last week and ill almost be at the point where not 1 thing hasn’t been replaced or refurbished!
Following this I can FINALLY fit the exhaust manifold, im kind of dreading this but cant wait to get it on. I’ve also ordered the rest of the exhaust, I’ve found a performance system in the right size that will come up short of my manifold outlet. I plan to have a transition piece made with a flexi that will join the 2. Looking forward to this showing up and getting it on the car!
I’ve also ordered the roll cage, bad news is that its on 20-22 week lead time, a little frustrating. Apparently all cages are made to order and that how long the list is. After speaking with various people I’ve decided against a 6 point cage and instead have requested the rear section only with the mounts for the front section deleted. I’ve added a X brace instead of a diagonal and also added a harness bar. With the rear end carpeted out I think it’ll really give the car that ‘clubsport’ sort of look and feel which is what I was really aiming for.
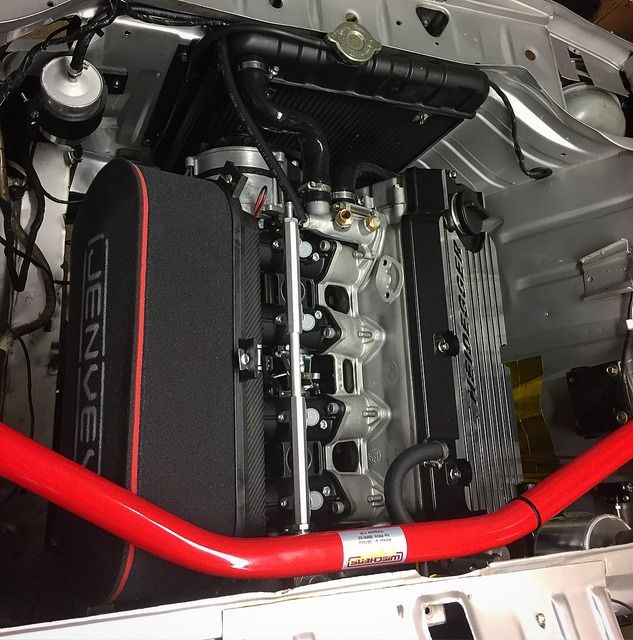
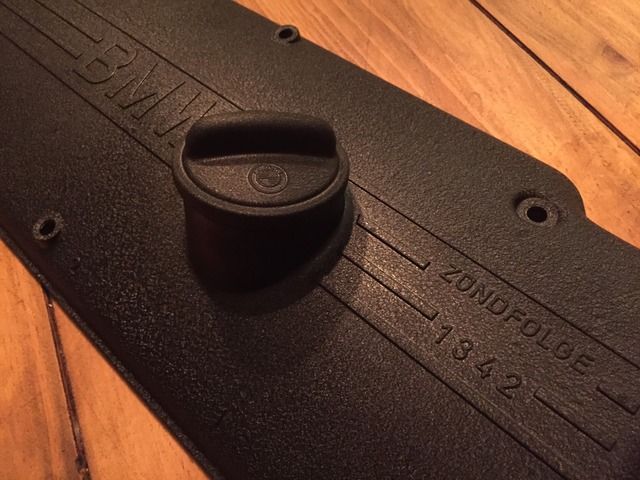
I’ve also ditched the fancy rocker cover I had fitted, for a few reasons. It was a bit too ‘bling’ in hindsight and took away from the rest of the engine bay, I got offered a good price for it, it was at least 3 times heavier than the original! I also didn’t like the original one I had in black with the raised bits in silver and I didn’t like it in all silver after soda blasting.
The competition engine builders I help out at gets a lot of classic competition engines through it and I’ve always loved crackle black on some of the lotus twin cam engines so I thought I’d give it a go. I’ve done 3 covers now, one for a friend and two of my own. I also found the metal oil cap with roundel on ebay so quickly grabbed that and gave that a coat too. I had some paint left once all that had been done and have taken the catch can off for better access to the clutch master cylinder, so did that too. The engine bay shot shows the crackle rocker but with the more modern plastic oil cap and the catch can still in aluminium.
It turns out the spray bar support to the front of the engine was in the wrong place too, an oversight on my part so quickly sorted this out whilst in there, still looks good!
As always the wiring is left to do, throttle cable etc but im slowly getting through the rest of the job to ensure the wiring etc will be the last thing moving into the New Year. I’m really hoping its all ready to get some miles on it moving into the spring.

Following on from this I plan to make the brake lines in the front wheel wells from the flexi’s to the callipers. These are the only lines I’ve not redone and it appears they may be leaking from the sleeve nuts that go into the callipers. Now is the time to remake them being that ill need to bleed the system anyway, teaches me for trying to cut corners eh! Hopefully that’ll be that sorted! Once this is sorted I can fit the new tie arms that showed up last week and ill almost be at the point where not 1 thing hasn’t been replaced or refurbished!
Following this I can FINALLY fit the exhaust manifold, im kind of dreading this but cant wait to get it on. I’ve also ordered the rest of the exhaust, I’ve found a performance system in the right size that will come up short of my manifold outlet. I plan to have a transition piece made with a flexi that will join the 2. Looking forward to this showing up and getting it on the car!
I’ve also ordered the roll cage, bad news is that its on 20-22 week lead time, a little frustrating. Apparently all cages are made to order and that how long the list is. After speaking with various people I’ve decided against a 6 point cage and instead have requested the rear section only with the mounts for the front section deleted. I’ve added a X brace instead of a diagonal and also added a harness bar. With the rear end carpeted out I think it’ll really give the car that ‘clubsport’ sort of look and feel which is what I was really aiming for.
I’ve also ditched the fancy rocker cover I had fitted, for a few reasons. It was a bit too ‘bling’ in hindsight and took away from the rest of the engine bay, I got offered a good price for it, it was at least 3 times heavier than the original! I also didn’t like the original one I had in black with the raised bits in silver and I didn’t like it in all silver after soda blasting.
The competition engine builders I help out at gets a lot of classic competition engines through it and I’ve always loved crackle black on some of the lotus twin cam engines so I thought I’d give it a go. I’ve done 3 covers now, one for a friend and two of my own. I also found the metal oil cap with roundel on ebay so quickly grabbed that and gave that a coat too. I had some paint left once all that had been done and have taken the catch can off for better access to the clutch master cylinder, so did that too. The engine bay shot shows the crackle rocker but with the more modern plastic oil cap and the catch can still in aluminium.


It turns out the spray bar support to the front of the engine was in the wrong place too, an oversight on my part so quickly sorted this out whilst in there, still looks good!


As always the wiring is left to do, throttle cable etc but im slowly getting through the rest of the job to ensure the wiring etc will be the last thing moving into the New Year. I’m really hoping its all ready to get some miles on it moving into the spring.
Legacywr said:
Funnily, those seats are the only part of this car that I don’t like.
I guess a project like this is always going to be personal. A buddy builds and looks after many classic 911's orientated around track/ hillclimb work and he gets in an awesome 964 on bbs e88's, half cage and these seats (well the posh version made by Recaro i think!) and thats always been the vision. I hope with the cage it plays out!What seats would you have in mind? I always enjoy hearing/ seeing what everyone would do or has done differently!
Justin S said:
Nothing to change with this build if it was mine. Looks fantastic. I remember a guy who used to break '02's when they were worth pennies, including Tii's
Thanks Justin. Yes i remember looking at these years ago when they were for nothing and a few friends i've made since buying this car have had multiple cars since those days. One friend told me he hasnt ever paid more than £2500 for a Tii, crazy to think they start at 10x that now really!CarlosV8 said:
Fantastic project, looking forward to seeing further progress!
What paint did you use for the rocker cover? I'm just about to start refurbing one for my 205 and I think that finish would look just right.
Thanks Carlos, i used VHT black wrinkle paint, Im not sure if i can post links on here but its available on eBay for around £12 and although the can is quite small there's plenty in it!What paint did you use for the rocker cover? I'm just about to start refurbing one for my 205 and I think that finish would look just right.
I found heat is your friend with it, heat the object up with a heat gun and heat the can whilst you're mixing it and keep the object warm for the 5 minutes between coats. I was then giving it around 15 mins to settle after all the coats then subjecting it to some proper heat from the heat gun. When dry to touch i left the things on top of the radiator for a couple of days much to my other half's objections!
e46m3Mark said:
My first properly nice 02, a white car that had a full body restoration, cost me £700. A dealer offered me 1500 the next day, but I kept it for a couple of years. It's one of those cars I wish I had never sold. (HKL 298L) A pub landlord bought it for his son. It was ruined within a few weeks and last time I saw it, was on flat tyres with the interior missing. Such a sad sight.
That is sad, hopefully with the valuse going up someone might save it now!Simon182 said:
Looks awesome Scott, we'll have to meet up next year when the weather improves.
Yes, I think im more north and youre more south now but we'll cross paths at some point i bet!Smokin Donut said:
You’ve gone and done it now, you’ve gone too far! It’s too nice to drive you’re going to have to hang it on the wall. 
Thats the great thing with this car, its immaculate and completely solid but its far from perfect so i wont mind using it!Time for another update, looking back there’s been quite a lot done since the last one. The first thing to note follows on from the previous engine oil cap, the nice metal one I found with the roundel on turned out to be a vented cap and is in fact a petrol cap from a 2000 CS! In the end I just wrinkle painted the plastic one I had to hand:
I then set about re-fitting the clutch MC I had sleeved and rebuilt in the last post:
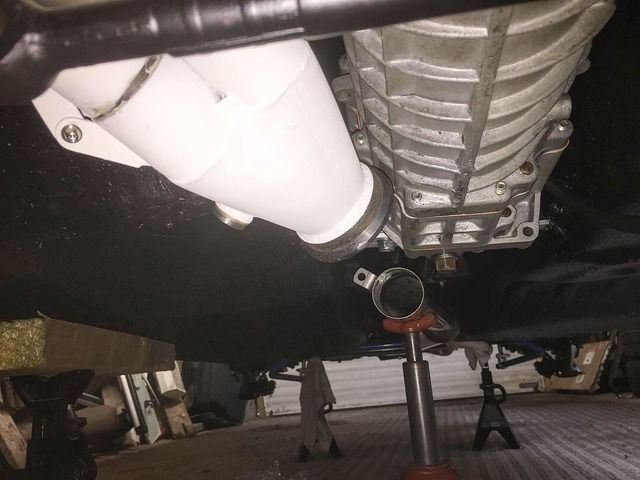
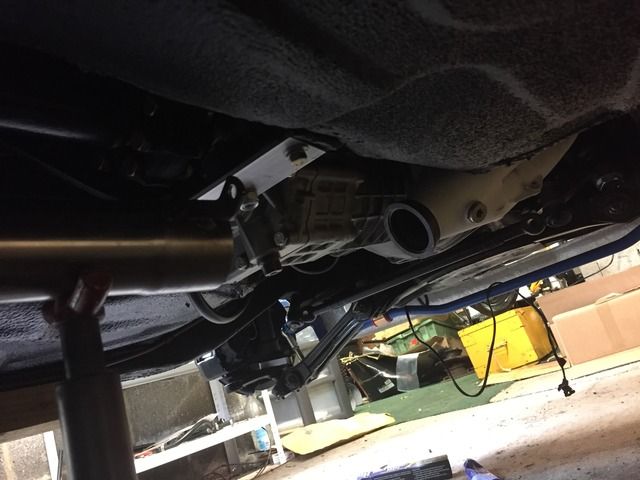
As I mentioned in the previous post, once this is fitted I can crash on with fitting the manifold, this is something id both been really looking forward to and really dreading at the same time. The coating stains really easily and cant be wiped as its surface is like really course sand paper! I wrapped all the primaries in bubble wrap and cable ties as you have to get them in and hang them off the steering column before you can even think about getting them onto the head studs!
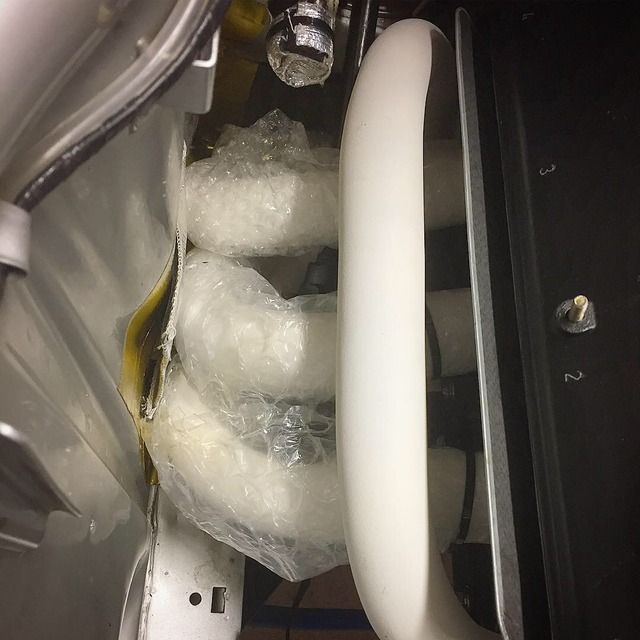
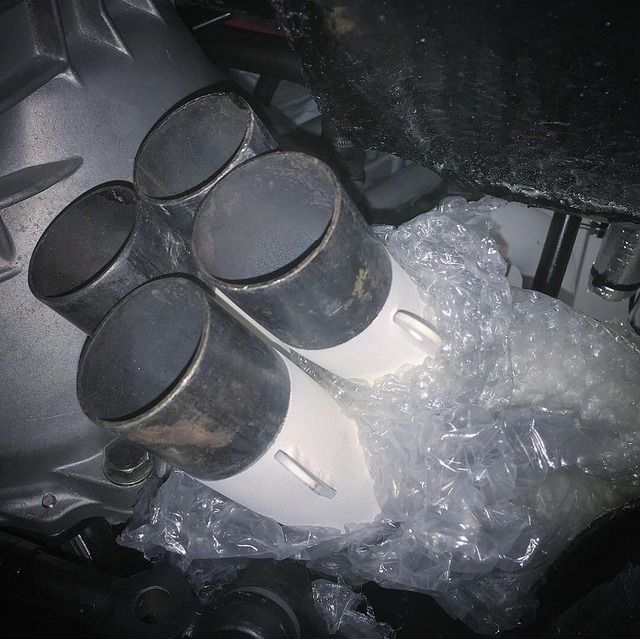
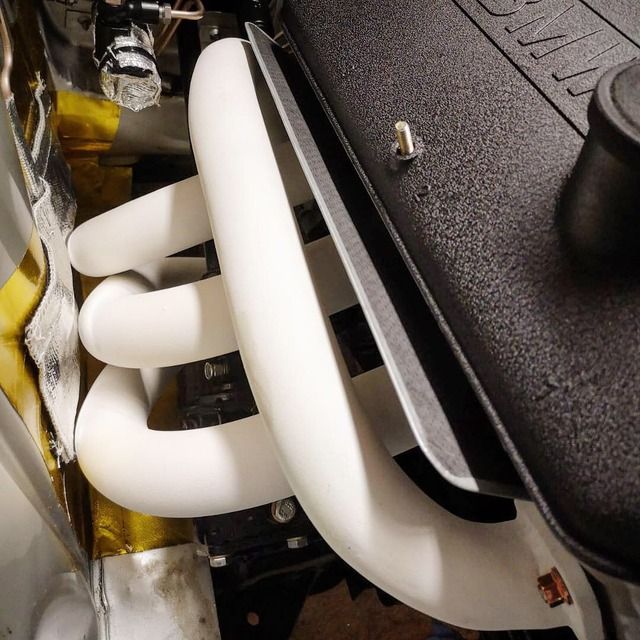
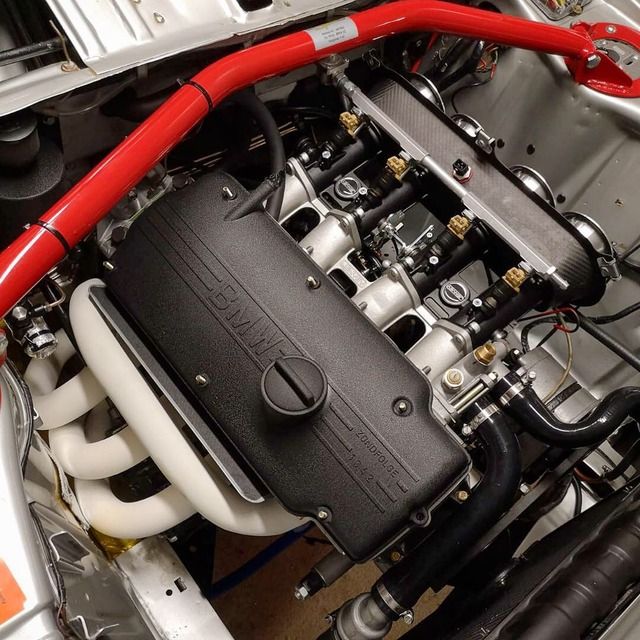

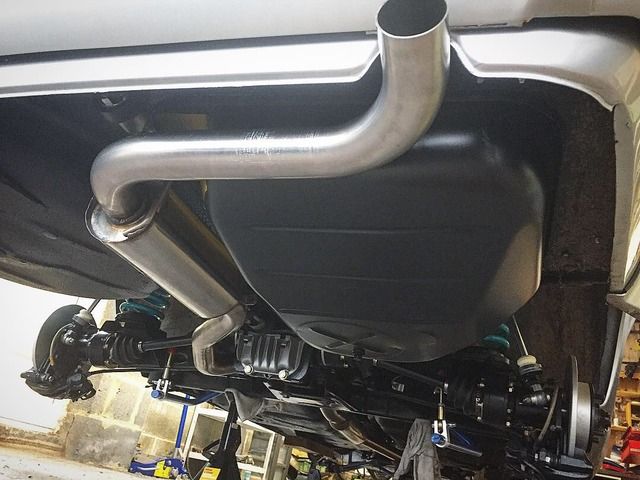
As you can see, it’s very very close to everything! Good job the engine doesn’t really move! This tied in nicely time-wise as the new exhaust showed up:
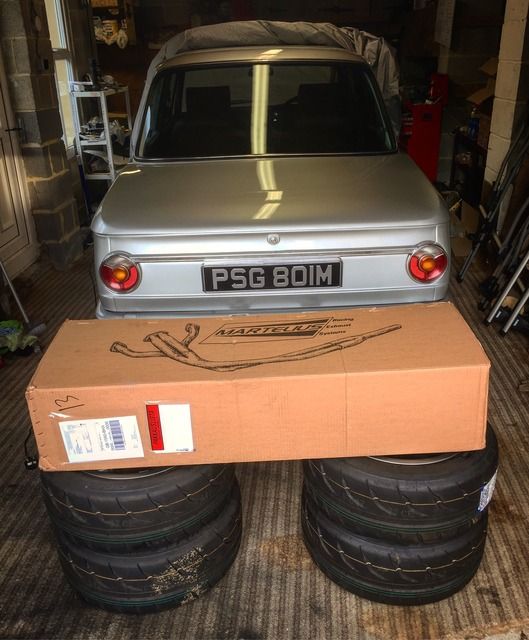
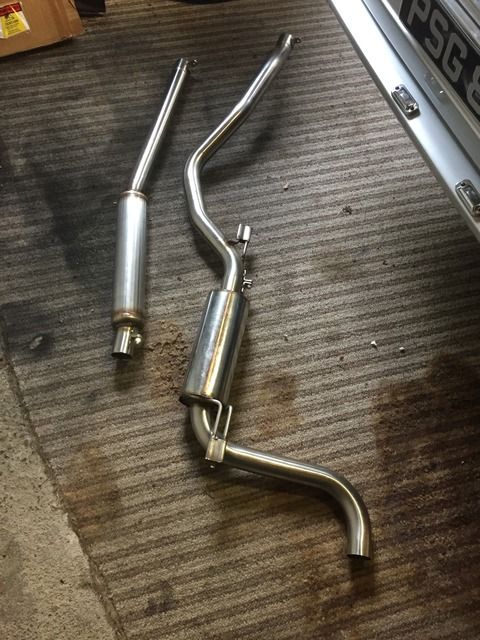
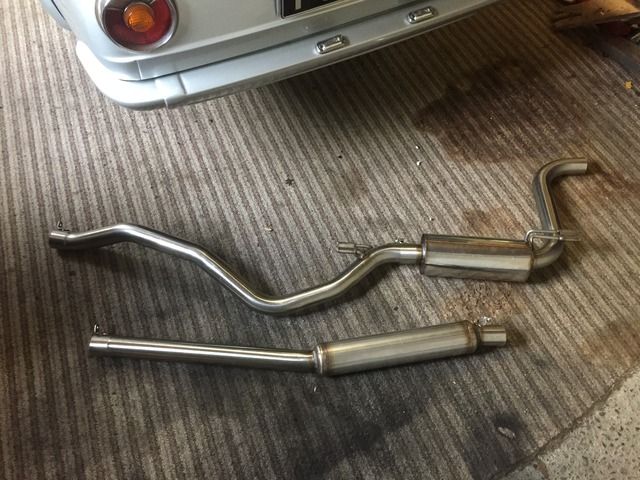
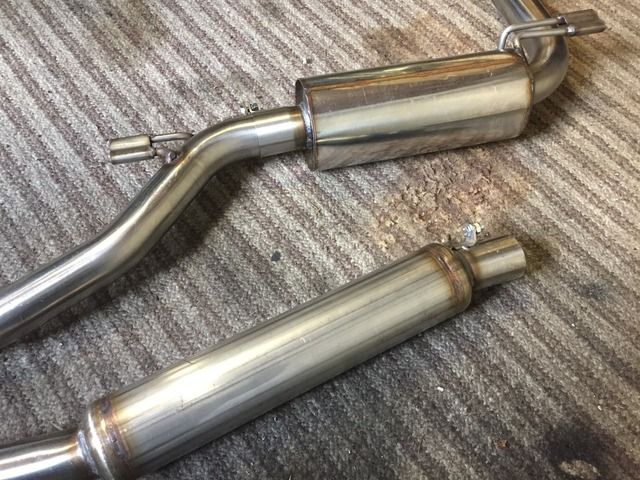
Really happy with the exhaust other than the fixing tabs on the rear section don’t line up properly but that’s easily sorted. I chose this exhaust because the quality on them seemed awesome and the pipes are all properly bent without any reduction in diameter and the silencers are of the straight through no restriction type and to top it off it looks very subtle.
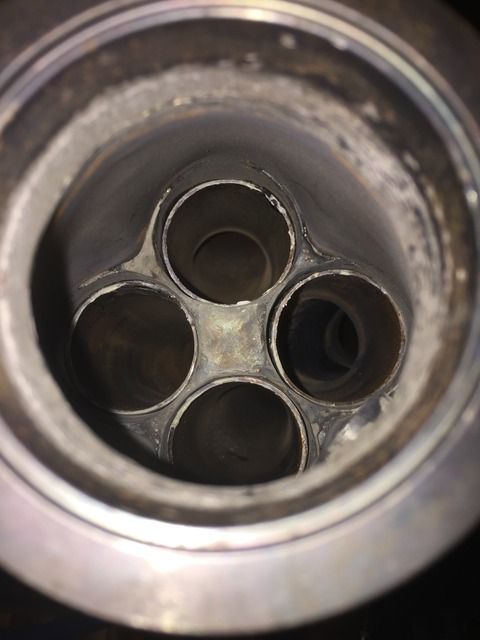
This exhaust is made to fit their manifolds, sadly designed for LHD only. Because of this I knew the exhaust would come up short of my manifold and I could then get a link pipe sorted between the 2:
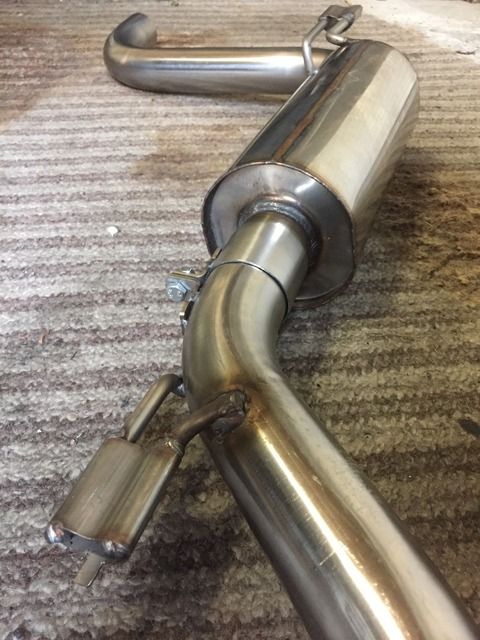
The pesky rear tab:
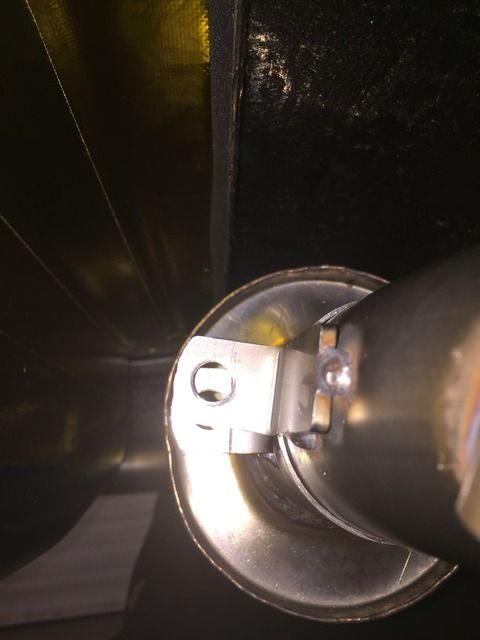
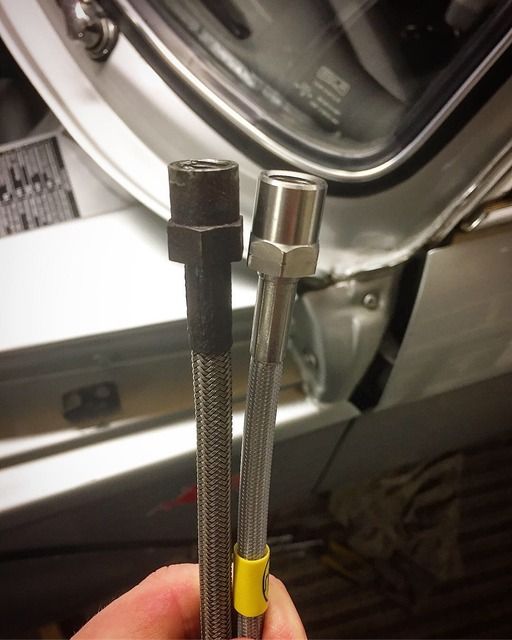
This is due to get sorted along with the link pipe soon. The next thing to sort was the hardlines to the front callipers:
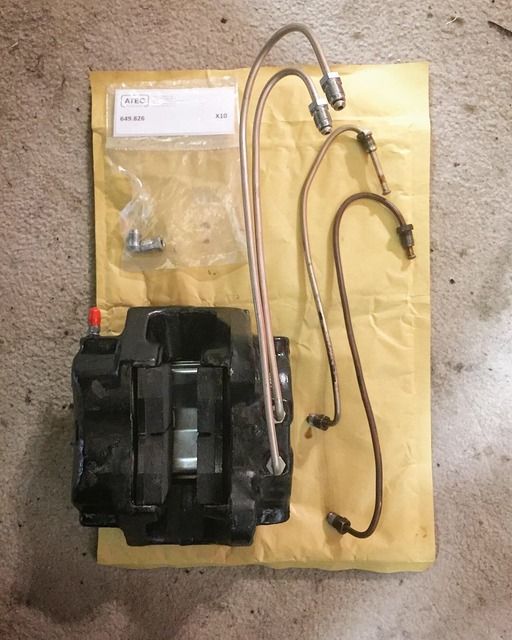
I got some more stainless tube nuts from Atec Fluid Solutions for these.
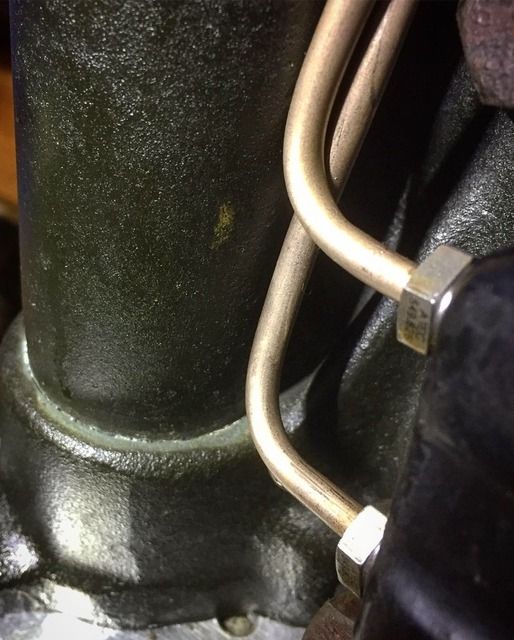
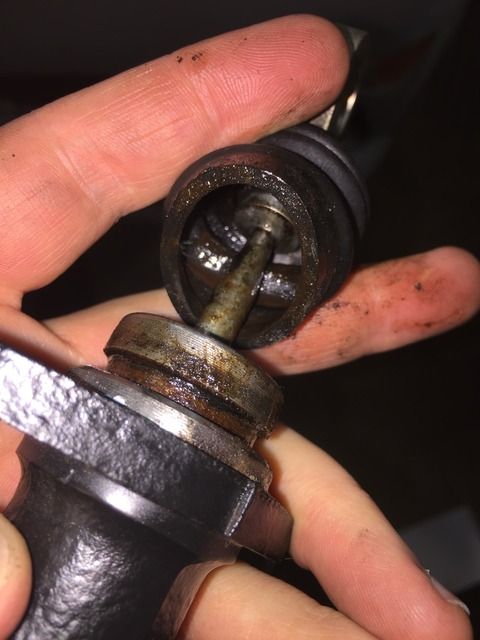
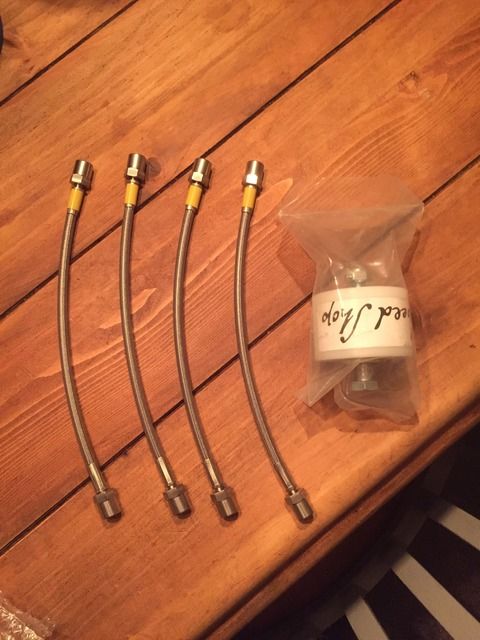
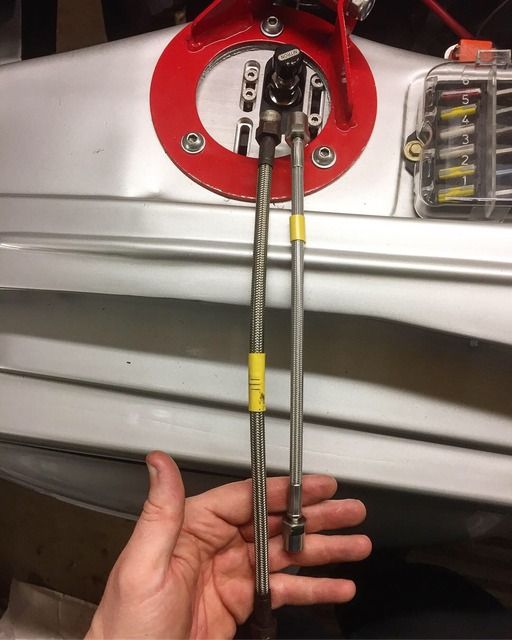
When it came to re-fitting, one of the flexi’s had been cross threaded slightly by whoever fitted them initially. When I got them off it turns out they are made by an American company and not Goodridge as I first thought. I was duped by the yellow labels. I wasn’t keen on these flexi’s as the ends weren’t stainless and they were solid so the ends didn’t turn, it made working on them more of a pain than it had to be. I decided to bin them all off and order a set of HEL ones from WG Motorparts who made them up for me overnight, very good service!
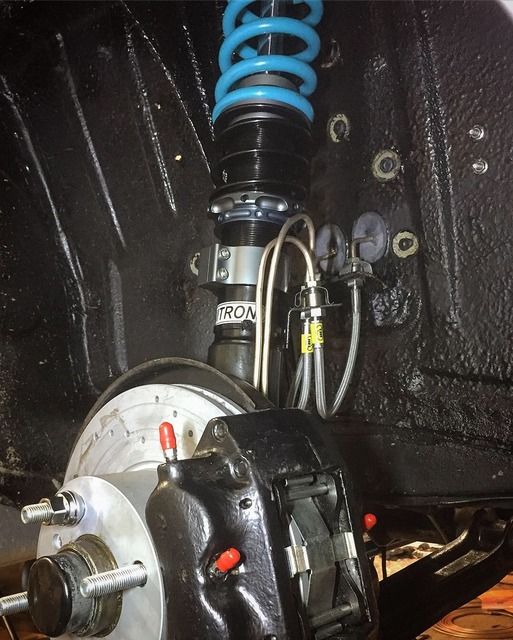
You’ll also spot the semi-solid left hand side engine mount from Condor in one of the pictures above, this was swapped over to limit the engine movement as much as possible without being too harsh.
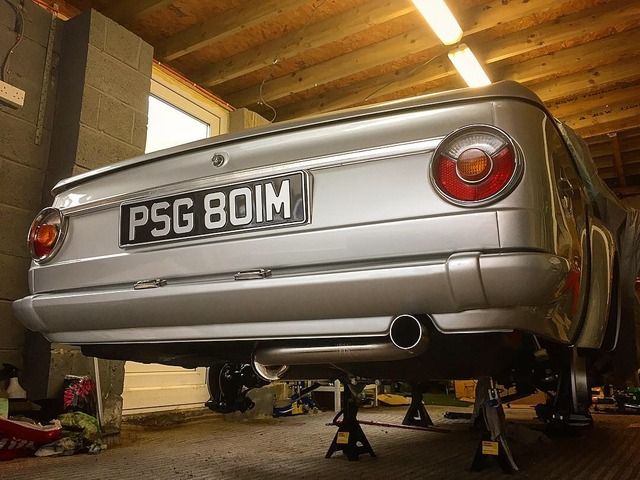
This allowed me to bleed everything through (again) and with everything seeming okay I got the new tie arms on and realised it was oh so very close. I couldn’t help myself but get it off the jackstands and onto its wheels for a look at it.
TBC.

I then set about re-fitting the clutch MC I had sleeved and rebuilt in the last post:

As I mentioned in the previous post, once this is fitted I can crash on with fitting the manifold, this is something id both been really looking forward to and really dreading at the same time. The coating stains really easily and cant be wiped as its surface is like really course sand paper! I wrapped all the primaries in bubble wrap and cable ties as you have to get them in and hang them off the steering column before you can even think about getting them onto the head studs!


As you can see, it’s very very close to everything! Good job the engine doesn’t really move! This tied in nicely time-wise as the new exhaust showed up:


Really happy with the exhaust other than the fixing tabs on the rear section don’t line up properly but that’s easily sorted. I chose this exhaust because the quality on them seemed awesome and the pipes are all properly bent without any reduction in diameter and the silencers are of the straight through no restriction type and to top it off it looks very subtle.
This exhaust is made to fit their manifolds, sadly designed for LHD only. Because of this I knew the exhaust would come up short of my manifold and I could then get a link pipe sorted between the 2:


The pesky rear tab:

This is due to get sorted along with the link pipe soon. The next thing to sort was the hardlines to the front callipers:

I got some more stainless tube nuts from Atec Fluid Solutions for these.

When it came to re-fitting, one of the flexi’s had been cross threaded slightly by whoever fitted them initially. When I got them off it turns out they are made by an American company and not Goodridge as I first thought. I was duped by the yellow labels. I wasn’t keen on these flexi’s as the ends weren’t stainless and they were solid so the ends didn’t turn, it made working on them more of a pain than it had to be. I decided to bin them all off and order a set of HEL ones from WG Motorparts who made them up for me overnight, very good service!


You’ll also spot the semi-solid left hand side engine mount from Condor in one of the pictures above, this was swapped over to limit the engine movement as much as possible without being too harsh.
This allowed me to bleed everything through (again) and with everything seeming okay I got the new tie arms on and realised it was oh so very close. I couldn’t help myself but get it off the jackstands and onto its wheels for a look at it.
TBC.
Gassing Station | Readers' Cars | Top of Page | What's New | My Stuff