460hp Lotus Exige V6
Discussion


keo said:
Looking forward to see the colour. Looks a great job. Will you be applying ppf out of interest? Now wondering if I did the right thing. I could if saved the money and changed the colour in a few years if I fancied it.
Not going to do PPF for several reasons:- The colour is easy to match as we have the formula, paint manufacturer and it's a single stage paint (no transparent pearls in the clear coat etc, so the colour doesn't change dependant on the number of coats.
- The car isn't original paint, so keeping it original doesn't matter.
- If you get one stone chip that goes through the PPF and also through paint, you have to respray anyway, but now with expensive PPF to replace.
- Car paint looks better without PPF, even with a very good modern PPF
- I could get a respray again easily if I wanted, although I wouldn't do a colour change again as that's quite a lot of work & time.
- Lacquer technology has come a long way and the clear coat we're using is very very hard.
So basically, the only reason I would want PPF is to mean I don't have to be quite as careful when washing the car, but I'm happy to wash it properly and get it periodically detailed if needed to keep it perfect, then repair any stone chips if they're ever bad enough to warrant it.
Time for a little update, the car is home!! Well, most of it is...
The clams were placed on for the journey home, and it was nice to see a hint at how it'll look.

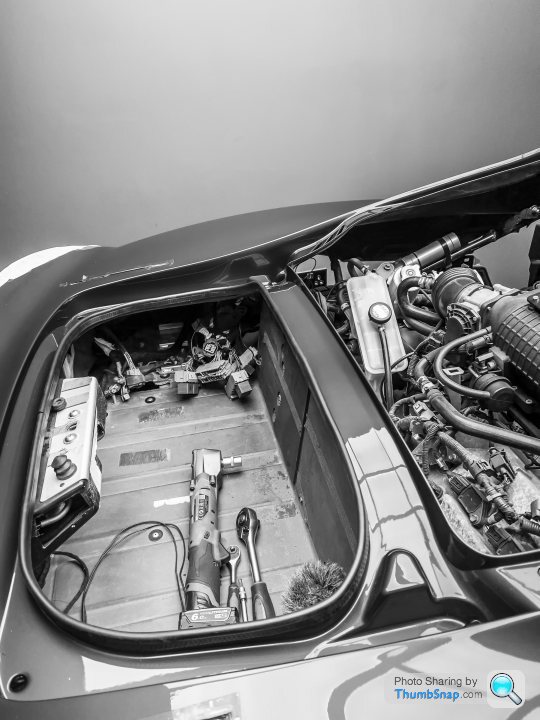
First thing as soon as it was home though was to get the rear clam off so I could start the process of getting it ready to go back on the car more permanently. My garage is very much on the small side to rebuild a car, but I have been making it work.

Because of my new chassis mounted wing, I lost a little boot space, and therefore I needed a smaller battery. I also needed to cut up the battery tray and add a couple of rivnuts. Quite happy to save 15kg with the new battery!
Getting the wiring through into the boot is fun, there are two small holes that it all fits through... Then it all connects together in a rather small area.
A few days later and you can see it 90% connected.

I also added a magnetic trickle charger into the side intake, since the photo I added a spring loaded cover for it too, to reduce crud getting in.

A little peak as the rear comes together, rear numberplate lights are now smoothed over, I'll be drilling holes and adding much smaller LEDs.
Brand new rubber seals were added. The old ones were in okay condition, but I have put so much effort into this rebuild that it seemed a shame to do things as half measures...

Ken (the painter) still has a fair few parts to paint, but is still cracking on and making great progress. Tomorrow I'll have some more parts so I can start with work on the front clam.
Other things I've done since the car has come back:
- Added electronic boot release (not finished, but working on it)
- A friend 3D scanned some parts of the car so that some small custom parts can be 3D printed
- Run wires for the reversing camera, and also a sensor for the gearbox temperature which will connect to the AIM MX2E dash.
- Spent a lot of time lining up the rear clam to get the perfect shut lines
To be honest, this is the part of the build I've been looking forward to, taking my time and geeking out on the details. Aim at the moment is to have the car working for the end of the month, then I can start taking some proper photos of it!
The clams were placed on for the journey home, and it was nice to see a hint at how it'll look.
First thing as soon as it was home though was to get the rear clam off so I could start the process of getting it ready to go back on the car more permanently. My garage is very much on the small side to rebuild a car, but I have been making it work.
Because of my new chassis mounted wing, I lost a little boot space, and therefore I needed a smaller battery. I also needed to cut up the battery tray and add a couple of rivnuts. Quite happy to save 15kg with the new battery!
Getting the wiring through into the boot is fun, there are two small holes that it all fits through... Then it all connects together in a rather small area.
A few days later and you can see it 90% connected.
I also added a magnetic trickle charger into the side intake, since the photo I added a spring loaded cover for it too, to reduce crud getting in.
A little peak as the rear comes together, rear numberplate lights are now smoothed over, I'll be drilling holes and adding much smaller LEDs.
Brand new rubber seals were added. The old ones were in okay condition, but I have put so much effort into this rebuild that it seemed a shame to do things as half measures...
Ken (the painter) still has a fair few parts to paint, but is still cracking on and making great progress. Tomorrow I'll have some more parts so I can start with work on the front clam.
Other things I've done since the car has come back:
- Added electronic boot release (not finished, but working on it)
- A friend 3D scanned some parts of the car so that some small custom parts can be 3D printed
- Run wires for the reversing camera, and also a sensor for the gearbox temperature which will connect to the AIM MX2E dash.
- Spent a lot of time lining up the rear clam to get the perfect shut lines
To be honest, this is the part of the build I've been looking forward to, taking my time and geeking out on the details. Aim at the moment is to have the car working for the end of the month, then I can start taking some proper photos of it!
Monster Mash said:
Out of interest, how are you planning on preventing water ingress into the boot with the new wing brackets running through the rear clam?
Thanks, that’s actually one of the things we 3D scanned the car for. My friend will design and 3D print a cover which can be sealed against both the clam and wing uprights. We will also make a cover, so if I decide to remove the wing for any reason, the slots can be covered. The 3D scanning was really useful as the clam section wasn’t at all flat, so we now have all the curves to match perfectly.Good progress on the build, it's slowly coming together, although I'm now at a stage where I'm waiting for parts to arrive to be able to progress further.
Let's look at some of the progress. First of all, my garage is very small to be rebuilding a car, it's challenging, but still progressing. Here you can see the front clam on, grills installed (these have to be installed from the rear of the clam which isn't accessible when it's on which is annoying!), and the carbon air curtains. I couldn't face the Lotus prices of the carbon air curtains, so bought the GRP ones and got my own carbon ones made... I also did the paint a bit different to factory cars here, just because I can...

Next up, you can see the new Komotec A-Panel, which is a lovely bit of carbon and actually functional!
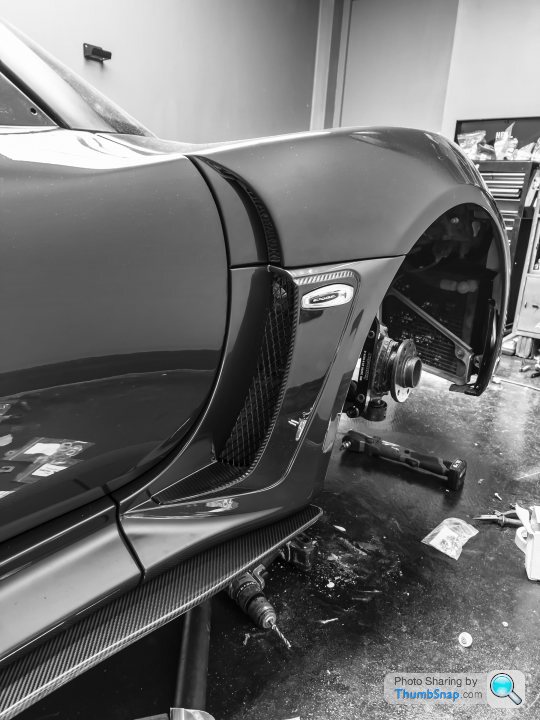
As you can see, they vent the air out of the wheel arch, down the side of the car.

The rear end is getting there now, the rear clam is all bolted down permanently, the wiring is all finished, and the car has been started and runs okay (despite no backbone so is very loud!)

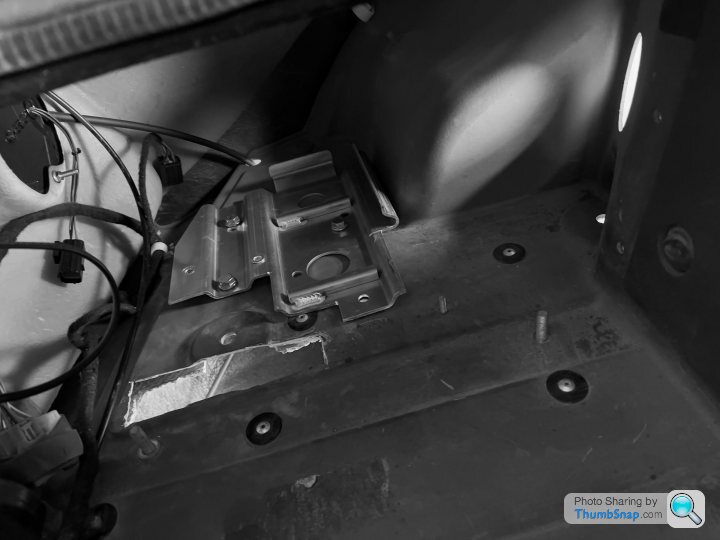
The bracket on my new rear clam for the coolant bottle was a bit different, so I bodged up a bit of aluminium, bent it into the right angle with a hammer (over my jack, proper bodging), then added a rivnut. Nice and secure and puts the coolant bottle at the right angle (plus luckily it's not seen!)

While bodging together some bits of metal, I also added an electronic boot release. This turned out to be more of a pain than I expected, using bicycle gear cables and having to change the spring on the boot catch so that it wasn't quite as stiff. There is a hidden switch on the back of the car that is only active for 5s after the indicators flash, so you can unlock the car and then press the button to release the boot. I have also added a few extra bits of security, but I will keep that to myself!

Onto something a little more exciting! I have bought CORE by Tractive dampers from Simon at Raceshocks. These are semi-active dampers, and the simplest way of describing them is that instead of changing the compression/rebound, they have an control unit which is constantly reacting and you can adjust the pitch/roll stiffness by adjusting the stiffness of each damper as you're driving.
Because they're semi-active, this meant I needed to install a wiring loom. Simon kindly got me the loom ahead of the dampers, beating the wait time a bit so I could get the loom in while the car was still in pieces which made life easier.

The Tractive Control Unit has to be installed as centrally in the car as possible, and also flat and low. I opted for under the passenger seat where it just about fitted if I removed the carpet.

The touch screen will be installed below where the headlight switches are I think so I can access them easily when driving.

I also test fitted my new HRE wheels. Over the moon with the look and fit of them!

That brings us up to where the car is now. Still a lot of work to go, there are some parts being custom made for me which is the current holdup. Once they're done I'll be able to progress more on the front clam and get it into the final position.
Let's look at some of the progress. First of all, my garage is very small to be rebuilding a car, it's challenging, but still progressing. Here you can see the front clam on, grills installed (these have to be installed from the rear of the clam which isn't accessible when it's on which is annoying!), and the carbon air curtains. I couldn't face the Lotus prices of the carbon air curtains, so bought the GRP ones and got my own carbon ones made... I also did the paint a bit different to factory cars here, just because I can...
Next up, you can see the new Komotec A-Panel, which is a lovely bit of carbon and actually functional!
As you can see, they vent the air out of the wheel arch, down the side of the car.
The rear end is getting there now, the rear clam is all bolted down permanently, the wiring is all finished, and the car has been started and runs okay (despite no backbone so is very loud!)
The bracket on my new rear clam for the coolant bottle was a bit different, so I bodged up a bit of aluminium, bent it into the right angle with a hammer (over my jack, proper bodging), then added a rivnut. Nice and secure and puts the coolant bottle at the right angle (plus luckily it's not seen!)
While bodging together some bits of metal, I also added an electronic boot release. This turned out to be more of a pain than I expected, using bicycle gear cables and having to change the spring on the boot catch so that it wasn't quite as stiff. There is a hidden switch on the back of the car that is only active for 5s after the indicators flash, so you can unlock the car and then press the button to release the boot. I have also added a few extra bits of security, but I will keep that to myself!
Onto something a little more exciting! I have bought CORE by Tractive dampers from Simon at Raceshocks. These are semi-active dampers, and the simplest way of describing them is that instead of changing the compression/rebound, they have an control unit which is constantly reacting and you can adjust the pitch/roll stiffness by adjusting the stiffness of each damper as you're driving.
Because they're semi-active, this meant I needed to install a wiring loom. Simon kindly got me the loom ahead of the dampers, beating the wait time a bit so I could get the loom in while the car was still in pieces which made life easier.
The Tractive Control Unit has to be installed as centrally in the car as possible, and also flat and low. I opted for under the passenger seat where it just about fitted if I removed the carpet.
The touch screen will be installed below where the headlight switches are I think so I can access them easily when driving.
I also test fitted my new HRE wheels. Over the moon with the look and fit of them!
That brings us up to where the car is now. Still a lot of work to go, there are some parts being custom made for me which is the current holdup. Once they're done I'll be able to progress more on the front clam and get it into the final position.


Gassing Station | Readers' Cars | Top of Page | What's New | My Stuff