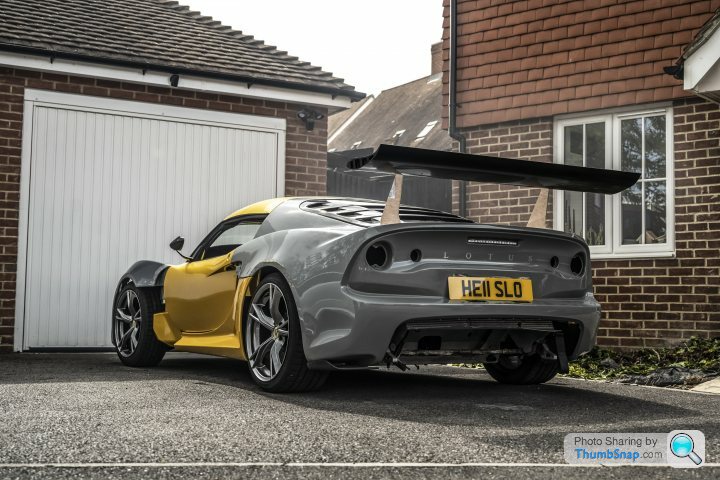
460hp Lotus Exige V6
Discussion


anonymous said:
[redacted]
It's been a bit of a quiet year for me, so I haven't done huge amounts to the car since the last update. Visually, I don't think the car needs much anymore, and I think I could ruin it quite easily if I'm not careful. With that said, I have done some subtle changes.A little project this year that I wanted to do was sort the exhaust. Part of the reason for this was that I was moving house and didn't want to annoy my neighbours with a stupidly loud exhaust. I hadn't had an awful lot of luck with valved exhausts in the past, with the valve failing, so decided it was best to start with an OEM exhaust from the 380 and 410 Exige to give me an ounce of hope for it lasting. With the valve closed, it is quite restrictive, then with the valve open it's a straight through. I wasn't a huge fan of the tip as it was shiny stainless, so got my friend to paint it. It was a gamble and although we used a special ceramic lacquer, it still didn't really last due to the heat. Looked good when it was done though, and now it's effectively just black, so still has the effect I wanted of hiding the exhaust and not making it as shiny.


The next update is more of a garage update, and is still very much ongoing. I bought a garage (it had a house attached for some reason), so wanted to spruce it up a bit. Here's how it started:

Here is how it is now I've painted it and done a self levelling screed:

Next stages are doing a stud wall, ceiling and an epoxy paint and adding a little insulation in the process.
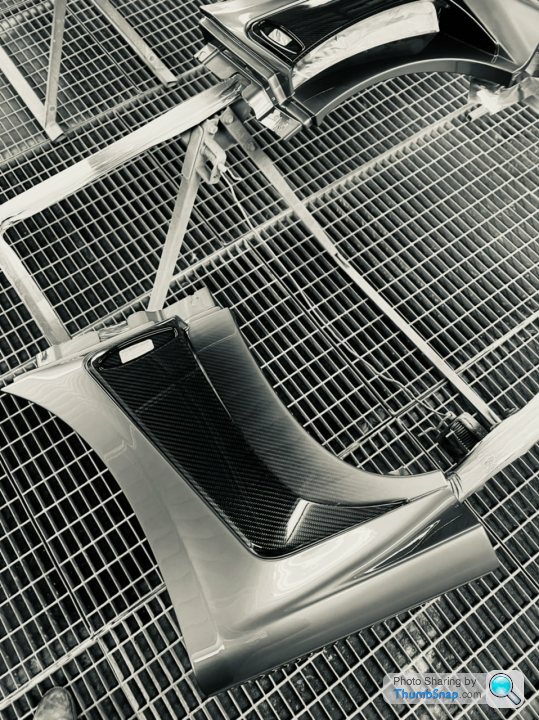
Back to the car, and the next thing I wanted to do to it was to replace some of the plastic with carbon fibre. I'm not normally a huge carbon fibre lover, but the plastic doesn't wear well and looks a bit knackered over time. I looked at the options on the market and didn't really like anything out there due to either the lack of quality or design. This led to discussions with a friend of mine who has a carbon company and soon after, I set up a company which will be selling parts...
The name of the company will be Hell Slow as the car numberplate and my instagram are already that. I made a logo, and wanted it on the car, but preferably in a classy way, not just a sticker, so I got Tillett to custom embroider the headrests of my seats:

Back to carbon, and here you can see some of the progress on making the moulds:

We've had quite a few delays as I'm so specific with with how I want everything, which has led to design changes quite a few times, but we're now getting there and I have the first set of side skirts on my car!


Oh, and one last photo to end, taken on my way to a shoot last month, showing my winter wheels, which I got refurbed in shadow chrome. Look way better than the diamond cut look which I had before (which wasn't in great condition anymore).

Gameface said:
The headrests are the first misstep for me.
Everything else has been spot on.
What's it like getting in and out of it in the garage?
Well they did have a big Tillett Logo on before, plus to be honest, you only see them if you're actually looking for them. The roof is so low that they're not that visible most of the time. Can always change back at any time of course, but I'm happy with them as they're a little nod to the new company.Everything else has been spot on.
What's it like getting in and out of it in the garage?
It's been a while... I decided it was time for some rather dramatic changes to my car. I intend to respray the car in a few months in a new colour and it has become a bit of a case of "while I'm doing it, I might as well also..."
So I've bought front and rear facelift clams, of course most people will think they look pretty much the same, but to me I like that it brings the car a little more up to date.
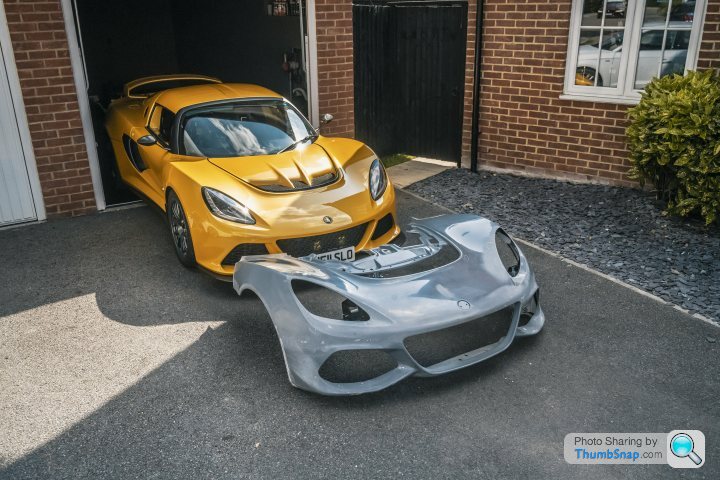
The next step will be removing the current clams from the car, then making some aero parts...
So I've bought front and rear facelift clams, of course most people will think they look pretty much the same, but to me I like that it brings the car a little more up to date.
The next step will be removing the current clams from the car, then making some aero parts...
AyBee said:
Looking forward to following this! What's the thought process around the colour change given yours is 1 of 2 liquid yellow cars in the UK?
Lotus decided that Liquid Yellow would become an option for anyone, so there are a lot more Liquid Yellow cars out there now. I’ve deliberately waited for Exige production to end, my car will be totally 1 of 1 when it’s done…Am43 said:
Very nice, are we getting a sneak peek of the proposed aero plans ?
I’ve designed a rear wing from scratch which will be made soon. We did a round of CAD, then I made it out of wood to check proportions, then decided to make some changes to aid the design. It’ll then be replicated in CAD, load tested to make sure it can handle the max theoretical downforce, then we’ll CNC it from 8mm thick aluminium.It’s a Cup R wing, but with different uprights, I have the aero data for the wing profile so can get the right idea. I’ll be able to adjust height and angle of attack to hopefully get it balanced close enough. I’m basing the uprights on the Cup R, but adding some design to make it (IMO) look better. I’m not racing my car, so it doesn’t need to be perfect, it just has to feel a nice balance. The car has no downforce at all with the 350 wing, and I was running the Cup R race car splitter before so the balance was very front heavy. I managed okay on trackdays…
The front aero parts I’m adding have had lots of CFD analysis and are designed to work together, and they’re done by a company with a very good reputation.
The front aero parts I’m adding have had lots of CFD analysis and are designed to work together, and they’re done by a company with a very good reputation.

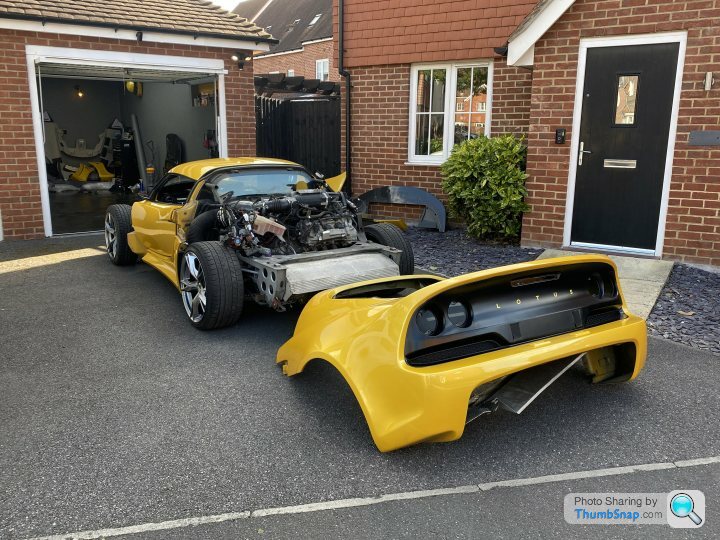
Things are going well so far, I made a video of the rear clam removal, which is on YouTube, but I won't link for fear of mods.
To give a few thoughts:
- It came off much easier than I expected, we did both front and rear clam in 6 hours
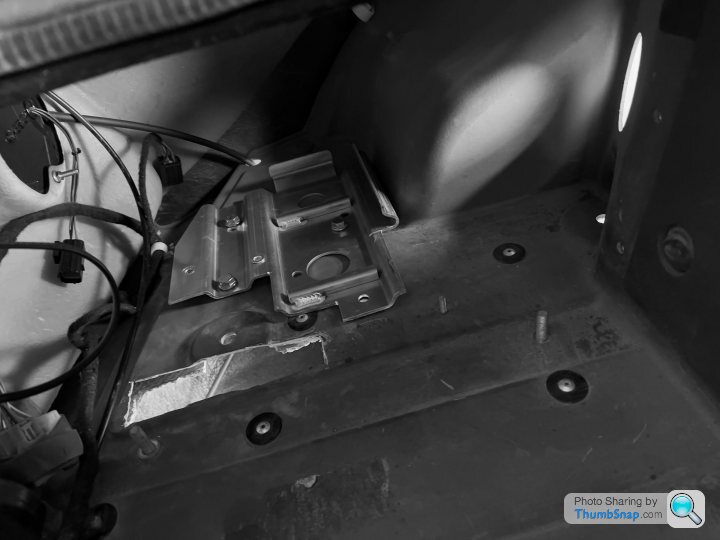
- Electronics which are in the boot (relays, fuses, ECU and battery) were a pain to disconnect, label, and then feed through two small grommets. Will be 10x worse trying to rewire it after the respray I think.
- Now everything is off, there's a noticeable difference between the front and rear in condition. The front wishbones and upright are steel and quite rusted and need some attention. The rear end (mainly aluminium) was in very good condition.
- While everything is off, it makes me want to do "just one more thing". Budget unfortunately is stopping this, so I have a feeling this might not be the last time the body comes off.
Next stage is to get the new clams in the right place to check fitment, then I'll be testing wing uprights.
To give a few thoughts:
- It came off much easier than I expected, we did both front and rear clam in 6 hours
- Electronics which are in the boot (relays, fuses, ECU and battery) were a pain to disconnect, label, and then feed through two small grommets. Will be 10x worse trying to rewire it after the respray I think.
- Now everything is off, there's a noticeable difference between the front and rear in condition. The front wishbones and upright are steel and quite rusted and need some attention. The rear end (mainly aluminium) was in very good condition.
- While everything is off, it makes me want to do "just one more thing". Budget unfortunately is stopping this, so I have a feeling this might not be the last time the body comes off.
Next stage is to get the new clams in the right place to check fitment, then I'll be testing wing uprights.
A little update:
Both the old clams are now sold, this helps a bit with costs of the new parts!
Rear wing uprights have been tested in wood for position to make sure the clearances are okay. Needed a few tweaks to get the wing position and angle options correct, but I'm now confident enough to send it away to be CNC out of 8mm aluminium sheet. The Lotus Cup R race car uses 6mm sheet, but I am going a bit higher with the wing so I'd rather make it a little thicker and be slightly safer.
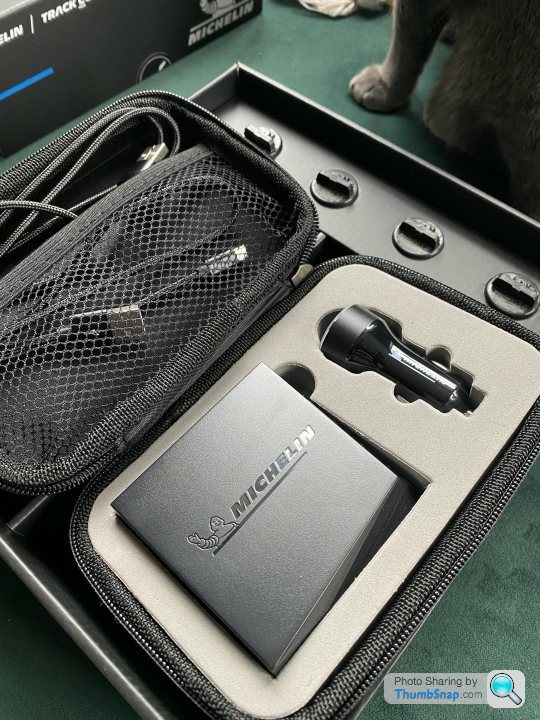
Today something rather cool arrived, the Michelin Track Connect kit. The tyres are a little bit behind, and wheels are quite a long way behind that still as they're being made to order, but I thought I'd rather get the tyres ordered while there is stock, and I can keep them stored in my heated garage.

Both the old clams are now sold, this helps a bit with costs of the new parts!
Rear wing uprights have been tested in wood for position to make sure the clearances are okay. Needed a few tweaks to get the wing position and angle options correct, but I'm now confident enough to send it away to be CNC out of 8mm aluminium sheet. The Lotus Cup R race car uses 6mm sheet, but I am going a bit higher with the wing so I'd rather make it a little thicker and be slightly safer.
Today something rather cool arrived, the Michelin Track Connect kit. The tyres are a little bit behind, and wheels are quite a long way behind that still as they're being made to order, but I thought I'd rather get the tyres ordered while there is stock, and I can keep them stored in my heated garage.
A little while since the last update, quite a bit has progressed, although there is a long way to go!
The new rear clam arrived, and therefore I rested it in place to test the fitment. It'll need some shims on the rear subframe, but it fits rather well, as you'd expect for an OEM part.
While the clam was off, I gave the subframe a clean and a light coat of heat proof rust paint to protect it. It won't ever be seen, but better safe than sorry. Garage was quite a mess at this point...
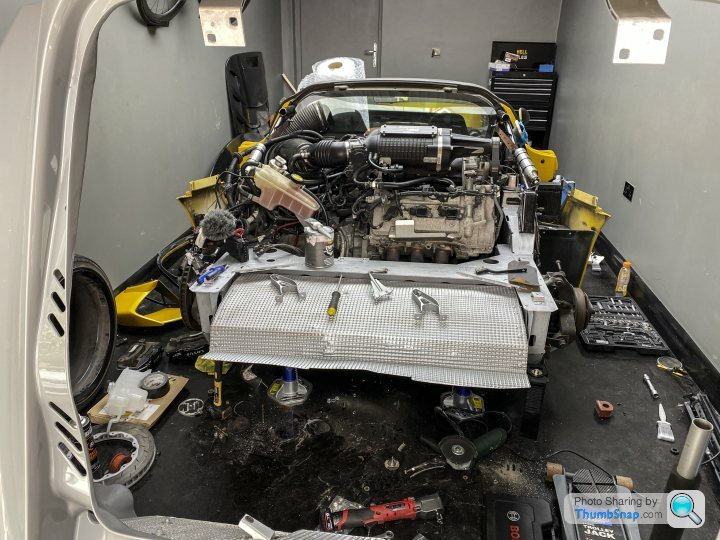
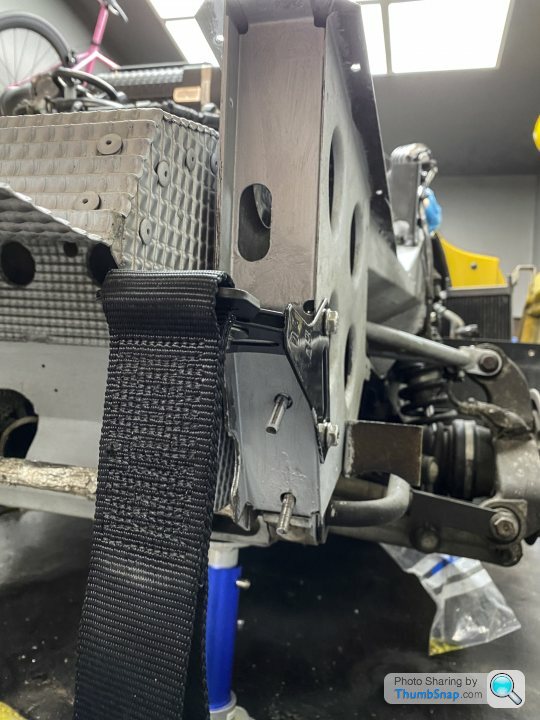
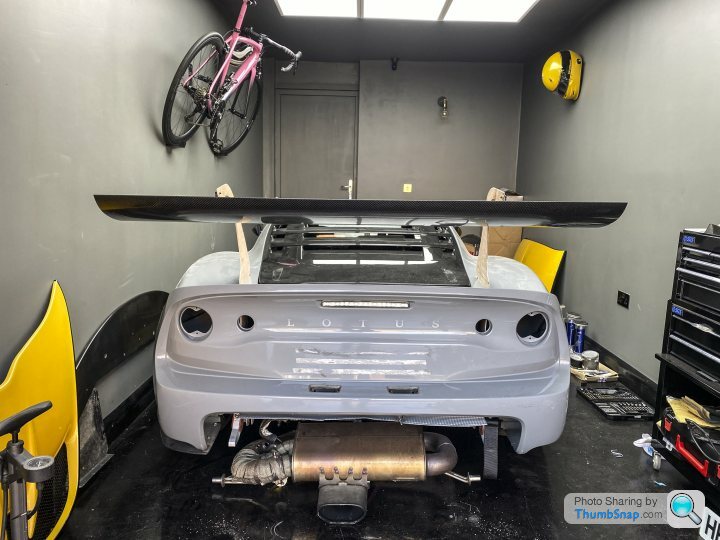
Next up was test fitting the new wing, plus cutting the slots for it. It is mounted direct to the subframe, so these brackets are from a Cup R race car. The mounts above it will be my own design.
I then templated the initial design for the uprights out of plywood. I want to keep the boot/engine lid hinged, so the wing has to sit far back and high. This fits with the look I want for the car with the top mounted wing. Here you can see the uprights being tested, before the wing profile arrived:

I realised that I didn't really have a safe way to winch the car onto the trailer to get it to the bodyshop, luckily I had already bought the 430 Cup towing eye ages ago and had it powder coated. It was an exhaust and heat shield off job, so now was the ideal time to fit it. Also gave me a chance to paint behind the heat shield.
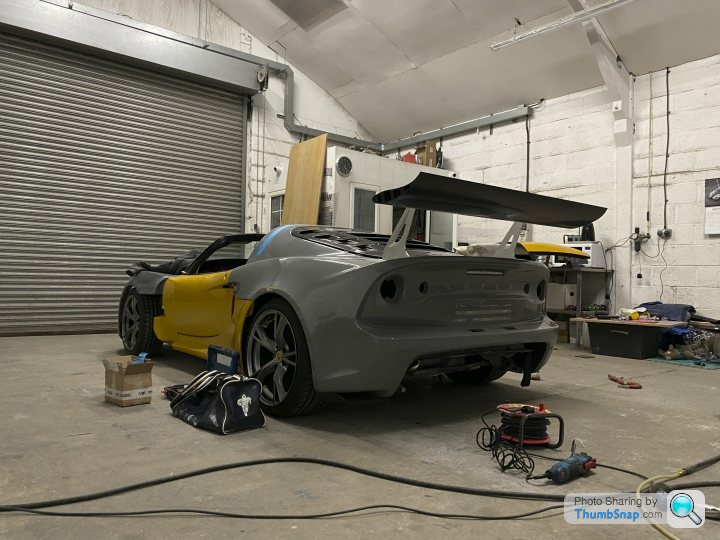
Then parts started arriving... The wing profile arrived ahead of schedule from Reverie. Very happy with the quality of the carbon. I opted for no clear coat so I could decide on matte or gloss later in the build. I think I'm leaning towards gloss. I gave it quick test fit and found a few issues with the uprights which can be addressed in the design before they're made.
From some angles it looks rather silly. I love it.
For those wondering about figures for the wing profile, on the max angle of 18 degrees, which is way more than I will run, it has 1400N of downforce at 100mph. It has 162N of drag which equates to 9.6bhp absorbed. Luckily I have 451hp left...
With that in mind, it was of course important to improve the front end to help with balance of the car. I can adjust the height of the wing and also the angle of attack (from -4 degrees to over 20 degrees).
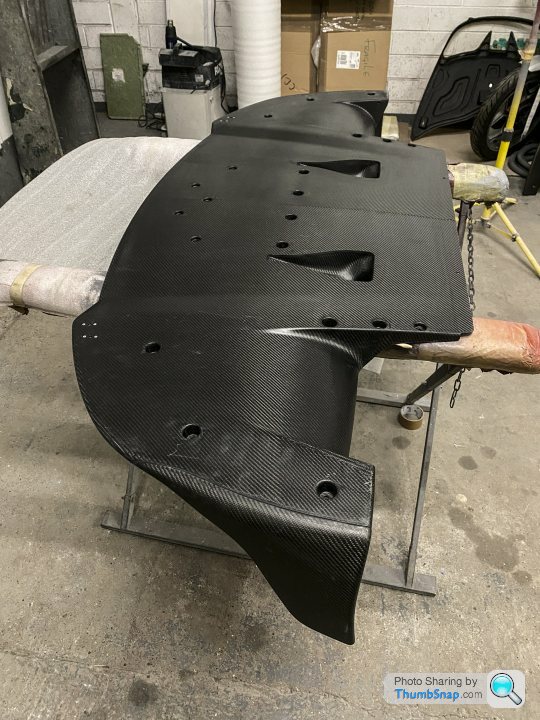
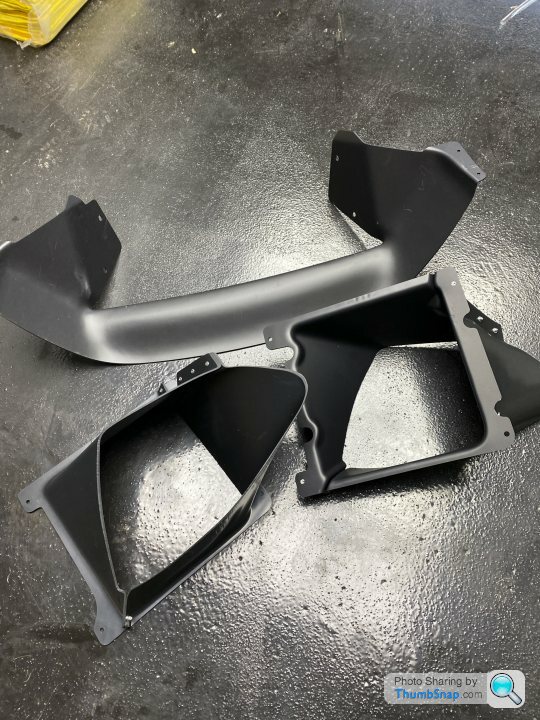
So incomes this lovely new splitter from Komotec, featuring quite a lot of fun stuff to help reduce lift!

My favourite part is the diffuser tunnels into the front arches which should help create negative pressure.
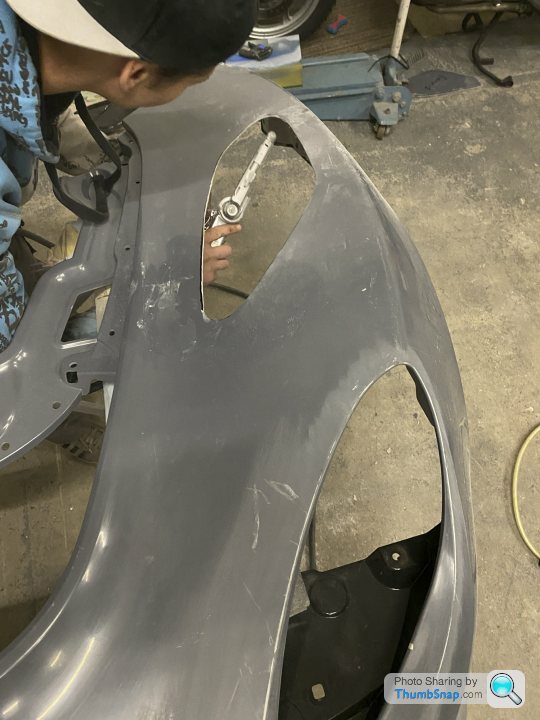
With more air going into the front arches, it is good to help it exit in a controlled way. I therefore bought the "A-panel" from Komotec which has an open vent behind the front wheels.
The majority of that part will be painted, leaving just the vent in exposed carbon. I also have carbon front arch louvres which are the same shape as the 430 Cup which I will install.
The car is now at the bodyshop ( https://www.instagram.com/ksdautobodyltd/ ) where it will be for some time now. Ken is a genius, and we'll be lots of small details in paint which I don't think many other people could do. It'll be a bit of a waiting game now, we're aiming for completion by the end of the year...
The new rear clam arrived, and therefore I rested it in place to test the fitment. It'll need some shims on the rear subframe, but it fits rather well, as you'd expect for an OEM part.
While the clam was off, I gave the subframe a clean and a light coat of heat proof rust paint to protect it. It won't ever be seen, but better safe than sorry. Garage was quite a mess at this point...
Next up was test fitting the new wing, plus cutting the slots for it. It is mounted direct to the subframe, so these brackets are from a Cup R race car. The mounts above it will be my own design.
I then templated the initial design for the uprights out of plywood. I want to keep the boot/engine lid hinged, so the wing has to sit far back and high. This fits with the look I want for the car with the top mounted wing. Here you can see the uprights being tested, before the wing profile arrived:
I realised that I didn't really have a safe way to winch the car onto the trailer to get it to the bodyshop, luckily I had already bought the 430 Cup towing eye ages ago and had it powder coated. It was an exhaust and heat shield off job, so now was the ideal time to fit it. Also gave me a chance to paint behind the heat shield.
Then parts started arriving... The wing profile arrived ahead of schedule from Reverie. Very happy with the quality of the carbon. I opted for no clear coat so I could decide on matte or gloss later in the build. I think I'm leaning towards gloss. I gave it quick test fit and found a few issues with the uprights which can be addressed in the design before they're made.
From some angles it looks rather silly. I love it.
For those wondering about figures for the wing profile, on the max angle of 18 degrees, which is way more than I will run, it has 1400N of downforce at 100mph. It has 162N of drag which equates to 9.6bhp absorbed. Luckily I have 451hp left...
With that in mind, it was of course important to improve the front end to help with balance of the car. I can adjust the height of the wing and also the angle of attack (from -4 degrees to over 20 degrees).
So incomes this lovely new splitter from Komotec, featuring quite a lot of fun stuff to help reduce lift!
My favourite part is the diffuser tunnels into the front arches which should help create negative pressure.
With more air going into the front arches, it is good to help it exit in a controlled way. I therefore bought the "A-panel" from Komotec which has an open vent behind the front wheels.
The majority of that part will be painted, leaving just the vent in exposed carbon. I also have carbon front arch louvres which are the same shape as the 430 Cup which I will install.
The car is now at the bodyshop ( https://www.instagram.com/ksdautobodyltd/ ) where it will be for some time now. Ken is a genius, and we'll be lots of small details in paint which I don't think many other people could do. It'll be a bit of a waiting game now, we're aiming for completion by the end of the year...
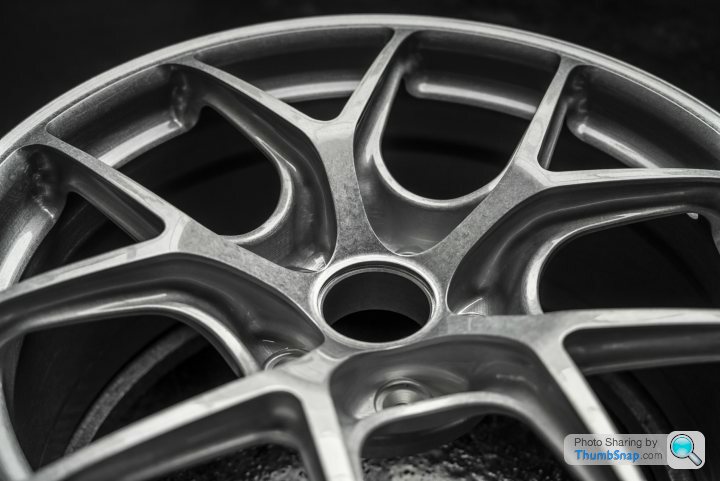
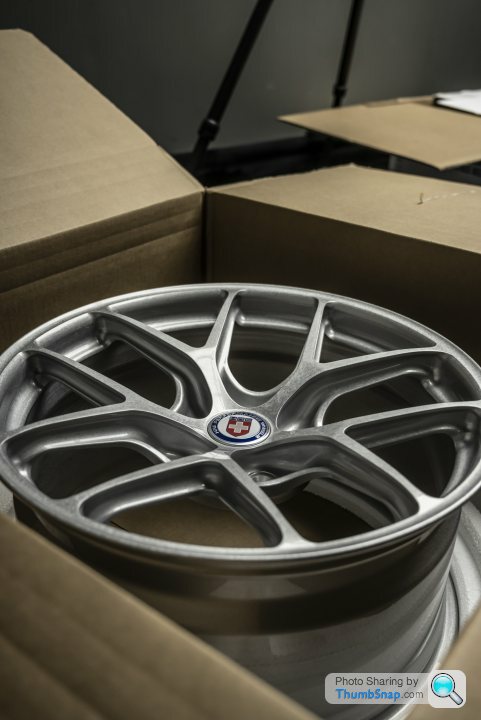
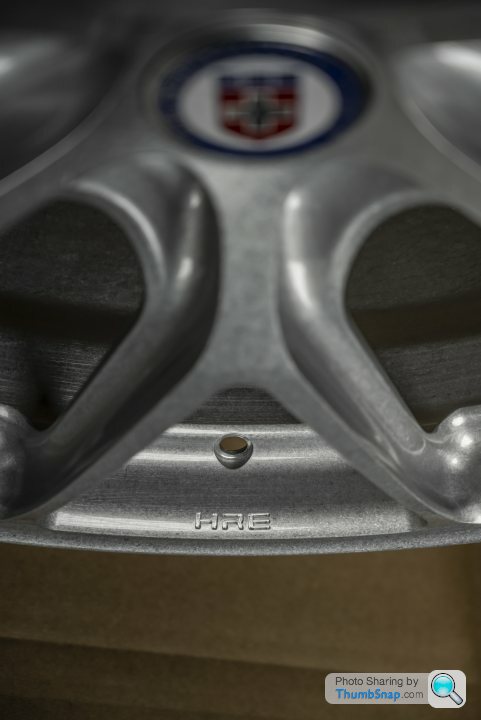
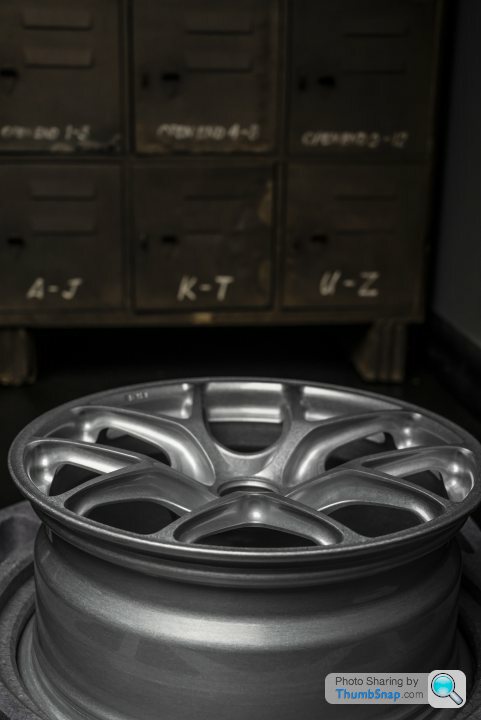
My new wheels arrived! They're from HRE in America, they save 6kg over the OEM Lotus forged wheels. They weren't cheap, but the quality is second to none IMO. The finish is called "stone clear" and it's a textured metal finish, but with a clear coat over the top. From a distance they just look silver, then up close you get to see the texture.

Since the lat post quite a lot has gone on with the car...
First of all, the new wing uprights were CNC. I'm very happy with how they've come out, and they've since been anodised black which makes them a bit less in your face
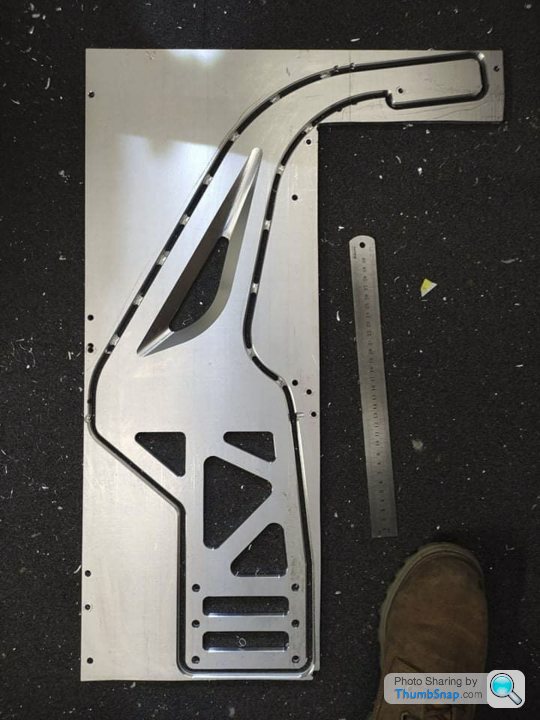
Wing still looks ridiculous
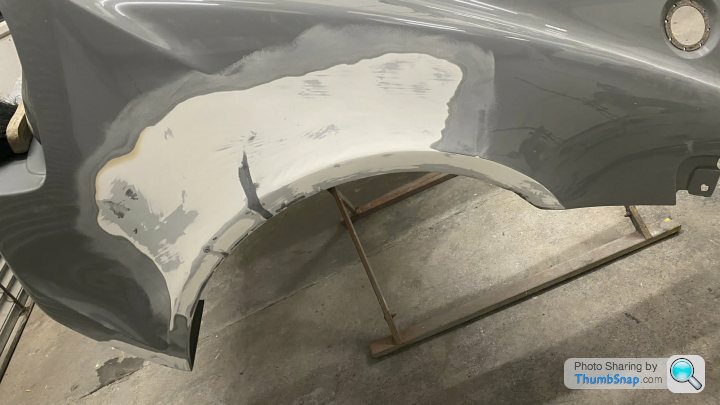
At the bodyshop, it's been steady but good progress. The preparation for paint is the biggest part of the job and you can't cut any corners here. Here is the rear arch which had to be repaired.
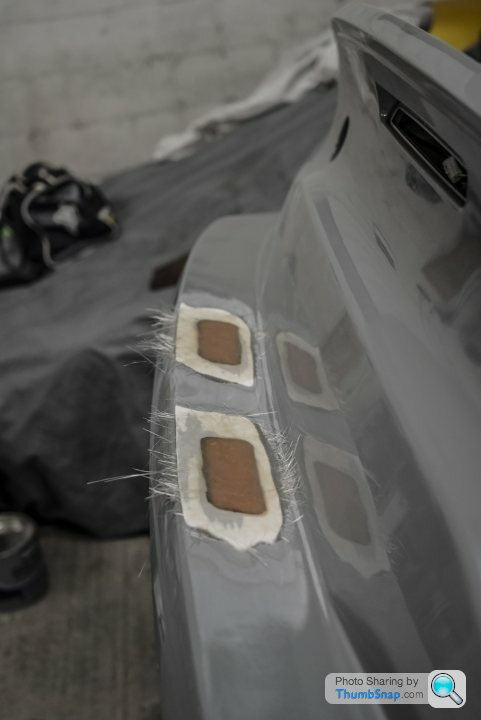
The front clam ended up needing more work, here are the holes we cut for the new carbon front arch louvres
These were then bonded in from behind
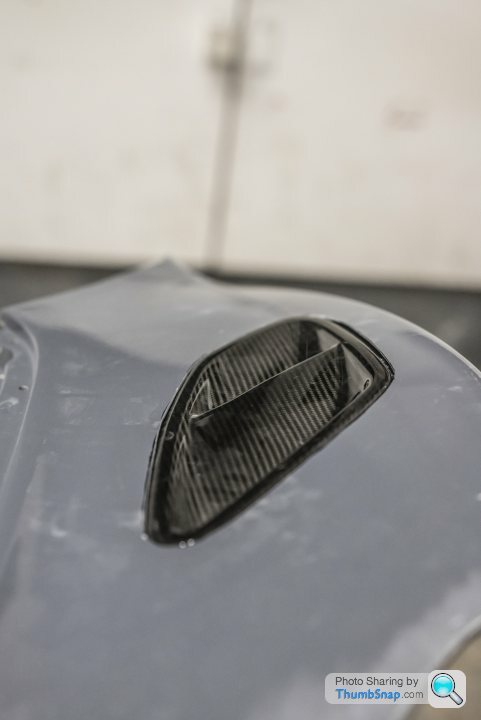
Then they were filled from above so that they'll fit flush. Ken the painter will then mask the edge of the carbon so it is nice and neat.
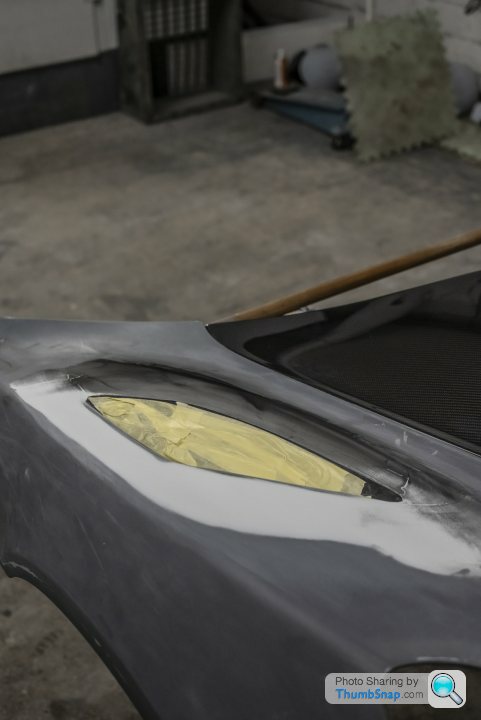
While Ken was repairing bits, I asked if it was possible to enlarge the size of the front intakes slightly. He likes making things custom, so jumped at the challenge! I also asked him to flatten out the indentation where the front badge was.
New ducts for the front clam arrived from Lotus. Painfully expensive...
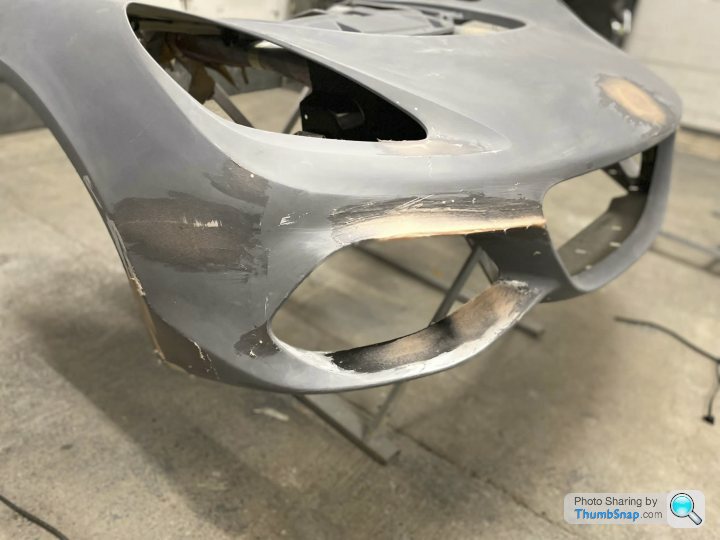
Here you can see the front clam looking closer to finished. It still had a few days of work after this photo... Crazy how long it takes to do the prep properly!
On the rear clam, I got Ken to remove the rear numberplate lights. I've always hated the look of these, so will use small (removable for photos) LED lights instead
So overall I'm happy, the car is making progress, although with the prep stages an awful lot of work goes in, while it doesn't look like much has been done. I'm hopeful that in January the car will get to the paint stages, then it can come home for me to rebuild it...
First of all, the new wing uprights were CNC. I'm very happy with how they've come out, and they've since been anodised black which makes them a bit less in your face
Wing still looks ridiculous
At the bodyshop, it's been steady but good progress. The preparation for paint is the biggest part of the job and you can't cut any corners here. Here is the rear arch which had to be repaired.
The front clam ended up needing more work, here are the holes we cut for the new carbon front arch louvres
These were then bonded in from behind
Then they were filled from above so that they'll fit flush. Ken the painter will then mask the edge of the carbon so it is nice and neat.
While Ken was repairing bits, I asked if it was possible to enlarge the size of the front intakes slightly. He likes making things custom, so jumped at the challenge! I also asked him to flatten out the indentation where the front badge was.
New ducts for the front clam arrived from Lotus. Painfully expensive...
Here you can see the front clam looking closer to finished. It still had a few days of work after this photo... Crazy how long it takes to do the prep properly!
On the rear clam, I got Ken to remove the rear numberplate lights. I've always hated the look of these, so will use small (removable for photos) LED lights instead
So overall I'm happy, the car is making progress, although with the prep stages an awful lot of work goes in, while it doesn't look like much has been done. I'm hopeful that in January the car will get to the paint stages, then it can come home for me to rebuild it...
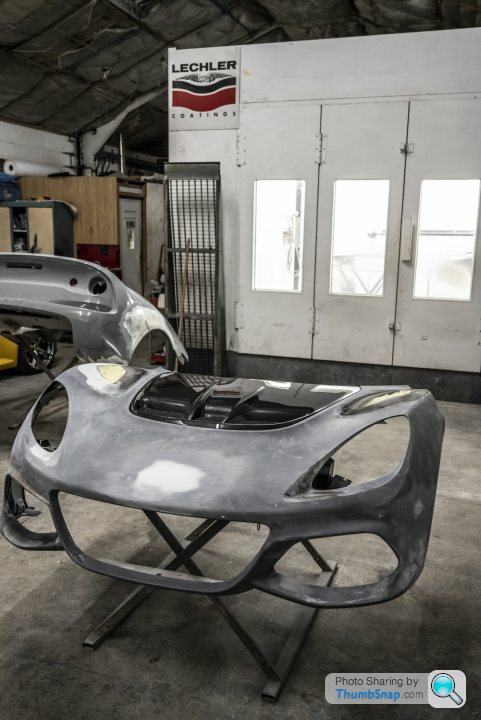
Yesterday I popped over to the bodyshop as I wanted to test my wheels with my brake callipers on to check clearances are okay. I had checked on my friend's 430 Cup and it was very tight. My brakes are a larger diameter with a spacer to move the calliper out, so I was worried it could be an issue. Luckily it was okay, but it's still a little closer than I'd like.
While there I wanted to see how the front clam looked with the splitter and was happy with the look. You still need some imagination to see the finished product, but it feels like we're getting close now.
While there I wanted to see how the front clam looked with the splitter and was happy with the look. You still need some imagination to see the finished product, but it feels like we're getting close now.
Still making steady progress forwards. I went to the body shop today to see the front clam get painted. I thought the process was super interesting and will show more in the video at a later date, but after the primer stage above, Ken block sanded the whole clam to get it as smooth as possible, then did the following stages yesterday:
- mask up carbon louvres
- clean up body using lint free cloths and some alcohol sprays
- same, but with a water based spray that stops static and dust being attracted to the body
- primer in dark grey. We chose a dark grey vase as it was similar to the carbon colour so when doing blends etc it would be a closer match
- let primer cure for 20 minutes and mix up the body colour paint
- wipe down again to make sure there’s no dust
- paint two coats of the body colour, then a dust coat
- remove masking on the louvres and then do two coats of clear lacquer
This took quite a while, and with most paint jobs, you’d let it bake, then polish it. We’re going above and beyond to make this paint job really special though, so the next stages are now:
- block sand the lacquer to get it as flat as possible, remove any dust specs (there aren’t many, but this is a good time to sort)
- back into the booth and clean it all ready for paint
- airbrush on front logo (yellow, then black)
- tint carbon louvres
- clear lacquer
- cure
- polish
And that’s just for the front clam…
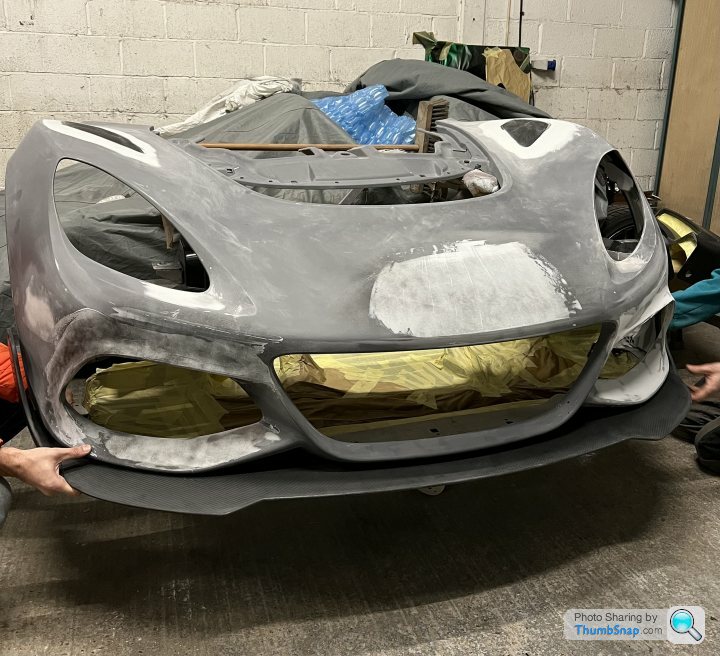
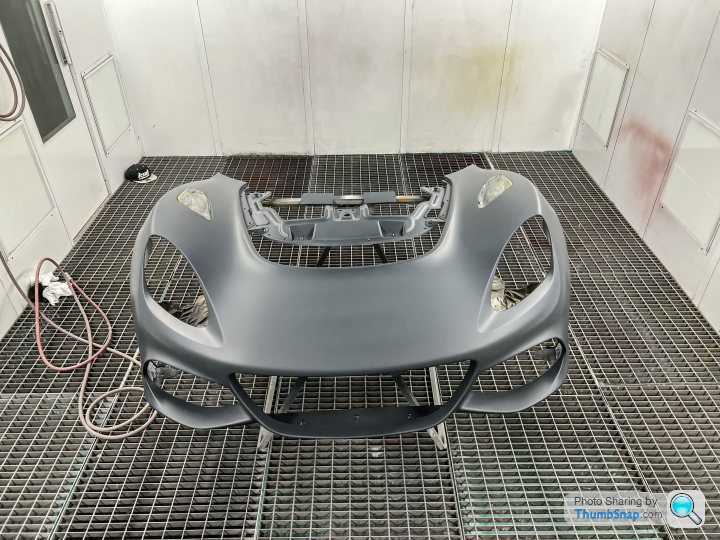
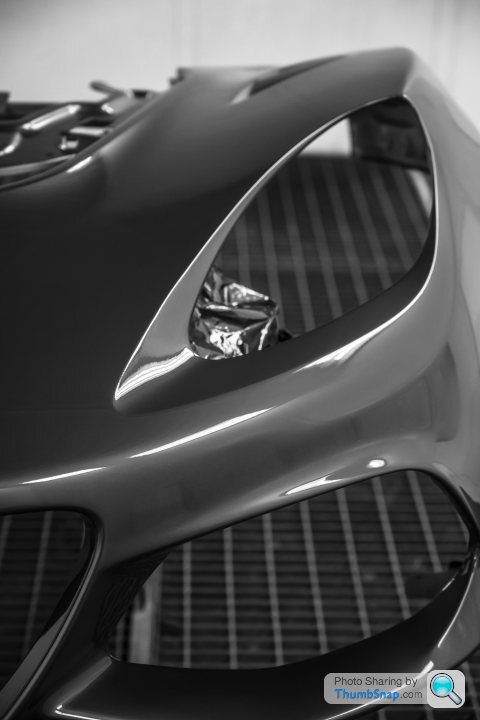
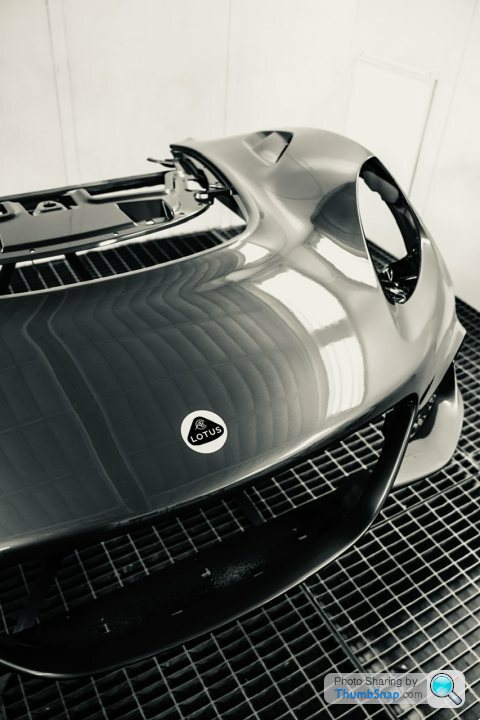
Here is a B&W photo of the front clam at the moment (I don't want to show the colour until the full car is done). That's the finish straight out of the gun and we're not done yet, which shows all the hard work Ken put in with the prep stages were worth it! I can only imagine how good it'll look with the extra stages and then a full detail.
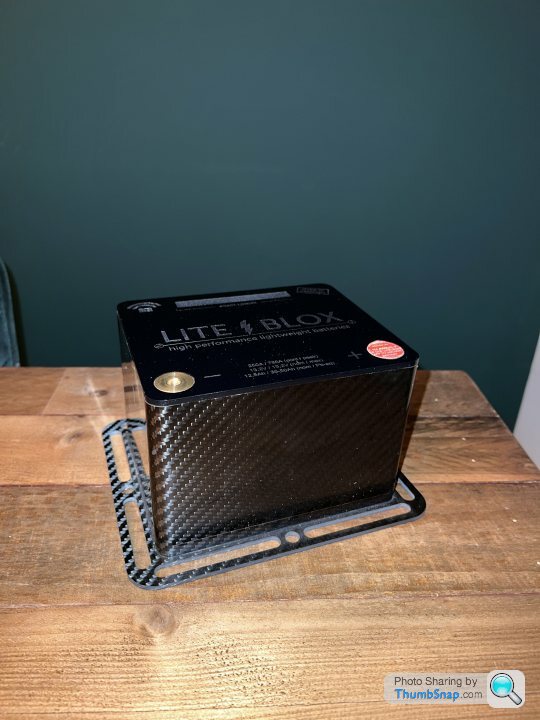
Also, I got a Liteblox battery from Seriously Lotus. It’s impressive how light it is (2kg), and the app is super easy. I needed a smaller battery than the original OEM as the chassis mounted wing would have had clearance issues. I debated getting a cheaper lightweight battery, but after so much effort has gone into my car, I didn’t really want anything but the best parts for it and the quality of the liteblox is on another level to any other battery I’ve ever seen!
- mask up carbon louvres
- clean up body using lint free cloths and some alcohol sprays
- same, but with a water based spray that stops static and dust being attracted to the body
- primer in dark grey. We chose a dark grey vase as it was similar to the carbon colour so when doing blends etc it would be a closer match
- let primer cure for 20 minutes and mix up the body colour paint
- wipe down again to make sure there’s no dust
- paint two coats of the body colour, then a dust coat
- remove masking on the louvres and then do two coats of clear lacquer
This took quite a while, and with most paint jobs, you’d let it bake, then polish it. We’re going above and beyond to make this paint job really special though, so the next stages are now:
- block sand the lacquer to get it as flat as possible, remove any dust specs (there aren’t many, but this is a good time to sort)
- back into the booth and clean it all ready for paint
- airbrush on front logo (yellow, then black)
- tint carbon louvres
- clear lacquer
- cure
- polish
And that’s just for the front clam…
Here is a B&W photo of the front clam at the moment (I don't want to show the colour until the full car is done). That's the finish straight out of the gun and we're not done yet, which shows all the hard work Ken put in with the prep stages were worth it! I can only imagine how good it'll look with the extra stages and then a full detail.
Also, I got a Liteblox battery from Seriously Lotus. It’s impressive how light it is (2kg), and the app is super easy. I needed a smaller battery than the original OEM as the chassis mounted wing would have had clearance issues. I debated getting a cheaper lightweight battery, but after so much effort has gone into my car, I didn’t really want anything but the best parts for it and the quality of the liteblox is on another level to any other battery I’ve ever seen!
Podie said:
Apologies if I'm teaching you to suck eggs here, but don't forget about wheel balance weights when it comes to caliper clearance!
I was actually worried the brakes wouldn’t clear the wheels at all, it’s very close on the inner barrel, but it’s got enough clearance that I think it’ll be okay, and the wheels are very stiff apparently. The wheel weights had to be put further into the barrel, but that was the same on the Lotus Forged wheels too.Update:
Front clam is now fully painted. Ken (KSD Autobody) even painted on the Lotus logo which I think is a really special detail. It’ll be totally flat under the lacquer. All the many stages of paint are now complete and it looks great. Just polishing to go on it now.
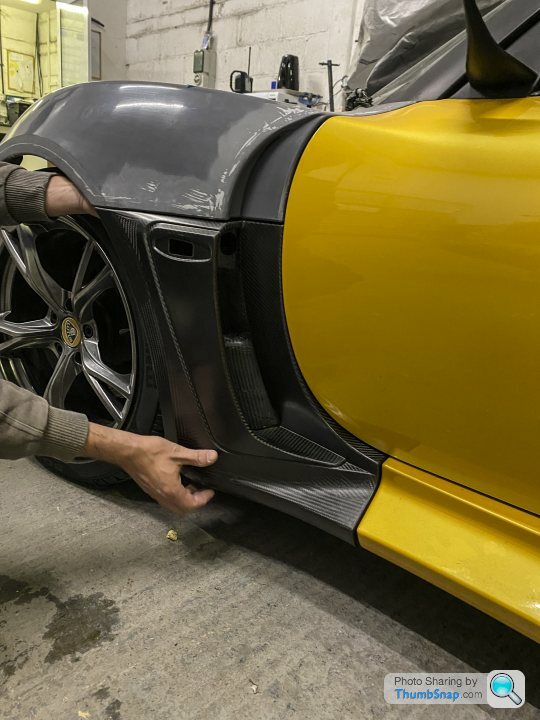
One of my favourite new parts is the fully carbon “A-panel” from Komotec. These are the part that goes behind the front wheels and they vent a fair bit of air out (standard Lotus vents are fake). I had a bit of fun with these and Ken did some tinted carbon behind the vent, plus a gradient so it blends into the door nicely.
Roof is also painted, plus some interior bits, the wing and splitter. Getting a lot closer now!
Front clam is now fully painted. Ken (KSD Autobody) even painted on the Lotus logo which I think is a really special detail. It’ll be totally flat under the lacquer. All the many stages of paint are now complete and it looks great. Just polishing to go on it now.
One of my favourite new parts is the fully carbon “A-panel” from Komotec. These are the part that goes behind the front wheels and they vent a fair bit of air out (standard Lotus vents are fake). I had a bit of fun with these and Ken did some tinted carbon behind the vent, plus a gradient so it blends into the door nicely.
Roof is also painted, plus some interior bits, the wing and splitter. Getting a lot closer now!
keo said:
Looking forward to see the colour. Looks a great job. Will you be applying ppf out of interest? Now wondering if I did the right thing. I could if saved the money and changed the colour in a few years if I fancied it.
Not going to do PPF for several reasons:- The colour is easy to match as we have the formula, paint manufacturer and it's a single stage paint (no transparent pearls in the clear coat etc, so the colour doesn't change dependant on the number of coats.
- The car isn't original paint, so keeping it original doesn't matter.
- If you get one stone chip that goes through the PPF and also through paint, you have to respray anyway, but now with expensive PPF to replace.
- Car paint looks better without PPF, even with a very good modern PPF
- I could get a respray again easily if I wanted, although I wouldn't do a colour change again as that's quite a lot of work & time.
- Lacquer technology has come a long way and the clear coat we're using is very very hard.
So basically, the only reason I would want PPF is to mean I don't have to be quite as careful when washing the car, but I'm happy to wash it properly and get it periodically detailed if needed to keep it perfect, then repair any stone chips if they're ever bad enough to warrant it.
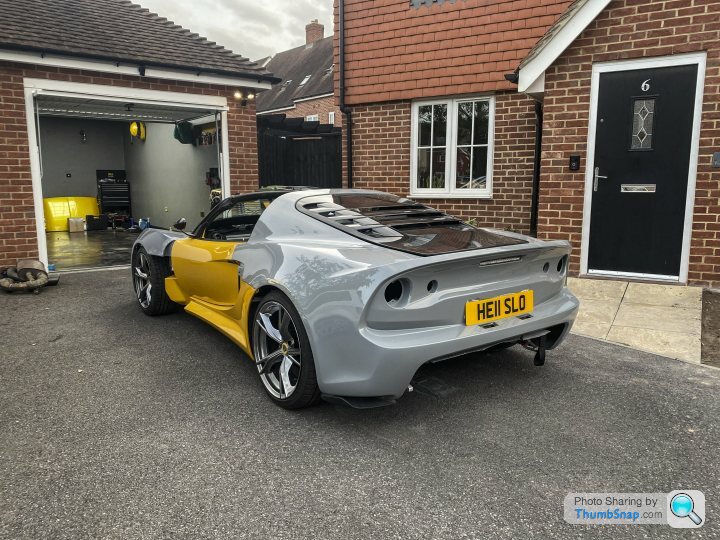
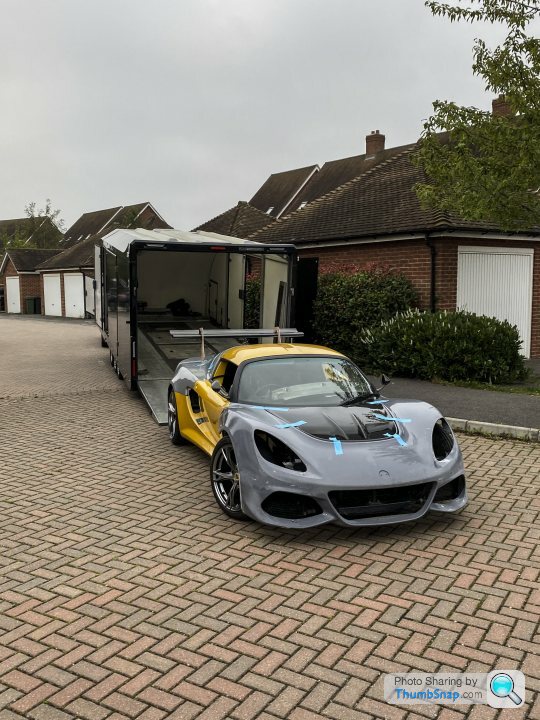
Time for a little update, the car is home!! Well, most of it is...
The clams were placed on for the journey home, and it was nice to see a hint at how it'll look.

First thing as soon as it was home though was to get the rear clam off so I could start the process of getting it ready to go back on the car more permanently. My garage is very much on the small side to rebuild a car, but I have been making it work.

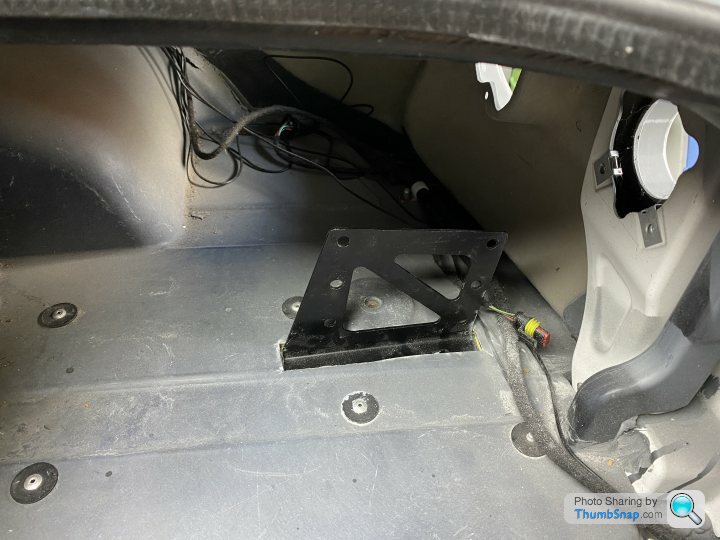
Because of my new chassis mounted wing, I lost a little boot space, and therefore I needed a smaller battery. I also needed to cut up the battery tray and add a couple of rivnuts. Quite happy to save 15kg with the new battery!
Getting the wiring through into the boot is fun, there are two small holes that it all fits through... Then it all connects together in a rather small area.
A few days later and you can see it 90% connected.

I also added a magnetic trickle charger into the side intake, since the photo I added a spring loaded cover for it too, to reduce crud getting in.

A little peak as the rear comes together, rear numberplate lights are now smoothed over, I'll be drilling holes and adding much smaller LEDs.
Brand new rubber seals were added. The old ones were in okay condition, but I have put so much effort into this rebuild that it seemed a shame to do things as half measures...

Ken (the painter) still has a fair few parts to paint, but is still cracking on and making great progress. Tomorrow I'll have some more parts so I can start with work on the front clam.
Other things I've done since the car has come back:
- Added electronic boot release (not finished, but working on it)
- A friend 3D scanned some parts of the car so that some small custom parts can be 3D printed
- Run wires for the reversing camera, and also a sensor for the gearbox temperature which will connect to the AIM MX2E dash.
- Spent a lot of time lining up the rear clam to get the perfect shut lines
To be honest, this is the part of the build I've been looking forward to, taking my time and geeking out on the details. Aim at the moment is to have the car working for the end of the month, then I can start taking some proper photos of it!
The clams were placed on for the journey home, and it was nice to see a hint at how it'll look.
First thing as soon as it was home though was to get the rear clam off so I could start the process of getting it ready to go back on the car more permanently. My garage is very much on the small side to rebuild a car, but I have been making it work.
Because of my new chassis mounted wing, I lost a little boot space, and therefore I needed a smaller battery. I also needed to cut up the battery tray and add a couple of rivnuts. Quite happy to save 15kg with the new battery!
Getting the wiring through into the boot is fun, there are two small holes that it all fits through... Then it all connects together in a rather small area.
A few days later and you can see it 90% connected.
I also added a magnetic trickle charger into the side intake, since the photo I added a spring loaded cover for it too, to reduce crud getting in.
A little peak as the rear comes together, rear numberplate lights are now smoothed over, I'll be drilling holes and adding much smaller LEDs.
Brand new rubber seals were added. The old ones were in okay condition, but I have put so much effort into this rebuild that it seemed a shame to do things as half measures...
Ken (the painter) still has a fair few parts to paint, but is still cracking on and making great progress. Tomorrow I'll have some more parts so I can start with work on the front clam.
Other things I've done since the car has come back:
- Added electronic boot release (not finished, but working on it)
- A friend 3D scanned some parts of the car so that some small custom parts can be 3D printed
- Run wires for the reversing camera, and also a sensor for the gearbox temperature which will connect to the AIM MX2E dash.
- Spent a lot of time lining up the rear clam to get the perfect shut lines
To be honest, this is the part of the build I've been looking forward to, taking my time and geeking out on the details. Aim at the moment is to have the car working for the end of the month, then I can start taking some proper photos of it!
Monster Mash said:
Out of interest, how are you planning on preventing water ingress into the boot with the new wing brackets running through the rear clam?
Thanks, that’s actually one of the things we 3D scanned the car for. My friend will design and 3D print a cover which can be sealed against both the clam and wing uprights. We will also make a cover, so if I decide to remove the wing for any reason, the slots can be covered. The 3D scanning was really useful as the clam section wasn’t at all flat, so we now have all the curves to match perfectly.Gassing Station | Readers' Cars | Top of Page | What's New | My Stuff