Mx5 Rocketeer V6 Conversion Project
Discussion


Thanks for the positive comments.
I really like the wheels too, and they are (relatively) light for the money, though not as light as some. I steered away from these originally as they are used a lot on mx5s and I fancied something different. But now they're on, I really like them even if they are common!
I really like the wheels too, and they are (relatively) light for the money, though not as light as some. I steered away from these originally as they are used a lot on mx5s and I fancied something different. But now they're on, I really like them even if they are common!
A small update (at least small in terms of work I have carried out – a big bit of work for those who carried it out!).
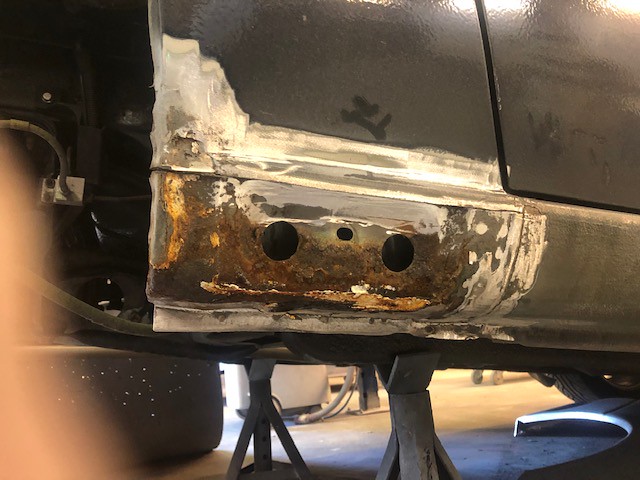
I have finally got the sills sorted on the Mx5. This was a big job, despite them having been done expertly before I bought the car – they were an absolute state and needed to be done properly. While I do own a welder, there is no world in which I could have repaired these so I handed it over to the professionals – and these are the pictures!
I asked for the sills to be repaired (of course), but more than that I also had the black underseal stripped off the length of the sills, replaced without a step and then painted body coloured.
Filler in the sills is always a good start.
 thumbnail_IMG_0228 by Jon Fellows, on Flickr
If the outer sills on these are showing rust, then the inners will be bad:
 thumbnail_IMG_0227 by Jon Fellows, on Flickr
Plate made up.
 thumbnail_IMG_0230 by Jon Fellows, on Flickr
And fitted.
 thumbnail_IMG_0231 by Jon Fellows, on Flickr
 thumbnail_IMG_0232 by Jon Fellows, on Flickr
 thumbnail_IMG_0233 by Jon Fellows, on Flickr
 thumbnail_IMG_0292 by Jon Fellows, on Flickr
The other side is much the same:
 thumbnail_IMG_0276 by Jon Fellows, on Flickr
Even more filth cut out of this side…
 thumbnail_IMG_0277 by Jon Fellows, on Flickr
 thumbnail_IMG_0278 by Jon Fellows, on Flickr
 thumbnail_IMG_0280 by Jon Fellows, on Flickr
 thumbnail_IMG_0281 by Jon Fellows, on Flickr
 thumbnail_IMG_0282 by Jon Fellows, on Flickr
 thumbnail_IMG_0284 by Jon Fellows, on Flickr
thumbnail_IMG_0284 by Jon Fellows, on Flickr
I need to take a photo of it all finished up now, but this is the majority of the work covered. I’m very pleased to finally have it all buttoned up and solid for what (hopefully) will be years to come. That’s the plan anyway!
I have finally got the sills sorted on the Mx5. This was a big job, despite them having been done expertly before I bought the car – they were an absolute state and needed to be done properly. While I do own a welder, there is no world in which I could have repaired these so I handed it over to the professionals – and these are the pictures!
I asked for the sills to be repaired (of course), but more than that I also had the black underseal stripped off the length of the sills, replaced without a step and then painted body coloured.
Filler in the sills is always a good start.
thumbnail_IMG_0228 by Jon Fellows, on FlickrIf the outer sills on these are showing rust, then the inners will be bad:
thumbnail_IMG_0227 by Jon Fellows, on FlickrPlate made up.
thumbnail_IMG_0230 by Jon Fellows, on FlickrAnd fitted.
thumbnail_IMG_0231 by Jon Fellows, on Flickrthumbnail_IMG_0232 by Jon Fellows, on Flickrthumbnail_IMG_0233 by Jon Fellows, on Flickrthumbnail_IMG_0292 by Jon Fellows, on FlickrThe other side is much the same:
thumbnail_IMG_0276 by Jon Fellows, on FlickrEven more filth cut out of this side…
thumbnail_IMG_0277 by Jon Fellows, on Flickrthumbnail_IMG_0278 by Jon Fellows, on Flickrthumbnail_IMG_0280 by Jon Fellows, on Flickrthumbnail_IMG_0281 by Jon Fellows, on Flickrthumbnail_IMG_0282 by Jon Fellows, on Flickrthumbnail_IMG_0284 by Jon Fellows, on Flickrthumbnail_IMG_0284 by Jon Fellows, on FlickrI need to take a photo of it all finished up now, but this is the majority of the work covered. I’m very pleased to finally have it all buttoned up and solid for what (hopefully) will be years to come. That’s the plan anyway!
Quick couple of pics I have just taken of the painted sills to complete this post... Forgive the less than clean state of the car!
 20200602_132220 by Jon Fellows, on Flickr
 20200602_132208 by Jon Fellows, on Flickr
20200602_132220 by Jon Fellows, on Flickr20200602_132208 by Jon Fellows, on FlickrHughG said:
Great that the car is structurally sound now and top marks for commitment to it. Is there stonechip, or similar, beneath the paint giving that orange peel look?
Cheers, I'm pleased its all sound again now.You're quite right, its stonechip up until the crease midway up the door and then painted. That's the original finish which has just been matched.
crossie said:
you stripping the jag for a spare engine/gearbox?
No, the jag has a 4.0 V8 and wouldn't fit I suspect! The V6 is generally out of an s-type. The jag is another summer project: https://www.pistonheads.com/gassing/topic.asp?h=0&...
Another very small update.
For a while I've been using my old Alpine single DIN headunit for music and such. However, I fancied a double DIN unit as a) I've never had a car that can fit one b) double DIN fills the gap better and looks more cohesive and c) Android Auto etc brings maps and nav etc into the car nice and easily rather than having phones and cables dangling around the place.
Happily I found the headunit I was interested in going secondhand but almost new on an extremely well know auction site so managed to save myself some money there.
I removed the tombstone (centre console) and removed the old headunit.
 20200607_120235 by Jon Fellows, on Flickr
I then fitted my new one - this is purely as a trial to check functionality etc... This is not how it will remain! But so far I'm pleased with it. I've ordered a fitting kit for a double DIN unit among a few other little bits so hopefully the upgrade of the interior should continue soon.
 20200607_121934 by Jon Fellows, on Flickr
For a while I've been using my old Alpine single DIN headunit for music and such. However, I fancied a double DIN unit as a) I've never had a car that can fit one b) double DIN fills the gap better and looks more cohesive and c) Android Auto etc brings maps and nav etc into the car nice and easily rather than having phones and cables dangling around the place.
Happily I found the headunit I was interested in going secondhand but almost new on an extremely well know auction site so managed to save myself some money there.
I removed the tombstone (centre console) and removed the old headunit.
20200607_120235 by Jon Fellows, on FlickrI then fitted my new one - this is purely as a trial to check functionality etc... This is not how it will remain! But so far I'm pleased with it. I've ordered a fitting kit for a double DIN unit among a few other little bits so hopefully the upgrade of the interior should continue soon.
20200607_121934 by Jon Fellows, on FlickrLewis's Friend said:
Another very small update.
For a while I've been using my old Alpine single DIN headunit for music and such. However, I fancied a double DIN unit as a) I've never had a car that can fit one b) double DIN fills the gap better and looks more cohesive and c) Android Auto etc brings maps and nav etc into the car nice and easily rather than having phones and cables dangling around the place.
Happily I found the headunit I was interested in going secondhand but almost new on an extremely well know auction site so managed to save myself some money there.
I removed the tombstone (centre console) and removed the old headunit.
20200607_120235 by Jon Fellows, on Flickr
I then fitted my new one - this is purely as a trial to check functionality etc... This is not how it will remain! But so far I'm pleased with it. I've ordered a fitting kit for a double DIN unit among a few other little bits so hopefully the upgrade of the interior should continue soon.
20200607_121934 by Jon Fellows, on Flickr
Nice. I just wish that it was possible to move the heater matrix to the bottom.For a while I've been using my old Alpine single DIN headunit for music and such. However, I fancied a double DIN unit as a) I've never had a car that can fit one b) double DIN fills the gap better and looks more cohesive and c) Android Auto etc brings maps and nav etc into the car nice and easily rather than having phones and cables dangling around the place.
Happily I found the headunit I was interested in going secondhand but almost new on an extremely well know auction site so managed to save myself some money there.
I removed the tombstone (centre console) and removed the old headunit.
20200607_120235 by Jon Fellows, on FlickrI then fitted my new one - this is purely as a trial to check functionality etc... This is not how it will remain! But so far I'm pleased with it. I've ordered a fitting kit for a double DIN unit among a few other little bits so hopefully the upgrade of the interior should continue soon.
20200607_121934 by Jon Fellows, on Flickr
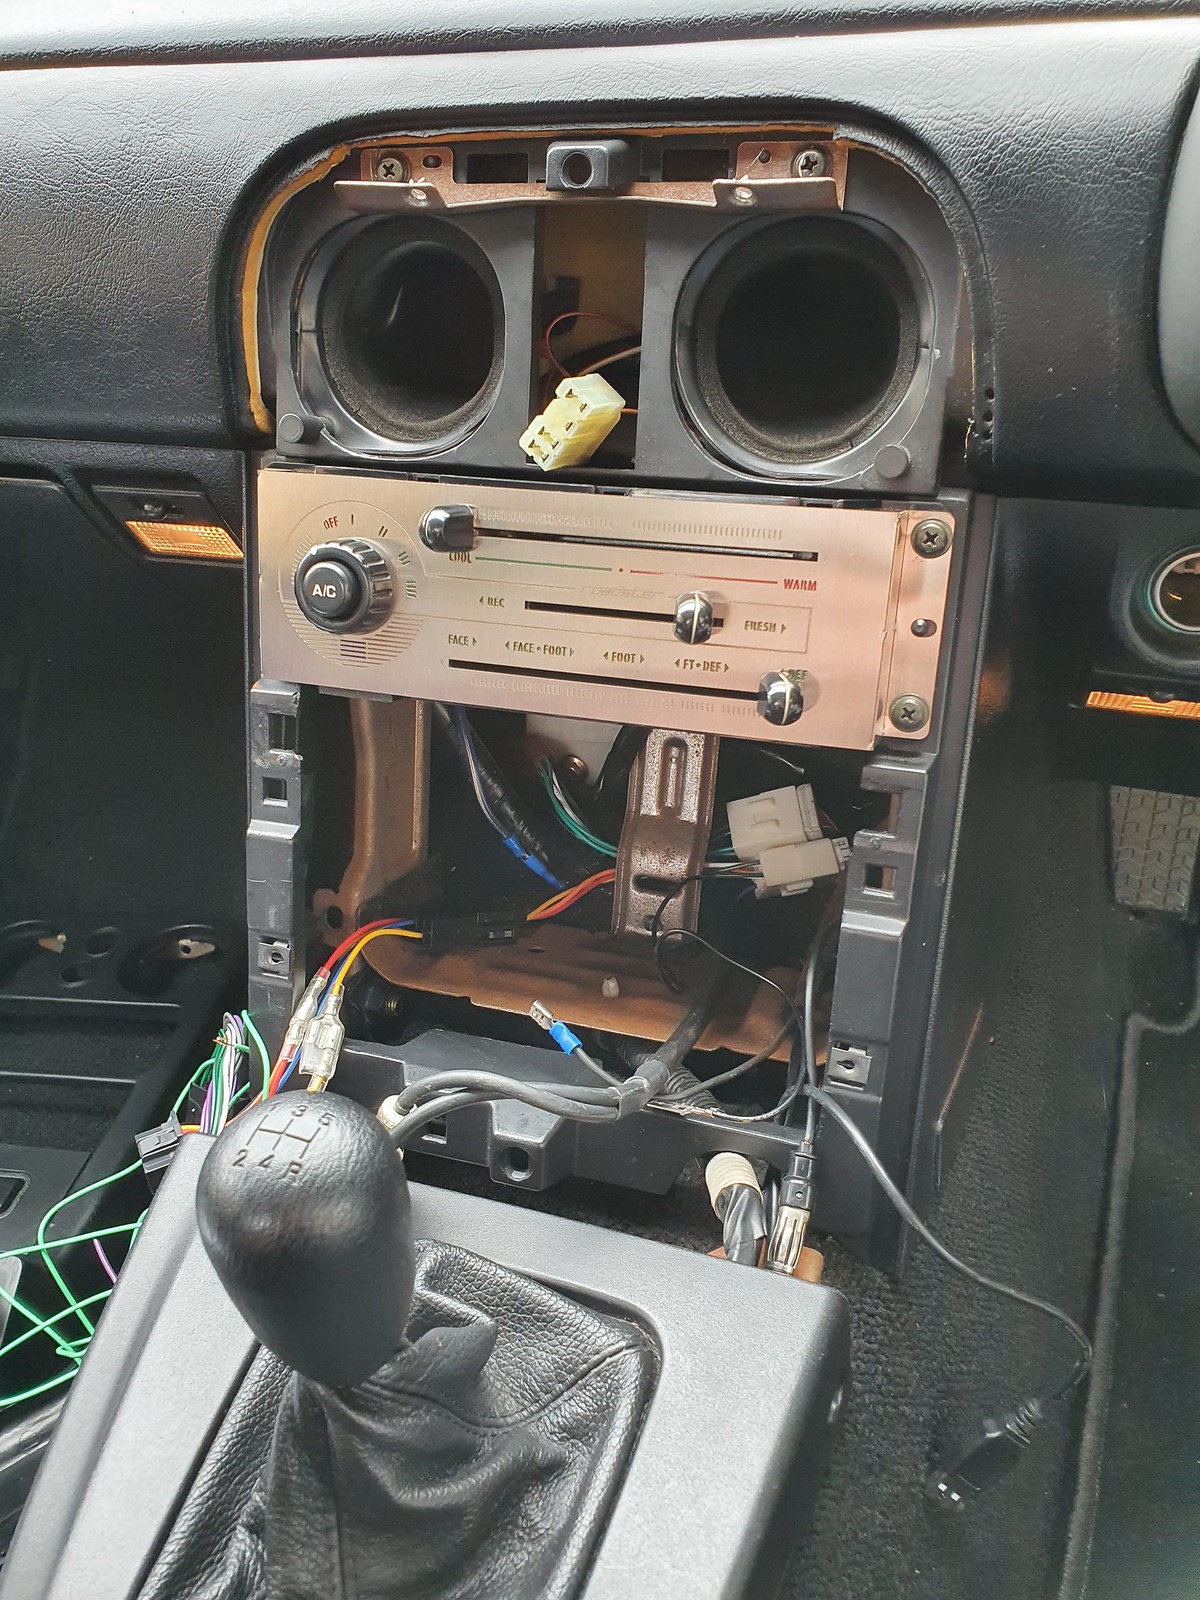
Another minor update as I start making the interior a bit less tatty and slightly less plasticky.
Last time I had roughly fitted my new headunit just to check it all worked, which happily it did. However, to get it fitting nice and flush with the centre console face I bought a fitting cage which gives adjustability. I also bought a new centre console as some fool in the past had tried screwing some screws into the back of it that were too long and had raised bumps in the surface!
As all this was apart, I also decided to fit a new stainless HVAC panel to replace the yellowing item in my car, as well as new switches for the hazard lights and pop-up healights. It made sense to do this all in one go.
So to start, the HVAC face plate needed to come apart.
 20200612_162200 by Jon Fellows, on Flickr
The new stainless plate is then fitted over the top and the sliders replaced.
 20200612_171101 by Jon Fellows, on Flickr
This done, the tombstone (centre console) can be fitted which I had already attached the headunit and new switches to (no photos as I totally forgot to take any alas!).
 20200615_133812 by Jon Fellows, on Flickr
 20200615_133805 by Jon Fellows, on Flickr
There is still a way to go but I’m pleased that it has neatened up the dash area and got rid of somem yellowing plastic bits. I also tried to take a shot at night for the illumination but this didn’t some out particularly well. However, I’ll post it anyway!
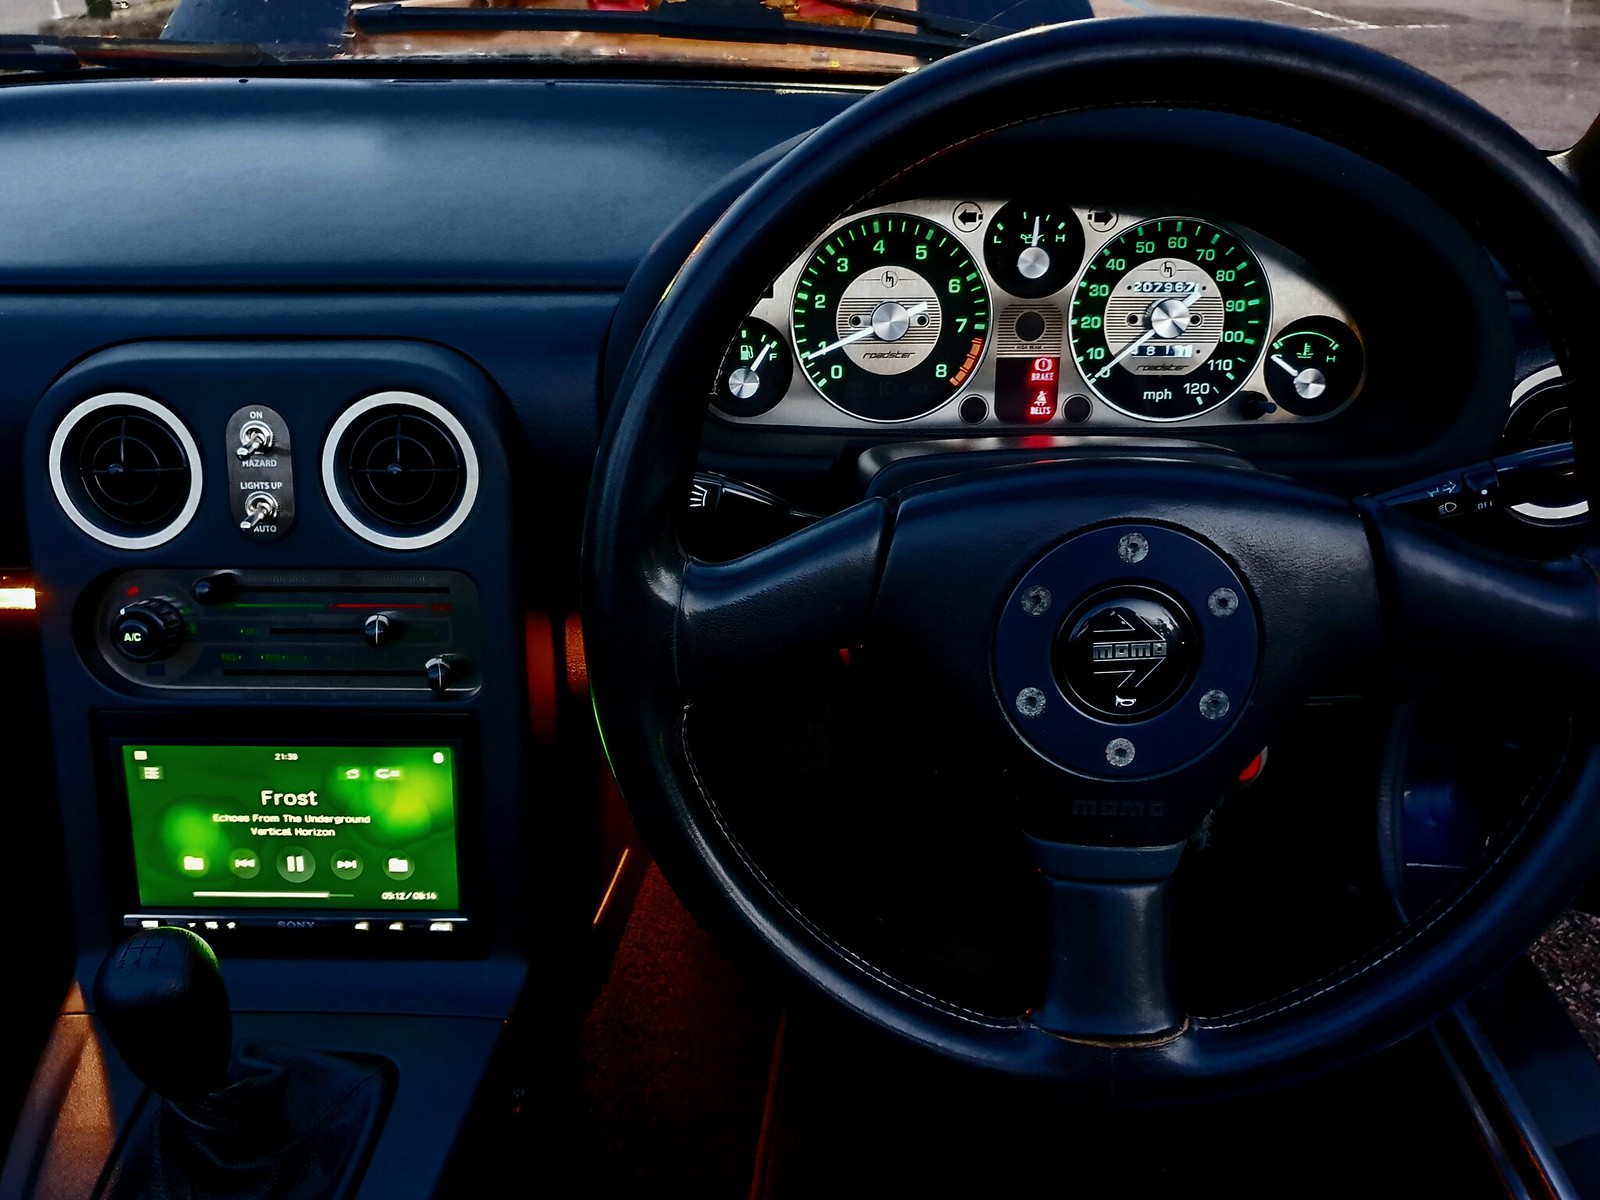 20200616_074748 by Jon Fellows, on Flickr
Last time I had roughly fitted my new headunit just to check it all worked, which happily it did. However, to get it fitting nice and flush with the centre console face I bought a fitting cage which gives adjustability. I also bought a new centre console as some fool in the past had tried screwing some screws into the back of it that were too long and had raised bumps in the surface!
As all this was apart, I also decided to fit a new stainless HVAC panel to replace the yellowing item in my car, as well as new switches for the hazard lights and pop-up healights. It made sense to do this all in one go.
So to start, the HVAC face plate needed to come apart.
20200612_162200 by Jon Fellows, on FlickrThe new stainless plate is then fitted over the top and the sliders replaced.
20200612_171101 by Jon Fellows, on FlickrThis done, the tombstone (centre console) can be fitted which I had already attached the headunit and new switches to (no photos as I totally forgot to take any alas!).
20200615_133812 by Jon Fellows, on Flickr20200615_133805 by Jon Fellows, on FlickrThere is still a way to go but I’m pleased that it has neatened up the dash area and got rid of somem yellowing plastic bits. I also tried to take a shot at night for the illumination but this didn’t some out particularly well. However, I’ll post it anyway!
20200616_074748 by Jon Fellows, on FlickrGassing Station | Readers' Cars | Top of Page | What's New | My Stuff