1979 Mercedes 450 SLC
Discussion


Good news that all is going well pauly and great that the trip was a success. As an aside, we've just moved from that neck of the woods and my daughter worked in that lovely, but very expensive, farm shop at the services.
Ref water. It might be window seals, they often leak with some enthusiasm. They also account for quite a lot of the noise. The cabin of my car doesn't leak at all now and I've learned to live with the noise, but we did fit new seals and rehanging the doors made a slight improvement.
It doesn't take much water to soak the carpets and insulation and unless you remove it and dry it properly it stays damp and smells fusty. Hopefully the bulkhead won't be too bad.
Ref fuel smells. I suspect it may very well be the fuel lines. Mine were in a very poor state and were all replaced. I'd recommend not leaving it very long before addressing. It's not a particularly expensive job but a fire would spoil your day.
And what a difference a knob makes! The heater levers and associated black magic, or non-magic in most cases, remain a mystery to me. Even the manual sheds little light!
Thanks all. I will start some more thorough investigation into where this moisture might be coming from if and when it returns, but your ideas on that and the fuel smell issue are welcomed. I will get those fuel-related items changed as a matter of course in any case.
CdG - how uncanny that your daughter worked at the services. We spent plenty on biscuits and desserts on this occasion as well as partaking of a delicious lunch. I love the place and it really is a welcome change.
Also apologies for spelling 'knew' incorrectly in the above posting...I would like it noted that my phone is the moron, not me, at least on this occasion.
Edited by paulyv on Sunday 25th March 23:05
paulyv said:
Anyone know the likelihood of retrofitting rear seat belts to one of these?
Dead easy. The holes are all there. I think the cutouts should be ready in the 'C' pillars. The parts are likely standard parts from a w201 or w123. Edit: The diagonal belt kits are A1078608685 (they are not sided). The lap belt is A1238602585 (standard w123). The buckles are A1238600469 and you need three (standard w123). These are kit part numbers and include everything you need, bolts, washers &c. The escutcheon for the 'C' pillar (a little trim for where the belt emerges) is A1266920059 (as the number suggests, a w126 part) and you need two.
Edited by r129sl on Monday 26th March 09:00
Some posts ago I jauntily described how to remove the blower, although I had never actually done it - spare us from so-called 'experts' like myself. Allow me to set things straight. Every guide to removing the SL heater blower I have seen states there are 4 bolts holding the unit into the bulkhead. THERE ARE NOT - THERE ARE FIVE as I eventually found out today.
A new blower unit arrived from the SL Shop today. Seems to be a good design - not identical but similar enough to the old unit. Should hopefully see me out for the next decade. With an extra hour in the day I now have time to toil over the car after work, so no time like the present. Out I strode, vintage socket set (with much needed extension) in hand.
Bonnet up, ready to go. I started by removing the 8 screws clamping the hopefully weather-proof lid to the bulkhead. Easy, although you do need a short stubby screwdriver as there isn't much room to access the upper 4 due to the bonnet. A little prying lifts the lid off and there is your blower. 2 of the supposed 4 bolts holding it in are clearly visible at the top...not so easy are the remaining '2' which are deeper down in the bulkhead and cannot be seen as the bonnet gets in the way of your head as you peer into the bulkhead itself. A camera helps you see the situation and you can feel them on each corner. An extension is required on the socket as they are quite low down.

Next I unplugged the connector running to the resistor pack on the unit - it just pulls out, and I then removed the 2 screws which hold the resistor pack to the bulkhead. If you have a short philips-head screwdriver you won't need to remove the airbox which restricts the angle you can get to them if you have a longer screwdriver.
So, by my reckoning we should be all done. But no - the unit wouldn't come out. It felt like the lower half was welded to the bulkhead along the gasket. I spent a good 15 minutes pulling, pushing, twisting, scraping my knuckles, swearing, peering, waiting until passers by had gone until I resumed beating the unit unto submission, and repeatedly photographing and I still couldn't understand why it was not shifting...had the previous owner superglued the thing in place? I would not put it past him. I couldn't get my head in far enough to see the bottom edge of the blower and by this time my phone was low on battery and would not let me use the flash. Wits end time.

It was purely by chance as I broggled (an old Lincolnshire word - it means to get an eel out of a muddy hole with stick) the socket extension in the area below the blower that all became clear as it randomly snagged and connected to something. There's a fifth bolt down there in the middle of the two fans. A FIFTH BOLT.
One more bolt off and the unit lifted out as promised on the interwebs. Positive to see no sign of rust coming through here, although I appreciate that's no proof of a clean bulkhead.

So given my time wasting that's as far as I got tonight. I put the cover back on the area and closed the bonnet. Later this week I am going to have to figure out how to attach the existing resistor pack onto the new blower...expect another tale of several hours wasted as I don't know what I am doing. If anyone has ever done that or knows a link online to a guide I would be more than thrilled to hear from them.

A new blower unit arrived from the SL Shop today. Seems to be a good design - not identical but similar enough to the old unit. Should hopefully see me out for the next decade. With an extra hour in the day I now have time to toil over the car after work, so no time like the present. Out I strode, vintage socket set (with much needed extension) in hand.
Bonnet up, ready to go. I started by removing the 8 screws clamping the hopefully weather-proof lid to the bulkhead. Easy, although you do need a short stubby screwdriver as there isn't much room to access the upper 4 due to the bonnet. A little prying lifts the lid off and there is your blower. 2 of the supposed 4 bolts holding it in are clearly visible at the top...not so easy are the remaining '2' which are deeper down in the bulkhead and cannot be seen as the bonnet gets in the way of your head as you peer into the bulkhead itself. A camera helps you see the situation and you can feel them on each corner. An extension is required on the socket as they are quite low down.
Next I unplugged the connector running to the resistor pack on the unit - it just pulls out, and I then removed the 2 screws which hold the resistor pack to the bulkhead. If you have a short philips-head screwdriver you won't need to remove the airbox which restricts the angle you can get to them if you have a longer screwdriver.
So, by my reckoning we should be all done. But no - the unit wouldn't come out. It felt like the lower half was welded to the bulkhead along the gasket. I spent a good 15 minutes pulling, pushing, twisting, scraping my knuckles, swearing, peering, waiting until passers by had gone until I resumed beating the unit unto submission, and repeatedly photographing and I still couldn't understand why it was not shifting...had the previous owner superglued the thing in place? I would not put it past him. I couldn't get my head in far enough to see the bottom edge of the blower and by this time my phone was low on battery and would not let me use the flash. Wits end time.
It was purely by chance as I broggled (an old Lincolnshire word - it means to get an eel out of a muddy hole with stick) the socket extension in the area below the blower that all became clear as it randomly snagged and connected to something. There's a fifth bolt down there in the middle of the two fans. A FIFTH BOLT.
One more bolt off and the unit lifted out as promised on the interwebs. Positive to see no sign of rust coming through here, although I appreciate that's no proof of a clean bulkhead.
So given my time wasting that's as far as I got tonight. I put the cover back on the area and closed the bonnet. Later this week I am going to have to figure out how to attach the existing resistor pack onto the new blower...expect another tale of several hours wasted as I don't know what I am doing. If anyone has ever done that or knows a link online to a guide I would be more than thrilled to hear from them.
Edited by paulyv on Tuesday 27th March 20:21
Time on my hands today between Easter eggs so moved the resistor pack over from the old blower to the new.

After cleaning 39 years of dust and grot from the component I saw the design of the resistor means it's very difficult to undo the electrical joints without reducing the pack to its constituent parts so I chose to use wire connectors. It doesn't look as pretty, and I will be adding some insulation tape to ensure moisture can't enter, but it'll have to do and as it sits out of the way in the blower case I think it'll remain reliable.

These resistor packs go for a pretty penny on Ebay and the like so I am thrilled to be able to reuse it. Can't wait to find out my removal of the South African grit from inside the casing has rendered it useless. Doesn't seems to be too much to go wrong in here however.
A new blower gasket is arriving tomorrow and I should get the chance to get all of this back in the car by the middle of the week.
Thanks to your advice the car is now booked in to be peered at by Edward Hall from the 16th April. With my original concern of bulkhead rot somewhat sidestepped I will have him glance at that but concentrate on those fuel lines so I can undertake a long journey without going green. It'll be interesting to get his general view of the car.
After cleaning 39 years of dust and grot from the component I saw the design of the resistor means it's very difficult to undo the electrical joints without reducing the pack to its constituent parts so I chose to use wire connectors. It doesn't look as pretty, and I will be adding some insulation tape to ensure moisture can't enter, but it'll have to do and as it sits out of the way in the blower case I think it'll remain reliable.
These resistor packs go for a pretty penny on Ebay and the like so I am thrilled to be able to reuse it. Can't wait to find out my removal of the South African grit from inside the casing has rendered it useless. Doesn't seems to be too much to go wrong in here however.
A new blower gasket is arriving tomorrow and I should get the chance to get all of this back in the car by the middle of the week.
Thanks to your advice the car is now booked in to be peered at by Edward Hall from the 16th April. With my original concern of bulkhead rot somewhat sidestepped I will have him glance at that but concentrate on those fuel lines so I can undertake a long journey without going green. It'll be interesting to get his general view of the car.


paulyv said:

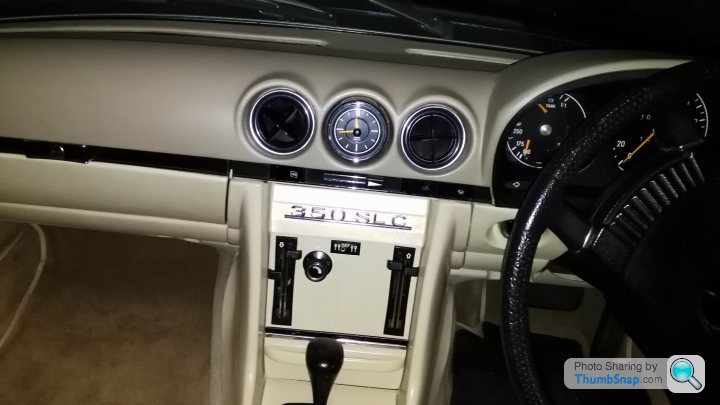
So I've got 2 headlight adjusters. These SA SL's were spec'd up to the hilt weren't they.
If so, maybe the walnut panel is not original and came from a RHD car with the headlight adjuster ergonomically placed smack in the middle of the heater controls. Or maybe the other one is not original.
Morning.
The second headlight dipper switch is by the gear selector, where one might expect to find the speaker fader switch on some models.
I do think I have had a heater trim change at some point in time. Indeed I have what must be the original one. It has 2 LED's and a sensor drilled into it for some kind of 80's alarm which likely pumped out microwaves - would have been useful when I was freezing cold in it last month.
I doubt I need either of these switches, so the positive is that if I get a replacement wooden trim for around the gear selector (my lacquer is cracked there) I can fit one without the headlamp dial.
It's one thing after another here.
So looking at the blower motor supplied I can see the new one has a different base to the old blower motor - notice the upward angle on the base of the moulding. If I try to place the motor into the aperture in the bulkhead with that upward part facing in the direction of travel I cannot get it in. If I place it the other way around there's no way to bolt it down due to the flanges and the holes not being in the correct positions.
I am assuming I am having difficulties in getting the right angle to place this back inside the car - I have heard you need to get the exact angle, but 20 minutes of trying and I still haven't found it.
Anyone here changed a blower motor or any thoughts whilst I await a reply? On the plus side when connected the blower works perfectly.
Edited by paulyv on Wednesday 4th April 20:45
Gassing Station | Readers' Cars | Top of Page | What's New | My Stuff