Rover 75 CDTi Tourer
Discussion


Gosh time flies when a car is behaving, and a lockdown keeps it stationary!

Before the lockdown the 75 was used for two longer distance loads - a treasure trove of Saab 900 parts:

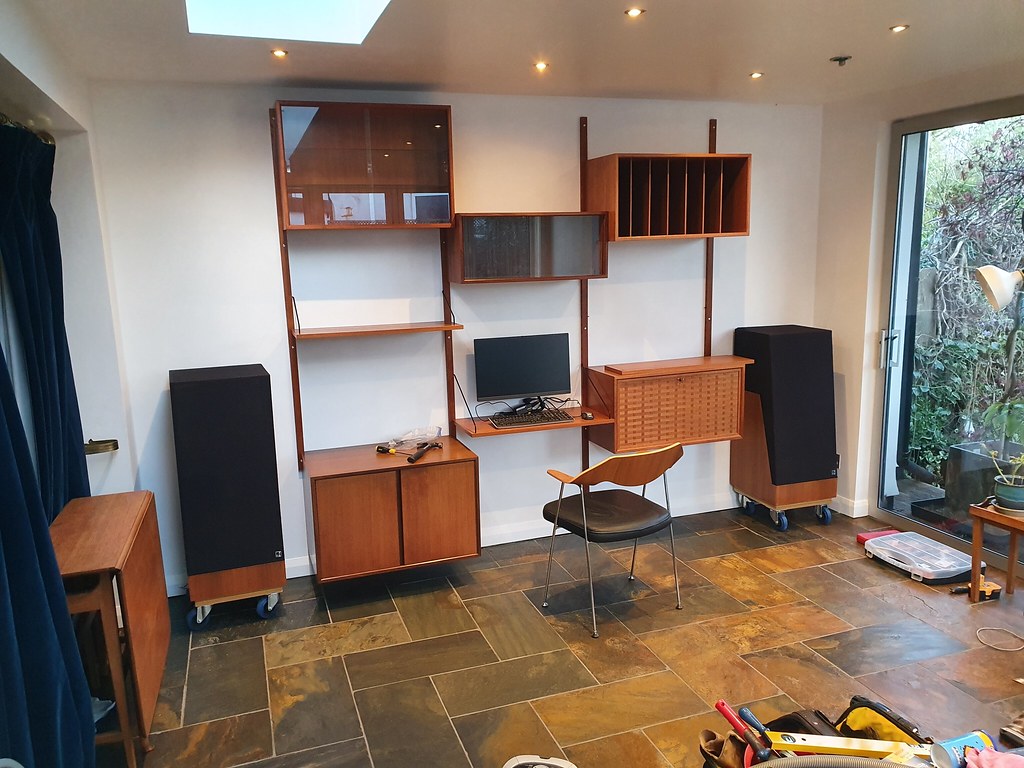
...and a journey up to the midlands to bring back a large 1950s Poul Cadovius shelving system for the house.


I was extremely happy to have picked that little lot up in Feb, as when the lockdown took effect I needed a proper home setup with daylight to stay sane!
It was on the return form the furniture trip that I has a very close run-in with another car, a giant BMW that decided to slow down and turn into my (inside) lane without indication or checking his mirrors on the outskirts of Birmingham. I jabbed the horn and the brakes in equal measure, and avoided contact (just!). At the next lights I had to have a quick word (my heard had skipped a beat, and most of the shelving had moved a few inches forward), and the glassey eyed simpleton had the temerity to say they hadn't 'heard your horn'. A quick explanation of mirrors and deconstruction of a driving style that relies on noises from other road users followed.
It stuck with me, even though I checked my camera footage to check I hadn't made any error, and remembered that the later 75s only had a single horn. The 75 ismuch quieter than any other car I've had, a low mooing you could say.
So, out of curiosity I tracked down a pre-Project Drive twin horn set with loom.

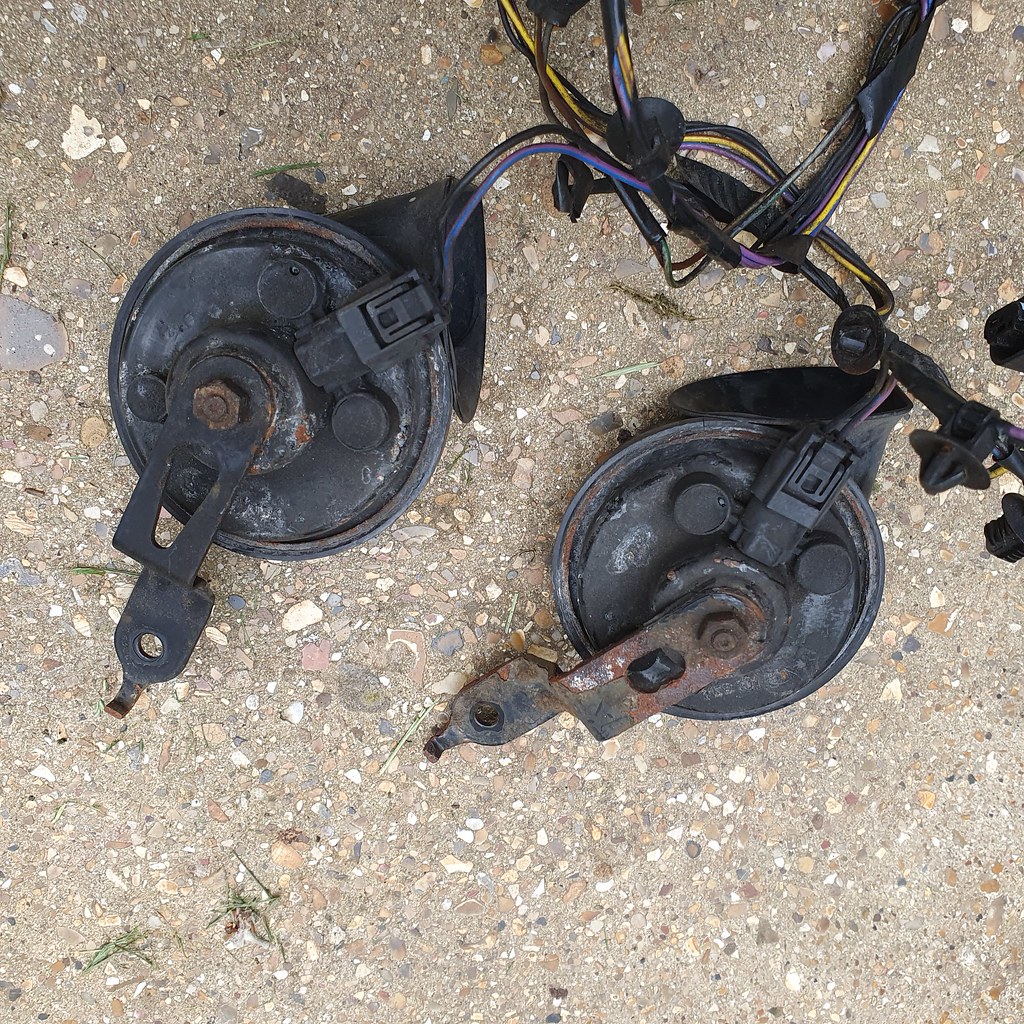
I gave it a quick spruce up and de-rust, adressing a few rubbed wires.

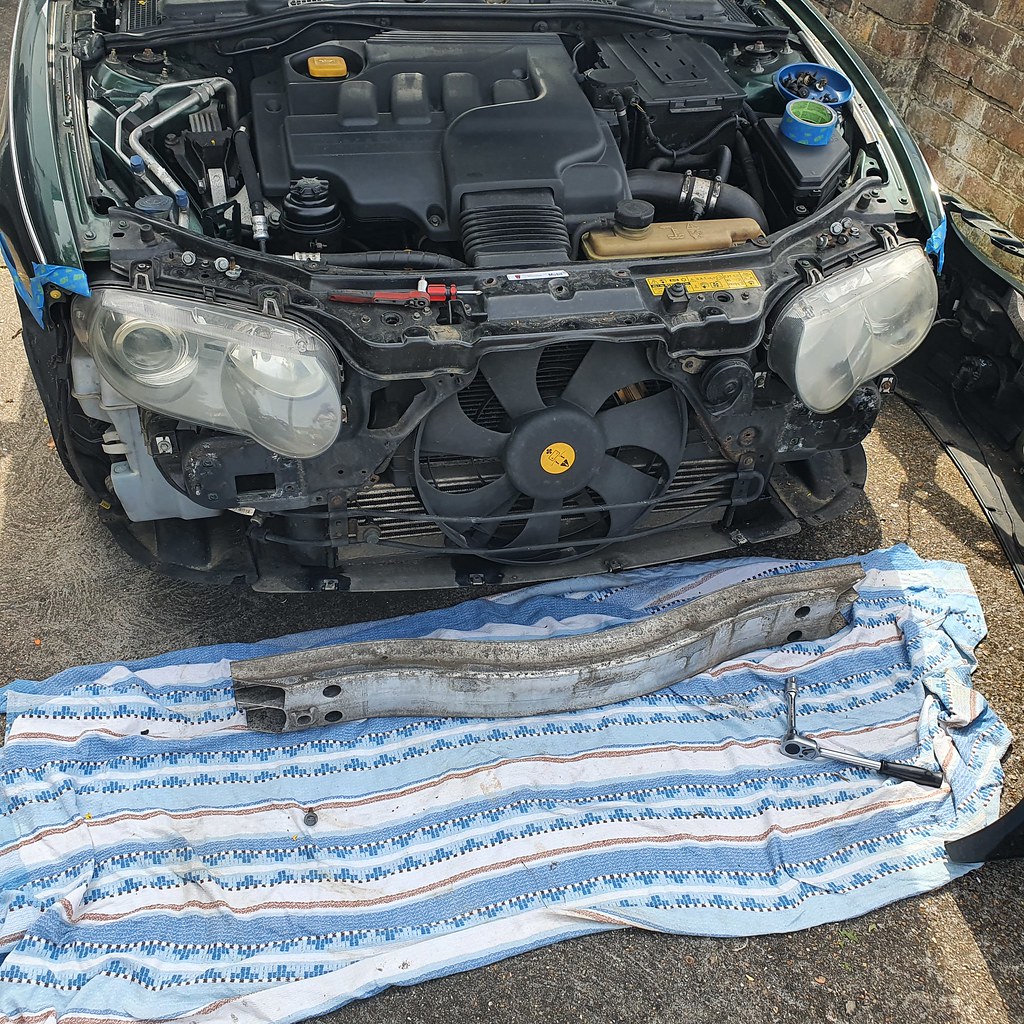
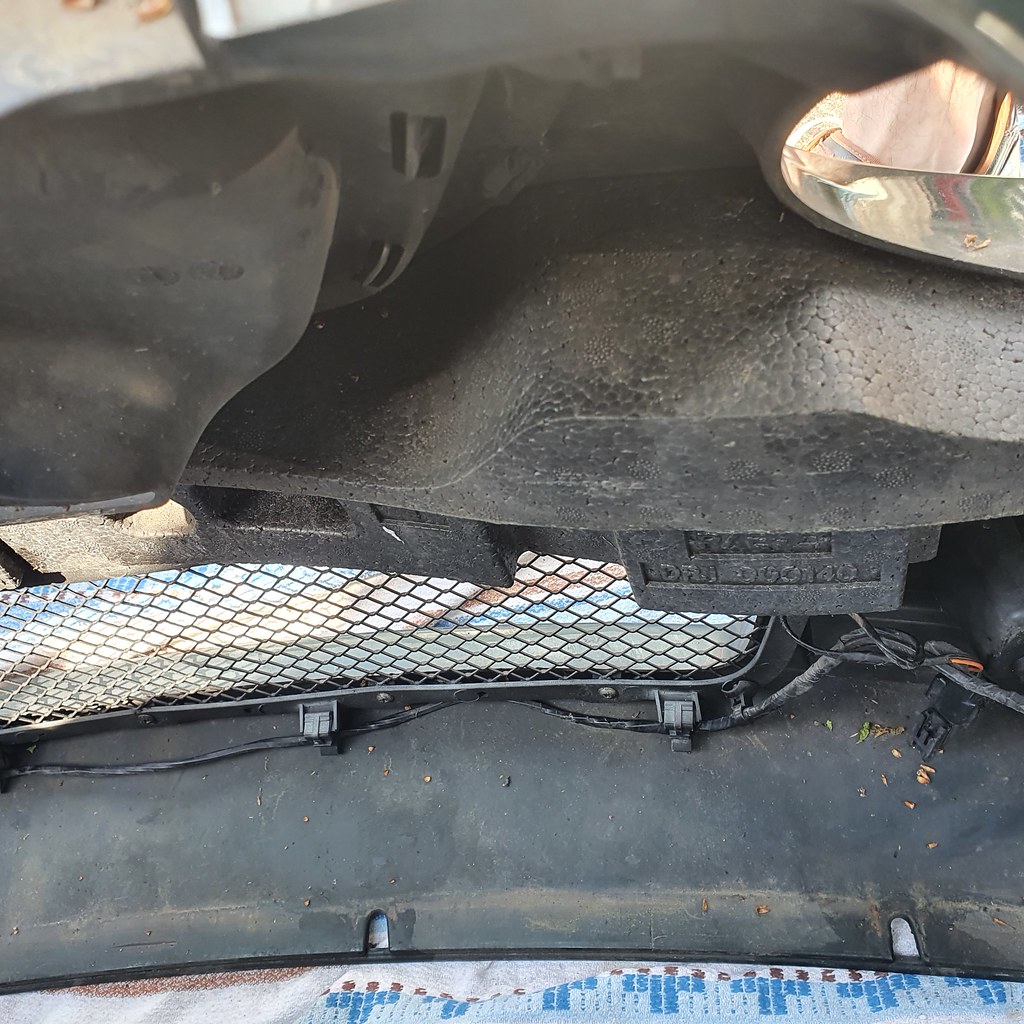
Today weather and time window was secured, and I began the laborious process of removing the front bumper, crash bar and original loom. The front grill hadn't fared well from my original stonechip coating, so I took the opportunity to freshen it up and finally tidy away the front sensor that was always in view, taunting me. I was also keen to use my new Stahlwille socket set:

From previous experience, a layer of masking tape protects the wings from scratches when putting it back on.


Quite a few 10mm bolts along the top, 1 in each bumper wing join, and 11 screws to the bottom and undertray.


Then 10 13mm bolts for the crash bar, and you can see the single cowhorn on the right.
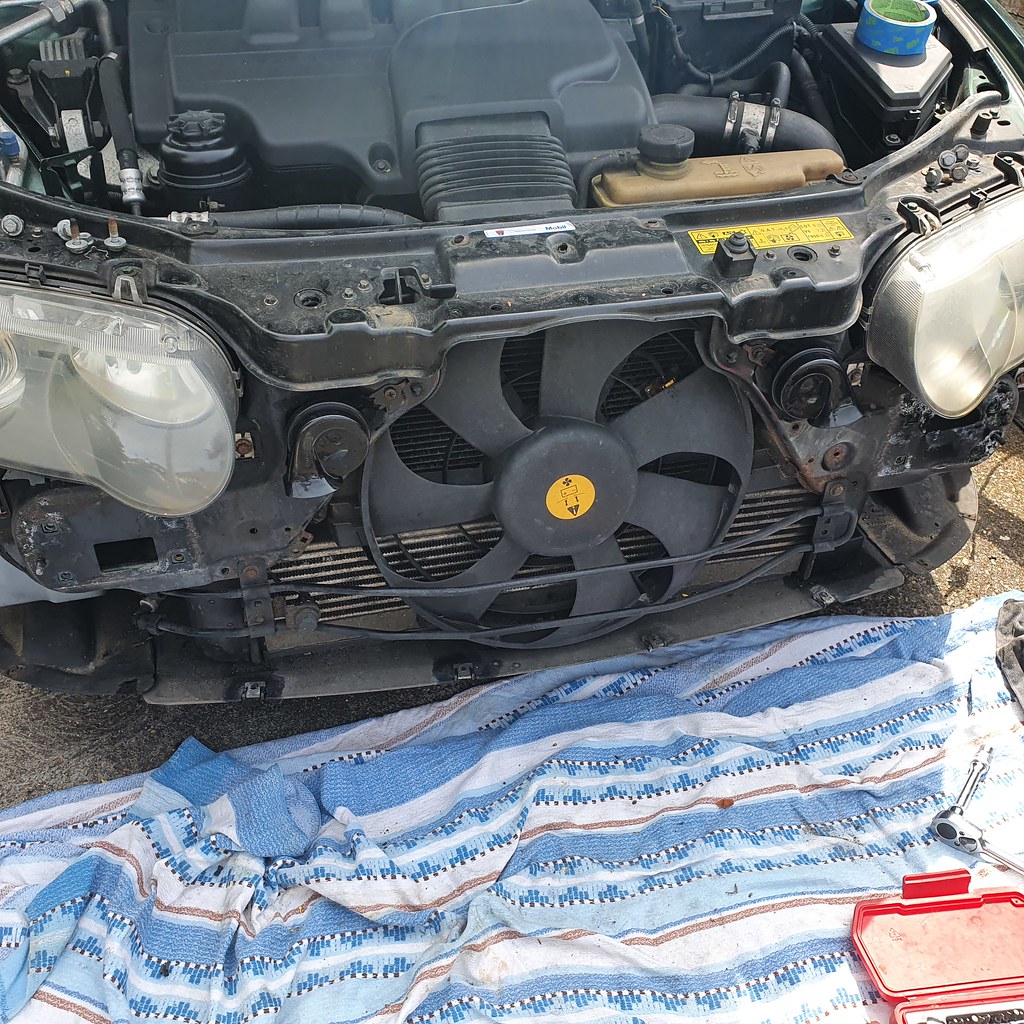
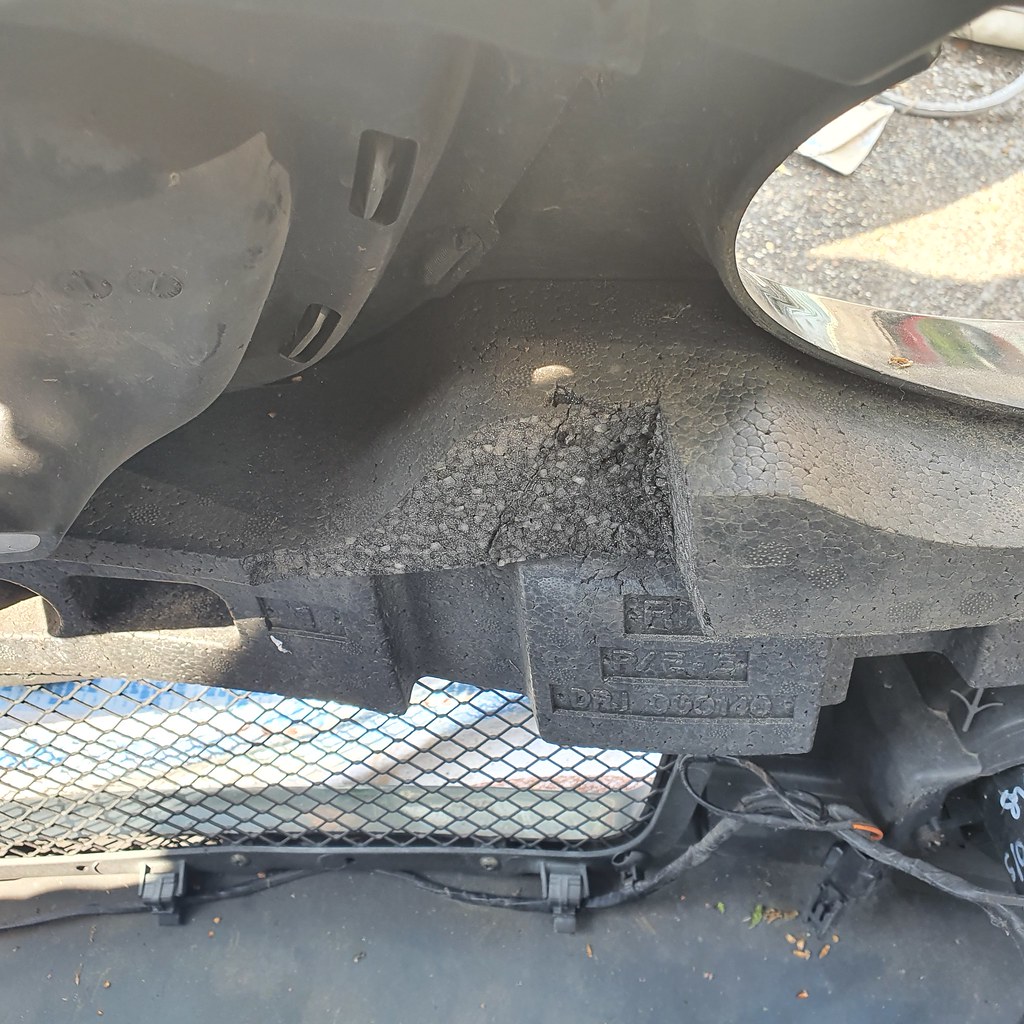
Next up was the tricky removal and reinstallation of the wiring loom. This doesn't just power the horns, but has a front numper crash sensor and a bonnet latch sensor (I think, and is fitted with myriad clips behind all sorts of gubbins.


Main connector is by the screenwash reservoir on the driver's side.


The loom goes around the back of the slam panel and I lost a few fingernail edges to this process.

An hour later, two welcome horn connectors are now visible!

Two 8mm bolts later, and yes a quick test made me smile as the nearby cats really bolted! No one's going to ignore that horn again! This is a heard of angry caribou, at the very least.
Grill had some primer and paint layers through the process, reinstalled.

I remounted the bumper and thought I was all done, but nothing quite 'went back' correctly. Some squeaks were hear, and I inspected the area by the new horn. Sure enough, a section of foam needed to be cut out to accommodate the new addition! Hadn't heard of that one before. Few quick cuts later and it all went back snugly.

I also gave the headlights a quick autosol polish while they were fully accessible. Much better! Time for a clean tomorrow I think.

Before the lockdown the 75 was used for two longer distance loads - a treasure trove of Saab 900 parts:
...and a journey up to the midlands to bring back a large 1950s Poul Cadovius shelving system for the house.
I was extremely happy to have picked that little lot up in Feb, as when the lockdown took effect I needed a proper home setup with daylight to stay sane!
It was on the return form the furniture trip that I has a very close run-in with another car, a giant BMW that decided to slow down and turn into my (inside) lane without indication or checking his mirrors on the outskirts of Birmingham. I jabbed the horn and the brakes in equal measure, and avoided contact (just!). At the next lights I had to have a quick word (my heard had skipped a beat, and most of the shelving had moved a few inches forward), and the glassey eyed simpleton had the temerity to say they hadn't 'heard your horn'. A quick explanation of mirrors and deconstruction of a driving style that relies on noises from other road users followed.
It stuck with me, even though I checked my camera footage to check I hadn't made any error, and remembered that the later 75s only had a single horn. The 75 ismuch quieter than any other car I've had, a low mooing you could say.
So, out of curiosity I tracked down a pre-Project Drive twin horn set with loom.
I gave it a quick spruce up and de-rust, adressing a few rubbed wires.
Today weather and time window was secured, and I began the laborious process of removing the front bumper, crash bar and original loom. The front grill hadn't fared well from my original stonechip coating, so I took the opportunity to freshen it up and finally tidy away the front sensor that was always in view, taunting me. I was also keen to use my new Stahlwille socket set:
From previous experience, a layer of masking tape protects the wings from scratches when putting it back on.
Quite a few 10mm bolts along the top, 1 in each bumper wing join, and 11 screws to the bottom and undertray.
Then 10 13mm bolts for the crash bar, and you can see the single cowhorn on the right.
Next up was the tricky removal and reinstallation of the wiring loom. This doesn't just power the horns, but has a front numper crash sensor and a bonnet latch sensor (I think, and is fitted with myriad clips behind all sorts of gubbins.
Main connector is by the screenwash reservoir on the driver's side.
The loom goes around the back of the slam panel and I lost a few fingernail edges to this process.
An hour later, two welcome horn connectors are now visible!
Two 8mm bolts later, and yes a quick test made me smile as the nearby cats really bolted! No one's going to ignore that horn again! This is a heard of angry caribou, at the very least.
Grill had some primer and paint layers through the process, reinstalled.
I remounted the bumper and thought I was all done, but nothing quite 'went back' correctly. Some squeaks were hear, and I inspected the area by the new horn. Sure enough, a section of foam needed to be cut out to accommodate the new addition! Hadn't heard of that one before. Few quick cuts later and it all went back snugly.
I also gave the headlights a quick autosol polish while they were fully accessible. Much better! Time for a clean tomorrow I think.
Indeed, but at least its both loud and polite!
Finally got round to giving the 75 a proper clean and polish a few weeks ago. It was looking properly miserable under lockdown.


A good soak later and many rounds of scrubbing left me a reasonable car, and dodging the very hot sunlight I spent a good few hours with a clay bar removing fly skulls, tar blobs and general nastiness.
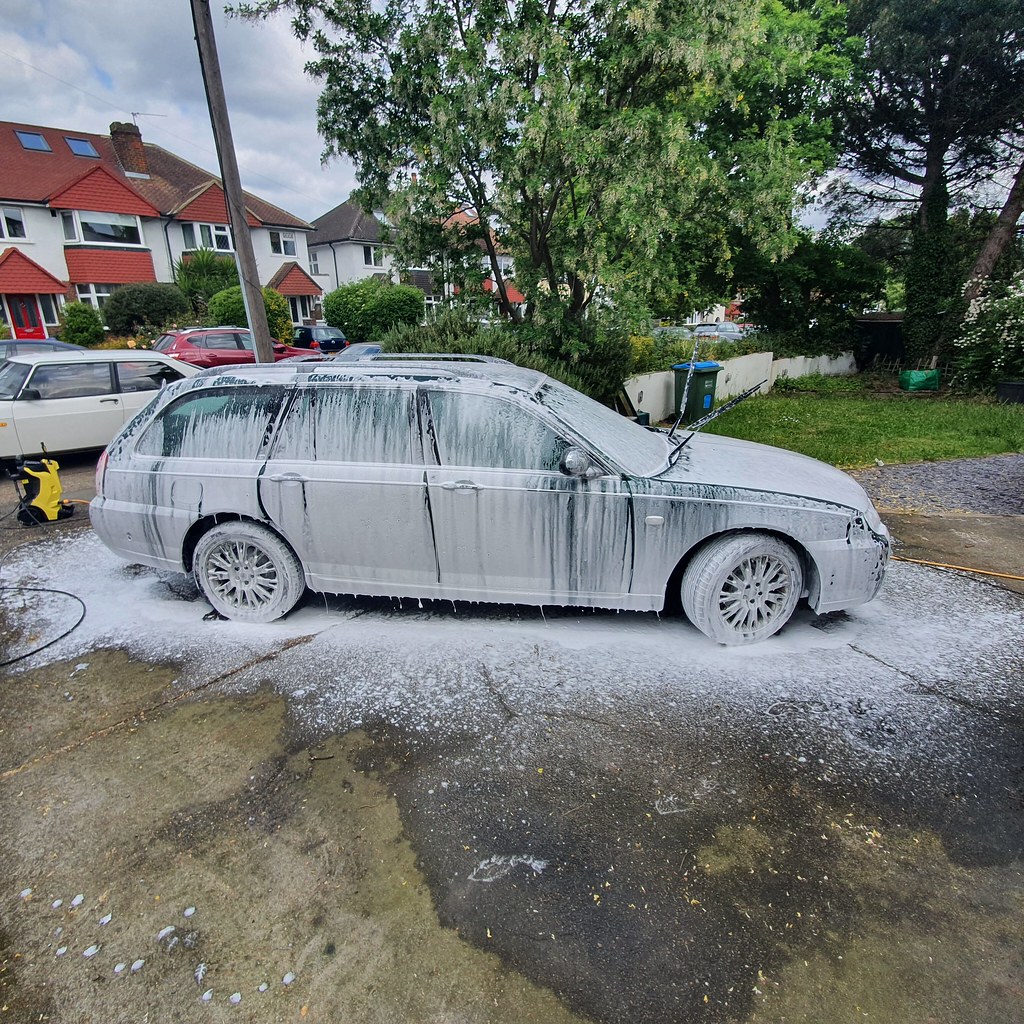

With Saab reflection following Super Resin Polish round:

Looking respectable, and a few more stone chips touched in. Of course, last few weeks of builder's dust and general grime has made it filthy again, but I'll have to live with that until the multistory car park is constructed.

Finally got round to giving the 75 a proper clean and polish a few weeks ago. It was looking properly miserable under lockdown.
A good soak later and many rounds of scrubbing left me a reasonable car, and dodging the very hot sunlight I spent a good few hours with a clay bar removing fly skulls, tar blobs and general nastiness.
With Saab reflection following Super Resin Polish round:
Looking respectable, and a few more stone chips touched in. Of course, last few weeks of builder's dust and general grime has made it filthy again, but I'll have to live with that until the multistory car park is constructed.
Cambs_Stuart said:
That's an impressive amount of effort to make the horn louder!
Brilliant attention to detail as always.
True! probably should have sourced an old barge horn or something from a trawler and wired it in, but mainly it was just a few hours of tinkering that was enjoyable, as always, on this car.Brilliant attention to detail as always.
A500leroy said:
OP do you only drive things from expired manufacturers? 
Well, I do have the Alfa Romeo 164...<looks at current Alfa lineup>
Er... Maybe you've got a point!
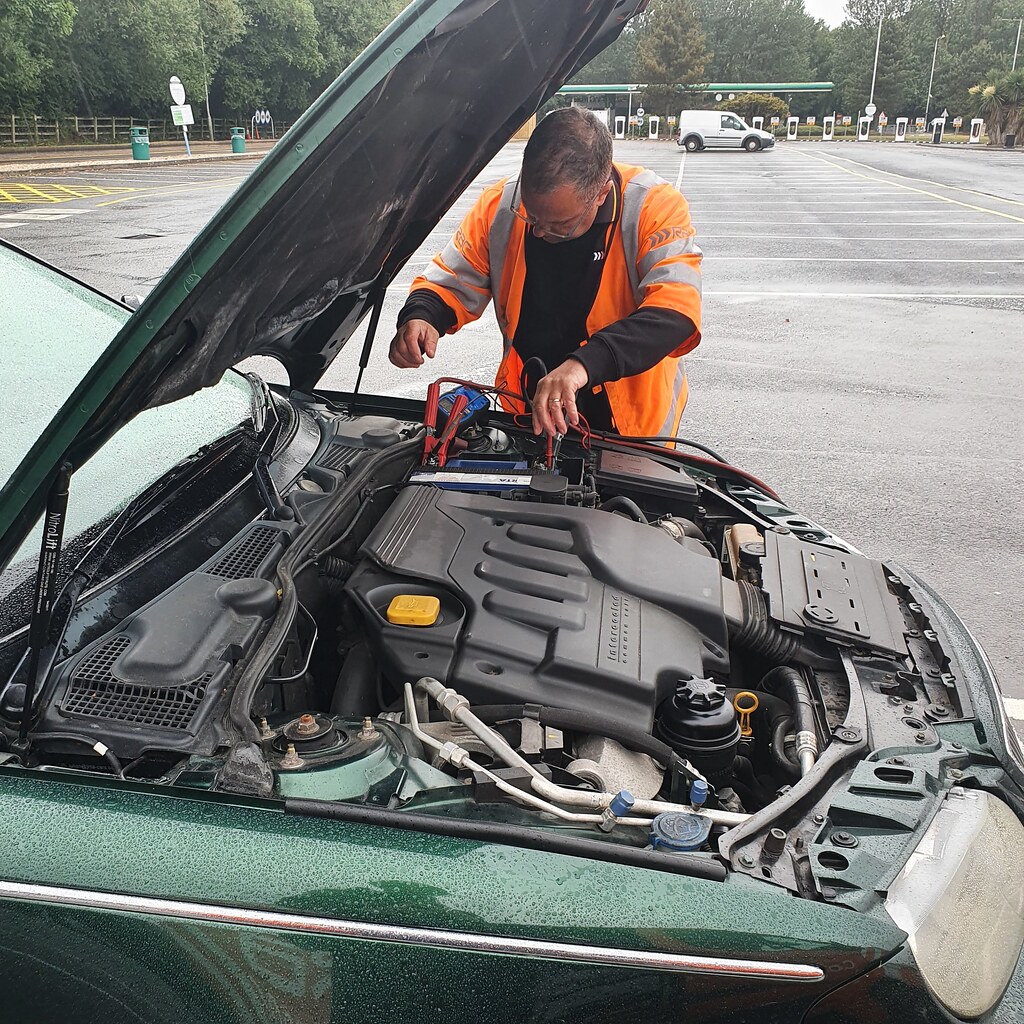
My first trip outside London in the 75 as restrictions relax didn't go to plan...

I tried to pick up some furniture but on the M6 the red battery light came on, then a few more red and yellow lights, so I pulled into a services and sighed my way to an RAC recovery. Alternator failure suspected.
Top response by the boys in orange - a check of the system verified my diagnosis, and unfortunately even a good tap with a stick didn't cure it permanently, so it was a flatbed home.
A replacement has arrived from Jules in Wales, so that's this weekend sorted...looks like an awkward fit:
Looking forward to cracking out the Stahlwille socket set though.
With good light and a free afternoon yesterday I set abut the alternator replacement. The last one I changed was on a Rover P5B, and took about 20 minutes as it was on the top of the engine with three bolts and plenty of space.
This was going to be a bit more involved... it's under there somewhere, beneath the power steering apparatus and various engine gubbins...

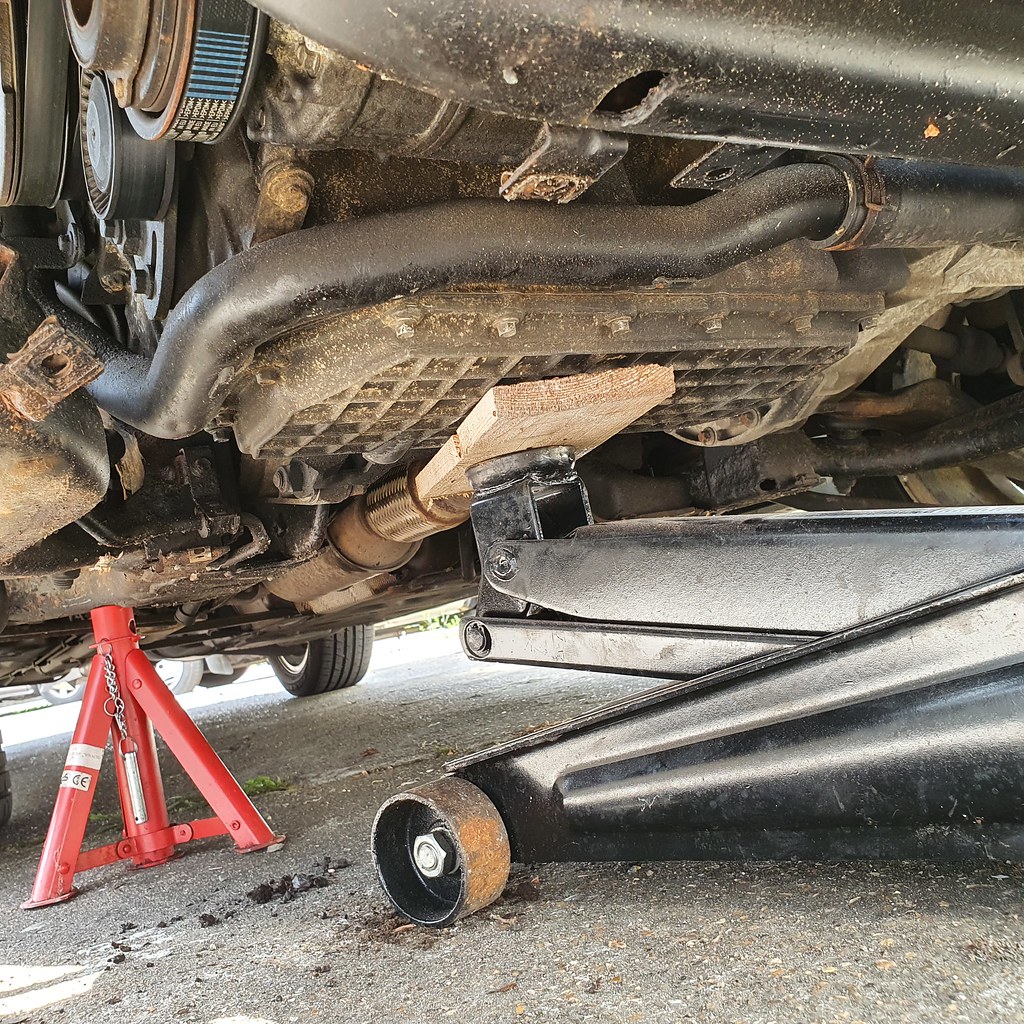
First up remove the front right wheel, support the car as best as possible (I used a combination of jack stands and the scissor jack from the boot, as the trolley jack is required later on!):

Remove inner wheel arch lining to gain a bit of access to the serpentine belt arrangement, luckily only a few plastic retainers and some screws, and I didn't pull out the whole piece:

Also the undertray, which took an age due to rusted fixings, horrible access and uncomfortable concrete. I'll only be putting this back on when I can use a ramp!

I opted for the 'changing from above' method, as to me it looked logical, and I prefer standing up than lying down when working on cars. Battery disconnected.
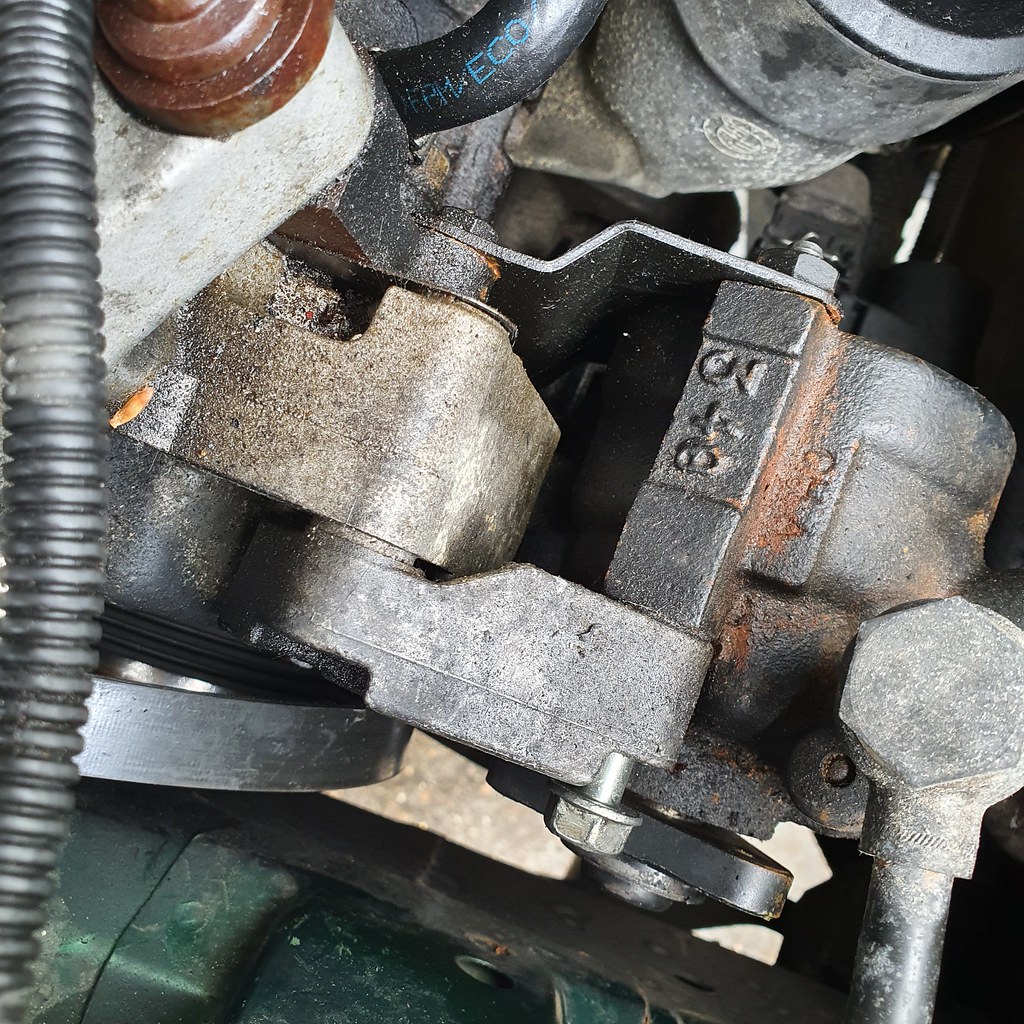
First up, loosened all the air con pipe brackets (not disconnected, just the brackets) and the front engine mount:

Trolley jack was placed under the engine - yes I know its never adviseable but I honestly couldn't see a better angle of attack than the oil pan with a 'load spreader' piece of wood. Support engine.
Using Stahlwille socket set (others are available, but they don't make me smile), remove the engine cover, intake bellows and power steering reservoir bracket.

Four big bolts for the chunky aluminium engine bracket, two more on the engine mount Y frame and another 18mm nut for the mount itself. A bit of wiggling past the pipes and it come out whole. I moved the engine down a bit on the jack to get clearance.


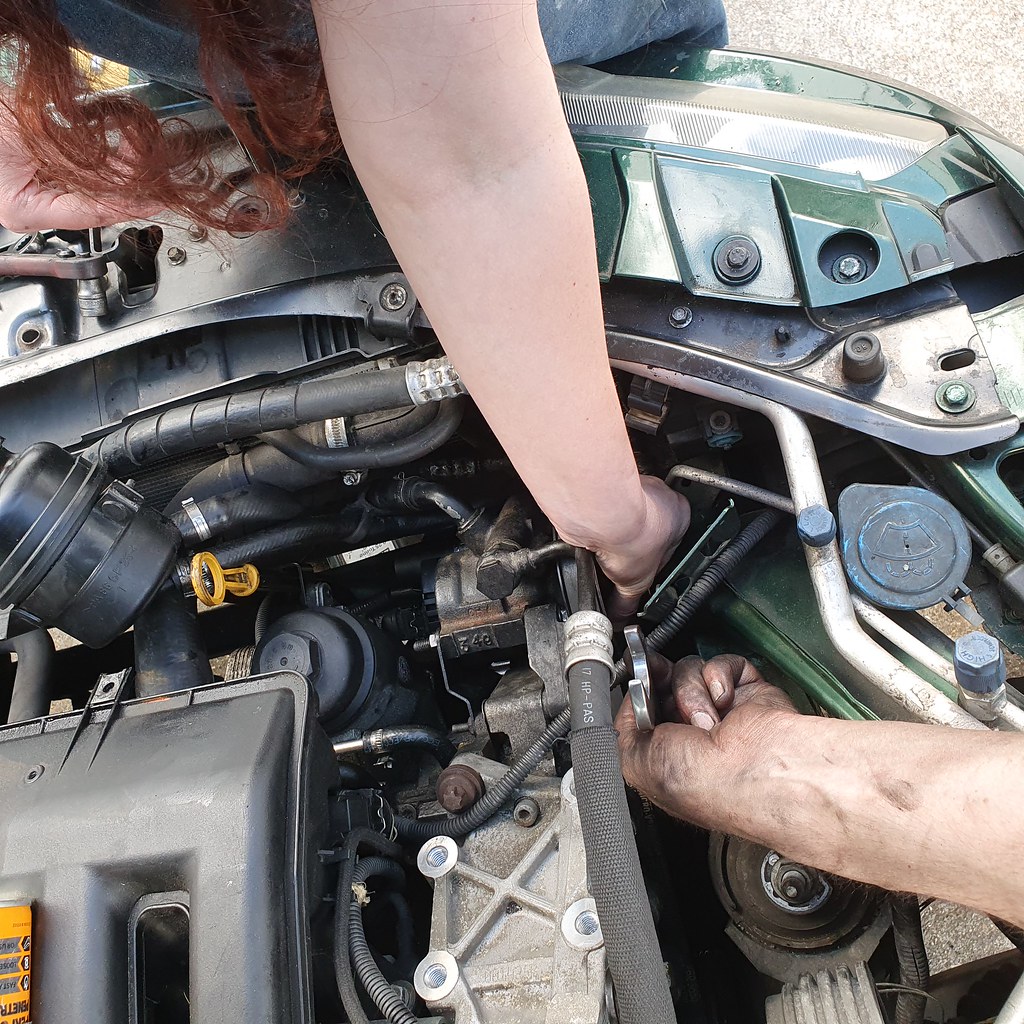
I then took off the power steering pump wheel as it was secured with three bolts and slid the belt free.


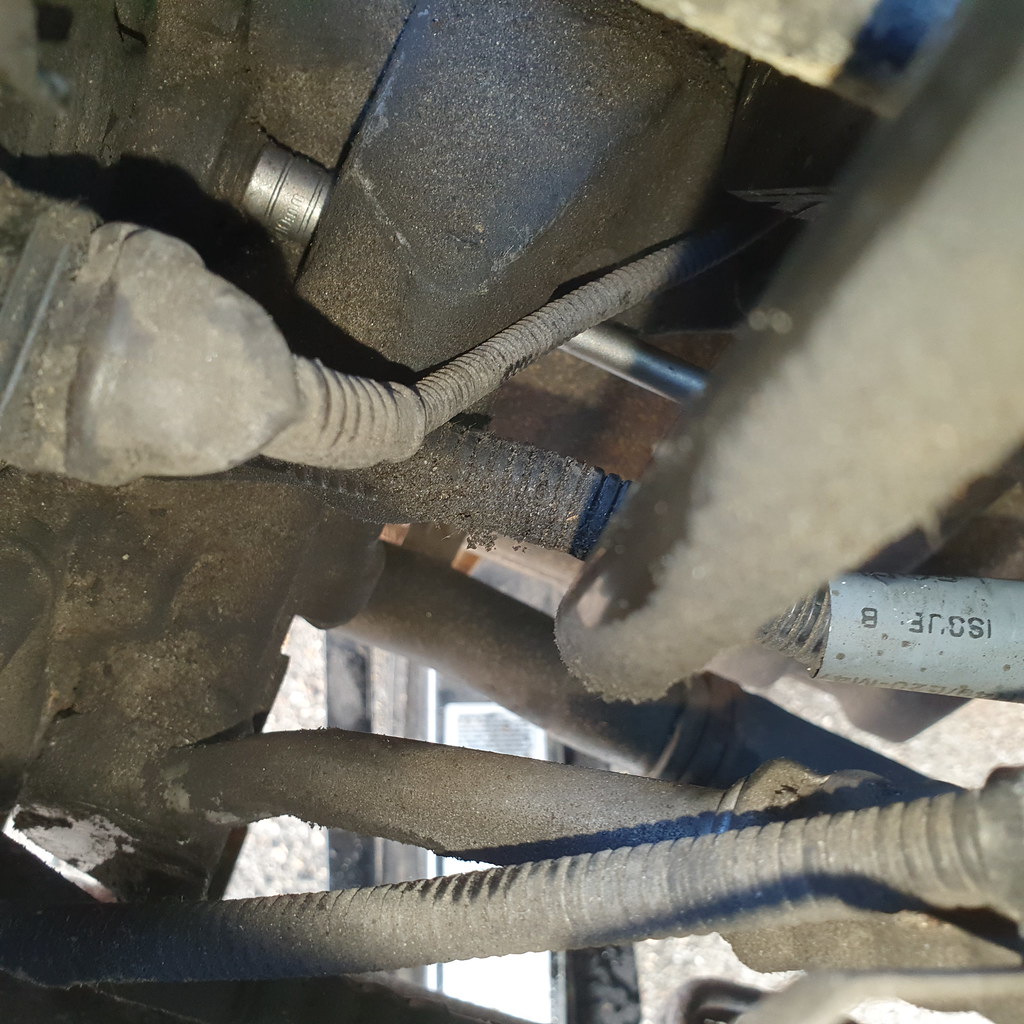
The power steering pump is secured to the engine with an intricate cage (I think the pump was from something else at BMW and they designed a suitable mount for this M47 application), which had a menagerie of two 8mm, two 10mm and three 13mm bolts. As these are loosened, some can be removed with the engine lowered and some with it raised - it is surprising how much the engine will move, but obviously don't jack it up any more than required!


As with the reservoir, the pump can be 'tidied away' without disconnecting any pipes. I knew I would get to use my hammer at some point.


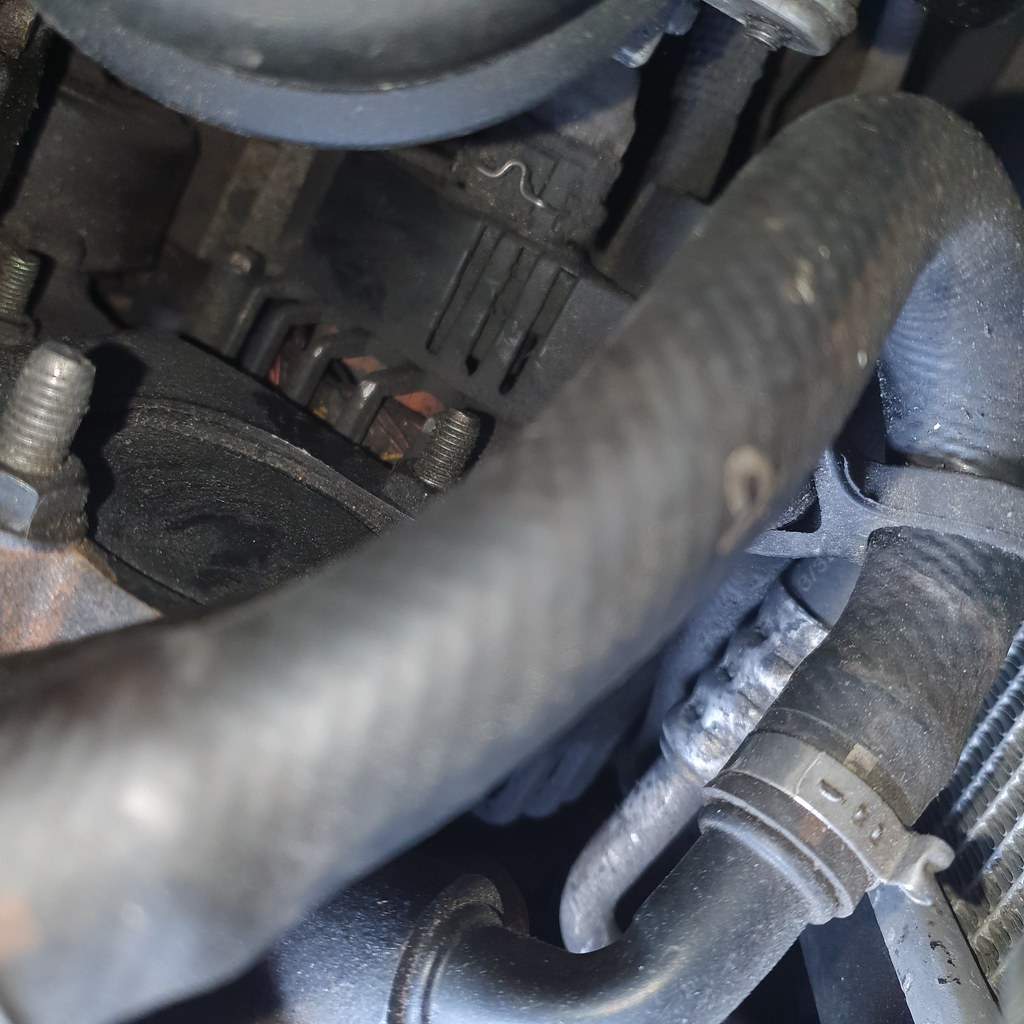
Finally, the alternator! Two 13mm bolts on the wheel side (one accessed from the wheel arch, and a standard connector & 13mm nut for the positive lead.

The final alternator bolt really had me scratching my head, but a quick look on the Rover 75 forum revealed a 10mm bolt that could only be accessed on an extension through a recess in another engine bracket. I tried to photograph it - easy once you know!
The alternator was a pain to get out with all the other engine hoses and power steering attached, but we got there in the end with a little help from the wife holding items out of harm's way! Again the engine did a little skip up and down for the bolts.

The power steering cage mount was a bit of a fiddle to get right - partial assembly required with various bolts sticking in'out or loose before offering up to the engine, but all ok in the end.

After refeeding the belt and checking the grooves, I again enlisted the wife to reattach the power steering wheel while I held the tensioner on a 24mm spanner.
Before I fully put everything back together, had to try it - success!

No wobbles, concerning noises or issues, and the red battery light disappeared from the dash. Phew.
Before reassembly I changed the air filter for a Mahle LX823 that Jules had put in with the alternator. Overdue I think.
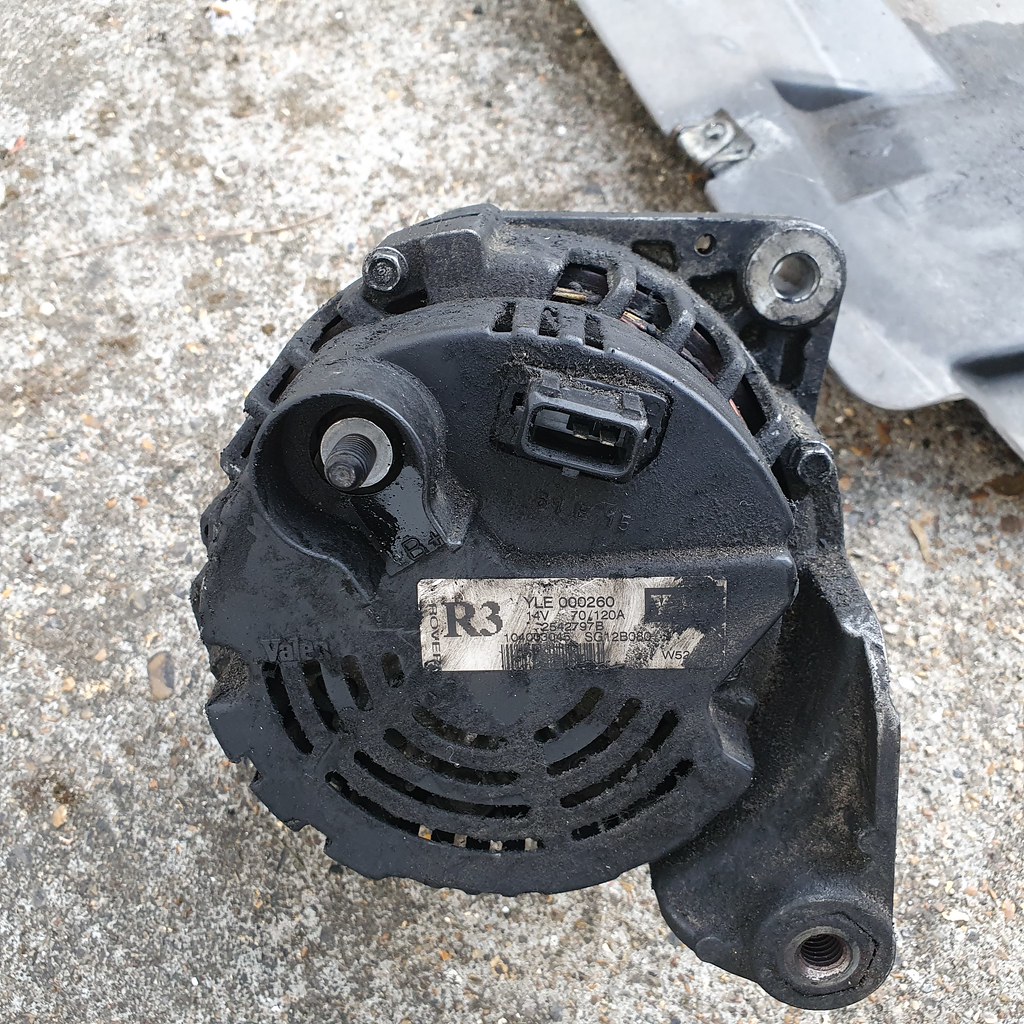
After tidying up, I move the alternator and realised it had an R3 label on the back, meaning it was likely the original item! 162k, not bad Valeo, not bad at all. I am considering getting it rebuilt, but I think for now I'll just keep it in case the 'new' one has any kind of failure for a year.
Total time elapsed? Just over five hours. Five hours! I must be loosing my touch. Full bath with much Swarfega and scrubbing, gosh that was a full workout on some of those bolts.

Next up, front brake discs and tie rods that I noticed were past useful when the wheel was off. Once I've recovered!
This was going to be a bit more involved... it's under there somewhere, beneath the power steering apparatus and various engine gubbins...
First up remove the front right wheel, support the car as best as possible (I used a combination of jack stands and the scissor jack from the boot, as the trolley jack is required later on!):
Remove inner wheel arch lining to gain a bit of access to the serpentine belt arrangement, luckily only a few plastic retainers and some screws, and I didn't pull out the whole piece:
Also the undertray, which took an age due to rusted fixings, horrible access and uncomfortable concrete. I'll only be putting this back on when I can use a ramp!
I opted for the 'changing from above' method, as to me it looked logical, and I prefer standing up than lying down when working on cars. Battery disconnected.
First up, loosened all the air con pipe brackets (not disconnected, just the brackets) and the front engine mount:
Trolley jack was placed under the engine - yes I know its never adviseable but I honestly couldn't see a better angle of attack than the oil pan with a 'load spreader' piece of wood. Support engine.
Using Stahlwille socket set (others are available, but they don't make me smile), remove the engine cover, intake bellows and power steering reservoir bracket.
Four big bolts for the chunky aluminium engine bracket, two more on the engine mount Y frame and another 18mm nut for the mount itself. A bit of wiggling past the pipes and it come out whole. I moved the engine down a bit on the jack to get clearance.
I then took off the power steering pump wheel as it was secured with three bolts and slid the belt free.
The power steering pump is secured to the engine with an intricate cage (I think the pump was from something else at BMW and they designed a suitable mount for this M47 application), which had a menagerie of two 8mm, two 10mm and three 13mm bolts. As these are loosened, some can be removed with the engine lowered and some with it raised - it is surprising how much the engine will move, but obviously don't jack it up any more than required!
As with the reservoir, the pump can be 'tidied away' without disconnecting any pipes. I knew I would get to use my hammer at some point.
Finally, the alternator! Two 13mm bolts on the wheel side (one accessed from the wheel arch, and a standard connector & 13mm nut for the positive lead.
The final alternator bolt really had me scratching my head, but a quick look on the Rover 75 forum revealed a 10mm bolt that could only be accessed on an extension through a recess in another engine bracket. I tried to photograph it - easy once you know!
The alternator was a pain to get out with all the other engine hoses and power steering attached, but we got there in the end with a little help from the wife holding items out of harm's way! Again the engine did a little skip up and down for the bolts.
The power steering cage mount was a bit of a fiddle to get right - partial assembly required with various bolts sticking in'out or loose before offering up to the engine, but all ok in the end.
After refeeding the belt and checking the grooves, I again enlisted the wife to reattach the power steering wheel while I held the tensioner on a 24mm spanner.
Before I fully put everything back together, had to try it - success!
No wobbles, concerning noises or issues, and the red battery light disappeared from the dash. Phew.
Before reassembly I changed the air filter for a Mahle LX823 that Jules had put in with the alternator. Overdue I think.
After tidying up, I move the alternator and realised it had an R3 label on the back, meaning it was likely the original item! 162k, not bad Valeo, not bad at all. I am considering getting it rebuilt, but I think for now I'll just keep it in case the 'new' one has any kind of failure for a year.
Total time elapsed? Just over five hours. Five hours! I must be loosing my touch. Full bath with much Swarfega and scrubbing, gosh that was a full workout on some of those bolts.
Next up, front brake discs and tie rods that I noticed were past useful when the wheel was off. Once I've recovered!
helix402 said:
The alternator’s a pain to do as your engine is the wrong way round!
I used to have an MG ZT diesel with the M47 engine.I've now got a BMW 335d, which uses the M57, which is very similar only with two more cylinders.
It's very weird working on an engine your used to, but where everything is rotated 90°. At least that way everything is more accessible!
I did a replacement on ours (actually I only replaced the carbon brushes inside, taken from a random BMW alternator kicking around - free repair!)
I took the front bumper and front panel off. That takes approx half an hour. Made is much, much easier. Getting the aux belt on is a 2-man operation that's for sure, as I had to hold the tensioner from underneath.
I took the front bumper and front panel off. That takes approx half an hour. Made is much, much easier. Getting the aux belt on is a 2-man operation that's for sure, as I had to hold the tensioner from underneath.
Well, when I say five hours, I mean, that includes 20 minutes looking for the locking wheel nut, 30 minutes staring with intent at the undertray, and, erm, quite a bit of muttering in the garage searching for the 24mm spanner.
More excuses available if required... !
But yes, a pig of a job , a Bavarian warthog if you will, and I don't want to donit again any time soon.
75 now ready for some post-lockdown trips and currently being loaded with items for the scrapyard.
More excuses available if required... !
But yes, a pig of a job , a Bavarian warthog if you will, and I don't want to donit again any time soon.
75 now ready for some post-lockdown trips and currently being loaded with items for the scrapyard.
jamesson said:
Christ, what a pain in the arse that looked. I'm no engineer, but surely there's a better way to design things so that replacement is less of a hassle than this.
Good work though and well done.
Yeah there is - have the engine the other way round.Good work though and well done.
On a BMW, the thermostat on the front at the right. Relatively easy.
On a 75/ZT, it's now right up at the back in the wind next to the bulkhead. Not so easy.
What a bizarrely interesting read! I don't particularly like Rovers but I applaud a) the resolve to keep it on the road and b) the want/ability to do as much as possible by yourself. Such a refreshing read vs "I have a Golf R on finance and here it is parked in a layby, here it is in a car park, here is the interior, here is....." you get the idea.
Thanks for the the comments! I can't begrudge people in forums posting pictures of fully working cars and discussing them, I just prefer getting my hands dirty on old vehicles!
What keeps me coming back to PH is the variety of cars and even approaches in just this sub-forum of Reader's Cars. I may always scoff at moderns SUVs or somebody spending four figures on new alloy wheels, but its good to see the full spectrum of the car community. Otherwise I would just be on the Rover 75 forums debating what shade of warm white LED bulb should go over a number plate!
Another year, another oil change on the 75 using the Pela pump - 164k, averaging about 7k a year at present so I suppose its enjoying a retirement of sorts.
36mm socket on the Stahlwille...

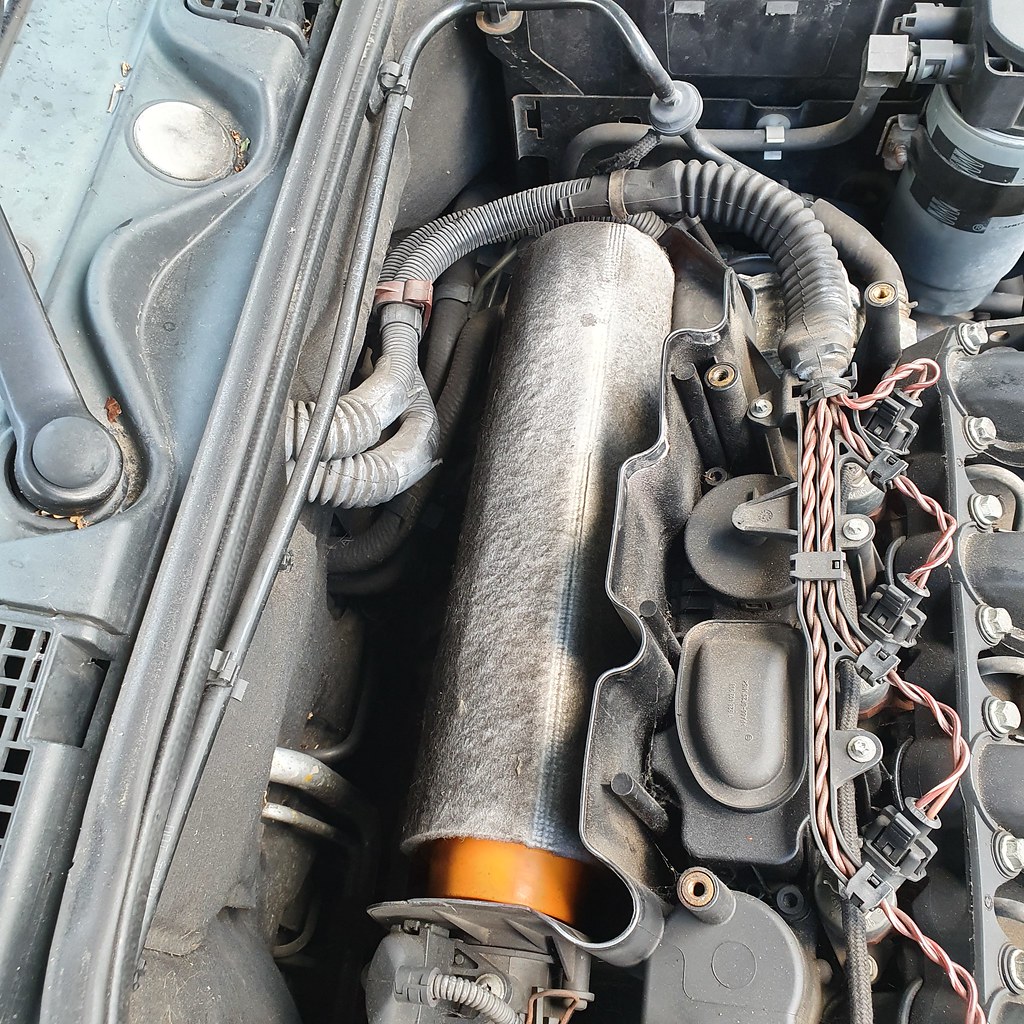
Engine cover off, vacuum pump down the dipstick tube:

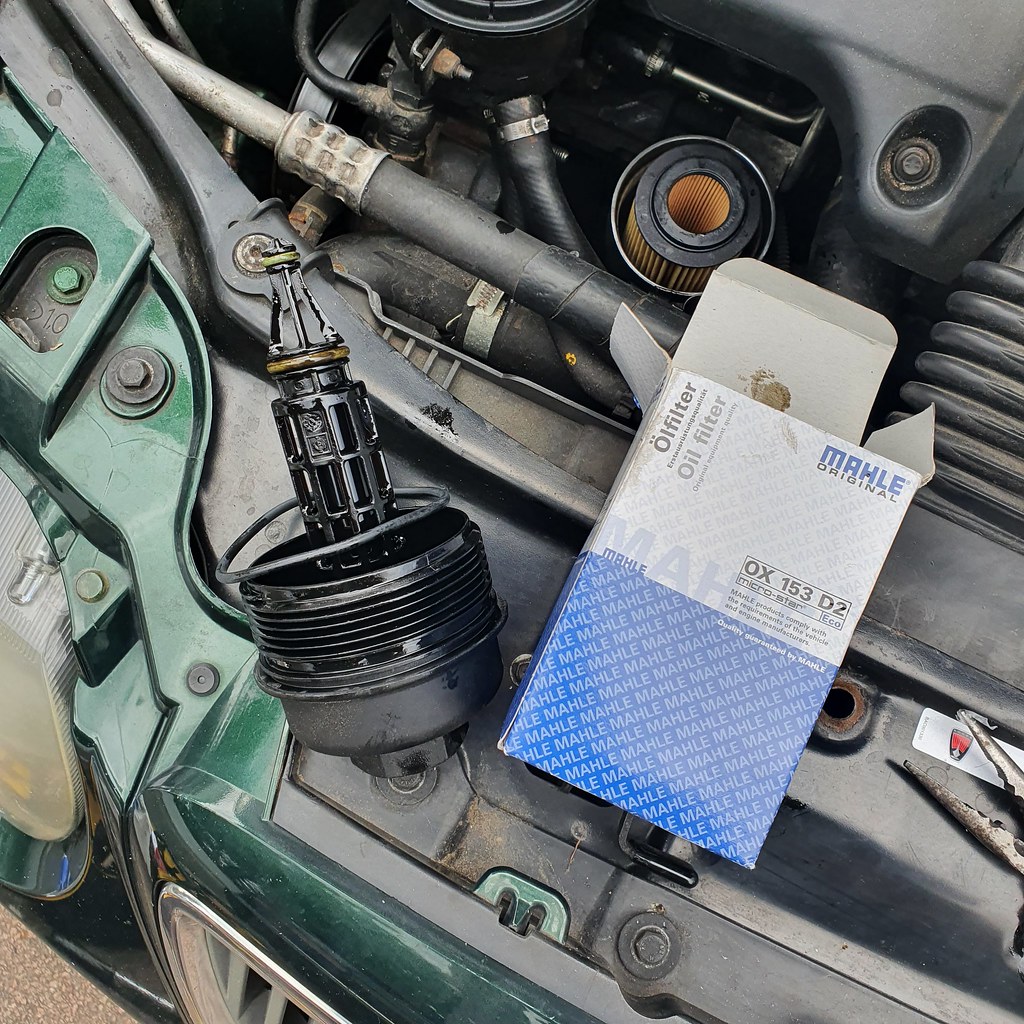
Once all that delightful sooty treacle had been extracted, 36mm socket on the oil filter housing and a quick change of the O rings on the housing. OX153D2 is the Mahle part number... comes wiht only the housing seal though!
Some lovely new Millers 10W40 down the hatch and its all set for another year of motoring, barring any catastrophes. In fact, the only thing currently on the 'Rover To Do List' is replace the slightly tatty driver's seat. Oh and the drop links! Forgot about those...
What keeps me coming back to PH is the variety of cars and even approaches in just this sub-forum of Reader's Cars. I may always scoff at moderns SUVs or somebody spending four figures on new alloy wheels, but its good to see the full spectrum of the car community. Otherwise I would just be on the Rover 75 forums debating what shade of warm white LED bulb should go over a number plate!
Another year, another oil change on the 75 using the Pela pump - 164k, averaging about 7k a year at present so I suppose its enjoying a retirement of sorts.
36mm socket on the Stahlwille...
Engine cover off, vacuum pump down the dipstick tube:
Once all that delightful sooty treacle had been extracted, 36mm socket on the oil filter housing and a quick change of the O rings on the housing. OX153D2 is the Mahle part number... comes wiht only the housing seal though!
Some lovely new Millers 10W40 down the hatch and its all set for another year of motoring, barring any catastrophes. In fact, the only thing currently on the 'Rover To Do List' is replace the slightly tatty driver's seat. Oh and the drop links! Forgot about those...
Gassing Station | Readers' Cars | Top of Page | What's New | My Stuff