Rover 75 CDTi Tourer
Discussion


As the 75 has continued heavy hauling duty during the latest stage of house renovation I decided to give it a bit of attention. Dipped headlight bulbs going will send a twitch of phantom pain through any 75 owner's nervous system - the H7s typically blow in pairs and have an access hatch housing sharp edges, myriad points to snap or cut the wires and the fingernails of previous attempts.
I decided that the 2 hours I had in the evening for the bulbs was more than sufficient, so added removal of the front bumper, replacement of foglights and a proper repair to the bent lower grill.
Foggy foglights no longer matched the new repeaters:

A decent smattering of 10mm bolts on top and the bumper edges, 6 rusty screws holding the lower undertrays off and the front bumper was free to move.

It slides straight forward and down, so I laid a few soft materials from my handy skip underneath and turned it upward to operate.
Foglights have three more rusty screws each and a plug connector, a two minute job to swap.

Obligatory old and new photo. I picked up a pair of used but unfogged examples for £12. If anyone needs the working old ones for postage only, send me a PM.

Both sets also had the original Osram bulbs in them - result!
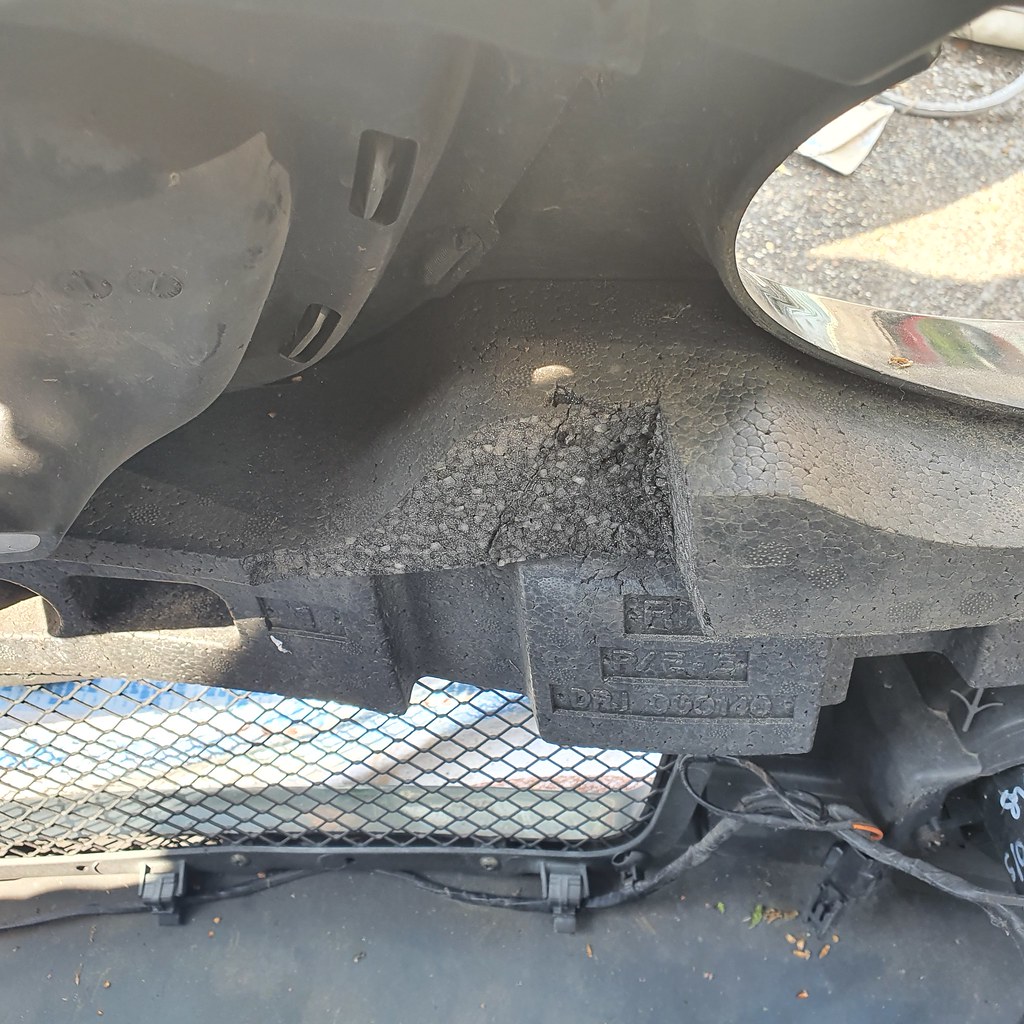
The grill has seen a pair bit of action over the years alongside the bumper itself. It appears to be the exact height of the average moron's tow bar.

A happy few minutes with pliers and various glues & sealants had it back in order. A wire brushing was followed by a few coats of stonechip to halt the rust and make it presentable.
While that sheet of tessalation dried I cleaned up the front end, removing sand, salt and the hard to reach gunk around the headlights.

Surely I also had time to wire brush the nooks that had some loose Crunchy Nut Oxide and Bilt Hamber them too? Of course I did. This extended to the rest of the front end as the bumper was off.

Grill dry and the best clips and screws salvaged & mated to some replacements from the darker crannies of the garage, plus some grease on the screw and bolts for next time. All done.

Getting dark now...I needed a light. Wait... that reminds me of the job I was going to start originally... the headlights! Ah. Yes. Well I'll spare you the details but there's two working H7s somewhat in and I have three less cuticles.
Ready for more tip runs and lopes across the country filled with stuff. Love this car. Needs a wash. Oh and an oil change.

I decided that the 2 hours I had in the evening for the bulbs was more than sufficient, so added removal of the front bumper, replacement of foglights and a proper repair to the bent lower grill.
Foggy foglights no longer matched the new repeaters:
A decent smattering of 10mm bolts on top and the bumper edges, 6 rusty screws holding the lower undertrays off and the front bumper was free to move.
It slides straight forward and down, so I laid a few soft materials from my handy skip underneath and turned it upward to operate.
Foglights have three more rusty screws each and a plug connector, a two minute job to swap.
Obligatory old and new photo. I picked up a pair of used but unfogged examples for £12. If anyone needs the working old ones for postage only, send me a PM.
Both sets also had the original Osram bulbs in them - result!
The grill has seen a pair bit of action over the years alongside the bumper itself. It appears to be the exact height of the average moron's tow bar.
A happy few minutes with pliers and various glues & sealants had it back in order. A wire brushing was followed by a few coats of stonechip to halt the rust and make it presentable.
While that sheet of tessalation dried I cleaned up the front end, removing sand, salt and the hard to reach gunk around the headlights.
Surely I also had time to wire brush the nooks that had some loose Crunchy Nut Oxide and Bilt Hamber them too? Of course I did. This extended to the rest of the front end as the bumper was off.
Grill dry and the best clips and screws salvaged & mated to some replacements from the darker crannies of the garage, plus some grease on the screw and bolts for next time. All done.
Getting dark now...I needed a light. Wait... that reminds me of the job I was going to start originally... the headlights! Ah. Yes. Well I'll spare you the details but there's two working H7s somewhat in and I have three less cuticles.
Ready for more tip runs and lopes across the country filled with stuff. Love this car. Needs a wash. Oh and an oil change.
Thanks - it's our stalwart companion of late - nice to have a car to count on when the others either have issues or aren't inspiring confidence! Another 300 miles this Easter lugging people, nonsense and nonsense people about. I completed the annual oil change using the pump again. It was parked out in the road and a trolley/stands was too much of a faff and too much time at the end of an Easter day. 6.5 litres out in short order, no mess and the filter changed from the top with the 34mm socket. Almost long enough for a cup of tea to go cold. Almost...

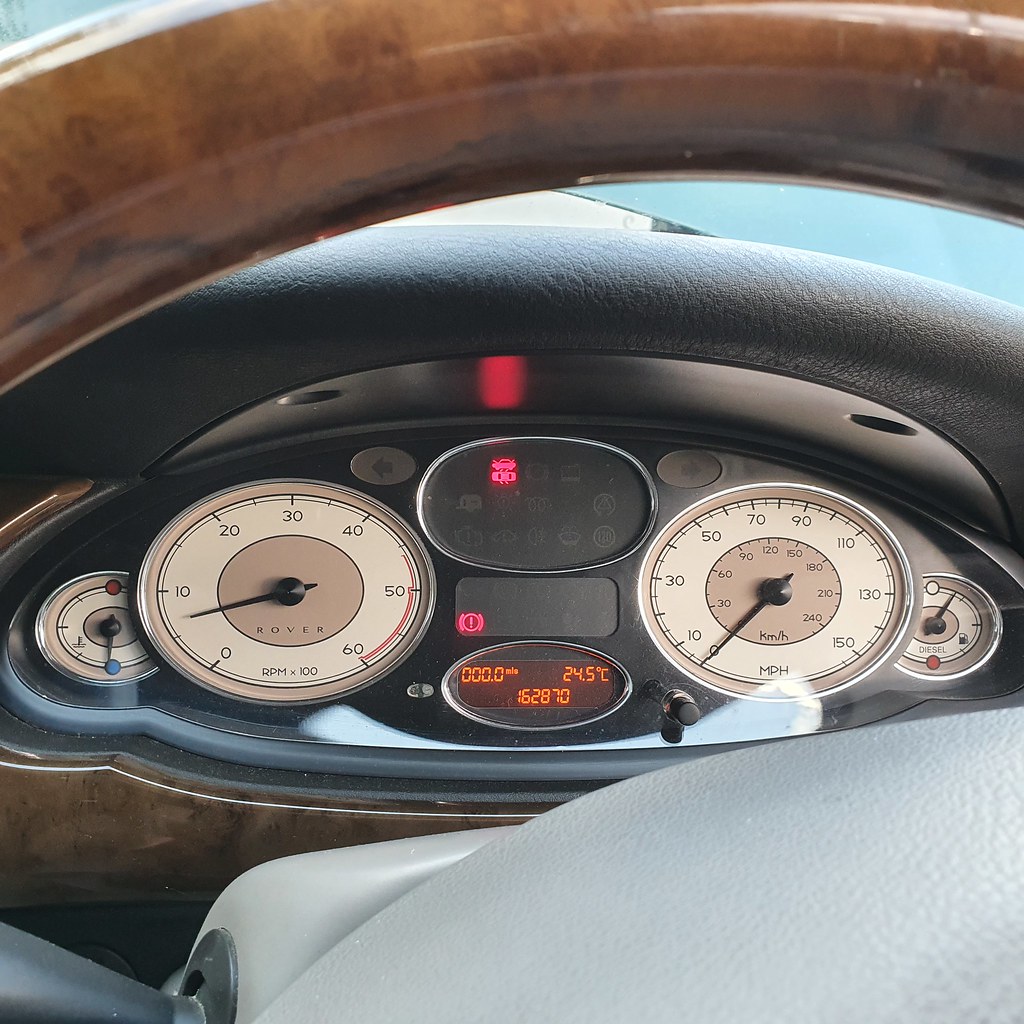
I then tried something new - resetting the oil service indicator on the dashboard - mine was was a significant negative number as it hadn't been reset the past few times, so I checked the forums, bent a paperclip and put it in to pins 4 and 8 (bottom row) when the key was turned to position II.

This took a few attempts, as it can't be left in - the two pins must be bridged only AFTER the key is turned and the time the Oil Service info pops up. All sorted now, and we're set for summer. Even the air con is working smoothly, though I think a full check of it when I'm next in Wales seeing Jules is in order as it's not as cold as I remember it. 'Air Con Needs A Regas', the advert will say.
Bad picture:

I then tried something new - resetting the oil service indicator on the dashboard - mine was was a significant negative number as it hadn't been reset the past few times, so I checked the forums, bent a paperclip and put it in to pins 4 and 8 (bottom row) when the key was turned to position II.
This took a few attempts, as it can't be left in - the two pins must be bridged only AFTER the key is turned and the time the Oil Service info pops up. All sorted now, and we're set for summer. Even the air con is working smoothly, though I think a full check of it when I'm next in Wales seeing Jules is in order as it's not as cold as I remember it. 'Air Con Needs A Regas', the advert will say.
Bad picture:
Time for an update on our stalwart 75 as I finally have something other than 'continues to tick off the miles' to report!
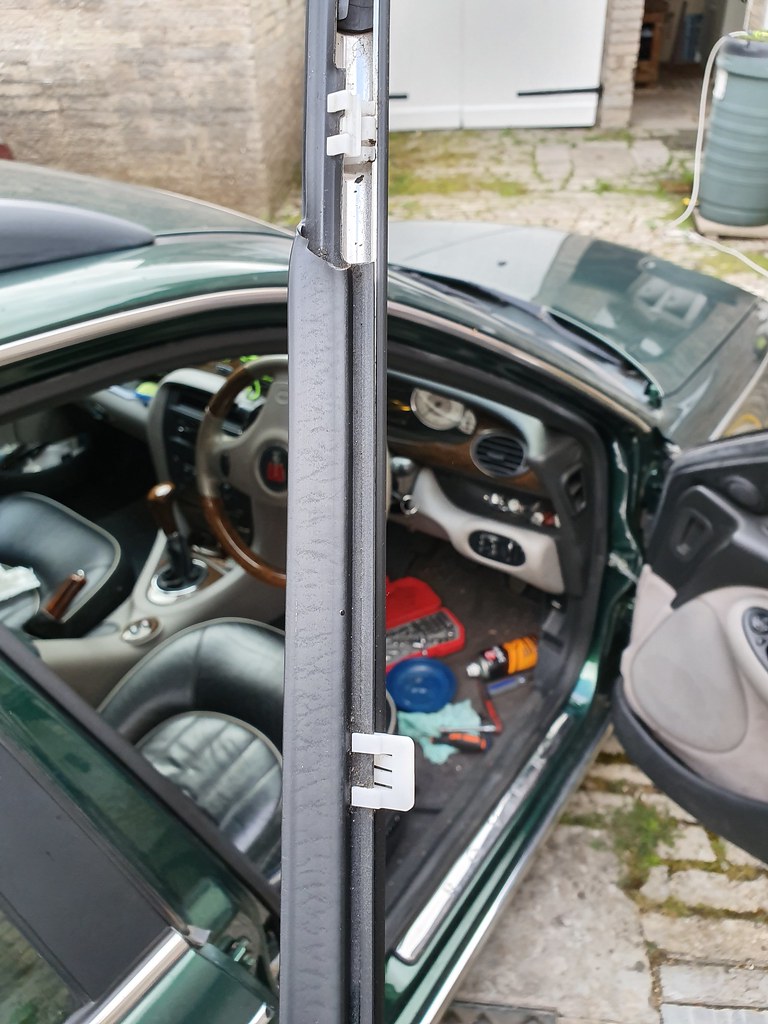
Stage... what are we up to? 4? Following the door replacement earlier in the year I hadn't got round to replacing the door card as I wanted to change the original door lock barrel over, and I hadn't changed the door lock barrel as I wanted to change the scratched driver's glass.
Following my haphazard disassembly of my old door I had a bag full of bits and no memory of the best method to attack the job. Giving up on similarly scratch used items, last month I finally conceded to Rimmer Bros and bought a new driver's glass from them. Given the number of small brittle plastics and panes of glass involved, I took the caboodle of components down to my parents and enlisted my diligent father to help out.
Donor door card, not a nice item to be sat next to, and in fact it had recently made a break for freedom from the door itself:

Bootful of tools and bits (and excessive bubble wrap):

Old sandstone trim came off with the usual door handle and front cavity screws, plus plenty of self immolating plastic clips.

A good study of the locking mechanism ensued. We looked at options for accessing just the barrel but they seem to be an integral unit, so we instead documented all the levels and attachments in situ to ensure we could get them all located. Parts numbers matched too.

After peeling back the door insulation and unhooking a few cables, I took the 10mm socket to the two window clamps, access holes courtesy of Rover at specific heights, parent at the top supporting the glass.
Once released, the glass can be removed at this angle, documented for re-installation:

The door handle removal is fiddly. There is a clip that looks like bent paperclip end at the rear of the handle that is pulled towards the rear of the car. Access is possible with a slim variety of tools, but I removed the external window scraper for better access, as that external seal is the culprit for all scratches and I wanted to clean it thoroughly.
That clip allows this lock cover to be removed:
Two torx screws and careful trim removal later and the handle was free!

There are two lock connectors - a bent metal rod that goes into a socket with a plastic collar support, common on a lot of cars, and short metal rod that looks like a medieval mace at both ends, and it not glued in at all. It is in the bottom right of this photo, and should not be lost under any circumstances - it is loose as standard and can become a 'door rattle' with little effort.

With two pairs of hands it was straightforward aligning the new/old lock and fixing it in place:

My dad had a wonderful pot of vintage bearing grease for lubrication and protection of the components!

New door glass gingerly unpacked and inserted...


The clamps were secured, and complete set of plastic clips assembled from all the spares amassed from the four doors that have been out and on in past few months - nice, tight fit for the old door card.

One final task - clean up the weatherstrip to prevent future scratches. I cleaned off the remains of the old, dry foamy fur and gave it a good coat of silicone. I also selected the toughest looking clips for securing it back, as they too commonly break.

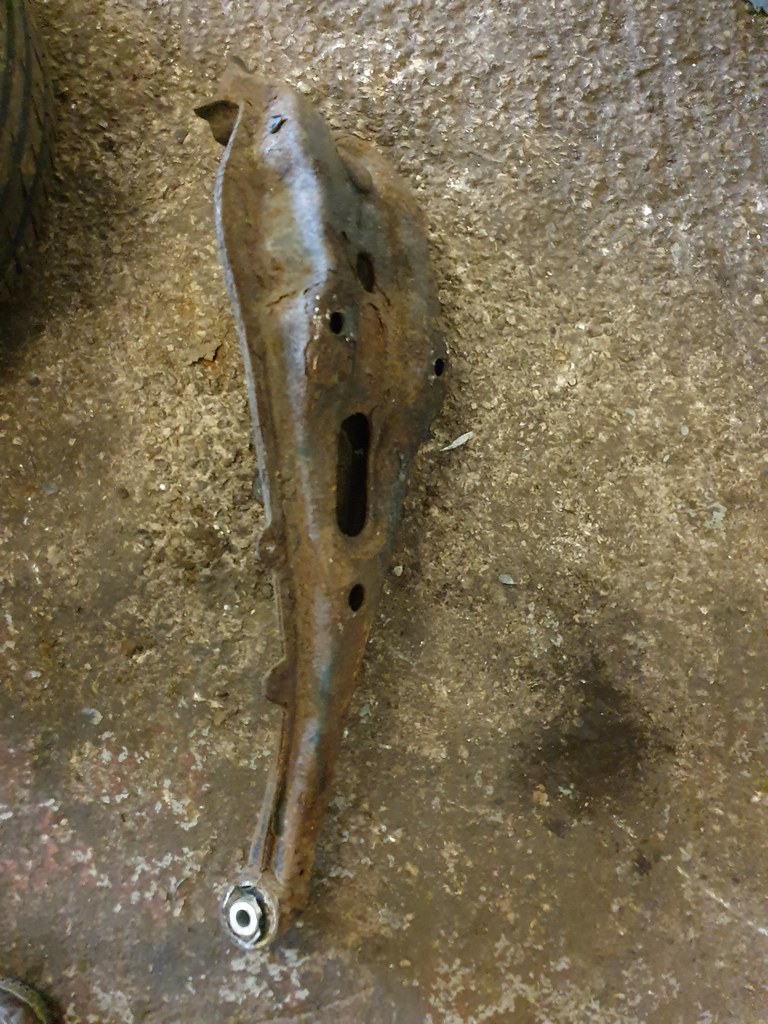
Done! A quick test of the lock mechanism and we're all set - no more jobs on the horizon for the 75, but I probably should replace that rusty fuel tank strap.
And the front brake discs look a little worn.
And the rear arms a bit cruddy.
And it needs a waxoyl.
And... (fade to the sounds of the M47 dag-dagging its way to another few thousand miles)
Stage... what are we up to? 4? Following the door replacement earlier in the year I hadn't got round to replacing the door card as I wanted to change the original door lock barrel over, and I hadn't changed the door lock barrel as I wanted to change the scratched driver's glass.
Following my haphazard disassembly of my old door I had a bag full of bits and no memory of the best method to attack the job. Giving up on similarly scratch used items, last month I finally conceded to Rimmer Bros and bought a new driver's glass from them. Given the number of small brittle plastics and panes of glass involved, I took the caboodle of components down to my parents and enlisted my diligent father to help out.
Donor door card, not a nice item to be sat next to, and in fact it had recently made a break for freedom from the door itself:
Bootful of tools and bits (and excessive bubble wrap):
Old sandstone trim came off with the usual door handle and front cavity screws, plus plenty of self immolating plastic clips.
A good study of the locking mechanism ensued. We looked at options for accessing just the barrel but they seem to be an integral unit, so we instead documented all the levels and attachments in situ to ensure we could get them all located. Parts numbers matched too.
After peeling back the door insulation and unhooking a few cables, I took the 10mm socket to the two window clamps, access holes courtesy of Rover at specific heights, parent at the top supporting the glass.
Once released, the glass can be removed at this angle, documented for re-installation:
The door handle removal is fiddly. There is a clip that looks like bent paperclip end at the rear of the handle that is pulled towards the rear of the car. Access is possible with a slim variety of tools, but I removed the external window scraper for better access, as that external seal is the culprit for all scratches and I wanted to clean it thoroughly.
That clip allows this lock cover to be removed:
Two torx screws and careful trim removal later and the handle was free!
There are two lock connectors - a bent metal rod that goes into a socket with a plastic collar support, common on a lot of cars, and short metal rod that looks like a medieval mace at both ends, and it not glued in at all. It is in the bottom right of this photo, and should not be lost under any circumstances - it is loose as standard and can become a 'door rattle' with little effort.
With two pairs of hands it was straightforward aligning the new/old lock and fixing it in place:
My dad had a wonderful pot of vintage bearing grease for lubrication and protection of the components!
New door glass gingerly unpacked and inserted...
The clamps were secured, and complete set of plastic clips assembled from all the spares amassed from the four doors that have been out and on in past few months - nice, tight fit for the old door card.
One final task - clean up the weatherstrip to prevent future scratches. I cleaned off the remains of the old, dry foamy fur and gave it a good coat of silicone. I also selected the toughest looking clips for securing it back, as they too commonly break.
Done! A quick test of the lock mechanism and we're all set - no more jobs on the horizon for the 75, but I probably should replace that rusty fuel tank strap.
And the front brake discs look a little worn.
And the rear arms a bit cruddy.
And it needs a waxoyl.
And... (fade to the sounds of the M47 dag-dagging its way to another few thousand miles)
I will be all Bilt Hamber - nothing but their range of products so far on this car to keep the rust at bay!
The original CD player gave up a few months ago, though the FM was still functional so I didn't want to give it any hint of attention.
My neighbour then dropped by with Sony CD head unit, said I could have it as he was scrapping a car - it pays to have helped him out over the years fixing his car!

With this healthy dose of 'car'ma I completed the swap over, a simple job.
Undo two screws at the fake wood 'hat at the top of the console:

This reveals two further screws at the top that can be removed:

The whole of the console surround can then be manhandled out:

Plugs diconnected as plenty of slack:

Grey and brown plugs go straight back in, the green/blue/yellow items are for the steering unit and can't be replaced without some rewiring. Oh well.
After taking the units inside for the night as it was dark, I spent a good 15 minutes look for my car keys. I retraced my steps and looked in every nook and cranny with my torch, no key. Nothing. Turns out the torch base has a stronger magnet than I thought...

Units inside, the fascia outer clips off - you can see the clips here on the top left.

A good 10 minutes carefully bending the two stereo cages to swap them over and get the new item seated securely at the right depth...


...and there we go. Not pictured - two days of driving around with the stero out while I waited for a aerial ISO to DIN adapter to arrive for £1.69.
Luckily it's not a Close Encounters Of The Third Kind stereo and most beeps and graphics can be turned off. All working well, and the red light not-quite-but-sort-of matches the orange used by Rover for night illumination.

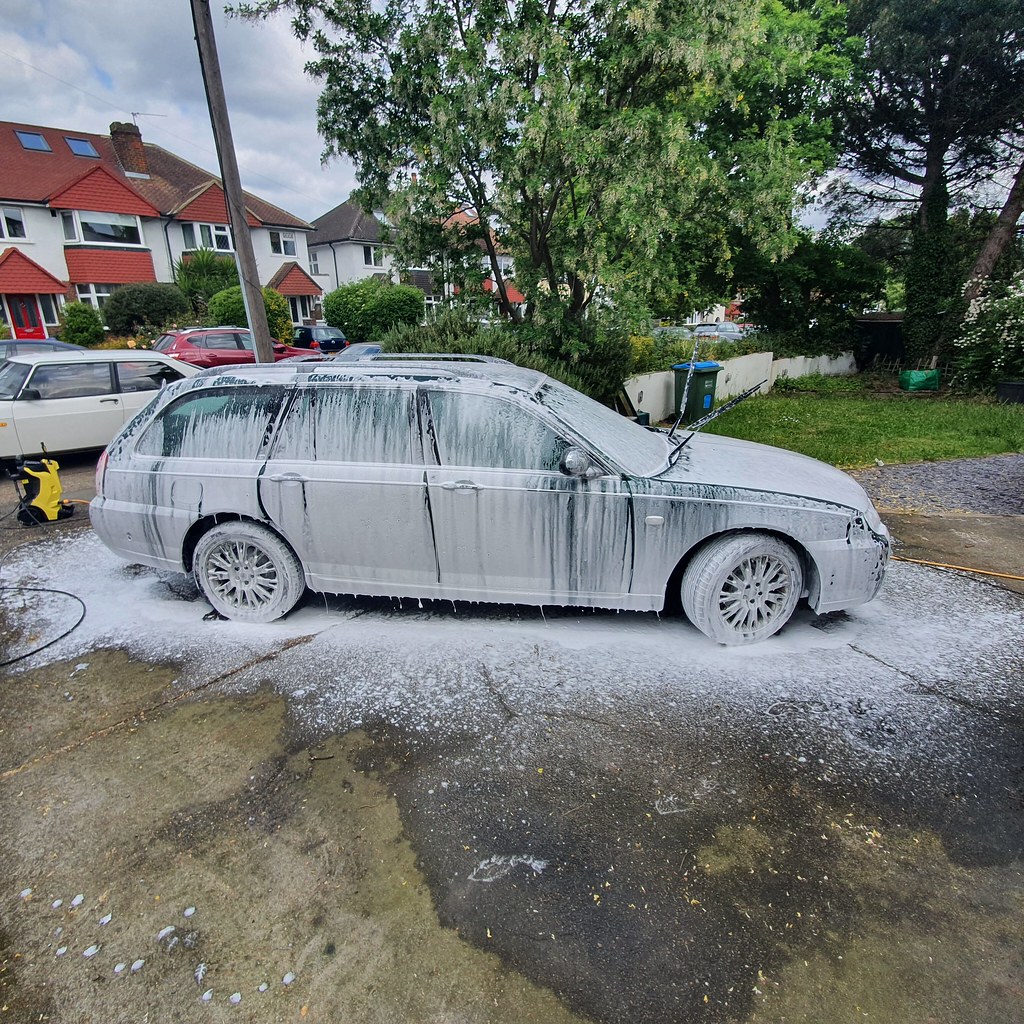
Time to give it a good clean as I have a new pressure washer and the relentless 30 degree baking weekends seem to have abated.

The original CD player gave up a few months ago, though the FM was still functional so I didn't want to give it any hint of attention.
My neighbour then dropped by with Sony CD head unit, said I could have it as he was scrapping a car - it pays to have helped him out over the years fixing his car!
With this healthy dose of 'car'ma I completed the swap over, a simple job.
Undo two screws at the fake wood 'hat at the top of the console:
This reveals two further screws at the top that can be removed:
The whole of the console surround can then be manhandled out:
Plugs diconnected as plenty of slack:
Grey and brown plugs go straight back in, the green/blue/yellow items are for the steering unit and can't be replaced without some rewiring. Oh well.
After taking the units inside for the night as it was dark, I spent a good 15 minutes look for my car keys. I retraced my steps and looked in every nook and cranny with my torch, no key. Nothing. Turns out the torch base has a stronger magnet than I thought...
Units inside, the fascia outer clips off - you can see the clips here on the top left.
A good 10 minutes carefully bending the two stereo cages to swap them over and get the new item seated securely at the right depth...
...and there we go. Not pictured - two days of driving around with the stero out while I waited for a aerial ISO to DIN adapter to arrive for £1.69.
Luckily it's not a Close Encounters Of The Third Kind stereo and most beeps and graphics can be turned off. All working well, and the red light not-quite-but-sort-of matches the orange used by Rover for night illumination.
Time to give it a good clean as I have a new pressure washer and the relentless 30 degree baking weekends seem to have abated.
Good to hear! Just spoke to him this morning to organise a trip up in the coming month - slightly crusty fuel tank strap and rear suspension mounts to be replaced.


He'll be delighted when I also turn up with jars of rustproofing, brushes and POR15 to coat stuff in on his workshop floor, I'm sure of it.
The 75 continues to shift things around the planet without much of a worry, and cruise long distances in those armchairs with a minimum of diesel.

Unfortunately at the last dump run some clot demonstrated their complete lack of spacial awareness and took out the NSR light, one that I had spent a fair amount of swearwords mounting, as you may recall, from the breaker car. The hit took out all the screw holes and clip mounts, so I had to improvise a few repairs with nuts, screws and nearby solvents. It's back in place but very annoying after sourcing this perfect set of rare rears!


It needs a clean, as always, and some more rustproofing before the winter proper. I'm going to run it until this silly ULEZ expansion comes in and we may be forced to let it go.
He'll be delighted when I also turn up with jars of rustproofing, brushes and POR15 to coat stuff in on his workshop floor, I'm sure of it.
The 75 continues to shift things around the planet without much of a worry, and cruise long distances in those armchairs with a minimum of diesel.
Unfortunately at the last dump run some clot demonstrated their complete lack of spacial awareness and took out the NSR light, one that I had spent a fair amount of swearwords mounting, as you may recall, from the breaker car. The hit took out all the screw holes and clip mounts, so I had to improvise a few repairs with nuts, screws and nearby solvents. It's back in place but very annoying after sourcing this perfect set of rare rears!
It needs a clean, as always, and some more rustproofing before the winter proper. I'm going to run it until this silly ULEZ expansion comes in and we may be forced to let it go.
Muddle238 said:
I can't work out how to send the link to the steering wheel dye kit, however if you search eBay for "Rover 75 Steering Dye" it'll make itself known.
I found it - thanks! Ours isn't so bad, maybe one for next year...alex98uk said:
Have read through this thread whilst having a beer and waiting for a train.
Thoroughly enjoyed it and I'm happy that a piece of British automotive history is kept on the road! I've always had this strange desire to own a Rover, but been a bit scared on the unknown and now generally unsupported.
Anyway, have subscribed and keep up the good work.
Cheers - the 75 is probably one of the most-supported modernish cars out there. It seemed to inspire fanaticism when still in production and it has not abated, with plenty of clubs, spare parts and aftermarket fixes abound in the UK. You can't go too far wrong with these if you know the top items to look for, and maintenance, as you can see, is relatively painless even in amateur hands.Thoroughly enjoyed it and I'm happy that a piece of British automotive history is kept on the road! I've always had this strange desire to own a Rover, but been a bit scared on the unknown and now generally unsupported.
Anyway, have subscribed and keep up the good work.
mercedeslimos said:
I've kept one going for my parents for 3 years now. Parts are surprisingly easy to come by. Some can be pricey but not to BMW or Audi standards. Just got a bit welded and a track rod end and a pair of drop links for twenty quid. That's the next years test sorted.
Good stuff, always happy to hear of another 75 going for another year (at least).I've got some time booked with Jules now in a few weeks, and I'm aiming to source a ZTT electric/heated interior if at all possible in time... If anyone spots one for a non-fantasy price, please let me know!
The 75 continues to be unfazed by weather and is mercifully unaware of the ULEZ in 2021, so its time for the quarterly healthcheck.

As any British motorist this time of year will tell you, a quarter of all 'car time' is spent making faces while pulling rotten leaves out of scuttles and drainage runs.

Small top up to the OAT, but nothing like the previous loss. New cap seems to be holding well.

One of my 75 paranoia points - the power steering reservoir, placed precariously above the alternator. A small misting of oil wiped away, level spot on (after 5 years, I probably need to flush it...). Gentle jubilee clip tightening continues around the engine bay.

This webbing on the bottom of the radiator came away. No idea what it is for, but not vital.

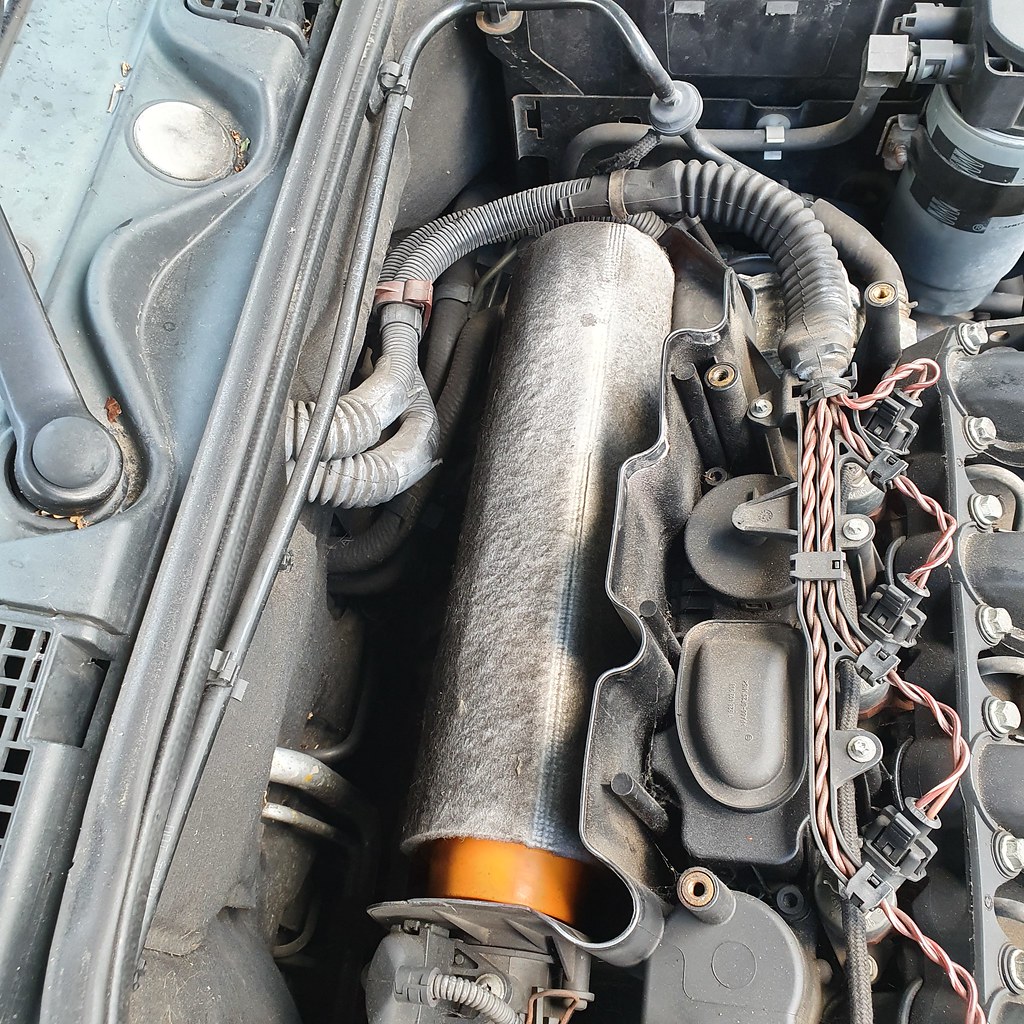
These turbo pipes look a bit...brown...

Underneath it is worse - a light misting of oil as it turns out (see finger marks from me jabbing it). No holes or rips, no issues with the Viton seals. A good clean up with rags and a few more gentle turns on various clips. To be monitored.

Checks underneath were uneventful, I just bent some of the heatshields into new shapes to ward of some occasional rattling. There's a black mark by the front hanger but I can't see if anything is blowing. To be checked.
The BiltHamber shipment has arrived, jamjar lids taken from the recycling, wire brushes ordered and various protective gear sourced.
We're ready for the rustproofing adventure!
As any British motorist this time of year will tell you, a quarter of all 'car time' is spent making faces while pulling rotten leaves out of scuttles and drainage runs.
Small top up to the OAT, but nothing like the previous loss. New cap seems to be holding well.
One of my 75 paranoia points - the power steering reservoir, placed precariously above the alternator. A small misting of oil wiped away, level spot on (after 5 years, I probably need to flush it...). Gentle jubilee clip tightening continues around the engine bay.
This webbing on the bottom of the radiator came away. No idea what it is for, but not vital.
These turbo pipes look a bit...brown...
Underneath it is worse - a light misting of oil as it turns out (see finger marks from me jabbing it). No holes or rips, no issues with the Viton seals. A good clean up with rags and a few more gentle turns on various clips. To be monitored.
Checks underneath were uneventful, I just bent some of the heatshields into new shapes to ward of some occasional rattling. There's a black mark by the front hanger but I can't see if anything is blowing. To be checked.
The BiltHamber shipment has arrived, jamjar lids taken from the recycling, wire brushes ordered and various protective gear sourced.
We're ready for the rustproofing adventure!

"This herd of Rovers are grazing peacefully, undisturbed by lone breakdown trucks or looming emissions regulations. A Rover 75 is not yet on an endangered species list, though in recent years their number have dropped alarmingly. For those herders that make it their expertise, a 75 in captivity can be a dependable beast, often living happily for many thousands of miles."
One of my favourite trips of the year - the pilgrimage to Colwyn Bay to see Jules, the Rover 75 guru and ensure our trusty Tourer is fit for another year.
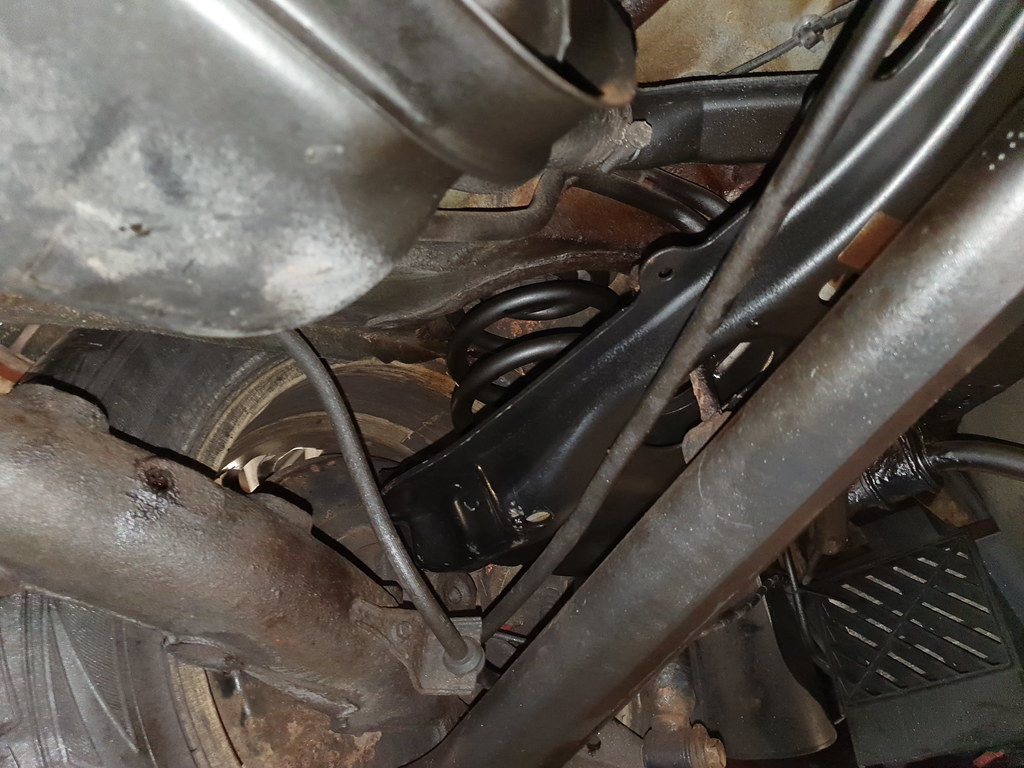
This year I had two days booked with him, replacing the rear upper arms and derusting/rustproofing the underneath of the car. Usually some other items are uncovered and we run out of time, so I'm keen to get there early.
This meant an 05:00 start to beat the M6 rush hour, and a good long drive is always a pleasure in the 75. Cruise control on, nothing on the roads after the M25 and some CDs dusted off for the dawn run. After Birmingham I can relax, and take the slightly more scenic A41 and surrounding roads.
Around 08:00 I made it to Whitchurch for breakfast, and a good sharp coffee.
A short while later I rolled into Colwyn Bay, seemingly at the right specialist.

Mornign coffee with Jules, two genuine rear upper arms and a fuel tank strap loaded from the spares department:

4.5 hours of December driving yields quite a salt haul on a Rover:

I was very happy to see the old Polo that transported my exhaust (see page 1 of this thread) still running for the garage!

Jules and I have form on the front section, but for the rears the space around the lift and the toolset & expertise meant a much quicker job - fortunately no seizes bolts (I treated them with penetrating fluid for a few days before the trip, so I'll say I loosened them).

Everything came apart much quicker than expected, and the new arms slotted right in. Jules swears by genuine Rover parts only for these - still available from him!

Last year I noticed the cruddiness of the arms and prodded a small hole in one with a screwdriver. Both were about to crumble, so I'm happy to have caught this in time...

The fuel tank strap was similarly compliant having seen the fate of its neighbours, and the new part slotted right in again, just a bit of nudging to get holes to line up.


It was now midday on day 1. This was almost going too well!
Next stop - another ramp. Please hold while I don various items of protective clothing.
Goggles - check.
Extra thick gloves - check.
Disposable footwear - check.
Disposable hat - check.
Facemask - check.
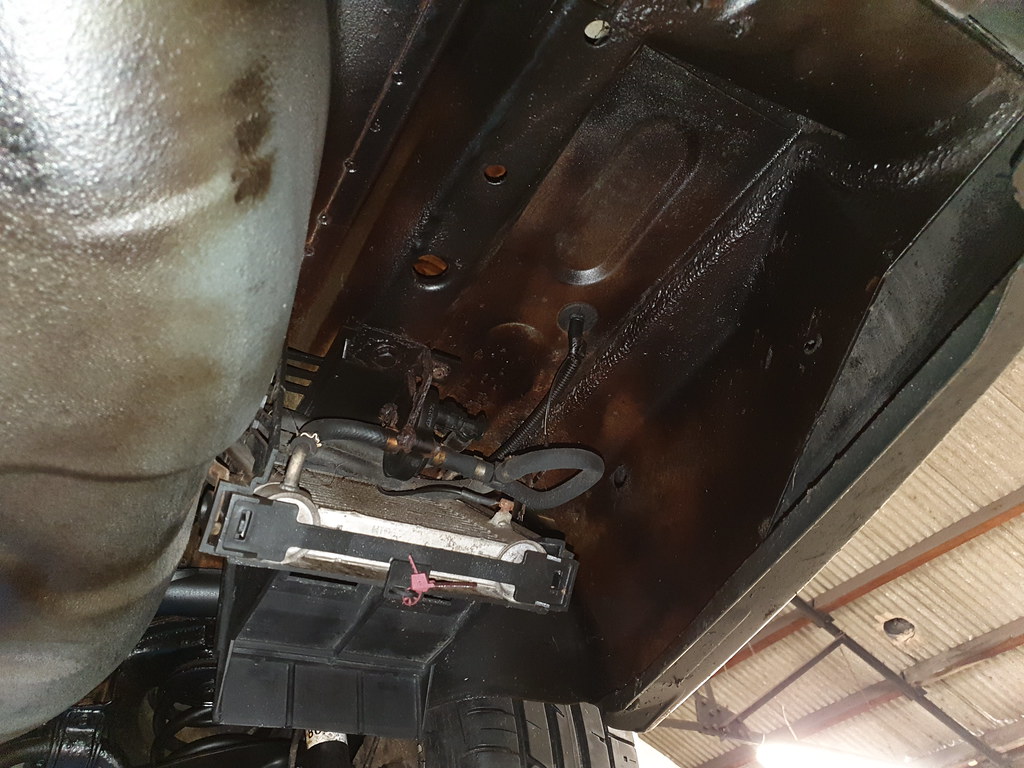
With the 75 up on a ramp I could get down to the long-awaited rustproofing. Despite it looking miserable in a few places, there were no alarming disintegrations and no other suspension, braking or moving parts that needed replacement (yet).
From rear to front - before cleaning, desalinisation and wire brushing. Note the rear bumper bracket that must have suffered a kerb somewhere:


Rearmost heatshield missing, jamjar lids still in place as repair washers for the front heatshield. Meh. No exhaust blows - looks liek the black mark was just a bit of rubber from the mounts as they go through heat cycles.
Surfaces prepared, loose flakes saved for sprinkling on cereal the next day:


I honestly thought there would be more on the tarp than this.

First up - cavity wax, S50 from Bilt Hamber x3. They come with an excellent lance for spraying in a circle, and are very easy to use.


..and finally, as beer and dinner begins to call, four cans of Dynax UB to make the underside look like the biggest nicotine stain in history.


Done. It was now late, and I was exhausted, so carefully peeled off the layers, binned the cans and anything covered in sticky nastiness and threw away the old tarp.
I know I didn't do a full steam clean, zinc bath, nano-protective coating process - but for my budget and as a learning experience for a few hours I'm happy. Hopefully it'll keep the worst of the corrosion at bay.
Just time for a few beers near Conwy castle before bed.
Extra thick gloves - check.
Disposable footwear - check.
Disposable hat - check.
Facemask - check.
With the 75 up on a ramp I could get down to the long-awaited rustproofing. Despite it looking miserable in a few places, there were no alarming disintegrations and no other suspension, braking or moving parts that needed replacement (yet).
From rear to front - before cleaning, desalinisation and wire brushing. Note the rear bumper bracket that must have suffered a kerb somewhere:
Rearmost heatshield missing, jamjar lids still in place as repair washers for the front heatshield. Meh. No exhaust blows - looks liek the black mark was just a bit of rubber from the mounts as they go through heat cycles.
Surfaces prepared, loose flakes saved for sprinkling on cereal the next day:
I honestly thought there would be more on the tarp than this.
First up - cavity wax, S50 from Bilt Hamber x3. They come with an excellent lance for spraying in a circle, and are very easy to use.
..and finally, as beer and dinner begins to call, four cans of Dynax UB to make the underside look like the biggest nicotine stain in history.
Done. It was now late, and I was exhausted, so carefully peeled off the layers, binned the cans and anything covered in sticky nastiness and threw away the old tarp.
I know I didn't do a full steam clean, zinc bath, nano-protective coating process - but for my budget and as a learning experience for a few hours I'm happy. Hopefully it'll keep the worst of the corrosion at bay.
Just time for a few beers near Conwy castle before bed.
Final day, and ahead of schedule, as no extra parts had been needed (not even a nut or bolt), I purchased a used undertray from Jules as further efforts to protect the underside of the 75. I had a cheap copy version before and it was a disaster, so I was happy to spend a few minutes cleaning and prepping a genuine article, with Jules' well-trodden improved fitment technique.


Well, that all tied up a bit earlier than expected - no other issues on the 75, a thumbs up from the guru and I was on my way.
A scant 5 hours later I made it to Somerset to see the parents, and the 75 managed just under 50 mpg with a light foot and cruise control. That marks another year of happy 75 ownership, and there's plenty for it to lug around this winter.

The only item outstanding is a set of replacement sport seats, as having sat in various examples in Wales they really are more comfortable, and the heater has given out on the driver's side of ours.
As always, great to stretch the Rover's legs a bit, get out of London and get my hands dirty. That'll set me up for the onslaught of the festive season...
Well, that all tied up a bit earlier than expected - no other issues on the 75, a thumbs up from the guru and I was on my way.
A scant 5 hours later I made it to Somerset to see the parents, and the 75 managed just under 50 mpg with a light foot and cruise control. That marks another year of happy 75 ownership, and there's plenty for it to lug around this winter.
The only item outstanding is a set of replacement sport seats, as having sat in various examples in Wales they really are more comfortable, and the heater has given out on the driver's side of ours.
As always, great to stretch the Rover's legs a bit, get out of London and get my hands dirty. That'll set me up for the onslaught of the festive season...
Edited by Spinakerr on Saturday 14th December 14:33
Gosh time flies when a car is behaving, and a lockdown keeps it stationary!

Before the lockdown the 75 was used for two longer distance loads - a treasure trove of Saab 900 parts:

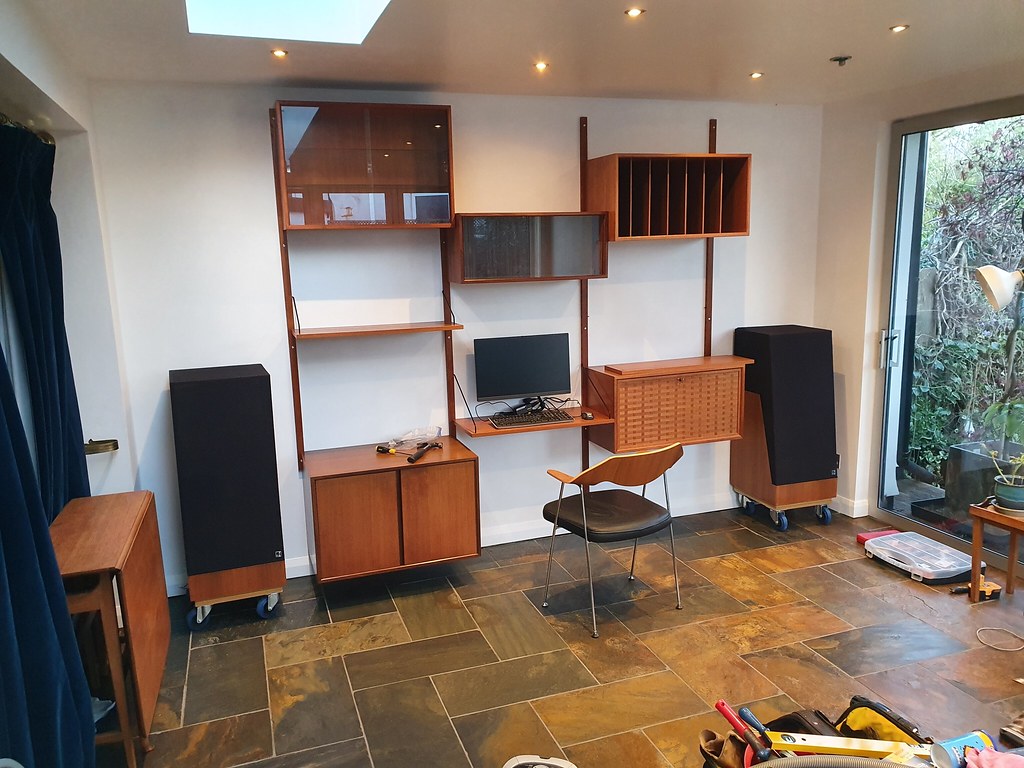
...and a journey up to the midlands to bring back a large 1950s Poul Cadovius shelving system for the house.


I was extremely happy to have picked that little lot up in Feb, as when the lockdown took effect I needed a proper home setup with daylight to stay sane!
It was on the return form the furniture trip that I has a very close run-in with another car, a giant BMW that decided to slow down and turn into my (inside) lane without indication or checking his mirrors on the outskirts of Birmingham. I jabbed the horn and the brakes in equal measure, and avoided contact (just!). At the next lights I had to have a quick word (my heard had skipped a beat, and most of the shelving had moved a few inches forward), and the glassey eyed simpleton had the temerity to say they hadn't 'heard your horn'. A quick explanation of mirrors and deconstruction of a driving style that relies on noises from other road users followed.
It stuck with me, even though I checked my camera footage to check I hadn't made any error, and remembered that the later 75s only had a single horn. The 75 ismuch quieter than any other car I've had, a low mooing you could say.
So, out of curiosity I tracked down a pre-Project Drive twin horn set with loom.

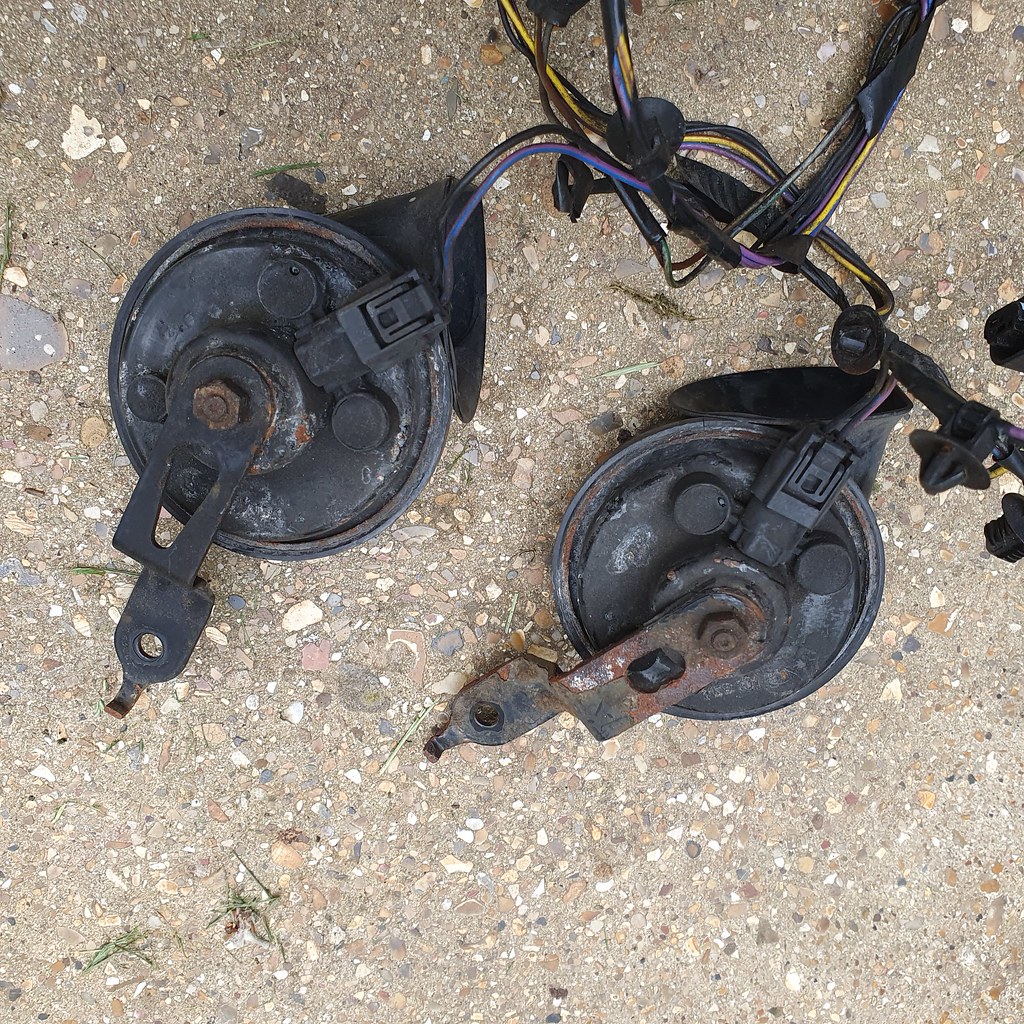
I gave it a quick spruce up and de-rust, adressing a few rubbed wires.

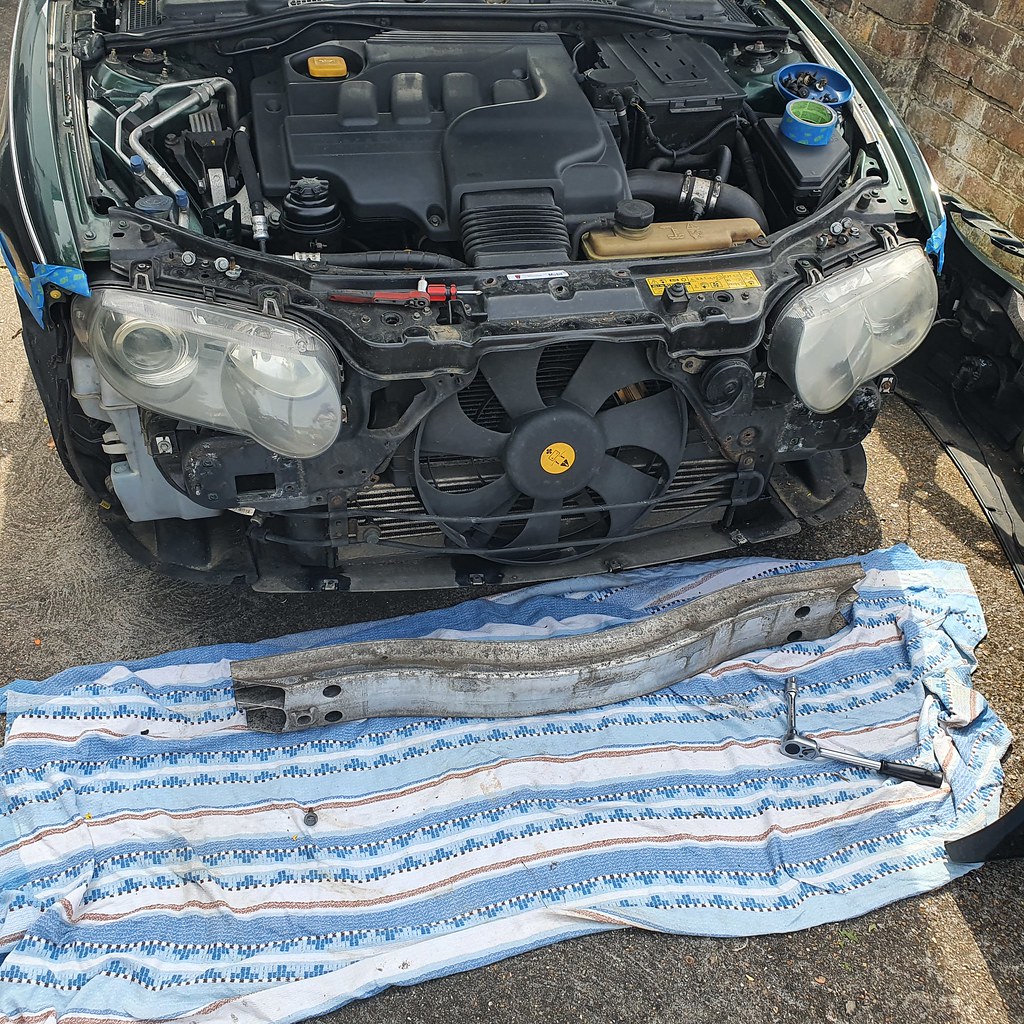
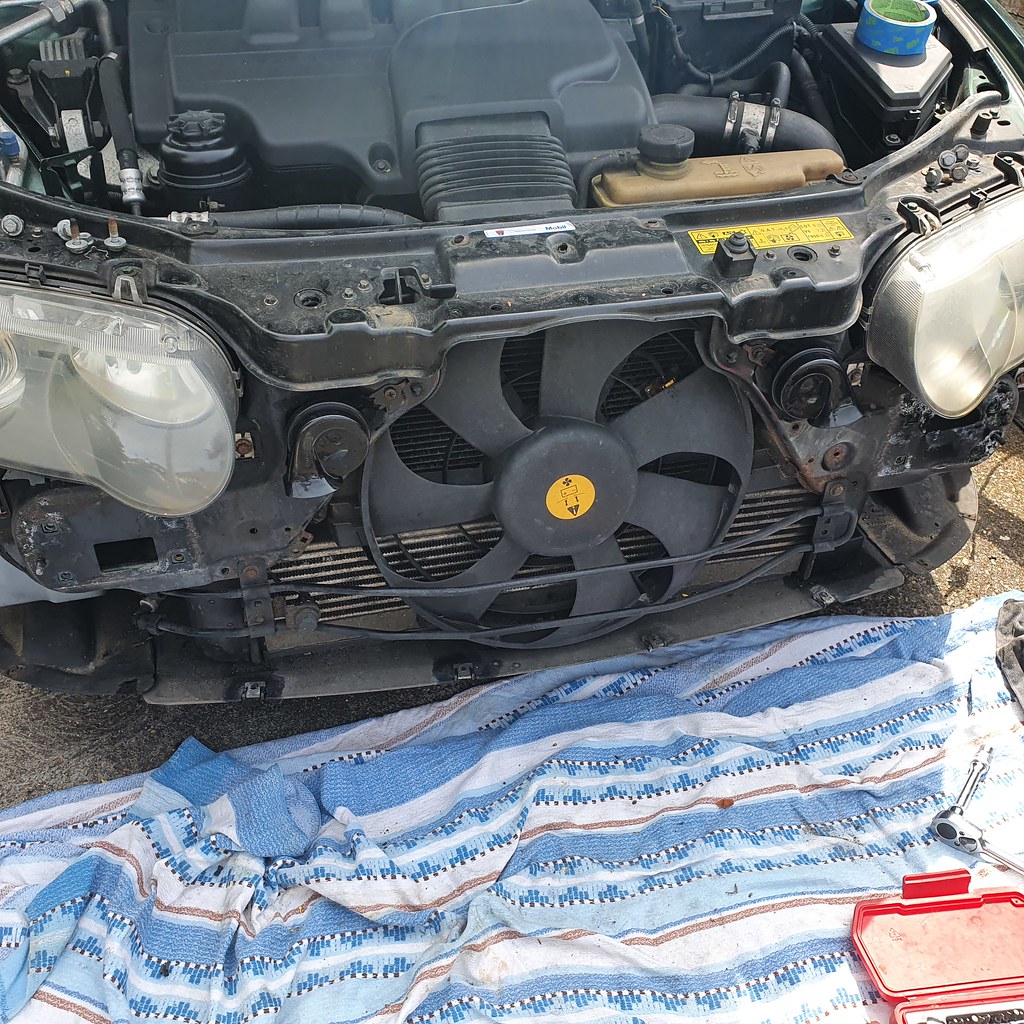
Today weather and time window was secured, and I began the laborious process of removing the front bumper, crash bar and original loom. The front grill hadn't fared well from my original stonechip coating, so I took the opportunity to freshen it up and finally tidy away the front sensor that was always in view, taunting me. I was also keen to use my new Stahlwille socket set:

From previous experience, a layer of masking tape protects the wings from scratches when putting it back on.


Quite a few 10mm bolts along the top, 1 in each bumper wing join, and 11 screws to the bottom and undertray.


Then 10 13mm bolts for the crash bar, and you can see the single cowhorn on the right.
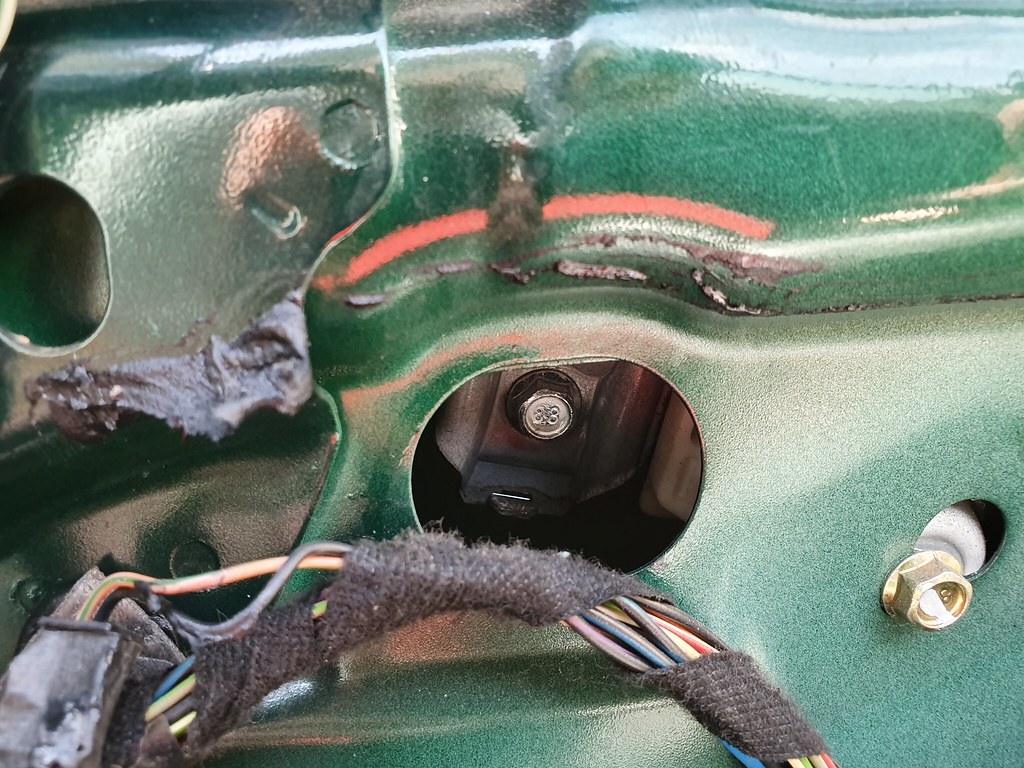
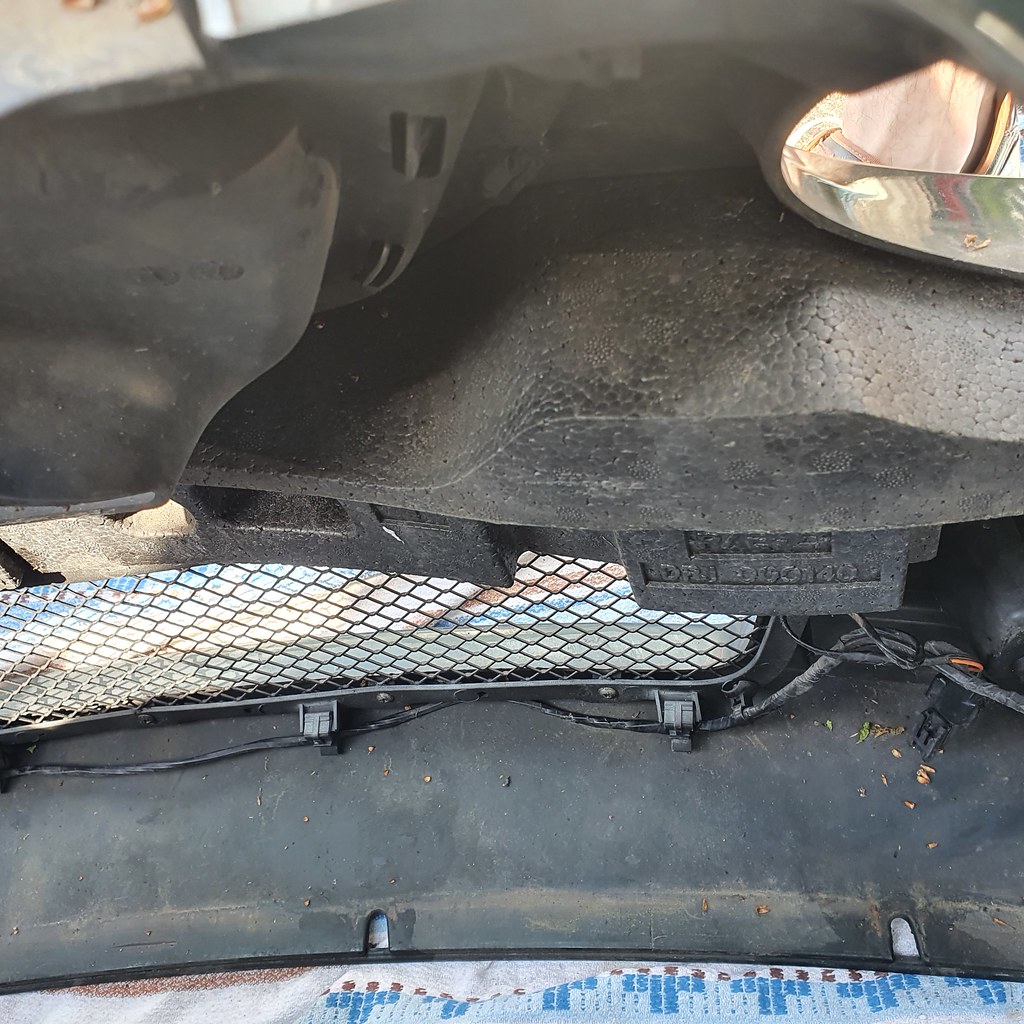
Next up was the tricky removal and reinstallation of the wiring loom. This doesn't just power the horns, but has a front numper crash sensor and a bonnet latch sensor (I think, and is fitted with myriad clips behind all sorts of gubbins.


Main connector is by the screenwash reservoir on the driver's side.


The loom goes around the back of the slam panel and I lost a few fingernail edges to this process.

An hour later, two welcome horn connectors are now visible!

Two 8mm bolts later, and yes a quick test made me smile as the nearby cats really bolted! No one's going to ignore that horn again! This is a heard of angry caribou, at the very least.
Grill had some primer and paint layers through the process, reinstalled.

I remounted the bumper and thought I was all done, but nothing quite 'went back' correctly. Some squeaks were hear, and I inspected the area by the new horn. Sure enough, a section of foam needed to be cut out to accommodate the new addition! Hadn't heard of that one before. Few quick cuts later and it all went back snugly.

I also gave the headlights a quick autosol polish while they were fully accessible. Much better! Time for a clean tomorrow I think.

Before the lockdown the 75 was used for two longer distance loads - a treasure trove of Saab 900 parts:
...and a journey up to the midlands to bring back a large 1950s Poul Cadovius shelving system for the house.
I was extremely happy to have picked that little lot up in Feb, as when the lockdown took effect I needed a proper home setup with daylight to stay sane!
It was on the return form the furniture trip that I has a very close run-in with another car, a giant BMW that decided to slow down and turn into my (inside) lane without indication or checking his mirrors on the outskirts of Birmingham. I jabbed the horn and the brakes in equal measure, and avoided contact (just!). At the next lights I had to have a quick word (my heard had skipped a beat, and most of the shelving had moved a few inches forward), and the glassey eyed simpleton had the temerity to say they hadn't 'heard your horn'. A quick explanation of mirrors and deconstruction of a driving style that relies on noises from other road users followed.
It stuck with me, even though I checked my camera footage to check I hadn't made any error, and remembered that the later 75s only had a single horn. The 75 ismuch quieter than any other car I've had, a low mooing you could say.
So, out of curiosity I tracked down a pre-Project Drive twin horn set with loom.
I gave it a quick spruce up and de-rust, adressing a few rubbed wires.
Today weather and time window was secured, and I began the laborious process of removing the front bumper, crash bar and original loom. The front grill hadn't fared well from my original stonechip coating, so I took the opportunity to freshen it up and finally tidy away the front sensor that was always in view, taunting me. I was also keen to use my new Stahlwille socket set:
From previous experience, a layer of masking tape protects the wings from scratches when putting it back on.
Quite a few 10mm bolts along the top, 1 in each bumper wing join, and 11 screws to the bottom and undertray.
Then 10 13mm bolts for the crash bar, and you can see the single cowhorn on the right.
Next up was the tricky removal and reinstallation of the wiring loom. This doesn't just power the horns, but has a front numper crash sensor and a bonnet latch sensor (I think, and is fitted with myriad clips behind all sorts of gubbins.
Main connector is by the screenwash reservoir on the driver's side.
The loom goes around the back of the slam panel and I lost a few fingernail edges to this process.
An hour later, two welcome horn connectors are now visible!
Two 8mm bolts later, and yes a quick test made me smile as the nearby cats really bolted! No one's going to ignore that horn again! This is a heard of angry caribou, at the very least.
Grill had some primer and paint layers through the process, reinstalled.
I remounted the bumper and thought I was all done, but nothing quite 'went back' correctly. Some squeaks were hear, and I inspected the area by the new horn. Sure enough, a section of foam needed to be cut out to accommodate the new addition! Hadn't heard of that one before. Few quick cuts later and it all went back snugly.
I also gave the headlights a quick autosol polish while they were fully accessible. Much better! Time for a clean tomorrow I think.
Indeed, but at least its both loud and polite!
Finally got round to giving the 75 a proper clean and polish a few weeks ago. It was looking properly miserable under lockdown.


A good soak later and many rounds of scrubbing left me a reasonable car, and dodging the very hot sunlight I spent a good few hours with a clay bar removing fly skulls, tar blobs and general nastiness.

With Saab reflection following Super Resin Polish round:

Looking respectable, and a few more stone chips touched in. Of course, last few weeks of builder's dust and general grime has made it filthy again, but I'll have to live with that until the multistory car park is constructed.

Finally got round to giving the 75 a proper clean and polish a few weeks ago. It was looking properly miserable under lockdown.
A good soak later and many rounds of scrubbing left me a reasonable car, and dodging the very hot sunlight I spent a good few hours with a clay bar removing fly skulls, tar blobs and general nastiness.
With Saab reflection following Super Resin Polish round:
Looking respectable, and a few more stone chips touched in. Of course, last few weeks of builder's dust and general grime has made it filthy again, but I'll have to live with that until the multistory car park is constructed.
Cambs_Stuart said:
That's an impressive amount of effort to make the horn louder!
Brilliant attention to detail as always.
True! probably should have sourced an old barge horn or something from a trawler and wired it in, but mainly it was just a few hours of tinkering that was enjoyable, as always, on this car.Brilliant attention to detail as always.
A500leroy said:
OP do you only drive things from expired manufacturers? 
Well, I do have the Alfa Romeo 164...<looks at current Alfa lineup>
Er... Maybe you've got a point!
My first trip outside London in the 75 as restrictions relax didn't go to plan...

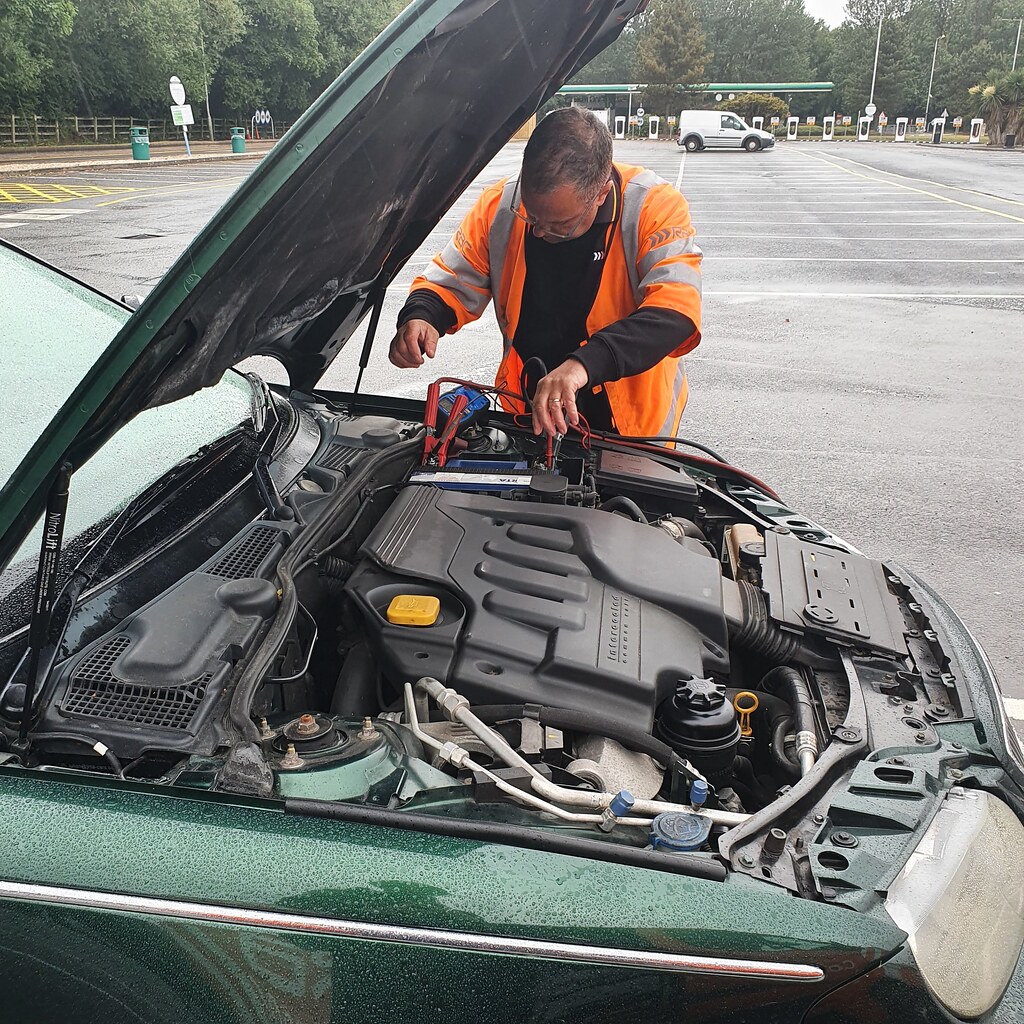
I tried to pick up some furniture but on the M6 the red battery light came on, then a few more red and yellow lights, so I pulled into a services and sighed my way to an RAC recovery. Alternator failure suspected.
Top response by the boys in orange - a check of the system verified my diagnosis, and unfortunately even a good tap with a stick didn't cure it permanently, so it was a flatbed home.
A replacement has arrived from Jules in Wales, so that's this weekend sorted...looks like an awkward fit:
Looking forward to cracking out the Stahlwille socket set though.
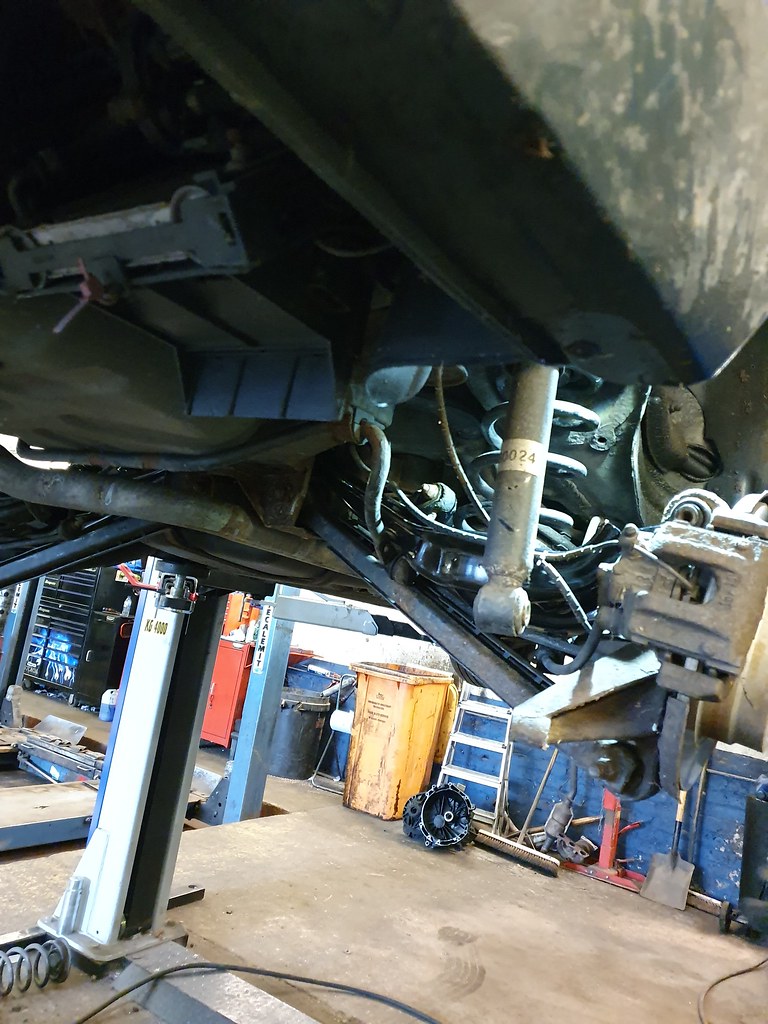
With good light and a free afternoon yesterday I set abut the alternator replacement. The last one I changed was on a Rover P5B, and took about 20 minutes as it was on the top of the engine with three bolts and plenty of space.
This was going to be a bit more involved... it's under there somewhere, beneath the power steering apparatus and various engine gubbins...

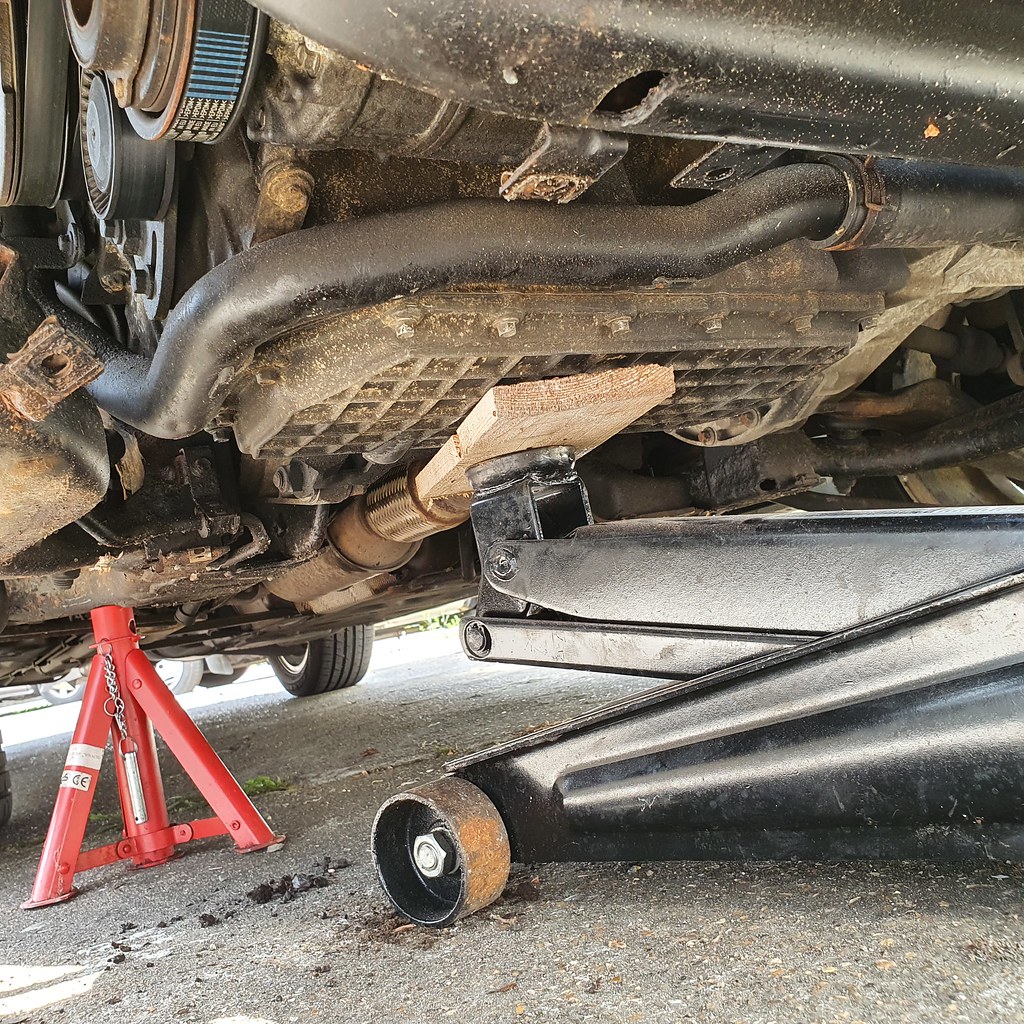
First up remove the front right wheel, support the car as best as possible (I used a combination of jack stands and the scissor jack from the boot, as the trolley jack is required later on!):

Remove inner wheel arch lining to gain a bit of access to the serpentine belt arrangement, luckily only a few plastic retainers and some screws, and I didn't pull out the whole piece:

Also the undertray, which took an age due to rusted fixings, horrible access and uncomfortable concrete. I'll only be putting this back on when I can use a ramp!

I opted for the 'changing from above' method, as to me it looked logical, and I prefer standing up than lying down when working on cars. Battery disconnected.
First up, loosened all the air con pipe brackets (not disconnected, just the brackets) and the front engine mount:

Trolley jack was placed under the engine - yes I know its never adviseable but I honestly couldn't see a better angle of attack than the oil pan with a 'load spreader' piece of wood. Support engine.
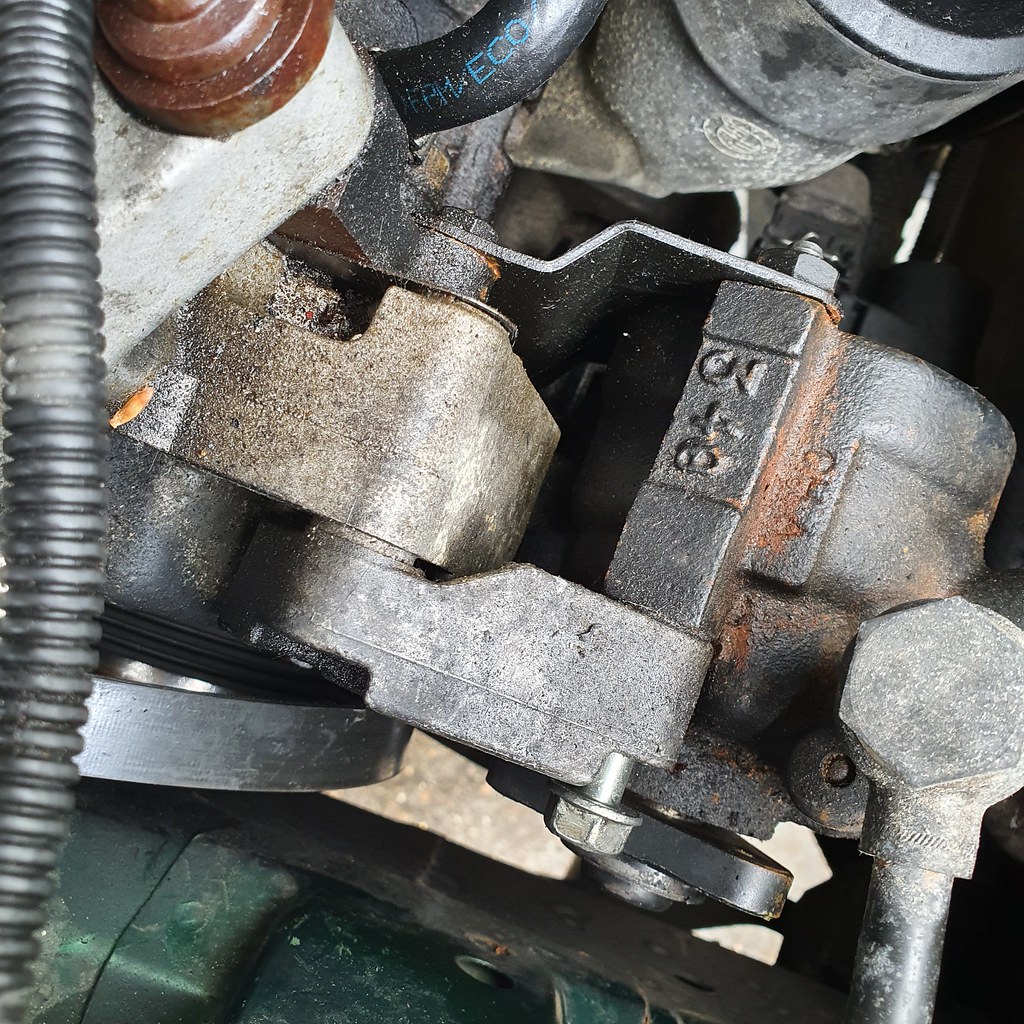
Using Stahlwille socket set (others are available, but they don't make me smile), remove the engine cover, intake bellows and power steering reservoir bracket.

Four big bolts for the chunky aluminium engine bracket, two more on the engine mount Y frame and another 18mm nut for the mount itself. A bit of wiggling past the pipes and it come out whole. I moved the engine down a bit on the jack to get clearance.


I then took off the power steering pump wheel as it was secured with three bolts and slid the belt free.


The power steering pump is secured to the engine with an intricate cage (I think the pump was from something else at BMW and they designed a suitable mount for this M47 application), which had a menagerie of two 8mm, two 10mm and three 13mm bolts. As these are loosened, some can be removed with the engine lowered and some with it raised - it is surprising how much the engine will move, but obviously don't jack it up any more than required!


As with the reservoir, the pump can be 'tidied away' without disconnecting any pipes. I knew I would get to use my hammer at some point.


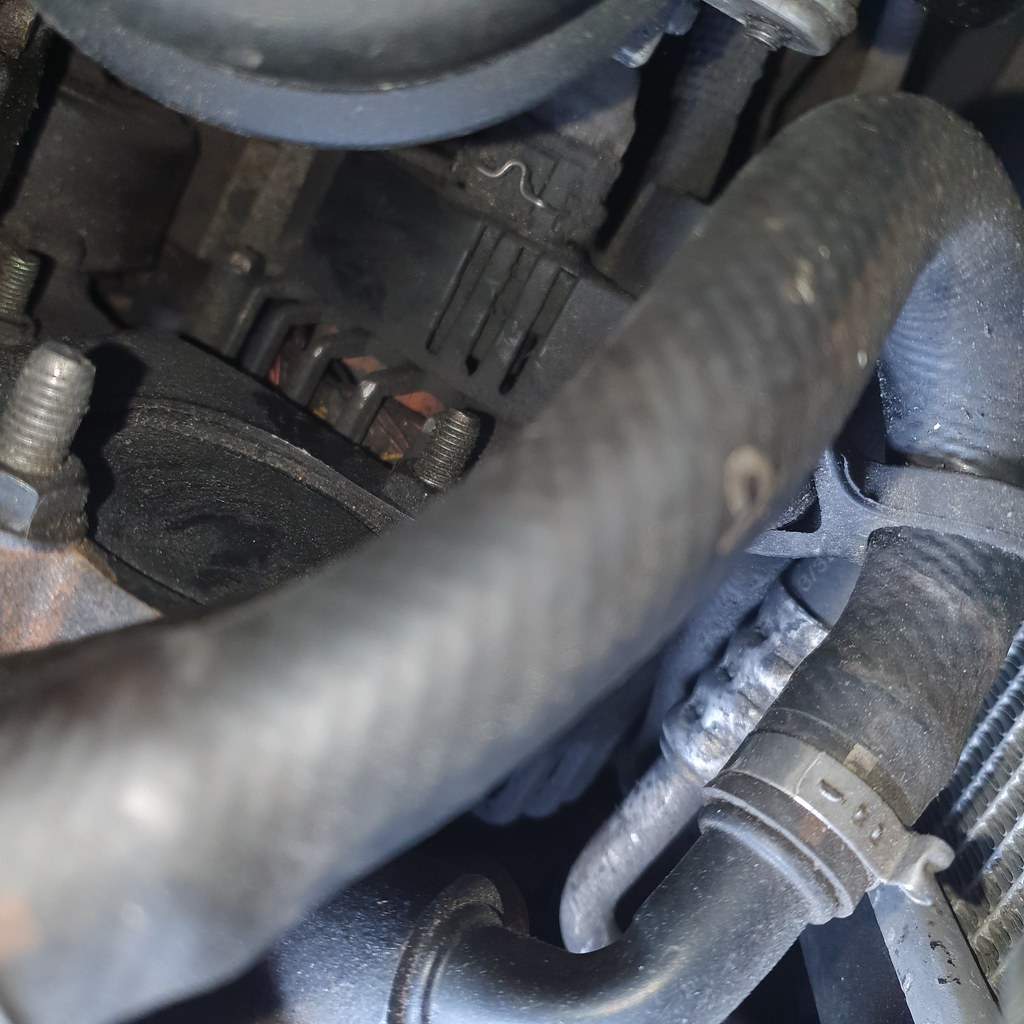
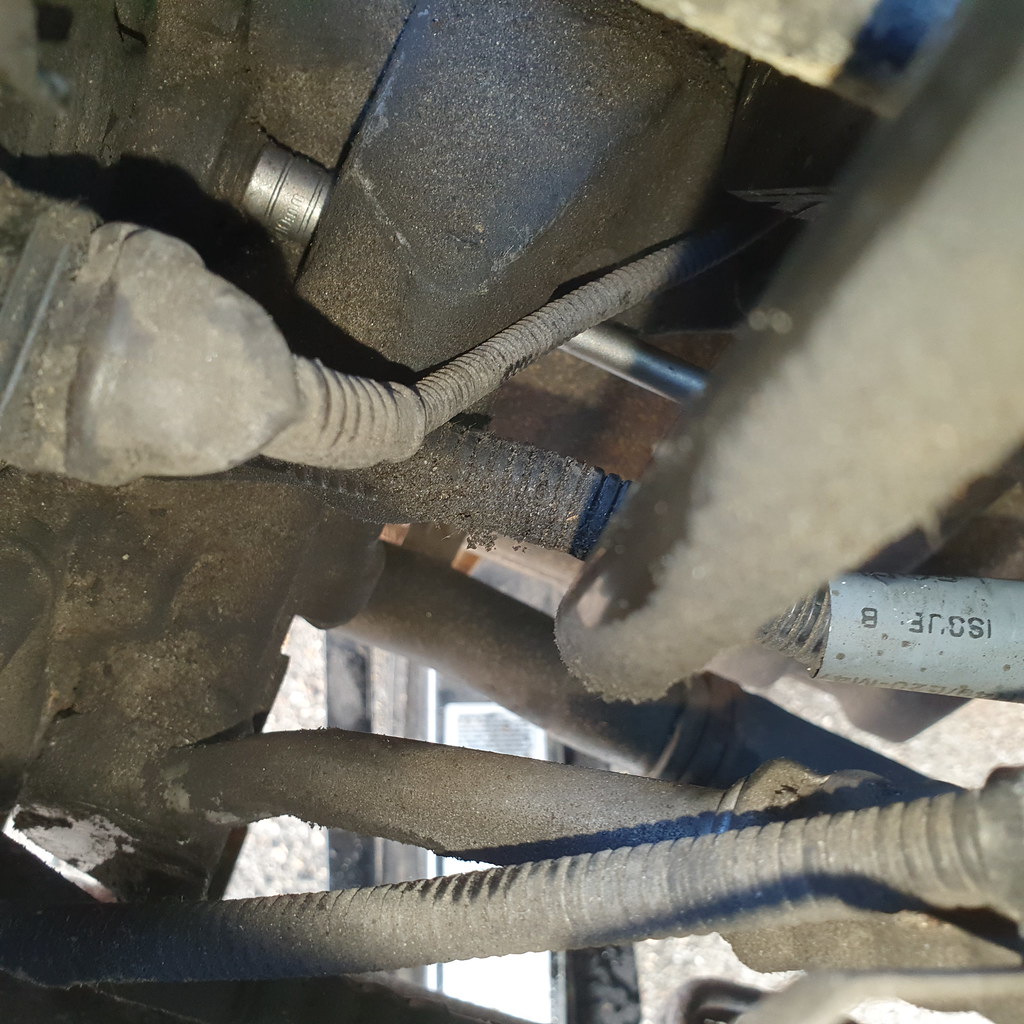
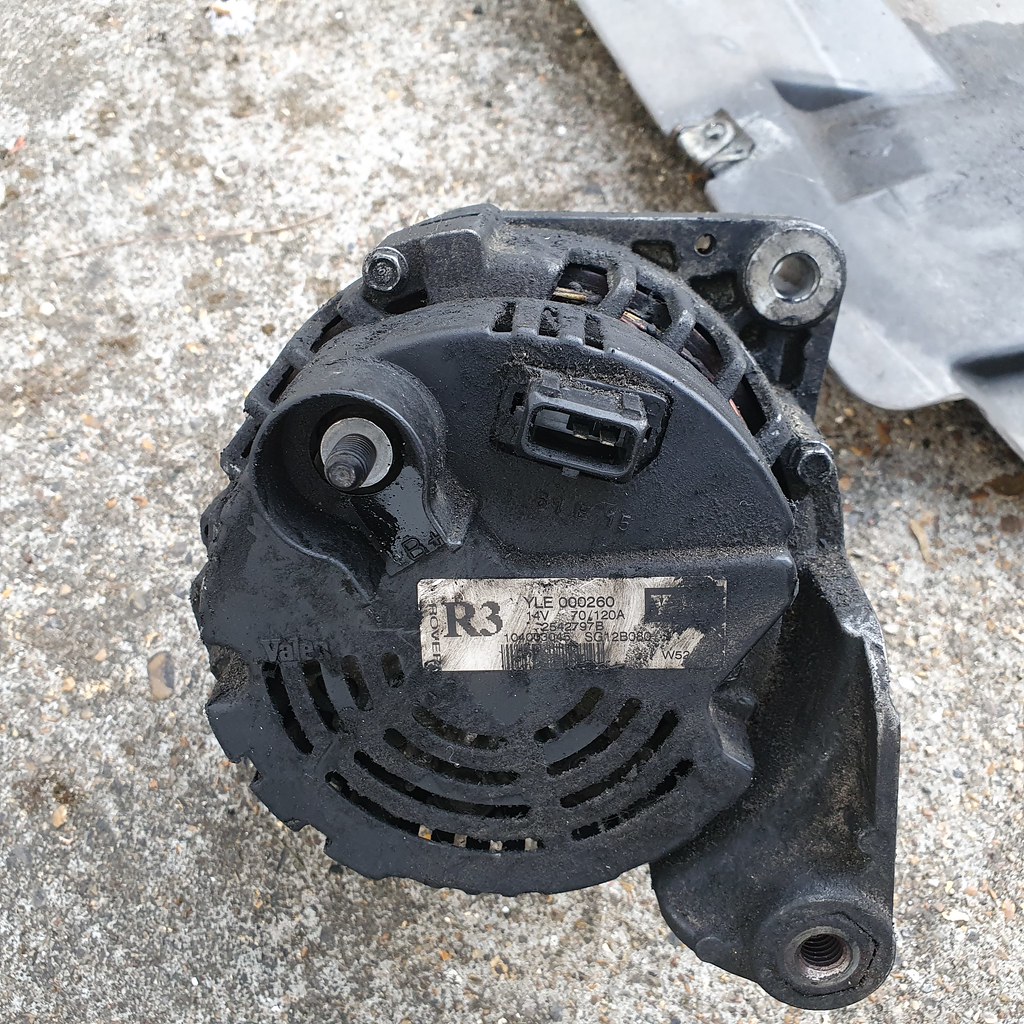
Finally, the alternator! Two 13mm bolts on the wheel side (one accessed from the wheel arch, and a standard connector & 13mm nut for the positive lead.

The final alternator bolt really had me scratching my head, but a quick look on the Rover 75 forum revealed a 10mm bolt that could only be accessed on an extension through a recess in another engine bracket. I tried to photograph it - easy once you know!
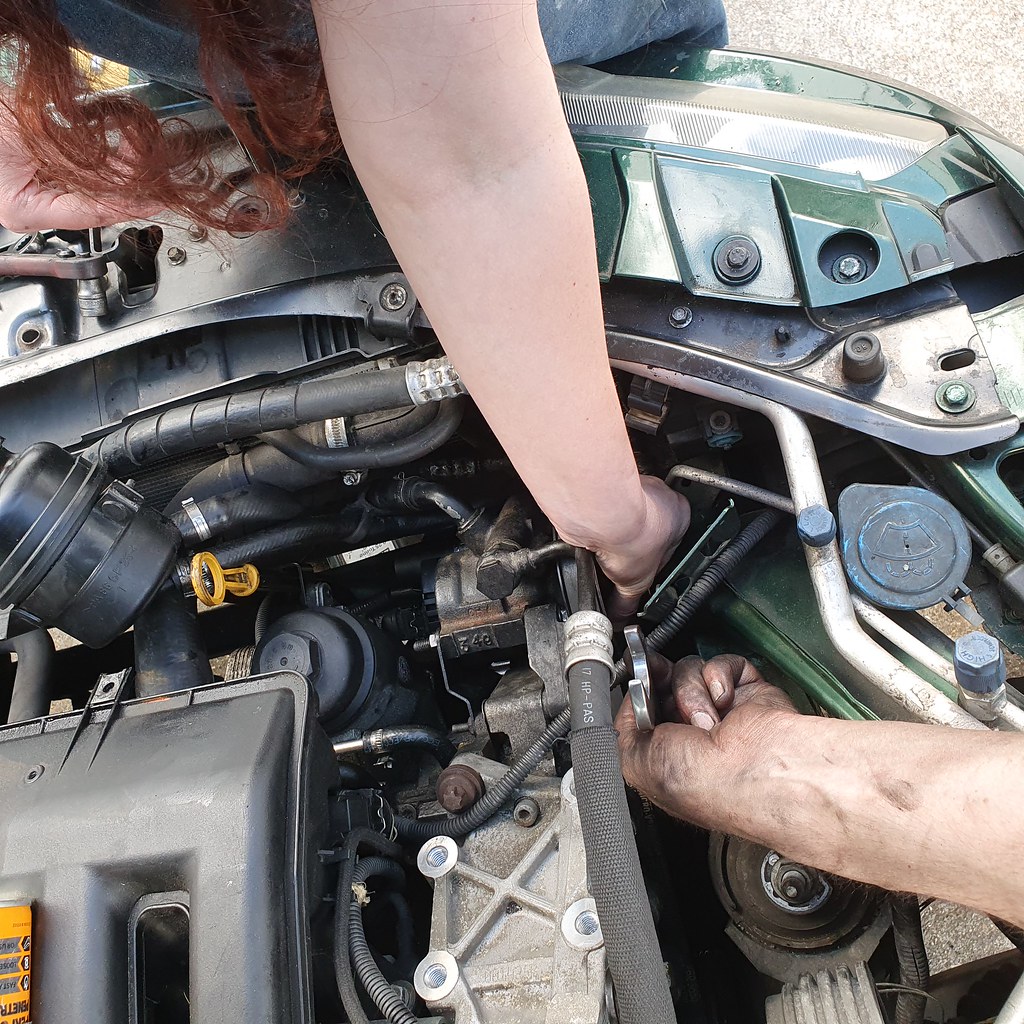
The alternator was a pain to get out with all the other engine hoses and power steering attached, but we got there in the end with a little help from the wife holding items out of harm's way! Again the engine did a little skip up and down for the bolts.

The power steering cage mount was a bit of a fiddle to get right - partial assembly required with various bolts sticking in'out or loose before offering up to the engine, but all ok in the end.

After refeeding the belt and checking the grooves, I again enlisted the wife to reattach the power steering wheel while I held the tensioner on a 24mm spanner.
Before I fully put everything back together, had to try it - success!

No wobbles, concerning noises or issues, and the red battery light disappeared from the dash. Phew.
Before reassembly I changed the air filter for a Mahle LX823 that Jules had put in with the alternator. Overdue I think.
After tidying up, I move the alternator and realised it had an R3 label on the back, meaning it was likely the original item! 162k, not bad Valeo, not bad at all. I am considering getting it rebuilt, but I think for now I'll just keep it in case the 'new' one has any kind of failure for a year.
Total time elapsed? Just over five hours. Five hours! I must be loosing my touch. Full bath with much Swarfega and scrubbing, gosh that was a full workout on some of those bolts.

Next up, front brake discs and tie rods that I noticed were past useful when the wheel was off. Once I've recovered!
This was going to be a bit more involved... it's under there somewhere, beneath the power steering apparatus and various engine gubbins...
First up remove the front right wheel, support the car as best as possible (I used a combination of jack stands and the scissor jack from the boot, as the trolley jack is required later on!):
Remove inner wheel arch lining to gain a bit of access to the serpentine belt arrangement, luckily only a few plastic retainers and some screws, and I didn't pull out the whole piece:
Also the undertray, which took an age due to rusted fixings, horrible access and uncomfortable concrete. I'll only be putting this back on when I can use a ramp!
I opted for the 'changing from above' method, as to me it looked logical, and I prefer standing up than lying down when working on cars. Battery disconnected.
First up, loosened all the air con pipe brackets (not disconnected, just the brackets) and the front engine mount:
Trolley jack was placed under the engine - yes I know its never adviseable but I honestly couldn't see a better angle of attack than the oil pan with a 'load spreader' piece of wood. Support engine.
Using Stahlwille socket set (others are available, but they don't make me smile), remove the engine cover, intake bellows and power steering reservoir bracket.
Four big bolts for the chunky aluminium engine bracket, two more on the engine mount Y frame and another 18mm nut for the mount itself. A bit of wiggling past the pipes and it come out whole. I moved the engine down a bit on the jack to get clearance.
I then took off the power steering pump wheel as it was secured with three bolts and slid the belt free.
The power steering pump is secured to the engine with an intricate cage (I think the pump was from something else at BMW and they designed a suitable mount for this M47 application), which had a menagerie of two 8mm, two 10mm and three 13mm bolts. As these are loosened, some can be removed with the engine lowered and some with it raised - it is surprising how much the engine will move, but obviously don't jack it up any more than required!
As with the reservoir, the pump can be 'tidied away' without disconnecting any pipes. I knew I would get to use my hammer at some point.
Finally, the alternator! Two 13mm bolts on the wheel side (one accessed from the wheel arch, and a standard connector & 13mm nut for the positive lead.
The final alternator bolt really had me scratching my head, but a quick look on the Rover 75 forum revealed a 10mm bolt that could only be accessed on an extension through a recess in another engine bracket. I tried to photograph it - easy once you know!
The alternator was a pain to get out with all the other engine hoses and power steering attached, but we got there in the end with a little help from the wife holding items out of harm's way! Again the engine did a little skip up and down for the bolts.
The power steering cage mount was a bit of a fiddle to get right - partial assembly required with various bolts sticking in'out or loose before offering up to the engine, but all ok in the end.
After refeeding the belt and checking the grooves, I again enlisted the wife to reattach the power steering wheel while I held the tensioner on a 24mm spanner.
Before I fully put everything back together, had to try it - success!
No wobbles, concerning noises or issues, and the red battery light disappeared from the dash. Phew.
Before reassembly I changed the air filter for a Mahle LX823 that Jules had put in with the alternator. Overdue I think.
After tidying up, I move the alternator and realised it had an R3 label on the back, meaning it was likely the original item! 162k, not bad Valeo, not bad at all. I am considering getting it rebuilt, but I think for now I'll just keep it in case the 'new' one has any kind of failure for a year.
Total time elapsed? Just over five hours. Five hours! I must be loosing my touch. Full bath with much Swarfega and scrubbing, gosh that was a full workout on some of those bolts.
Next up, front brake discs and tie rods that I noticed were past useful when the wheel was off. Once I've recovered!
Well, when I say five hours, I mean, that includes 20 minutes looking for the locking wheel nut, 30 minutes staring with intent at the undertray, and, erm, quite a bit of muttering in the garage searching for the 24mm spanner.
More excuses available if required... !
But yes, a pig of a job , a Bavarian warthog if you will, and I don't want to donit again any time soon.
75 now ready for some post-lockdown trips and currently being loaded with items for the scrapyard.
More excuses available if required... !
But yes, a pig of a job , a Bavarian warthog if you will, and I don't want to donit again any time soon.
75 now ready for some post-lockdown trips and currently being loaded with items for the scrapyard.
Thanks for the the comments! I can't begrudge people in forums posting pictures of fully working cars and discussing them, I just prefer getting my hands dirty on old vehicles!
What keeps me coming back to PH is the variety of cars and even approaches in just this sub-forum of Reader's Cars. I may always scoff at moderns SUVs or somebody spending four figures on new alloy wheels, but its good to see the full spectrum of the car community. Otherwise I would just be on the Rover 75 forums debating what shade of warm white LED bulb should go over a number plate!
Another year, another oil change on the 75 using the Pela pump - 164k, averaging about 7k a year at present so I suppose its enjoying a retirement of sorts.
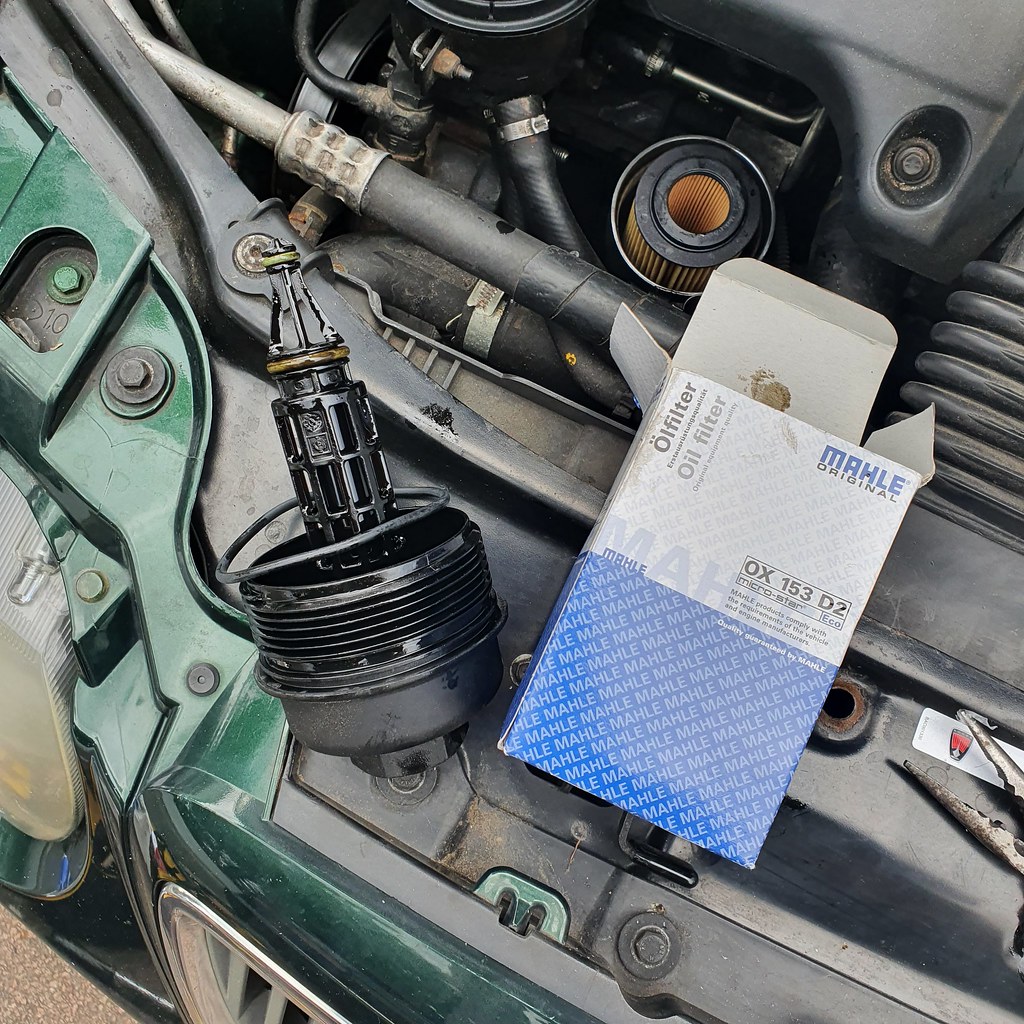
36mm socket on the Stahlwille...

Engine cover off, vacuum pump down the dipstick tube:

Once all that delightful sooty treacle had been extracted, 36mm socket on the oil filter housing and a quick change of the O rings on the housing. OX153D2 is the Mahle part number... comes wiht only the housing seal though!
Some lovely new Millers 10W40 down the hatch and its all set for another year of motoring, barring any catastrophes. In fact, the only thing currently on the 'Rover To Do List' is replace the slightly tatty driver's seat. Oh and the drop links! Forgot about those...
What keeps me coming back to PH is the variety of cars and even approaches in just this sub-forum of Reader's Cars. I may always scoff at moderns SUVs or somebody spending four figures on new alloy wheels, but its good to see the full spectrum of the car community. Otherwise I would just be on the Rover 75 forums debating what shade of warm white LED bulb should go over a number plate!
Another year, another oil change on the 75 using the Pela pump - 164k, averaging about 7k a year at present so I suppose its enjoying a retirement of sorts.
36mm socket on the Stahlwille...
Engine cover off, vacuum pump down the dipstick tube:
Once all that delightful sooty treacle had been extracted, 36mm socket on the oil filter housing and a quick change of the O rings on the housing. OX153D2 is the Mahle part number... comes wiht only the housing seal though!
Some lovely new Millers 10W40 down the hatch and its all set for another year of motoring, barring any catastrophes. In fact, the only thing currently on the 'Rover To Do List' is replace the slightly tatty driver's seat. Oh and the drop links! Forgot about those...
Yes it has 10w40 in the handbook I have, but according to the Rover wizardry texts anything from 0w40 to 10w40 was recommended throughout production.
I always think the change intervals are most important, and I've started using Millers over Mobil1 from a bulk buy cost and fancy mineral content reasons.
I did drop the whole pan a few year ago and it was clean as diesel-baked oil-covered whistle could be. Since then I've only used the Pela pump every 10k or year, whichever came first.
If this engine was going to give up based on oil I think it would have happened a while ago, and I generally think at higher mileages a slightly thicker oil can't be bad.
Received the drop links but don't think I'll get to them for a few weeks - should be a fun little job!
Gassing Station | Readers' Cars | Top of Page | What's New | My Stuff