Jaguar xjc 4.2
Discussion


This may be a help to you with the windows.
Some of the problem with slow windows on these cars is because all the current to the motors is run through the switches. The contacts get dirty and worn leading to a voltage drop when operating the motors.
What I did was run a heavy power cable to each of the doors and used the wiring from the switches to operate 2 relays. One for up and one for down to switch the power from the heavy cable to the motor.
Made a vast difference for me.
Dave
Wheelbrace said:
This may be a help to you with the windows.
Some of the problem with slow windows on these cars is because all the current to the motors is run through the switches. The contacts get dirty and worn leading to a voltage drop when operating the motors.
What I did was run a heavy power cable to each of the doors and used the wiring from the switches to operate 2 relays. One for up and one for down to switch the power from the heavy cable to the motor.
Made a vast difference for me.
Dave
Cheers for that Some of the problem with slow windows on these cars is because all the current to the motors is run through the switches. The contacts get dirty and worn leading to a voltage drop when operating the motors.
What I did was run a heavy power cable to each of the doors and used the wiring from the switches to operate 2 relays. One for up and one for down to switch the power from the heavy cable to the motor.
Made a vast difference for me.
Dave
 I was wondering about upgrading the cable size but didn’t think about using the switches with relays and then the bigger cables.
When testing those motors they do pull 10amps for initial start and that’s without any mechanism fitted. I think bigger cables and relays are the way forward! Thank you
No problem.
I checked the original setup and found I was only getting 8 - 9V at the motor.
It really does make all the diffference. More than worth the effort, and not expensive to do.
Almost as good as throwing the AED in the bin and fitting a proper manual choke, but that's another story.
Dave
I checked the original setup and found I was only getting 8 - 9V at the motor.
It really does make all the diffference. More than worth the effort, and not expensive to do.
Almost as good as throwing the AED in the bin and fitting a proper manual choke, but that's another story.
Dave
Edited by Wheelbrace on Friday 4th October 20:43
Wheelbrace said:
No problem.
I checked the original setup and found I was only getting 8 - 9V at the motor.
It really does make all the diffference. More than worth the effort, and not expensive to do.
Almost as good as throwing the AED in the bin and fitting a proper manual choke, but that's another story.
Dave
I have a manual choke I checked the original setup and found I was only getting 8 - 9V at the motor.
It really does make all the diffference. More than worth the effort, and not expensive to do.
Almost as good as throwing the AED in the bin and fitting a proper manual choke, but that's another story.
Dave
Edited by Wheelbrace on Friday 4th October 20:43
the aed went when I fitted the 3 carburettorsEdited by RobXjcoupe on Friday 4th October 23:37

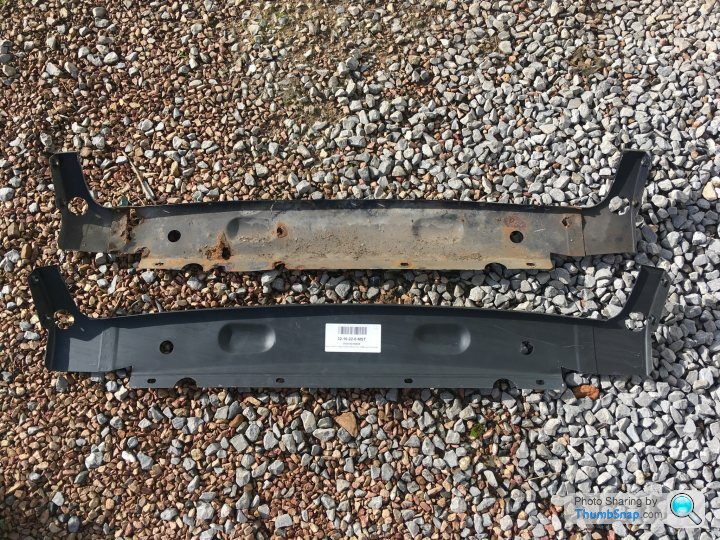
Replacement front valance. Would be fantastic if it fitted perfectly lol.
Made of 3 sections as per original. The outer parts have been spot welded on and should fit nicely into a joggled stamped edge but unfortunately the new part has just a bevel so the outer parts are fitted too wide by about 10mm. Other than that not bad a panel
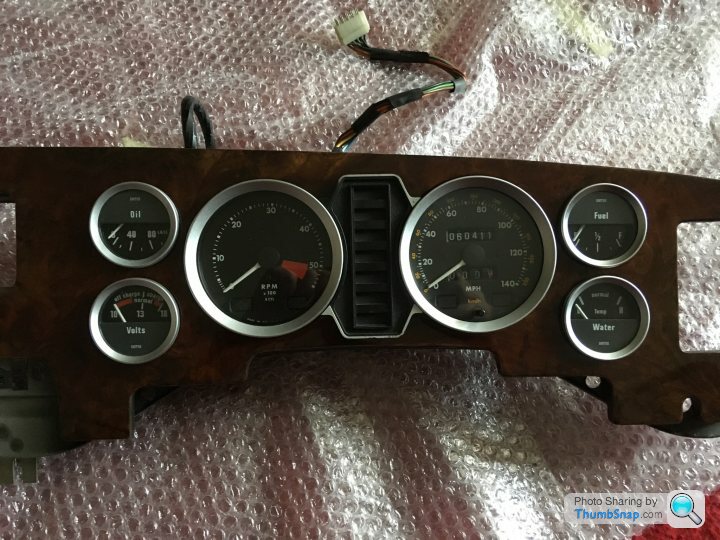
Thought I would test fit assemble the restored walnut dash to the backing plate then make sure all the dials fit nicely within the wood. Only the fuel gauge aperture needed a bit of careful lacquer removal. The wiring I’ve also connected so as I can see which bulbs go where. I fancy red lit dials.
The dials all have green filters though. So quick experiment was to shine a red led bulb through a green filter and luckily it still glows red!
no need to take each dial apart to remove the green filters which is a bonus. Above picture just shows how dark the walnut is when restored. I really like it.
A couple of paint details to go over worn off areas notably the middle warning lamp display surround.
I’m pleased with how well the original dials scrub up fitted into the restored dash


More little bits I’ve found that need attention.

These I found yesterday as I was unwrapping the dials. They are brackets that screw into the sill to attach the jaguar logo’d Kick plates. The holes the kick plates screw into are the smaller of the 2 but as you can see none line up with anything as they were drilled after screwing into the sill. Basically I need the small holes tig welded over, flushed off then ready to drill again when the kick plates go back on.
As you can see I’ve already done this once before when I fitted a better set of kick plates about 15 years ago. So rather than try figure out where each one should go it’s far simpler to weld those holes again. I’ve also had new outer sills fitted so no holes to secure the brackets to either, bit of double jeopardy to try make all those brackets line up with the kick plates. I’m missing one as well grrr
Gassing Station | Readers' Cars | Top of Page | What's New | My Stuff